| CATEGORII DOCUMENTE |
| Asp | Autocad | C | Dot net | Excel | Fox pro | Html | Java |
| Linux | Mathcad | Photoshop | Php | Sql | Visual studio | Windows | Xml |
Contact
Win
English
ContactWin32
This publication can only be reproduced, transmitted, transcribed, or translated into any human or computer language with the written consent of the copyright holder.
ContactWin and Contact Digital are Registered Trademarks of Dentalica Spa.
DenOptix and GX-S are Trademark of Dentsply International.
Windows95, Windows98, Windows NT, Windows, and Microsoft are Registered Trademarks of Microsoft Corp.
This manual in English is the original version.
ContactWin is a software program for general dental and maxillo-facial diagnostic imaging. It controls capture, display, treatment, analysis and archiving of x-ray digital images from DenOptix T and Contact Digital / GX-S digital imaging systems by Dentalica . It can also handle other types of image, e.g. images acquired by digitizing film with an optical scanner, or colour images from an intraoral or extraoral dental camera.
When properly installed in your computer, ContactWin lets you:
Control scanning and intake of x-ray images from image plates with the DenOptix scanner (*).
Control the direct capture of x-ray images from the intraoral sensor Contact Digital / GX-S (*).
Intake colour images from certain cameras, such as a dental camera, via a suitable video capture card(*).
Export and import digital images in several standard file formats to and from other programs.
Process images with dental specific tools, to enhance their diagnostic value.
Analyze images in order to gather additional diagnostic information which may not be immediately apparent on initial visual inspection.
Create a database of patients, and easily store images in patient folders. The database can be structured for LAN (Local Area Network) and for multi-volume operation.
Note (*): provided that the relevant hardware is available and properly connected with your computer and configured, of course!
ContactWin works under Microsoft Windows95 Windows98 WindowsNT and takes advantages of the general functions there provided. In order to take full advantage of ContactWin , you need to be familiar with the functionality of the operating system.
On-line instructions about all functions of the ContactWin software are available through the Help function. Please use it to supplement the information provided in this manual.
|
|
The CE symbol ensures that the product here in specified meets the provisions of European Council Directive 93/42 EEC concerning medical devices. |
|
|
Warning (in this Operator Manual) |
|
|
Note (in this Operator's Manual) |
See the following text for other symbols description.
ContactWin requires Microsoft Windows 95, Windows98 or Windows NT 4 for full operation.
To install ContactWin :
Start Microsoft Windows 95.
Insert the ContactWin installation CD-ROM into the proper drive.
An automatic setup will pop up.
Click on Install WixWin and follow the online instruction.
The installation and set-up program will create a "Dentalica Imaging" folder in the start menu.
![]() You can install ContactWin over previous ContactWin installations,
including older versions. The previously existing patients and images database,
and the configuration data, is not affected and remains available for the new
installation.
You can install ContactWin over previous ContactWin installations,
including older versions. The previously existing patients and images database,
and the configuration data, is not affected and remains available for the new
installation.
When ContactWin is run after the very first installation, you may be asked to provide some initial configuration options, i.e. language, preferences and hardware. If you are not sure about any of the options, then accept the default selection by clicking on the "OK" button. Any of the options can be re-configured in ContactWin through the Options menu.
When working with x-ray images only (i.e. grayscale images), the 256 colours mode is the minimum required. This displays up to 64 gray levels. Video modes at 32K or 64K colours are discouraged, as they display fewer gray levels.
You can change the video mode in Windows 95 e.g. via Configuration/Control Panel/Video.
To uninstall ContactWin :
Open the control panel. Open Install Applications
Click on ContactWin and on the Add/Remove button. Follow the on line instructions
Operation of ContactWin in Local Area Network (LAN) is possible and esay to configure. In this way, it is possible to share a common mass memory device (e.g. a large hard disk, or a drive for re-writeable magneto-optical disks) between several computers. A different copy of ContactWin shall have to be installed for each of the computers.
Please refer to the file LAN.DOC in the Manual/Utility directory on the CD Rom for complete installation and configuration information. We recommend that a trained professional install and configure ContactWin in LAN.
It is very important that you customize ContactWin to best fit your requirements. The default for many options can be configured in the "Options" menu. They can be modified at any time. We recommend that you carefully evaluate the available options. They are:
Language - English is default.
Preferences (default settings)
Dentist / Practice name - Free text that will be printed with images.
Tooth numbering - Select between FDI or US system.
Image folder layout : select default image load page.
Drive for database index. C: recommended for stand alone installation
Database image files disk drive. C: recommended for stand alone installation.
Image file format - See Chapter 6.
Automatic images treatments
Treatments automatically applied to enhance visual quality of newly captured x-ray images. We recommend that you keep these enabled, unless you have a special need to do otherwise.
type of image treatments
enabled by default
Intraoral from sensor: Logarithmic, Equalize, Despeckle.
Intraoral from DenOptix: Equalize.
Pan / Ceph from DenOptix: Logarithmic,
Equalize.
Intraoral sensor:
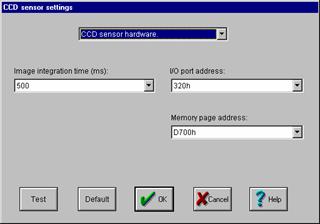 You may need to change certain settings in
the hardware (i.e. memory address, I/O address) depending on the requirements
of the computer system. For instance, it might be necessary to change any of
these settings in order to prevent conflict with another system peripheral that
uses the same resources. Selection is done in the hardware via dip-switches on
the board, and you must match the same settings in ContactWin via the
'Options/CCD sensor hardware' toolbox (See also the CCD sensor
Service Manual for hardware set-up).
You may need to change certain settings in
the hardware (i.e. memory address, I/O address) depending on the requirements
of the computer system. For instance, it might be necessary to change any of
these settings in order to prevent conflict with another system peripheral that
uses the same resources. Selection is done in the hardware via dip-switches on
the board, and you must match the same settings in ContactWin via the
'Options/CCD sensor hardware' toolbox (See also the CCD sensor
Service Manual for hardware set-up).
DenOptix scanner:
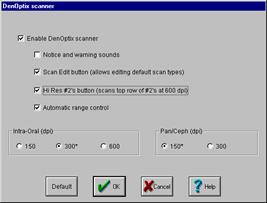
Scan Edit button: allows you to modify the default scanning selection.
High Res #2: for scanning size 2 intraoral at 600 dpi.
Automatic range control: always keep enabled, except for eventual technical tests (e.g. to test linearity of output as a function of imparted dose).
Resolution: the higher the d.p.i., the better the image definition, but the longer the scanning time and the bigger the file size. Default values are defined in order to match the requirements for standard clinical use.
![]() For panoramic or Cephalometric images, you may use 150 dpi for standard
resolution, or 300 dpi for very high resolution. 600 dpi is useless, as the
inherent resolution of a panoramic machine is usually lower than 300 dpi.
For panoramic or Cephalometric images, you may use 150 dpi for standard
resolution, or 300 dpi for very high resolution. 600 dpi is useless, as the
inherent resolution of a panoramic machine is usually lower than 300 dpi.
For intraoral, you may use 300 dpi for standard resolution, or 600 dpi for high resolution.
These settings can be modified anytime, so you may use the default resolution for standard applications, and set a higher resolution when a special clinical case requires it.
Video camera:
You need a video capture board to connect your video camera, compatible with Video For Windows. See chapter 5 for compatibility.
Optical scanner:
Optical image scanners are supported through the TWAIN protocol. See chapter 5 for compatibility.
To start ContactWin click on the ContactWin icon in the Dentalica Imaging folder.
ContactWin lets you work with images on the computer monitor as if they were films on a light box. You can display several images simultaneously, even from different patients. You can move, resize, minimize, and/or cascade them (according to the customary Windows functionality).
However, if you have chosen to work in any of the "n images layout" (View menu), images will always be displayed at pre-defined position on the screen.
Any one image can be selected for treatment, analysis and filing, by clicking on it. The currently selected image is highlighted by a title bar or frame of different colour.
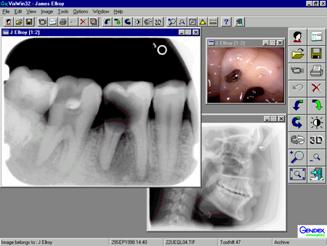 A message bar in the lower part of the
screen provides information about the selected Image.
A message bar in the lower part of the
screen provides information about the selected Image.
All functions can be executed from the menu bar. The most important are replicated in the toolbar.
![]()
Different scale factors can be used to
display images. The selectable scale factor (1:8 to 4:1, shown in the image
title bar) refers to the relation between the pixels in the original image and
those in the scaled image on screen, and bears no direct relationship with the
actual size of the radiographic objects displayed.
We advise that you do not over-zoom images in pursuit of better detail discernment. Actually, the detection of diagnostic information is best when a moderate magnification factor is used.
You can also export and import images from ContactWin, to and from another software programs. The most popular file formats are supported: TIFF, BMP, JPEG/JFIF, PCX, and TGA. Images are exported as displayed on the screen, not the original untreated image files. Another way to transfer image files to and from another program is via the "Copy" and "Paste" functions in the Edit menu.
![]()
![]()
Images can be cleared from screen with the Edit / Close image or Close all functions.
![]()
ContactWin cannot display and consequently capture more than 60 images at the same time.
ContactWin provide a toolbar (horizontal) and a toolbox (vertical) for you convenience. You may hide them, or customise them separately. Use the menu Options / Toolbar and Toolbox to hide or show the tools and to customize both tool bars. Though customization, you may add or remove buttons in order to fit your needs. Customization may be different for both toolbars. Customization is saved when leaving ContactWin.
Default configuration :
Select patient ![]()
![]() DenOptix
DenOptix
Load image ![]()
![]() Save image
Save image
Video camera ![]()
![]() Print
Print
Undo ![]()
![]() Close image
Close image
Rotate left ![]()
![]() Rotate right
Rotate right
Rotate 180 ![]()
![]() Contrast &
Brightness
Contrast &
Brightness
Logarithimc ![]()
![]() Emboss
Emboss
Zoom + ![]()
![]() Zoom -
Zoom -
Fit to screen ![]()
![]() Exit
Exit
|
|
||||
|
Patient name |
Date & time of capture |
File name |
Tooth # |
New = not yet saved Archive = saved |
All information in the status bar is related to the active image.
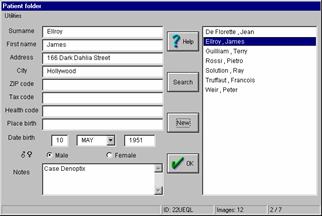
When ContactWin is started, the "Patient Select" page pops up. To select an existing patient, just click on the patient name, then on the "OK" button. You can look for a patient by using the vertical scroll bar, or, in case of a large database, you can also use the search engine by clicking the "Search" button.
To enter a new patient, click on "New", then fill in the records at the right side. This data is optional (you might enter just the surname). Data can be modified at any time.
To remove a patient (permanently erasing all records and images), use function "Utilities / Delete selected patient".
![]() You can recall the "Patient Select" page at any time simply by clicking on the button
with the folder icon. The name of the
currently selected patient is shown in the title bar at the top left of the
screen.
You can recall the "Patient Select" page at any time simply by clicking on the button
with the folder icon. The name of the
currently selected patient is shown in the title bar at the top left of the
screen.
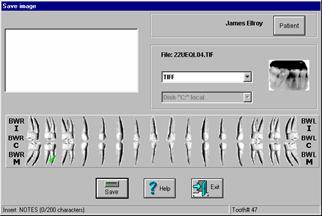
![]() To save an image and assign it to the
current patient, use the "Save Image"
function. This opens up an image-saving page where you can graphically
associate the image to a specific tooth, or to one of the 3 left or right
bitewings. You can also save an image without association to a location if none
is applicable, as is the case for panoramic or cephalometric x-ray images and
for full mouth camera views.
To save an image and assign it to the
current patient, use the "Save Image"
function. This opens up an image-saving page where you can graphically
associate the image to a specific tooth, or to one of the 3 left or right
bitewings. You can also save an image without association to a location if none
is applicable, as is the case for panoramic or cephalometric x-ray images and
for full mouth camera views.
The image-saving page lets you optionally associate a written note with the saved image, and to change any of the file saving default parameters. Click on the "Save" button to complete, or "Exit" to abort.
You can choose between different file compression to save images (see Appendix A for the features of the available formats). The default format can be changed via the 'Options/Preferences' menu.
The original image, without any of the treatments you may have applied, is retained. You can always undo the treatments and revive the original appearance at any time.
Before quitting ContactWin , make sure that all newly acquired images have been either saved or discarded (e.g. with Edit / Close image or Close all).
![]()
Maximum number of images which can be saved for each patient : 256 images (4096 in DDE Mode)
![]()
![]() In order to open previously saved images,
select the relevant patient (via "Patient Select"), then open the "File / Load image" page. There are two
types of load page: "Status" (default) and " Browser". You may toggle between
them, and you may change the default via the 'Options/Preferences'
menu.
In order to open previously saved images,
select the relevant patient (via "Patient Select"), then open the "File / Load image" page. There are two
types of load page: "Status" (default) and " Browser". You may toggle between
them, and you may change the default via the 'Options/Preferences'
menu.
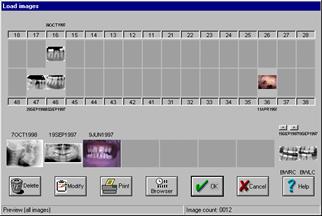 Status
In the "Status" image load page, preview thumbnails of saved images are arranged anatomically according to the tooth to which they have been associated. The preview thumbnails of images without tooth association are displayed in the lower part of the window, the most recent one being to the far left.
Browser
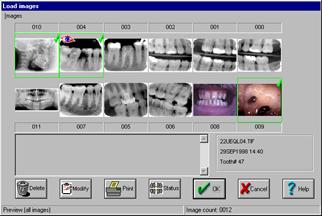 In the "Browser" image load page, the thumbnails of saved images are shown
sequentially, the most recent being at the upper left corner. Up to 12 images
can be simultaneously displayed. You can browse throughout all images via the
scrollbar.
In the "Browser" image load page, the thumbnails of saved images are shown
sequentially, the most recent being at the upper left corner. Up to 12 images
can be simultaneously displayed. You can browse throughout all images via the
scrollbar.
You may select any number of images by clicking on them. A green tick indicates the selected images. The "OK" button will cause the load page to be closed and all selected images to be opened in the viewing layout, for normal viewing. An eye-shaped mark indicates the last selected image. If you see an annotation in the note area, it is associated with this image.
![]()
You can individually and permanently erase an image from the database with the Delete button.
![]()

![]() In order to display intraoral images on screen as film were
mounted, use the menu View / Full Mouth.
ContactWin will ask you to select a mount type. All images of the patients are
them loaded and display on a specific place on screen, based on the mount type.
In order to display intraoral images on screen as film were
mounted, use the menu View / Full Mouth.
ContactWin will ask you to select a mount type. All images of the patients are
them loaded and display on a specific place on screen, based on the mount type.
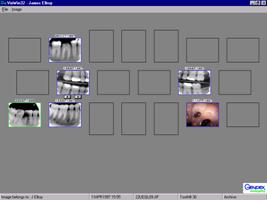 Different images may be assigned to the same location. Use the
arrows to switch images. Images are stacked chronologically, the last image is
presented first.
Different images may be assigned to the same location. Use the
arrows to switch images. Images are stacked chronologically, the last image is
presented first.
Click on an images to zoom it. Click again to reduce it. Use the menu image to modify for all images the brightness and contrast or to apply the logarithmic.
Use print to print the full mouth as it is on screen, including patient and practice information.
Whenever ContactWin is booted, it checks whether a DenOptix scanner is properly connected, interfaced, and powered, and runs an initializing routine, lasting approximately 45 seconds.
![]() The "File
/ DenOptix Scanner" function causes a window that controls the scanning of
Image Plates to open. Note that this window can be toggled open and close
without affecting operation.
The "File
/ DenOptix Scanner" function causes a window that controls the scanning of
Image Plates to open. Note that this window can be toggled open and close
without affecting operation.
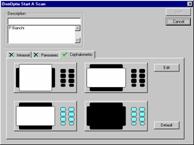
The scanner will first check the carousel type inserted, and offers then 4 scanning options. These options are designed to allow the operator to select the area of the carousel that will be scanned. The more accurate your selection, the more efficient and quick the scan will be. You may choose to scan the entire carousel as well.
Note that the Edit button (If enable in the Options / DenOptix scanner) allows you to customize the default scanning options.
 Click on start to launch the scan. A windows will display the remaining
time. This windows may be closed or opened at any time without any effect on
the scan. When the scan is finished, the newly captured images are displayed on
the screen.
Click on start to launch the scan. A windows will display the remaining
time. This windows may be closed or opened at any time without any effect on
the scan. When the scan is finished, the newly captured images are displayed on
the screen.
If enable in the Options / DenOptix scanner, the Hi Res #2s button will scan the first row of intraoral at high resolution (600 dpi)
Do not open the scanner door during this process. If you do so, the scanning will be immediately interrupted. The partially scanned image will be anyway made available. You may try to re-scan the imaging plates to recover the entire image. (Please refer to the DenOptix user manual).
To capture a new intraoral x-ray image with the intraoral sensor, you only need to position the sensor in the patient's mouth (paralleling technique and the use of the specific positioning and aiming device is recommended), position your dental radiographic generator and emit x-ray. You shall use from 2 to 4 times less exposure time and dose than with film. No connection or synchronization is needed between the x-ray generator and CCD sensor: approximately 1 s after detection of the x-ray irradiation by the sensor, ContactWin will automatically cause the image to appear on the screen (unless you have disabled the sensor). You can immediately examine the image, or use any the various facilities for enhancement and analysis.
![]() Images can be subject to various
treatments in order to enhance their appearance and, potentially, the
diagnostic information that can be elicited. Some treatments can be automatically
applied to the image at acquisition (see Configuration and Preferences), others
are only applied when manually selected. At any time, you can undo both the
automatic and manually applied treatments, via the "Edit / Undo treatment" function, thus restoring the original
display appearance. The Undo function (button with icon) removes the last-applied treatment
only.
Images can be subject to various
treatments in order to enhance their appearance and, potentially, the
diagnostic information that can be elicited. Some treatments can be automatically
applied to the image at acquisition (see Configuration and Preferences), others
are only applied when manually selected. At any time, you can undo both the
automatic and manually applied treatments, via the "Edit / Undo treatment" function, thus restoring the original
display appearance. The Undo function (button with icon) removes the last-applied treatment
only.
![]() Rotate : by 90-degree steps. Use it for properly
watching and saving an image according with the real orientation in the mouth
(e.g. maxillary or mandibulary).
Rotate : by 90-degree steps. Use it for properly
watching and saving an image according with the real orientation in the mouth
(e.g. maxillary or mandibulary).
![]() Mirror/
Flip: sidewise
or up-down, to correct an image that has been scanned the wrong way. It is
disabled for images from a CCD sensor as these cannot be wrong.
Mirror/
Flip: sidewise
or up-down, to correct an image that has been scanned the wrong way. It is
disabled for images from a CCD sensor as these cannot be wrong.
![]() Reverse: converting negative into positive and
vice versa, i.e. white to black and black to white.
Reverse: converting negative into positive and
vice versa, i.e. white to black and black to white.
![]() Brightness
& Contrast (button
with icon): this lets you control, via
two separate scrollbars, the entire gray scale of the image.
Brightness
& Contrast (button
with icon): this lets you control, via
two separate scrollbars, the entire gray scale of the image.
![]()
Equalize: this enhances image contrast by maximizing the use of the available gray scale.
![]() Logarithmic: this refers to the way the x-ray images
are displayed. It lets you take images, with a given overall density, using an
imparted dose about 40% lower than if a linear display scale is used. In
addition, a logarithmic grayscale visualizes radiographic objects in a fashion
that fits the human eye perception better than a linear scale, and is similar
to what film radiography provides.
Logarithmic: this refers to the way the x-ray images
are displayed. It lets you take images, with a given overall density, using an
imparted dose about 40% lower than if a linear display scale is used. In
addition, a logarithmic grayscale visualizes radiographic objects in a fashion
that fits the human eye perception better than a linear scale, and is similar
to what film radiography provides.
![]()
Emboss: this is a spatial filter providing a simulated 3D image.
Sharpen: this enhances the edges at the expense of increased grainy look (it is a high pass spatial filter).
Smooth: a soft blurring filter (it is a low pass spatial filter).
![]()
Despeckle: this reduces the 'grainy' or speckled appearance that is typical of x-ray images, at the expenses of a small loss in resolution.
A number of software tools are available to help analyzing images. They are:
![]() Colours: this momentarily produces a
pseudo-colour image. This may enhance the detection of subtle differences in
radiographic density.
Colours: this momentarily produces a
pseudo-colour image. This may enhance the detection of subtle differences in
radiographic density.
Isodensity: momentarily replaces a (selectable) range of gray shades with a colour. This may be used to better visualize areas of uniform radiographic density.
![]()
Histogram: graphically returns the gray scale histogram of a rectangular area.
![]()
Gray Section: returns a diagram with the gray levels distribution along any line selectable.
![]()
Angle measurement: returns the angle between any pair of segments.
![]() Length measurement: returns the total length of
a set of segments. A distance calibration versus an object of known size can be
done.
Length measurement: returns the total length of
a set of segments. A distance calibration versus an object of known size can be
done.
Area measurement: returns the area, in mm square, of any polygon drawn on the image. Clicking the mouse right button closes the polygon and returns the measure. The calibration done for Length also holds for Area measurements.
![]() Measurement
(angle, length, area) on digital x-ray image have a limited accuracy due to
image projection, magnification and manual point selection.
Measurement
(angle, length, area) on digital x-ray image have a limited accuracy due to
image projection, magnification and manual point selection.
![]() Clicking on the Print button in the
toolbar or toolbox print directly the selected image on the default printer.
Clicking on the Print button in the
toolbar or toolbox print directly the selected image on the default printer.
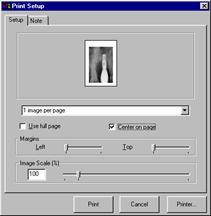 Operating the "File Print" function
opens a printing dialog box, with allows you to resize and move the image on
the page, using the General tab, and to add or modify notes (free text) to be
printed with the images, using the Note tab.
Operating the "File Print" function
opens a printing dialog box, with allows you to resize and move the image on
the page, using the General tab, and to add or modify notes (free text) to be
printed with the images, using the Note tab.
In order to print multiple images, select the images in the Browser or Status load page, then click on the print button. The print dialog box will be opened, allowing you to select the number of images by pages, to resize or move the images on the page, using the margin and scale fields.
Using the Note tab, you may, for each image, add or modify a note field which will be printed. Use the Next and Previous buttons to switch images.
For all pages, the Dentist/practice name with the patient name will be printed. For each image, the date & time of capture with the notes are also printed.
![]() If a supported video capture board is
present and recognized by ContactWin, the Camera function is enabled. By
operating this function, you open a window that displays in real time the image
fed from the camera. You can freeze
the image and, if you decide that it is worth retaining, capture it into the main ContactWin screen. When finished, close
the camera window.
If a supported video capture board is
present and recognized by ContactWin, the Camera function is enabled. By
operating this function, you open a window that displays in real time the image
fed from the camera. You can freeze
the image and, if you decide that it is worth retaining, capture it into the main ContactWin screen. When finished, close
the camera window.
The captured images are like any other newly acquired image for ContactWin , you can decide to discard it or to assign it to the selected patient and save it.
See Chapter 5 for compatibility.
Keep floppies and CD Rom in a dry and clean storage, avoiding direct sunlight, hot or humid environment or any electromagnetic field.
Operating system : Windows95, 98 and NT4.
Processor : Pentium 200 Mhz
Memory : 32 MB
Hard Disk : 4 GB
Video Board : 2 MB video memory, 800x600 true color
Intraoral sensor driver : DLL Version 4.1
DenOptix driver : OCX version 2.1
TWAIN : DLL Version 1.5 or greater (32 bits only)
Video camera : Video For Windows : version 1.1 (Windows95)
Printer : Windows driver.
ContactWin use different file format to save images in the database, using the following compressions :
TIFF UNCOMPRESSED: Lossless format, fast but using more disk space than other format.
TIFF JPEG LOSSLESS : Jpeg lossless format, slower but using about 30% less space than uncompressed files. Default for x-ray images.
JFIF 100%, 75%, 50%: JFIF compressed format, the percent figure refers to the amount of information that is theoretically retained after compression. Lossy format, however the loss of information on a dental x-ray image is virtually undetectable by the naked eye. JFIF 100% and 75% formats are very practical for saving hard disk space, unless otherwise dictated by the need for very fast filing, or by legal consideration prohibiting the use of lossy format in filing of medical x-ray images. A Medium or High compression format is always recommended for colour camera images.
Typical image sizes (data are indicative and approximate only), in kilobytes:
|
COMPRESSION |
TIFF |
TIFF JPEG |
JFIF100% |
JFIF 75% |
JFIF 50% |
|
Intraoral sensor | |||||
|
DenOptix size #2 at 300dpi | |||||
|
DenOptix size #2 at 600dpi | |||||
|
DenOptix Panoramic and Ceph at 150 dpi |
Size of colour images from cameras is variable, depending upon the features and options of the specific camera.
IEC 601.1.4 (Medical Electrical Equipment. Collateral standard : Programmable electrical medical systems).
93/42 EEC, European Directive concerning medical devices
You may want to duplicate the entire database (image files and patient database files) on a back up volume (i.e. LAN, removable hard disk, magneto-optical disk, etc.) in order to be able to restore the information, e.g. in case of a computer crash or fault.
All ContactWin database files are saved in the Root:VXDATA directory (by default C:VXDATA). In multi-volume configuration, files are saved on different media (floppies, magneto optical disks, LAN etc.) but always in the Root:VXDATA. To back up the database, you need to copy all VXDATA directories from all volumes to the back-up volume.
In order to keep track of the volumes architecture in multi-volume configuration, as necessary for the database, you can create sub-directories on the back-up volume, named for the volume drive letter. For example, copy the directory E:VXDATA in the directory VXDATAE on the back-up volume. For removable media (floppy disks, magneto-optical disks, removable hard disks, data tapes, etc.) create directories VXDATAXyyyyyyyy , where X represents the drive letter (for example A for the floppy) and yyyyyyyy represents an identification code of the removable media.
Restoring a database
In case of the loss of a database, you can restore it by copying back the whole set of VXDATA directories.
A utility software program is automatically installed at the set-up, to permit testing of the proper operation and hw/sw configuration of the intraoral sensor, when this is installed, independently from ContactWin .
Through self-explanatory, WVIXTEST is meant to be used only by a trained technician, not by the end user.
|
Politica de confidentialitate | Termeni si conditii de utilizare |

Vizualizari: 1024
Importanta: ![]()
Termeni si conditii de utilizare | Contact
© SCRIGROUP 2024 . All rights reserved