| CATEGORII DOCUMENTE | ||
|
||
| Asp | Autocad | C | Dot net | Excel | Fox pro | Html | Java |
| Linux | Mathcad | Photoshop | Php | Sql | Visual studio | Windows | Xml |
Using MSDN Help
Back in the olden days, you learned a language by reading the reference guide and paging through the 20-page tutorial. Once you were past that, your sources of help were scarce: the index to the documentation, a magazine with a relevant article, or, if all else failed, a toll call to technical support. Nowadays, there's an abundance of resources for getting help past the product's documentation. Microsoft's help encompasses three resources: the online help that you can install with the product, and two more Web-based help resources. In this chapter, I'll discuss each of these and how to use them.
Most people are familiar with pressing F1 and getting a screen of online help. Unfortunately, most people just stop there. There are a number of powerful features in the online help for Visual Studio, and using them is a necessity for a product that powerful and complex. There are also two large Web-based databases that provide support for the product, but many people aren't aware of them or don't know how to use them properly. It's time to explore.
The MSDN Library
Microsoft has long had a resource called Microsoft Developer Network (MSDN). Although the makeup of this support program has changed over the years, its intent is still the same-to provide a comprehensive source of documentation and other technical resources for developers. The basic idea behind MSDN is a fee-based, subscription-oriented support service that provides regular updates of products and documentation during the life of the subscription.
With Visual Studio 6.0, the online help files for all products-Visual Basic, Visual C++, Visual FoxPro, Visual InterDev, Visual J++, and other ancillary products-can be accessed under one unified engine. This unified engine is called the MSDN Library, and is a subset of the MSDN product. As VS has become more and more integrated, this makes sense, because it would be both a waste and a source of errors or inconsistencies to duplicate topics that were relevant to more than one product.
The help files for each individual product have all been converted to HTML Help; thus each has its own .CHM (Compiled HTML Help) file that can be accessed on its own, just as any .CHM file can be. However, the MSDN Library engine provides a single access point to all of the files as well.
You don't have to install all components of the MSDN Library if you just want to access the help files for a particular product, and many people don't because of disk-space limitations or just a purist's sense of "I only want product X on my machine." If you go that route, however, you'll likely run into situations where a help topic you're trying to access hasn't been installed, and you'll be prompted for the CD. So I recommend you install the entire MSDN Library, even if you don't use all of the products.
Installation
In order to take advantage of the MSDN Library, you first have to install it properly. The MSDN Library comes on its own CDs (yes, that's plural), and while it can be installed as part of the process of installing Visual Studio, it can also be installed separately. And because many Fox developers probably only installed the Visual FoxPro part of MSDN, it's a good idea to review the independent install process.
First, dig out your MSDN CDs-either as part of the Visual Studio CDs or, if you subscribe to the MSDN support service, the most recent MSDN Library CDs you've got. As of this writing, there are two CDs. Put the first one ("Disk 1") in your CD-ROM drive and wait for the auto-installer to kick in. If it doesn't, run the SETUP.EXE program in the root of CD 1.
After some housekeeping tasks such as checking disk space, you'll be presented with a screen that looks something like Figure 22.1.
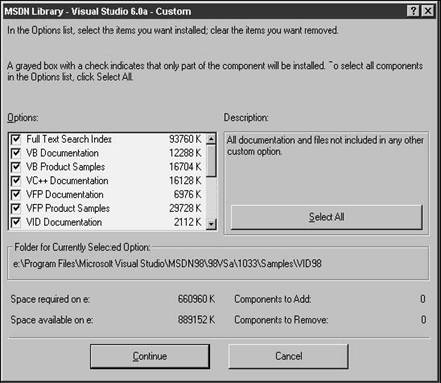
If you select all the check boxes, you'll end up with about 700 MB of materials. If you don't have enough space on your C drive to keep all of this, here's a hint: Although the install program leads you to install all files in the same Program FilesMicrosoft Visual Studio directory, in which all programs themselves are placed, you don't have to do so. I keep MSDN Help on a different drive that has more room than that dinky 2 GB partition on C. In fact, I believe you can install all of the help files on a network drive. (I haven't done this myself, but I don't see why it wouldn't work.)
Opening MSDN Help
Once you've got it all installed, Visual FoxPro should be pointing to the MSDN Help engine, not to the VFP .CHM file itself. You can tell by looking in the File Locations tab in the Tools, Options dialog. In the Help File entry, you should see something like this:
C:Program FilesMicrosoft Visual StudioMSDN9898VSA1033MSDNVS6A.COL
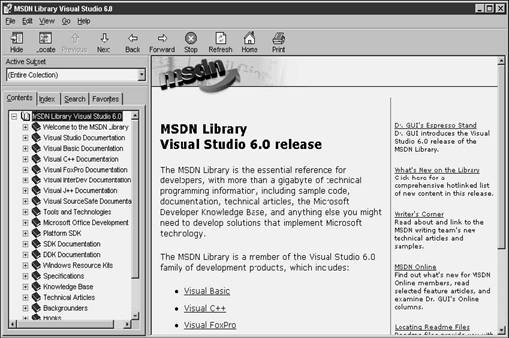
To access help while in VFP, just select the Help, Microsoft Visual FoxPro Help menu option, and the main MSDN Library screen will be displayed, as shown in Figure 22.2.
You can also call up help by pressing F1. This brings up context-sensitive help-if you've got a particular dialog open, such as the Form Designer, the help topic for that dialog will be displayed automatically.
You can also find help on the commands and functions by using the Command window. You simply issue the Help command followed by the keyword you're interested in; for example:
help set strictdate
will bring forward the help topic on the SET STRICTDATE command.
Features of MSDN Help
Once you've opened the Help window, a number of features are available to you. First off, the basic engine is the HTML Help application, so you get all standard features of HTML Help.
The left pane has a four-tab page frame, with each tab providing a different set of features to access one or more entries. Once you select an entry, the help topic will be displayed in the right pane.
The Contents tab
The Contents tab displays a TreeView control with a multi-level hierarchy of entries. As with other Explorer interfaces, you can drill down through the hierarchy by clicking on entries that have a (+) in front of them, or close up a level of entries by clicking on the (-) in front of the top-level entry.
If you examine Figure 22.2 carefully, you'll see that the MSDN Library contains much more than just reference material. The Knowledge Base, for example, contains more than 40,000 articles about products, bug reports, bug fixes and workarounds, documentation errors, and answers to frequently asked technical support questions.
There are also numerous technical articles, backgrounders, excerpts from books and conference papers, and even the full text of about a dozen Microsoft Press books covering a variety of Windows development topics.
The Index tab
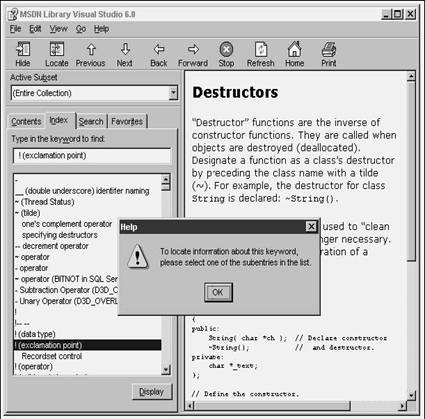
The Index tab displays a list of every keyword or phrase in the entire index of the MSDN Library. This list is organized alphabetically, and some entries have subentries. You can often view topics for both the entry and its subentries. However, not all entries have associated topics. For example, if you click the "~ (tilde)" entry, you'll get topics describing Unary Arithmetic Operators. You can also click one of the subentries, such as "specifying destructors." However, if you select the "! (exclamation point)" entry, you'll get a message indicating you have to select one of the subentries as shown in Figure 22.3.
The Search tab
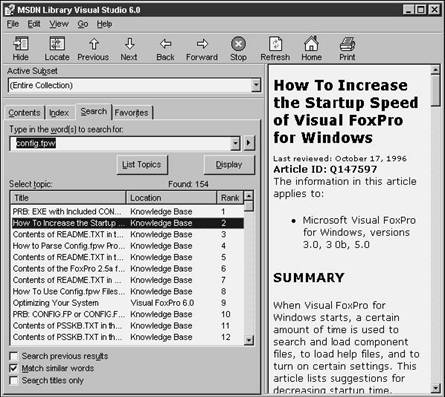
The Search tab has all sorts of slick capabilities. You can enter a word or expression in the combo box, and then click the List Topics button to see all topics where that word or expression was found. The number of matches is displayed midway below the List Topics and Display command buttons. In Figure 22.4, I've searched for the expression "config.fpw" and found 154 matches.
Because there could potentially be a lot of entries, the results are ranked by a super-secret algorithm known only by two programmers who are never allowed to ride in the same airplane together. If you examine the top few topics, you can noodle a couple of general rules. For instance, topics with the keyword or expression in the title of the help topic are ranked higher than other topics. Other factors that help determine the rank include the number of times the expression is found in the topic and how close the expression is to the beginning of the topic.
Once you have found a likely topic, click the Display button (or just double-click the selected topic in the list). The topic will be displayed in the right pane.
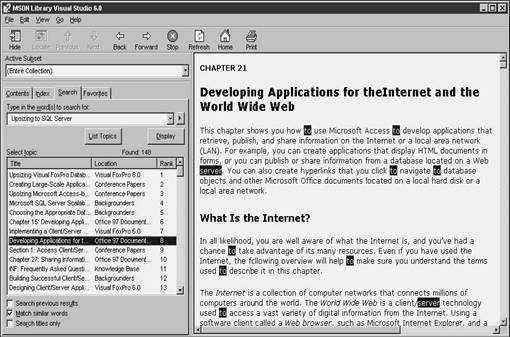
If you want to search for topics that contain an entire phrase, enclose the phrase in quotes. Otherwise, you'll get every topic that contains all of the words in the expression, but those words can be anywhere in the topic-they don't have to be together in the order you specified. For example, in Figure 22.5, I've searched on the phrase "Upsizing to SQL Server" (without the quotes). The results included 148 topics, and as you see, all of the words were found-just not in proximity to each other.
You can match similar words (for example, if you search on "print" but want to see topics with "printing" and "printed" as well) by checking the Match similar words check box. Be careful, because this will find a large number of topics if you are searching for common words.
You can create Boolean expressions as well, using common Boolean operators such as AND and OR. You can click the button to the right of the combo box to select an allowable operator (AND, OR, NEAR, and NOT). It's tricky to use it-here's how:
1. 1. Type the word "Strictdate" in the combo box.
2. 2. Click the right-arrow button to display a context menu of the four operators.
3. 3. Select the desired operator, such as OR. The context menu will disappear, and the operator will appear to the right of "Strictdate" in the combo box.
4. 4. Type a second keyword (or an expression, surrounded by quotes) after the operator, so that you see
strictdate OR 'Set Century'
You can choose to search only topic titles by checking the Search titles only check box. And you can narrow your search to just those topics in a previous results set by checking the Search previous results check box. For example, if you searched on "date" and got 487 matches, you can then search on "century", and by checking the Search previous results check box, the "century" search will be performed just on those 487 matches, not every topic in the MSDN Library.
If you're thinking it's easier to just type the word OR, you're right-once you know which operators are allowed.
Whittling down the topics
If you aren't judicious about the expressions you use, you could end up with lots of topics. In fact, if you search on a word like "Print" or "Integer", you'll get so many that the search engine will stop after it finds 500 matches. (Did you wonder why there were so many keywords that had exactly 500 topics?)
How can you narrow the list? First of all, use more words rather than fewer, and be sure to use quotes to search for the exact phrase. Uncheck the Match similar words check box, and, optionally, check the Search titles only. Once you've got a reasonable list, you can further refine your search by using the Search previous results check box.
The Favorites tab
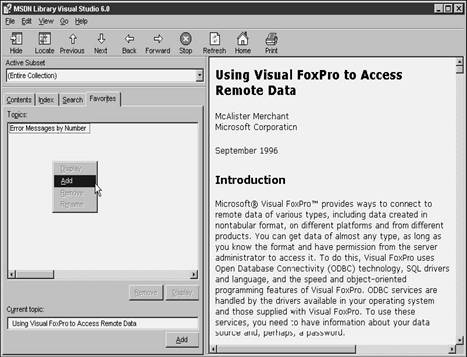
The last tab in the left pane is for Favorites. The use of Favorites is a bit counter-intuitive, I think. Instead of selecting the Favorites tab and then searching for a topic to add, you first have to find a topic and decide that you want to add it to Favorites.
To do so, once the topic is displayed in the right pane, switch to the Favorites tab. Then right-click in the list box, as shown in Figure 22.6. Select the Add menu option, and the topic displayed will be added to your list of favorites.
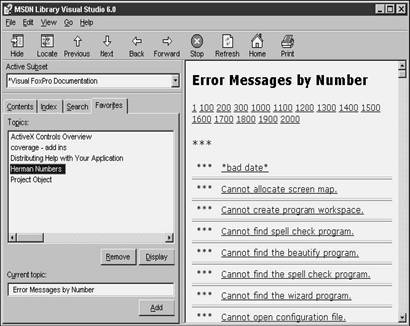
To remove a topic from the list, select the entry in the list box, right-click, and select the Remove menu option. You can also rename a topic entry if the entry that's provided isn't as intuitive as you would like for your own reference. Note that you're only renaming the topic in Favorites, not in all of the MSDN Library. In Figure 22.7, I've renamed the Error Messages by Number topic to "Herman Numbers" but you'll see that the topic still retains the original title, and if you look under the Visual FoxPro Reference help topics, "Error Messages by Number" is still there where it was originally.
The MSDN Library menu bar
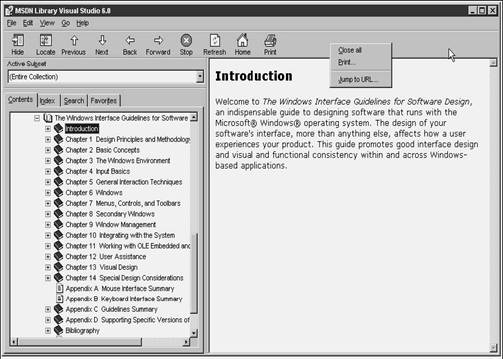
The MSDN Library help engine is a program that runs on top of the HTML Help engine. That's why you see a menu bar at the top of the MSDN Library window, unlike regular HTML Help windows in other applications. I'm not talking about the browser-style buttons like Hide, Locate, Previous, Next, and so on-they come standard with HTML Help, and are pretty obvious in terms of what they do. However, a feature that might not be obvious is that you can right-click in the area next to the browser buttons and get a small context menu as shown in Figure 22.8.
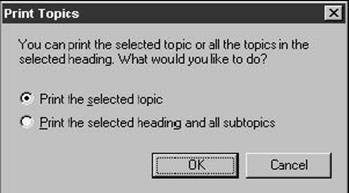
Close All and Print do what they say-Close All shrinks the outline control in the Contents list box to the top-level entry, while Print displays the Print dialog in Figure 22.9, which is fairly self-explanatory. You can also access the Print Topics dialog from the File, Print menu option.
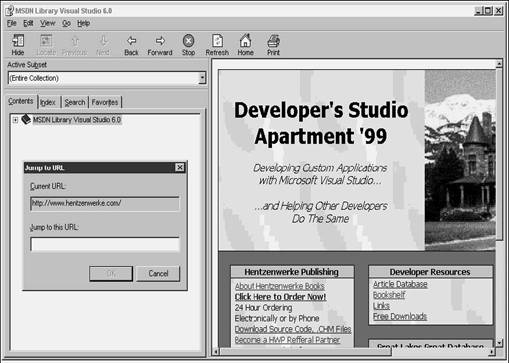
The Jump to URL menu option displays the dialog shown in Figure 22.10. You can display a Web page from the World Wide Web in the right pane as well as topics from the MSDN Library. This dialog shows you the URL of the current Web page and also allows you to enter a new URL. Note that simply entering www.yourwebsite.com won't be enough-you need to prefix the address with https:// or another mechanism as appropriate.
The MSDN Library menu bar also contains File, Edit, View, Go and Help menu pads, which I'll explain in the following sections.
File
The File menu pad has just two options: Print and Exit. Selecting Print displays the dialog shown in Figure 22.9.
Edit
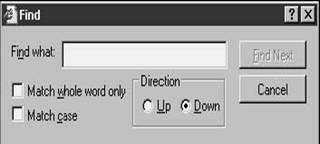
The Edit menu pad has a limited number of choices-Copy, Select All, and Find in this Topic-that are all fairly self-explanatory. Clicking Find in this Topic displays the dialog in Figure 22.11.
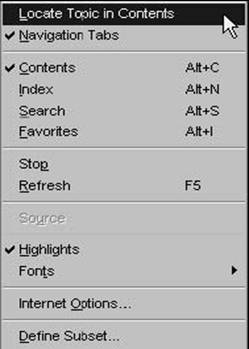
View
The View menu pad, on the other hand, has a whole raft of options, as shown in Figure 22.12.
Locate Topic in Contents allows you to drill into the TreeView control and find where a displayed topic is displayed. For example, suppose you've added a topic to Favorites, but after a while, you realize you forgot where you got it, and you can't find it in the contents simply by trial and error. You can display the topic in the right pane, and then select this menu option to display where in the TreeView the topic is located. You can also do this by clicking the Locate button in the browser button bar.
The Navigation Tabs menu option is either checked or unchecked-it performs the same function as clicking the Show/Hide buttons between the menu and the two panes. The Contents, Index, Search, and Favorites menu options all allow you to bring forward a specific tab in the left pane. I can't see why you'd want to use the mouse to select one of these menu options, but their existence means you've also got keyboard shortcuts for those tabs.
The Stop menu option simply allows you to stop a search that's taking a long time or, if you're viewing content from the Web in the topic pane, to interrupt a download. Refresh allows you to refresh the content from the Web in the topic pane.
The Source menu option is enabled when a topic in the right pane has focus, and simply allows you to view the HTML underlying the topic.
When you do a search on a word or phrase, that word or phrase is highlighted in reverse video throughout the topic. This can make it very hard to read if there are a number of matches in the topic. You can uncheck the Highlights menu option to remove the reverse video highlighting in the current topic.
You can choose the size of the font you want topics displayed in the right pane by selecting the Fonts menu option. Note that this affects only the right pane-the left pane remains the same regardless of the font size selected.
The Internet Options menu option brings forward the same Internet Options dialog (with tabs for General, Security, Content, Connections, Programs, and Advanced) that you can get through the Tools, Internet Options menu option in Internet Explorer.
The last menu option is Subsets-I'll discuss this in more depth in the next section.
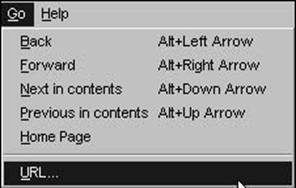
Go
The Go menu pad contains menu options that allow you navigate through topics in the same manner that the browser buttons do. See Figure 22.13.
Help
In addition to help about using the MSDN Library and a useless About box (it only tells you the version of the HTML Help control, which, given the frequent upgrades of HTML Help, only serves to tell you that this version of the control is badly out of date), the Help menu pad has a great hidden feature-a direct link to the MSDN Web site's home page. Check it out!
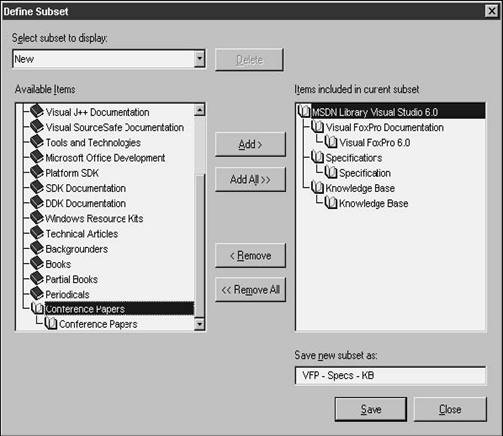
Subsets
You can't help but have noticed by now that there is an awful lot of material in the MSDN Library. If you printed this all out on 8.5 x 11 paper, single-spaced with half-inch margins, you'd end up with about 30 four-drawer file cabinets full of paper. And it's likely that you're going to want to regularly use only part of the materials in the Library. You can winnow out materials that you normally don't want to use by creating subsets of topics that are of particular interest to you.
To create a subset, select the View, Define Subset menu option. The Define Subset dialog displays as shown in Figure 22.14.
The initial display of the Define Subset dialog isn't exactly intuitive-you need to double-click on the MSDN Library Visual Studio 6.0 entry to expand it into an outline of all available items. Once you do so, you can highlight an item and then click the Add button to move it to the subset you're defining, as shown in Figure 22.15.
Once you've added to the subset all the items you're interested in, enter a name in the Save new subset as text box in the lower right corner, and click the Save button.

After you've created a subset, you'll see that the current subset is still displayed. How do you create yet another subset? All you need to do is select the New item in the Select subset to display combo box, and the two list boxes-Available Items and Items included in current subset-will be restored to their original state.
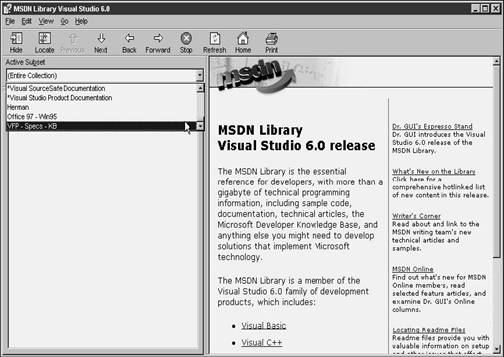
So now that you've defined a few subsets, how do you use them? Open the MSDN Library help window and select the Active Subset combo box. The subsets you've added will appear at the bottom of the list, as shown in Figure 22.16.
If you decide you don't need a subset anymore, you can remove it by selecting the View, Define Subset menu option, selecting the subset to rid in the Select subset to display combo box, and then clicking the Delete button to the right of the combo box. You will be prompted to verify your action.
Help on the Web
If you've just bought a copy of Visual Studio, you'll get a copy of the MSDN Library as it stood at some specific date in time-perhaps three months before the release of the product, given the lead time required to format and proof articles, press CDs, and package everything in boxes. Then, that copy of Visual Studio might have sat upon a shelf for another indeterminate length of time, resulting in a help file that could be anywhere from three months to over a year out of date.
In the brick-making business, that might not amount to much, since state-of-the-art 4000 years ago is still pretty much state-of-the-art now. But in the software biz, well, it's difficult to keep current no matter how much time you devote to it. Having your help files on a static medium such as a CD is one sure way to ensure you stay out of touch with the newest news.
MSDN
You can access the very latest version of MSDN on Microsoft's Web site at https://msdn.microsoft.com.
You can get to this site in a number of ways. First, you can just type the URL in your browser, but, well, blech! You can get there directly via the Help menu in the MSDN Library Help window, or through Visual FoxPro via the Help, Microsoft on the Web, MSDN Online menu option. I heartily encourage you to pop up there soon and scout around. You'll have access to the very latest articles, bug fixes, and other product information.
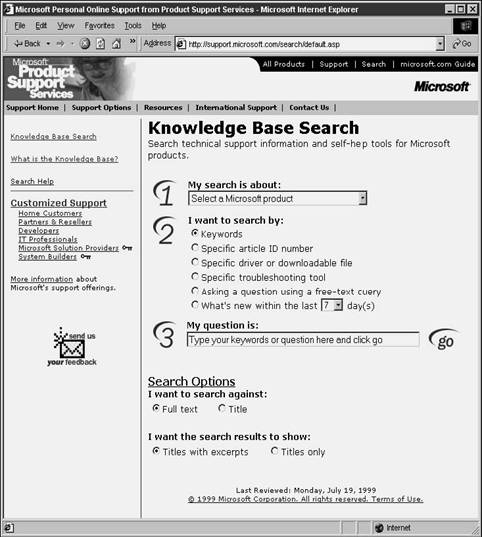
The Microsoft Knowledge Base
There's another database on Microsoft's Web site that's just as good-the Knowledge Base, as shown in Figure 22.17. The URL for this tool is https://support.microsoft.com.
I won't spend any time describing how to use this site; it's fairly straightforward, and the interface is updated regularly. Nonetheless, it's another site you'll want to keep bookmarked or memorized for regular access.
|
Politica de confidentialitate | Termeni si conditii de utilizare |

Vizualizari: 1408
Importanta: ![]()
Termeni si conditii de utilizare | Contact
© SCRIGROUP 2024 . All rights reserved