FullOffice Wireless Desktop
Internet / Multimedia / Office Ergo A-shape Keyboard
& Wireless
Office Optical Mouse
Userts
Guide
THIS DEVICE
COMPLIES WITH PART 15 OF THE FCC RULES. OPERATION IS SUBJECT TO THE FOLLOWING TWO
CONDITIONS: (1) THIS DEVICE MAY NOT CAUSE HARMFUL INTERFERENCE AND (2) THIS
DEVICE MUST ACCEPT ANY INTERFERENCE RECEIVED, INCLUDING INTERFERENCE THAT MAY
CAUSE UNDESIRED OPERATION.
Federal Communications Commission Requirements
The
equipment has been tested and found to comply with the limits for Class B
Digital Device, pursuant to part 15 of the FCC Rules. These limits are designed
to provide reasonable protection against harmful interference in a residential
installation. This equipment generates, uses and can radiate radio frequency
energy and, if not installed and used in accordance with the instruction, may
cause harmful interference to radio communication. However, there is no
guarantee that interference will not occur in a particular installation. If
this equipment does cause harmful interference to radio or television
reception, which can be determined by turning the equipment off and on, the
user is encouraged to try to correct the interference by one or more of the
following measures:
l
Reorient or relocate the receiving
antenna.
l
Increase the separation between
the equipment and receiver.
l
Connect the equipment into an
outlet on a circuit different from that to which the receiver is connected.
l
Consult the dealer or an
experienced radio/TV technician for help.
Important
Notice
Before you
start using wireless products, read following warning message thoroughly to
ensure you are fully understood the potential hazards and risks in the case of
abuse or improper use of battery charger.
Warning:
The charger
included with the product is only applicable to Ni-Cd and Ni-MH 1.2V type of
Rechargeable Batteries. Charging to any other type of battery such as alkaline
battery will cause severe results of damage to the charger and battery.
Hazard
Warning:
Never put
the non-rechargeable alkaline nor any other type
of non-rechargeable battery into the charger, it may result in battery leakage
or battery explosion consequence. Moreover, your USB charger will no longer
work properly!
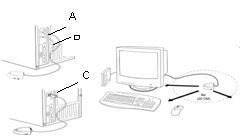 Getting the Receiver Ready
1.
Turn off the power of your
computer
2.
Remove the
existing keyboard and mouse
3.
Connect the receiverts cable to
the computerts keyboard and mouse ports.
4.
Place the receiver eight
inches (20 centimeters) from any electromechanical device.
Insert Battery
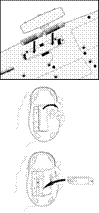 1. Install 2
AA alkaline or rechargeable batteries in the wireless keyboard.
1. Install 2
AA alkaline or rechargeable batteries in the wireless keyboard.
(a)
Remove the battery compartments
cover on the bottom of the keyboard by squeezing the cover in front the tab to
release it.
(b)
Insert the batteries, making sure
to properly orient the positive (+) and the negative (-) ends as specified by
the battery compartment labels.
(c)
Replace the cover.
2. Install 2 AA alkaline or rechargeable batteries in the wireless
mouse.
(a)
Remove the battery compartments
cover on the bottom of the keyboard by squeezing the cover in front the tab to
release it.
(b)
Insert the batteries, making sure
to properly orient the positive (+) and the negative (-) ends as specified by
the battery compartment labels.
(c) Replace the cover.
Installing the Mouse Software and
Keyboard Software
If theretre other mouse drivers installed on your computer, please have
them uninstalled before you start the installation process. Also please be sure
you have completed above hardware setup.
Before you can take advantage of the many features your mouse and
keyboard offer, you must install the driver. The driver is in the installation CD
driver that came packaged with your mouse and keyboard.
Windows 98/Me/2000/XP installation
1.
Insert the
installation CD into your CD drive.
2.
The tauto runt program
will show you the installation screen.
3.
Click on the tiOfficeWorkst
to start the installation.
4.
Follow the instructions on your
screen to complete the installation
 Selecting the Frequency Channel
The Wireless keyboard and Optical Mouse operates on two frequency
channels. To prevent interference when using two RF optical mice or two RF
wireless keyboards in close proximity a different frequency channel should be
used for each mouse.
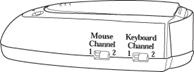 Refer to
the following to change the frequency channel for your keyboard and mouse: Set
the frequency channel on the receiver to 1
or 2. Set the frequency channel
on the keyboard and mouse to 1 or 2.
Refer to
the following to change the frequency channel for your keyboard and mouse: Set
the frequency channel on the receiver to 1
or 2. Set the frequency channel
on the keyboard and mouse to 1 or 2.
The Wireless Keyboard and Mouse ID Code
Each keyboard and mouse is assigned a unique ID code when produced, so
the receiver only picks up the signal from your mouse and prevents other wireless
keyboard or mouse radio signals from operating on your computer. This feature
can also be disabled, allowing other wireless pointing devices to operate on
your computer.
Connecting the Wireless Mouse and
Keyboard ID Code
 Before connect the ID, make sure to choose the same channel on the mouse
and on the receiver: if you choose the channel 1 on the mouse, choose also the
channel 1 on the receiver. When you connect the keyboard ID, make be sure to
choose the same channel too.
Before connect the ID, make sure to choose the same channel on the mouse
and on the receiver: if you choose the channel 1 on the mouse, choose also the
channel 1 on the receiver. When you connect the keyboard ID, make be sure to
choose the same channel too.
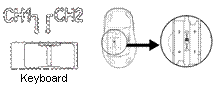
Move the Wireless mouse for a few seconds to establish a connection, then press
Connect ID button (Q) on receiver. The unique ID code of your mouse is
recognized and another RF pointing device will not function on your computer.
Click some keys of keyboard and then press Connect ID button (Q) on
receiver to connect the unique ID code of your keyboard, the green LED (N) light shows you that the keyboard ID is connected
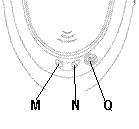
Receiver Works As a Charger
The
receiver can work as a charger which you can put the spare batteries on the
charging compartment. The LED (M) is the charging LED.
Charging:
LED (M) blinks red
Charged:
LED (M) turns dim red
Low Battery: LED (M) turns bright red
F-Lock Indicator
The F-Lock hot key is to be used to switch the F-Keyts
default function and the special Office Hotkey function. This switch can be
indicated by a LED (N), shared by the ID Locking LED. When the F-Lock is on,
the standard function keys F1~F12 are enabled. When the F-Lock is off, the
enhanced Office function keys are enabled.
Using the iOfficeWorks Software
To launch the iOfficeWorks software, double-click the  iOfficeWorks icon
on the Windows Taskbar. The iOfficeWorks software brings you closer to your
desktop, allowing you to set up and organize your keyboard, as you like. Using
the Hotkeys and the iOfficeWorks software, customize your keyboard to access
your Internet home page, or favorite chat room, and run your e-mail application
with the push of a button.
iOfficeWorks icon
on the Windows Taskbar. The iOfficeWorks software brings you closer to your
desktop, allowing you to set up and organize your keyboard, as you like. Using
the Hotkeys and the iOfficeWorks software, customize your keyboard to access
your Internet home page, or favorite chat room, and run your e-mail application
with the push of a button.
Using All 33 Hotkey
|
Hot Keys
|
Default
Functions
|
Microsoft Office program functions
|
|
 Back Back
|
Back to previous page
|
- Font Size: Decrease font
size in Microsoft Word.
|
|
 Forward Forward
|
Forward to next page
|
+ Font Size: Font size in Microsoft Word.
|
|
 Stop Stop
|
Stop download the page
|
New Office Document.
|
|
 Refresh Refresh
|
Refresh the page
|
Open Office Document
|
|
 Search Search
|
Web
search
|
Address Book
|
|
 Favorites Favorites
|
My favorite
|
WinZip
|
|
 Web/Home Web/Home
|
My Home key: Accesses your home web page.
|
Microsoft Word
|
|
 Mail Mail
|
E-mail key: Launches an e-mail application.
|
Open default Email Software. (Ex: Outlook Express)
|
|
 Mute Mute
|
Mute key: Stop/Start the sound volume.
|
Open Microsoft Outlook
|
|
 Volume - Volume -
|
Volume Down key: Decreases the sound volume.
|
Zoom Out
|
|
 Volume + Volume +
|
Volume Up key: Increase the sound volume.
|
Zoom In
|
|
 Play Play
|
Play/Pause key: Plays or pauses the CD/DVD.
|
Microsoft Excel
|
|
 Stop Stop
|
Stop key: Stops play.
|
Internet Brower
|
|
 Previous Previous
|
Previous Track Key: Plays the previous track.
|
Previous Document
|
|
 Next Next
|
Next Track key: Plays the next track.
|
Next Document
|
|
 My
Computer My
Computer
|
Open My Computer folder
|
Open My Document folder
|
|
 Calculator Calculator
|
Calculator: Display online calculator
|
Office Tools
|
|
 Sleep Sleep
|
Suspend
key: Access the Windows shut down dialog box, where you can put your system
on stand-by or shut down Windows.
|
Microsoft Publisher
|
|
 Power Power
|
Cut off the computer power
|
Microsoft
Publisher
|
|
Hot Keys
|
Default Functions
|
Microsoft Office program functions
|
|
 File File
|
Open a new Office file
|
Editing key by user
|
|
 Word Word
|
Open Microsoft Word Programmer
|
Editing key by user
|
|
 Excel Excel
|
Open Microsoft Excel Programmer
|
Editing key by user
|
|
 Calendar Calendar
|
Open calendar in Microsoft Outlook
|
Open Microsoft Excel Programmer
|
|
 Log Off Log Off
|
Open Microsoft FrontPage
|
Editing key by user
|
|
 Toggle Toggle
|
Switch the current Windows application
|
Editing key by user
|
|
 Close Close
|
Close the current Windows application
|
Editing key by user
|
|
 Undo Undo
|
Use in Office as tundot command
|
Editing key by user
|
|
 Cut Cut
|
Use in Office as tcutt command
|
Editing key by user
|
|
 Copy Copy
|
Use in Office as tcopyt command
|
Editing key by user
|
|
 Paste Paste
|
Use in Office as tpastet command
|
Editing key by user
|
|
 Office Office
|
Office F-lock key: Control office
enhanced function keys
|
Editing key by user
|
|
 Navig-
wheel Navig-
wheel
|
Scroll up and down through application
|
Editing key by user
|
Using Office F-lock Key
The Office F-lock key gives your keyboard more functionality by
providing two command sets for the top row of
keys. When the F-Lock is on, the standard function keys F1~F12 are enabled.
When the F-Lock is off, the enhanced Office function keys are enabled.
|
Hot
Keys
|
Default Functions
|
Office Functions
|
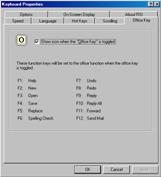
|
|
F1
|
F1
|
Help
|
|
F2
|
F2
|
New file
|
|
F3
|
F3
|
Open a file
|
|
F4
|
F4
|
Save a file
|
|
F5
|
F5
|
Replace
|
|
F6
|
F6
|
Spelling check
|
|
F7
|
F7
|
Undo
|
|
F8
|
F8
|
Redo
|
|
F9
|
F9
|
Reply an email
|
|
F10
|
F10
|
Reply to all
|
|
F11
|
F11
|
Forward an email
|
|
F12
|
F12
|
Send an email
|
Using Office Easy Key &
Navig-wheel
There is
four Office Easy Keys: COPY, UNDO, PASTE and CUT, on the left of keyboard
layout. The four Office Easy keys are especially designed for to simplify
the use of Office functions. Under a Office environment, pressing any of the
keys instead of the mouse button allows you to quickly perform a function.
The
Navig-wheel on the keyboard works just like the wheel of mouse, to scroll up
and down through application.
Using Office Mouse
This Office Mouse have
8 buttons. The 3rd Wheel button, 4th and 5th
buttons are programmable with 54 shortcuts to make your daily works easier. The 6th and 7th buttons located in
front of the wheel are working as the coupling buttons with 24 various command
sets such as tOPEN, CLOSEt; tDELETE, REPLYt, tZOOM IN, ZOOM OUTttKetc. which may
be easily changed by one click on the 8th OfficeJump key.
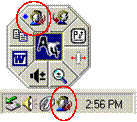 To
customize, open the Mouse Properties window and select the Office Buttons tab. Check
up to 8 sets of command that you need to use often. Then Click tAPPLYt. After Office command sets screen has
been completely setup, you can use the selected 8 sets of command by pressing
the 8th OfficeJump key. The OfficeJump Menu can be found in the
Windows System Tray next to the clock to remind you the current activating
office commands you have selected.
To
customize, open the Mouse Properties window and select the Office Buttons tab. Check
up to 8 sets of command that you need to use often. Then Click tAPPLYt. After Office command sets screen has
been completely setup, you can use the selected 8 sets of command by pressing
the 8th OfficeJump key. The OfficeJump Menu can be found in the
Windows System Tray next to the clock to remind you the current activating
office commands you have selected.
By clicking the A4 company logo, you can launch the 24
Office commands setup screen.
Using Zoom Function of Mouse
We integrated and standardized different Zoom commands into our two office
fingertip buttons, and that function can be use in all Windows applications
that use Zoom-supported functions.
3rd wheel button - Net/LuckyJump Commands
To use the Net/LuckJump, you need to open the Mouse Properties window
and select the Button tab. Then assign Net/LuckyJump in 3rd button command. You
also can use tSettingt to update the command list of Net/LuckJump. Press the
wheel button, it will show up NetJump or LuckyJump screen which shows 14 commonly
used tasks as for convenient shortcut.
Programmable 3rd, 4th & 5th
Buttons tV 54 Available Shortcuts
Button assignment lists out of 54 available commands and settings for
the 3rd, 4th and 5th keys which you can open many useful programs or execute
the commands by one click on the button. The default setting for the 4th and
5th buttons is Internet Explorer and Browser tBackt and tForwardt function.
Declaration of Conformity
We,
the undersigned,
Company: A-FOUR
TECH CO., LTD.
Address: 6F,
No. 108, Min-Chuan Rd.,
Hsin Tien, Taipei,
Country: Taiwan,
R.O.C.
Telephone
number: 886
2-2218-4952
Fax
numbertR 886
2-2218-9908
certify and declare under our sole responsibility
that the following equipment:
Product
Description
/Intended
use: 27
MHz low power wireless computer mouse and keyboard for home and office use
EU/EFTA
member states
Intended
for use: EU:
Austria, Belgium, Denmark,
Finland, France, Germany,
Greece,
Ireland, Italy, Luxembourg,
The Netherlands, Portugal, Spain,
Sweden,
United Kingdom
EFTA:
Liechtenstein, Estonia, Iceland,
Norway, and Switzerland
Restrictive
use:
-none-
Manufacturer: A-FOUR
TECH CO., LTD.
Brand: A4Tech
Model
Number: Wireless
Optical mouse and receiver (all models)
Wireless
Wheel Mouse and receiver (all models)
Wireless
Keyboard and receiver (all models)
Wireless
Optical Desktop (all models)
is tested to and conforms with the
essential radio test suites included in following standards:
Standard Issue
date
ETSI
EN 300 220-3 V1.3.1 (2000-09)
ETSI
EN 301 489-1 (2001-09)
ETSI
EN 301 489-3 (2001-11)
ETSI
EN 60950:1992+A1: 1993+A2: 1993+A3: 1995+A4: 1997+A11: 1997
ETSI
EN 50371
and therefore complies with the essential
requirements and provisions of the Directive 1995/5/EC of the European
Parliament and of the council of 9 march 1999 on Radio equipment and
Telecommunications Terminal Equipment and the mutual recognition of their
conformity.
Notified
Body: EMCC DR. RASEK
Address:
Boelwiese 5, 91320 Ebermannstadt,
Germany
Identification
Number: 0678
Tel:
+49-9194-9331; Fax: +49-9194-7964-84; emc.cert@emcc.de; Web-site: https://www.emcc.de
The technical documentation as required
by the Conformity Assessment procedure is kept at the following address:
Company: A-FOUR
TECH CO., LTD.
Address: 6F,
No. 108, Min-Chuan Rd.,
Hsin Tien, Taipei,
Country:
Taiwan,
R.O.C.
Telephone
number: 886
2-2218-4952
Fax number: 886
2-2218-9908
CE
