| CATEGORII DOCUMENTE |
| Bulgara | Ceha slovaca | Croata | Engleza | Estona | Finlandeza | Franceza |
| Germana | Italiana | Letona | Lituaniana | Maghiara | Olandeza | Poloneza |
| Sarba | Slovena | Spaniola | Suedeza | Turca | Ucraineana |
What you need to install and how to dial up
If you have Windows 95 installed on your PC, you will be able to access the Internet using either the NTS Winsock supplied with Turnpike v3 or the one provided as part of the Windows 95 Dial-Up Networking (DUN) software.
Either of these Winsocks can be used not just with Turnpike but also with other Internet applications that you wish to run alongside Turnpike - whether 16bit or 32bit.
In general, it will be easiest and most convenient to use the NTS Winsock provided with Turnpike, because this allows you to run the Turnpike Connect program and go on-line in one smooth action. Setting up the Windows 95 DUN and using it to dial up your Access provider is not a simple task.
But in case you particularly want to use the DUN's auto-dial feature or you need it to support some exotic hardware you are using, the following pages describe the special features of running Turnpike alongside the DUN. It also explains how to install and configure the DUN software because this isn't always clear to Windows 95 users.
If you are happy to use the NTS Winsock supplied with Turnpike, you can ignore this document.
Turnpike itself is a good source for much of the configuration information you will need to give. So we suggest that you start by installing Turnpike as described for example in the Turnpike Set-Up book, then return here and follow the steps to ensure that your modem and the Dial-Up Networking software are correctly installed.
Note: If you need to use the Windows 95 Winsock but you have already installed Turnpike's own Winsock, don't worry - just use the Configure: Winsock Used option in the Turnpike Connect program to select the DUN Winsock instead.
You should also note that Windows 95 Set-Up disks are needed for some of the steps, and that the pictures show the settings required for connecting to Demon using a Sportster 28800 modem connected on COM1 from a stand-alone machine. Other settings may be required if you use either a different Access provider or a different modem - or if your PC is on a network.
Call up the Control Panel (from the Settings option of the Start menu) and double-click on the Modems icon.
With no modem yet installed on your PC, you should see:
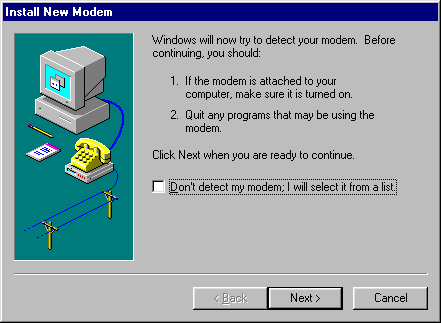
(If a modem is installed, you will see instead a list of modems. If your modem is listed, go on to set its properties as described below. If not, click the Add button to display this 'Install New Modem' dialog.)
Opt for Windows to detect the modem (by ensuring that the tick box by the 'Don't detect' option is cleared), then click Next
Windows then tries to identify your modem.
If your modem is correctly identified, simply click the Next button.
If it isn't correctly identified, click the Change button and select the modem's manufacturer and model from the following display.
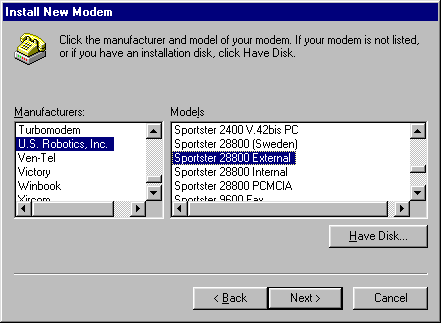
(If your modem isn't listed, either take the 'Have disk' option if a disk was supplied with the modem or select the 'Standard' modem of the appropriate baud rate - from the top of the Manufacturers list.)
When you are ready to continue, click the Next button and, if necessary, set the port to which the modem is attached.
If you are installing a modem for the first time, you will then be asked for details of your location and your phone system.
In the final dialog, you are offered a Finish button. When you click this, you will be put into the Modem Properties dialog from where you can set the properties of your modem.
Check your modem is selected in the Modem Properties dialog, then click the Properties button and set its properties as follows.
General properties (Displayed first)
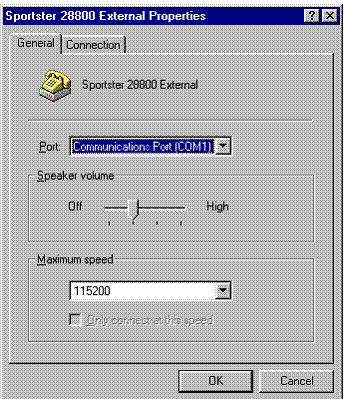
The speaker volume is up to you but the speed to set depends on the modem and the type of UART in the COM port - and also on how fast your PC is able to respond. Ideally, the speed set here should be 4 times the modem speed eg. 57600 for a 14.4k modem or 115200 for a 28.8k modem. But data can only be transmitted at these speeds if the COM port uses a 16550 UART (and then only if the PC itself can cope at these speeds). If it uses a 16450 UART, the highest speed to set is 38400, while if it uses an 8250 UART, the limit becomes 19200.
Note: If you don't know what type of UART is used, you can find out by returning to the Modem Properties dialog, switching to the Diagnostics display, selecting the appropriate port and clicking the More info button.
Connection properties (Displayed by clicking on the Connection tab)
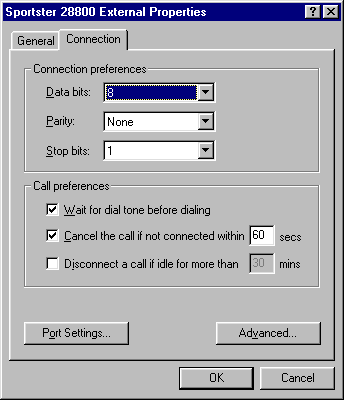
Connection preferences: The default settings of '8, None, 1' are the ones you are likely to need here.
Call preferences: This 'Wait for dial tone' option should be selected unless your modem isn't able to detect the appropriate dial tone.
Now click the Advanced button to show the 'Advanced Connection Settings' dialog.
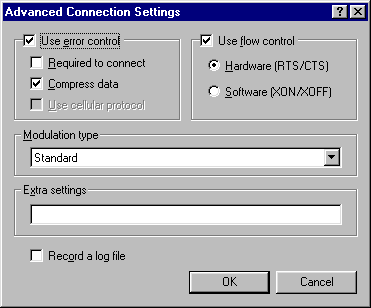
Error control: is automatically selected where it is supported by your modem.
Flow control: Select Hardware flow control.
Modulation type: The 'Standard' setting should be fine.
Extra settings: Slot for additional modem initialisation commands. These may be needed if Windows 95 didn't recognise your modem.
When you have finished setting your modem's properties, click OK/Close until you are back to the Control Panel.
This is done from the Control Panel which is called up from the Settings option of the Start menu.
Double-click on the Add/Remove programs icon in the Control Panel.
Click the Windows Setup tab, select the Communications option and click the Details button.
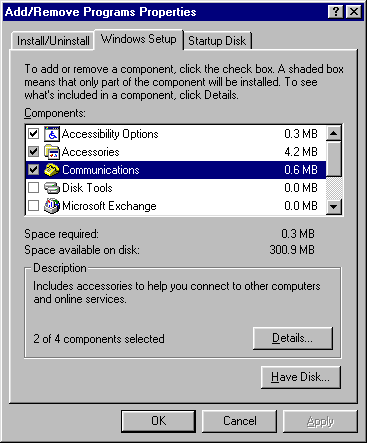
Tick Dial-Up Networking, and click OK - then click OK again to leave the Add/Remove programs dialog.
(If Dial-Up Networking is already ticked, just click OK back to the Control Panel, then go on to the section on 'Install the TCP/IP software'.)
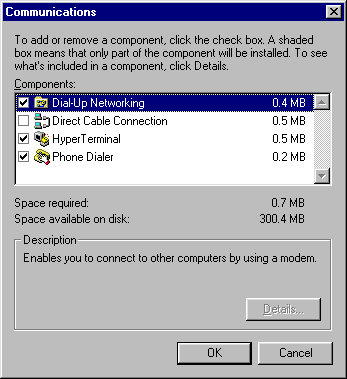
Follow the instructions that appear on the screen to install the DUN software.
When the following dialog is displayed:
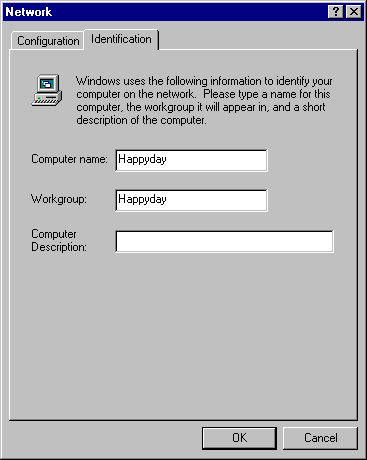
Note that these settings are primarily for computers on local networks. If your computer is not networked to others, just invent a name for your computer and 'workgroup'.
You can fill in a Computer description if you wish.
Then restart your computer when you are prompted to do this.
(This is also done from the Control Panel - called up from the Settings option of the Start menu.)
Double-click on the Network icon in the Control Panel to display a list of the installed Network components.
(If TCP/IP is listed, simply select it - then set its properties as described below.)

If TCP/IP isn't listed, click Add and select Protocols from the list that is displayed.

Click Add again and select Microsoft TCP/IP from the following list.
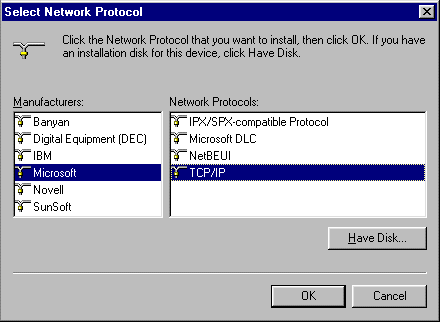
Click OK, then set the TCP/IP properties as described below.
To set these, select TCP/IP in the Network Configuration list (as described above) and click the Properties button.
IP Address
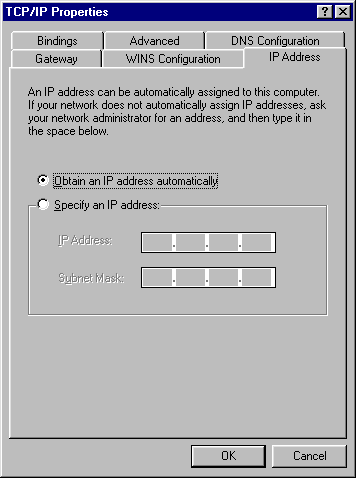
Take the 'Obtain automatically' option - unless specifically told otherwise by your Access provider.
WINS configuration
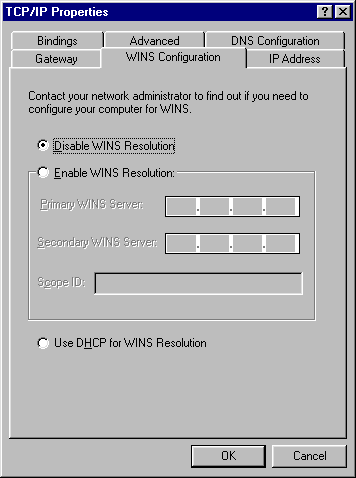
Take the 'Disable' option - unless you are on a local network where WINS is used.
Gateway
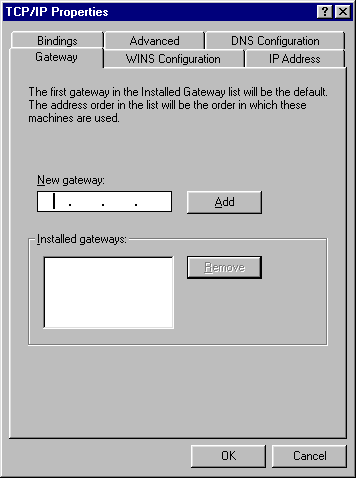
Set this if your Access provider or Network manager tells you the number to use, but otherwise leave it blank. This gateway doesn't have any real meaning on a dial-up connection.
Bindings
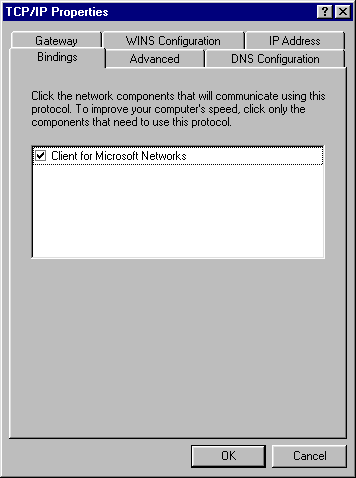
The default is for TCP/IP to be bound to Client for Microsoft Networks. Leave it like this, though it does no harm if it isn't bound.
Advanced
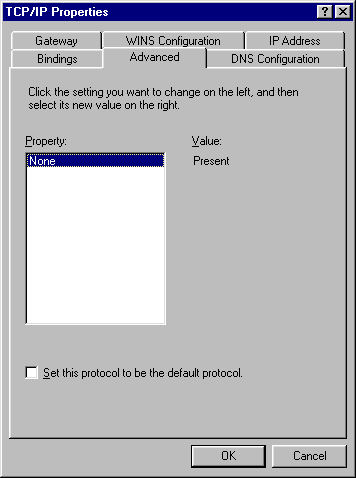
You don't need to alter this.
DNS configuration
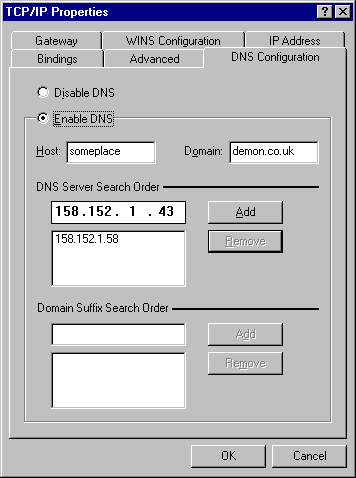
Demon customers. If your full Domain name is someplace.demon.co.uk enter someplace as the Host and demon.co.uk as the Domain. (If you are about to sign up for a Trial account with Demon Internet, you need to fill in olr as the Host.) The DNS numbers for Demon are and
Other customers. Generally you should enter your username as the Host and your service provider as the Domain. (e.g. freddie@whizz.net would enter freddie as the Host and whizz.net as the Domain. The numbers to use for the DNS addresses can be obtained from your ISP, or you can run the Turnpike Connect program and look at the Service access option in the Configure menu.)
When you have finished making these settings, click OK back to the Network dialog.
If the list of Network components is not already displayed, double-click Network in the Control Panel to call it up.
If Dial-Up Adapter is already listed, ensure that Windows Logon is selected as the Primary Network Logon, then set the properties of the Dial-Up Adapter as described below.
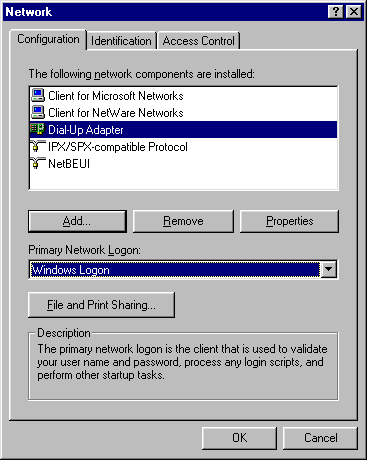
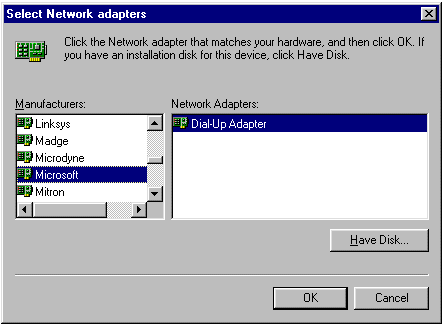
If Dial-Up Adapter isn't listed, click the Add button and select Adapter from the following list.
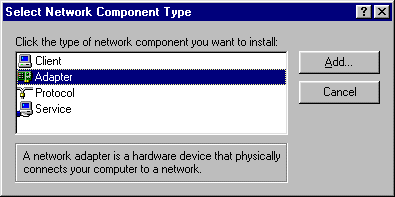
Click Add again and select Microsoft Dial-Up Adapter from the following list.
When you return to the main list, ensure 'Windows Logon' is selected as the Primary Network Logon - then set the properties of the Dial-Up Adapter as described below.
To set these, select Dial-Up Adapter in the list of Network components (see above) and click the Properties button.
Driver Type
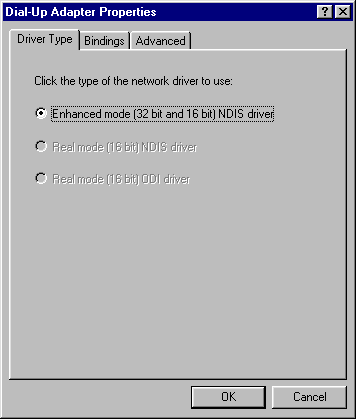
Leave this alone.
Bindings

Ensure that TCP/IP is ticked - and that the other protocols are cleared.
Advanced
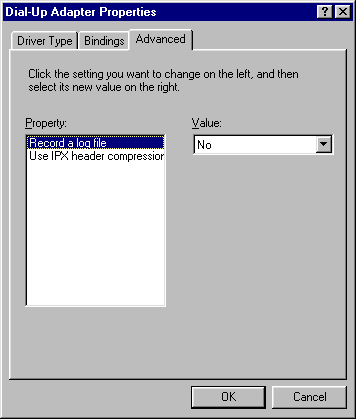
Leave these settings alone too.
When all set, click OK/Close until you get back to the Control Panel.
Select 'My computer' and open the Dial-Up Networking folder.
Assuming this is the first time you have gone into this folder, you will see a Welcome screen followed by a 'Make New Connection' dialog.

(If you have another connection set up, open the Dial-Up Networking folder and click on the Make New Connection icon.)
Enter a name for the connection (such as Demon Internet), and select the modem you intend to use (if you have a choice).
Click Next
In the next dialog, enter the details needed to phone your Access provider.

Be sure to set the correct country.
Click Next, then click Finish in the next display.
You are then returned to the Dial-Up Networking folder.
Back in the Dial-Up Networking folder, select the new icon you have just made, then take Properties from the File menu.

Click the Server Type button and set the required details in the dialog that's displayed.

Advanced options: Clear these options unless specifically needed.
Allowed network protocols: Ensure that TCP/IP is ticked and that all other protocols are cleared.
Then click the TCP/IP Settings button, and set your Access Provider's DNS addresses in the following dialog.
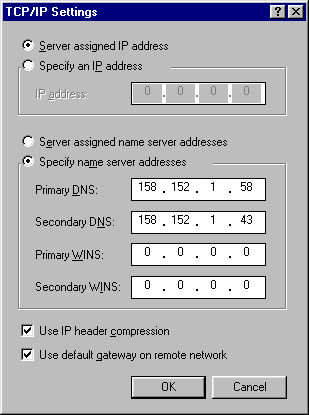
IP address: Select Server assigned IP address unless specifically told otherwise by your Access provider.
Name server details:The numbers needed here are the ones you entered when setting the TCP/IP properties. (See Step 3.)
When you have finished setting these Server details, click OK until you get back to the DUN folder.
The next step is to dial up
Note: Dialling up can be automated by using a 'script' containing the information needed for logging in. However, this requires extra software as Windows 95 itself doesn't include dialling scripts. If you have suitable scripting software (or you would like to know how to acquire this), see Step 7, 'Using a Dial-up script '. Otherwise, dial up as described here.
Preparation
If you will be dialling up without a script, you first need to arrange that a terminal window will be displayed after dialling for you to enter the different pieces of information that your Access provider requires.
To do this, select the appropriate Connection icon in your Dial-Up Networking folder, take the Properties option from the File menu, then click the Configure button under the modem in the Connection details that are displayed.

When the dialog appears, click the Options tab and tick the option to Bring up terminal window after dialing

Then click OK back to the Dial-Up Networking folder.
When you are ready to dial
Double click the appropriate Connection icon in your Dial-Up Networking folder in order to dial in.
You will then see the following dialog
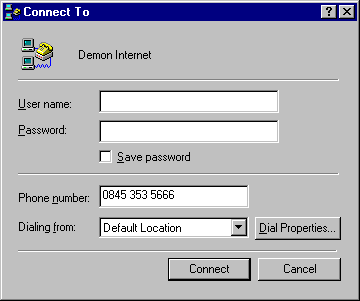
Leave the slots for your username and password blank, and simply click the Connect button.
After dialling, a terminal window will be displayed - probably containing brief details of the connection that has been made, followed by one or more requests for information.
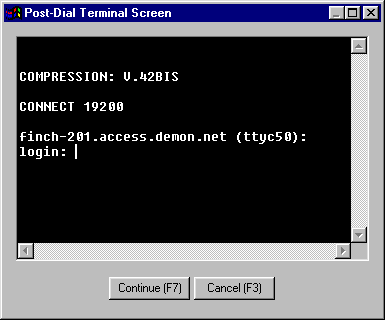
The likely sequence is login name (ie. user or 'nodename'), password, then protocol (normally PPP).
To each such request, type the appropriate details and press RETURN. After the last item, click Continue (or press F7).
Note: If you are in the process of signing up for a Trial account with Demon, you need to give olr as both your login name and your password. On subsequent occasions, however, you will need to give the host name and the password you chose for your Demon account. (Remember to make a note of these!) Note too that you may see a message later advising you that your Services file is not any good, but in this case (but only this case), you can ignore this message.
When you are connected, you will see a 'Connected to' dialog showing your Access provider.
Run the Turnpike Connect program which you should already have set up to use the Microsoft Winsock (by taking 'Winsock Used' from the Configure menu).
When the following message appears
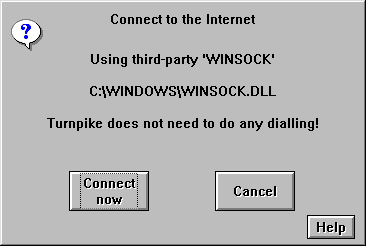
Click 'Connect now' to send and receive email and news.
Typing the different pieces of information your Access provider requires every time you connect can be tedious. A better solution is to set up a 'script' that will provide this information for you.
Windows 95 doesn't normally include a scripting tool. To get this facility, you need to add either the Dial-Up Scripting Tool from the Windows 95 CDROM, or the Internet Jumpstart Kit provided as part of Microsoft Plus, or the Dial-Up Networking upgrade for ISDN - or one of the third-party scripting programs that are available.
If you don't have any scripting software at the moment, you can download a copy of the basic Microsoft scripting tool software from:-
ftp://ftp.demon.co.uk/pub/mirrors/turnpike/win95/dscript.exe
Stored alongside this software is a file called demon.scp which provides the basis for a suitable script for Demon customers. This script may also be adaptable for use with other Access providers as similar procedures are used by most Access providers.
We suggest you create a Win95 directory within your main Turnpike directory, dial up without a script, and use Turnpike's FTP program to copy these files to your TurnpikeWin95 directory. Then install the scripting tool and the script as described below.
To install the scripting tool
The first step is to extract the various component files that go to make up the Dial-Up Scripting Tool.
dscript.exe is a self-extracting .exe file, so just double-click the file to run it.
Next go to the Start menu and select Settings, Control Panel. Double-click on the Add/Remove Programs icon then, when the dialog appears, click on the Windows Setup tab, then click the Have disk button.
When the 'Install from disk' dialog appears, click the Browse button and select the rnaplus.inf file from your TurnpikeWin95 directory - then click OK. You will then see a panel containing the single entry Slip and Scripting for Dial-Up Networking. Tick the box beside this entry, then click Install
When you return to the Add/Remove Programs dialog, click OK
To install the supplied script
Open the Dial-Up Scripting Tool now shown in the Start | Programs | Accessories menu.
When the Dial-Up Scripting Tool dialog appears, check that the appropriate connection is selected, then use the Browse button to pick out the demon.scp file from your TurnpikeWin95 directory.
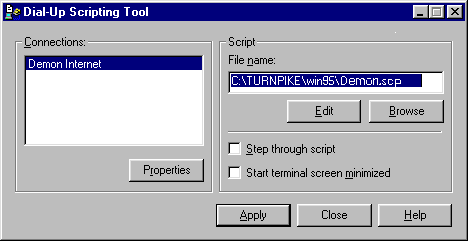
(If you want to see what is in this script or you expect to need to change it, click the Edit button when you return to the Dial-Up Scripting Tool dialog.)
Back in the Dial-Up Scripting Tool dialog, check that the option to Start terminal screen minimized isn't ticked, then click the Properties button underneath the list of connections. When the Connection Properties dialog appears, click the Configure button below the modem details, click the Options tab of the Modem Properties dialog and ensure that neither Bringup terminal window option is ticked.
When you've done this, click OK back to the Windows Desktop - pausing only to accept the offer to save the changes you've made to the connection if this is offered.
When you are ready to dial
Double-click the appropriate connection icon in your Dial-Up Networking folder as when dialling up without a script.
However, this time when the dialog appears, check that your username and password are entered in the slots provided before clicking the Connect button. (Note: These details may be filled in for you as your username is automatically saved while there's a special option to save your password.)
You should then go straight through to the 'Connected' dialog without any further intervention from you - at which point (if not earlier), you should run the Connect program and allow this to continue.
Further information about Turnpike is available on the Turnpike Home Page,
https://www.Turnpike.com
Turnpike, Dorking,
Fax: +44 1306 732325, Email: info@turnpike.com
|
Politica de confidentialitate | Termeni si conditii de utilizare |

Vizualizari: 927
Importanta: ![]()
Termeni si conditii de utilizare | Contact
© SCRIGROUP 2024 . All rights reserved