| CATEGORII DOCUMENTE |
| Bulgara | Ceha slovaca | Croata | Engleza | Estona | Finlandeza | Franceza |
| Germana | Italiana | Letona | Lituaniana | Maghiara | Olandeza | Poloneza |
| Sarba | Slovena | Spaniola | Suedeza | Turca | Ucraineana |
Introduction
Radiography involves the use of x-radiation and thus is potentially dangerous if mishandled. For your own sake, and that of the staff, patient, and public, it is essential that you gain adequate knowledge of radiographic techniques and radiation health and safety, prior to performing clinical procedures.
This course is intended to provide current, vital information on film and tube head placement, to serve as a guide to acquire new skills or refine current skills, and allow you to test yourself as you progress through the pages.
When you complete a continuing education course on the Dental ResourceNet, a form will come up that requests your name, address, etc. If you are a member of the AGD, make sure to fill out the field that asks for your AGD membership number (if you are not an AGD member, leave blank). When you hit submit, a copy of the 'proof of completion' is e-mailed directly to the AGD and P&G. For your records, make sure to print a copy of the 'proof of completion' certificate.
Overview
Radiography involves the use of x-radiation and thus is potentially dangerous if mishandled. For your own sake, and that of the staff, patient, and public, it is essential that you gain adequate knowledge of radiographic techniques and radiation health and safety, prior to performing clinical procedures.
This course is intended to provide current, vital information on film and tube head placement, to serve as a guide to acquire new skills or refine current skills, and allow you to test yourself as you progress through the pages
Learning Objectives
Upon the completion of this course, the dental professional will be able to:
Course Contents
Introduction
Radiography involves the use of x-radiation and thus is potentially dangerous if mishandled. For your own sake, and that of the staff, patient, and public, it is essential that you gain adequate knowledge of radiographic techniques and radiation health and safety, prior to performing clinical procedures.
This course is intended to provide current, vital information on film and tube head placement, to serve as a guide to acquire new skills or refine current skills, and allow you to test yourself as you progress through the pages.
Intraoral Procedures
Introduction
The intraoral radiograph, when correlated with the case history and clinical
examination, is one of the most important diagnostic aids available to the
dental practitioner. When examined under proper conditions,
diagnostic-quality intraoral radiographs reveal evidence of disease that cannot
otherwise be found. They also play a major role in forensic identification.
Two of the fundamental rules of radiography are that 1) the central beam should pass through the area to be examined, and 2) the x-ray film should be placed in position so as to record the image with the least amount of image distortion. Each of three types of intraoral radiologic examinations commonly used in dental practiceperiapical, bitewing (interproximal), and occlusal examinationsdepend on the operators adherence to these two rules even though specific techniques, processes, and indications differ widely among them.
Another aspect that these three examinations have in common pertains to the film packet. The film packet has two sides, a tube side and a tongue side. The tube side may be plain or textured. When placed intraorally, the tube side always faces the radiation source, the tube head. The tongue side may be colored and has a flange to open the packet and remove the film. When placed intraorally, the tongue side always faces the patients tongue, except in the case of the mandibular occlusal examination.
Because of patient anatomic variations such as narrow arches, missing teeth, or the presence of tori, and limitations of the patients ability to open sufficiently (caused by age or other factors), or maintain the film placement, a clinical examination must precede the taking of films. After the clinical examination, the operator can determine the number and size of films to expose, the technique modifications necessary, and the type of film retention devices to be employed.
Advancements are continually being made in the development and manufacturing of the actual film packet. These advancements have helped to decrease radiation exposure. Whenever possible the 'fastest' film speed should be used.
Periapical Radiographs
The purpose of the intraoral periapical examination is
to obtain a view of the entire tooth and its surrounding structures, as in
Figure 1. Two exposure techniques may be employed for periapical
radiography: the paralleling technique and the bisecting angle technique.
The paralleling technique is the preferred method. This technique
provides less image distortion and reduces excess radiation to the
patient. The paralleling technique should always be attempted before
other techniques. The bisecting technique can be employed for patients
unable to accommodate the positioning of the paralleling technique.
Candidates may include those with low palatal vaults and children.
Disadvantages to the bisecting technique include image distortion and excess
radiation due to increased angulations involving the eye and thyroid
glands. Regardless of the technique, however, the rules of radiography
referred to earlier must be followed.
Figure 1
Intraoral Procedures
Bitewing
Radiographs
Bitewing examinations were introduced by Raper in 1925. The greatest
value of bitewing radiographs is the detection of interproximal caries in the
early stages of development, before it is clinically apparent. The arrows
in Figure 2 indicate areas of interproximal caries. Bitewing projections
also reveal the size of the pulp chamber and the relative extent to which
proximal caries have penetrated.
Bitewings also provide a useful adjunct to evaluating periodontal conditions, offer a good view of the septal alveolar crest, and, in addition, permit changes in bone height to be accurately assessed by comparison with adjacent teeth. Bitewings do not show the apices of the teeth and cannot be used to diagnose in this area.
Figure 2
Occlusal
Radiographs
Occlusal radiography is a supplementary radiographic examination designed to
provide a more extensive view of the maxilla and mandible (Figure 3).
Figure 3
The occlusal radiograph is very useful in determining the buccolingual extension of pathologic conditions, and provides additional information as to the extent and displacement of fractures of the mandible and maxilla. Occlusals also aid in localizing unerupted teeth, retained roots, foreign bodies, and calculi in the submandibular and sublingual salivary glands and ducts. It should be noted that when imaging soft tissues exposure time needs to be appropriately reduced.
Dentulous
Adult Survey
The number of films needed for a full mouth series
varies greatly. Some practitioners may prefer 10 films, while others may
prefer 18, 20 or more exposures.
The selection of film sizes used in a full mouth series also varies. A full survey can consist of narrow anterior film (size #1); standard adult film (size #2); #2 bitewing film or long bitewing film (size #3), (Figure 4) and may include anterior bitewings. It is generally recommended to use 20 films --- four bitewings and 16 periapicals. Eight anterior #1 films will allow for ease of film placement on patients with narrow palates. However, in some cases six anterior periapicals will cover the area needed.
Edentulous
Adult Survey
By definition, an edentulous patient is one without the natural dentition, and
a partially edentulous patient is one who retains some, but not all of the
natural dentition. Merely because a patients clinical exam reveals an
edentulous state does not disqualify him or her from diagnostic radiographic
examination. In fact, it is commonly accepted that certain areas of the
patients jaws may contain tooth roots or impacted teeth. Residual
infection, tumors, cysts, or related pathology may also be found, which, while
not visible to the clinician, would hinder the effectiveness and comfort of an
appliance such as a denture and could potentially cause life threatening conditions
to the patient. In addition to the hidden pathology mentioned above,
edentulous surveys reveal the position of the foramina and the type of bone
present.
In the case of the partially edentulous patient, placement of the film holding device may be complicated by its tendency to tip or slip into the voids which would normally be occupied by the crowns of the missing teeth. This can usually be overcome by placing cotton rolls between the patients alveolar ridge and the film holder, thereby supporting the film holding device in position.
A 14 or 16 film intraoral periapical survey will usually examine the tooth bearing region in most edentulous patients (Figure 7). Bitewings are not needed because there are no interproximal areas to be examined.
The use of film holders allow the paralleling technique to be used with edentulous patients. The operator may be able to reduce radiation exposure in the edentulous patient by 25% by using the paralleling technique. The film can be held in biteblocks to which cotton rolls have been taped. To prevent patient discomfort on biting due to missing teeth and resultant over-closing of the arches, the cotton rolls can be attached to the upper and lower surfaces of the biteblocks. Opposing arch denture or partial denture appliances can be left in place to make contact with the biteblock.
The radiographic film should be positioned with approximately one-third of the films vertical dimension protruding beyond the alveolar ridge; that is, the radiographic image should occupy two-thirds of the film. The horizontal angulation of the central beam is perpendicular to the film in the horizontal plane. If bisecting, the vertical angulation of the central beam is much increased for an edentulous patient with minimal ridges. The film placement may be similar to that of an occlusal film, and this flat film placement is the principal cause of dimensional distortion. To determine vertical angulation it is necessary to estimate the long axis of the ridge instead of the tooth.
Intraoral Procedures
Mixed Dentition Survey
The full mouth survey for pediatric patients may vary, depending on the
patients age, eruption pattern, behavior, and the size of the childs mouth.
In the six to nine-year-old group, a 12 film survey, using #1 narrow film is
recommended, and would include:
An adult-sized periapical film is used in the posterior region if the childs first permanent molar is fully developed. The size of the tooth requires the use of a large periapical film to capture the complete image.
Pre-School Child Survey
Since pre-school children have smaller mouths, reduced size pediatric films
(film size #0) are used to examine the posterior teeth, and adult films are
used for anterior examinations in children who have only primary (deciduous or
'baby') teeth. For this group, an eight film survey is
recommended.
The paralleling technique should be used whenever possible. This technique delivers the lowest dose of radiation possible. The bisecting angle technique is a viable alternative for pediatric radiography because the apices of the permanent molar teeth tend to lie above the palate and below the floor of the mouth in the undeveloped mandible. These positions prevent the image of the apices of the teeth from being projected into the oral cavity when the x-ray beam is perpendicular to the long axis of the teeth as it is when using the paralleling technique.
Quiz
Answers
Paralleling Technique
Basic
Principles
The paralleling technique of intraoral radiography was developed by Gordon M.
Fitzgerald, and is so named because the object (tooth), receptor (film packet),
and end of the position indicating device (PID) are all kept on parallel
planes. Its basis lies in the principle that image sharpness is primarily
affected by focal-film distance (distance from the focal spot within the tube
head and the film), object-film distance, motion, and the effective size of the
focal spot of the x-ray tube.
Successfully using the paralleling technique depends largely on maintaining certain essential conditions as illustrated in Figure 8. These are: 1) the film packet should be flat; 2) the film packet must be positioned parallel to the long axis of the teeth; and 3) the central ray of the x-ray beam must be kept perpendicular to the teeth and film.
Figure 8
To achieve parallelism between the film and tooth (i.e., to avoid bending or angling the film) there must be space between the object and film. However, remember that as the object-to-film distance increases, the image magnification or distortion also increases. To compensate, manufacturers are recessing the target (focal spot) into the back of the tube head. Depending on the machine's age, and placement of the focal spot within the tube head, you may encounter long, medium, or short cones/PIDs. The goal is to have the focal spot at least 12' or 30 cm from the film to reduce image distortion.
The anatomic configuration of the oral cavity determines the distance needed between film and object and varies among individuals. However, even under difficult conditions, a diagnostic quality radiograph can be obtained provided that the film packet is not more than 20 degrees out of parallel with the tooth, and that the face of the PID/cone is exactly parallel to the film packet to produce a central beam which is perpendicular to the long axis of the tooth and the film packet.
The major advantage of the paralleling technique, when done correctly, is that the image formed on the film will have both linear and dimensional accuracy. The major disadvantages are the difficulty in placing the film packet and the relative discomfort the patient must endure as a result of the film holding devices used to maintain parallelism. The latter is particularly acute in patients with small mouths and in children. In certain circumstances the film and holder may be slightly tipped toward the palate to accommodate oral space and patient comfort. Too much palatal tipping will throw off all parallel planes.
Paralleling Technique
Beam Angulation
The position of the x-ray tube head is usually adjusted in two directions:
vertically and horizontally. The vertical plane is adjusted by moving the
tube head up and down. The horizontal plane is adjusted by moving the
tube head from side to side. By convention, deflecting the head so that
it points downward is described as positive vertical angulation or +
vertical. Correspondingly, an upward deflection is referred to as
negative vertical angulation or - vertical (Figure 9). The degree of
vertical angulation is usually described in terms of plus or minus degrees as
measured by a dial on the side of the tube head.
Figure 9
When applying the paralleling technique, the vertical angulation is ALWAYS dictated to maintaining the parallel plane. There is no set degree number to follow. As stated earlier under basic principles, the object (tooth), receptor (film packet), and end of the position indicating device (PID) are all kept on parallel planes. If the vertical angulation is excessive the image will appear foreshortened. Insufficient vertical angulation procedures an elongated image.
The beams horizontal direction determines the degree of overlap among the tooth images at the interproximal spaces. If the beam is not perpendicular to the specific interproximal space(s) as it approaches several relatively aligned objects, the objects overlap and the space(s) between them close. Imagine a flashlight beam approaching a picket fence perpendicularly at a 90-degree angle. The spaces between the pickets will remain open in the shadow image unless the beam angle varies from perpendicular or 90 degrees. The degree of overlapping of the image will increase or decrease as the beam angle increases or decreases from the perpendicular.
Film Holding Devices
The paralleling technique requires the use of film
holding devices to maintain the relatively precise positioning needed. A
great variety of film holders are commercially availablesimple, complex,
light, heavy, reusable, disposable, autoclavable, and non-autoclavable. A
few of the more common include XCP (extension cone paralleling) with localizing
rings, Snap-a-ray, Precision rectangular paralleling device, Uni-Bite, and
Stabe biteblock (Figure 10 and 11). Having several options available will
provide the operator different opportunities for enhanced patient
comfort. It is not uncommon to employ more than one option during the
same radiographic survey.
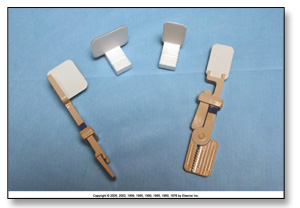
Figure 10
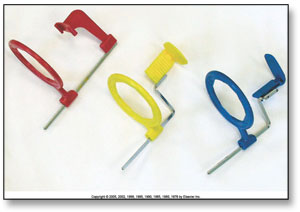
Figure 11
The dental radiographer should be able to assess which holder best conforms to the technical and diagnostic requirements of the job, the needs of the patient, and infection control protocols within the office.
(Table 1: Paralleling - Exposure Guide and Film Placement - Helpful hints when utilizing Stabe or Snap-a-ray film holders)
|
Politica de confidentialitate | Termeni si conditii de utilizare |

Vizualizari: 6793
Importanta: ![]()
Termeni si conditii de utilizare | Contact
© SCRIGROUP 2024 . All rights reserved