|
This is one of my favorite areas of photography, simply because
each time you head out to make photos, it's like a mini-adventure. You never
know what you'll find or what kind of pictures you'll come home with. So many
items are variables that you can't control, from the weather to road
construction. It's a creative challenge to produce the best images you can,
no matter what the circumstances.
Landscape,
Nature and Travel - What's The Difference?
The terms 'landscape photography', 'nature photography'
and 'travel photography' tend to get lumped together (sort of like
I'm doing in this lesson) but they're all quite different ways of looking at
the earth we live on and our perceptions of it.
Landscapes, as a general rule, tend to feature grand, sweeping views of the
land, whole cities or buildings, bodies of water and sky. They might feature
some interesting object in the foreground - fences, flowers, park benches or
just about anything - but the actual subject of the photograph is the
landscape itself. They tend to be generic in the sense that they don't
provide a 'flavor' of a specific local culture. A beautiful desert
scene could be taken in the United States
or Africa, but unless you as the viewer are
familiar with the specific area, the overall feeling of the photograph is
simply that of a dry, arid landscape.
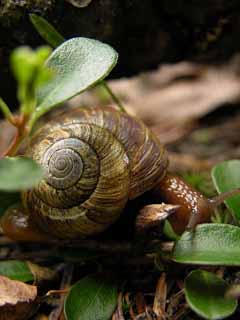
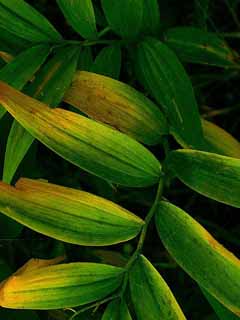
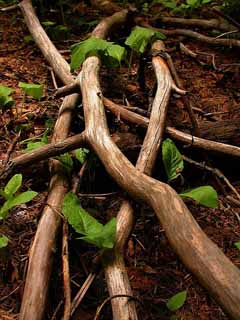
Nature photography covers a broad spectrum of categories from animals in the
wild to detailed shots of flora and fauna - there is usually an actual
subject to focus in on when taking nature photography.
Travel photography can be a combination of landscapes, nature and several
other things. When you go on a trip, you want to take photographs that really
capture the essence of the place you've been. Not just beautiful landscapes
and cityscapes, but perhaps details of architecture that are unique to the
place you're visiting or images that capture the particular culture of the
people, whether it be through photos of food, customs, clothing or any other
particular man-made influences on the area. Travel photography is both
important for sentimental reasons when you've been on a wonderful trip and
also a big seller in the travel publishing industry.
 The Lens The Lens
Ask most people to name a true master of landscape photography and time and
again you will get the answer 'Ansel Adams'. If you ever get to see
a 'real' print made by Adams himself, you will be stunned beyond
your wildest imagination. No reproduction of his work in a book or any print
made by mass-production processes can come close to the magic he could work
in a darkroom, making images by using his famous and complex 'zone
system' for black and white photography. That being said, he had a
wonderful eye for capturing the landscape - for making his vision come to
life through his camera's lens. But ask him to tell you how he did it and
he'd answer, 'There are no rules for good photographs, there are only
good photographs.'
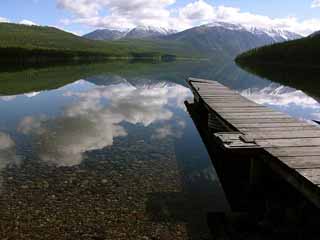
Back in our lesson on lenses, I recommended a wide-angle lens for landscape
photography. The wider, the better, really. This is because a large part of
the horizon can be shown in the photograph and a large part of the foreground
can be included as well. Including the foreground really makes the viewer
feel like they're standing there. The wider the angle of the lens, the more
you can exaggerate the effect, because you can capture the scene in front of
you right up to your toes (or the front legs of your tripod, which I've
oftentimes accidentally captured in my landscape photographs.) If you use
your lens in this manner, it can give great depth to a photograph. Likewise,
if you place the horizon at the bottom of your photo's frame, you can add
great depth to the sky by including interesting clouds all the way up to
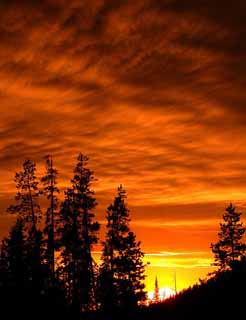
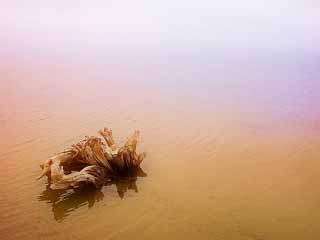
those above your head. The following photo is a successful example of using a
wide-angle lens to capture a dramatic landscape.
 When
using a wide-angle lens, it can be fun to get down close to the ground and
have some sort of object near you, like in the following picture I took in a
ghost town in Montana.
The old wagon wheel adds a feeling that takes you back in time - much more so
than a straight-on shot of the building would have done. When
using a wide-angle lens, it can be fun to get down close to the ground and
have some sort of object near you, like in the following picture I took in a
ghost town in Montana.
The old wagon wheel adds a feeling that takes you back in time - much more so
than a straight-on shot of the building would have done.
This technique is particularly popular for travel photography. I've seen
pictures that sum up the whole feeling of being in the wine region of France by
showing a glass of wine on a table with a corkscrew, overlooking a vineyard.
The combination of a successful landscape shot with an element specific to
the place being photographed will bring back wonderful memories for you for
many years to come. This sort of shot is also in high demand among publishers
of travel material.
|
|
When The Weather Is Bad
Rain
Okay, so yesterday's weather report forecasted blue skies with bright,
fluffy, white clouds. You got your camera equipment ready, set the alarm for
some ridiculous hour and got up bright and early to go take the most amazing
landscape photos ever. But what's that noise? Raindrops hitting your rooftop?
You look out the window and see rain pouring down that doesn't show any sign
of stopping. Don't despair! Go back to bed, sleep in and when you wake up you
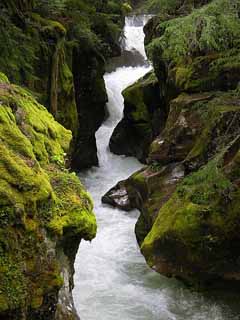
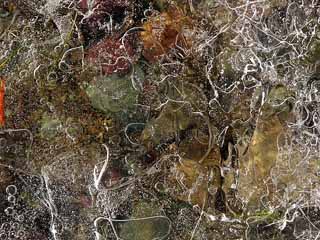
can STILL go out and get some of the most amazing photos ever. Head for
either a wooded area or somewhere with some sort of a body of water. Rich,
saturated colors will spring to life, no matter whether it's spring, summer
or autumn. The darkness of the day will allow you slower shutter speeds to
expose really nicely for flowing water without getting too many distracting
specular highlights. The following images were taken on freezing, rainy days
when most people would never dream of trying landscape or nature photography.
Some guidelines need to be applied when shooting in the rain, however. Take
an umbrella - if you can rig up some sort of stand for one so it will shelter
you while you're taking photographs, all the better.
Make sure you have a way to keep your camera dry at all times. Water dripping
off leaves above you can really be irritating when it comes down on your
camera lens, so always have your lens cap on unless you're actively taking a
photograph. Even then, make sure you have a clean, soft, dry cloth in a
waterproof container that you can use to wipe off any water drops you do get
on your lens.
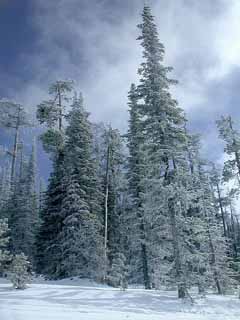
Snow and ice can make for some AMAZING photographic opportunities, but they
also present a myriad of challenges to the photographer.
|
 Snow
And Ice Snow
And Ice
First of all, there are the extreme temperatures you may be dealing with.
Cameras (especially digital cameras with their LCDs) are built to work
within specific temperature ranges. You'll find the same thing with
batteries - cold weather will wear them out extremely quickly. I've been
known to remove my camera's batteries and keep them in my pockets to stay
warm from body heat so that they're warm while I take pictures. You may
prolong your battery's life by several photographs by doing this. If I'm
shooting digitally - which I do on a regular basis at this point - I
sometimes keep the camera on a strap around my neck and tucked into my coat
to keep the whole thing from freezing temperatures. You can also buy those
nylon-covered foam insulated lunch coolers in various sizes. If you cut
slits inside in the nylon, they will hold those little hand warmers you can
buy that contain iron filings and stay warm for many hours. This is another
good way to lug your camera and batteries around out in the cold without
having to worry about the elements damaging your hardware. Those hand
warmers can get quite hot, so figuring out a way to keep them inside of the
bag and actually away from the camera itself is a must. Always check your
camera manufacturer's recommendations on what temperature ranges are okay
for operating your camera before heading out into the winter weather.
|
|

|
|
 The
second challenge you'll run into photographing outdoors in the winter is
the bright whites that will trick the light meter in your camera. Your
camera's metering system looks at your picture and sort of scrambles up all
of the shades of light. Then it tells your camera to expose so that overall
you have a 'mid grey'. That tends to work really well when you're
photographing normal subjects that have a wide range of colors from black
to white, but when you're taking a picture of a snowy scene, your camera
will tell you to expose so that the white turns out grey. Ugh. To
compensate for this, you'll want to actually overexpose by one or two stops
to get really 'white' snow. You'll have to experiment and make
notes while shooting to find the perfect exposure for your particular
camera. The
second challenge you'll run into photographing outdoors in the winter is
the bright whites that will trick the light meter in your camera. Your
camera's metering system looks at your picture and sort of scrambles up all
of the shades of light. Then it tells your camera to expose so that overall
you have a 'mid grey'. That tends to work really well when you're
photographing normal subjects that have a wide range of colors from black
to white, but when you're taking a picture of a snowy scene, your camera
will tell you to expose so that the white turns out grey. Ugh. To
compensate for this, you'll want to actually overexpose by one or two stops
to get really 'white' snow. You'll have to experiment and make
notes while shooting to find the perfect exposure for your particular
camera.
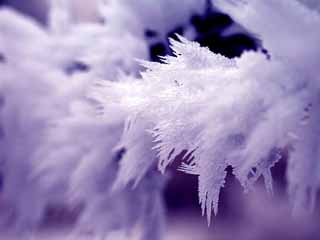
If you can get up early before the sun rises and things start to melt, you can
capture all sorts of beautiful images on a frosty morning. The following
image was taken of a barbed wire fence that was completely covered in
hoarfrost. A deep blue filter was used to emphasize the feeling of cold.
You can get amazing pictures of leaves, blades of grass, spider webs and
all sorts of other ornate natural objects if you make it out before the sun
melts the frost.
|
|
|
The
Panorama
Panoramic images are a specialty area of photography that can be a lot of
fun. There are cameras that you can buy that will let you use regular 35-mm
and take either regular 35-mm format shots or panoramic images. These are
quite versatile and can be useful if panoramic photography is an area that
you are interested in exploring. If you use a digital camera, there are quite
affordable software programs you can buy that will let you stitch several
images together into a panorama. If you choose to go this route, there are a
couple of things you'll need keep in mind. You'll
need a tripod with a head that will let you pan the camera from side to side,
while keeping the camera perfectly level. When stitching photos together,
having them line up perfectly is the most important element. Also, you'll
need to set your camera's settings manually, and look at each 'frame'
that you're going to expose using those settings. If you have a spot that's
darker or lighter than the rest of the series and use automatic settings on
your camera, you'll wind up with a panorama that fades from dark to light and
back again, making a visually unsettling photograph. I highly suggest trying
this - it's fun!
Wildlife Photography
Back in our discussion on lenses, I recommended a very good long lens if you
plan on doing a lot of wildlife photography. I also recommend large
quantities of patience and a willingness to sit in perhaps very uncomfortable
positions for hours on end without moving.
Following is my most popular wildlife photograph.
 Well,
it's my only wildlife photograph, unless you count ducks and geese in the
city park. Oh, and there was the time the moose was running down the road in
front of my vehicle and I got a picture of its rear end. I live in an area
renowned for amazing wildlife and I have seen wolves, grizzly and black
bears, mountain lions, bald eagles, elk, mountain goats and bighorn sheep
numerous times in the wild. But photographing them is another story all
together. I simply don't have the patience to sit in a stand all day hoping
the elusive animal will come by and pose for me. So when I see a beautiful
wild animal, I sit back and simply appreciate it, rather than grabbing for my
photo equipment. Well,
it's my only wildlife photograph, unless you count ducks and geese in the
city park. Oh, and there was the time the moose was running down the road in
front of my vehicle and I got a picture of its rear end. I live in an area
renowned for amazing wildlife and I have seen wolves, grizzly and black
bears, mountain lions, bald eagles, elk, mountain goats and bighorn sheep
numerous times in the wild. But photographing them is another story all
together. I simply don't have the patience to sit in a stand all day hoping
the elusive animal will come by and pose for me. So when I see a beautiful
wild animal, I sit back and simply appreciate it, rather than grabbing for my
photo equipment.
Having said that, I can still offer some tips on wildlife photography, for
those of you who are interested.
One of the most important things that makes a good
wildlife photo is when you can really fill your frame with your subject -
hence the recommendation for a long lens. Those two polar bears up on the
mountainside don't make that great of a picture if they're just tiny white
dots in the upper left hand corner.
Make sure you have your focus set on the animal's eye. No matter if the water
buffalo are doing a hula dance complete with grass skirts and coconut bikini tops, if the eyes are out of focus, it's a distraction
that will keep your photo from being all it can be. Because animals move, I'd
recommend no slower than a 1/250 second shutter speed to eliminate blur.
If you're lucky enough to live in an area with a zoo, this is a good place
for a beginner to practice wildlife photography. Some of the serious wildlife
photographers I know - those who make their own ghillie suits and lie
motionless in the bushes awaiting that rare shot of the Ring-Necked African
Brush Penguin for 27 hours or more at a stretch - will scoff at this idea
because it's not 'real' wildlife photography. Also, many wildlife
publications refuse to publish photos of animals that are taken in captivity.
However, if I lived near such a wonderful opportunity, you can be sure I'd
take advantage of it. If you do have such an opportunity, make sure and check
with the officials at the zoo first and find out any rules and restrictions
they may have about photographing the animals.
One interesting thing to note is that if your subject is behind a wire mesh
screen (like birds in many zoos' aviary areas), you can put your lens right
up next to the screen, open up your aperture, zoom in and focus tightly on
the subject and the depth of field will completely eliminate the screen in
your final shot. Similarly, with animals behind glass, rather than using a
polarizer, you can put your lens up directly to the glass and it will eliminate
any glare. I'd recommend not using your camera's flash so that you don't
disturb the animals.
If you are ready to venture out into the outdoors to photograph your
subjects, the best advice I can offer is to research your subjects and the
location thoroughly. Go to the spot you plan on taking photographs several
times, at different times of day, to see what kind of lighting the area gets
and when animals frequent the area. Getting out early to get the best light
on the actual day you plan to shoot will benefit you and make for great
photographs. You can shoot all morning, and when the sun gets to the high point in the sky
where the light has become harsh and is making ugly, dark shadows that don't
work well in photography, use that time to move to a different location for
an evening shoot.
Wildlife photography can produce some of the most eye-catching shots you'll
ever see. I have enormous respect for those photographers who come back from
safaris to places unknown with rolls and rolls of film containing dramatic
images that took so much hard work to get. If that's what you're interested
in and you have the same resolve, there's no doubt you can be successful
making the same sorts of photographs.
Tips
On Travel Photography
If you're traveling via air, the first thing to
consider is x-ray equipment and film. If you've gone digital, you don't need
to worry about x-ray equipment, but in the case that you're carrying a dozen
or a hundred rolls of film in anticipation of a rewarding photo excursion,
here are some thoughts to consider.
X-ray equipment can cause something called 'fogging' on your film.
I've seen it and it's not pretty. It generally appears as bands that run
across your pictures - dark bands on negative film and light bands on
positive (slide) film. The faster speed film you are using, the more
pronounced the effects of x-ray equipment will be.
So what do you do? First, the easiest way to travel used to be to put your
film in your checked luggage, as checked luggage was rarely, if ever, x-rayed.
Security concerns with increased terrorism threats in the world have put an
end to this process. Now checked baggage is run through a very strong x-ray
process that can permanently damage your unprocessed film. I highly suggest
taking any film with you onto the plane with your carry-on luggage. There's a
bit of debate about how strong the x-ray machines are that your carry-on
baggage goes through and whether or not they will damage your film. Chances
are if you're only going through one or two terminals, you won't have any
problems. But the effects of x-ray equipment on film are cumulative, so if
you have several layovers, change planes and have to go through numerous
gates on your voyage, you might be exposing your precious images to damage.
The airlines offer hand-inspection rather than x-rays, which might be a good
thing to consider if your journey is a complicated one with lots of stops.
Always remember to be polite when asking for such an inspection - the airline
inspectors are doing their jobs to the best of their abilities. Their jobs
don't pay particularly well, nor are their jobs particularly fun, so the last
thing you need is to make an enemy of a tired airline baggage inspector at
the end of a grueling 10-hour shift when his or her feet hurt. 'I am a
photographer, please hand-inspect my film and camera' will get you a lot
further than some of the approaches I've heard of people taking with these
employees. Also, non-US airports may not honor this sort of request,
according to their country's rules. If you do plan to request a
hand-inspection of your film, make sure and arrive early, as this type of
inspection takes more time than a quick run-through at the x-ray machine. You
can also get film that comes in clear plastic containers, rather than the
dark black ones. This makes it easier for the inspectors to see what's inside
each canister, rather than having to open each one to make sure it's not
packed full of hazardous material.
All right, now you're actually on the plane and on your way to your
destination. Don't forget taking photos out the airplane window! An overhead
view of the city or scenic areas you pass as you're on your way there will
bring back enjoyable memories in the future. Just like we discussed with
photography at the zoo, taking pictures through glass can cause disturbing
reflections, so get your lens as close to the glass as possible, and use your
hand or anything else you can to create a cover to eliminate the reflections.
Interestingly enough, that thick glass in airplane windows is polarized
already, so if you use a polarizing filter on your camera, the two pieces of
polarized glass will work against each other and cause weird rainbow-like
effects. You can use a wide-angle lens to capture the wing of the airplane
against puffy blue clouds, or a telephoto lens to capture an aerial view of
the city you're approaching without getting any portion of the airplane in
the shot. If you're stuck with glass that's dirty, there's not much you can
do about it, of course. Enjoy the ride and pay attention to what you can see
- maybe on your return trip you'll have better luck!
 I'd
advise against taking photographs of the actual
airport and runway as you approach or leave, however, unless you've discussed
it with the flight crew, first. I've heard of people becoming quite
suspicious of photographers taking such pictures in today's world of high
security. Unless you have a need for such a picture, I'd skip it and just
settle in for landing and take-off like everyone else. I'd
advise against taking photographs of the actual
airport and runway as you approach or leave, however, unless you've discussed
it with the flight crew, first. I've heard of people becoming quite
suspicious of photographers taking such pictures in today's world of high
security. Unless you have a need for such a picture, I'd skip it and just
settle in for landing and take-off like everyone else.
Okay! Whew! Now that you've arrived at your destination, what more is there
to say about travel photography? One good idea is to get up early to take
photos of your destination. You'll find fewer tourists at popular
destinations and you may have a better chance at getting closer to your
subjects and not having people in the actual image. Also, if you're not a
professional photographer, this can be a good way to get the day's shooting
done so that you can still enjoy the traveling time with your companions or
family.
|

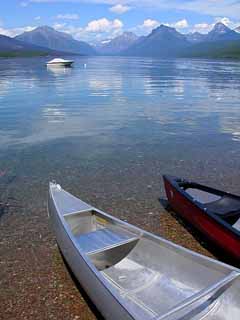 The
same idea is employed here with the boats on the lakeshore. While being a
lovely landscape shot, the boats being up front that grab your attention and
the boat out in the water suggest an adventure awaits the viewer.
The
same idea is employed here with the boats on the lakeshore. While being a
lovely landscape shot, the boats being up front that grab your attention and
the boat out in the water suggest an adventure awaits the viewer.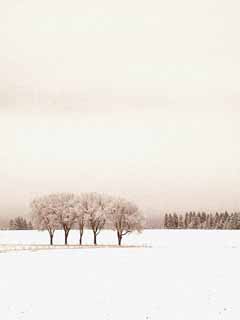 But
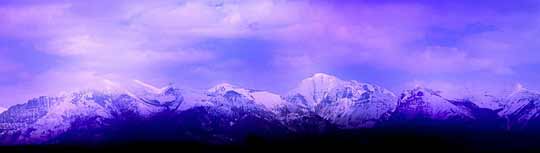
what about a telephoto lens? What if that's all you have? Does that mean you
can't take a good landscape photo? No, not at all. (Refer to the quote by Mr.
Adams, above.) Just because one thing is 'recommended', that
doesn't mean at all that there's no use for another. The picture of the storm
in lesson one was taken with a telephoto lens and includes very little
foreground. That photo has been purchased many times over and even used by
Kodak. This is another image I took one winter using a telephone lens.
But
what about a telephoto lens? What if that's all you have? Does that mean you
can't take a good landscape photo? No, not at all. (Refer to the quote by Mr.
Adams, above.) Just because one thing is 'recommended', that
doesn't mean at all that there's no use for another. The picture of the storm
in lesson one was taken with a telephoto lens and includes very little
foreground. That photo has been purchased many times over and even used by
Kodak. This is another image I took one winter using a telephone lens.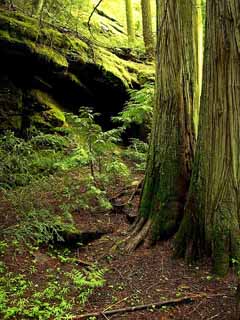
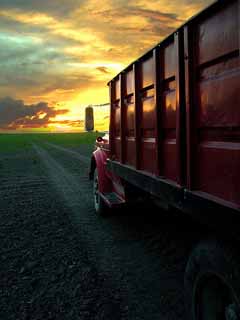 If
you have a digital camera, are using a tripod, and know how to overlay photos
using digital software, here's another thing to try. Take one picture exposed
for the sky and a second picture exposed for your foreground. Then lay the
two correctly exposed parts of the image out together using your imaging
software. I used that technique in the following picture and it really made a
dramatic shot of what would have been a nightmare of an exposure situation,
otherwise. It was extremely dark out and the ground and truck required a full
two second exposure that would never have worked on the sky. But the two
pictures worked out very well together after being combined.
If
you have a digital camera, are using a tripod, and know how to overlay photos
using digital software, here's another thing to try. Take one picture exposed
for the sky and a second picture exposed for your foreground. Then lay the
two correctly exposed parts of the image out together using your imaging
software. I used that technique in the following picture and it really made a
dramatic shot of what would have been a nightmare of an exposure situation,
otherwise. It was extremely dark out and the ground and truck required a full
two second exposure that would never have worked on the sky. But the two
pictures worked out very well together after being combined. 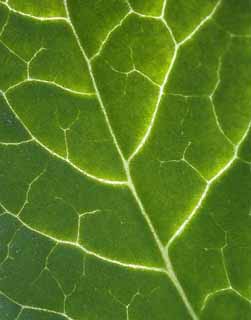
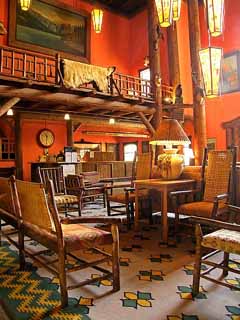
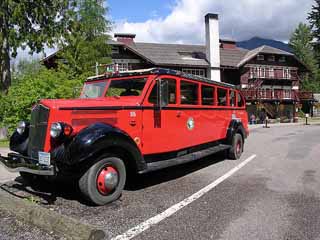 Don't
forget to take pictures of places you stay and restaurants you eat in, if the
dcor is particularly interesting. The picture above was taken at a lodge in
Don't
forget to take pictures of places you stay and restaurants you eat in, if the
dcor is particularly interesting. The picture above was taken at a lodge in