|
Studio Lighting - Still Life and Product Photography
Now that you all have a grasp on basic lighting setups, we'll plunge a
little further into more detail, talking about still life and product
photography. This is the area of photography that I personally enjoy the
most. It takes up very little room and the limits of your creativity are
the only limits that you have.
|
|
|

|
|
Equipment
You've already got your lighting equipment instructions as we set up in
lesson seven. In this lesson we'll go a little further into how to use that
lighting effectively, especially for hard-to-light subjects, but first we'll
talk about the one element that can make or break your photo: the background.
When you're shooting still life photography, the background is as important
as your subject, believe it or not.
The
Black Background
|
|
|
|
The first type of background I'd recommend
experimenting with is the solid black background. When you use this approach,
you simplify your setup because the black material absorbs all of the light
hitting it, which means that you can set up your lights specifically for your
subject matter and you won't get any distracting reflections or uneven
lighting in the background that will compete for the viewer's attention.
Plus, you get that really cool sort of 'floating-in-outer-space'
effect as a bonus.
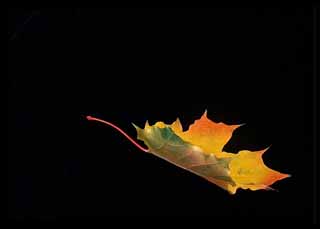
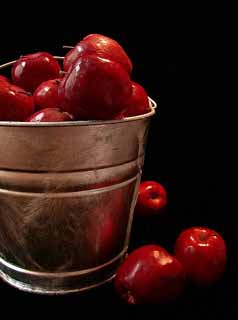
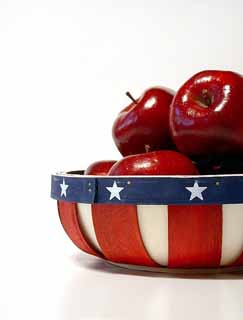
The photo of the apples was taken using a light above and to the right of the
camera and a piece of gold foil as a reflector on the left and in front of
the subject to bounce a nice warm light back and fill in any shadows. The
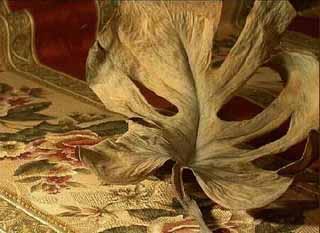
photo of the leaf was taken using ambient light. I laid the leaf on the
background and tilted the camera to give the impression that the leaf was
falling through space.
So how do you achieve this effect? Many people think that they can just take
any old piece of black fabric and drape it over something to provide a nice
black background. Not so! You'll be hard pressed to find regular black fabric
that won't reflect at least some light, showing wrinkles and folds in the
fabric and such. Black velvet material is what you need. In the last lesson I
sent you to the hardware store for equipment. Now it's time to go to the
fabric store. You'll find black velvet in varying thicknesses and densities.
The thicker, the better, as thicker material will act as a sponge and really
absorb much more light. I have a large piece that's about two and a half
yards long that I use for my tabletop photography when I need a solid black
background. Velvet tends to be fairly expensive by the yard, but fabric
stores tend to have big sales every so often, and if you can get it for a
decent price, you'll find it's a worthwhile investment. I've had mine for
years and as long as you take care of it by keeping it clean and not leaving
heavy things setting on it for too long to crush indentations into it, you
should never need to replace it.
In this case, setting up your background is very easy. You simply need a
clean table for your subject and a sturdy board of some sort to set up at a
90 degree angle to act as a backboard. You can then clamp your black velvet
so it hangs down nicely and lay it out over your table, then proceed to light
and photograph your subject.
|
|
 I
have a frame built from 2-inch by 2-inch boards similar to this diagram. It
works well for all kinds of lighting setups. In the case of the black velvet,
I can simply clip it on at the top and then down each side to hold it in
place. Many times I want to place my subjects on a translucent material so I
can light them from behind or below (we'll get to that part a little later),
so this is ideal. I can take out the bottom horizontal piece in that case so
it doesn't show up in the photo, and then put it back in for sturdiness when
I'm done. It props up on its side in the corner so it doesn't take up any
space and is just about the handiest piece of photo equipment that I have! I
have a frame built from 2-inch by 2-inch boards similar to this diagram. It
works well for all kinds of lighting setups. In the case of the black velvet,
I can simply clip it on at the top and then down each side to hold it in
place. Many times I want to place my subjects on a translucent material so I
can light them from behind or below (we'll get to that part a little later),
so this is ideal. I can take out the bottom horizontal piece in that case so
it doesn't show up in the photo, and then put it back in for sturdiness when
I'm done. It props up on its side in the corner so it doesn't take up any
space and is just about the handiest piece of photo equipment that I have!
|
|
The White Background
Another popular - and more advanced - background used in tabletop photography
is the white background. There are a couple of ways to go about achieving a
nice white background.
 Normally
when you want a white background, the idea is that you want to really show
off your subject and you don't want anything at all to distract the viewer's
eye. The best way to do this is by using what's referred to as a
'seamless background'. For photographing small objects in still
life photography, and easy and inexpensive way to do this is by using plain
old posterboard. It tends to work better than fabric because there are no
textures to worry about dealing with, and one side is shiny while the other
is matte, meaning you can control how much light you want bouncing around off
of your background. Normally
when you want a white background, the idea is that you want to really show
off your subject and you don't want anything at all to distract the viewer's
eye. The best way to do this is by using what's referred to as a
'seamless background'. For photographing small objects in still
life photography, and easy and inexpensive way to do this is by using plain
old posterboard. It tends to work better than fabric because there are no
textures to worry about dealing with, and one side is shiny while the other
is matte, meaning you can control how much light you want bouncing around off
of your background.
Simply prop your posterboard up as in this diagram. Then set up your lighting
for your subject and photograph til your heart's content. When I use this
kind of a setup, I usually put my key light to one side, slightly above the
subject, a fill light to the other side a bit lower and use a reflector to
bounce light back and fill in any shadows. To get a REALLY white background,
you'll need to be very careful about your exposure and your white balance.
You can bracket your shots a bit, but you'll want to make sure and set your
camera to meter off of your subject, NOT your background. If the camera takes
in its light reading from the background, it will try and set that white to
be an ever-so-undesirable shade of gray and your subject will wind up
underexposed. (Sort of like when we talked about photographing snow a few
lessons back.)
|
|
 The
posterboard background was used to make this image. One thing you'll notice,
however, is the heavy shadow directly underneath the ducks. This shot was lit
with those shadows in mind to give the viewer the feeling that the ducks are
really 'sitting' in this huge field of white and to add perspective
to the image. The depth of field adds to the perspective even further. I used
the matte side of the white posterboard in the case, and I could have made
another interesting effect by using the shiny side and letting a bit of
reflection of the ducks show up. The following picture of the apples uses
this reflection technique to add depth. There is still a shadow to give you
the feeling that the basket is sitting on something, but there's also an
ever-so-slight reflection of the red and white stripes of the basket that
adds even more depth. The viewer might not even notice it, but it's those
subtle details that you'll pay more and more attention to as you advance with
your photography. The
posterboard background was used to make this image. One thing you'll notice,
however, is the heavy shadow directly underneath the ducks. This shot was lit
with those shadows in mind to give the viewer the feeling that the ducks are
really 'sitting' in this huge field of white and to add perspective
to the image. The depth of field adds to the perspective even further. I used
the matte side of the white posterboard in the case, and I could have made
another interesting effect by using the shiny side and letting a bit of
reflection of the ducks show up. The following picture of the apples uses
this reflection technique to add depth. There is still a shadow to give you
the feeling that the basket is sitting on something, but there's also an
ever-so-slight reflection of the red and white stripes of the basket that
adds even more depth. The viewer might not even notice it, but it's those
subtle details that you'll pay more and more attention to as you advance with
your photography.
|
|
 Sometimes,
however, you want a REALLY white background with no shadows at all, to make
your subject look like it is floating in space, similar to the black
background we talked about. These kinds of images are very popular in
commercial photography because a graphic designer can simply select the
subject from the background and paste it into his design. How do you do this? Sometimes,
however, you want a REALLY white background with no shadows at all, to make
your subject look like it is floating in space, similar to the black
background we talked about. These kinds of images are very popular in
commercial photography because a graphic designer can simply select the
subject from the background and paste it into his design. How do you do this?
One way to do so is using this exact same setup and lighting very, very
carefully. By playing with your key and fill lights, it's entirely possible
to completely eliminate shadows. Using several big softboxes (like we made in
lesson seven) will be especially helpful, since softboxes tend to produce
fewer shadows to begin with.
There's also another way, and that is to place your subject on a white
translucent background that is lit from behind. Then set up your lights for
your subject, expose for your subject, and you've got yourself a subject
floating in midair! These translucent kits are available for commercial
photographers for fairly reasonable prices. Your local glass store may be
able to hook you up with piece of white translucent plexiglass curved at
about a 90 degree angle for even a more reasonable rate. There are also
commercial 'light tents' made of white fabric that you simply place
your subject in, light the whole thing up, and - whammo! - you've
got yourself a seamless white background.
As with all of these lessons, however, I'm trying to show everyone ways to
experiment and decide what type of photography is right for you before you go
spending a lot of money on equipment. If tabletop and product photography are
something you know you're interested in, you might want to look into these
commercial options, but I highly recommend trying the do-it-yourself way
first, even if its only as a learning experience.
The more you know about lighting, the more successful your photographs will
be.
|
|
 Still Life With
Other Backgrounds Still Life With
Other Backgrounds
Of course, there are a million other kinds of backgrounds you can use in
still life photography, as well. Using fabrics that complement the colors of
your subject and draping them so that the light falls gracefully and creates
interesting contours can really add to a photograph.
Also, adding other objects to your background that relate to your subject and
enhance the color scheme of your setting can really enhance an image nicely.
This old leaf had fallen off a plant, but when I picked it up to throw it
away, the textures caught my eye. I placed in on some fabric I had recently
purchased to make curtains and used one large soft light to the left of the
camera to really emphasize both the textures in the leaf and the fabric for a
beautiful, dramatic still life.
|
|
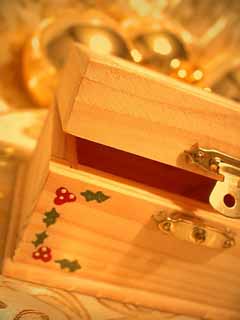 In
this shot, I used a warming filter on my camera to enhance the gold tones and
create a warm feeling. The wooden box was placed on a reflective gold fabric
and the shiny gold ornaments in the background add a visual sparkle. In
this shot, I used a warming filter on my camera to enhance the gold tones and
create a warm feeling. The wooden box was placed on a reflective gold fabric
and the shiny gold ornaments in the background add a visual sparkle.
|
|
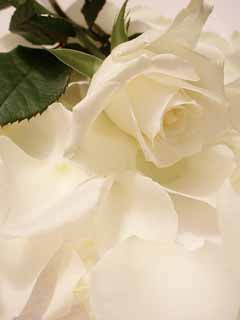 For
this photo, I wanted a feeling of simplicity and purity. I placed the white
rose on a white background and set up one softbox to the side of the rose to
bring out the texture with soft shadows, but I wasn't satisfied with the
results. I had purchased several roses, so I decided to pluck the petals from
one of them and use them as the background. This has been a very successful
stock photograph in terms of sales because the background is just a bit
different than a lot of shots you see. For
this photo, I wanted a feeling of simplicity and purity. I placed the white
rose on a white background and set up one softbox to the side of the rose to
bring out the texture with soft shadows, but I wasn't satisfied with the
results. I had purchased several roses, so I decided to pluck the petals from
one of them and use them as the background. This has been a very successful
stock photograph in terms of sales because the background is just a bit
different than a lot of shots you see.
|
|
 This
shot was a lot easier to do than it might look. I simply used a white piece
of posterboard for a seamless background and one strong light source. I then
covered half of that light source with a dark, graduated piece of plastic (I
think it was a tinted plastic clipboard from an office supply store, if I
remember correctly) and the colors that were scattered onto the background
simply curved right along with the posterboard, making this dramatic effect.
I'm showing you this to emphasize that you should never quit being creative.
I did this as a bit of a lark just to see what happened and wound up with a
fantastic result! This
shot was a lot easier to do than it might look. I simply used a white piece
of posterboard for a seamless background and one strong light source. I then
covered half of that light source with a dark, graduated piece of plastic (I
think it was a tinted plastic clipboard from an office supply store, if I
remember correctly) and the colors that were scattered onto the background
simply curved right along with the posterboard, making this dramatic effect.
I'm showing you this to emphasize that you should never quit being creative.
I did this as a bit of a lark just to see what happened and wound up with a
fantastic result!
|
|
In the last lesson, one of the photographic
lighting terms mentioned was 'gobo'. I don't know why they have
such a silly name, but they're wonderful for enhancing your photography. A
gobo is simply a piece of metal with holes cut in it that you place in front
of a light source to throw 'shapes' of light onto your background.
You can purchase them commercially or you can make your own, cutting thin
lines and patterns into anything you have handy. As when we were talking
about scrims in the last lesson, I want to emphasize that anything you place
in front of a light source needs to be fire-resistant and never left
unattended.
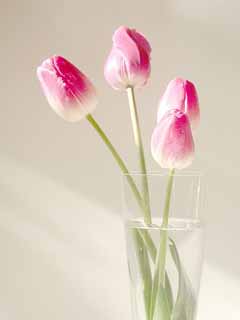 This
photo of the tulips was taken using a dominant light source from the left,
fill light from the right and a light aimed directly at the background (but
not falling on the subject) covered by a gobo with a couple of
diagonal-shaped holes in it. The gobo sheds that angle of light on the
background that the viewer might not even consciously notice, but it's the
detail that really makes this composition complete. If the four tulips were
on a plain white background without that bit of light, it would be a much
more 'flat' composition and far less appealing to the eye. This
photo of the tulips was taken using a dominant light source from the left,
fill light from the right and a light aimed directly at the background (but
not falling on the subject) covered by a gobo with a couple of
diagonal-shaped holes in it. The gobo sheds that angle of light on the
background that the viewer might not even consciously notice, but it's the
detail that really makes this composition complete. If the four tulips were
on a plain white background without that bit of light, it would be a much
more 'flat' composition and far less appealing to the eye.
|
|
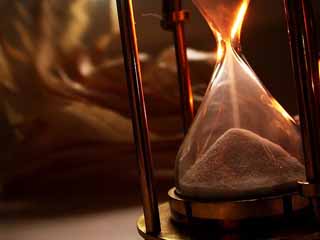 This
photo of the hourglass is dramatic because the subject itself if lit with a
strong orange light from behind and off to the right of the camera,
emphasizing the outline of the glass and the warm gold tones of the hourglass
frame. A faint fill light from the front left kept the hourglass from being a
complete silhouette, adding dimension to the shot. This
photo of the hourglass is dramatic because the subject itself if lit with a
strong orange light from behind and off to the right of the camera,
emphasizing the outline of the glass and the warm gold tones of the hourglass
frame. A faint fill light from the front left kept the hourglass from being a
complete silhouette, adding dimension to the shot.
|
|
The client needed some text space in the image, so I kept the
subject out of the left half of the frame and sprinkled some interesting
light on the background, which was made of crumpled paper grocery bags,
painted with metallic copper and gold paints. The gobo sent a few straight,
thin lines of light onto the background, but because the background had been
crumpled and uncrumpled, it turned the straight lines into interesting
zigzags and swirls.
Any time you photograph a reflective surface such as the metal in this
hourglass, if you use very dramatic lighting, you'll need to be conscious of
overexposure where there are specular reflections. Specular reflections are
actually mirror images of the light source, itself. In this case of the
hourglass, since the frame is made of long brass cylinders, the specular
reflections turn into long, stretched out bright spots. The other thing that
adding the fill light to the front of the hourglass did was let me expose the
shot for a shorter period of time, so these reflections didn't just become
huge, white, blown-out spots.
Most of the time when you see backgrounds lit with a gobo covering a light
source, they'll be in the shape of straight lines, waffle patterns or other
geometric designs. As you can see from the examples, you can create a lot of
variety by using textured backgrounds to alter those patterns.
Glass
& Liquids
The hardest subjects to photograph well are glass and liquids. For one thing,
glass gets dirty really easily so you have to clean it until it is spotless
and then be careful to not leave any fingerprints on it. For another thing,
there are so many reflections you need to deal with. The specular reflections
we talked about with the hourglass work the same with a glass subject. When
doing tabletop photography, though, there are some easy ways to keep your
reflections to a minimum and actually use them to enhance your photograph.
The best ways to light glass and liquids are from above, behind and the
sides. If you keep your light sources anywhere but the front of the subject
and keep the rest of the room dark, you'll wind up with successful shots. A
lot of photographers also use the 'light tents' that I mentioned
earlier, also, but there are several ways you can experiment without
incurring the expense of extra equipment. Let's talk about some of those.
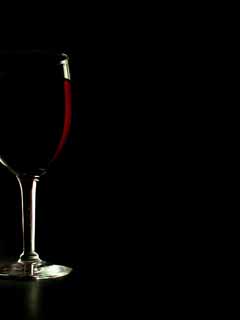 To
take this picture, I got a good bottle of wine and headed to my studio. I
used the same sort of seamless background setup that we showed above, but I
used black posterboard (double thick so no light shined through). Then I
placed a softbox very close and behind the wine glass on the camera's left.
The vertical reflection on the right side of the glass is actually a
reflection of the softbox - keep in mind that when light shines through
liquid in a round glass container, whatever is behind the container will
appear to show up backwards. It's important that it was the only light source
in the room - that eliminated any chance of other reflections showing up. I
then used a seamless black background for the subject. What a fun shot to
take! When you're done you can drink the wine! (Hic!) To
take this picture, I got a good bottle of wine and headed to my studio. I
used the same sort of seamless background setup that we showed above, but I
used black posterboard (double thick so no light shined through). Then I
placed a softbox very close and behind the wine glass on the camera's left.
The vertical reflection on the right side of the glass is actually a
reflection of the softbox - keep in mind that when light shines through
liquid in a round glass container, whatever is behind the container will
appear to show up backwards. It's important that it was the only light source
in the room - that eliminated any chance of other reflections showing up. I
then used a seamless black background for the subject. What a fun shot to
take! When you're done you can drink the wine! (Hic!)
|
|
|
|
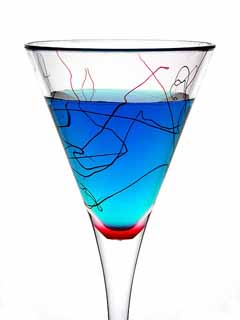
This shot was taken with a softbox behind the subject and a small light just
above it. Illuminating fluids in this manner will really seem to make them
glow and can create quite a dramatic impact. For variation, you can try
dropping in an cherry or an olive and capturing the
splash! Using a softbox as a background creates a very bright light, perfect
for the quick shutter speed needed for such a shot. I'd suggest doing the
martini shots and wine shots on different days if you plan on consuming the
products when you're finished! (Hic!)
The last thing I want to mention, and this works for other subjects, too -
not just glass and liquids - is using a piece of glass as a base to set your
subject on. If you backlight your subject and it is your only light source, a
piece of glass can make a very visually interesting addition to your
photograph by making a mirror image of your subject.
|
|
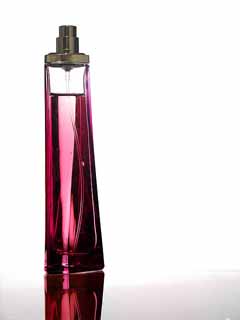
For this product setup, I again used a softbox as a background and simply
placed the perfume bottle on a piece of glass (steal one out of a picture
frame if you don't have glass sheets handy). You will see this technique time
and time again in product photography - it really gives a nice, professional
finish to your photo.
|
|
Assignments
Wow, is it assignment time already? Okay, here we go:
Assignment
1:
Photograph your subject on either a white or black background. Make sure
your subject is properly lit and composed and take care to get those
backgrounds really white or black.
Assignment
2:
Photograph a still life scene and use light to convey a definite mood,
picking up textures and using shadows creatively as part of your
composition.
Assignment
3:
Photograph a liquid in glass, taking care to avoid distracting reflections.
Easy enough? Remember to have fun! Wow me with your creativity!
|
|
