| CATEGORII DOCUMENTE |
| Bulgara | Ceha slovaca | Croata | Engleza | Estona | Finlandeza | Franceza |
| Germana | Italiana | Letona | Lituaniana | Maghiara | Olandeza | Poloneza |
| Sarba | Slovena | Spaniola | Suedeza | Turca | Ucraineana |

Comparing the POP3 Service in Exchange Server 2003 and Windows Server 2003, and Configuring the Service for Coexistence

Author, Patricia Anderson
![]()
![]()
Comparing the POP3 Service in Exchange Server 2003 and Windows Server 2003, and Configuring the Service for Coexistence

Author, Patricia Anderson
Copyright
Information in this document, including URL and other Internet Web site references, is subject to change without notice. Unless otherwise noted, the example companies, organizations, products, domain names, e-mail addresses, logos, people, places and events depicted herein are fictitious, and no association with any real company, organization, product, domain name, e-mail address, logo, person, place or event is intended or should be inferred. Complying with all applicable copyright laws is the responsibility of the user. Without limiting the rights under copyright, no part of this document may be reproduced, stored in or introduced into a retrieval system, or transmitted in any form or by any means (electronic, mechanical, photocopying, recording, or otherwise), or for any purpose, without the express written permission of Microsoft Corporation.
Microsoft may have patents, patent applications, trademarks, copyrights, or other intellectual property rights covering subject matter in this document. Except as expressly provided in any written license agreement from Microsoft, the furnishing of this document does not give you any license to these patents, trademarks, copyrights, or other intellectual property.
2003 Microsoft Corporation. All rights reserved.
Microsoft,
MS-DOS, Windows, Windows NT, Windows Server, Active Directory, and Outlook are
either registered trademarks or trademarks of Microsoft Corporation in the
The names of actual companies and products mentioned herein may be the trademarks of their respective owners.
Published: April 2003 Applies To: Windows Server 2003, Exchange Server 2003
Editor: Cathy
Anderson Artist: Kristie
Smith
Production: Sean
Pohtilla
Introduction 7
Introduction 7
Chapter 1 9
Comparing the POP3 Service in Exchange Server 2003 and Windows Server 2003 9
Determining Your Messaging Needs 9
Comparing POP3 in Windows Server and Exchange 10
Exchange Server Architecture and Administrative Advantages 10
Exchange User Advantages 11
Considerations for Specific Organizations 12
Feature Comparison Matrix 13
Comparison Summary 14
Chapter 2 15
Scenarios for Coexistence 15
Coexistence While Sharing an SMTP Mail Domain 16
Step 1 Set Up Your Infrastructure 18
Step 2 Mail-Enable POP3 User Accounts in Active Directory 18
Step 3 Configure Your POP3 Clients to Use Exchange As Their SMTP Server (Optional) 20
Step 4 Configure
Your POP3 Clients to Use Authentication on Their
Outgoing Mail Server 21
Step 5 Configure
Your POP3 Clients to Use the Shared SMTP Mail
Domain As the Return Address 22
Step 6 Verify
the Recipient Policy for the SMTP Mail Domain You Want
to Share for Your Exchange Users 23
Step 7 Configure a Recipient Policy for Your POP3 Users 25
Step 8 Create
an SMTP Connector on Exchange to Route Mail to the
Server Running the POP3 Service 28
Step 9 Configure
Exchange As a Smart Host in the SMTP Service on
the Server Running the POP3 Service 30
Step 10 Configure
the SMTP Service on the Server Running the POP3
Service with Permission to Relay Through Exchange 31
Coexistence with Different SMTP Mail Domains 32
Step 1 Set Up Your Infrastructure 33
Step 2 Mail-Enable POP3 User Accounts in Active Directory 33
Step 3 Configure
Your POP3 Clients to Use Exchange As Their SMTP
Server (Optional) 35
Step 4 Configure
Your POP3 Clients to Use Authentication on Their
Outgoing Mail Server 36
Step 5 Create
an SMTP Connector on Exchange to Route Mail to the
Server Running the POP3 Service 37
Step 6 On
the Server Running the Windows Server POP3 Service,
Create a Remote Domain for the Exchange SMTP Mail Domain in the
SMTP Service 39
Step 7 Configure
Exchange As a Smart Host in the SMTP Service on the
Server Running the POP3 Service 39
Step 8 Configure
the SMTP Service on the Server Running the POP3
Service with Permission to Relay Through Exchange 40
Appendix A 45
Additional Resources 45
Technical Papers 45
Microsoft Knowledge Base Articles 45
Other Useful Resources 46
This document focuses on two key areas:
A comparison of the POP3 service in Microsoft Windows Server 2003 and the POP3 service in Microsoft Exchange Server 2003.
An explanation of Windows Server 2003 POP3 service and Exchange Server 2003 coexistence.
This document contains two chapters:
Chapter 1, Comparing the POP3 Service in Exchange Server 2003 and Windows Server 2003
This chapter presents an overview of the POP3 service in Windows Server 2003 and Exchange Server 2003. It compares the available functionality and discusses the advantages and disadvantages of running the POP3 service on Windows Server or Exchange.
This information is intended for IT decision makers, system architects, and anyone interested in comparing the functionality provided by the POP3 service in Windows Server and Exchange Server.
Chapter 2, Scenarios for Coexistence
This chapter explains how to configure a computer running Windows Server with the POP3 service installed to coexist with an Exchange server using the same SMTP mail domain or using different SMTP mail domains.
This information is intended for a technical audience interested in configuring Exchange Server 2003 to coexist with a Windows 2003 Server providing POP3 services.
The POP3 service is a standard messaging protocol that is supported in Microsoft Windows Server 2003 and Exchange Server 2003. Although the POP3 service offers the same functionality to any POP3 client, the administration and architecture of POP3 service in Windows Server and Exchange Server are different. Exchange Server also offers additional functionality in messaging and collaboration. All these aspects play a role in the choice of a messaging system.
This chapter outlines the difference in the POP3 service in each product and provides guidance for users trying to determine which POP3 service is appropriate for their environment.
Which messaging solution is right for any organization is based on which abilities the organization requires from a messaging system.
Some organizations require only basic e-mail service and are very cost sensitive. These organizations generally do not require centralized, sophisticated management, administration, backup, or high availability. They often have only basic security requirements and can work with decentralized storage of their e-mail. Their users do not require shared calendar or other specialized functionality. Windows Server and its POP3 service can be an appropriate solution for this scenario.
Other organizations have complex messaging and collaboration needs and require services such as server-side rules, shared calendar, resource management, and access from anywhere through a Web client. These organizations often look for sophisticated and integrated management and administration. Security, reliability, and high data availability are key factors in choosing a messaging solution. Some companies require centralized backup (for example, retaining e-mail for legal reasons). For these requirements, Exchange Server is the better solution.
Both Exchange Server 2003 and Windows Server 2003 (Web Edition, Standard Edition, Enterprise Edition, and Datacenter Edition) mail services provide inboxes for POP3 clients. They both also allow integrated authentication through Active Directory directory service. Both are scalable messaging solutions although Exchange Server is the recommended solution for large environments.
Exchange Server provides better administration for the POP3 service than Windows Server 2003 although the user experience on a POP3 client (such as when sending or receiving e-mail is the same.
The Exchange Server architecture offers administrative advantages in terms of e-mail routing, maintenance, and administration. The following architectural differences should be noted when comparing the POP3 service in Exchange Server 2003 with the POP3 service in Windows Server 2003:
Integrated administration Exchange System Manager allows you to manage all your Exchange servers from a single location. In Windows Server 2003, you manage the POP3 service on each individual server.
Support for online and offline backups Exchange Server deploys a transactional database that can be backed up when it is either online or offline. Online backup minimizes the time that the server is unavailable for users. Windows Server POP3 e-mail should be backed up when it is offline. Having to back up while offline could lead to a service interruption for users. If the administrator backs up while the service is online, he or she runs the risk that open files (mailboxes) might be skipped by the backup software.
Support for virus scanning Microsoft Exchange Server is designed with an Application Programming Interface (API) for antivirus. This API allows antivirus products to scan Internet mail and report the sender and receiver of infected mail. This API allows organizations to implement antivirus and anti-spam solutions that protect their users. The Windows Server POP3 service does not have any built-in support for virus scanning or anti-spam utilities. A virus scanner used on files on the server running the Windows Server 2003 POP3 service would need to be capable of skipping files that cannot be read and tracking the need to come back to them. If a virus scanner does not meet this requirement, there is no guarantee that all files will be scanned.
Single instance storage Exchange Server stores only one copy of an e-mail message (with or without an attachment) sent to several recipients on the same server. Single instance storage allows for central storage of e-mail while keeping the requirements for storage space to a manageable scale. The Windows Server POP3 service stores multiple instances of a copied e-mail and will, therefore, lead to larger datastores until messages are downloaded from the server.
Support for multiple domain names Exchange Server allows mailboxes that have different domain names and multiple e-mail aliases to be within one domain. The Windows Server POP3 service also supports multiple domains if using either Active Directory or encrypted password file authentication, but it does not support multiple e-mail names using local Windows account authentication.
Support for Microsoft Operations Manager The Application Management Pack for Microsoft Operations Manager (MOM) includes a management pack module for Exchange Server 5.5 and Exchange 2000 Server. This management pack module consists of preconfigured rules that can monitor Exchange Server and its services. Additionally, these rules are coupled with Knowledge Base articles that can help administrators troubleshoot and solve detected issues more efficiently. Currently, no MOM management pack is available for the Windows Server 2003 POP3 service.
Additional administrative advantages Exchange Server supports a distributed architecture along with the ability to move mailboxes between servers without modifying the client settings. With Exchange Server, convenient administration is available without any scripting.
Exchange Server is an integrated messaging and collaboration environment and provides many advantages over a server running the Windows Server POP3 service. These advantages include:
Support for protocols such as IMAP and MAPI, which allow rich messaging functionality either online or offline.
Microsoft Outlook Web Access for access from any computer on the Internet for email, calendar, contacts, and tasks.
Mobile client support through Microsoft Outlook Mobile Access.
Rich client functionality such as group calendaring with free and busy information, resource management, and rules.
Support for e-mail features such as aliasing, mailing lists, auto-reply, and auto-forwarding.
Two types of organizations that primarily may consider Windows Server 2003 with its POP3 service appropriate for their use are small businesses and service providers.
Small businesses Small businesses have a small number of users and, therefore, can be served with one store location. Decentralized storage is seen as sufficient and centralized backup is often not required. Most small businesses are cost sensitive and often only want the ability to send e-mail. Their users dont require collaboration features such as shared calendaring, public folders, and resource management. These users might not have a need for access from any computer through the Internet.
For small businesses that require sophisticated messaging and collaboration, access from any computer, and antivirus and anti-spam protection, Exchange Server offers these services. If a small business wants high data availability and centralized backup for e-mail retention (for example, for legal reasons), Exchange Server may offer the right solution.
Small Business Server 2000 provides Exchange Server functionality combined with installation and administration wizards that help deploy and manage a small messaging environment. Small Business Server is a lower-cost alternative for smaller businesses.
Service Providers Service providers for whom messaging and collaboration are not business goals, but just desirable enhancements, may find that Windows Server 2003 e-mail services are a satisfactory offering. These organizations should consider the administrative advantages in Exchange Server regarding backup and antivirus and anti-spam protection to provide quality of service.
However, any service provider who wants to take advantage of messaging and collaboration as a business opportunity and create value on messaging and collaboration for its users, Exchange Server is a better option. The rich feature set in Exchange enables service providers to extend different service offerings to a wide range of customer segments. They can move customers from basic messaging feature to rich collaboration and increase their average revenue per user (ARPU). At the same time, providers can reduce costs through using a single, extensible platform that enables these multiple, value generating services at high scale. They can also take advantage of a set of tools, such as provisioning, that are added to Exchange Server to manage the business efficiently.
Table 1.1 shows the key comparison points between Windows Server 2003 and Microsoft Exchange Server.
Table 1.1 POP3 feature comparison table
|
Functionality |
Windows Server 2003 POP3 mail services |
Exchange Server 2003 |
|
Support for POP3 clients |
Yes |
Yes |
|
Support for other client and development protocols |
No |
MAPI, IMAP, WebDAV, CDO, ADO, HTTP |
|
Support for multiple server storage of mailboxes |
No |
Yes |
|
Integrated Web client support |
No |
Yes, with Outlook Web Access |
|
Authentication methods for POP3 |
Integrated authentication through Active Directory, local security access method, encrypted password file |
Integrated authentication through Active Directory |
|
Authentication passing methods |
Basic, NTLM, APOP |
Basic, NTLM, Kerberos, Certificate, Public Key |
|
SSL support |
No |
Yes |
|
Collaboration features |
Not applicable |
Calendar, Outlook Web Access, reminders, rich address book, rules, storage event sink |
|
Support for integrated antivirus and anti-spam solutions (third party) |
No |
Yes, using AVAPI 2.0 |
|
Backup method |
File based |
Online and offline database backups |
|
Storage architecture |
File based |
Exchange database |
|
Mailbox size limits |
Yes, through Windows Server quota system, which means user-specific per volume |
Yes, can be configured at the mailbox level |
|
Distributed architecture |
No |
Yes, support for front-end and back-end servers |
|
Cluster support |
No |
Yes, for all protocols |
|
Support for distributed storage |
Yes, through network-attached storage or Distributed File System that requires configuration and maintenance overhead |
Each Exchange Server within SMTP domain can be configured as a mailbox server |
|
Support for Microsoft Operations Manager (MOM) |
No |
Yes, using Exchange Management pack for rules, monitoring, and Knowledge Base access |
|
Tested to scale of millions of users |
No |
Yes, up to 3 million |
Both Windows Server 2003 and Exchange Server 2003 provide the same POP3 experience to users. However, Windows Server 2003 only offers POP3 messaging experience to the user and limited administrative features to the administrator. It is best used in situations where basic messaging or administration is required.
Exchange Server provides not just the POP3 experience but rich messaging and collaboration options to the user. It also offers better administrative advantages in terms of managing a complex messaging and collaboration environment in efficient ways.
The following chapter presents options for coexistence with the Windows Server 2003 POP3 service and Exchange within the same organization.
This chapter explains how to configure coexistence between the Microsoft Windows Server 2003 POP3 service and Exchange Server 2003. It explains two basic scenarios in which the Windows Server POP3 service and Exchange can coexist within an organization:
Windows Server POP3 and Exchange users coexisting and sharing the same SMTP mail domain; that is, the SMTP address for which mail is accepted for users.
Windows Server POP3 and Exchange users coexisting and using different SMTP mail domains.
In either scenario, Windows Server POP3 users and Exchange users can coexist in a single Active Directory forest. The basic configuration relies on the following principles:
Exchange users are created as mailbox-enabled users and granted access to a mail client such as Microsoft Outlook or Outlook Web Access Basically, your Exchange users exist as they would in most standard deployments.
All users (both Exchange users and POP3 users) use a single authentication method through Active Directory POP3 supports additional authentication methods, which are not discussed in these scenarios.
The mail domain on the POP service is different from the mail domain in Exchange Exchange and a server running the Windows Server POP3 service cannot use the exact same mail domain because mail-looping occurs when e-mail is sent from a user in one system to a invalid user on another system.
Each POP3 user exists as a mail-enabled user account in Active Directory You must use the Exchange Tasks Wizard to mail-enable each user account and assign the account an external e-mail address matching the SMTP mail domain that you want to share. If you do not configure this account, Exchange does not recognize these users as possible recipients for mail it receives. This configuration also allows POP3 users and Exchange users to view each other in the global address list.
The Windows Server POP3 service clients are configured to use authentication on their outgoing mail server To send e-mail to external users, POP3 users must authenticate on the SMTP server on Exchange.
An SMTP connector is created to route mail to the server running the Windows Server POP3 service The connector allows messages to be routed to POP3 users in this domain.
The SMTP service on the server running the Windows Server POP3 has permission to relay through Exchange Exchange must be configured as a smart host and the Windows POP3 service must have permissions to relay.
This section explains how to configure Exchange and the Windows Server POP3 service to allow users to share a single SMTP e-mail domain. The shared SMTP mail domain is the primary SMTP address of all Exchange users. This address is the return address that is shown on all mail destined to external or Internet addresses. Similarly, POP3 users use this same e-mail address when communicating with external users.
The best way to share an SMTP mail domain is to allow Exchange to accept incoming mail from the Internet and locate a recipient in the Exchange organization, and then forward the mail to users on the Windows Server POP3 service. Figure 2.1 illustrates this example.
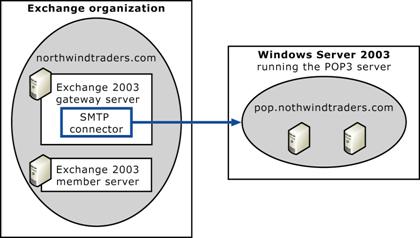
Figure 2.1 Sharing an SMTP domain
In this scenario, Exchange functions as the first mail server, and the Exchange server is configured to use the SMTP mail domain of northwindtraders.com. The server running the Windows Server POP3 service is configured with a domain of pop.northwindtraders.com, but POP3 clients are configured to use northwindtraders.com as their return address.
Important You cannot configure a server running the Windows Server POP3 service that uses the same mail domain as the Exchange system. Your server running the Windows Server POP3 service must be configured with a different mail domain.
There are ten main steps that you must perform to enable mail flow between your Exchange server and the server running the Windows Server POP3 service, and have the two share the same SMTP mail domain.
Step 1
Set up your infrastructure.
Step 2
Mail-enable each POP3 user in Active Directory and assign an external address of pop.northwindtraders.com.
Step 3
(Optional) Configure your POP3 clients to use your Exchange server as an SMTP server.
Step 4
Configure your POP3 clients to use authentication on their outgoing mail server (the SMTP server).
Step 5
Configure your POP3 clients to use the shared SMTP address (for example, northwindtraders.com) as their return address.
Step 6
Ensure that your recipient policy for the SMTP mail domain you want to share is configured on your recipient policy and is the primary SMTP address for your Exchange users.
Step 7
Create a recipient policy for your POP3 users that assigns the shared SMTP mail domain as a secondary e-mail address.
Step 8
Create an SMTP connector to route mail to the server running the Windows Server POP3 service.
Step 9
Configure the SMTP service on the server running the Windows Server POP3 service to use Exchange as a smart host.
Step 10
Configure the SMTP service on the server running the Windows Server POP3 service with permissions to relay. You can set these permissions in one of two ways:
Configuring outbound security on the SMTP virtual server on the server running the Windows Server POP3 service.
Configuring the SMTP virtual server in Exchange to allow relay from the IP address of the server running the Windows Server POP3 service.
Setting up your infrastructure involves the following steps:
Deploying Exchange and creating mailboxes for each Exchange user, as you would in any Exchange deployment, and creating a recipient policy for your Exchange users.
Deploying the Windows Server POP3 service and creating POP3 mailboxes for each POP3 user for the POP3 domain (for example, pop.northwindtraders.com).
After deploying Exchange and mailbox-enabling your Exchange users, and after deploying the Window POP3 service and configuring your users POP3 mailboxes, you must mail-enable each POP3 user account to assign an external address for the mail domain used by the POP3 service. POP3 accounts are mail-enabled so that these users appear in the global address list (GAL) and both Exchange and POP3 users can view each other.
u To mail-enable a POP3 user account
On your Exchange server, click Start, point to All Programs, point to Microsoft Exchange, and then click Active Directory User and Computers.
Navigate to the container in which your users reside.
Right-click the first POP3 user account and click Exchange Tasks.
In Exchange Task Wizard, click Establish E-mail Address (Figure 2.2).
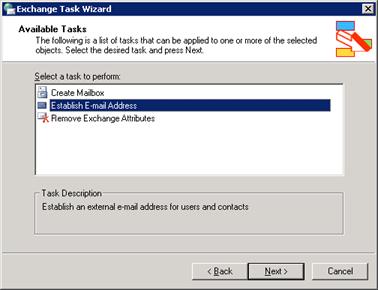
Figure 2.2 Available Tasks page in Exchange Task Wizard
Click Next.
On the Establish E-mail Address page, the external e-mail address shows the e-mail address assigned to your POP3 user, which should be the same as the mail domain on the server running the Windows Server POP3 service (for example, pop.northwindtraders.com, Figure 2.3).
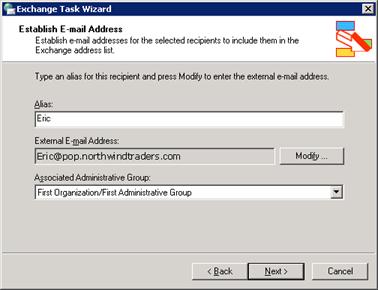
Figure 2.3 Establish E-mail Address page in Exchange Task Wizard
Click Next, and then click Finish.
Repeat steps 2 through 7 for each POP3 user account.
Optionally, you can configure your POP3 clients to use Exchange as their SMTP server. In this configuration, the Windows Server POP3 service allows POP3 users to retrieve their e-mail, while the SMTP service in Exchange allows them to send e-mail. Configuring your POP3 clients to use Exchange as their outgoing server offers the benefit having a single system through which outgoing e-mail flows. However, you can configure your POP3 service to use the SMTP service in Windows if you desire.
Note If you configure your POP3 clients to use the SMTP service on the server running the Windows Server POP3 service, you must configure the SMTP virtual server to use authentication. To configure authentication, on the server running the Windows Server POP3 service, open Internet Information Services Manager. In the SMTP virtual server properties, on the Access tab, click Authentication, and then select Basic and Integrated Windows Authentication.
The following procedure shows you how to configure an SMTP server on an Microsoft Outlook Express client. On different mail clients, these steps will vary.
u To specify an SMTP server on a POP3 client
On the client computer, open Outlook Express.
On the Tools menu, click Accounts.
In Internet Accounts, click the Mail tab, select the mail account, and then click Properties.
Click the Servers tab.
Note For increased security, your POP3 users should use Secure Password Authentication to log on to their incoming server. For more information, see the Windows Server 2003 online documentation.
Under Server Information, in Outgoing mail (SMTP), type the fully-qualified domain name of your Exchange server (Figure 2.4).
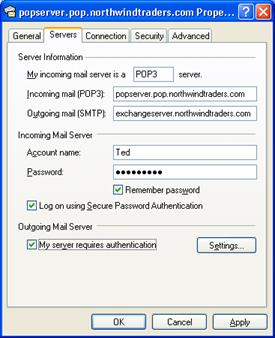
Figure 2.4 Configuring server information on a POP3 client
Click OK.
To allow your POP3 users to send e-mail externally through the Exchange server, you must configure authentication on the outgoing mail server.
u To configure authentication on your POP3 clients outgoing mail server
On the client computer, open Outlook Express.
On the Tools menu, click Accounts.
In Internet Accounts, click the Mail tab, select the mail account, and then click Properties.
Click the Servers tab.
Under Outgoing Mail Server, select the My server requires authentication check box.
Click Settings.
In Outgoing Mail Server, click Use same settings as my incoming server (Figure 2.5).

Figure 2.5 Outgoing mail server authentication settings
Click OK.
Because you want all your POP3 to show a return address of the shared SMTP mail domain (for example, northwindtraders.com), you need to configure this setting on the POP3 client.
u To configure the return address on an POP3 client
On the client computer, open Outlook Express.
On the Tools menu, click Accounts.
In Internet Accounts, click the Mail tab, select the mail account, and then click Properties.
On the General tab, in Reply address, enter user name and SMTP mail domain that you want to share in the following format: user@domain. In this example, for a user named Ted, you would enter ted@nortwindtraders.com (Figure 2.6)
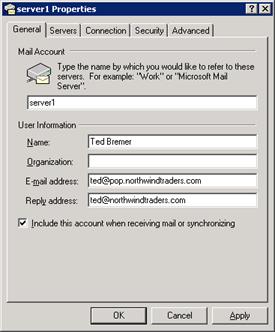
Figure 2.6 Configuring reply address
Click OK.
Verify that the recipient policy for the SMTP mail domain that you want to share is configured correctly. This SMTP address should be set as primary for all your Exchange users and Exchange should be authoritative over this domain. Remember that, when Exchange is authoritative over the domain, it assumes responsibility for delivering the message and returns a delivery status notification if it cannot find a recipient in Active Directory.
Note The following procedure demonstrates how to verify that your recipient policy for your Exchange users is configured correctly. If your Exchange server is already configured with the correct SMTP mail domain for your Exchange users, you do not need to change anything on your recipient policy.
u To configure your recipient policy for your Exchange users
Click Start, point to All Programs, point to Microsoft Exchange, and then click System Manager.
In the console tree, expand Recipients, and then click Recipient Policies.
In the details pane, right-click the recipient policy applied to your users, and then click Properties.
Click the E-Mail Addresses (Policy) tab, and then verify that the SMTP address that you want to share (for example, northwindtraders.com) is configured as the primary SMTP address. The primary SMTP address appears in bold (Figure 2.7).

Figure 2.7 Primary SMTP Address of @northwindtraders.com
Select one of the following options:
If the SMTP address appears in bold, it is set as the primary SMTP address. Proceed to the next step.
If the SMTP address does not appear in bold, select the SMTP address, and then click Set as Primary.
Click the SMTP address space that you want to share (for example, northwindtraders.com), and then click Edit.
To ensure that Exchange is authoritative for this SMTP address, verify that the This Exchange Organization is responsible for all mail delivery to this address check box is selected. If it is not, select it, and then click Apply (Figure 2.8).
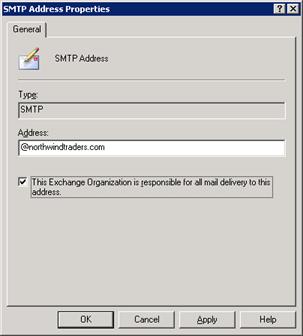
Figure 2.8 Verifying an authoritative domain
A message displays asking if you want to update all corresponding recipient e-mail addresses. Click Yes.
On the E-mail Addresses (Policy) tab, click OK.
Changing the recipient policy in this way causes Exchange to use the new primary address as the return or reply-to address in outgoing e-mails for your Exchange users. In the example above, all Exchange users in this policy now have a return e-mail address that matches the new primary address space of @northwindtraders.com.
After you configure the recipient policy for the Exchange users, you must create another recipient policy for your POP3 users. This policy will assign a secondary proxy SMTP address of the shared SMTP mail domain so that Exchange can match your POP3 users to the shared SMTP domain. When the recipient update service runs, it assigns SMTP addresses to users, but it does not replace the primary SMTP address if it has been configured. Because the POP3 users already have a primary SMTP address (that corresponds to the POP3 domain), you need another recipient policy with the shared SMTP domain as a secondary proxy address so that the POP3 users are stamped with this address.
u To configure your recipient policy for your POP3 users
Click Start, point to All Programs, point to Microsoft Exchange, and then click System Manager.
In the console tree, expand Recipients, right-click Recipient Policies, point to New, and then click Recipient Policy.
In New Policy, select the E-Mail Addresses check box, and then click OK.
On the General tab, in the Name box, type an appropriate name, such as POP User Addresses.
Under Filter rules, click Modify, and then create a filter to select only the POP3 users.
Note The steps for creating a filter for your POP3 users assume that the POP3 users are the only users with external addresses. If this is not the case in your environment, you may need to modify the filter criteria.
a. In Find Exchange Recipients, in Find, select Users, Contacts and Groups from the drop-down list
b. Click the Exchange tab.
c. Click the Show Only Exchange recipients check box.
d. Click the Users with External E-mail Addresses, and ensure no other check boxes are selected.
Click Find Now and ensure that the results return only your POP3 users.
Note It is important that this policy applies only to your POP3 users. You do not want to alter the recipient policy for your Exchange users in this way.
Click OK.
On the E-mail Addresses (Policy) tab, the shared SMTP domain (for example, @northwindtraders.com) displays as the primary domain. You need to create a new address for your POP3 users and set this address as primary. Click New to create a new SMTP address.
In New E-mail Address, select SMTP, and then click OK.
In SMTP Address Properties, in the Address box, type the SMTP address space that of your POP3 domain, for example, pop.northwindtraders.com.
To make Exchange non-authoritative for this SMTP address, clear the This Exchange Organization is responsible for all mail delivery to this address check box (Figure 2.9)

Figure 2.9 Configuring a non-authoritative domain
Note Exchange must be configured as non-authoritative over the POP3 domain, so that it can forward any messages to the server running the Windows Server POP3 service.
In SMTP Address Properties, click OK.
On the E-mail Address Policy tab, select the new SMTP address that you just created (for example, @pop.northwindtraders.com), and then click Set as Primary.
A message displays asking if you want to update all corresponding recipient e-mail addresses. Click Yes.
On the E-mail Addresses (Policy) tab, click OK.
By configuring the recipient policy, the recipient update policy runs and now assigns the shared mail domain (for example, northwindtraders.com) to all of the POP3 users. Now when Exchange receives e-mail addressed to one of the POP3 users, it will recognize the northwindtraders.com address as a secondary address and send it to the target address of pop.northwindtraders.com.
In this scenario, you must create an SMTP connector to route the mail to the server running the Windows Server POP3 service. Additionally, you must create this connector on each Exchange server that accepts incoming Internet mail.
u To create an SMTP connector to route mail to the server running the Windows Server POP3 service
Click Start, point to All Programs, point to Microsoft Exchange, and then click System Manager.
In the console tree, right-click Connectors, point to New, and then click SMTP Connector.
On the General tab, type an appropriate name, click the Forward all mail through this connector to the following smart hosts option, and then type the fully qualified domain name (FQDN) or, in square brackets ([ ]), type the IP address of the server to which e-mail for the shared SMTP address space is to be routed (Figure 2.10)
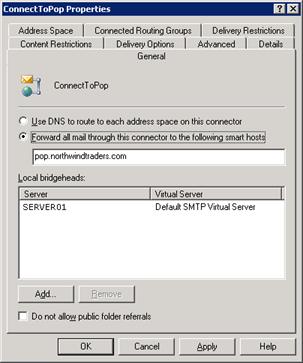
Figure 2.10 Configuring a smart host on the SMTP connector
Click Add to configure your bridgehead servers, and then select your Exchange gateway servers that accept Internet mail for this domain.
Click the Address Space tab, click Add, click SMTP, and then click OK.
In E-mail domain, type the name of the SMTP address space of the POP3 users (for example, pop.northwindtraders.com), and then click OK On the Address Space tab, the e-mail domain now displays (Figure 2.11).
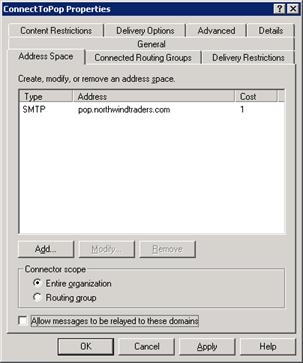
Figure 2.11 Creating an SMTP address space on the connector
Warning It is important to enter the specific SMTP mail domain. Do not type (asterisk) on the SMTP connector. Setting causes Exchange to accept mail for all external domains and then relay it externally. This configuration allows open relaying for anyone on the Internet and is extremely insecure.
If you are accepting e-mail for your POP3 users using the POP3 domain of pop.northwindtraders.com, on the Address Space tab, click the Allow messages to be relayed to this domain check box. This step is not necessary if all incoming mail to your POP3 users has the e-mail address of northwindtraders.com.
Click OK.
On the server running the Windows Server POP3 service, you must configure Exchange as a smart host in the SMTP service. This configuration enables the delivery of notification of delivery reports to Exchange users and other external users.
u To configure Exchange as a smart host in the SMTP service
On the server running the Windows Server POP3 service, click Start, point to All Programs, point to Administrative Tools, and then click Internet Information Services (IIS) Manager.
Expand Internet Information Services, expand <your server>, and then click the SMTP virtual server.
Right-click your SMTP virtual server, and then click Properties.
Click the Delivery tab, and then click Advanced.
In Advanced Delivery, under Smart host, enter the fully-qualified domain name of the Exchange server (Figure 2.12).
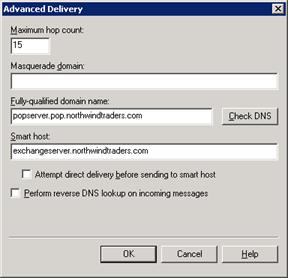
Figure 2.12 Configuring Exchange as a smart host
Click OK twice.
To allow Exchange to deliver non-delivery reports (NDRs) from the POP users to external addresses, you must configure the SMTP service on the server running the Windows Server POP3 service with permissions to relay through the Exchange server. You can do this configuration in one of two ways:
Method 1 Configure outbound security on the SMTP virtual server on the server running the Windows Server POP3 service.
Method 2 Configuring the SMTP virtual server in Exchange to allow relay from the IP address of the server running the Windows Server POP3 service.
In method 1, on the server running the Windows Server POP3 service, you configure the SMTP service to authenticate on the Exchange server and send outbound mail.
u To configure the SMTP service to authenticate to send outbound mail through Exchange
On the server running the Windows Server POP3 service, click Start, point to All Programs, point to Administrative Tools, and then click Internet Information Services (IIS) Manager.
Expand Internet Information Services, expand <your server>, and then click the SMTP virtual server.
Right-click your SMTP virtual server, and then click Properties.
Click the Delivery tab, and then click Outbound Security.
In Outbound Security, click Integrated Windows Authentication.
In Account, enter a valid Active Directory user account.
Note It is recommended that you create a special account for the SMTP service. You should configure this account with a password that never expires, so that this server can always send mail to Exchange.
Click OK twice.
In method 2, on the Exchange server, you configure Exchange to allow the POP3 service to relay.
u To configure the SMTP service to authenticate to send outbound mail through Exchange
On your Exchange server, click Start, point to All Programs, point to Microsoft Exchange, and then click System Manager.
Expand Servers, expand <server name>, expand Protocols, and then expand SMTP.
Right-click the SMTP virtual server responsible for outbound mail, and then click Properties.
Click the Access tab.
On the Access tab, click Relay.
Under Select which computers may relay through this server, ensure that Only the list below is selected.
Click Add.
In Computer, click Single computer, and in IP address, enter the IP address of the server running the Windows Server POP3 service.
Click OK..
This section explains how to configure Exchange and a server running the Windows Server POP3 service to coexist using different SMTP mail domains. In this example, Exchange users use the SMTP mail domain, exchange.northwindtraders.com, and the POP3 user use the SMTP mail domain, pop.contoso.com. In this scenario, Exchange accepts e-mail for Exchange users with the address of exchange.northwindtraders.com and it also accepts e-mail for POP3 users with a different address, pop.contoso.com
This scenario involves the following eight major steps. Each of these steps is explained in detail in the following sections.
Step 1
Set up your infrastructure.
Step 2
Mail-enable each POP3 user in Active Directory and assign an external address of pop.contoso.com.
Step 3
(Optional) Configure your POP3 clients to use your Exchange server as an SMTP server.
Step 4
Configure your POP3 clients to use authentication on their outgoing mail server (the SMTP server).
Step 5
Create an SMTP connector to route mail to the server running the Windows Server POP3 service.
Step 6
On the server running the POP3 service, create a remote domain for SMTP mail domain that Exchange users.
Step 7
Configure the SMTP service on the server running the Windows Server POP3 service to use Exchange as a smart host.
Step 8
Configure the SMTP service on the server running the Windows Server POP3 service with permissions to relay. You can do this configuration in one of two ways:
Configuring outbound security on the SMTP virtual server on the server running the Windows Server POP3 service.
Configuring the SMTP virtual server in Exchange to allow relay from the IP address of the server running the Windows Server POP3 service.
Setting up your infrastructure involves the following steps:
Deploying Exchange and creating mailboxes for each Exchange user, as you would in any Exchange deployment, and creating a recipient policy for your Exchange users.
Deploying the Windows Server POP3 service and creating POP3 mailboxes for each POP3 user for the pop.northwindtraders.com domain
After deploying Exchange and mailbox-enabling your Exchange users, and after deploying the Window POP3 service and configuring your users POP3 mailboxes, you must mail-enable each POP3 user account to assign an external address for the mail domain used by the server running the Windows Server POP3 service. POP3 accounts are mail-enabled so that these users appear in the GAL, and both Exchange and POP3 users can view each other.
u To mail-enable a POP3 user account
On your Exchange server, click Start, point to All Programs, point to Microsoft Exchange, and then click Active Directory User and Computers.
Navigate to the container in which your users reside.
Right-click the first POP3 user account and click Exchange Tasks.
In Exchange Task Wizard, click Establish E-mail Address (Figure 2.13).

Figure 2.13 Available Tasks page in Exchange Task Wizard
Click Next.
On the Establish E-mail Address page, the external e-mail address shows the e-mail address assigned to your POP3 user, which should be the same as the SMTP address to the POP3 domain (for example, pop.contoso.com, Figure 2.14).

Figure 2.14 Establish E-mail Address Page in Exchange Task Wizard
Click Next, and then click Finish.
Repeat steps 2 through 7 for each POP3 user account.
Optionally, you can configure your POP3 clients to use Exchange as their SMTP server. In this configuration, the Windows Server POP3 service allows POP3 users to retrieve their e-mail, while the SMTP service in Exchange allows them to send e-mail. Configuring your POP3 clients to use Exchange as their outgoing server offers the benefit of having a single system through which outgoing e-mail flows. However, you can configure your POP3 service to use the SMTP service in Windows Server if you want.
Note If you configure your POP3 clients to use the SMTP service on server running the Windows Server POP3 service, you must configure the SMTP virtual server to use authentication. To configure authentication, on the server running the Windows Server POP3 service, open Internet Information Services Manager. In the SMTP virtual server properties, on the Access tab, click Authentication, and then select Basic and Integrated Windows Authentication.
The following procedure shows you how to configure an SMTP server on an Outlook Express client. On different mail clients, these step will vary.
u To specify an SMTP server on a POP3 client
On the client computer, open Outlook Express.
On the Tools menu, click Accounts.
In Internet Accounts, click the Mail tab, select the mail account, and then click Properties.
Click the Servers tab.
Note For increased security, your POP3 users should use Secure Password Authentication to log on to their incoming server. For more information, see the Windows Server 2003 online documentation.
Under Server Information, in Outgoing mail (SMTP), type the fully-qualified domain name of your Exchange server (Figure 2.15).
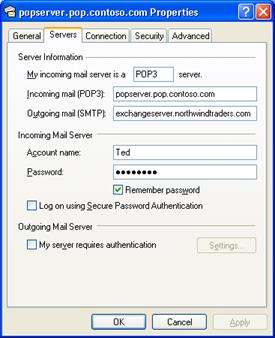
Figure 2.15 Configuring server information on a POP3 client
Click OK.
To allow your POP3 users to send e-mail externally, you must configure authentication on the outgoing mail server.
u To configure authentication on your POP3 clients outgoing mail server
On the client computer, open Outlook Express.
On Tools menu, click Accounts.
In Internet Accounts, click the Mail tab, select the mail account, and then click Properties.
Click the Servers tab.
Under Outgoing Mail Server, select the My server requires authentication check box.
Click Settings.
In Outgoing Mail Server, click Use same settings as my incoming server (Figure 2.16).
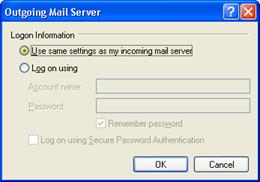
Figure 2.16 Outgoing mail server authentication settings
Click OK.
After you configure your POP3 clients, you must configure Exchange to relay mail to the users in the POP3 domain. You do this by creating an SMTP connector on the Exchange server to route mail to the server running the POP3 service. Additionally, you must create this connector on each Exchange server that accepts incoming Internet mail.
u To create an SMTP connector to route mail to a specific host
Click Start, point to Programs, point to Microsoft Exchange, and then click System Manager.
In the console tree, right-click Connectors, point to New, and then click SMTP Connector.
On the General tab, type an appropriate name, click the Forward all mail through this connector to the following smart hosts option, and then type the fully qualified domain name (FQDN) or, in square brackets ([ ]), type the IP address of the server to which e-mail for the shared SMTP address space is to be routed.
Click Add to configure your bridgehead servers, and then select your Exchange gateway servers that accept Internet mail for this domain.
Click the Address Space tab, click Add, click SMTP, and then click OK.
In E-mail domain, type the name of the SMTP address space of the POP3 users (for example, pop.contoso.com) and then click OK. On the Address Space tab, the e-mail domain now displays (Figure 2.17)
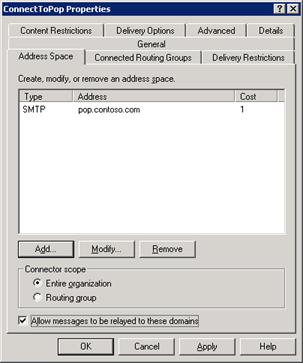
Figure 2.17 Creating an SMTP address space on the connector
Warning It is important to enter the specific SMTP mail domain. Do not type (asterisk) on the SMTP connector. Setting causes Exchange to accept mail for all external domains and then relay it externally. This configuration allows open relaying for anyone on the Internet and is extremely insecure.
Because Exchange 2003 must also receive messages for this domain, on the Address Space tab, click Allow messages to be relayed to these domains. This setting makes it possible for all SMTP virtual servers that are listed under Local Bridgeheads to accept messages for domain.
Click OK.
Repeat this procedure on each Exchange server that acts an Internet gateway for incoming mail.
On the server running the Windows Server POP3 service, you must create a remote domain with the Exchange mail domain.
u To create a remote domain on the server running the Windows Server POP3 service
On the server running the Windows Server POP3 service, click Start, point to All Programs, point to Administrative Tools, and then click Internet Information Services (IIS) Manager.
Expand Internet Information Services, expand <your server>, and then expand your SMTP virtual server.
Right-click Domains, point to New, and then click Domain. New SMTP Wizard starts.
In New SMTP Wizard, under Specify the domain Type, click Remote, and then click Next.
On the Domain Name page, in Name, enter the mail domain of the Exchange server (for example, exchange.northwindtraders.com).
Click Finish.
In the details pane, right-click the remote domain that you just created, and then click Properties.
On the General tab, select the Allow incoming mail to be relayed to this domain check box.
Click OK.
On the server running the Windows Server POP3 service, you must configure Exchange as a smart host in the SMTP service. This enables the delivery of notification of delivery reports to Exchange users and other external users.
u To configure Exchange as a smart host in the SMTP service
On the server running the Windows Server POP3 service, click Start, point to All Programs, point to Administrative Tools, and then click Internet Information Services (IIS) Manager.
Expand Internet Information Services, expand <your server>.
Right-click your SMTP virtual server, and then click Properties.
Click the Delivery tab, and then click Advanced.
In Advanced Delivery, under Smart host, enter the fully-qualified domain name of the Exchange server (Figure 2.18).
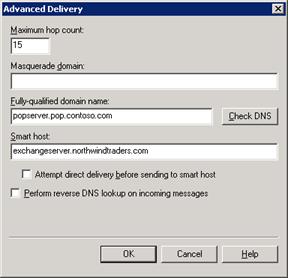
Figure 2.18 Configuring Exchange as a smart host
Click OK twice.
To allow Exchange to send NDRs to external addresses, you must configure the SMTP service on the server running the Windows Server POP3 service with permissions to relay through the Exchange server. You can do this configuration in one of two ways:
Method 1 Configure outbound security on the SMTP virtual server on the server running the Windows Server POP3 service.
Method 2 Configuring the SMTP virtual server in Exchange to allow relay from the IP address of the server running the Windows Server POP3 service.
In method 1, on the server running the Windows Server POP3 service, you configure the SMTP service to authenticate on the Exchange server to send outbound mail.
u To configure the SMTP service to authenticate to send outbound mail through Exchange
On the server running the Windows Server POP3 service, click Start, point to All Programs, point to Administrative Tools, and then click Internet Information Services (IIS) Manager.
Expand Internet Information Services, expand <your server>, and then click the SMTP virtual server.
Right-click your SMTP virtual server, and then click Properties.
Click the Delivery tab, and then click Outbound Security.
In Outbound Security, click Integrated Windows Authentication.
In Account, enter a valid Active Directory user account.
Note It is recommended that you create a special account for the SMTP service. You should configure this account with a password that never expires, so that this server can always send mail to Exchange.
Click OK twice.
In method 2, on the Exchange server, you configure Exchange to allow the POP3 service to relay.
u To configure the SMTP service to authenticate to send outbound mail through Exchange
On your Exchange server, click Start, point to All Programs, point to Microsoft Exchange, and then click System Manager.
Expand Servers, expand <server name>, expand Protocols, and then expand SMTP.
Right-click the SMTP virtual server responsible for outbound mail, and then click Properties.
Click the Access tab.
On the Access tab, click Relay.
Under Select which computers may relay through this server, ensure that Only the list below is selected.
Click Add.
In Computer, click Single computer, and in IP address, enter the IP address of the server running the Windows Server POP3 service.
Click OK.
Appendix or Appendices

A
The following resources provide valuable information regarding Exchange Server and Windows Server.
Configuring SMTP in Microsoft Exchange 2000 Server
(https://go.microsoft.com/fwlink/?LinkId=15084)
Configuring and Securing Microsoft Exchange 2000 Server and Clients
(https://go.microsoft.com/fwlink/?LinkId=10733)
Using Microsoft Exchange Front-End Servers
(https://go.microsoft.com/fwlink/?LinkId=12055)
The following Microsoft Knowledge Base articles are available on the Web at https://support.microsoft.com/:
265293, XFOR: How to Configure the SMTP Connector in Exchange 2000
(https://go.microsoft.com/fwlink/?LinkId=3052&ID=265293)
260973, XCON: Setting Up SMTP Domains for Inbound and Relay E-Mail in Exchange 2000 Server
(https://go.microsoft.com/fwlink/?LinkId=3052&ID=260973)
315591, XCON: Authoritative and Non-Authoritative Domains in Exchange 2000
(https://go.microsoft.com/fwlink/?LinkId=3052&ID=315591)
321721, XCON: Sharing SMTP Address Spaces in Exchange 2000
(https://go.microsoft.com/fwlink/?LinkId=3052&ID=321721)
XFOR: How to Configure the SMTP Connector in Exchange 2000
(https://go.microsoft.com/fwlink/?LinkId=3052&ID=265293)
319759, XADM: How to Configure Exchange 2000 Server to Forward Messages to a Foreign Messaging System That Shares the Same SMTP Domain Name Space
(https://go.microsoft.com/fwlink/?LinkId=3052&ID=319759)
Microsoft Exchange 2000 Server Resource Kit
(https://go.microsoft.com/fwlink/?LinkId=12058)
Exchange 2000 Server Service Pack 3 Deployment Guide
(https://go.microsoft.com/fwlink/?LinkId=12337)
w w w w
Does this book help you? Give us your feedback. On a scale of 1 (poor) to 5 (excellent), how do you rate this book?
mailto:exchdocs@microsoft.com?subject=Feedback: Comparing and Configuring the POP3 Service.
For more information about Exchange, see https://www.microsoft.com/exchange/.
To download a self-extracting executable of all Exchange Product Team technical articles and online books, see https://go.microsoft.com/fwlink/?LinkId=10687.
|
Politica de confidentialitate | Termeni si conditii de utilizare |

Vizualizari: 750
Importanta: ![]()
Termeni si conditii de utilizare | Contact
© SCRIGROUP 2024 . All rights reserved