| CATEGORII DOCUMENTE |
| Bulgara | Ceha slovaca | Croata | Engleza | Estona | Finlandeza | Franceza |
| Germana | Italiana | Letona | Lituaniana | Maghiara | Olandeza | Poloneza |
| Sarba | Slovena | Spaniola | Suedeza | Turca | Ucraineana |
Most image editing software packages and digital cameras offer quick filters and presets to convert your photographs and images to sepia tones however they all create images that are compromised in one form or another. Digital camera conversions and lower end applications often just apply a sepia tint to a shot ignoring the images inherent luminosity and this looks very fake indeed. Photoshop has many useful sepia effects available either using droplets, gradient maps or tritones. Whilst these all do preserve luminosity they ignore other image ageing properties such as bleaching and weathering so this has to be adjusted manually. Here is a quick tutorial on how to achieve these effects with a minimum of effort.
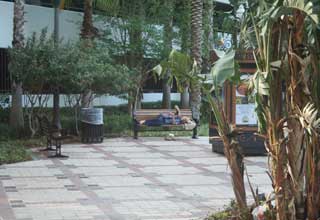
Here is the initial image to be converted. It is important to remember that sepia effects do not always work well with any image. The composition and style of the shot will have a significant bearing on how realistic the end result appears so if you are determined to convert a particular shot you may have to adapt it to suit before you begin.
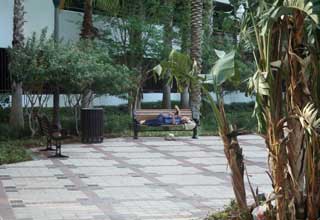
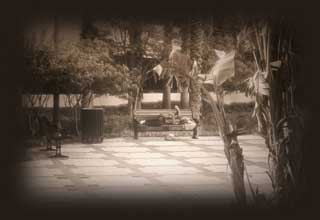
You can see here that some of the more modern aspects of the image such as the advertising rotunda and plastic bag in the trash bin have been either removed completely or reduced significantly with the clone tool so they do not detract from the old style effect of the sepia shot. Similarly, cloning in some extra plants has reduced some of the backgrounds building elements. The paving stones were extended and restored using CS2s very clever vanishing point clone tool.
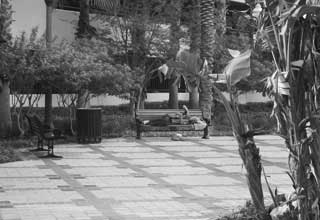
The next stage is to do an infrared mono conversion. This creates a monotone image with much greater brightness and contrast than performing a regular greyscale colour mode change. You can do this by either using a digital infrared filter if you have one or by using channel mixer (Image >> Adjustments >> Channel Mixer..) by hitting the Monotone checkbox and using only the red or green channel depending on the more dominant colour of the original image.
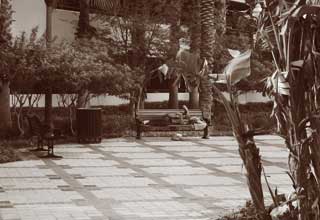
Applying the sepia colouration is very simple and perhaps the easiest ways to do it are to run your image through CS2s sepia droplet function or to convert to duotone in the colour mode menu and select tritone when the options box appears. You can then load a Photoshop preset using the Load function and there are about 4 or 5 different styles to choose from. When you have applied this, convert your image back to RGB.
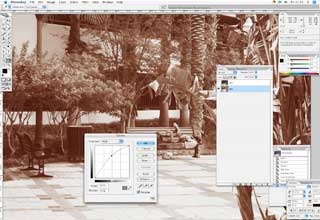
Duplicate your layer in Photoshop naming the top layer dark and the bottom light. Using Curves (Image >> Adjustments >> Curves) darken the top layer off considerably and on the light layer, brighten it up to the point of almost burning out the highlights.
On your top dark layer apply a layer mask (Layer >> Layer Mask >> Reveal All) and click on the mask icon in your layer palette to highlight it. Pick a very large soft paintbrush and paint random patches on the mask in highlight areas to allow the light layer to show through. You can apply a heavy gaussian blur to the mask to soften the transitions.
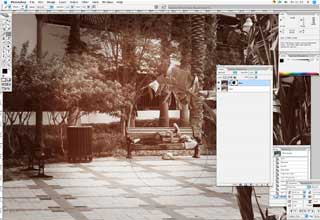
Flatten you layers and apply some diffuse glow (Filter >> Stylize >> Diffuse) to soften the whole image off. Create a blank layer on top of the image and using one of the darkest brown tones on the image, paint a thick soft border around the edges. Use Gaussian blur on a high setting to really spread and soften this border.
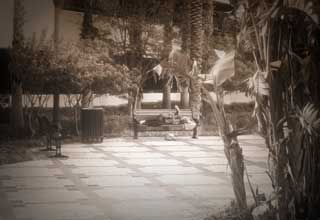
Set the border layer to a Multiply blending mode and reduce its opacity right down until you get the strength that best suits the tonal balance of the image. Finally, apply an auto levels fix (Image >> Adjustments >> Auto Levels) and then fade it back by about 60%. As a finishing touch you can also apply a little noise or grain from your filters to simulate an old film effect.
|
Politica de confidentialitate | Termeni si conditii de utilizare |

Vizualizari: 923
Importanta: ![]()
Termeni si conditii de utilizare | Contact
© SCRIGROUP 2024 . All rights reserved