| CATEGORII DOCUMENTE |
| Bulgara | Ceha slovaca | Croata | Engleza | Estona | Finlandeza | Franceza |
| Germana | Italiana | Letona | Lituaniana | Maghiara | Olandeza | Poloneza |
| Sarba | Slovena | Spaniola | Suedeza | Turca | Ucraineana |
Introduction
Chapter 1 Your First 3-D Application
Chapter 2 Setting the Stage
Chapter 3 Interfaces and Classes
Chapter 4 Creating Shapes
Chapter 5 Transforms
Chapter 6 Moving
Chapter 7 Hit Testing
Chapter 8 Color and Texture
Chapter 9 Sprites
Chapter 10 Lights and Shadows
Chapter 11 Making Movies
Chapter 12 The DirectDraw Interface
Chapter 13 DirectX 2
Appendix A Debugging
Glossary
Index
Many years ago I taught a Microsoft Windows programming course that took C programmers from ground zero to Windows programming in four days. The best part for me was telling them at the start of the first day that by the end the day they would all have created a Windows application. Not many thought this was possible, but nobody failed. By the end of the day, I had a lot of pumped-up apprentice Windows programmers who didn't want to go home. I hope that's how you'll feel by the end of this chapter.
In this chapter you'll learn how to create a Windows application that shows a few 3-D objects in a window. Well use Microsoft Visual C++ and the Microsoft Foundation Classes (MFC) to create the application framework. Then we have to add only about 50 lines of code to call functions in the 3dPlus library and we'll be done. If you want to see what we're going to create, try running the Basic sample from the companion CD. Figure 1-1 shows a screen shot of the Basic sample.
Note Before you can run any of the samples either from this book or from the DirectX 2SDK, you must install the DirectX 2 run-time libraries on your computer. To do this, read the installation instructions in the SDK or run the Setup program from the CD that accompanies this book and select the option to install only the run-time components.
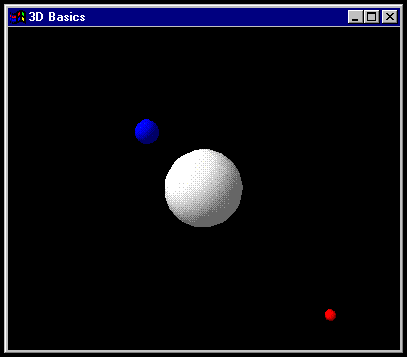
Figure 1-1. The Basic ample application
The Basic sample creates a window that shows a scene containing three spheres of different colors. The spheres are lit by two different light sources. The objects are set in motion so that the two smaller spheres appear to orbit around the large sphere.
This might not seem like much of an application, and as you'll see in a moment the guts of the application turn out to be quite simple. There's a lot of code behind the scenes in the MFC libraries, the DirectX 2 libraries, and the 3dPlus library, but you don't need to know how any of that works to build your first application. All you need to get started is a little guidance. The rest is just a matter of finding out exactly which calls you need to make to achieve the effects you want. The rest of the book looks at how the 3dPlus library is built and the reasoning behind all the code you're about to see. So say good-bye to the dog, take a deep breath, and jump!
There are two kinds of programmers in the world, and I think the balance is about 50:50. Half of us like to take existing code and munge it around until it does what we want. The other half like to start from scratch. I belong to the second category. I hate to use someone else's code because I might not know how it works, and debugging it later could mean a nightmare. So just in case you don't want to take the Basic sample and play with it, I'll describe how I built it. (Of course you're going to have to use my 3dPlus library for now, but by the end of the book you'll be able to rewrite that, too.) If you don't care right now how the application got built, skip this section and come back later when you need to.
Here are the steps I followed to create the Basic sample:
1. Use the Visual C++ MFC AppWizard (exe) to create a single-document-interface (SDI) application with no OLE support and no database support. You can also leave out the toolbar, status bar, printing, and 3-D features. This is the simplest Windows application you can create. I named my project Basic. I chose to use the MFC as a shared DLL option, but you can link it statically if you want.
2. Remove the document and view class files from the project. Mine were called BasicDoc.h, BasicDoc.cpp, BasicView.h, and BasicView.cpp. Delete the files from your directory and from your project.
3. Remove the main window files (usually MainFrm.h and MainFrm.cpp) in the same way. This leaves you with two C++ files: Basic.cpp and StdAfx.cpp.
4. Edit the source files to remove any reference to the header files for the document, view, or main frame classes. I also usually clean up some of the resources, like the About dialog box, the string table, any unused menus, and so on at this point, but a lot of this cleanup can also be done later.
5. In StdAfx.h add lines to include <mmsystem.h> and <d3drmwin.h>. The Mmsystem header is used for joystick functions we'll need later and the d3drmwin header defines all the DirectX 2 functions.
6. Include <3dPlus.h> in either StdAfx.h or Basic.h. I put mine in Basic.h so when I modify the library, I don't need to rebuild all the files in an application I'm working on.
7. Modify the InitInstance function in Basic.cpp so it looks like the InitInstance function that begins below, under Code. I also removed the About Box code (CAboutDlg).
8. Use ClassWizard to add an OnIdle function stub to Basic.cpp.
9. Edit the OnIdle function so that it looks like the code that begins below, after the InitInstance function
10. Click Settings on the Build menu; add the DirectX 2 libraries and the 3dPlus library to the link list in the dialog box. My samples all have 3dPlusd.lib, d3drm40f.lib, ddraw.lib, and winmm.lib. Note that the 3dPlus library project allows you to build either a debug version (3dPlusd.lib) or a release version (3dPlus.lib). For the samples, I use the debug build to get all the library symbols and to trace into the library code. The directories for the necessary libraries and include files must be specified in the Options dialog box. See Want to Start Playing Yet? below.
11. Update all dependencies and build the application. Your application should look just like the sample.
Note In some of the samples there are a few loose ends, such as File menu items that don't do anything. In some cases I removed all unused items. In others, I left them in because I thought you might find a use for them, and adding them back to the sources is a lot harder than pulling them out.
Let's look at the code required to create the spheres and set them spinning in the window. If you don't follow everything you're about to see, just take in what you can for now and trust that as you read on more and more of this will become clear. For now I want to show you how little you need to do, not explain why it's all in there. Here are the two functions from the Basic.cpp file that set up the scene and make it run:
BOOL CBasicApp::InitInstance()
BOOL CBasicApp::OnIdle(LONG lCount)
}
return bMore;
}
CBasicApp::InitInstance creates the window and the objects that form the scene, and CBasicApp::OnIdle updates the positions of the objects in the scene when the application is idle. The CBasicApp class was generated by AppWizard when the application was first built. CBasicApp is derived from the MFC class CWinApp, which provides the essential framework for a Windows application. Let's look at what the two functions do, step by step.
The first thing InitInstance does is to create the window that will display the 3-D scene. A window of the C3dWnd class is created as the application's main window. The C3dWnd class comes from the 3dPlus library as do all of the other classes we'll look at here that begin with the C3d prefix. (The source code for the 3dPlus library, as well as the other samples, is on the CD that accompanies this book.) A pointer to the main window is stored in m_pMainWnd, which is a member of the MFC CWinApp base class. This window pointer is used by the MFC code in implementing the applications message handling and so on. The final step in creating the window is to call UpdateWindow to paint the window onto the screen.
A C3dScene object is then created. The scene object is used to contain all the elements of one scene that we might want to display in our 3-D window, such as lights, 3-D objects, and so on.
The next step is to set up the lighting in the scene. We use two different lightsan ambient light and a directional light. The ambient light illuminates all objects evenly and on its own gives a flat appearance to the objects. The directional light behaves more like a spotlight. (Directional light alone gives a very harsh contrast, making the darker parts hard to see.) When an object is illuminated by a directional light, the intensity of the object's colors varies in a way that suggests a light shining on it from one direction. By using both kinds of light we get a reasonable 3-D impression, and we can still see all the bits of an object even if they are in the shadow of the directional light. The C3dScene class has a built-in ambient light so all we need to do here is set the level:
scene.SetAmbientLight(0.4, 0.4, 0.4);
Lights are made up of different levels of red, green, and blue. In this case, we set the red, green, and blue values to produce white light so that the color of the objects will look correct. Color values for lights can vary from zero to unity (0.0 to 1.0); in Windows programming we are used to integer color values that vary from 0 to 255. Using a floating point value (a double) might seem a bit of overkill, but bear in mind that the colors you set here are used to mathematically determine the exact colors of the faces of the objects in a scene. There's a lot of trigonometry and so on required to do the calculations, so using floating point values for color components really isn't so strange.
Unlike the ambient light that just needs to be set, the directional light needs to be created and added to the scene. Then the position and direction of the directional light can be set. The position coordinates are x-, y-, and z-axis values. The direction is set by defining a vector that points the way we want the light to look. Let's not worry about coordinates and vectors at the moment but take it for granted that the light is positioned so that it appears to come from the top left side of the scene.
Note I chose to set the directional light at the top left because this is the lighting direction Windows uses for its own 3-D controls.
Figure 1-2 shows the scene with the directional light in place and also shows the x-, y-, and z-coordinate axes.

Figure 1-2. The stage, coordinate axes, and directional light
Having created the lighting setup, we are ready to add some objects. We create three spheres and add them to the scene by calling the AddChild method. You can think of the AddChild function as attaching a child object to a parent object. In the case of the first object we create, the scene is the parent, but as we'll see later the hierarchy can be much more complex than that. We set the colors of the spheres using red, green, and blue values in the same way we specified the colors of the lights. White is the default for color objects.
The white sphere remains in its default position 0, 0, 0. The red and blue spheres are set some distance away from the white one by calling SetPosition. The dimensions given as parameters to SetPosition are 'model units,' which are rather arbitrary. You'll learn how object sizes are determined later.
The last steps are to apply a rotation value to the large sphere and then attach the entire scene, consisting of the lights and the spheres, to the 3-D window. The arguments to C3dShape::SetRotation define an axis as a vector of x-, y-, and z-coordinates to rotate around and a rate at which the rotation should take place. Rotating an object is actually quite complicated. The SetRotation function makes it very easy to apply the simple rotational effects we're using here. In Chapters 5 and 6 we'll be looking at the subject of rotating objects in a lot more detail.
The CBasicApp::OnIdle function is called by the MFC framework code when the application is idle (that is, when the application has no messages to process and no other applications are busy, which actually turns out to be most of the time). We use this idle time to move the scene to its next position and draw it into the window. All of this happens when the C3dWnd:: Update function is called (pWnd->Update(1)). The argument to C3dWnd:: Update is used to determine how far along the scene should be advanced. We'll use this argument later to keep movement in the scene at a fixed rate even though the idle time might vary. For now, we'll use the default value of 1 to advance the scene one (somewhat arbitrary) unit.
As you can see, we didnt use too many lines of code, but we did skate over a few of the points. You get a special prize if you spotted my use of a few static variables back theresorry about that. I used them here to keep the code as short as possible. As we progress, we'll add some support that makes using static variables unnecessary.
At the risk of repeating myself, let me remind you not to worry if everything wasnt clear first time around. We'll be looking at it all again as we progress through the book. Let's explore some of the details next.
If you run the Basic sample on a decent machine with a good video card that supports hardware bit block transfers (bitblts) you should be impressed by the performance. By a decent machine, I'm talking about at least a 50-MHz 486 or, preferably, a more recent Pentium machine with PCI video. The most critical element is the video card. If your card has lots of video memory (more than required for the display resolution you're using), and hardware that implements functions for moving video memory around, then the DirectX 2 libraries can take advantage of that memory and hardware. This greatly increases performance over older video cards that require the system processor to move the video memory around. In fact, supporting the hardware features of the latest generation of video cards is really what DirectX 2 is all aboutletting you get the most from your host.
To return to the sample: each sphere has 256 faces that have to be painted. For each face there are three or four coordinates that need to have their positions computed. The color of each face has to be altered according to the position of the face and the sum of all the effects of the lights in the scene. That's quite a lot of math to do, and the smooth movement you see is the result of all the calculations being done pretty quickly. The DirectX 2 rendering engine is quite an impressive piece of code that has been optimized to get the best possible performance.
Note All 3-D objects are created by piecing together lots of flat polygonsusually triangles. The polygons are the faces of the object. Why do they have to be flat? Only because that's the easiest and fastest thing for the computer to draw. We'll look at how to create objects in Chapter 4.
OK, so you're sold on the engine, but as you might have guessed, terrific performance necessitated a few trade-offs. For example, there are no shadows or reflections. Perhaps you didn't notice? Run the sample again and watch as the spheres revolve. Look at where the light is coming from: the red and blue spheres both pass between the white sphere and the directional light source, but no shadows appear on the white sphere. You don't see any reflections of the small spheres on the big one either.
The rendering engine doesnt do ray tracing so it doesn't generate shadows and reflections. The benefit we get from this is a massive increase in performance. Most people dont notice the missing shadows, evidence that effective 3-D animations don't rely on shadows and reflections. As you'll learn later, we can generate shadows and even the appearance of reflections by using a technique called a chrome wrap, so keep reading.
If you look back at the code above, you'll see that a call was made to SetRotation to make the big white sphere revolve in the scene. When you run the sample you can see that the white sphere is revolvingthe shading is so good it's quite hard to tell. However, you can certainly see that the two small spheres are rotating around the bigger one. But where is the code that told them to rotate? The secret lies in how they were added to the scene. You'll notice that the big sphere was added to the scene directly.
scene.AddChild(&sh1);
but the small spheres were added to the big sphere instead.
sh1.AddChild(&sh2);
sh1.AddChild(&sh3);
By attaching the small spheres to the big sphere, we are able to rotate the small spheres when we set the big sphere in motion. The ability to attach objects in a hierarchy is one of the major advantages of this 3-D rendering engine over many others.
Each object in the scene we created has an associated frame. The frame is really just a description of the mathematical transform (the position, size, or nature of an object) that needs to be applied to all the objects and frames attached to that frame before they are rendered. A frame can have other frames attached to it as child frames, and the transforms for any child frames get applied after the parent transform. The result is that the child frames move with the parent and can also have their own motions relative to the parent. To picture this, think about walking around inside an office in a big building. Your frame is the office you're in. The offices frame might be the entire floor and the floor's frame might be the entire building. Although you see yourself as moving only in the room, you're also moving relative to the floor you're on and the building youre in. Youll learn more about these topics in Chapter 5, when we look at transforms, and in Chapter 6, where we see how objects are moved.
In implementing the 3dPlus library of objects, I chose to give each scene a frame. Each shape and light also has its own frame. So you can group together any collection of objects and attach them to a frame or to each other in any way you want.
Why do you want to do this? Well, apart from orbiting spheres, there are quite a lot of effects that are very simple to implement using an object (frame) hierarchy. Consider the Mark VII Inter-Planetary Battle Tank, which as we all know has an X Band-Doppler radar for ranging its guns. If we want to model this tank in our 3-D application, we can create a shape for the radar, attach it to the body of the tank, and set the radar rotating about its support axis. In frame terms, the radar frame becomes a child of the tank's frame. Then we can concentrate on moving the tank and not have to worry about the radarit will always be in the right place and rotating correctly. Figure 1-3 shows a Mark VII tank in action.

Figure 1-3 (draft). The Mark VII Inter-Planetary
The last point I'd like to cover here is the coordinate system. Because were working in three dimensions, any point requires three values to represent its position. We have three axesx, y, and zarranged in what is known as a left-handed set. This calls for a little audience participation. (If you're reading in bed, you might want to warn your significant other that you are about to make weird hand gestures, which are not to be taken as some form of communication on your part.) Stick your left hand out in front of you, extending your fingers away from you with the palm of your hand facing right. Your thumb should be on top. Put your thumb up. Now curl your third and fourth fingers into your palm and bend your second finger to the right. Your hand should look something like Figure 1-4; your thumb is the y-axis, your first finger is the z-axis, and your second finger is the x-axis.
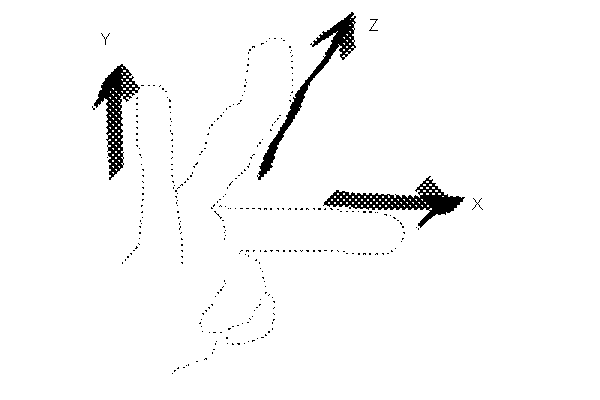
Figure 1-4 (draft). A left hand showing the left-handed coordinate axes
In the left-handed 3-D world, the y-axis is up, the x-axis is to the right, and the z-axis is into the screen (away from the user). Of course, it's not called left-handed because you can make your left hand into this strange shape but because if you had a threaded rod and rotated it from the x-axis to the y-axis, it would move in the direction of the z-axis. You can see we'd need a rod with a left-hand thread to make this work for our set of left-handed axes.
Many 3-D environments are based on right-handed coordinate sets, but ours is not, so get used to sticking out that left hand when you want to sort out which way things will be pointing.
The coordinates of points in 3-D space are specified in code in two ways. Sometimes coordinates are supplied as three doubles representing the x-, y-, and z-axis values, and sometimes they are supplied as a D3DVECTOR, which internally is a structure with member variables for the x, y, and z values. In either case, the axis values are floating point numbers. The scale used is arbitrary; I chose to set the camera position and other stage parameters so that a one-unit cube looks like a reasonable-sized object when placed at point 0, 0, in the scene. We'll look at coordinates and so on again later.
Note The 3dPlus library includes the C3dVector class, which is derived from D3DVECTOR. Anywhere that a D3DVECTOR type is specified as a function argument, you can also use a C3dVector object as the argument. I created the C3dVector class because I can make a C++ class more useful in the code than a simple data structure.
You've probably had enough of reading and hand exercises by now and want to crank up Visual C++, copy the Basic project from the CD that accompanies this book (if you havent already run the Setup program), and start modifying the application to do a few different things. You can try changing the colors of the shapes, the color of the lights, the rotation parameters, or even add a few more objects such as cubes, cones, or tubes. The C3dShape class has functions to create all of these simple shapes. Just before you leap into action, however, you should know a little bit about the samples and the development environment you need to set up.
Before you can compile any of the sample code, you need to set up your development environment correctly by doing the following:
1. Run the DirectX 2 SDK Setup program and install the DirectX 2 SDK development tools. This will add the DirectX 2 SDK include files, libraries, and so onto your hard disk. It will also install the DirectX 2 SDK run-time libraries if you didn't install them earlier.
2. Run Visual C++ and click Options on the Tools menu; click the Directories tab in the Options dialog box.
3. Add the path to the DirectX 2 SDK include files to the Include Files list and the path to the DirectX 2 SDK libraries to the Library Files list. If you don't do this, your applications won't compile or link.
Note The DirectX 2 headers have references to two filessubwtype.h and d3dcom.h, which are not actually used when building a Windows application and consequently are not shipped in the SDK. Unfortunately the Visual C++ dependency checker notices that these files might be needed and complains that it can't find them. To fix this problem I created two dummy filessubwtype.h and d3dcom.h. Youll find these files in the 3dPlus library Include directory. The files are empty except for a short comment.
All the samples use the 3dPlus library and you need to copy at least the include files and libraries to your hard disk before you can build the samples. It's simplest to copy the entire tree of the 3dPlus sample directory. That way you can compile the entire thing for yourself as a confidence test and be sure that everything is in place before you start work on the other samples. If you run the Setup program on the CD that accompanies this book, you will not need to manually copy the 3dPlus directory structure. You will, however, need to include the 3dPlusInclude directory in your IncludeFiles list and the 3dPlusLib directory in your Library Filer. Using the default Setup, your entries for the include and library lists should look like this:
C:MSDEVINCLUDE
C:MSDEVMFCINCLUDE
C:DXSDKSDKINC
C:3D3DPLUSINCLUDE
C:MSDEVLIB
C:MSDEVMFCLIB
C:DXSDKSDKLIB
C:3D_3DPLUSLIB
Of course you can do whatever you like with your files and set your compiler paths to find them. I set it up this way to cause the least amount of pain. The directory tree on your development machine should look something like the following:
C:
3D
3dPlus
Include
Lib
Source
Basic
Color
. . . (The other samples)
Dxsdk (The DirectX 2 SDK)
sdk
inc
lib
. . .
. . .
Msdev (Visual C++ installation)
. . .
Once your environment is set up and youre ready to start on a project, don't forget to click Update All Dependencies on the Build menu in Visual C++ to make sure the compiler can find all your header files.
If your answer is 'Not much,' I guess you aren't too impressed! I was hoping for something along the lines of 'Creating my first 3-D application was really easy' or 'I always wanted to make some colored spheres float around in a window and now I've done it. Each to his or her own, I guess. Of course, now you have thousands of questions about where we go from here and how all this works and how we get an elephant into the scene and how we fly through the planets with majestic music playing as a large bone floats up into space from the planet below and how to get a picture of President Nixon texture-mapped to a cube and what exactly is the armament complement of a Mark VII Battle tank? All this and more will be revealed in the following chapters. Well, most of it willI couldn't find a picture of Nixon and the tank is in the shop.
In the next chapter we're going to start building a slightly more complete application framework to which we'll add features as we progress through the rest of the book. We'll also look at how some of the underlying rendering engine is configured and start to explain how it works.
In the last chapter we created a simple application to show how little code was required to get up and running. In this chapter were going to build a slightly more complex application framework that we can expand on in the following chapters. The new framework is similar to what you created in Chapter 1 except that it has a menu bar and toolbar and creates the 3-D window a little differently.
Im also going to cover a good deal of conceptual information you should find useful. Ill go through the details of how this framework was built so that you understand, for instance, how to add menu items of your own. Well look at how the 3-D window works in more detail. We will examine the DirectX 2 device and viewport interfaces, see what they are, how they work, and how we control them. We are also going to look at frames in more detail and see how the stage, camera, scene, and the scenes objects relate. Finally well look at how to load 3-D objects from disk files and show them in a window. By the end of this chapter youll at least have an object file viewer you can modify to test different sample objects.
The sample application that accompanies this chapter, Stage, is in the Stage directory. You might like to run it now and see what it does before we get into how it was built and how it works.
The architecture that you start with in a project often greatly influences how the rest of the project grows. A bad framework can mean that your project grows rather more warts than you would like. For example, when I wrote Animation Techniques for Win32 I was new to C++ and also to using Microsoft Visual C++ and the MFC libraries. I made then what I now consider to be a mistake when I started creating the samples: I used Visual C++ to build a single-document-interface (SDI) framework and just assumed my work would fit in somewhere. I built an SDI application because at the time the only choices were SDI or multiple document interface (MDI), and MDI was the last thing I needed to show off an animated game. In hindsight, I think that my samples would have been simpler if I had avoided the Visual C++ document/view metaphor and stuck to using a simple window with a menu bar.
This time I decided that the application framework for the samples in this book would be simpler and closer to what might be needed to create a game. (Thats not to say that you cant use this framework for more complex applications, its just saying that Ive dispensed with the document/view idea to simplify the sample code, which also happens to fit into what a game builder might want.
In fact, as you will see shortly, the window object we use can be used as an applications main window as it is in the Basic sample, or as a child window as it is in the Stage sample. You can even switch it to full-screen exclusive mode, take over the video display entirely, and run the video in some mode other than the one Windows was using before your application was started. On the whole, even though the overall application framework is much simpler than what Ive used before, there is enough flexibility in the design to allow for many different uses.
Im not suggesting that you use the sample code here as the basis for a real product. But it can provide a platform on which you can effectively experiment with the ideas for a product.
Here are the steps I took to build the framework using Visual C++:
1. Use the Visual C++ MFC AppWizard to create an SDI application with no database support, no OLE support, and no printing support. This is the simplest windowed application you can create. I called my project Stage. You can choose to use MFC linked statically or in a DLL. My samples all use the DLL to keep the EXE file size smaller.
2. Remove the document and view class files from the project. Mine were called StageDoc.h, StageDoc.cpp, StageView.h, and StageView.cpp. Delete the files from your directory and remove them from your project. This leaves you with three C++ files: Stage.cpp, MainFrm.cpp, and StdAfx.cpp.
3. Edit the source files to remove any reference to the header files for the document or view classes.
4. In StdAfx.h add lines to include <mmsystem.h> and <d3drmwin.h>. The Mmsystem header is used for joystick functions well need later, and the d3drmwin header defines all the DirectX 2 functions.
Include <3dPlus.h> in either StdAfx.h or Stage.h. I put mine in Stage.h so when I modify the library, I dont need to rebuild the precompiled header file in an application Im working on.
5. In the Project Settings (Build-Settings), add the DirectX 2 libraries and the 3dPlus library to the Link list. My samples all have 3dPlusd.lib, d3drm40f.lib, ddraw.lib, and winmm.lib. Note that the 3dPlus library project allows you to build either a debug version (3dPlusd.lib) or a release version (3dPlus.lib). For the samples, I use the debug build so you get all the library symbols and can trace into the library code if you want. The d3drm40f library provides the 3-D functions well be calling. The ddraw library provides DirectDraw support; and the Winmm library provides some multimedia functions for playing sounds.
Now you should have the essential bits. A lot of code needs to be added to this framework before well have an application that can be built, but this is as far as we can go with AppWizard. Figure 2-1 shows the architecture of the Stage application.
[Figure 2-1 to come]
Figure 2-1. The application architecture
The box labeled DirectX 2 Engine is a bit like
The next step is to modify the applications startup code to create the main window. In the Stage.cpp file well edit the function CStageApp::InitInstance. When AppWizard builds an SDI framework it adds code to the InitInstance function to create the first empty document, which in turn creates the main window. Because we threw out the document code, we need to create the main window ourselves. Heres what the new version looks like:
BOOL CStageApp::InitInstance()
// save the main window pointer
m_pMainWnd = pFrame;
return TRUE;
}
Two things are important herecalling LoadFrame to load and display the frame and saving a pointer to the frame window in m_pMainWnd. We save the pointer to the frame because the MFC classes need to know which window is the main window of the application to be able to pass messages to the window, enabling the application to function correctly. Youll also have to edit the MainFrm.h file to make the CMainFrame constructor publicits protected by default. While youre in MainFrm.h, you need to add the C3dWnd m_wnd3d member variable declaration to the public attributes of CMainFrame.
If you compile the code now, your application should run and show the main window with its menu and toolbar. Although we dont yet have the framework to support the rest of the edits required for the Stage.cpp file, lets go ahead and finish up with it so we can move on to creating the 3-D window.
There are two functions left to add to Stage.cpp: OnIdle and OpenDocumentFile. The first updates the scene during idle time and the second deals with one aspect of opening files. The idle time handler is added by using ClassWizard to add an OnIdle function to the CStageApp class. We then edit the OnIdle function to look like the following:
BOOL CStageApp::OnIdle(LONG lCount)
}
return bMore;
}
This function is called when the application is idle. The idea is that if our application has nothing to do it returns FALSE and someone gets to play with a different application for a while. If our application has lots of stuff to do, such as making a 3-D scene move, it returns TRUE to indicate that it would like more idle cycles. The C3dWnd::Update function that is called from the OnIdle function returns TRUE if it has a scene it can render and FALSE if theres nothing to display. This way our application doesnt needlessly request idle cycles when there is nothing to draw.
The second function we need to add to Stage.cpp, OpenDocumentFile, handles the most-recently-used file list in the menu. If you add the code described in the next section, The Main Window, but dont add this function, everything works fine until you click an item in the Recent File list. At that point MFC generates an ASSERT and your application stops. Its a little unfortunate that the MFC framework is so closely tied to the document/view architecture, but it is, so we must deal with the problems caused when we stray from what AppWizard creates, as we did when we removed all the Doc and View files from our project. Fortunately the fix is simple. All we need to do is override CWinApp:: OpenDocumentFile (using ClassWizard to add the function to the CStageApp class) as follows:
CDocument* CStageApp::OpenDocumentFile(LPCTSTR lpszFileName)
else
}
When a Recent File list item is clicked, pass the name of the selected file to the main frame window to deal with just as if the user had clicked Open on the File menu.
Thats it for the application framework, but we havent seen the implementation of all of the functions yet, such as OpenFile, so if you compile at this point youll get a few errors. Now we configure the main window and add the 3-D elements to it.
We need to do quite a bit of work with the main window to get it to look and behave the way we want. There are lots of details here and Im going to go through them all for the benefit of those unfamiliar with MFC. After this well leave the framework alone and concentrate on the far more interesting issues associated with displaying 3-D objects. (If youre so inclined, now is a good time to get another cup of coffeeI just did.)
AppWizard adds a lot of code to the OnCreate function in CMainFrame. This code creates the window itself, the toolbar, and the status bar. We need to add some more code to create a 3-D window as a child of the main frame window. And just for interest, well create an initial scene with an object in place so we can tell when weve built something that works. Theres nothing worse than typing in hundreds of lines of code, compiling, and running only to see a large black window. (Not the sort of thing to get you jumping up and down with excitement.) Heres the OnCreate function with the code that AppWizard generates omitted so you can see just the bits we need to add. (Refer to the Stage project on the companion disc to see where in the program the code was added.)
int CMainFrame::OnCreate(LPCREATESTRUCT lpCreateStruct)
NewScene();
ASSERT(m_pScene);
// Create a shape to add
C3dShape sh1;
sh1.CreateCube(2);
m_pScene->AddChild(&sh1);
sh1.SetRotation(1, 1, 1, 0.02);
return 0;
}
This is pretty much the code we used in the Basic sample to get the initial scene displayed. Note that the IDC_3DWND constant needs to be added to the project by using the View Resource Symbols menu item in Visual C++. The CMainFrame class has gained a couple of data members: m_wnd3d and m_pScene. We added wnd3d to MainFrm.h earlier after we edited the CStageApp::InitInstance function (see 'Making the Main Window Visible,' above). We add m_pScene now as shown:
class CMainFrame : public CFrameWnd
;
Note C++ purists might not like the fact that Ive declared the window and scene objects as public. However, I often do this in sample code to avoid having to declare an access member function such as GetScene. Its less cluttered to just provide direct access to the object even if it does break the encapsulation.
Now our main frame window includes a 3-D window and a pointer to the current scene. Looking back to the OnCreate function (see 'Creating the 3-D Window,' above) you can see that the 3-D window is created, a new scene is created using the NewScene function (well see how NewScene works later), and then a cube is created, added to the scene, and set rotating. If you look at the C3dWnd::Create function in the 3dPlus library youll see that it creates the 3-D window as a child window and the this pointer shown in the OnCreate function above is used to identify the 3-D windows parent. Not much technology here but important groundwork nonetheless.
I run my development machine with a screen resolution of 1280 by 1024. Windows has an annoying habit of creating huge windows by default just because I have a big display. When Im working on applications that dont need large windows I usually fix the initial size by adding a couple of lines of code to CMainFrame::PreCreateWindow. This example fixes the initial size of the main window at 300 by 350.
BOOL CMainFrame::PreCreateWindow(CREATESTRUCT& cs)
We mentioned above that we would look at the NewScene function. Lets do that now:
BOOL CMainFrame::NewScene()
// Create an initial scene
m_pScene = new C3dScene;
if (!m_pScene->Create()) return FALSE;
// Set up the lighting
C3dDirLight dl;
dl.Create(0.8, 0.8, 0.8);
m_pScene->AddChild(&dl);
dl.SetPosition(-2, 2, -5);
dl.SetDirection(1, -1, 1);
m_pScene->SetAmbientLight(0.4, 0.4, 0.4);
m_wnd3d.SetScene(m_pScene);
return TRUE;
}
We add the NewScene function to MainFrm.cpp. NewScene removes any existing scene and creates a new one with a default lighting arrangement. It then attaches this scene to the stage that is part of the 3-D window. When Im experimenting with creating new objects, I like to be sure they can be destroyed and recreated without problems. This function allows us to destroy everything weve got set up in a scene and start again. (It also turns out to be very useful when my young son has grabbed the joystick and moved all the objects off the screen so they cant be selected.)
Because the AppWizard created a toolbar and status bar in the framework that share space in the main windows client area, we need to be able to reposition the 3-D window if the user moves or removes the toolbar or hides the status bar. Overriding the CFrameWnd::RecalcLayout function by using ClassWizard to create CMainFrame::RecalcLayout allows us to control this process:
void CMainFrame::RecalcLayout(BOOL bNotify)
}
Essentially this code rearranges the control bars, figures out what space is left over, and uses that to position the 3-D window. Check out the MFC documentation if this sort of stuff excites you.
All good things must come to an end, and so do windows. Adding an OnDestroy message handler (by using ClassWizard with the WM.Destroy) allows us to tidy up:
void CMainFrame::OnDestroy()
}
Failing to delete all the objects we create results in memory leaks. Thanks to the MFC memory tracking mechanism in debug builds, these are reported when the application exits, so spotting them is easy. Fixing them can be a bit more demanding so lets be tidy folks.
One of the things thats interesting about the 3-D rendering engine is that it draws directly to the video memory and doesnt use the Windows Graphical Device Interface (GDI). So its really important that the rendering engine knows where the window its drawing into is positioned on the screen. If it doesnt know the exact position, it either wont draw, or worse, it will draw over other windows. The rendering engine also needs to know if the application is active or not and if the application has received any palette messages. If the application becomes inactive, the rendering engine must release the palette so that other applications can use it. All of these requirements are handled by adding functions to process WM_ACTIVATEAPP, WM_PALETTECHANGED, and WM_MOVE messages:
void CMainFrame::OnActivateApp(BOOL bActive, HTASK hTask)
void CMainFrame::OnPaletteChanged(CWnd* pFocusWnd)
void CMainFrame::OnMove(int x, int y)
As you can see, all thats required for the rendering engine to draw the video display is for your application to send the messages to the 3-D window, which handles the details of communication with the rendering engine.
The final steps are to handle the File/New and File/Open menu items. Since we already wrote a function to delete the scene and start again, handling the File/New menu item is trivial (using the ClassWizard with the ID_FILE_NEW Object ID):
void CMainFrame::OnFileNew()
Handling the File/Open menu item is done with these two functions:
BOOL CMainFrame::OpenFile(const char* pszPath)
void CMainFrame::OnFileOpen()
Lets see how the OpenFile function works.
A new C3dShape object is created and its Load member function is called. This function either tries to open the file or, if no filename is supplied, it displays a dialog box asking the user to select a file. Assuming that the file is a valid 3-D object file, the C3dShape code opens the file and creates a new 3-D object from the data in the file. Easy, eh? The new object is added to the scene and set rotating so you can see it in all its glory. The name of the newly opened file is then added to the Recent File list to make it easy to open again later. (Remember that the OpenDocumentFile function in Stage.cpp also calls the OpenFile function when you select an item from the Recent File list.)
There are a few finishing touches we need to add before our Stage project will compile cleanly and run correctly. First, we must initialize m_pScene in the CMainFrame constructor with the statement m_pScene = NULL. Also, since the functions NewScene and OpenFile were not created by the ClassWizard, you need to manually add declarations for them in MainFrm.h in the CMainFrame class constructor.
If youre still awake, you can compile and build the code. You should now have a functional 3-D object file viewer. Of course, you havent any idea how it works; well look at that next, and I think youll find it very interesting.
The word window means lots of things: to traditional graphics programmers it relates to how a scene is projected onto a flat surface; and to many of us its an object in an operating system that seems to have a zillion APIs. Any way you look at it (no pun intended) window is a vastly overused word, running a close second to object. The problem with describing a 3-D rendering system is that no matter what words are used to describe the various parts of the system, someone wont understand or will insist that a term is used incorrectly. I subscribe to the idea that even if it's is grossly wrong, commonly used terminology is good enough for me. The same applies to documentation: if the documents refer to it as a window, window is generally what Ill call it. So if you dont like how Im about to describe the rendering system, dont blame meI didnt pick the words.
Lets start at the top. The window is the Microsoft Windows object that handles messages and appears in your application. The viewport is a mathematical description of how the appearance of a set of objects in 3-D space are drawn into the window. The device is software associated with the actual video device that implements the video system in your computer. To create a 3-D scene in your application, you need a window, a viewport, and a device. In fact, you can have multiple viewports and multiple windows associated with a single device, but were going to build a system that has one window, one viewport, and one device. You manage the window; the rendering engine manages the viewport and the device.
Lets look at what having a window open on the desktop really means. Figure 2-2 shows an open window at an arbitrary position on the desktop.
[Figure 2-2 to come]
Figure 2-2. A window open on the desktop
Now lets drop down to the hardware level and look at a map of the memory on the video adapter card.
[Figure 2-3 to come]
Figure 2-3. The video adapter memory map
Lets say you have a video adapter with 2 MB of video memory as shown in the memory map diagram in Figure 2-3. Youre running your video display at 1024 x 768 resolution with 256 colors, so the video card is actually using only 786,432 bytes (1024 768) of your video memory. This is the part shown as the active video memory in Figure 2-2. The open window is maybe 512 x 400 pixels, which uses 204,800 bytes of the video memory.
Now lets say that you want to show a 3-D animation in your open window. You define the window by setting its size and position on the desktop. This determines the area of video memory that will be used to display the contents of the window (shown as window memory in Figure 2-3). If you were to use normal Windows GDI functions to draw to your window, GDI would use the video device driver to set pixels in the video memory that gave the effect you asked for. Figure 2-4 shows the software architecture we usually deal with in Windows programming.
[Figure 2-4 to come]
Figure 2-4. The Windows drawing model
In this case, to draw a rectangle, you call the Rectangle function. GDI asks the device driver if it draws rectangles; if not, GDI negotiates with the device driver for some other way to draw the rectangle by using lots of lines or whatever. The device driver then draws the pixels into the video memory or, if were lucky, uses hardware on the video card to draw the rectangle directly. So, do you think this process is fast or slow? Well, its not that slow, but its not super speedy either. The problem is that GDI is very general and there is a price to pay for that.
Wouldnt it be great if you could bypass GDI and the video device driver and just write to the video memory directly? That might be faster, but youd have to understand how every video card on the planet works. DirectDraw provides a better approach that allows you to ask the device driver for direct access to the video memory and if it can provide access you get to party on the pixels directly. If the driver cant provide the access, it provides a mechanism so you think youre drawing pixels directly to the video memory even though the device driver is doing some of the work. The application can choose to use either GDI or DirectDraw functions to get the effect and performance it needs. When DirectDraw is installed, the drawing model looks more like Figure 2-5.
[Figure 2-5 to come]
Figure 2-5. Drawing with DirectDraw
DirectDraw also provides bit block transfer (bitblt) functions that you can use, which the video hardware implements if it is capable of doing so. By calling the bitblt functions in DirectDraw you get either totally awesome bitblt performance implemented directly in the adapter hardware, or you get merely stunning performance implemented by the DirectDraw code writing directly to the video memory.
Theres one other very important feature to DirectDraw. Look back at Figure 2-3 for a moment. Less than half the available video memory is actually being used to provide the desktop image you see on screen and the remainder is wasted. OK, so what could we do with it? Given that the video card in Figure 2-3 has a hardware blitter (a special system built to perform bitblt operations), we could perhaps use some of this spare memory to store sprite images, texture maps, and so on. Then we could use the hardware blitter to quickly move the images in this off-screen video memory area directly to the active video area. By avoiding the need to move data over the computers data bus, we can potentially speed up our video effects. DirectDraw provides a management scheme for this spare memory and allows you to create surfaces within it for whatever use you can think of. We can even use a chunk of this spare memory as a second page buffer that is the same size as the main window, and use this buffer as our animation rendering area. We can compose a new scene in this off-screen video memory and do an extremely fast bitblt to update the active video memory when we want the scene to change.
To understand why copying memory within the video memory is faster than copying from main memory to video memory, you need to understand the hardware architecture. Figure 2-6 shows a simplified hardware model that illustrates the main components.
[Figure 2-6 to come]
Figure 2-6. An example of a video hardware architecture
The video processor works closely with the video memory and is highly optimized for performance. Transferring data between chunks of video memory means the data moves only across the video data bus. Transferring data from the main memory to the video memory is generally much slower because the block of data in main memory needs to be moved across the computers main data bus, which is narrower than the video data bus, and then via the video bus interface to the video bus and into the video memory. Transferring data between the two buses involves a negotiation between the main processor and the video processor. This takes time, and the processors might not get anything else done until the transfer is complete. Ive oversimplified the story here, but you can see that video to video bitblts involve less bits of hardware than do the main memory to video bitblts, which generally means they are faster.
In fact, you can go even further with DirectDraw to speed up the video transfer. If you are willing to run full-screen in Exclusive mode, the video hardware can flip between two pages in the video memory, achieving the kind of animation performance normally associated with DOS games.
So what does all this have to do with the 3-D rendering engine? Well, the engine needs to draw very quicklyideally straight to the video memory, or better still, by using some nifty piece of 3-D rendering hardware on the video card. By the time you read this book there may well be hardware-accelerated video cards on the market for about $200. To make all this video-transferring work, the rendering engine calls a software layer (in this case DirectX 2), which notifies the video card to execute a set of 3-D primitives (shapes) directly. If the video card cant handle the request, the DirectX 2 software drivers emulate the function. With all this new software in place we now have a model (Figure 2-7) that allows any softwarenot just the rendering engineto call a set of 3-D drawing functions and be assured of the best possible performance. Your applications can take whatever path you need to get the effect you want.
[Figure 2-7 to come]
Figure 2-7. Rendering through the DirectX 2 layer
Lets return to where the device and viewport fit in to this scheme. The device is a chunk of software in the rendering engine that deals with the DirectX 2 layer (Figure 2-7); the viewport controls how the device is used to draw into the video memory area defined by the window. So the entire function of the window that you create is simply to define the area of video memory that the device will manage. When we build a 3-D window we also create a device, specifying which area of video memory the device gets to run with. There are several ways to do this; well look at just two.
Its easiest to call a function that creates the device directly using a window handle. This is wonderful because you dont need to have any idea about how the DirectX 2 layer works, you just provide your window handle and the rendering engine figures out the rest. You can also use the DirectDraw functions to allocate the video buffers youll need and use some of the DirectX 2 functions to define a Z buffer. (A Z buffer is a special video buffer that provides depth information about each pixel in the image.) You can then pass all this information to the rendering engine, which builds a device you can use.
Obviously its much easier to create the device directly from the window handle than to create it from a bunch of DirectDraw surfaces, but thats not what I did. In my first pass at the 3dPlus library I did indeed create my device from the window handle. Then one weekend I went crazy and decided to play with the DirectDraw functions. As a result I created a set of classes that act as wrappers for the DirectDraw functions, making it just as easy to create the rendering engine device from DirectDraw surfaces as it is to create the device from a window handle. I can tell youre not convinced, so heres the code that creates the stage object in the 3-D window for the Stage project weve been discussing in this chapter:
BOOL C3dWnd::CreateStage()
// Create DirectX 2 object
m_pD3D = new CDirect3D;
if (!m_pD3D->Create(m_pDD)) return FALSE;
// Set the color model
if (! m_pD3D->SetMode(D3DCOLOR_MONO)) return FALSE;
// Create a stage object
m_pStage = new C3dStage;
if (!m_pStage->Create(m_pD3D)) return FALSE;
// Attach any current scene
m_pStage->SetScene(m_pScene);
return TRUE;
}
The first half of the C3dWnd::CreateStage function deals with creating the DirectDraw and DirectX 2 objects, which provide the underlying mechanism for drawing 3-D objects to the window. The DirectDraw object is set to operate in windowed mode rather than full screen and the DirectX 2 object is set to run using what is known as the MONO (monochrome) color model. (Well look at color models in Chapter 10.) The last few lines create a C3dStage object from the DirectDraw object and attach the current scene to the stage object. The C3dStage object contains C3dDevice and C3dViewport objects that communicate with the DirectDraw and DirectX 2 components. The stage also contains a C3dCamera object that well take a closer look at a little later. The function that actually creates the stage from the DirectX 2 object looks like this:
BOOL C3dStage::Create(CDirect3D* pD3D)
return TRUE;
}
As you can see, the function above consists of creating the C3dDevice and C3dViewport objects. The creation of the device is done by calling the DirectX 2 engine and passing it a pointer to the DirectDraw components we want to use:
BOOL C3dDevice::Create(CDirect3D* pD3D)
m_hr = the3dEngine.GetInterface()->CreateDeviceFromD3D(
pD3D->GetD3DEngine(),
pD3D->GetD3DDevice(),
&m_pIDevice);
if (FAILED(m_hr))
ASSERT(m_pIDevice);
return TRUE;
}
If we were creating the device from a window handle instead of from a set of DirectDraw surfaces, this function would be calling CreateDeviceFromHWND instead of CreateDeviceFromD3D.
Because Id already written the code using DirectDraw rather than a window handle, I chose to leave it in place as an example of how it is used. At some point if youre going to do your own thing with the rendering engine rather than use the 3dPlus library, you should look at creating your device from a window handle. Of course, if you use the 3dPlus library classes you can forget all about how they are implemented and just use them as a set of black-box functions. However, knowledge of the underlying engine is essential if you want to extend the 3dPlus library.
Having had a quick look at the hardware to keep the engineers happy, lets move into a more abstract plane and look at how the projection system works. (The projection system refers to the way in which objects are projected onto the display.) Because objects can float almost anywhere in 3-D space, we need a way to define whats going to be visible in our window. In photographic terms, we need to decide which way to point the camera and the focal length of the lens. In addition, in the interest of efficiency, we need to define two clipping planesfront and back. Anything behind the back plane isnt rendered, and anything in front of the front plane isnt rendered. Figure 2-8 shows the viewing frustum that defines what will be visible in a scene.
[Figure 2-8 to come]
Figure 2-8. The viewing frustum
Note Frustum is defined by Websters as That part of a solid cone or pyramid next to the base that is formed by cutting of the top by a plane parallel to the base.
The front and back plane positions can be set using IRLViewport::SetFront and IRLViewport::SetBack. IRLViewport is a COM interface used to control the viewport. The angle subtended at the camera can be altered using IRLViewport::SetField. The creation of the C3dStage object sets some of these parameters and leaves others at their default values. If you look at the C3dStage class youll see that I havent exposed methods to play with the frustum parameters because the default values work fine for the sample applications. (If you want to, its very easy to add these additional methods for yourself in order to experiment with different camera angles and so on, but we are getting ahead of ourselves a bit.)
In order to calculate exactly how a 3-D object will appear on the screen, the position of the objects vertices (corners, if you like) have to be manipulated by applying a transform, which maps the 3-D coordinates into 2-D coordinates on the window. This coordinate transformation process is done using a 4 x 4 matrix that is constructed by combining transforms for perspective, scale, and translation (position). Essentially, each 3-D coordinate gets multiplied by the transform matrix to produce a 2-D coordinate in the window. If you want to know more about the theory, I suggest you refer to J. Foley, A. van Dam, S. Feiner, and J. Hughes, Computer Graphics: Principles and Practice.
In practice the story is a little more complex. (Isnt it always?) In Chapter 1, I mentioned that the rendering engine uses frames to represent a hierarchy of transforms. Objects attached to frames can be moved (transformed) relative to other frames. To compute the 2-D coordinates for any given object, the transforms of all the frames in the hierarchy above the object must be combined to get the final transform for the object.
Note I should mention that Im using a bit of poetic license here. A frame isnt a physical object, like Ive shown in Figure 2-7, but rather a transform that gets applied to all of its children. As such, it has no physical size or shape. Having said that, I like to think of frames as structures made from pipe cleaners and drinking-straws that are glued to each other. This helps me visualize how shapes move when attached to their frames in a scene.
Combining all those transforms together sounds lengthy and detrimental to performance, and it would be if it were done needlessly. The rendering engine is a little more subtle, though. It keeps a copy of the final transform for each frame (obtained by multiplying all the frame transforms together), and if none of the frames above a particular frame in the hierarchy change, the final transform doesnt need to be recomputed. Thus, using frames doesnt necessarily reduce performance. In practice, if you have various objects moving in a scene, calculating the location of all those objects has to be done somehow. Having a hierarchy of frames to keep track of relative object positions greatly improves the chances that you wont perform redundant computations in figuring out the final result. Well look at transforms in more detail in Chapter 5. If youre feeling a bit lost, hang in there and Ill try to clear things up later.
The C3dStage object provides the root frame for our application's projection system. All other frames are in some way child frames attached to the stage frame. A frame for the camera and a frame for the current scene are attached directly to the stage frame. All the frames within a scene are child frames of the scenes frame. By using frames in this way, its very easy to define the relative positions of the camera and the scene. It is also easy to move the camera on the stage frame to give a feeling of flying through a scene, or to fix the camera in one place while moving the scene aroundanother way to achieve the flying affect.
When the stage frame is created, the camera is placed in front of the stage facing in toward the center. In other words, the camera is placed at a negative value on the z axis. Figure 2-9 shows the relationship between the camera frame and the stage frame.
[Figure 2-9 to come]
Figure 2-9. The camera frame and stage frame
Well be looking at frames and how they affect an objects position in the scene again when we cover transforms in more detail. For now, well move on to a quick look at how shapes get loaded from files.
The last piece of code we added to the main frame window was to load a C3dShape object from a disk file and show it in the current scene. Well look at shapes in more detail in Chapter 4, but I want to introduce you to whats in a C3dShape object and discuss why I created it that way.
The DirectX 2 SDK provides the tools you need to create applications that employ the rendering engine. The SDK doesnt include any tools to create 3-D shapes, nor are there many simple functions in the SDK that create shapes, because it is assumed that you have your own tools to create scenery, 3-D objects, texture maps, and so on. However, I considered a slightly different scenario. I imagined a small company might like to evaluate this rendering engine before investing money in the tools required to generate the artwork for a big project. But with no tools to create shapes, how would anyone be able to experiment? In fact, the SDK does have functions that allow you to create shapes; you provide a list of vertex coordinates and a set of face vertex lists for your shape and call a function to create the shape. I thought this implementation was way too low-level for initial tinkering so I added functions in the 3dPlus library to create common geometric shapes such as cubes, spheres, rods, and cones. I also added some code to make it easy to use Windows bitmaps as images and texture maps, which the SDK is missing. But before I implemented any of these functions, I discovered a single function that loads a shape from an XOF file. So my first implementation of the C3dShape class consisted more or less of a constructor and the Load function. With this minimal piece of code I could get some objects visible on my stage.
If you review the DirectX 2 rendering engine documentation you will see that a frame can have one or more visuals attached to it. A visual is a shape or texture that can be rendered as a visible object. A visual in itself doesnt have a position but needs to be attached to a frame so that it can be transformed in a way that makes it appear where its supposed to be in the window. To keep things simple I built my C3dShape object so that it always has one frame and one visual associated with it. With both a frame and a visual, the C3dShape object has position as well as shape, which makes it a lot more like a real object. The downside to this is that if you want to have 23 trees in a scene and all the trees are exactly the same, you apparently need 23 frames and 23 visuals to create your forest, which isnt very efficient. It would be much better to have only one shape (visual) and to render that one shape in 23 different places. In other words, we would attach one visual to 23 frames, thus saving the vast amount of data required to define the other 22 shapes.
Actually, you can attach the same visual element from a C3dShape object to several frames as well see later in Chapter 4 when we look at how to clone a shape. Even though this simple design looks a bit inefficient here, it can be used quite efficiently.
Lets look now at how the C3dShape::Load function works. This will allow me to introduce you to some of the details of the implementation and in particular to show you some real examples of how the rendering engine COM interfaces are used.
Note for OLE programmers Although the DirectX 2 engine is implemented as a set of COM objects and interfaces, there is no IClassFactory support. You cannot create these objects by calling CoCreateInstance, and you dont need to call CoInitialize in the application.
Heres the Load function in its entirety:
const char* C3dShape::Load(const char* pszFileName)
else
// Remove any existing visual
New();
// Try to load the file
ASSERT(m_pIMeshBld);
m_hr = m_pIMeshBld->Load(strFile);
if (FAILED(m_hr))
AttachVisual(m_pIMeshBld);
m_strName = 'File object: ';
m_strName += pszFileName;
return strFile;
}
You can use this function in two ways. If you know the name of a file you want to open, you can call it like this:
C3dShape shape;
shape.Load('egg.xof');
If you need to browse for a file to open, you can call the following:
C3dShape shape;
shape.Load(NULL);
If no file name is provided, a dialog box appears with the filter string set to *.xof so that by default the dialog box only shows files the function can open. Having obtained the name of the file to open, the local function New is called to remove any existing visual from this shape. Because I try to always create objects that are reusable, you can call Load on a C3dShape object as many times as you want. I find this much more useful than having to create a new C++ object each time I want to load a shape to play with.
The next bit of the loading code performs the real magic and needs the most explanation:
ASSERT(m_pIMeshBld);
m_hr = m_pIMeshBld->Load(strFile);
if (FAILED(m_hr))
First a test is made to verify that the m_pIMeshBld pointer is not NULL. Youll find these ASSERT statements throughout the 3dPlus library code. Then a call is made to IRLMeshBuilder::Load to load the file and create a mesh from it. IRLMeshBuilder is a COM interface that deals with the creation and modification of meshes. A mesh is a collection of vertices and faces that define the shape of an object. (Actually a mesh has a little more to it than that, but thats enough of a description for the moment.) This function, like the majority of COM functions, returns an HRESULT that contains a code indicating whether or not the call was successful. Two macros, SUCCEEDED and FAILED, are defined to test an HRESULT value to see if a call was successful or not. These are actually defined as a part of the OLE functions and arent specific to DirectX 2. I made it a policy to assign the result of all COM interface calls made in the 3dPlus library to the m_hr member variable, which is common to all of my C3d classes. This way, if a call fails and the class member function returns FALSE, you can interrogate the objects m_hr data member to find the cause of the error. It isnt rocket science, but it is handy when debugging.
The m_pIMeshBld value is initialized when the C3dShape object is constructed:
C3dShape::C3dShape()
The global object the3dEngine, uses some of the global DirectX 2 functions to create various rendering interfaces. Just so you can see that Im not hiding anything nasty, heres how the IRLMeshBuilder interface is obtained:
BOOL C3dEngine::CreateMeshBuilder(IDirect3DRMMeshBuilder** pIBld)
OK, so Im still hiding where the m_pIWRL value came from, but Im sure you get the idea: calling COM interface functions is just like calling the member functions in C++ objects. In fact its hard to tell the difference, which is why I use the pI prefix for COM object interfaces. To see why theres a difference, look below at what happens to these COM interface pointers when a C3dShape is destroyed:
C3dShape::~C3dShape()
This is very different from disposing of a pointer to a C++ object. Whenever you are finished with a COM interface, we must call its Release function to decrement the objects usage count. If you dont, the COM object lives in memory forever.
Theres just one last point about the code that I want to point out here, which has to do with calling functions inside of a C++ objects constructor. It should be obvious that when the constructor of a C3dShape object is attempting to create the mesh builder interface, it might failtypically with an out-of-memory condition. As you can see, I dont attempt to detect this in my code. The memory problem should raise an exception, which Im assuming youll catch in your code! I guess its not very nice of me to dump this problem on you, but its difficult to write totally robust code without adding a lot more lines, and Ive tried to keep this code as simple as possible. As I mentioned in the introduction, this is a set of examples, not a production-quality library. The production version is up to you.
In this chapter we looked at how the application framework that were going to use throughout the rest of the book was built. We also learned what DirectDraw is all about and how 3-D objects get projected onto a 2-D screen. We finished up with a look at how to load a 3-D object from an XOF file and show it in the current scene. Along the way Ive introduced you to some of the workings of the underlying engine. If youre interested in looking at the engine in more detail, now might be a good time to browse through the DirectX 2 SDK documents.
If what weve covered in this chapter seems like a lot of work, Id like to leave you with a short story about what happened to me when I reached this point in my experimenting.
After I had written the code for the sample in this chapter, I was admiring my work revolve on the screen when my eight-year-old daughter came in for a visit. Her perception of my work wasnt quite what Id expected. She asked, Why is there just a teapot spinning around there? to which I had no answer. It did, however, give me a chance to reflect on how far I had gotten and how far I had left to go if I was going to create anything even remotely spectacular.
Dont worry, it gets easier from here.
In this chapter well take a brief look at the interfaces provided by the DirectX 2 rendering engine and the C++ classes in the 3dPlus library that use those interfaces. It won't be a complete discussion of every interface and class well be using but rather an introduction to each of them. Each interface and class mentioned here is discussed in more detail in later chapters. By the end of this chapter you should have a good idea of the uses of most of the rendering engine interfaces and how to call them. You should also have an understanding of the 3dPlus library class architecture. If you don't want to dig through all the classes and interfaces in one go, skip this chapter and come back when you need to.
Let's take a brief look at the component object model (COM) and how COM object interfaces work.
An interface is really just a collection of functions that share a common purpose. The interface functions are similar to the member functions of a C++ class except that the interface only defines the interface functions; it doesn't implement them. It's like a design plan for a C++ class you might want to write.
A COM object is a chunk of code that implements one or more interfaces. COM objects can be as simple as statically linked C++ class objects or as complex as a piece of code running on a server on the other side of the world. If you're familiar with dynamic-link libraries (DLLs), 'COM objects are to C++ programs what DLLs are to C programs,' in the words of my colleague Dale Rogerson.
COM objects are required to support an interface called IUnknown which provides two mechanisms for every COM objectreference counting and the ability to request other interfaces. We can use the IUnknown interface to see what other interfaces the object has that we might want to use. Let me give you an example. Suppose that you have just created a 3-D object using the rendering engine and now want to change its position in the scene. Because the IDirect3DRMFrame interface provides a function to change position, you can test to see if your new object supports the IDirect3DRMFrame interface. If it does you can call the appropriate IDirect3DRMFrame function to change the object's position. You interrogate the object for interfaces by calling the IUnknown::QueryInterface function:
HRESULT hr;
IDirect3DRMFrame* pIFrame = NULL;
hr = pIUnknown->QueryInterface(IID_ IDirect3DRMFrame,
(void**)&pIFrame);
If the call is successful, the object supports IDirect3DRMFrame and you can use the interface:
pIFrame->SetPosition(2, 4, 5);
When QueryInterface returned the IDirect3DRMFrame pointer, it also added one to the object's reference count. Therefore, when you are finished with the pointer, you must release it to decrement the object's reference count again:
pIFrame->Release();
pIFrame = NULL;
Setting the pointer to NULL isn't required. I just do this so that the debugger will catch any attempt to reuse the pointer after I have released the interface it was pointing to. If you like macros (and I don't) you can always write a macro to release the interface and NULL the pointer all in one call:
#define RELEASE(p) ((p)->Release(); (p)=NULL;)
Note I don't like macros because they hide the implementation. In my opinion, macros cause more problems (particularly when it comes to debugging code) than is warranted by their convenience.
All COM interfaces are derived from IUnknown so if you have any interface pointer, you can call QueryInterface on it for any other interface you might want to use. For example, if you already have an IDirect3DRMFrame interface pointer (pIFrame) and you want to see if the object it points to supports the IDirect3DRMMesh interface, you can make the following test:
HRESULT hr;
IDirect3DRMMesh* pIMesh = NULL;
hr = pIFrame->QueryInterface(IID_ IDirect3DRMMesh,
(void**)&pIMesh);
if (SUCCEEDED(hr))
This is a very powerful capability because if you have any interface pointer to any COM object you can find out if the object supports another interface you might want to use. The only thing you can't do is get a list of all the supported interfaces.
In addition to the fact that you can call QueryInterface to test for supported interfaces, it's possible that any given interface for a COM object might inherit the functions and properties from some other interface or set of interfaces. But you can't tell programmatically; you need to look at how the interface is defined. For example, if you look in the d3drmobj.h header file in the DirectX 2 SDK, you'll see that IDirect3DRMFrame is derived from IDirect3DRMVisual. So the IDirect3DRMFrame interface supports all of the functions in the IDirect3DRMVisual interface as well. IDirect3DRMVisual is derived from IDirect3DRMObject, which in turn is derived from IUnknown. In fact the IDirect3DRMFrame interface supports all of the IDirect3DRMFrame functions plus those of the IDirect3DRMVisual interface, the IDirect3DRMObject interface, and the IUnknown interface.
Note All the rendering engine interfaces have an IDirect3D prefix. Those interfaces that have the IDirect3DRM prefix refer to the higher level 3-D interfaces that deal with frames, shapes, lights, and so on. The letters RM stand for retained mode (as opposed to the immediate mode of the DirectX 2 layer below it).
It's not terribly important to know which interface inherits from which other interface because you can always call QueryInterface to find out the interfaces that are supported. But if performance is important, knowing the hierarchy helps you avoid making a redundant call.
Let me finish this brief review of COM objects by discussing how the AddRef and Release functions in IUnknown help us share objects. Let's say we want a scene containing several trees. The design for the tree consists of a set of vertices and face descriptions in a mesh. The mesh is a visual object that can be attached to a frame to position it in a scene. In fact one mesh can be attached to many frames. To implement our small forest we create one mesh for the shape of the tree and several frames to represent the individual tree positions. The single mesh is then attached to each of the frames as a visual using code like this:
pIFrame->AddVisual(pIMesh);
If you could look at the code for the AddVisual function in IDirect3DRMFrame you'd see something like this:
HRESULT IDirect3DRMFrame::AddVisual(IDirect3DRMVisual* pIVisual)
The visual interface's AddRef member is called to increase the reference count of the object supplying the visual interface. Why? Because while this frame object exists, the object supplying the visual interface to the frame can't be destroyed. When the frame is destroyed, or a call is made to remove this specific visual interface from the frame, the frame's code will release the object supplying the visual interface:
pIVisual->Release();
So if this frame was the last frame to release the object supplying the visual interface, the reference count for that mesh object would drop to zero and the mesh object would destroy itself.
What does all this mean to you? If you use COM object interfaces correctly with AddRef and Release, you never need to worry about having to track which objects are alive in memory or whether it's safe to delete an object, because the object's internal reference counting handles these details for you.
Let me give you a couple of final tips regarding COM objects. Any function call that returns an interface pointer will AddRef the pointer before returning it to you; you must call Release for the pointer when you're done with it to avoid keeping objects needlessly in memory. If you copy an interface pointer, you should call AddRef for the copy and Release both pointers when they are no longer used. Remember that returning a pointer to an interface from one of your functions is essentially copying the pointer. You should call AddRef before returning the pointer.
Having set the rules, Im now going to break one. If you know what you're doing, you don't absolutely have to call AddRef when you copy a pointer, but you do need to be religious about calling Release the correct number of times. Calling Release once too often will destroy an object while its still being used; not calling Release results in memory leaks. If you look at the 3dPlus library code you'll see that many of the C++ objects support a GetInterface function This function returns an interface pointer for the rendering engine object for which the C++ class provides a wrapper. I did this for convenience and performance inside the library code. The GetInterface function does not AddRef the pointer, If you call one of these GetInterface functions, do not call Release on the pointer it returns.
We are going to look at only the most commonly used interfaces which I use in the 3dPlus library. All of the rendering engine interfaces are documented in the help files that come with the DirectX 2 SDK, so I'm not going to discuss the details of how every function of each interface is used. Figure 3-1 shows the hierarchy of the interfaces used in the 3dPlus library. This diagram was created by looking at the individual interface definitions in d3drmobj.h in the DirectX 2 SDK.
[Figure 3-1 to come]
Figure 3-1. The interface hierarchy of the rendering engine
As you can see, there are two major groupingsinterfaces derived from IDirect3DRMObject and interfaces derived from IDirect3DRMVisual. IDirect3DRMObject serves as a convenient root for all of the rendering engine interfaces and includes the SetAppData function which allows you to add a 32-bit private data value to any interface. This can be very useful when an interface is encapsulated in a C++ class, for example. The private data value can be a pointer to the C++ class object, and given the interface pointer you can quickly get at the containing C++ object.
The interfaces derived from IDirect3DRMVisual are important because they can be used as an argument to any function that needs a IDirect3DRMVisual pointer. (See the IDirect3DRMFrame::AddVisual example below.) On the subject of function arguments, now would be a good time to point out that the actual function prototypes defined in the DirectX 2 SDK don't use the interface type names directly. For example, a function requiring a pointer to a IDirect3DRMVisual interface might be defined like this:
HRESULT IDirect3DRMFrame::AddVisual(LPDIRECT3DRMVISUAL pVisual);
As you can see, the type for a pointer to an IDirect3DRMVisual interface is LPDIRECT3DRMVISUAL.
Note Using a defined type as a pointer is a common Windows practice. I happen to think that in the brave new 32-bit world this practice is obsolete because we no longer need to differentiate between near and far pointers. As you can see from the example above, using specially defined pointer types also increases the effort required to figure out exactly what the argument to this function really is. Having the type name all in uppercase is another common practice, which in this case also manages to alienate the pointer type from the object type the pointer references. All in all, this is not a practice I find helpful. However, it is how the SDK defines things and is a Windows standard as well, so we need to deal with it in our code.
In the 3dPlus library, I have defined for the few cases where a function has an interface pointer argument the pointer type as shown below:
void AttachVisual(IDirect3DRMVisual* pIVisual);
Let's take a brief look at the purpose of each of the interfaces shown in Figure 3-1.
This interface provides control functions that affect how the scene gets rendered into your window. The functions deal with the DirectX 2 support layer and, in effect, with aspects of the physical display device. You're most likely to use this interface to alter the rendering quality using the SetQuality function. You might also use IDirect3DRMDevice to limit the number of color shades used when working on a palletized display by calling the SetShades function. As an example, let's look at how the rendering quality is set. Here's the code that implements the SetQuality function in the C3dDevice class (found in 3dStage.cpp):
void C3dDevice::SetQuality(D3DRMRENDERQUALITY quality)
Here's how the C3dDevice::SetQuality function is used when a C3dStage object is first created and m_Quality has been initialized to D3DRMRENDER_GOURAUD
BOOL C3dStage::Create(CDirect3D* pD3D)
The quality can be set to various levels from a simple wire frame to the Gouraud shading model as shown in Table 1. I chose Gouraud shading (also known as smooth shading) as the default because I think it gives the most realistic effects.
Note Many of the 3dPlus library functions return a BOOL indicating success or failure. However, I decided that for some functions to fail, something had to be catastrophically wrong, so those functions return void. An ASSERT statement in the function traps any failure that might actually occur.
Table 1. Possible parameter values for the SetQuality function
|
Quality |
Shading |
Lighting |
Fill |
|
D3DRMRENDER_WIREFRAME |
Flat |
Off |
None (wire frame) |
|
D3DRMRENDER_UNLITFLAT |
Flat |
Off |
Solid |
|
D3DRMRENDER_FLAT |
Flat |
On |
Solid |
|
D3DRMRENDER_GOURAUD |
Gouraud |
On |
Solid |
|
D3DRMRENDER_PHONG |
Phong |
On |
Solid |
This interface controls the projection system, shown in Figure 3-2, employed to convert the 3-D coordinates to 2-D coordinates on your computer screen. You can use the SetBack function to set where the back clipping plane is on the z axis. You can also use the SetField function alter the focal length of the camera viewing the scene.
[Figure 3-2 to come]
Figure 3-2. The projection system
The SetProjection function is used to determine whether or not perspective correction should be applied or objects should be rendered with a simple Orthographic projection type. In most cases we'll want to use the Perspective projection type for realism. We'll look at this subject in Chapter 8 when we see how texture maps are applied.
After the initial rendering conditions have been set, the primary use of this interface is in conjunction with the selection of objects in a scene. The Pick function is used to determine which object, if any, lies under a given point on the screen. We'll explore the Pick function more in Chapter 7 when we look at hit testing.
This interface allows you to examine a single face of a 3-D object or set the attributes of a face. For example, you can set the color of a given face using SetColor, or you can obtain the normal vector to a face by calling GetNormal. Getting an IDirect3DRMFace pointer is usually done by asking the IDirect3DRMMeshBuilder interface for a list of faces and then asking the face array returned from the mesh builder for the interface to a specific face in the array. Here's how the color of a single face is set in the C3dShape::SetFaceColor function:
BOOL C3dShape::SetFaceColor(int nFace, double r, double g, double b)
This interface controls the various kinds of lights supported by the rendering engine. (Lights are examined in some detail in Chapter 10.) A light can have many different properties ranging from color to how its intensity varies with distance. Here's a simple example of setting the color of a light from C3dLight::SetColor:
BOOL C3dLight::SetColor(double r, double g, double b)
The D3DVAL macro is used to convert values to the floating point argument format that the rendering engine uses.
A wrap determines how a texture is applied to an object. Wraps can be flat, cylindrical, spherical, or chrome. Unless you use chrome wraps, the function you're most likely to use is Apply, which applies the wrap to a mesh. If you use a chrome wrap to make an object appear reflective, you'll need to use ApplyRelative to apply the wrap to the object so the texture remains oriented relative to a frame other than the object's. This is how the reflection stays the right way up, even though the object might be rotating. Wraps are discussed in more detail in Chapter 8.
A wrap can also be applied to a single face of an object. Here's the code (found in 3dImage.cpp) that allows a C3dWrap object to be applied to a single face of a C3dShape object:
BOOL C3dWrap::Apply(C3dShape* pShape, int nFace)
Materials determine the way surfaces reflect light. Using the material properties you can affect how shiny a surface looks and whether it looks more like plastic or metal.
This interface has no member functions of its own. It serves only as a root interface from which any interface that can be used as a visual is derived. You wont find IDirect3DRMVisual in the SDK documents, but you'll find it used as a type for various function arguments, as shown in the AddVisual declaration above.
IDirect3DRMFrame is the most commonly used interface and is used to change the properties of a frame. For example, you can set the position of a frame by calling SetPosition, and you can set which way the frame points using SetOrientation. As another example, you can call SetTexture to give the frame a texture of its own so that meshes attached as visuals to the frame can use the frame's texture. This allows a single mesh defining a shape to be used in many places but with different textures. Here's how C3dFrame::SetPosition uses the interface to set the position (having declared IDirect3DRMFrame* m_pIFrame):
void C3dFrame::SetPosition(double x, double y, double z, C3dFrame* pRef)
You can also use SetRotation and SetVelocity to set a frames rotation around a given vector and the speed at which it rotates. This can be useful if you want some continuous action in a scene and don't want to constantly compute the position.
If the frame is the root frame (it has no parent frame), the background image can be set using SceneSetBackground or you can simply set the background color using SceneSetBackgroundRGB.
The mesh interface is primarily used to set the attributes of groups within the mesh. A group is a set of vertices with common attributes such as color. Grouping common elements can improve rendering performance.
Two other functions that might be of interest are the Save function, which saves the details of a mesh to a disk file, and the Translate function, which adds an offset to every vertex in a mesh. This latter function is most useful when adding several meshes to a common frame to build a complex shape.
This interface has no member functions of its own but serves as a data type for shadow objects, which are a kind of visual. Using shadows is discussed in Chapter 10.
This is a complex interface used for the creation of 3-D objects. The C3dShape class uses the IDirect3DRMMeshBuilder interface to implement most of its own functionality. The interface includes some very simple functions such as Load, which loads a mesh from a disk file, and other more complex functions such as AddFaces, which uses a list of vertices, normals (vectors that signify direction), and face descriptions to add a new set of faces to a mesh. (See Chapter 4 for more details of how meshes are used to create 3-D objects.)
Given that m_pIMeshBld is declared as a pointer to IDirect3DRMMeshBuilder, here's the C3dShape::Create function that uses the mesh builder interface to construct new objects from vertex and face descriptions:
BOOL C3dShape::Create(D3DVECTOR* pVectors, int iVectors,
D3DVECTOR* pNormals, int iNormals,
int* pFaceData, BOOL bAutoGen)
AttachVisual(m_pIMeshBld);
// Enable perspective correction
m_pIMeshBld->SetPerspective(TRUE);
return TRUE;
}
The mesh builder interface also has many interrogation functions to allow you to get more information about a mesh. For example, we can find out how many faces there are in a mesh:
int C3dShape::GetFaceCount()
Textures are images that can be applied to faces or entire shapes to make them look more realistic. The interface functions are used mostly to control how a texture will be rendered. For example, if its important to restrict how many colors are used in rendering a texture, you can by call the SetShades function. Otherwise, one colorful texture can use all of the palette colors and leave none for other shapes and textures to use.
You can call SetDecalTransparencyColor to define transparent areas in a texture. Decals are textures that are rendered directly as visuals and are generally used as a kind of sprite object that's flat and always facing the camera. However, the transparency feature of textures doesn't actually rely on the texture being used as a decal. We look at textures in more detail in Chapter 8 and sprites in Chapter 9.
As I mentioned in previous chapters, the 3dPlus class library is not intended to be the definitive class library for all of the rendering engine functions. I designed it so that I could explore 3-D ideas in a way I found more familiar than using COM object interfaces. You don't need this library to create 3-D applications, but using it as a learning tool or as the basis for a real library might get you going a little more quickly.
The library code uses the ASSERT statement to test pointers and various other conditions. In many cases, mistakes in your code cause the Visual C++ debugger to stop at the ASSERT statement rather than letting your application blow up in the rendering engine core.
Many of the classes are very simple wrappers around a rendering engine interface. Some of the classes provide a higher level of functionality than a single interface. In all cases I've tried to make it easy for you to figure out how to bypass the class and call the underlying interfaces directly if you want. To this end, most classes have a GetInterface function that returns the underlying interface pointer. Note that AddRef is not called before the pointer to the interface object is passed back to you so, in these cases, you must not call Release on the pointerjust treat it as a C++ class pointer.
Figure 3-3 shows the hierarchy of the classes in the 3dPlus library. I have not included any of the classes that relate directly to the DirectDraw layer. The classes in Figure 3-3 all relate to the 3dPlus rendering engine.
[Figure 3-3 to come]
Figure 3-3. The 3dPlus rendering engine class hierarchy
The classes fall into three groups: those simply derived from C3dObject, those derived from C3dVisual, and those derived from C3dFrame. If you look at the DirectX 2 rendering engine hierarchy in Figure 3-1 you'll see that the two hierarchies are quite similar. The main difference between the two lies in the fact that I derived several classes from C3dFrame so that those classes can have a position and direction as well as being visual components in their own right. So in interface terms, the classes derived from C3dFrame are using both IDirect3DRMFrame and IDirect3DRMVisual in some way. Let's walk through the list of 3dPlus library classes, looking at what the classes do and in some cases how you might use them.
The C3dEngine class collects several global functions from the rendering engine in one place. The 3dPlus class library includes a single global instance of this class called the3dEngine. Member functions of this class are typically used to create some other rendering engine object and usually return an interface pointer. You generally won't have a reason to use this class in an application directly, but when you create instances of some of the other classes, their code will use the engine functions. Here is an example of the C3dFrame::Create function using the the3dEngine object:
BOOL C3dFrame::Create(C3dFrame* pParent)
ASSERT(m_pIFrame);
m_piFrame->SetAppData((ULONG)this);
return TRUE;
}
A call is made to the CreateFrame member of the3dEngine, which actually creates the frame interface and assigns it to the frame's m_pIFrame variable.
The rendering engine defines its own 4 x 4 matrix for coordinate manipulation, but again I prefer to use a C++ class because it reduces the amount of code I need to write. For example, look at the C3dFrame::SetDirection example (see 'C3dFrame,' below) for the C3dVector class; you can see a matrix being used to apply a rotation to two vectors. The code looks ridiculously simple despite the complex math involved in the calculations. Using a C++ class gives me great flexibility in how I use my matrices without cluttering the code.
Of course, you don't have to use C3dMatrix or C3dVector if you don't want to. But if you're using the other classes in the 3dPlus library you'll find that the matrix and vector classes make your job a bit easier. We'll look at using matrices in more detail in Chapter 5.
This class provides a simple wrapper for the IDirect3DRMDevice interface. C3dDevice is used by C3dStage to build an environment for displaying 3-D objects. You're not likely to want to create one of these objects yourself unless you redesign the stage concept. You might, however, want to call the SetQuality member function to modify how rendering is handled in your particular application. Here's a part of the code that creates a stage that shows how the device class is used:
BOOL C3dStage::Create(CDirect3D* pD3D)
// Update the display
m_Device.Update();
}
As you can see, using these classes is very simple. The various member functions hide the underlying COM object interfaces and make the code a little easier to follow.
This class (defined in 3dImage.cpp) is again primarily just a wrapper for the IDirect3DRMWrap interface but it does have a little added value. The Apply member function has two implementations. The first implementation, shown below, applies the wrap to the entire object, which is easy to implement:
BOOL C3dWrap::Apply(C3dShape* pShape)
The other implementation of the function, which we looked at above (see 'IDirect3DRMWrap'), applies a wrap to a single face.
Having a couple of different implementations of the Apply method simplifies the code while retaining a lot of flexibility in how the method is implemented. Wraps are explained in more detail in Chapter 8 when we look at texture maps.
This class serves as the base class for all other classes that can be used as visuals in a scene. The C3dVisual class includes a member variable to hold the name of the object. You can use the SetName and GetName functions to set and retrieve the name. I found attaching a name to visual objects quite useful when implementing mouse selection of objects in a scene. The object's name can be displayed to verify the selection.
This is the only class that does not use any rendering engine interfaces. Its purpose is to load an image from either a disk file or an application resource for use in a texture map or decal. The rendering engine defines a structure for images named D3DRMIMAGE. The C3dImage class uses the D3DRMIMAGE structure to hold the image data once it has been loaded. Here's an example of how the C3dImage class is used to load an image from a disk file for use as a background image in a scene:
C3dImage* pImg = new C3dImage;
if (!pImg->Load())
ASSERT(m_pScene);
m_pScene->m_ImgList.Append(pImg);
m_pScene->SetBackground(pImg);
The C3dImage::Load function is used here with no arguments, which causes a dialog box to appear. The dialog box allows the user to select a Windows bitmap file to be used as the background image. You can also specifiy which bitmap to load by providing either a file name or the ID of a bitmap resource as a parameter to the Load function. Here's an example where a bitmap resource is loaded and then used to create a texture:
// Load the image of the world
C3dImage* pImg1 = new C3dImage;
if (!pImg1->Load(IDB_WORLD))
m_pScene->m_ImgList.Append(pImg1);
// Create a texture from image
C3dTexture tex1;
tex1.Create(pImg1);
This class (defined in 3dImage.cpp) provides a wrapper for the IDirect3DRMTexture interface. Textures are created from images as shown in the example above. The image used to create a texture must have sides that are integral powers of two in size: 32 x 64, 128 x 128, and 4 x 8 are all valid images sizes for a texture; 32 x 45 and 11 x 16 are invalid sizes. The C3dTexture::Create function will fail if the image is not a valid size:
BOOL C3dTexture::Create()
// validate that image size is in power of 2
for (int i = 0; (1 << i) <GetWidth(); i++);
for (int j = 0; (1 << j) <GetHeight(); j++);
if (GetWidth() != (1 << i) || GetHeight() != (1 << j))
if (!the3dEngine.CreateTexture(GetObject()
&m_pITexture))
ASSERT(m_pITexture);
return TRUE;
}
Textures are attached to an image and rendered under the control of a wrap. The wrap determines the algorithm used to apply the texture. Here's some code that creates a texture from an image and then applies it to a shape using a cylindrical wrap:
C3dImage* pImg1 = new C3dImage;
pImg1->Load(IDB_LEAVES);
C3dTexture tex1;
tex1.Create(pImg1);
C3dWrap wrap;
wrap.Create(D3DRMWRAP_CYLINDER,
NULL,
0, 0, 0, // Origin
0, 0, 1, // Direction
0, 1, 0, // Up
0, 0, // Texture origin
1, 1); // Texture scale
pTree->SetTexture(&tex1);
wrap.Apply(pTree);
This class holds all the information required for a scene: the lights, the list of shapes, the current background image, and the camera setup. A single C3dScene object is attached to the stage at any one time. The scene has a built-in ambient light that can be set with SetAmbientLight. You can add other lights to the scene by calling AddLight. The scene is actually the topmost frame in the frame hierarchy, so 3-D shapes (which are also frames) are added by calling AddChild. The background color of a scene can be set with SetBackground(r, g, b) or an image can be used instead by calling SetBackground(pImage). The Move function is used to update the position of any objects in the scene that might be moving and to render the current scene to the application window. The scene must be attached to the stage for the Move function to have an effect. C3dScene also stores vectors for camera position and direction. These vectors can be set using SetCameraPosition and SetCameraDirectory. Here's a code fragment that creates a new scene and sets the initial lighting arrangement:
// Create an initial scene
m_pScene = new C3dScene;
if (!m_pScene->Create()) return FALSE;
// Set up the lighting
C3dDirLight dl;
dl.Create(0.8, 0.8, 0.8);
m_pScene->AddChild(&dl);
dl.SetPosition(-2, 2, -5);
dl.SetDirection(1, -1, 1);
m_pScene->SetAmbientLight(0.4, 0.4, 0.4);
In this case the ambient lighting level is set quite low, and a directional light is added that points down from the top left corner to add highlights to any shapes that might be added to the scene.
The C3dScene object contains two list objects to help you manage your scenes. Use the m_ShapeList member list object to track any C3dShape objects you want deleted when the scene is destroyed and use the m_ImageList member list object to track C3dImage objects you want deleted when the scene is deleted. Objects are only added to these lists if you call the Append member function of the list object. No objects are ever added on your behalf.
The frame class is a wrapper for the IDirect3DRMFrame interface with some additional member functions to make it easier to use. A frame has several attributes including position and its orientation in 3-D space. Setting the position is done using SetPosition. The orientation is set by using the SetDirection function, which determines the direction the frame points. To determine the orientation exactly, you need to specify two vectors. The first vector describes the forward direction and the second vector describes the up direction. Think of setting the direction that an airplane is flying. The forward vector specifies the direction that the nose of the plane is pointing. The up vector determines which way the tail fin pointsup, down, left, and so on. Some objects don't really need an up vector when you point them. For example, a cone can be used as a pointer in a scene. The tip of the cone is set to point in some direction using only the forward direction vector. The up vector is irrelevant because the cone can be rotated about its axis any amount and still look the same. To make life easy for you, the SetDirection function allows you to specify only the forward direction vector and it supplies the up vector for you. Here's the code that implements it:
void C3dFrame::SetDirection(double dx, double dy, double dz, C3dFrame* pRef)
The C3dVector class includes a member function for generating up vectors, which makes this piece of code look extremely simple. I like that.
All the position and direction functions have a
reference frame argument (the pRef
value shown in the example above). This is very important because a frame can
be anywhere in the frame hierarchy, and its position is determined by its own
transform and also those of all its parents. You can run around your home in
your kitchen. If you move your home from
void C3dPosCtlr::OnUpdate(_3DINPUTSTATE& st, C3dFrame* pFrame)
You can see that all the positions are relative to the stage, which is the expected behavior when a user attempts to move an object into place in the scene.
The C3dCamera class doesn't have any member functions and, in fact, doesn't do much of anything at all. The class is derived from C3dFrame so you can set its position and direction, which is all the control thats needed to fly through a scene or simply look in a particular direction.
This class combines the functionality of a frame interface and a visual interface, providing a convenient way to create 3-D shapes that can be directly positioned in a scene. One shape can be attached to another as a child so you can build complex shapes easily. There are several functions that build simple geometric shapes such as spheres, rods, and cones and a Load function allows you to create a C3dShape object from an XOF file. You can set the color and texture of the entire shape or individual faces of the shape. There are some limitations when you attempt to apply textures to individual faces and these are covered in Chapter 8. Here's an example of creating a simple geometric shape and adding it to the current scene:
C3dShape sh1;
sh1.CreateCube(2);
m_pScene->AddChild(&sh1);
Note that the C3dShape object is just a container for the underlying frame and visual interfaces. When a shape is added to a scene or another frame in this way, the containing C++ object is no longer required because the interfaces, not the C++ containing object are used to create the object in the scene. When the visual from one object is used in a second object, the second object calls AddRef on the visual interface pointer so if the original container is destroyed and releases its own interface pointer, the interface still stays alive.
Having said that the container doesnt need to be kept around, it's still useful to do so because the user might select an object to manipulate in a scene and it's through the containing C++ object that we want to exercise control. Not clear? We'll cover this subject in more detail in Chapter 6 when we look at ways of letting the user manipulate objects in scenes.
The C3d Stage class is used by the C3dWnd class to provide the device and viewport necessary for viewing a 3-D scene in a window. The class contains functions for retrieving the camera, setting the rendering quality, and setting the background to the current scene. You're not likely to want to use many of these functions to start with, except perhaps for retrieving the camera. Attaching a scene to the stage can be done through the C3dWnd class, which has a SetScene member function that passes the request down to the stage:
BOOL C3dWnd::SetScene(C3dScene* pScene)
else
return TRUE;
}
This light serves as a base class for the other light types. Its Create function is called by derived classes to construct the underlying light interface:
BOOL C3dLight::Create(D3DRMLIGHTTYPE type, double r, double g, double b)
ASSERT(m_pILight);
// Add light to its frame
ASSERT(m_pIFrame);
m_hr = m_pIFrame->AddLight(m_pILight);
if (FAILED(m_hr)) return FALSE;
return TRUE;
}
This class is used to implement the ambient light object, which is built into the C3dScene object. You can manipulate the ambient light in the scene using C3dScene::SetAmbientLight rather than by calling member functions in this class directly.
This class implements a directional light that can be placed in a scene to provide highlights on your scene's objects. Here's an example of a directional light being placed in the top left corner of a scene:
C3dDirLight dl;
dl.Create(0.8, 0.8, 0.8);
m_pScene->AddChild(&dl);
dl.SetPosition(-2, 2, -5);
dl.SetDirection(1, -1, 1);
Note that the direction in which the light is shining is set using only the forward direction vector. The up vector is generated automatically, which saves you from having to compute it.
This class provides a way to keep a list of C3dShape objects and is derived from the MFC class CObList. For details on how CObList works, refer to the MFC documentation. The C3dScene object contains a C3dShapeList object to track shapes that need to be deleted when the scene is destroyed.
This class provides a way to keep a list of C3dImage objects. and is derived from the MFC class CObList. For details on how CObList works, refer to the MFC documentation. The C3dScene object contains a C3dImageList object to track images that need to be deleted when the scene is destroyed.
This class provides everything you need to create either a popup window or a child window containing a 3-D scene. It contains a stage object and can support an object movement controller (keyboard, mouse, or joystick) and object selection via the mouse. Using it as a child window is extremely simple as this code fragment shows:
// Create the 3D window
if (!m_wnd3d.Create(this, IDC_3DWND))
The 3-D window is created as a child window with a specified parent and child ID value. Once the window is created, you just need to create the scene and attach it to the 3-D windows stage to make the scene visible:
m_pScene = new C3dScene;
if (!m_pScene->Create()) return FALSE;
// Set up the lighting
C3dDirLight dl;
dl.Create(0.8, 0.8, 0.8);
m_pScene->AddChild(&dl);
dl.SetPosition(-2, 2, -5);
dl.SetDirection(1, -1, 1);
m_pScene->SetAmbientLight(0.4, 0.4, 0.4);
m_wnd3d.SetScene(m_pScene);
The rendering engine defines its own 3-D vector, D3DVECTOR, which is a simple structure, but I prefer to work with C++ vector objects. This way I can have multiple constructors to simplify how I create the vectors and, of course, I can implement operators such as add and multiply to simplify the code. The C3dVector class is derived from the D3DVECTOR structure, so anywhere you can use a D3DVECTOR structure, you can also use a C3dVector object. As an example of how the C3dVector class is used, here is a piece of code that updates the position of a 3-D object as a user moves it about the screen:
C3dVector d, u;
pFrame->GetDirection(d, u, pStage);
// Rotate the direction and up vectors
double a = 3.0;
C3dMatrix r;
r.Rotate(-st.dR * a, -st.dU * a, -st.dV * a);
d = r * d;
u = r * u;
pFrame->SetDirection(d, u, pStage);
Using the vector class (and the matrix class) here greatly simplifies the code. Mind you, understanding how it works might be a different matter. We'll be looking at this topic again in Chapter 6 when we see how to move objects under user control.
The 3dPlus library includes a few classes to support the DirectDraw interfaces. These classes are shown in Figure 3-4.
[Figure 3-4 to come]
Figure 3-4. The DirectDraw support classes in the 3dPlus library
These classes all provide very simple wrappers around the underlying DirectDraw interfaces. However, a full explanation of the DirectDraw interfaces is beyond the scope of this book. The code that implements these classes can be found in 3dDirDraw.cpp in the 3dPlus library Source directory. To create the code for these classes I used as my guide the Viewer sample application code that is a part of the DirectX 2 SDK. I implemented only enough support to get my C3dDevice class to work. You are, of course, most welcome to browse the source code and make of it what you will.
We have very briefly touched on all of the interfaces and C++ classes that well going to use to implement the sample applications in the remaining chapters. I'm sure you have many questions about what we just covered and everything that has been mentioned here is discussed in more detail in later chapters. If you're a bit confused about which bits of the functionality come from the 3dPlus library and which bits come directly from the DirectX 2 interfaces, remember that all interface pointers in the code have a pI prefix to distinguish them from pointers to the 3dPlus library C++ objects which just have a p prefix. Also, remember that the C++ classes are frequently just convenient wrappers for the DirectX 2 interfaces. Only a few of the classes, such as C3dShape, have any real code content of their own, and we'll see what all that's for in the subsequent chapters.
|
Politica de confidentialitate | Termeni si conditii de utilizare |

Vizualizari: 1700
Importanta: ![]()
Termeni si conditii de utilizare | Contact
© SCRIGROUP 2024 . All rights reserved