| CATEGORII DOCUMENTE |
| Bulgara | Ceha slovaca | Croata | Engleza | Estona | Finlandeza | Franceza |
| Germana | Italiana | Letona | Lituaniana | Maghiara | Olandeza | Poloneza |
| Sarba | Slovena | Spaniola | Suedeza | Turca | Ucraineana |
INFO 2
Version history: 2
General: 2
FAQ 4
1. Programs 6
2. Decrypting 7
3. Audio 8
MP3 8
AC3 8
4. Video 10
Video adjustments 10
4.2 Determining the bitrate/filesize 11
4.3 General XMpeg settings 12
4.4 Codec settings 13
4.5 Encoding 19
5. Subtitles 20
Miscellaneous 22
Time Adjuster 22
DivXG400 23
NANDub 24
Disclaimer!
Although there are instructions on this site for
DVD-decryption and copying, distributing copyrighted material is illegal. I do
not endorse or encourage anyone to participate in such action. These
instructions are intended for personal use only, to copy your own legally
purchased DVDs for YOUR OWN PERSONAL USE (for example to your laptop computer
without a DVD-drive).
4.0.22102004: New layout and structure,
guides for Time Adjuster, DivXG400 and NANDub, XviD 1.0.2, small changes here
and there
3.7.26112003: DivX 5.1.1 Pro, codec speeds at section 4
3.61.19102003: Minor additions. DOC-files up to date.
3.6.23092003: Xmpeg 5.02, DivX 5.1 Pro
3.5.07082003: XMpeg 5, XviD codec settings, Subrip 1.17, big changes to
sections 3 and 4
3.04.11072003: DOC-file available again
3.03.13052003: Small additions/changes.
3.02.26042003: DivX 5.05 Pro codec. Just a bug fix.
3.01.24042003: DivX 5.04 Pro codec. No changes to encoding, since the only new
feature (EKG) is for advanced users (allows manual editing of analysis files)
Subrip 1.16 version.
3.0.04032003: Complete upgrade including the graphical layout. New features of DivX 5.03 Pro codec. The
first English version.
2.1.19102002: Subtitle cutting using Subrip, minor corrections.
2.01.07102002: Subrip updated to 1.07 version. No
changes in using the program. Logo.
2.0.03102002: Added AC3-sound, Subtitles and AVI-cutting.
1.1.07092002: Minor changes/corrections.
1.0.24072002: The original release.
After noticing a huge amount of interest on the subject I decided to create a 'For Dummies' guide to those who wish to copy their DVD-movies into DivX -format. The goal was to have complete guide, which goes through all the work phases in detail giving everyone an opportunity to use DivX-technology. And the guide should be simple enough to understand, even for people who are not familiar with video compression technologies.
I recommend, that you read through the entire site before starting to work. This will give an overview on the subject making it easier to understand what is the purpose of every phase. The numbering I've used is in my opinion the easiest way through the process.
Why is it necessary to encode DVD's into DivX? Simply because DVD-movies are very, very large. You can copy a DVD directly 'as is' to your hard drive, but this typically takes about 7-8 GB of space. This is far too much especially for laptop computers with small hard drives. Compressing the DVD using DivX-technology reduces the file size down to 700-1400 MB without suffering any significant quality loss. Roughly approximated a movie in DivX-format is about 7-8 times smaller then the same movie on DVD.
Theoretically you can encode DivX with any computer, but I don't recommend using a computer with less then 1000 MHz of CPU power. It would take far too long to encode (over 24h). A reasonable encoding time is achieved with CPUs of 1.5 GHz or more power (5-10h) . You also need hard drive space, because the DVD .VOB-files must first be copied to the hard drive. You will need space for the DVD-files (4-8 GB) + the encoded avi-file (700-1400 MB). 10 GB of hard drive space should be enough for any project.
* The size of the video file depends on the length of the movie, but as a rule of thumb you shouldn't compress smaller then 600 MB/90mins. Any smaller then that reduces the image quality noticeably. More on this subject on 4. Video.
* This is simply practical. There's often the need to move the created video files or just backing them up elsewhere. And a CDR-disk is the most appropriate media; it's large enough (quality wise) and it's cheap. Of course there is no rule that says you can't make video file the size you want or the size that best suites your purposes.
* Yes, it will. The AC3-codec (comes with the software package) handles the audio and tells to the soundcard how it should playback the sound despite the type of the card.
* Yes. The program is capable of handling in addition to IFO/VOB files various MPEG-formats: .MPG, .MPEG, .MPE, .MPV, .M1V, .M2V and .MV2. DivX-codec settings work exactly the same way, but in XMpeg 'Video tools' you must be careful to make sure the image doesn't distort or stretch.
* Download ASPI driver here and install.
* Check out XMpeg-forums. You are sure to find experienced help there.
* Why not indeed. All are excellent solutions, some are even easier to use than XMpeg. I myself prefer XMpeg; it is fast, efficient and it can handle other things than DVD-compression. Plus there aren't many guides made for it (especially in finnish)
NOTE! This guide is written with these exact programs in mind. If you plan to use other similar programs I cannot guarantee that all work phases proceed the way I've described here. Furthermore the video codec MUST BE DivX 5.05 Pro or 5.1.1 Pro. Older versions of DivX are not compatible with the new features of version 5.05 (or newer) and cannot be used with this guide. Or instead of DivX, use the XviD 1.0.2 codec. Older XviD versions are also not compatible with this guide.
(codec=enCOder/DECoder or compressor/decompressor)
DivX 5.05 Pro Video codec
DivX
5.1.1 Pro Video codec
XviD
1.0.2 Codec (Koepi's 29/08/2004) Video codec
Radium
MP3 Audio codec (compatible with XMpeg)
XMpeg 5.03 Encoding program
DVDDecrypter
2.4 DVD-decrypting program (duh!)
Subrip
1.17 Subtitle tool
DivX
4 Bitrate Calculator 2.0
Nandub 1.0rc2 Tool for cutting
videofiles and audio joining
Intervideo
AC3 audiofilters For AC3 playback
Time
Adjuster Subtitle adjustments
DivXG400
Subtitle viewer
All are available for download at the site.
Only XMpeg 5 installation has some tricks to it: choose English for language. The screen captures in this guide are in Finnish, but that shouldn't cause any trouble since the corresponding menu options are covered in the english text.
Install DivX 5.05 OR 5.1.1.NOT BOTH!
Also note that the DivX Pro package included in the ZIP has GAIN -adsoftware in it. The Pro package is available without adsoftware, but that version is not free of charge. You can prevent Gain-program from functioning for example by using a software firewall (block gain_trickler_????.exe and Gator traffic (CME II Client Application=cmesys.exe, Gator Client Application=gmt.exe) if you don't want to look at ads.
 There are newer 3.x
versions of DVDDecrypter,
but those also have DVD-burning capabilities, which complicate the program for
simply decrypting purposes. There fore I am still using the very simple 2.4
version in this guide.
There are newer 3.x
versions of DVDDecrypter,
but those also have DVD-burning capabilities, which complicate the program for
simply decrypting purposes. There fore I am still using the very simple 2.4
version in this guide.
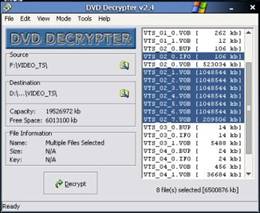
This is perhaps the easiest phase since DVDDecrypter is pretty much automatic. Simply insert a DVD into your drive and start the program. The program should automatically choose the VOB-files that belong to the actual movie. If this does not happen, choose them manually from the menu option 'Edit->Select Main Movie Files'. The nearby image shows a DVD with the main VOB-files chosen.
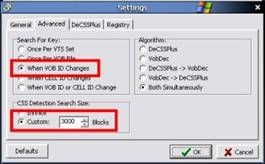
Before you do anything some changes to the basic settings of DVDDecrypter are necessary (you only need to do this once, the program will save it settings for future use). Once these changes are made the program can handle trickier DVDs better. Go to 'Tools->Settings->Advanced'. Change to setting 'Search for key' to 'When VOB ID changes' and 'CSS Detection Search Size' to 'Custom: 3000 Blocks' as shown on the image.
 After the files have
been chosen, simply select a 'Destination' folder and click 'Decrypt'
. The time it takes to decrypt a DVD depends of you CPU power, the speed
of your DVD-drive and the complexity of the DVD. It shouldn't take more than
15-30 minutes though.
After the files have
been chosen, simply select a 'Destination' folder and click 'Decrypt'
. The time it takes to decrypt a DVD depends of you CPU power, the speed
of your DVD-drive and the complexity of the DVD. It shouldn't take more than
15-30 minutes though.
Once the decryption is complete you should find an .IFO -file and a few matching .VOB -files on your hard drive. The VOB-files hold the actual video/audio-data and the IFO-file acts as a menu where you choose which parts of the VOB-data you want to include to the encoding process (video stream, the soundtrack and the subtitle language)
NOTE : If for some reason decryption doesn't seem be successful try some other program; for example Smartripper is worth a try.
Before you start processing the video data you need to choose whether you want 2-channel MP3 Stereo or multichannel AC3(5.1) audio for your video file. Both have advantages. MP3 audio is small in size and works with any computer. AC3 audio has superior quality and, with the proper audio equipment, is multichannel. MP3 audio works without any additional software while AC3 requires the proper audio codec to be installed. If your computer doesn't have and AC3-codec installed, install 'Intervideo AC3 audiofilters' which is available at the website. AC3 audio can easily take 300-400 MBs of space, so you are forced to make a so-called 2CD version (1400 MB) in order to maintain image quality.
Since this section overlaps a bit with 4. Video I won't describe here how to start the XMpeg program and choose the IFO-file. These are explained in detail in the following phase, so I will go directly into XMpeg menus.
First make sure the correct audio track is selected. Right-click the thumbnail image in the Player menu and see what track is selected in 'Audio' menu. You should be able to tell just by that if it is correct or not. You can also click Play and listen if it is what you want
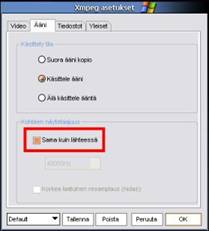 Go to 'Options->Audio'.
Select 'Process audio'.
Also check, that 'Same as
input' is selected. Nothing else, click OK. Then click 'Audio tools' at the
lower Xmpeg Player-window. This will open a menu on the right side of the video
image. Enable both options Compression
and Normalisation;
set the compression value to and normalisation to . These settings
make sure, that the audio volume doesn't drop too low when downmixing from
multichannel DVD-audio to two-channel stereo. Click 'Audio tools' again to
close the menu.
Go to 'Options->Audio'.
Select 'Process audio'.
Also check, that 'Same as
input' is selected. Nothing else, click OK. Then click 'Audio tools' at the
lower Xmpeg Player-window. This will open a menu on the right side of the video
image. Enable both options Compression
and Normalisation;
set the compression value to and normalisation to . These settings
make sure, that the audio volume doesn't drop too low when downmixing from
multichannel DVD-audio to two-channel stereo. Click 'Audio tools' again to
close the menu.
MP3-audio is created at the same time with the video, so all other settings such as choosing the codec are made with the 4. Video settings.
If you want MP3 VBR sound, you'll need to use some external program. First extract the audiotrack the same way as in AC3 section (MP3 File) and do the VBR conversion with an external editor. Then join with videofile the same way as instructed in AC3 section.
Unfortunately the XMpeg-program cannot produce an AVI-file with AC3 audio directly. It can create separate video and audio files, but they have to be joined with Nandub-program. Luckily this is not difficult. Perhaps the next version of XMpeg will know how to do this by itself.
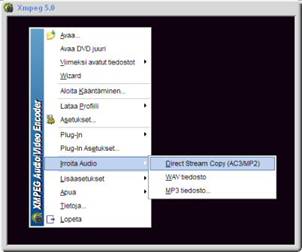 Go to the same menu as with MP3 audio 'Options->Audio', but this time choose 'Don't process audio'. After that go to 'Files'
and type a filename and folder in the LOWER line for the AC3-audiofile, which is then 'separated' from the video data. Next click as
shown on the image 'Extract
Audio to->Direct stream copy (AC3, MP2)' ,
which starts making the audiofile. This shouldn't take more then 10-15 minutes.
Go to the same menu as with MP3 audio 'Options->Audio', but this time choose 'Don't process audio'. After that go to 'Files'
and type a filename and folder in the LOWER line for the AC3-audiofile, which is then 'separated' from the video data. Next click as
shown on the image 'Extract
Audio to->Direct stream copy (AC3, MP2)' ,
which starts making the audiofile. This shouldn't take more then 10-15 minutes.
NOTE! If your DVDs audiotrack is only 2-channel AC3, it's more sensible to use MP3 audio instead since the audio format will be stereo anyway. MP3 audio takes a lot less space and there is no significant quality loss.
When you've also created the video file (following the instructions in Video the joining is done with Nandub. Instructions for that in section Miscellaneous.
Without a doubt the most difficult and time consuming
phase. In order to clarify thing I've divided this phase into five sections:
1. Video adjustments
2. Determining the bitrate/filesize
3. General XMpeg settings
4. Codec settings: DivX 5.05, DivX 5.1.1, XviD 1.0.2
5. Encoding
Settings I'm recommending in this guide are aiming for the highest possible image quality, not the fastest possible compression. Changing a few options can reduce the time needed for encoding quite a lot, but the image quality won't be even near what it could be.
First of course start the XMpeg program and load the IFO/VOB files. Open the main menu by right-clicking on the image. Click 'Open' and search the IFO-file you created with DVDDecrypter. You should now see a big black screen and the Player menu at the bottom.
 First you need to make adjustment to
the video size and apply cropping. With the Player slider seek to a bright
scene in the movie (specifically
bright at the edges). Click 'Video tools' .
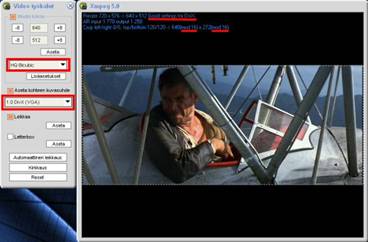
A menu should appear on the left. Enable 'Resize output' and 'Set output aspect ratio'
and set that to '1.0 DivX
(VGA)'. The image should now show correctly. Make sure that 'HQ Bicubic' is selected.
Click the
buttons to reduce the size of the image. You'll notice that in the upper left
corner of the image 'not
valid for DivX' appears. This will immediately tell you when the
image aspect is the same as it was in the original
image. When the text changes to 'Good settings for DivX' the aspect is correct
and no distortion occurs.
First you need to make adjustment to
the video size and apply cropping. With the Player slider seek to a bright
scene in the movie (specifically
bright at the edges). Click 'Video tools' .
A menu should appear on the left. Enable 'Resize output' and 'Set output aspect ratio'
and set that to '1.0 DivX
(VGA)'. The image should now show correctly. Make sure that 'HQ Bicubic' is selected.
Click the
buttons to reduce the size of the image. You'll notice that in the upper left
corner of the image 'not
valid for DivX' appears. This will immediately tell you when the
image aspect is the same as it was in the original
image. When the text changes to 'Good settings for DivX' the aspect is correct
and no distortion occurs.
NOTE: If the image looks distorted despite the '1.0 DivX (VGA)' setting try the other choices. If you need to do so 'Good settings for DivX' may not appear at any resolution. This however is not important. It is only the programs reaction to the settings and doesn't not affect the final video image. What you see on the preview screen is what will be seen on the final videofile regardless of what Xmpeg thinks is 'not valid'.
How much you should decrease the size depends on the calculated bitrate, but for the mean time reduce to 640x512. Once the bitrate is determined later on the size can be readjusted if need be.
I recommend using the following resolutions:
over 800 kbps -> 640x??? (vertical
resolution depends on the image aspect)
725-800 kbps -> 608x???
650-725 kbps -> 560x???
less 650 kbps -> 512x???
640 is the biggest you should use despite how much the bitrate. And you shouldn't go smaller then 512 because as the image gets smaller the possible compression distortions will get bigger in relation to the image size. Nothing prevents you from using other values, but I highly recommend using resolutions between 640-512.
Next you need to crop away the black bars from the top and bottom. Click 'Crop' and 'Auto-crop'. A dotted line appears in the image and another info-line 'Crop'. In order for the AVI-file to follow standard as well as possible (and thus be playable on any hardware) the final resolution should be divisible by 16. This is indicated by the 'mod ?? texts in the 'crop' line. Both should read MOD 16. After auto-cropping this most likely is not the case. Adjust the dotted line accordingly so that both values read MOD 16, just as you do any program window; dragging the dotted line with mouse-left button
Once the adjustments are made, click 'Video tools' again. The Xmpeg image window will now show the final size of the output video.
( bitrate=how many bits per seconds is used, direct
relation to image quality and file size )
If you want to encode the ENTIRE movie with end credits, the easiest way to determine the length is to use some external program, your DVD-player for example. Write that down on paper for later use. If you want to, for example, cut off the end credits (which is sensible if your goal is the smallest possible file size) do the following.
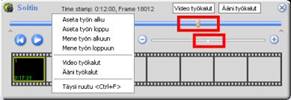 Using the sliders in the XMpeg Player window find the
spot where you want your video file to end (the smaller slider is for fine tuning). Once you've found the spot use the
right click menu and select 'Set job end'.
Using the sliders in the XMpeg Player window find the
spot where you want your video file to end (the smaller slider is for fine tuning). Once you've found the spot use the
right click menu and select 'Set job end'.
Now you must find out how much shorter the video file got after you made the cut. 'Time stamp' at the top of the Player window, will indicate the time, which may be (not necessarily) the full length from the beginning. If this is the case, you can use that time directly. If not, you'll have to determine the correct time some other way for example using your DVD-software (find the same spot and look at the time). It doesn't matter how you do it as long as you get the final length at +-5 second accuracy.
Next you need to decide what size video file you want to make. For practical reasons terms 1CD- (700 MB) and 2CD- (1400 MB) version are used, so you should between the two. There is of course nothing stopping you from making a video file exactly the size you prefer.
 Even though the Xmpeg program has it's own bitrate calculator it is more sensible to use an
external program for this. DivX
4 Bitrate Calculator is designed for just this. Xmpeg's
internal calculator gives the exact same values, but it's
features are not enough if you are using AC3-audio. XviD codec has it's own internal calculator.
Even though the Xmpeg program has it's own bitrate calculator it is more sensible to use an
external program for this. DivX
4 Bitrate Calculator is designed for just this. Xmpeg's
internal calculator gives the exact same values, but it's
features are not enough if you are using AC3-audio. XviD codec has it's own internal calculator.
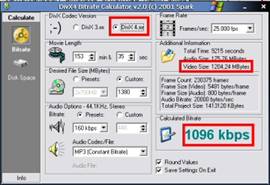
It is very simple to use. Only setting to be made is selection the 'DivX Codec Version' 'DivX 4.xx' . This setting produces close enough values for DivX 5 codec as well. My own experience has shown that 'Custom' values 692-693 MB creates a file of about 700 MB (the calculator does not give absolutely accurate values since it presumes that the bitrate is constant although it in fact changes all the time as it is needed)
Set the final length you determined to 'Movie Length' and the file size you want to 'Desired File Size'. At 'Audio options' select the MP3 audio quality you want to use (Constant Bitrate) or find the AC3-audiofile you created (Audio Codec/File). The calculator then shows the bitrate on the lower right corner. Write it down (approximately; nearest 0 or 5 will do, for example in this case 1095) and if you're using MP3 audio also the quality you selected.
If the bitrate is less then 650 kbps, you should seriously consider making a 2CD-version (or otherwise larger video file), because bitrates lower then that will result in considerably decreased image quality. In practise this means that in 700 MB (1CD) you can fit a movie that is a bit under two hours long. If you don't want a bigger file, you either need to shorten the length (cut end credits) or use lower MP3 quality. I don't recommend using quality lower then MP3/112 kbps though.
The amount of bitrate required without suffering a quality loss depends greatly on the genre of the movie and camera technique. If you're dealing with an action-packed movie or a movie with lots of handheld footage (in both cases the image information changes constantly and in large steps) you need lots of bitrate to be able to record the changes properly. But if you're dealing with a slow paced drama with little or no camera movement or the movie has lots of dark, night footage (in which case there's hardly any change between images) quality remains good with very little bitrate. For a movie like this a bitrate as low as 525-550 kbps/4 passes may be enough and still suffer virtually no loss of quality.
Some movies require very high bitrate and others cope with very little. It is wise to take into account the genre of the movie when determining the bitrate.
Go to 'Options-> Video'. In that section you don't need to make any changes. Just make sure 'Use the fastest' and 'IEEE1180 only ' are both enabled.
NOTICE! If there is HORIZONTAL 'tearing' visible in the videopreview window it is necessary to enable the 'Deinterlace' in the 'Video' section. In most cases the settings 'Blend' or 'Motion Detection' work best. You can test the settings by clicking OK and browsing the preview screen.
'Audio' section settings according to 3. Audio. In 'Files' type in the upper line the name and folder for your video file. Leave the lower line empty. No changes need to be done in the 'General' section. Just make sure 'Compile whole file' is enabled.
If you want to include subtitles in the videofile (not recommended, a bright white text will reduce image quality significally. And you cannot adjust the placement/font/size of the subtitles afterwards) do the following. Right-click the thumbnail on 'Player' window and choose the desired subtitle from the 'Subtitles' menu. If you want to adjust the placement or the beginning/ending times for the subtitles you can do so in 'Options->Subtitles'.
You have two different codec's to choose from: DivX 5.05 Pro/5.1.1 Pro or XviD 1.0.2. Both are MPEG4 based techniques so image quality is pretty much the same with both codec's. Also both support the powerful MPEG4 Advanced Simple Profile features Quarter Pixel, Global Motion Compensation and Bidirectional Encoding. DivX's advantage is the multipass capability, which allows for several analysis passes instead of just 2-pass technique of XviD (theoretically the image quality should improve as more analysis passes are done but practically it is very difficult to notice, unless very aggressive compression is used). In practise the image quality produced is so identical that it is very hard to tell any difference between the two codecs.
DivX codec settings are much simpler and are easier to make. XviD is more complicated, but at the same it can be better adjusted to meet desired requirements.
There are quite big differences between the encoding speeds achieved, some I ran benchmarks on my computer. This will help others to evaluate the encoding time needed for each codec and to choose the most suitable codec for their CPU strength. The encoded material was exactly the same for every codec: 5000 frames/25 FPS/200 seconds, bitrate 1000kpbs, no sound, 2 passes. Each test was run three times and the average value calculated. Test machine was AMD XP 2400+@2100 MHz, 512 MB.
|
Codec/settings |
1st pass |
2nd pass |
Total time |
Ratio |
|
DivX 5.05 Pro: QPEL+GMC+Bidirectional, Slowest, no psychovisual, log-file |
325.2 sec/15.4 FPS |
307.7 sec/16.2 FPS |
632.9 sec | |
|
DivX 5.1.1 Pro: QPEL+GMC+Bidirectional, Standard, no psychovisual, log+bin -files |
519.2 sec/9.6 FPS |
318.0 sec/15.7 FPS |
837.2 sec | |
|
DivX 5.1.1 Pro: GMC+Bidirectional, Slowest, no psychovisual, log-file |
1142.7 sec/4.4 FPS |
1085.0 sec/4.6 FPS |
2227.7 sec | |
|
XVID 1.0.2 VHQ OFF: QPEL+GMC+B-frames, log-file, ultra high, chroma motion |
190.0 sec/26.3 FPS |
383.5 sec/13.0 FPS |
573.5 sec | |
|
XVID 1.0.2 VHQ Limited search: QPEL+GMC+B-frames, log-file, ultra uigh, chroma motion |
190.0 sec/26.3 FPS |
471.7 sec/10.6 FPS |
661.7 sec | |
|
XVID 1.0.2 VHQ Wide search: QPEL+GMC+B-frames, log-file, ultra high, chroma motion |
190.0 sec/26.3 FPS |
571.2 sec/8.8 FPS |
761.2 sec |
DivX 5.05 still hangs on because of its speed even though it is the oldest codec. DivX 5.1.1 on the other hand is for those who don't care how long it takes to encode; at worst nearly four times as long as the fastest codec. The newest XviD 1.0.2 shows its strenght being relatively fast even at heaviest settings. VHQ-mode setting appeared to have no effect to the encoding time during the first pass.
A quicktest seems to indicate that DivX 5.2.1 is approximately the same speed as XviD. If enough interest is found, I may in the future replace the 5.1.1 guide to 5.2.1 even though that Pro version is no longer available free of charge (or what ever version is current at that time). For those interested, 5.1.1 settings are nearly identical to 5.2.1 settings so this guide should be enough to start encoding 5.2.1 Pro if you have purchased it. I will keep 5.05 guide for now, since it is the latest fast and free DivX version.
|
|
Fast |
|
|
Multipass |
|
|
Easy to use |
|
|
Oldish |
|
|
Pro-version not free of charge or is AdWare |
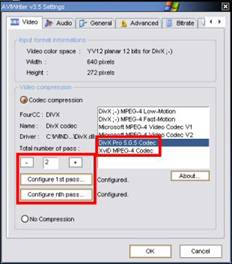 In the XMpeg menus choose 'Set Plug-In options'
.
You will see the AVIWriter
window. Next move to 'Video'
section and choose from the list DivX Pro 5.0.5 Codec.
In the XMpeg menus choose 'Set Plug-In options'
.
You will see the AVIWriter
window. Next move to 'Video'
section and choose from the list DivX Pro 5.0.5 Codec.
By far the superior image quality is achieved using multipass technique: the video data is processed several times. The first pass is only an analysis of the video stream, providing information for next passes. The codec now knows which scenes in the movie require a lot of bitrate and which require less. The second pass will use the analysis data to make an actual working video file, which you can test. The more passes you make, the more accurately the codec knows how to divide bitrate between different scenes in the movie. This being the case set at least two passes in 'Total number of pass'.
My own
personal experience has shown that for 2CD-versions (bitrate more than 1000kbps) two passes are enough. The smaller
file you make, in other words the higher compression you use, quality increases
the more passes you make. After the fourth pass there is no significant
improvement detectable so there really is no need to do more than four passes.
Then click 'Configure 1st
pass' You will see the 'DivX Codec 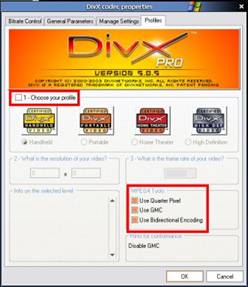 Properties' window.
First go to 'Profiles' -section. Disable the setting '1-Choose your profile'. This will free all the codec settings to be set at will, instead of being determined by a certain profile. Next enable all three 'MPEG4 Tools' settings.
|
Use Quarter Pixel: |
Activates a 16x16-division matrix instead of the normal 8x8-matrix. This improves the image clarity/accuracy especially along 'edges' in the image (for example a roof against a bright sky). |
|
Use GMC: |
Global Motion Compensation. If the image pans left or right all pixels in the image change. Instead of processing the entire image again GMC detects motion and simply gives pixels new coordinates in the image. |
|
Use Birectional Encoding: |
Every image in the video stream isn't processed separately. Only the changes between images are recorded. Bidirectional Encoding compares the change both to the image before and the image after and records the change that is smaller. |
Then go to 'General Parameters' section. These settings should be correct by default, but make sure that all settings are DISABLED (Enable crop, Enable Resize, Psychovisual enhancements, Pre Processing Source). Also Max Keyframe Interval should be , Scene change threshold , Performance/quality Slowest, Source Interlace Encode as Progressive and Basic Video Deinterlace off.
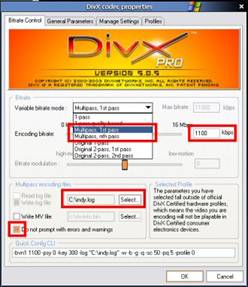 The most important
settings are in 'Bitrate Control' section.
The most important
settings are in 'Bitrate Control' section.
Of course, set 'Variable bitrate mode' to 'Multipass, 1st pass'. Type in 'Encoding bitrate' the value you calculated. In 'Multipass encoding files' type folder and name for the .LOG -file. There is no need to enable 'Write MV file' since that options has been disabled in this codec version (5.05) due to incompatibility with multipass encoding (this does not affect image quality in any way, the MV file only speeds up the following nth passes). No other settings are necessary for 1st pass.
NOTE: 'Multipass, 1st pass' WILL NOT MAKE a working AVI-videofile. It only makes the analysis file .LOG (and a small broken avi-file). Only after the second pass will there be testable video file.
Click OK and select 'Configure nth pass' You'll see the same 'Codec Properties' window. Make the EXACT SAME settings as in 1st pass (should already be done by default) except:
In 'Variable bitrate mode' set 'Multipass, nth pass' and make sure that 'Update log file' is enabled. Once all settings are made click OK.
|
|
Multipass |
|
|
Easy to use |
|
|
Slow |
|
|
Pro-version not free of charge or is AdWare |
Majority of the settings being exactly the same as for 5.05 Pro I will not explain the settings in detail for other than changed/new features.
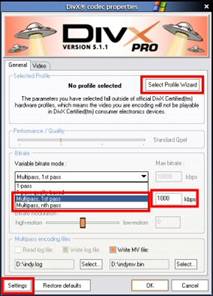
In Xmpeg's AVIWriter window select DivX Pro 5.1.1 Codec. Make the multipass settings the same way as for 5.05 Pro and click 'Configure 1st pass' .
First click 'Select Profile Wizard'. Select 'Disable profiles' and click 'Next'. In the next screen enable all three 'MPEG4 Tools' settings and click 'Finish'.
 'Performance/Quality' will be locked 'Standard' when QPEL is
enabled. This is roughly the same as 5.05 Pro codec's 'Slowest' setting. If you
wish to use 'Slow' or 'Slowest' disable QPEL. This will slow the encoding
process considerably. Also the MV-file cannot be used with these modes.
'Performance/Quality' will be locked 'Standard' when QPEL is
enabled. This is roughly the same as 5.05 Pro codec's 'Slowest' setting. If you
wish to use 'Slow' or 'Slowest' disable QPEL. This will slow the encoding
process considerably. Also the MV-file cannot be used with these modes.
Set 'Variable bitrate mode' to 'Multipass, 1st pass' and write the bitrate value you calculated to the adjacent box. At 'Multipass encoding files' enable 'Write MV file' and set the filenames and locations for the LOG and BIN files. MV-file will speed up the following passes: it contains information on 'movement' in the image which of course remains the same all the time, so it only needs to be analysed once at the first pass. In the following passes the setting changes to 'Read MV file'.
At 'Video' section make sure that ALL three 'Video settings' are disabled. At 'Advanced' make sure that 'Pre Processing Source' is disabled, 'Scene change threshold' is set to '50%', 'Encode as progressive' is selected and 'Max Keyframe Interval' is set to 300.
Then click the 'Settings' button at lower left corner and enable both 'Do not prompt with errors and warnings' and 'Disable the feedback window'. (If you leave 'Feedback window' activated the codec will open a window during encoding where you can follow in realtime what the codec is doing. This will slow down the encoding though, so only use for testing purposes). Exit back to AVIWRITER window by clicking OK.
Then do the 'Configure nth pass' settings in EXACTLY the same way EXCEPT set 'Variable bitrate mode' to 'Multipass, nth pass' and make sure the now appeared 'Update log file' is enabled.
|
|
Fast |
|
|
Free of charge, Open Source |
|
|
Versatile settings/complicated settings |
|
|
Only 2-pass |
 Go to 'Set Plug-In Options->Video'
section and choose 'XviD
MPEG-4 Codec' from the list. As with DivX codec, multipass
technique provides the best quality. BUT , XviD
supports only 2-pass
technique, so set 'Total
number of pass' to only 2 passes , no more.
Go to 'Set Plug-In Options->Video'
section and choose 'XviD
MPEG-4 Codec' from the list. As with DivX codec, multipass
technique provides the best quality. BUT , XviD
supports only 2-pass
technique, so set 'Total
number of pass' to only 2 passes , no more.
Then click 'Configure 1st pass' which brings you to 'XviD Configuration' window. First select Profile. The profile settings as such do not affect encoding, but they do limit settings to a certain level. For normal XviD encoding select AS@L5 and click more.
At the appearing window compression settings are chosen. No changes need to be made in Level and Aspect Ratio pages.
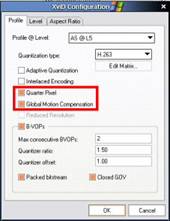 Quantization
type:
Quantization
type:
H.263, smooths the image, use if bitrate is low/1CD version
MPEG, sharpens the image, use if bitrate is high/2CD version, slightly slower
then H.263
Adaptive Quantization: Reduces bitrate from areas that the human eye doesn't easily see, use if bitrate is low/maximum compression is required
Interlaced Encoding: DO NOT USE, use XMpegs Interlace settings instead.
Quartel Pixel, Global Motion Compensation: Always on, explained in more detail at section DivX 5.0.5 Pro.
The rest of the settings manage B-frame (DivX's Bidirectional). The default values are fine. Click OK to return to the opening window. Choose Two Pass - 1st Pass at Encoding Type. At More you can change the folder and name of the analysis file, if you want to. There is a setting called 'Full quality first pass' which should not be used because it doesn't improve the second pass only slows the first and a setting called 'Discard first pass' which should be enabled, since the first pass video file will not work anyway. Then click Advanced Options.
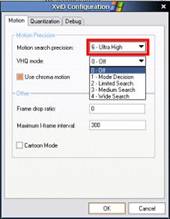 These settings adjust motion
detection. Motion search precicion should be the best 6 - Ultra High.
These settings adjust motion
detection. Motion search precicion should be the best 6 - Ultra High.
VHQ mode sets even higher mode of detection. Beyond 1 - Mode decision the settings will not improve image quality much especially with higher bitrates, but slow down encoding considerably. Use the higher 3/4 modes only if bitrates is low/maximum possible compression is required.
Use chroma motion should be enabled, even though it slows down a bit. Turbo mode activates some detection optimizations, but they can cause distortions in the image. I myself have not noticed any distortions however. Use if encoding speed is more important then image quality.
Frame Drop ratio should be zero (of course all frames are to be encoded) and Maximum I-frame interval default is good. If you are encoding animated material enable Cartoon Mode (traditional animation, modern computer animations will not benefit from this)
Quantization page settings are best left handled by the codec algorithms, so all settings should remain minimum and maximum values. The smaller the value, the lighter compression is used, The bigger, the heavier. All three minimum should be set to and the maximum to .
|
I-Frame or keyframe |
'An important frame' that is saved with high bitrate. These frames are found in places where most of the image data changes (scene cuts/camera changes, an explosion or some other radical change). They also function is points of reference to other 'regular frames' (frames never carry all image information, only the pixels that have changed). |
|
P-Frame |
A regular frame, most frames are these. |
|
B-Frame |
XviD's counterpart for DivX's Bidirectional encoding. A frame that can refer to either the previous frame or the following frame, which ever change is smaller. |
Trellis quantization utilizes special algorithms for
motion detection. Slows down the encoding a bit and reduces the image quality,
but the need for bitrate also reduces radically. Use if bitrate is
low/compression efficiency is more important then image quality. At Debug page make sure
that Print debug info
and Display encoding status
are 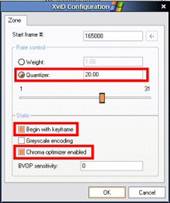 disabled.
Last thing before second pass settings is determining different Zones, that allow for different compression strenghts to be set for different parts of the video. The most typical way of using zones is increasing compression during beginning or end credits. Click Zone options.
First you need to define the beginning frame for the zone. Note, that if you define a zone for beginning credits, you also need to define a zone for the video itself since no ending point is defined for any zone.
The weight setting determines the ratio used for certain zone, for example 0.15 would compress the zone using 15% of the defined bitrate. The setting however doesn't seem to work efficiently enough, so I recommend using a fixed Quantizer setting instead. 20-25 is sufficient here.
Begin with keyframe ensures that the zone starts with a
keyframe. Greyscale
encoding makes the zone black and white (doesn't help compression as such). Use if you like it. Chroma optimizer enabled
interpolates even black/white areas reducing distortions caused by extreme
compression. BVOP
sensitivity adjust the amount of B-frames used between -20 (none) to 30 (lots). Not much practical use, so leave at zero
setting. 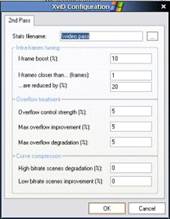 When you've defined the zones you
want click OK
twice to return to Plug-In settings.
When you've defined the zones you
want click OK
twice to return to Plug-In settings.
Choose 'Configure nth pass' and set Encoding type to Two Pass - 2nd Pass and click More. Make sure that the folder and file name for the analysis file is the same you set at first pass settings. The default values are good for the rest of the settings, but I will explain their meaning here anyway.
I-Frame boost increase the size of keyframes from what they would be following the bitrate formula. I Frames closer than decreases the size of keyframes if they are unnecessarily close to each other.
Overflow control strength adjusts how the bitrate
surplus/deficit is compensated per frame. Max overflow improvement and max overflow degradation define
how quickly the codec attempts to realign back to the defined 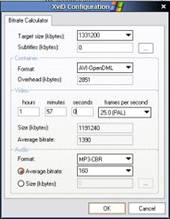 bitrate when it changes higher or lower
depending on scene demands. Higher values will align the bitrate quicker. Too
high values however create strong bitrate fluctuation which may decrease image
quality.
bitrate when it changes higher or lower
depending on scene demands. Higher values will align the bitrate quicker. Too
high values however create strong bitrate fluctuation which may decrease image
quality.
Curve compression settings adjust the scaling of bitrate formula. High bitrate scenes degradation moves bitrate from 'big frames' to smaller frames and Low bitrate scenes improvement enhances 'small frames' by taking bitrate from other frames.
Defining bitrate for XviD is easy because of its internal calculator. Click Calc. Set the filesize you want to Target size (kbytes). You can even include the size of your subtitle file when defining file size at Subtitles (kbytes). Select AVI-OpenDML at Container. Set video time and FPS at Video.
At Audio set the audio quality you have used, or find the separate audio file you've created at Size (kbytes). When you click OK, the opening window automatically shows the correct bitrate/filesize (you can switch between the by clicking Target bitrate/Target size)
All other settings, including zones EXACTLY the same way as for the first pass.
If you are
using MP3-audio, in 'Audio'
section 'Codec
compression' use the same settings you used in the calculator (note: 48000Hz). If you are using AC3-audio codec doesn't have
to selected at all (don't
process audio is selected). There is one useful option in 'General' section: '
Go through
all the setting to make sure everything is set correctly. To
start encoding click 'Start
Conversion'. Do not touch the 'Priority' setting. Normal setting is quite
adequate, High
starts to cripple the computer and Highest will crash the system at 100% certainty.
Setting the priority higher then
At the Encoder window you can follow the progress of the process. The percentage indicated is for the current passnot the total amount of passes. The program will process all the passes defined in a row without stopping in between, so once complete you should have a fully functional videofile (not including possible audio joining)
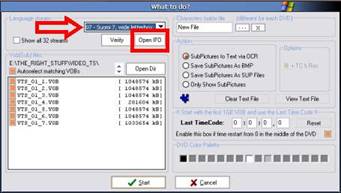 The last phase is separating the subtitles from the IFO/VOB files. First
you need to open the VOB-files into the Subrip -program (click the VOB-icon in the upper left corner) . As shown in the image click 'Open IFO', find the
IFO-file and select the language you want. Make sure all the VOB-files are
selected, 'SubPictures to
Text via OCR' is enabled and TimeCode reads all zeroes. Start by
clicking 'Start'
(duh).
The last phase is separating the subtitles from the IFO/VOB files. First
you need to open the VOB-files into the Subrip -program (click the VOB-icon in the upper left corner) . As shown in the image click 'Open IFO', find the
IFO-file and select the language you want. Make sure all the VOB-files are
selected, 'SubPictures to
Text via OCR' is enabled and TimeCode reads all zeroes. Start by
clicking 'Start'
(duh).
Then the actual text interpretation begins. The program asks you to recognize what letter (or letters) is shown inside the red box. Type the letter to the line observing capital letters. There are also options for bold, italic and underline but very few video-players support these features. Use them only if your player supports them.
 You'll quickly notice that the program only asks for
each letter once. It won't take long for the program
to stop asking and the process starts to proceed more rapidly. All in all it
should take more then half an hour to go through the whole movie. This of
course depends on the movie length and the amount of dialog. You can also save
the 'text recognition' to Characters
Matrix file for use with other subtitle jobs. This way you don't
have type all letters all over again. There is a danger, though, that some
symbols might be incorrect as DVD-subtitles vary somewhat on different
DVD-disks so I recommend making a fresh matrix for each DVD and use the same
matrix only for titles on that particular DVD (possible extras and
other bonus material
you might copy of the disk)
You'll quickly notice that the program only asks for
each letter once. It won't take long for the program
to stop asking and the process starts to proceed more rapidly. All in all it
should take more then half an hour to go through the whole movie. This of
course depends on the movie length and the amount of dialog. You can also save
the 'text recognition' to Characters
Matrix file for use with other subtitle jobs. This way you don't
have type all letters all over again. There is a danger, though, that some
symbols might be incorrect as DVD-subtitles vary somewhat on different
DVD-disks so I recommend making a fresh matrix for each DVD and use the same
matrix only for titles on that particular DVD (possible extras and
other bonus material
you might copy of the disk)
Once the process is complete (you can follow the progress indicator at the top of the screen) some adjustments are in order. The program easily confuses capital I's with small L's etc. In the lower menu select 'Correction->Post OCR Spelling Correction' and make sure all three options are enabled and English language is selected ('orthography' option not enabled)
Once the corrections are made save the file using the lower menu command 'File->Save as'. The .SRT -file the program uses is a regular text file, so you can edit it with any text editor for example Notepad, if further changes are necessary. It is quite common that extra spaces in the text file need to be removed.
 If you've made a 2CD-version the subtitle needs to be cut also. Open the
file into Subrip. If you're returning to the program first
click 'Show/Hide subtitles
text window' -icon next to the VOB-icon to reveal the lower menu
where you can find the 'File->Open'
command. Then click '
If you've made a 2CD-version the subtitle needs to be cut also. Open the
file into Subrip. If you're returning to the program first
click 'Show/Hide subtitles
text window' -icon next to the VOB-icon to reveal the lower menu
where you can find the 'File->Open'
command. Then click '
Note, that Subrip is capable of saving into many different subtitle-formats. Be sure to use a format (Output Format) that your videoplayer supports. SRT is Subrip's own format.
If you have not created a subtitle file yourself, it is possible that it is not suitable for your videofile. With Time Adjuster it is however quick and easy to adjust the subtitle to match the video file. The program can also divide subtitles in to two parts, or join them back together. Guide text follows the english version of TA, so use that language when installing.
The program can handle TST, SUB, SRT and SSA formats.

Open the subtitle file to Time Adjuster and click Synchro button (an image of a clock). This opens a window which shows First 50% of file at top and Last 50% of file at the bottom. The object is to select a scene from the beginning and end parts of the video, and tell to the program at what point a selected subtitle line is said in the video. This is easiest done looking/listening directly from the video playback. That is, click 'Or use AVI player to point me that line': you will see a 'Load AVI file' window. Open the video file and find the scene which included the subtitle line you've chosen and click 'Line below is playing NOW!' exactly at the moment the line is spoken.When you are happy with the 'hit' click OK. Do the same for both First 50% and Last 50%. The closer to the beginning/end the subtitle lines you choose are, the more accurate the synchronization will be. When both lines are matched click OK, and the screen now shows a new, synchronized, subtitle file. Which of course you save.
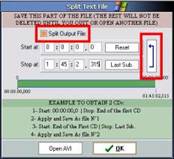
Open the
subtitle to Time Adjuster. Find the spot, where you want to cut the subtitle
and click '
Joining two subtitle files is basically the same thing in reverse. Open the first part of the subtitle and click 'Join' and select the second part. When both are opened click 'Join' again and in 'Joining two files' window enable 'Enter time value to add to second file'. Set the entire time of the first part of the video. If you do not know the exact time of the first part you may need to guess. The last subtitle line time will you give a time to start guessing though. As with cutting you may need adjust the timing when done.
Once you have a subtitle file, it should be viewed with the videofile. There are several different methods. DivXG400 is one of the easiest. This program add subtitles over almost any other player program. That means it is not an actual videoplayer itself, it only shows subtitles. The program is also codec-independent, which means it will work with any player that uses DirectShow Filter Graph to produce video image (Windows Media Player, PowerDVD, MicroDVD, Global DivX Player, BSPlayeretc etc)
After installation some settings need to be changed in order for the program to find your subtitle files and show the correct the way. You should have a start menu program group called PRR Video Utilities. Start 'Configure DivXG400'.
TIP: It is wise to place 'Configure DivXG400'-shortcut to desktop (or where ever you keep often needed shortcuts), because subtitle settings may need to adjusted for each individual video; typically the font size may need changing.
 Settings
Since the program was originally written for Matrox G400-series card, it also has capabilities that only work with such graphic cards. If you do not have such a card, disable all options at Picture page at 'Picture adjustment' and 'Extended overlay support'. At Miscellaneous select 'Load filter - always', 'FPS conversion - Disabled' and enable 'Show icon in system tray'.
Then switch to Subtitles page. At 'File - Search' set the folder where you want the program to look for subtitle file (the dot means the same folder where the video file is located). For example in the adjacent picture I have selected folders D:ElokuvatSubtitles which holds the majority of my subtitle files; the program will find them there automatically. I also have . (dot) for video burned on CD's including the subtitle file (in other words, in to the same folder) and D: which I use as a 'work folder' when I'm editing subtitles. I never have to wonder where the heck is the subtitle for this and that videowhen they are automatically loaded from these locations, regardless of where the actual video file is located.
Font and Position settings adjust the look and location of the subtitle text on the screen. These setting may need to be adjusted for each video file. The settings shown in the picture should work for most subtitles/videos.
At OSD page you can select to show the time, or video length on screen if you want to. Help/About page has among other things a link to program developers website.
No other settings are required. Program is automatically started when you start video playback and a subtitle loads if available. The program will start even if no subtitle file is found, but of course it will not show anything, unless OSD settings are made.
In order for correct recognition of subtitle files (which subtitle belongs with what video), the files need to be named in a certain way. That is, each videofile and the matching subtitle file must have EXACTLY the same file name Except the file extension of course. For example: 'Movie (DVDRip).avi' and 'Movie (DVDRip).sub' are recoginized as a pair. The alternative is file name 'subtitles.???', which is used it is found in the same folder with the video file (for example when burned on a cd with a file called subtitles.sub, it will automatically load). This of course cannot be used if you keep all your subtitle files in the same folder.
When DivXG400 starts an icon will appear in 'System tray', through which you can see what subtitle file (if any) is being used, can access the program settings and can see what filters and codecs are being used. If you do not wish to see the icon deselect 'Show icon in system tray' at 'Settings - Picture' page.
DivXG400 supports the following subtitle formats: SubViewer 1.0, 2.0, SubRip, MicroDVD, SAMI, Sub Station Alpha 3.0, 4.0, JACOsub, DVDSubtitle, VobSub 3.0, 4.0, TMPlayer, SMIL-RealText, AqTitle.
If you did
not cut the video during encoding and you plan to fit it on CDR-disks you need
to cut afterwards. This is not difficutl using Nandub. Open the AVI-file in to
the program and enable 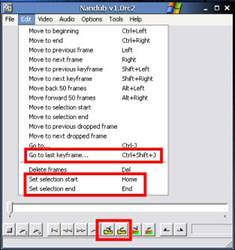 'Direct Stream
Copy' in both 'Video' and 'Audio' menus.
'Direct Stream
Copy' in both 'Video' and 'Audio' menus.
Make sure that the slider is at beginning (Edit -> Move to beginning) and set the starting point: Edit -> Set selection start. Next you must find the cutting point. Select Edit -> Go to last keyframe, and choose at the window at first 698 MB and click OK. Then set this point as the ending point: Edit -> Set selection end. Then simply save the file File -> Save as AVI. UNDER NO CIRCUMSTANCE overwrite the original file, or you will loose the end part of the video.
If the video file created is not the desired size move the end-point in either direction using the key-buttons at the buttom, set the end point and save again. Keep doing this untill you get the first (CD1) part to suitable size and then do the second part. This way you only need to resize the first part, if it is not the right size right away. When ready set the current end-point as a new starting point and the end of the file as the new end point, and save the CD2-file.
It is up to you if you want the CD1 end-point to be exactly the same as CD start-point or if they overlap a few seconds.
TIP: Using the same method you can 'trim' a video file a little bit smaller by cutting away end credits afterwards if the videofile you've created is slightly too large. No need to save the second part
If you have selected to use AC3-audio or video and audio did not synchronize proprely during encoding, video and audio are joined/synchronized afterwards in the following way. Or if you wish to use an audioformat, that XMpeg doesn't directly support such as VBR MP3. In section 3. Audio separation of audio track is instructed.
Open the videofile you created in to Nandub (File->Open video file). Set 'Direct Stream Copy' to both 'Video' and 'Audio' menus. Then select in Audio-menu 'AC3 audio' or '(VBR) MP3 audio' and the audio file you want. You can create the VBR MP3 file with any MP3-editor you prefer, if you want to use this format. Note, that the audiotrack size will change if done so, which again will change the size of the final video file which may not fit a 700 MB CDR anymore.
If you need adjust the timing of the audio, in 'Audio' menu select 'Interleaving'. At 'Audio skew correction' set the adjustment needed in milliseconds. If the audio track plays too early use positive values, if too late use negative values.
Then just save the new video file 'File->Save as AVI' with then name you want (do not overwrite, make a new file just to be safe)
|
Politica de confidentialitate | Termeni si conditii de utilizare |

Vizualizari: 1378
Importanta: ![]()
Termeni si conditii de utilizare | Contact
© SCRIGROUP 2024 . All rights reserved