LastXP Builder Tool
The LastXP Builder Tool
is a simple tool for copying a LastXP disk from your Virtual Drive or DVD-ROM, configuring
default settings for your disk and re-creating a fresh image (ISO) to burn.
Virtual Drive software is best to use. If you have a copy of
the original DVD image, mount this with Daemon Tools, UltraISO, Alcohol 120% or
any other virtual drive application and use this as the source, instead of the
DVD itself (if you have already burnt a copy).
* NOTE * - Disable
Resident Virus Scanners or a rebuild of the ISO may not function correctly due
to some of the Tools needed to create it.
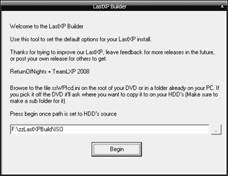
The first step is to
get the files off the ISO/DVD onto a hard drive so you can edit it. To do this
simply press the [..] button and find a drive with a
ssWPIcd.ini file (this file identifies a valid LastXP disk) if you already
have done this step then browse for the folder youve pointed it to. It will
prompt for a folder to copy the DVD contents to if the drive is un-writable
(DVD/ISO), copying all the needed files to generate a new ISO. Give the old DVD
to a less fortunate friend to use J
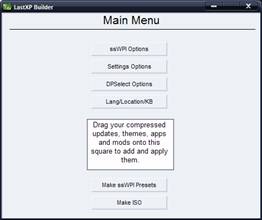
Main menu:
- ssWPI Options
Allows you to make the default options that happen when you run the
ssWPI to pick apps (after burn).
- Settings Options Create the defaults for when you running the
Settings or LastXP installation completes.
- DPSelect Options Pick which driver packs you prefer to have
selected by default.
- Lang/Location/KB This will allow you to change your LastXP
installs default location.
- Drag and Drop This box allows you to update your selected ISO
with Themes, addons etc
- Make ISO Select the boot menu of your choice and generate an
ISO to burn.
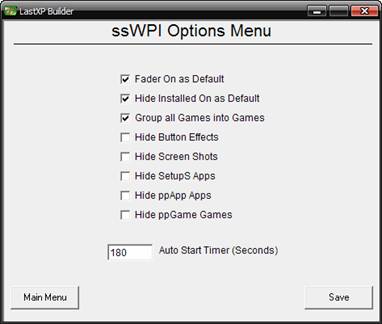
ssWPI Options:
- Fader On as Default The ssWPI has a screen that shows pretty
fades instead of each app installing, some people prefer to watch their
toast cook (I mean apps install) so they want this off.
- Hide Installed On as Default This option makes all apps found
on the system not shown in the list of available to install items. (you can disable again from the button in ssWPI).
- Hide Button Effects If your planning
on using your ssWPI on older PCs then turning off the shadows, gloss and
hover events will make the ssWPI run smoother on these old PCs.
- Hide Screen Shots If your planning on using this disk A LOT
or in old DVD readers then disabling this will hide the Screenshots from
loading when U click on a app (best for people who know everything and
dont need pictures to decide).
- Hide SetupS Apps Not used by me, but is available to hide the
apps that can be installed to the current OSs main drive.
- Hide ppApp Apps This will hide the semi portable types of
apps that can be installed to the Drive you select.
- Hide ppGames Games This will remove any ppGames from the list
of apps you can install.
- Auto Start Timer (Seconds) This is how long the ssWPI waits
during install of LastXP before it accepts
default selection set in the Presets.
NOTE: All
app types will be scanned from any drives in the current PC. Making you able to
update apps and not need to burn a new disk to access them.
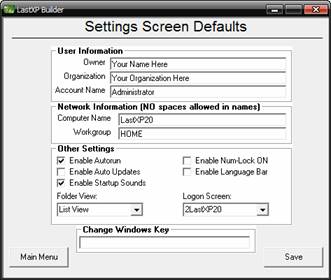
Settings Screen Defaults:
- Owner This often appears in applications as the owner of each
application
- Organization Also shows in applications
- Account Name This is the name shown on the Welcome screen as
well as on the Start Menu
- Computer Name When you browse the network this name is shown
to other PCs
- Workgroup If this is the same on each PC your able to share
files and printers
- Enable Autorun When you insert a CD/DVD it will run the disk
without having to browse it
- Enable Auto Updates This will enable/disable the MS Auto
Updates services on your PC
- Folder View Each time you open a folder in Explorer it will
default to the chosen option
- Enable Num-Lock
ON Makes Num Lock on as
default on each reboot
- Enable Language Bar After a reboot this will Show/Hide the
language bar
- Logon Screen Chose from the list of Logon screens included
with your ISO
- Change Key You can set this to default to a key that gets
applied on install
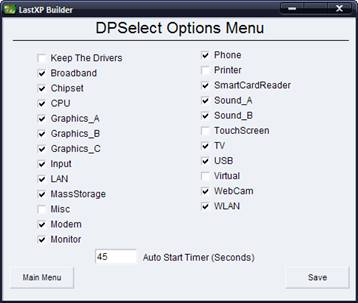
DPSelect Options:
Choosing which options
you want to have selected as default
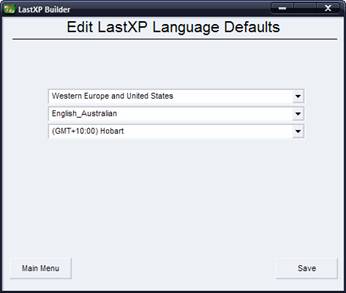
Language Defaults:
On the DPSelect during
setup your able to change the location and time zone
that gets used as default (For LastXP only, not Lite or vanilla) although your
able to change this per install.
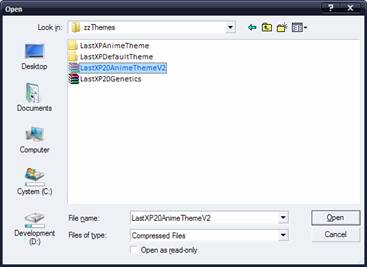
Drag and Drop Box:
No more guessing when
it comes to applying Mods, Updates, Themes and apps to your ISO, simply click
the box to add one at a time or drag a group of them onto this box to add them.
Supports:
Driverpacks 7z updates
Compressed or folders:
ppApps
ppGames
SetupS Apps
LastXP v20 theme packs
LastXP v20 Update
Archives
LastXP v20 Mod Archives
Video Examples:
To give you more of an
idea of what is possible with LastXP Builder, please see the example vids: they
will show -
* How to use the Drag
and Drop Box
* How to copy off the
DVD (using the builder)
* How to use the ISO
Builder
3 short movies with
text and moving swf gfx
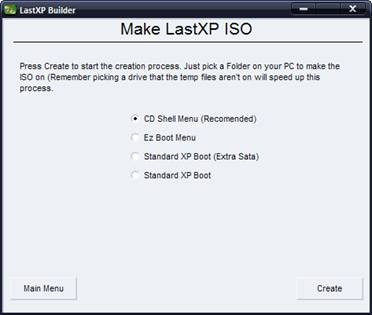
Make LastXP ISO:
- To create the final LastXPDVD.iso file that you will burn this
screen allows you to pick how you want it to boot and lets you set where
it will get created on your computer (this step is faster if you go across
drives to a different letter).
- CD Shell Menu This is the Text based menu that seams to work
on more systems than the Graphical eZBoot menu.
- Ez Boot Menu The graphical interface with mouse support.
- Standard XP Boot (Extra Sata) This is the same boot method
you get from Microsoft, only allows installing LastXP with no extra
options on boot, but also includes the extra Sata/Raid support made by
Bashrat Driverpacks.
- Standard XP Boot This is the same boot you get from
Microsoft, but only allows you to install LastXP no other options are
available during boot.
Good Luck from
TeamLastXP with configuring your LastXP to suit your personal needs and please
remember to share your experiences or mods with the World.
