| CATEGORII DOCUMENTE |
| Bulgara | Ceha slovaca | Croata | Engleza | Estona | Finlandeza | Franceza |
| Germana | Italiana | Letona | Lituaniana | Maghiara | Olandeza | Poloneza |
| Sarba | Slovena | Spaniola | Suedeza | Turca | Ucraineana |
Setting up Xmpeg
![]() View the Printer Friendly Version
View the Printer Friendly Version
Return to DVD to DivX Conversion Guide
Xmpeg is very similar to FlasK MPEG 0.6 Preview, so those of you who have used
FlasK MPEG 0.6 Preview before should be right at home here.
Below are instructions on how to setup Xmpeg for DVD conversion. You may want
to first visit our DVD to DivX Conversion Guide,
which features full instructions on how to convert DVDs to DivX using this tool
(this page only contains instructions on how to setup this tool).
You should download the following software, which are required for this article :
Start Xmpeg. You'll be prompted to select the language of the Xmpeg interface - this guide will choose the English language interface.

Use Xmpeg's 'Open Media' option in the 'File' menu, change the 'Files of type' option to 'XMpeg DVD mism', and open the IFO file corresponding to the main movie (either on your hard-drive, after being ripped, or straight from the DVD). You can locate this file easily by finding the first VOB file (alphabetically) that is about 0.99 GB in size, and the IFO file that has the same name is the IFO file corresponding to the main movie. You should then get the following screen :
Here, you can select which audio track, subtitle (although it doesn't always
work) and which chapter you want to start ripping from.
Xmpeg will now test your iDCT, which may take a long time and
seems like Xmpeg has crashed.
Once Xmpeg has finished testing your iDCT, the Xmpeg player should appear. Press the '>>' button on the bottom right of the control panel to expand it :
You can use this player to set jobs, or in other words, tell Xmpeg which part of the movie it should convert (if not the whole movie). If you wish to use this feature, simply follow these simple instructions :
Right click within the 'Video stats' box, and select 'Clear All Jobs' to clear the default job (encode whole file).
Use the slider to slide to the part of the movie you want to start conversion at.
Right click again and select 'Set job start'.
Use the slider to slide to the part of the movie you want to end conversion at.
Right click again and select 'Set job end'.
Right click again and select 'Add job'.
You have just added a job to the Xmpeg job queue.
Right click within the 'Video stats' box, and select 'Run' -> 'Audio Player'. This screen should now appear :
The settings that you should take special note of have been marked with an
orange rectangle, and they are :
o Dolby Surround downmix - when this button is activated, the audio will be down-converted to a Dolby Surround compatible stereo track. You will usually want this option on when converting audio along with the video.
o
o Normalization - Normalization is the process where the peak audio value is found, and then the rest of the audio is evened out according to this peak value. When this function is activated, you can use the 'Search' button to search through the movie to find the peak value, and normalize the audio accordingly.
o Available tracks - You can also use the 'Available tracks' option to change which track you want to listen to if the DVD has multiple audio tracks. Make a note of the position of the right audio track (eg. if it is the 2nd available item on the 'Available tracks' drop down list), and if you think you selected the wrong audio track in Step 1 above, go back to Step 1 and select the right track.
When you are finished, click on the big blue tick sign to close down the audio
player.
You should also take note of the following section on the control panel :

Please remember the 'Detected FPS' and 'Video Structure'
settings - this will become important in the next step.
Again, right click within the 'Video stats' box, and select 'Run' -> 'Project Options'. The following screen should be displayed :
Ensure that the 'Time Base (FPS)' setting to match the 'Detected
FPS' setting you found in the previous step. If your 'Video
Structure' (again, from the previous step) is 'Progressive',
then select the 'Reconstruct Progressive Images' option. If
your 'Video Structure' is 'Interlaced', playback or encode
a small part of the movie and see if you see any interlacing artifacts (lines
streaking across during scenes with lots of movement, like panning or zooming),
and if you see interlacing artifacts, select the 'Deinterlace
Video' option. Normally, you will not want Deinterlace as it slows
down encoding, and causes the picture to appear blurry.
Still in the 'VIDEO' section, you should now set the 'iDCT Options'. There are many ways in which you can select an iDCT. For this tutorial, I recommend using the 'Miha x87 Reference iDCT', and to select this iDCT, disable the 'Use the fastest' check box, and click on the 'iDCT Selection' button - the following screen should pop up :
I recommend selecting Miha's x87 Reference iDCT, since it is of reference
quality, and it is actually faster than any of the iDCTs that come
pre-installed with Xmpeg. There are also other iDCT plugins
you can add to FlasK MPEG/Xmpeg.
Now go to the 'AUDIO' section and you should see a screen like the following :
Select the 'Decode Audio' option and uncheck the 'same as
input' option. Select 48000 Hz since DVDs have 48 kHz audio - we don't
want to down-convert the audio to 44.1 kHz unless you absolutely have to (eg.
conversion to VCD), as you'll lose a lot of audio quality.
Now go the the 'POST PROCESSING' section and you should see a screen like this :
The most important settings are :
o Format - If you want to convert the movie to DivX, change this option to YV12, as this is the colorspace used by DivX.
o Filtering - Using the default 'Bressenham' seems to work well.
o Aspect ratio - This is where you set the aspect ratio of the input (eg. DVD) and output (eg. DivX). For Output, select '1:1 (VGA) DivX ;-)' for DivX encoding. As for Input, this depends on your conversion source - most DVDs are 16:9.
This optional step involves cropping the widescreen video so that
the black bars are not encoded and thus don't waste anyspace (black bars waste
the most space in DivX encodings). Why 'optional' you ask? The
disadvantage of this is that you cannot playback this video file with PowerDVD,
as it does not properly support 'lock aspect ratio' (ie. it will fill
up the full 4:3 screen with your cropped video - hence everything appears
long). All the other players shouldn't have a problem with this. You should
also skip this step if your original VOB was full-screen.
Click on the 'Show output Pad' button, you should be presented with
the following dialog box :
Working in the Output Pad :
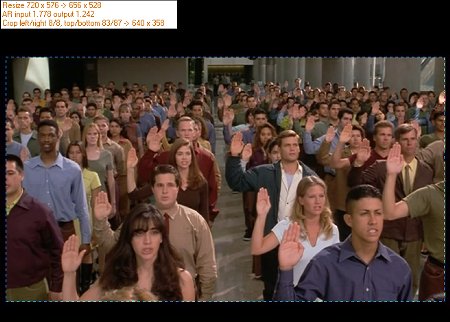
Use the slider to slide to a part of the movie that is bright (so you can see where the picture ends, and the black bars begin).
Press the '>>' button on the bottom right of the Output pad control panel, and select 'Reset Settings'.
Think of the 'Crop' settings as changing the frame of a picture, whereas the 'Output size' settings change the actual size of the picture in the frame (so you can have a really tall frame, but a really short picture - ie. a widescreen movie).
Take a note of the AR input and output settings.
![]()
Go to the 'Output Size' section and press the '-8 Width' button until your movie is at the size you desire. I recommend making sure the width is not only a multiple of 16, but also 32. So width wise, these settings are good : 480, 512, 576, 640 (any lower or higher will mean quality/file size will not be at the optimum ratio). Make sure you also adjust the '-8 Height' until the AR output setting matches that of the original (reset) setting as found in the previous step. You can tell the current width setting by looking at the 'Resize ###x### -> ###x###' stats.
We'll now crop the video to remove the black bars on the top and bottom (and perhaps a little bit on the side as well). Check the 'Crop' option, and click on the '>>' button (on the bottom right of the control panel) again and select 'Auto Crop'. You might need to use the slider to skip to a bright part of the video, so that the auto crop works properly. Note the final resolution value on the third line - if the width is not a multiple of 16 or 32, then I suggest you close the output pad and manually enter a value into the cropping section (under 'Post Processing') so that it is a multiple of 16 or 32. Xmpeg will give you an error is any dimension isn't a multiple of at least 4, so manual editing may be required here again.
The dotted line around the picture is what will actually be converted by Xmpeg.
Your movie is now cropped, and you can now close the output pad.
Now go to the 'Files' section and you can type in the
location of your output file. You don't need to type an extension to the
filename (eg. you don't need to type 'movie.avi', just type
'movie'). You may also want to take this opportunity to save your
conversion profile, by pressing the 'Save Current' button and
choosing a profile name.
Press the 'OK' button to close the 'Options'
window.
Xmpeg is now setup properly. You may want to return to our DVD to DivX Conversion Guide, which features full instructions on how to convert DVDs to DivX using this tool (this page only contains instructions on how to setup this tool).
|
Politica de confidentialitate | Termeni si conditii de utilizare |

Vizualizari: 1373
Importanta: ![]()
Termeni si conditii de utilizare | Contact
© SCRIGROUP 2024 . All rights reserved