Scrigroup - Documente si articole


HomeDocumenteUploadResurseAlte limbi doc
BulgaraCeha slovacaCroataEnglezaEstonaFinlandezaFranceza
GermanaItalianaLetonaLituanianaMaghiaraOlandezaPoloneza
SarbaSlovenaSpaniolaSuedezaTurcaUcraineana

AdministrationAnimalsArtBiologyBooksBotanicsBusinessCars
ChemistryComputersComunicationsConstructionEcologyEconomyEducationElectronics
EngineeringEntertainmentFinancialFishingGamesGeographyGrammarHealth
HistoryHuman-resourcesLegislationLiteratureManagementsManualsMarketingMathematic
MedicinesMovieMusicNutritionPersonalitiesPhysicPoliticalPsychology
RecipesSociologySoftwareSportsTechnicalTourismVarious

Aftershaft Leech

fishing


+ Font mai mare | - Font mai mic


DOCUMENTE SIMILARE

THE SLIDING 'D' RIG

Aftershaft Leech

Discus Classification

TERMENI importanti pentru acest document


Aftershaft Leech

About 9 years ago I was fishing Whitetail Lake in southeastern British Columbia. Whitetail Lake has a reputation for large trout although its gin-clear waters and scenic beauty are reason enough to visit. Leech patterns were proving to be successful specially in the early evening but I was not satisfied with their performance. One evening I was fortunate to hook a good fish. Just prior to releasing him, I pumped his stomach and found he had been feeding on a number of 3-inch leeches. Looking at the leeches in the palm of my hand, it was clear how slender they were, about the diameter of a pipe cleaner. Reviewing my own leech patterns confirmed my suspicions, I needed a new slim life-like pattern.

The late Gene Armstrong from Kaufmann's Bellevue, Washington location developed a number of successful lake patterns using filoplume or aftershaft feathers as his primary ingredient. Spurred on my Gene's designs I created my own version of his Filoplume Leech. The next evening, armed with a handful of these feather duster patterns, I tried my luck. Using a dry line and a weighted pattern to probe the shallows, my variation was an outstanding success. A number of Whitetail Lake's larger inhabitants towed me around the lake on that trip. I will always remember their searing runs. The aftershaft made a realistic body and, coupled with a long marabou tail and pheasant rump hackle, mimicked the natural leeches perfectly. I had found my ideal leech pattern both slender and animated.

Over the years I have added additional leech patterns to my fly box, yet the Aftershaft Leech has remained a permanent resident. When some of my louder leech patterns don't seem to be working, the somber nature of the aftershaft leech often does the trick . . .Aftershaft is the secondary feather found on most game birds. The best source for this material is ring-necked pheasant. Aftershaft comes in a variety of colors. I like aftershaft feathers so much for stillwater flies that I often joke that I should just throw the balance of the pheasant away. The only drawback to aftershaft feathers is their strength. Aftershaft feathers are brittle and difficult to wind onto the hook like other feathers. Employ a dubbing loop to control this material. Prepare the feather by trimming the butt and plucking the tip. This practice makes the feather manageable. . . Using aftershaft feathers for the entire body allows for the creation of a mottled leech pattern. My favorite color combinations are black and burgundy, black and purple and dark and light olive. This latter color combination gives a realistic camouflage look and I have nicknamed this version the 'Camo Leech.' All of these combinations have worked well and pattern selection is often just a matter of which one I grab first. To further accent the natural motion of the aftershaft feather, I added a long marabou tail and a pheasant rump hackle tied Carey style. These soft-flowing materials work in unison to create a fly that breathes and pulses in the water. Be prepared for takes on the drop when fishing this pattern. Weighting the front portion of the fly further animates this fly.

The Aftershaft Leech has been a wonderful pattern over the years and continues to perform despite some of the rookie leech patterns that now grace my fly box. I feature my Aftershaft Leech whenever I teach a course or provide a fly-tying demonstration.

Materials: Aftershaft Leech

Hook:  Tiemco 5263, #6 - #10 (weighted).

Thread:  Color to match body.

Tail:   Marabou.

Body:   Aftershaft feathers (mix colors to create a mottled look).

Hackle:   Pheasant rump (color to match body).

Tying Steps:

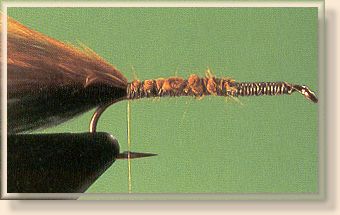
1. Place hook into vise and cover the front 1/3 of the hook shank with lead wire substitute. Attach the tying thread and cover the wire to lock it firmly in place. Leave the tying thread hanging at the rear of the lead wire.

2. Strip a clump of marabou fibers from a marabou feathers. Tie in the marabou at the rear of the lead wire. The finished tail should be about shank length. Try mixing various colors of marabou to create a mottled effect.

3. Pull down a 4- to 5 inch length of tying thread. Place a thin coating of dubbing wax onto the tying thread. Place the prepared aftershaft feathers onto the tying thread to the stem of the feather lies directly on top of the tying thread. Lay the feathers tip to butt along the tying thread. A size-8 fly takes about 5 aftershaft feathers.

4. Bring the tying thread back up to the hook shank to form a dubbing loop. Clost the loop at the hook shank and spin the dubbing loop tight reinforcing the aftershaft feathers. Spin the loop until the stems of the feathers are no longer visible and the fibers radiate out perpendicular to the dubbing loop.

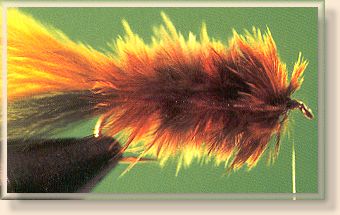
5. Wind the aftershaft dubbing loop forward to the eye to form the body. Tie off and remove the excess aftershaft dubbing loop.

6. Prepare a pheasant rump feather by stripping the flue from the base of the feather. Grasp the feather by the tip and sweep the fibers downwards to expose the tip. Tie the prepared feather in by the tip. Trim the excess material and wind the feather 2 to 3 times around to form the hackle. Don't overdress the pattern. Tie off the pheasant rump feather and trim the left-over material. Sweep the hackle fibers rearward and hold in position to expse the hook eye and head area. Build a neat neat. Whip-finish and apply head cement. Do designate a weighted pattern place a dab of red nail polish on the hook eye. Be careful not to close the eye of the hook accidentally with the polish. ~ Philip Rowley


Politica de confidentialitate | Termeni si conditii de utilizare


DISTRIBUIE DOCUMENTUL

Comentarii


Vizualizari: 2430
Importanta: rank

Comenteaza documentul:

Te rugam sa te autentifici sau sa iti faci cont pentru a putea comenta

Creaza cont nou

Termeni si conditii de utilizare | Contact
© SCRIGROUP 2024 . All rights reserved