INTRODUCERE
Digital Surveillance System is the
perferct security solution
for
home,office,or other place. You can monitor live camera video indoor,and elso
view the camera remotely; with the Motion Detection and I/O Alarm, intruder or
any suspicious event will be recorded in digital video.
FACILITATI:
Ø
TEHNOLOGIE
COMPRESIE:MPEG4;
Ø
SUPORTA PANA LA 24 CAMERE PE UN PC ;
Ø
MODUL tE-MAPt DISPONIBIL PENTRU INREGISTRARI;
Ø
MOD INTELIGENT DE A VIZUALIZA
INREGISTRARILE;
Ø
MOD DE DETECCTIE AL MISCARII EVOLUAT;
Ø
SUPORTA VIZUALIZAREA IN RETEA
Ø
SUPORTA
UN ACANAL AUDIO;
Ø
SUPORTA MARCAREA INREGISTRARILOR;
Ø
SUPORTA ;
CAPITOLUL 2 SISTEML
SOLICITAT
²
Intel Pentium IV , solutietAMD Athlon CPUt sau
superioara,sau compatibil cu CPU , cu solutie MMX.
²
256M
Ram sau mai mult ca memorie.
²
Card
video: tG-forcet este recomandat.
²
Sistem
operare: Microsoft Windows 2000 sau Windows XP
CAPITOLUL
3 INSTALARE
DRIVERE
PASUL 1: Opriti
calculatorul inaintea instalarii cardului.
PASUL 2: Se introduce
cardul intr-un slot PCI.
PASUL 3:
se porneste calculatorul si se introduce CD-ul in CD-rom.
PASUL 4:
Windows-ul nu o sa recunoasca driverele corecte.
PASUL 5:
Windows-ul o sa va indrume spre calea in care trebuie sa-I dati calea pentru
instalarea driverelor.
O sa dati click pe 'Next'.
PASUL 6: Windows XP o sa gaseasca
driverele corecte pe CD-ROM. Selectati driver-ul gasit si apoi dati click pe 'Next'.
PASUL
7: Windows-ul o sa va avertizeze ca este periculos sa instaleze aceste drivere
deoarece nu le-a recunoscut de la inceput. Click pe 'Continue
Anyway'.
PASUL 8: Click pe 'Finish'.
PASUL
9: Daca este mai mult de un card instalat pe computer se repeat rutina de la
pasii 5 pana la pasul 8 de cate ori este necesar corespunzator numarului de
cardri instalate.
In t
Device Managert o sa vizualizati drivele instalate.
TIPS: Daca
Windows-ul nu recunoaste cardul incercati sa-l montati pe alt slot PCI.
Capitolul 4 Instalarea
software-ului pentru server
Introduceti
CD-ul in CD-rom.
Double-click
pe directorul :tServert.
Double-click
pe iconul ts_installt.
Dupa restartare calculatoruluio sa gasiti
o scurtatura pe ecran pentru programul tSVDVRt in meniul 'START'ce se
gaseste in 'All Programs'.
Chapter
5 GHID
SOFTARE PENTRU MODULULtSERVERt


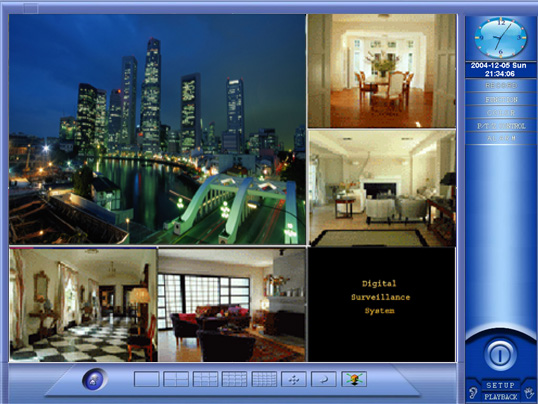
Ecran divizat in
1,4,9,16, sau 25
HD used info.
|
|
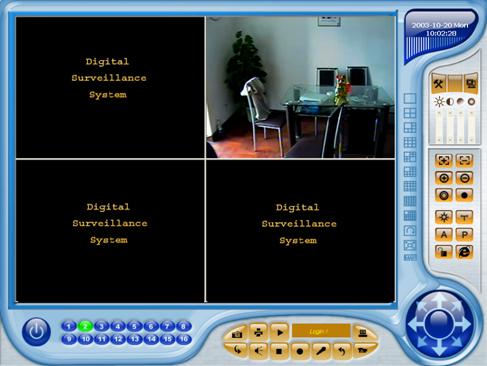
Lansati programul
SVDVR si o sa va apara aceasta imagine:

Apoi apare subrutina de
logare in program unde se introduce un nume de utilizator si parola
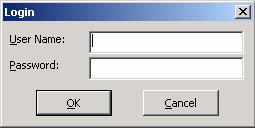
Nume
implicits dvr Parolasdvr
.
u
Scrinul divizat:
Arata
imagini de la mai multe camere in acelasi timp
u
Reglare culoares
Se regleaza lumina contrast,, culoare individual
pentru fiecare camera.
Acest buton se foloseste pentru cazul cand
toate camerele au aceleasi reglaje
|
|


Acest buton este folosit pentru reglaje
implicite
|
|


u
PTZ Controls


Click pe butonul 
 pentru
a bloca ecranul, si alete
butoane nu vor mai putea fi selectate;
pentru
a bloca ecranul, si alete
butoane nu vor mai putea fi selectate;
Pentru deblocare se foloseste o parola care implicit
este 1234, parola care se poate schimba;
u
Speed Dome Control Panels
Click pentru a deschide optiunea Speed Dome
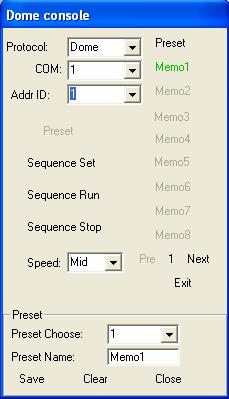
latProtocolstse allege speed dome.
La tCOMst se allege
RS232 sau RS485 functie de adapterul folosit. RS485 este conectat la speed dome.
La tAddr ID:t se allege tspeed dome ID: din
menu.
tSpeed:t alegeti viteza : mare, medie sau
mica;
.Click tPresett pentru presetare
tPreset Choose:t se alege;
tPreset Name:t nume presetat;
Control PTZ
se foloseste pentru mutare camerei pe locul prestabilit;
Click tSavet
pentru salvare;
Click tCleart
pentru stergere;
Click tCloset
pentru iesire;
Presetarile
sunt pana la 64;
The
Preset o sa arate un ecran albastru, click pe tpreset namet, the Speed Dome o
sa se miste pe sectorul selectat;
Apasati tPret si tNextt pentru a gasi toate pozitiile prestabilite;
.ClicktSequence
Sett pentru a seta secventele
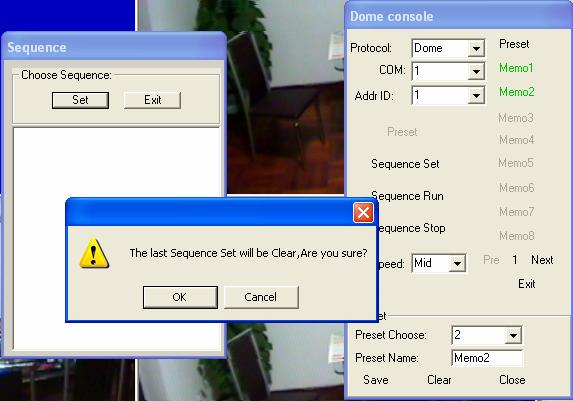
Daca tSett o sa va arate un buton
tThe
last Sequence Set will be Clear,Are you sure?t
click
tokt pentru a sterge toate secventele anterioare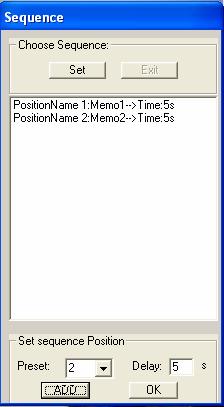
tPreset:t alegeti numarul prestabilit ;
tDelay:t timpul
intirziere implicit este de 5 secunde
Sequence
Runt ruleaza o secventa;
Click tSequence Stopt pentru a opri secventa;
u
FUNCTII:


SETAREA
TIMPULUI INREGISTRARILOR
setup
|
|

u
Afisarea modelui E-Map s
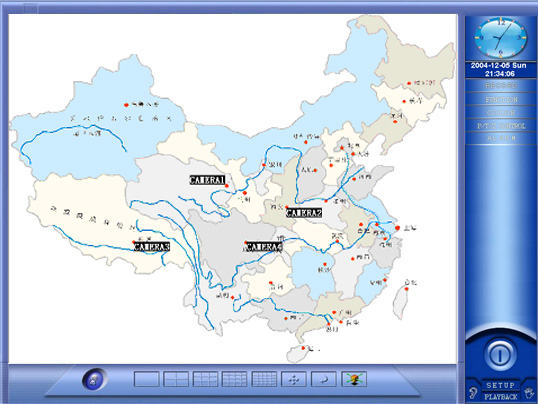
Click pentru a arata E-Map(harta)
Click inca
o data pentru a se converti pe
ecranul video split
Daca
modul tdetectie miscaret sau alarma activate culoarea va fi verde pentru
acele camere!
u
Inregistrares
Dati
Click pe butonul camerei care doriti sa fie activata la inregistrare
|
|

1--32
canale(situatia camerelor active
|
|


Dati
Click pentru a opri inregistrarea
|
|
Dati
Click pentru a inregistra pe toate camerele
|
|

Situatia camerelor:
Verdescamera este pe monitorizare;
Rosuscamera este pe inregistrare;
Galbenscamera este pe detectarea miscarii;
Movscamera
este pe I/O;
u
Control
Panel:
Dati Click pe  pentru logare sau iesire;
Dati Click pe 
 pentru
a salva istantaneu imagine pe camera selectata si SDVR o sa salveze imaginile
in directorul tPictt
pentru
a salva istantaneu imagine pe camera selectata si SDVR o sa salveze imaginile
in directorul tPictt
Dati Click pe butonul pentru
a arata ultimile imagini si a printa aceste imagini.
pentru
a arata ultimile imagini si a printa aceste imagini.
Dati Clickpe
acest buton  pentru vizualizarea inregistrarilor.
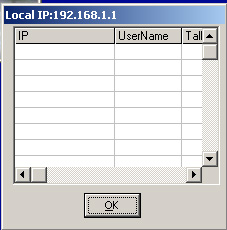
Daca tremote
clientt este conectat la acest server click pe  pentru a va fi arata
statutul IP-ului pentru mod clientt
pentru a va fi arata
statutul IP-ului pentru mod clientt
Sistem Setup
Click pe  pentru a intra in modul setup
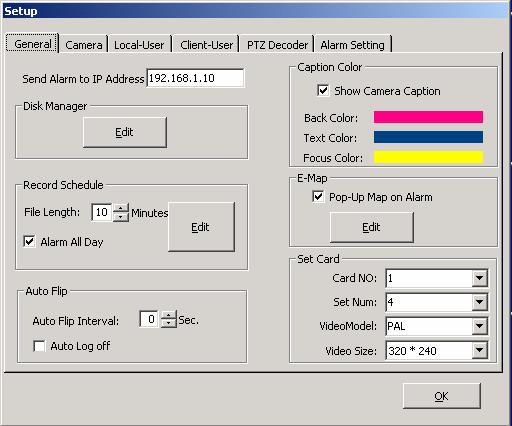
l Generals
²
Disk Manager
Click pe tEdittpentru a va fi aratat boxul cu situatia spatiilor de
memorie si marimii acestora pentru inregistrare:
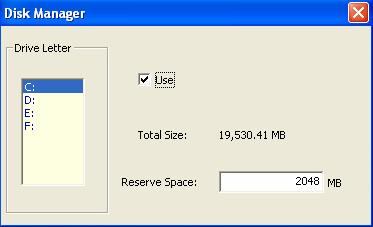
Selectati spatiul unde doriti sa va fie memorate informatiile;
Ultimile informatii se scriu peste primele cand Hardul este plin, iar
capacitate hardului folosita dedicate inregistrarii este prestabilita aici spre
exemplu las2048MB.
²
Programarea inregistrarii:
File
Lengthsthe one recording filets Max timedefault times10minutes
Alarm
all dayswhen select this item,no matter what the
status of record base on is,if I/O Alarm trigger, will record;
When deselect this item, if I/O Alarm trigger,only when the status of
record base on is I/O Alarm, will record;
ClicktEdittbutton
to setup record schedule
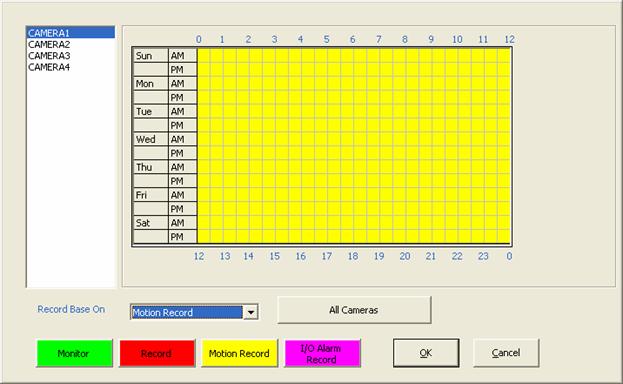
You can
set up schedule and status of individual camera or all from Sunday to Saturday
, 00:00 to 24:00 every half of hour;
.Record Base Ons
Choose status of
camera from this dropdown menu
tMonitort: 24 hours a day
and every week as monitor status;
tRecordts24 hours a day and every week as record
status;
tMotion Recordts24 hours a day and every week as record only if motion is detected status;
tI/O Alarm Recordts24 hours a day and every week as I/O
Alarm trigger the camera to record;
tBank
Recordtsfrom 8:00 AM to 6:00 PM every week as
tRecordt status,theother time as tMonitort status;
.The Means of Colors
Greensat the time as tMonitort status;
Redsat the time as tRecordt status;
Yellowsat the time as tMontion Recordt status;
Purplesat the time as tI/O Alarm Recordt status;
After set up
one camera schedule & status,if the other cameras have same schedule &
status, will get just clicking tAll Camerast button ;
Click tokt to save the
setup, or click tCancelt button to cancel.
²
Auto Flip:
Auto Flip Intervalsif
select 0 second, not auto flip;
Auto Log offsif putinng check in this box,the current
user will be auto log off 5 minutes laterall the cameras display on screen will be hid,but the
schedule & status not changed;
.Caption
Color:
Show Camera Captionsif
putinng check in this boxwill
show the camera caption on split screen;
Back
Colorsthe background color of Caption;
Text
Colorsthe text color of Caption;
Focus
Colorswhen the camera be selected,the
background color of Caption;
Click
the color bar to change the corresponding color.
.E-Map:
Pop_up
map on alarmsif putting check in this boxthe E-Map will show when I/O alarm
trigger ;
ClicktEdittbutton
to edit the e-map
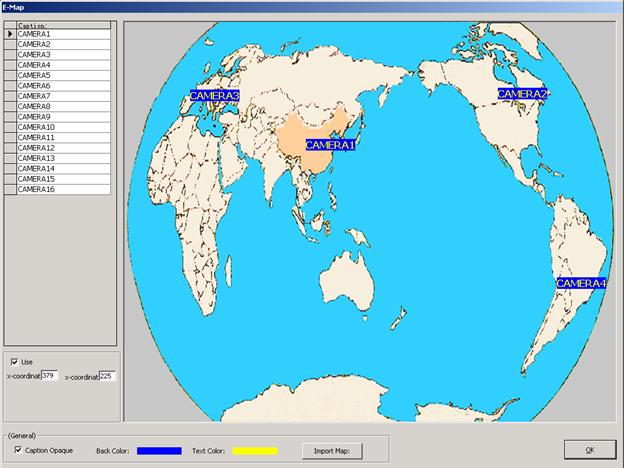
Select a camera at Captionif let the camera show on map,just put check in the tUset
box;
Press the left button of mouse to drag the camera Caption on
map to your desired place;
Caption Opaquesputting check in this box, will show the caption background
color;
Back
Colorsthe background color of Caption;
Text
Colorsthe text color of Caption;
ClicktImport
Mapt button to replace map image,
The map
image must be : bmptjpeg , image size : 800X600 Pixes
.Set Card:
Card No.schoose the card number from dropdown
menu;
Set Nums one XV-100 cardsupport 1 to 4 cameras, you can set the numbers of camera
which connect to one card at here;
Video Modelsyou can choose the camerats format : PAL
or NTSC
Video SizesDefault is 320 X 240
l Camera
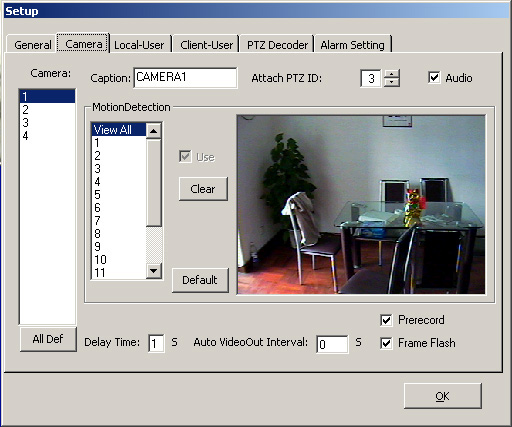
Camera: se selecteaza
camera dorta pentru setari;
Captionsse defineste numele camerei;
Attch PTZ IDsse alege
PTZtul corespunzator IDtului;
Audios cdaca se markcheaza aceasta casuta se
vor inregistra 2 canale audio corespunzator canalelor 1 si 2
Detectarea
Miscariis
Select a
camera number and click 'View All' to show all drawing Zone;
Select
Zone number from 1 to 16, you can draw up to 16 individual zones.
Draw zones
by clicking on the picture and dragging with the left mouse button.
Putting
check in tUset box to enable the zone.
As you
enable zones, be sure to set the sensitivity for each zone to
meet
your specific needs.
Click
tCleart button to clear the drawing Zone.
sensitivitysthe sensitivity rate from 1 to 100, 1 is
most sensitive;
Delay Timesdelay
recording time after Motion Detection or I/O Alarm trigger stop,the default
time is 1 minute;
Auto VideoOut
Interval: Camera analog video output to monitor/TV interval if set as 0 s,
will no analog video output.
This function need card support(optional
purchase).
Pre record: Choose this function will
pre_record when Motion Detection trigger.
Frame flash: when
choose this function,the green frame (motion detection Zone) will glint.
l Local User
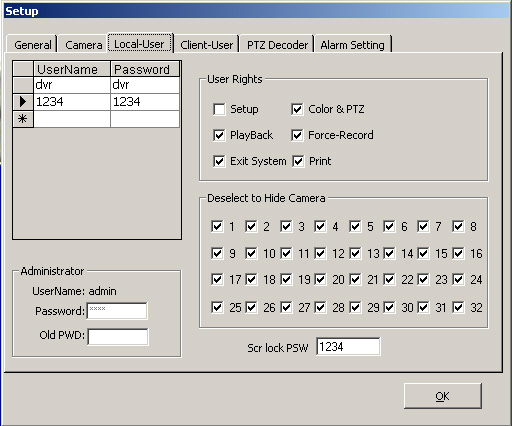
Administrators
User
Namesadmin
Default
Passwords1234
If input correct
Password at tOld PWD:t, you can change a new password at tPassword:t;
At User Name ,you can add, delet and
modify user;
User Rights:
Select a user , you can modify the user
rights by putting check in/off corresponding box;
Deselect to Hide Camera:
If deselect the Userts camera number, the corresponding video will not
show on split screen, but the camera schedual & status not changed;
When this User login , he/she canntt view the hide camerats recording
playback;
Scr lock PSWsset screen unlock passworddefault password is: 1234;
l Client User:
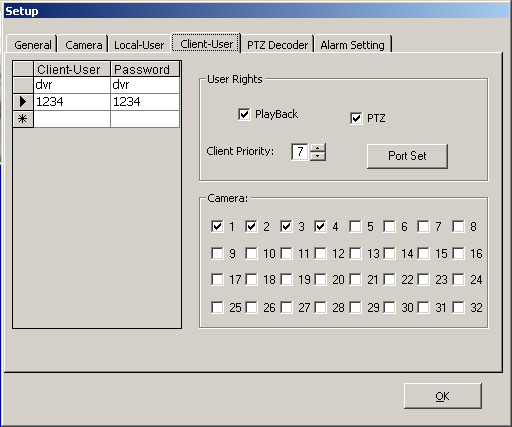
At left side tClient-User, Passwordt, You
can add, delet and modify Client-User & Password;
User Rights:
If select Playback, the Client-User can
view Serverts camera recording
files remotely;
If select PTZ, the
Client-User can control Serverts camera PTZ remotely;
Camera:
If select the camera number, the
Client-User can view this camera remotely;
Client
priority:
From 1 C 7, 1 is super, 7 is lowest;
Port Set:
The Ports of Camera video transport (Default): from
2200 to 2231;
The Port of talk[Audio] (Default): 1981;
HTTP(default port): 80
You can edit & modify these Ports if
necessary.
l PTZ Decorder:
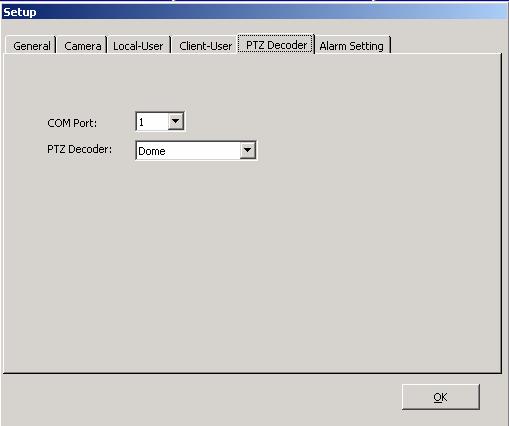
COM
Port: Choose the communication port that your RS232 to RS485
adapter used, RS485 adapter connects to your PTZ decoder.
PTZ Decoder: Choose the model or brand of your
decoder from the dropdown menu. If your model is not listed,pleas send the
decoder protocol to us,wetll add it for you.
l
Alarm Setting:
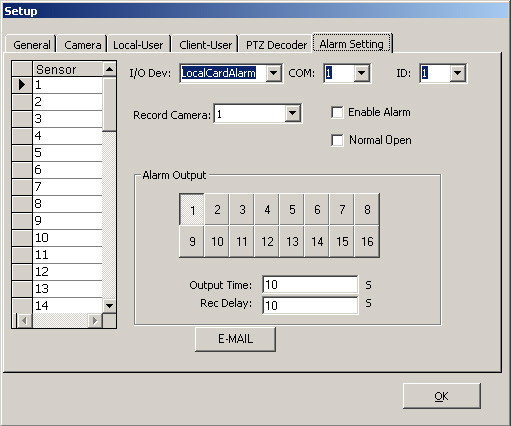
I/O Dev:
dv7608 is a alarm box
connect to the COM port(optional purchase)
Local Card Alarm xv-100 card support 8channel alarm input and 4channel alarm
output (the input/output interface board optional purchase)
COM,
ID Config for dv7608;
Sensor: choose sensor number at here to config;
Record Camera: when sensor trigger, the corresponding
record camera number config at here;
Enable Alarm: putting check in box to enable alarm
function;
Normal Open: choose this function , if sensor input
is low TTL, start alarm
Not choose this
function, if sensor input is high TTL,start alarm;
Alarm Output: when sensor trigger,choose corresponding
Alarm output number at here;
Output Time: when sensor trigger, the corresponding
alarm output delay time;
Rec Time: when sensor trigger,the corresponding
camera record delay time;
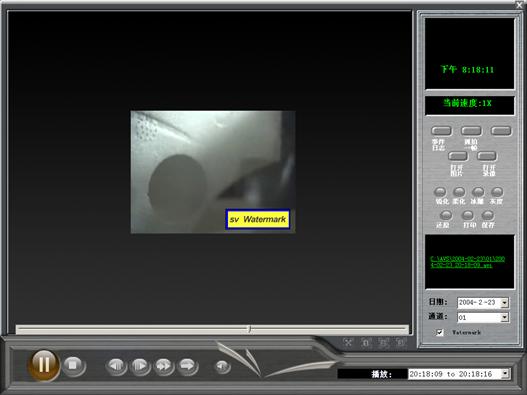
Playback
Click  button
to playbck
button
to playbck


Current playing file directory
Choose Date
Choose Camera
Watermark show
|
|


Open recording file folder
|
|


|
|
|
|
|
|
|
|
|
|
|
|
|
|
Playback screen size switch
|
|
|
|
|
|
|
|
|
|
|
|
|
|
|
|
|
Date:
choose
date from dropdown menu;
Channel: choose camera number;
Play: choose time to play;
Playback
Screen Size Panel:


Click button
to fast forward playclick the button one time to speed up one
level, there are 3 level 2X, 4X, 8X;
button
to fast forward playclick the button one time to speed up one
level, there are 3 level 2X, 4X, 8X;
Click button
to slow forward playclick the button one time to speed up one
level, there are 3 level 1/2X, 1/4X, 1/8X;
button
to slow forward playclick the button one time to speed up one
level, there are 3 level 1/2X, 1/4X, 1/8X;
Click button
to forward 1 second;
button
to forward 1 second;
Click button to backward 1 second;
ClicktSnapt button to snapshot the
playback,the image save at the SVDVR
install directory [Pics] folder;
ClicktView BMPt button to view the
snapshot images;
ClicktPlay videot button to play other AVI
files;
Click
thetCurrent playing file directorytto backup recording files;
Image Filter:
When view a image, you can process image
by tsharpt, tBlurt, tIcet, tGreyt;
Click
tRevertt to undo;
Click
tPrintt to print;
Click
tSavet to save the image;
Event Logs
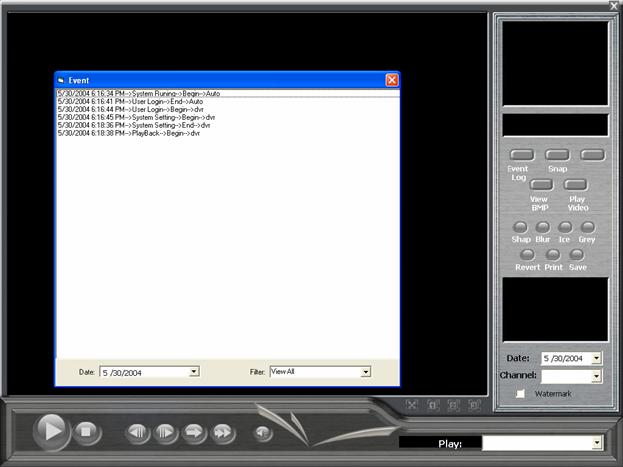
Event
Log record all the system run status, you can view the log by Date,Filter;
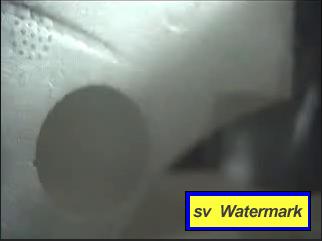
Select
twatermarkt,the watermark will show on screen
Chapter 6 Client Software
Client Software allows you to view remote
camera,control remote PTZ,even playback remote camera recording files. Support
Lan,internet network.
Client
Software Installation:
Insert the software CD in the CD-ROM
drive.
Double-click on the folder of [Client].
Double-click
on the c_install icon to begin installation.
After
rebooting your computer, you will find a shortcut for the Clenr program in your
'START' menu, listed
under 'All Programs'. You may now run the program as desired.
Client
Software Guide:
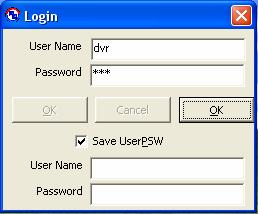
Run Client program,will show this box
first.
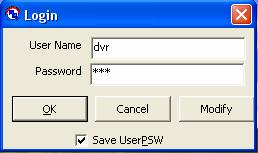
User Name: default is: dvr
Password: default is: dvr
This User Name & Password prevent the
client program not be run by others;
Click tModifyt button, You can modify the
User Name & Password personally,
Client GUIs

Zoom
Focus
Iris
Light
Wiper
Auto
Power
Lock Scr
IE
PTZ
|
|


Setups
ClicktSetupt button to setup system;

New Host:
Input Serverts PC IP, then click tAdd IPt to add new remote
Server;
Host Info:
Choose remote Server IP from dropdown menu to edit;
Host Name:
To define remote
server name which will show on video box title;
User Name & Password:
The User Name & Password which input
at here must be defined in
Client-User of remote Serverts Setup;
Default
is:
User
Name: dvr
; Password: dvr
ClicktSavet to save the setup;
ClicktDelet to delete the selected server setup
information;
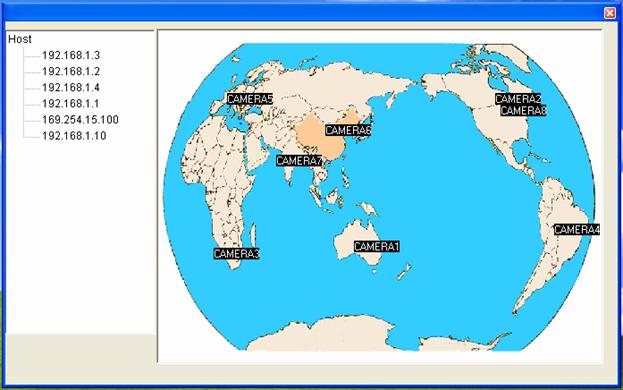
Client software support E-Map login;
Click tSelect Mapt to import map image;
Dragging Server IP to
the corresponding place;
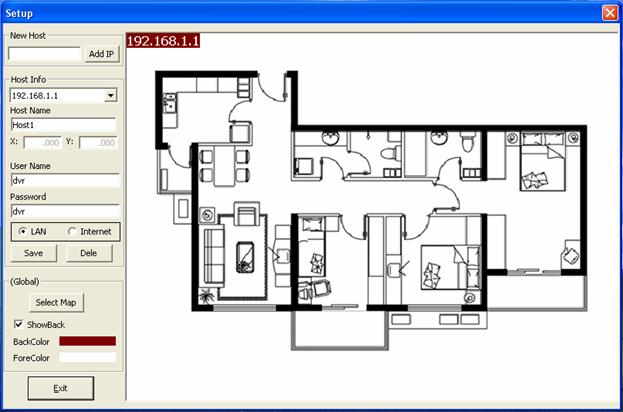
Click tExittbutton to exit;
Click  button to choose the Server IP which you
want to log in;
button to choose the Server IP which you
want to log in;
If login ok, the tShow Login/off statust panel will show tLogin
Success!t;
If login failure, panel will show tLogin Fail!t;
Click  button
to choose the camera which you want to view;
button
to choose the camera which you want to view;
Click  button
to record at client site;
button
to record at client site;
Click  button
to stop recording at client site;
button
to stop recording at client site;
Click tPTZt button to control remote PTZ;
Click  button
to save the current login status;
button
to save the current login status;
When logoff click  button
to recall the last login status and atomatically login;
button
to recall the last login status and atomatically login;
Click button to
login from E-Map;
Click the Server IP on map, will auto login, then click the camera
number
will show the
corresponding video;
Click  button
to playback the recording of remote Server;
button
to playback the recording of remote Server;
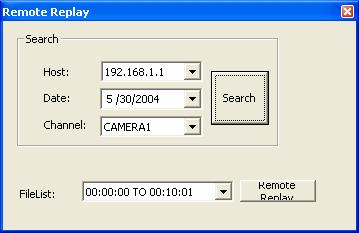
Host: choose the remote Server IP;
Date: select the date;
Channel: choose the camera number;
Click tSearcht button to find, if getting, the files name will show at
tFileListt;
Choose the file ,
then click tReplayt button to play;
Putting mouse at the video for seconds will show the video
information(Server IP & Camera number).
Internet Explorer remote view:
Please
input the serverts IP at URL of internet explorer,
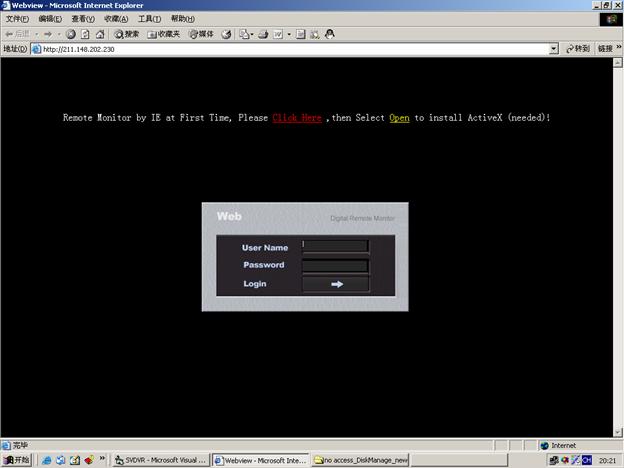
if first time view by IE, please click t click heret to install
ActiveX..
Note:
Internet Explorer Security Level must be setup as Low,
otherwise you maybe login
success,but canntt view the video!
User
Name & Password:
The User Name & Password which input
at here must be defined in
Client-User of remote Serverts Setup.
Click tLogint to log in.


|
|
|
|
|
|
|
|
|
|
|
|
|
|
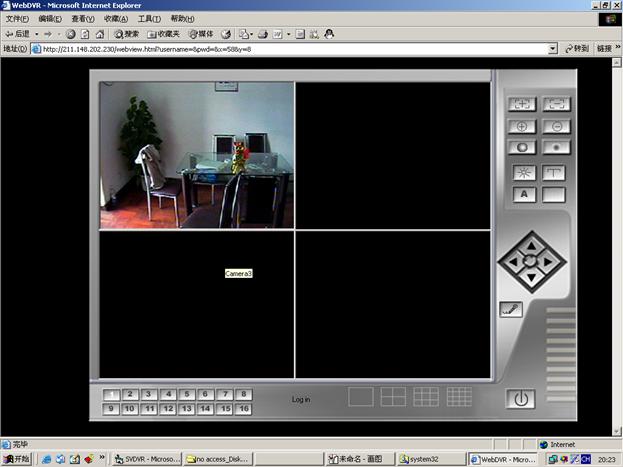
If login success, will show tlog int at here
|
|
|
|
|
|
|
|
click camera number to view remote
video which you desired
|
|
|
|
|
|
|