| CATEGORII DOCUMENTE |
| Asp | Autocad | C | Dot net | Excel | Fox pro | Html | Java |
| Linux | Mathcad | Photoshop | Php | Sql | Visual studio | Windows | Xml |
DOCUMENTE SIMILARE |
|||||
|
|||||
Overview of Part 1
In this part, we'll build our first XML Web service in Visual Studio .NET. The Web service will demonstrate one of the key benefits of using XML Web services: Integration of disparate data sources into an easy to use data object. We'll unite two different data sources, XML and SQL Server, into a single ADO.NET object called a DataSet. The DataSet serializes automatically as XML, and is returned by the XML Web service.
XML Web services form the core business logic in the .NET application model. In an upcoming section, we'll write a Microsoft Visual Basic .NET program based on Microsoft Windows that will use this Web service. Then, we'll create Web and mobile interfaces as well. In each case, the logic in the XML Web service will serve as the core of the application, running separately from whatever presentation model we choose as appropriate for the situation.
After finishing the Guided Tour, you'll have a good understanding of the importance and power of XML Web services, and how Microsoft Visual Studio .NET enables developers to quickly and easily build Web services, and incorporate them into business applications.
Part 1: Build an XML Web Service
Step 1 of 7: Add new Web service file
Adding a new file with the extension .asmx will instruct ASP.NET to treat the methods tagged with [WebMethod] as Web service calls.
a. In the Solution Explorer, right-click DownhillBikes, click Add, then click Add New Item. .
b. In the Templates list, click the Web Service icon. Leave the default name Service1.asmx.
c. Click Open.

Part 1: Build an XML Web Service
Step 2 of 7: Add Customers table to the Web service
Using the RAD features of Visual Studio .NET, create a connection to the Customers table by dragging it from the Server Explorer.
a. From the View menu, click Server Explorer to open it. (Or, press CTRL+ALT+S.)
b. Expand the Servers tree and locate the Customers table (Servers computername SQL Servers computername bikes Tables).
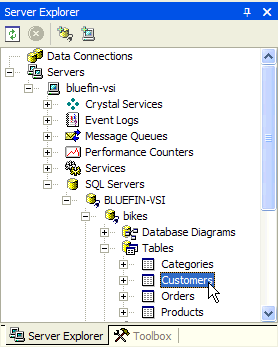
c. Drag the Customers icon to the right, onto the design surface.
![]() Optional
Optional
If you would like to preview the data in the Customers table, right-click the Customers icon, and click Retrieve Data from Table. This is an easy way to quickly verify or modify the data in the table. Close this window with CTRL+F4 before moving to the next step.
Part 1: Build an XML Web Service
Step 3 of 7: Add the Get and Update Web methods
The GetData Web method will return a DataSet that combines
the SQL data from Customers, and the Order data from
the Orders.xml file. The DataSet can then be manipulated easily on any tier of
the application.
Even though these are two completely different kinds of data storage mechanisms,
ADO.NET combines them into a disconnected in-memory DataSet for consumption by
the XML Web service.
a. From the View menu, click Code. F7
b. Click on the empty line above the comment:
// WEB SERVICE EXAMPLE
This will position the insertion point in the right spot so that we can insert some code.
c. From the View menu, click Toolbox. Or, press CTRL+ALT+X.
d. Click the Guided Tour tab then double-click 1.3 WebService methods item to insert the code.
![]() Optional
Optional
You can remove the four [LLR1]comment tags (//) before HelloWorld() as shown in the following picture and recompile to see a simple WebMethod example.

Part 1: Build an XML Web Service
Step 4 of 7: Build and test the Web service
Here we build the page and test the Web service using a test page generated automatically by ASP.NET. This will allow us to see the data returned from the two data sources and show the results in a simple Web page. This is how quickly and easily you can build and deploy an XML Web service with Visual Studio .NET!
a. From the File menu, click Build and Browse. CTRL+F8
b. Click the GetData hyperlink, then click Invoke.
c. Examine the resulting schema and data for all customers and their orders.
Part 1: Build an XML Web Service
Step 5 of 7: Add a new performance counter
Using the Visual Studio .NET RAD server features, components and server-side resources, such as performance counters and message queues, are wrapped with programmatic interfaces, making them easy to program.
In this step, we'll create a custom performance counter that will keep track of the number of times per second the new Web service method GetData is accessed.
a. From the View menu, click Server Explorer. CTRL+ALT+S
b. Expand the Servers tree and locate the Performance Counters (Servers computername Performance Counters).
c. Right-click Performance Counters and click Create New Category.
d. In the Category name box, type: bikes
e. Click New.
f. Change the Type list from NumberOfItems32 to RateOfCountsPerSecond32. We'll go with the default name CounterName. Click OK.

Part 1: Build an XML Web Service
Step 6 of 7: Use the performance counter
Now we will update the performance counter by invoking it in our GetData method. One line of code is all we need to update the performance counter. Prior to Visual Studio .NET, simple steps such as these required hundreds of lines of code.
a. In the Solution Explorer, right-click Service1.asmx and click View Designer.
b. From the View menu, click Server Explorer. CTRL+ALT+S
c. Expand the new bikes performance counter to locate CounterName. (Performance Counters bikes CounterName). Drag the CounterName icon to the design surface.
d. Press F4 to view the properties of the performanceCounter1 object. Double-click the ReadOnly property to change it to False.
e. Press F7 to view the code.
f. Place the insertion point right before the return dataset line in the GetData() method.
g. In the Toolbox, click the Guided Tour tab then double-click the 1.6 hit rate counter item.

Part 1: Build an XML Web Service
Step 7 of 7: Test the performance counter
Now we'll show the performance counter in action by watching the counter increment as we use the XML Web service.
a. Double-click hit_rate.msc in the Solution Explorer window. CTRL+ALT+L
b. Switch back to Visual Studio .NET, and press CTRL+F8 to build and browse the Web service.

c. Click the GetData
hyperlink. Click Invoke. Press the Refresh icon ![]() (Located on the left side of the toolbar)
several times to requery the Web service.
(Located on the left side of the toolbar)
several times to requery the Web service.

d. Switch to PerfMon and you should see the performance counter move up and down, showing the number of requests per second this page is handling.
e. Close PerfMon (don't save the changes) and all browser windows.
f. In Visual Studio .NET, from the Window menu, click Close All Documents. If asked to save changes, click Yes.
In this first exercise you have accomplished many of the tasks that will drive the next generation of computing. You have built and deployed an XML Web service. You added business logic and database connectivity using the Visual Studio .NET Server Explorer. Most importantly, you created this XML Web service in minimal time using the RAD skills that today's developers already have. Now that we have constructed and tested our XML Web service, we will build a series of client experiences that integrate the Web service into their functionality.
[LLR1] I see only FOUR comment tags below. I've queried this in the first set of Parts docs too. Can this be fixed across all?
|
Politica de confidentialitate | Termeni si conditii de utilizare |

Vizualizari: 967
Importanta: ![]()
Termeni si conditii de utilizare | Contact
© SCRIGROUP 2024 . All rights reserved