| CATEGORII DOCUMENTE |
| Asp | Autocad | C | Dot net | Excel | Fox pro | Html | Java |
| Linux | Mathcad | Photoshop | Php | Sql | Visual studio | Windows | Xml |
Working with data structures
Manipulating tables
Tables that are part of a database cannot be accessed without opening the database first. Visual FoxPro will automatically open a table's database if you try to open the table before the database. However, once the database is opened, manipulating one of its tables is pretty much like handling a table that isn't part of a database. Tables that are not part of a database are called free tables, and I'll cover how to use them first. Then I'll delve into databases and discuss the additional functionality available for tables that are part of a database.
The Fundamentals of Visual FoxPro 6.0
Accessing an existing table
Generally speaking, you can access (or "open") a table simply by entering the command:
use MYTABLE
in the Command window, where MYTABLE is the name of the table. If you don't know (or remember) the name of the table, you can enter:
use ?
and VFP will present an Open File dialog, through which you can navigate to find the desired table. (See Figure 3.1.) If the table is part of a database, the command:
use MYTABLE
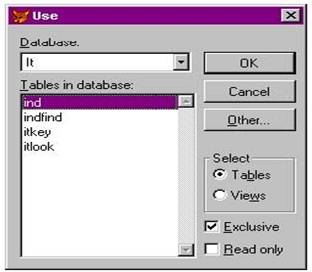
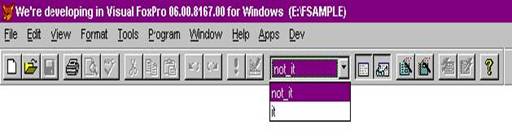
will automatically open the database while opening the table. If a database is open, the command:
use ?
will display a different dialog-one that shows just the tables contained in the database. (See Figure 3.2.) If you want to open a table that's not in the database, click the Other button and you'll be presented with the Use dialog in Figure 3.1.
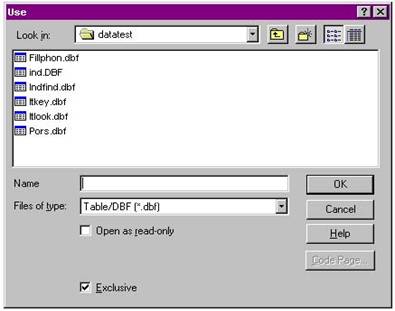
A number of options are available when opening a table. The Exclusive option gives you exclusive use of the table-no others users can open the table at the same time. The Read-only flag lets you view the contents of the table but not make changes to it. (I'll discuss the difference between Tables and Views later in this book.)
Once you've opened a table for the first time, you might be temporarily disconcerted because the contents aren't automatically displayed. You have to explicitly tell Visual FoxPro to show you the contents. To view data in a table, select the Browse command from the View menu. You'll be presented with a spreadsheet view of the table, with the records appearing in the order that they were physically entered. As with everything in VFP, you can also enter a command. The command:
browse
will display the same Browse window. I'll examine the Browse window in more detail shortly.
Exclusive vs. Shared use
Visual FoxPro is natively a multi-user programming environment, which means all the commands and capabilities you need to write multi-user systems are provided in the box. As a result, more than one person on a network can access a table at the same time. This also means a single user can open the same table multiple times on a single machine by running several instances of VFP. I often open several sessions of VFP on a single machine to test multi-user functionality instead of tying up multiple machines on a network.
VFP defaults to opening a table in Exclusive mode, so you'll have to force the table to be opened in Shared mode. You can do this by unchecking the check box in the Open File dialog, or entering this command in the Command window:
use MYTABLE shared
The Fundamentals of Visual FoxPro 6.0
If you issue the command:
set exclusive off
every table for the current session of VFP will be opened shared. (Of course, SET EXCLUSIVE ON will reverse the state.) Note that tables initially opened exclusively are not converted to shared use if you SET EXCLUSIVE OFF afterwards. You have to close the tables and reopen them.
Accessing multiple tables
Just as you can have multiple spreadsheets or documents open in Excel or Word, you can open more than one table at a time. Unlike Excel or Word, however, you have significant programmatic control over how this is handled. It's easier to follow along if you open up the Data Session window (open the Window menu and click Data Session), or enter this in the Command window:
set
See Figure 3.3 for an example of how I usually position the Command and Data Session windows in VFP.
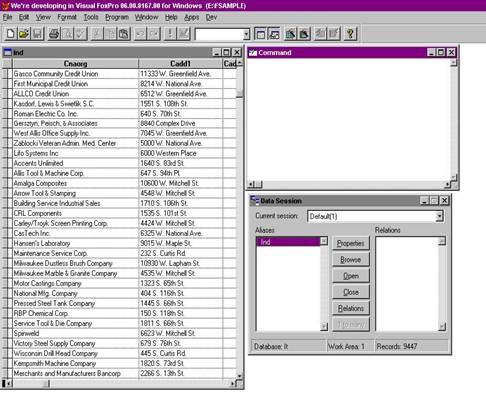
As you open tables, their names will appear in the left list box of the Data Session window. You can switch between tables, making a specific table "active" by selecting its name in the Data Session window. However, that's obviously not as useful a mechanism when you're running a program, and so VFP has the concept of "work areas."
I've often used the analogy of a carnival midway, where somewhere partway down the concrete aisle, there's the Visual FoxPro booth, manned by a rather dimwitted fellow with thousands and thousands of hands. Every time you tell him to open a table, he grabs a board with the table with one of his many hands. If you want to see the contents of the table, you have to tell him to show you the board (remember, VFP is pretty darn literal). If you tell him to open more than one table, he'll use hand after hand after hand.
These hands are "work areas," and you have control over manipulating them. Remember how dimwitted this fellow in the booth is? If he's got hold of a table (you've opened a table and it's highlighted in the Data Session window), and you tell him to open another table (you issue the USE MYTABLE2 command), he'll simply drop the one he had open and grab that one instead-so the table you had opened will be closed and the new table will be opened in its place.
In order to open more than one table at a time, you have to select a new work area (tell the guy to use a new hand). There are several variations on how to do this. If you want the new table to be the current table, select an empty work area and then open the table:
select 0 use MYTABLE2
Alternately, you could simply tell him to use another hand to open the next table but keep the current table active:
use MYTABLE2 in 0
Finally, you could also tell him which hand, explicitly, to use, by identifying a work area. Work areas are numbered from 1 to 32,767 (that's 32K - 1):
use MYTABLE in 213
But this practice is generally frowned upon because there might already be a table open in that work area-and if so, it would be closed and MYTABLE would be opened in its place.
Once you have tables opened in several areas, you can switch between them, making one or another active. You use the SELECT command to do so (remember that lines beginning with asterisks are comments):
* open four tables in unused work areas
use MYTABLE in 0
use MYTABLE1 in 0
use MYTALBE2 in 0
use MYTABLE3 in 0
�. * make MYTABLE2 active select MYTABLE2
�. * and browse it browse
�. * make MYTABLE1 active select MYTABLE1
The Fundamentals of Visual FoxPro 6.0
If you have multiple Browse windows open on the screen, you can move between tables simply by selecting the appropriate Browse window, much as you do with Excel or Word when switching between documents.
You can also give a friendlier name to a table when opening it, and refer to the table by that name. The friendlier name is called an alias:
* open four tables in unused work areas
�.* with friendlier names use MYTABLE alias ALLY in 0
use MYTABLE1 alias BOBBY in 0
use MYTALBE2 alias INVENTORY in 0
use MYTABLE3 alias EASTSALES in 0
�. * make MYTABLE2 active select INVENTORY
�. * and browse it browse
�. * make BOBBY active select BOBBY
This practice of using aliases, rather than specific work area numbers, eliminates a lot of tedious maintenance and makes your code more readable. The previous example is much easier to work with than this:
* open four tables in unused work areas
use MYTABLE in 4
use MYTABLE1 in 22
use MYTALBE2 in 16
use MYTABLE3 in 99
�. * make MYTABLE2 active select 16
�. * and browse it browse
�. * make MYTABLE1 active select 22
Closing a table
You can close a table through several different means. If the table is in the current work area, simply issuing the USE command in the Command window will close the table and leave the work area empty. If the table is open in another work area, you can enter the command:
use in 7
or
use in CUSTOMER
assuming, of course, that the table is open in work area 7, or that it's named (or given the alias) CUSTOMER.
You can also close a table by opening another one "on top of it"-just open a table while in the work area of the table to be closed. Finally, press the Close button in the Data Session window to close the highlighted table.
Viewing the contents of a table
Once you have a Browse window open, you can manipulate it much like any other window. In addition, as long as the Browse window is the active window, the Format menu pad disappears while a new pad, Table, appears. (Click on the Command window and you'll see the Table menu pad disappear.)
Naturally, the Browse window can be resized like any other window, and the current record is marked with a small triangle in the leftmost column of the Browse window. The "current record" is an important concept in Visual FoxPro and other Xbase languages and is worthy of some discussion. Unlike other database languages, languages based on the .DBF file structure operate in a "record-centric" manner. (Languages like SQL operate on a "record set" concept-if you want to work with a single record, you need to retrieve a record set consisting of just that one record.) As you manipulate a table, VFP keeps track of the current record by means of an internal "record pointer," much like a word processor keeps track of where you are in the document by positioning a cursor between two characters or under a single character. You can think of the dimwitted fellow in the carnival midway as pointing to a specific row in the table in his hand.
As you move through a table, the value of the record pointer-the number of the current record-changes. When you initially open a table, the record pointer is positioned on the first record, and so the number of the current record is 1. You can see what the current record number is by entering the command:
? recno()
in the Command window. The number of the current record will be displayed on the screen. Click on a different record in the Browse window, execute this command again, and see the new value. It's important to note that every table has a record pointer and a "current record" even if it's not the active table. I'll cover moving through tables later in this chapter.
The scroll bars on the right side and bottom, if they're visible, allow you to scroll the contents of the Browse window. Note that scrolling the window doesn't actually change the record pointer; you're just changing the "view port" that you're looking at the table from. (Just because you focus your eyes on a different part of the table, the dimwitted fellow hasn't moved his finger.) You can resize columns by dragging the divider bar between the column headings, and move the columns by dragging the column header (click on the column name and then drag). The black box in the lower left corner is a splitter-drag it to the right to provide two panes (or partitions) of the Browse window. The partitions enable you to view two sets of columns in the table that are far apart without having to drag them. You can use the Link Partitions command from the Table menu to synchronize or unsynchronize the left and right partitions.
Pressing the Tab key moves the highlight from field to field in the current record in a left-to-right order (Shift-Tab moves right to left). The left and right cursor keys will move the highlight from field to field when the entire field is highlighted, or from character to character if you are editing the contents of a field. The up and down cursor keys move from record to record, and the PgUp and PgDn keys move the highlight a screen at a time.
By default, a Browse window will display the table in a spreadsheet view; you can view the contents of a single record by selecting the Edit command from the View menu. (You can also enter the EDIT command in the Command window.) As long as an entire field is
The Fundamentals of Visual FoxPro 6.0
highlighted, the left, right, up and down cursor keys will move the highlight from one field to another, and then, when the end of the record is reached, from one record to the next. If you have a Browse window split into partitions, you can select one of the partitions and change it from Browse to Edit. If your partitions are synchronized, you can scroll through the Browse partition and see the contents of the entire record (or at least the first couple dozen fields, depending on how big your windows are) in the other partition.
Specifying the order of records in a table
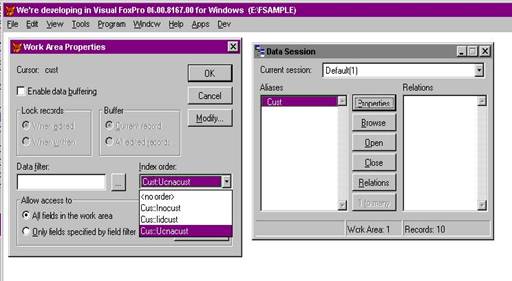
Most likely, the records in the table you're working with won't be in the order you want. After all, the records are added to the end of the table. Index tags are used to change the order in which the records are presented to the user. If you know the name of the index tag, you can issue the command:
set order to MYTAGNAME
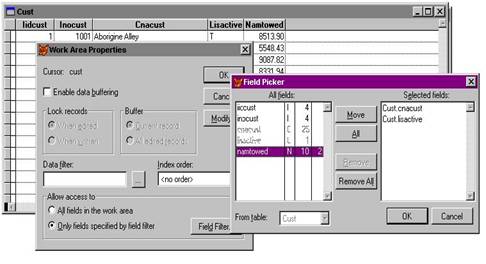
Alternatively, if the Data Session window is open, you can click the Properties button to open the Work Area Properties dialog and select the desired tag from the Index Order drop-down. See Figure 3.4.
Creating indexes
The previous section doesn't do you much good if you haven't created indexes, so let's cover that next. Remember that a single index tag is simply a description of the order in which a table will be ordered, and a compound index file (with the .CDX extension) can contain one or more index tags. If a table doesn't already have a .CDX file, it'll be created when you create the first index tag. If it already has a .CDX file, additional index tags will be added to the existing .CDX file.
In order to create an index tag, you must have exclusive use of the table. (If you're not sure if a table is opened exclusively, you can find out in the status bar at the bottom of the VFP window.) You can create an index tag in two ways-interactively or through the Table Designer.
Creating an index tag interactively
This method requires a comfort level with the commands and functions available in VFP; if you're still getting started, you might want to use one of the next couple of techniques until you have more experience. If you know how to create the index expression, enter the command:
index on MYEXPRESSION tag MYTAGNAME
where MYEXPRESSION is the index expression and MYTAGNAME is the name of the tag. The index tag name will then appear in the drop-down of the Work Area Properties dialog and you can issue SET ORDER TO MYTAGNAME from then on.
Creating an index tag through the Table Designer
The Table Designer dialog is used for creating and modifying tables and indexes, and there are about a million ways to get to it. You can enter the CREATE MYTABLE command to create a new table, the MODIFY STRUCTURE command to modify the current table, or click the Modify button from the Work Area Properties dialog. (There are actually two variations of the Table Designer; the other is brought forward when you are creating or modifying tables that belong to a database, and I'll discuss those topics shortly.)
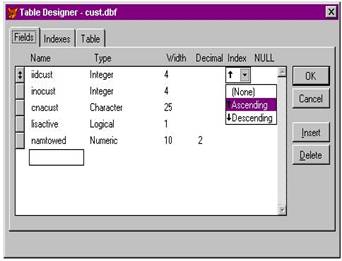
Indexes take one of two forms: simple index tags that just use the field name as the expression-often used for fields that contain a key-and those that use an expression for the index tag. You can create simple index tags using the Fields tab of the Table Designer, but you must use the Indexes tab for tags using more complex expressions.
To create an index on a single field:
1. 1. Select the Fields tab of the Table Designer. (See Figure 3.5.)
2. 2. Highlight the row containing the field upon which you want to create a tag.
3.
3. Click on
the drop-down that appears under the Index header, and select either
Ascending or Descending. (Or select None to remove the tag.)
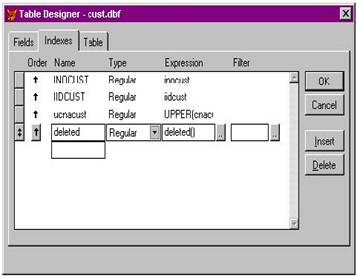
To create an index with an expression:
1. 1. Select the Indexes tab in the Table Designer dialog. (See Figure 3.6.)
2. 2. Place your cursor in the Name column in the blank row under the last existing index tag. As you start entering an expression, a button under the Order heading will appear with an arrow pointing up. This arrow means that the index will be ascending: A through Z and 0 through 9.
3. 3. When you've finished typing the name (it can be a maximum of 10 characters), tab to the next column.
4. 4. Select the Type of index: Regular, Unique, or Candidate. (There is a fourth choice, Primary, for tables that belong to databases.) Generally, you'll want to select Regular. You might find Candidate tags useful for free tables as well as when you want a unique value entered by the user, but that unique value won't be used to relate that table to other tables. For example, you might have a system-generated primary key for a Customer table, but also have a Customer Number field to which you'd assign a Candidate tag.
The Fundamentals of Visual FoxPro 6.0
![]() You'll want to
stay away from Unique index tags. Here's why. A Unique
You'll want to
stay away from Unique index tags. Here's why. A Unique
index tag contains one key
for all records where the value is the same. For example, if you create a
Unique index on 'State', you'll have one index tag for '
1. 5. Enter the expression for the index. Alternately, click the gray button to the right of the Expression text box to open the Expression Builder dialog for assistance in constructing a legal expression.
2. 6. Enter the filter expression for the index. Generally, you won't use a filter for index tags built in the Table Designer. Rather, you'll use a filter while programmatically building an index for a special circumstance.
3. 7. Select the order of the index by clicking the arrow button in the Order column. Generally, you'll keep your index tags set to ascending, but you can change a tag to descending (Z through A and 9 through 0) for special circumstances. You can also press the spacebar when the focus is on the button.
4. 8. Create additional tags as desired, and click OK when finished.
The tag being built in Figure 3.6 might not initially make sense to you.
![]() See the
discussion about tags on 'deleted()' for a full explanation. Creating
a table and modifying the structure of an existing table
See the
discussion about tags on 'deleted()' for a full explanation. Creating
a table and modifying the structure of an existing table
To create a brand new table, type this command in the Command window:
create MYTABLE
where MYTABLE is the name of the table; or select the New command from the File menu and select the Table option button from the New dialog. In both cases, the Table Designer dialog will appear. This dialog is used to add, delete, and modify fields and index tags for new and existing tables.
For each field, type in a field name. This field name can be a maximum of 10 characters (for tables that don't belong to a database). It must begin with an alphabetic character and can contain only the letters of the alphabet, digits from 0 through 9, and underscores.
Next, select the type of data the field will contain. Depending on your choice of Type, the width and decimal spinners will and allow various values. (See the description of fields earlier in this chapter for specific parameters.) Click the NULL button to allow NULLs to be placed in the field.
After you've created at least two fields, the mover bars to the left of the field names allow you to rearrange the order of the fields. By using the Insert and Delete buttons, you can position the cursor in a field and insert a new field in between that field and the one above it, or delete the highlighted field.
The Fundamentals of Visual FoxPro 6.0
Clicking OK will create the table and cause VFP to ask if you want to add records immediately. If you're modifying an existing table, VFP will ask you if you want to save the changes to the structure.
Changing the structure of your table has several ramifications and should be planned carefully. There is no "undo" function to reverse the effects of a structure change. However, the original file is saved with the same name and a .BAK extension. You can rename this file by changing the .BAK extension to .DBF, and then use it as any other table.
Visual FoxPro will let you change the structure of a table regardless of the effects it will have on any data in that table. If fields are deleted, the data in those fields will be lost. If fields are added, empty values will be placed in those fields. If fields are shortened, data will either be truncated (in the case of character fields) or lost (in the case of numeric fields). If fields are lengthened, data will be preserved. If field types are changed, data will be preserved if possible (changing a numeric field to character, for example), or lost if inevitable (changing character to numeric).
To avoid problems with the conversion of data from one type to another,
![]() avoid changing
the field type directly. Instead, add a new field, perform a
avoid changing
the field type directly. Instead, add a new field, perform a
programmatic conversion of the data from the old field to the new one,
and then delete the old field. You can have more control over exactly how
data is converted than by letting VFP do it for you.
Setting a filter
You can choose to view a subset of records based on a condition you create, and you can choose to work with a subset of fields as well. For example, suppose that you want to look only at customers located in a specific state. You can create a filter in one of several ways.
If you know how to create the filter expression, you can enter the command:
set filter to MYFILTER
where MYFILTER is the filter expression.
Open the Work Area Properties dialog by clicking the Properties button in the Data Session window or by opening a Browse window so that the Table menu pad appears. Open the Table menu and select Properties. In either case, then type an expression in the Data filter text box or click the ellipsis button to bring forward the Expression Builder.
You can also control which fields you want to work with by selecting the "Only fields specified by field filter" option button and then clicking the Field Filter button. (See Figure 3.7.)
Manipulating databases
As you learned earlier, tables can be part of a database or they can be independent ("free" tables). Now that you're comfortable with tables and indexes, I'll move on to databases, and then cover the differences between tables and indexes that are part of a database.
Accessing an existing database
There are several ways to access an existing database:
. . Open the File menu and select Open. From the Open dialog, select "Database (*.DBC)" from the Files of Type drop-down. Then navigate through the directory structure to find the desired database.
. . Enter the OPEN DATABASE command in the Command window to bring forward the Open dialog (with the Files of Type drop-down already set to "Database (*.DBC)") and then navigate through the directory structure as before.
. . Enter the OPEN DATABASE MYDB command in the Command window to open the MYDB database.
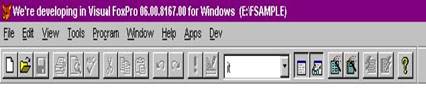
At the conclusion of any of these steps, the name of the chosen database will appear in the Database drop-down in the standard toolbar. (See Figure 3.8.) It's important to note that opening a database doesn't automatically open any of the tables in that database.
The Fundamentals of Visual FoxPro 6.0
Accessing multiple databases
You can have multiple databases open just as you can have multiple tables open, with the exception that VFP does not use a mechanism like work areas to hold the databases. However, we still have a tool to move between databases, much like we used the Data Session window to visually change from one table to another. The Database drop-down in the standard toolbar will list all open databases, and you can use the drop-down to switch between one database and another. (See Figure 3.9.)
You can also use the SET DATABASE TO MYOTHERDB command, where MYOTHERDB is the name of the database you are changing to, in the Command window. After doing so, the name of the database displayed in the standard toolbar will reflect the change.
You can use the DBC() function to determine the current database, and the ADATABASES() function to create a two-column array of all open databases. The first column in the array contains the name of the database and the second column contains the fully qualified pathname.
Viewing the contents of a database
So, what's in a database? Just as with tables, Visual FoxPro is rather literal-minded when it comes to opening databases: Just because you opened one doesn't mean you're going to see anything special. You have to tell that dimwitted guy behind the counter to show you the contents of the database. (I guess you could think of a database as a big board in the back of the booth upon which all of the tables are going to be hung.) You can use the MODIFY DATABASE command to open the Database Designer. There are several permutations of the MODIFY DATABASE command:
. . If you have an open database and you issue MODIFY DATABASE, that database will be displayed in the Database Designer.
. . If you issue MODIFY DATABASE IT, the "it" database will be made current (opened if it wasn't already open) and displayed in the Database Designer. (If another database had been current, it would remain open but not be selected.)
. . If you don't have an open database and you issue MODIFY DATABASE IT, the "it" database will be opened, made current, and displayed in the Database Designer.
. . If you don't have an open database and you issue MODIFY DATABASE, the Open dialog appears, displaying all available databases, just like with the OPEN DATABASE command.
Now that you have the Database Designer open, I should mention that if you explicitly typed the name of the database with the MODIFY DATABASE command, you'll create a brand new, empty database on disk if it doesn't exist. So if you're in the wrong directory or you mistype the name, you'll end up with a new database file as well-and that can cause needless confusion (you know, as opposed to the confusion that isn't needless).
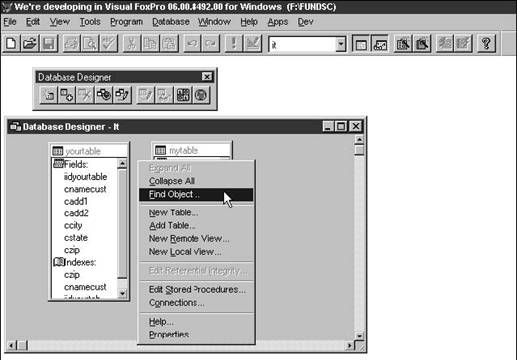
Once you've successfully issued the MODIFY DATABASE command, three things will happen. First, a window with the name of the database in the title bar will appear. If the database contains tables or views, this window will contain small windows with half-height title bars for each of those tables and views. Second, a new toolbar-the Database Designer toolbar-will appear. If it doesn't appear, you can bring it forward by opening the View menu and selecting Toolbars, and then checking the Database Designer check box in the Toolbars dialog.
The third thing you'll notice is that a new Database menu pad appears on the main menu. The menu bars under this menu pad correspond roughly to the buttons on the Database Designer toolbar. There's also a fourth thing that happens although it's not readily apparent. Right-clicking inside the Database Designer window opens a context menu that, yes, again, has many of the same options as the main menu and the toolbar. (See Figure 3.10.)
Selecting the New Table command will bring forward the Table Designer so that you can define a table. When you're done, the new table will automatically be added to the database. There are a number of additional capabilities in the Table Designer for tables that belong to a database, and I'll cover these shortly.
Selecting the Add Table command will add an existing free table to the database; you can't add a table belonging to a database to another database.
The options having to do with views, stored procedures and connections will be discussed later in this book when they become applicable.
Selecting the Modify Table command brings forward the Table Designer that we've already examined. The Remove option removes the table from the database, and, optionally, deletes the file from the disk. There's no Remove option in the Database Designer context menu-instead, you need to select a specific table in the Database Designer and then right-click to bring up another context menu just for that table-and this context menu contains a Remove option.
The Browse Table command does what you would expect: provides yet another way to open a Browse window for the selected table. This option is available on the Database Designer
The Fundamentals of Visual FoxPro 6.0
toolbar only when a table is selected inside the Database Designer window; it's also available on the context menu of each table in the Database Designer.
Using the Database Designer
The Database Designer displays all tables in the database, each in its own child window within the Database Designer window. Each table displays a list of all fields in the table, and then below, all indexes in the structural index file for the table. You might also see lines drawn between various table windows-these represent persistent relationships between the tables. You'll notice the relation lines are actually attached to specific indexes in each table. Together, the table window and the relation lines are called the schema of the database and serve to help you visualize the database in its entirety, together with the contents of each table and the relationships between tables.
You can move the table windows around in the Database Designer by dragging the window by its title bar, and resize the window like any other window. Notice that the relation lines follow the table windows to which they belong, much like a leash follows a dog around.
Manipulating a table window inside the Database Designer window
The table window inside the Database Designer window has several interesting interface capabilities. First, you can browse the table by double-clicking anywhere in the table (yes, I believe that's now the 474th new method for browsing a table). You can resize the table window by dragging any edge or corner. Right-clicking on the table window displays a shortcut menu with the Browse, Delete, Collapse, Modify and Help options. I've covered some of these earlier; the Collapse command reduces the size of the window to display only its title bar. After you do so, the Collapse menu bar in the context menu for that table is replaced by the Expand menu bar.
When you choose Browse or Modify Structure, the table will be opened in the next available work area if it's not already open. If it's open but not in the current work area, VFP will switch to that work area rather than open the table again.
Adding tables to a database
I've covered the different mechanisms of adding a table to a database, but there are some details you need to be aware of. First, note that you can't add the same table to more than one database-if you try, you'll get a warning message that the table is already part of another database. Why is this? It's because there is a spot in the header of the table for the name of the database it belongs to-so there can be only one database. Selecting the Add Table command displays the Open dialog, from which you can select a table. Note that you don't have a way of visually determining if a table already belongs to a database when you see it in the Open dialog. You also don't know if it's already in the current database unless you can see it in the Database Designer window.
You can navigate through the directory tree to find a table in a different location, but it's advisable to keep all the tables for a database in the same directory. If the table and the database are in the same directory, only the file names are stored in the table header and the database. This means that the database and associated tables are portable-you can move the whole batch of files to another directory and everything works fine. If you have the table and the database in different directories, however, the path of the files (relative if they're on the same drive, absolute if they're on different drives) is stored in the table header and in the database. This severely limits portability.
You don't need to know the name of the database to which a table belongs, because the header record in the table contains the name and path of the .DBC file. However, if you move the tables from one directory to another, those changes are not reflected in the database. Furthermore, if you move the .DBC (and related) files, those changes are not reflected in the table header.
If you've examined the Commands and Functions list in Chapter 2, you probably saw the Add Table command-while you can issue that command in the Command window, you'll probably find it easier to do so through the menu or visually in the Database Designer.
You can use a long file name (more than eight characters) for a table, and you can assign a long name to a table that has an "8.3-style" file name as well. I personally recommend staying away from long names unless you have a compelling reason to use them, but other developers are completely comfortable with them, given a couple of caveats. For example, while you can refer to the table by its long name in your programs, the long name disappears if you remove the table from the database. Any programs that used to refer to that long name will no longer
The Fundamentals of Visual FoxPro 6.0
work. If you use a long name but keep your file names to the 8.3-style format, you can't compare DBF() and ALIAS() successfully. You should, in all cases, avoid spaces in long names because you then have to surround the name with quotes when you open the table, and you will run into some problems.
If you try to add two tables to a database that have the same file name (such as two tables in different directories), you'll be warned that the name is already in the database. (Didn't I already tell you to keep the database and its tables in the same directory? Hmmm?) In this case, you must use a long name in order to add it to the database. The long name will be displayed in the half-height title bar of the table window.
Closing a database
To close a database, issue the CLOSE DATABASE command from the Command window. Doing so also closes all open tables in the database. Note that the Close command in the File menu does not close a database-it just closes the open window. You can verify this by noting that the database name is still visible in the standard toolbar database drop-down, and if you have any tables open from the current database, their names will still be visible in the Data Session window.
The CLOSE DATABASE command works only on the current database and its tables. To close all open databases (and their tables), issue the CLOSE DATABASE ALL command instead. There isn't a way to close a single database if it's not the current database, so don't get frustrated when you're unsuccessful at repeated attempts to CLOSE DATABASE IT.
Creating a database
You can create a database in one of two ways. The first method is to enter the command CREATE DATABASE in the Command window. If you don't include a file name, you'll be prompted to enter it in the Create dialog that appears.
The second method is to open the File menu and select New, Database, New File. You again will be prompted for a file name in the Create dialog, just as if you'd used the Command window. Once you've entered a name, the database will be created and its name will appear in the database drop-down in the standard toolbar. Unlike creating a table, where you have to define at least one field before you can save it, a database is created as soon as you hit the Enter key. It just won't be a very interesting database because it won't have anything in it.
Manipulating database tables
I've already discussed how to access a table that's part of a database when the Database Designer window is open. In addition, you can access the table by entering the command USE MYTABLE in the Command window, where MYTABLE is the name of the table. Once the table is open, you can manipulate it-adding, deleting, filtering, and just generally having a great time with it, like you're used to with free tables.
However, there are some caveats and additional capabilities related to manipulating tables that are part of a database. As you're aware, you can't USE a table that belongs to a database without the database automatically being opened. When you enter the USE command in the Command window while a database is open, you'll be presented with a different dialog than that presented when a database is not open, as illustrated in Figure 3.2. It's a good idea to keep the Data Session window open and the standard toolbar available while you're experimenting with opening databases and tables, to get comfortable with what opens what, when, and where.
The Visual FoxPro Data Dictionary
One of the advantages of a database is that you can attach additional information to the database or to a specific table that enforces how the data in the table is accessed and modified. Because the table can't be accessed except thorough the database, this provides a robust and secure method that also reduces-and in some cases, eliminates-additional coding. For example, you might want to execute a specific operation every time a new record is added to a table. In the pre-Visual FoxPro days, you had to manually call that function each time your program added a record. It was easy to forget to do so, and oftentimes it complicated the program by having multiple copies of the routine in different areas.
Visual FoxPro enables you to perform the following tasks:
. . Create a collection of programs tied to the database.
. . Create programs to be automatically executed upon the addition, modification, or deletion of a record.
. . Create programs to be automatically executed upon the modification of field values, default values for fields, information related to keys, and relations between tables.
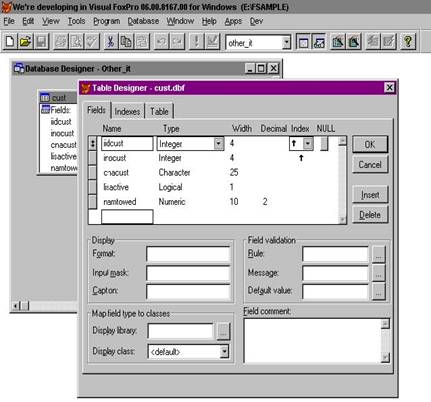
When you issue the MODIFY STRUCTURE command with a table that's part of a database, the Table Designer contains additional objects that it does not contain when you modify a free table. (See Figure 3.11.)
The first thing that's different is that you can enter field names longer than 10 characters. However, field names longer than 10 characters are truncated if you convert the table to a free table. You might feel that's not a big deal, because once it's in the database, that's that. However, this rule also applies when you pull data into a temporary table, say, through a SQL SELECT command. You can run into some rather unexpected results working with a temp table that has fields with names other than what you thought they were going to be. I've chased down more than one bug because I accidentally named a field name with 11 characters instead of 10, and then got caught when the 11th character wasn't there anymore. My advice: Keep field names to 10 characters.
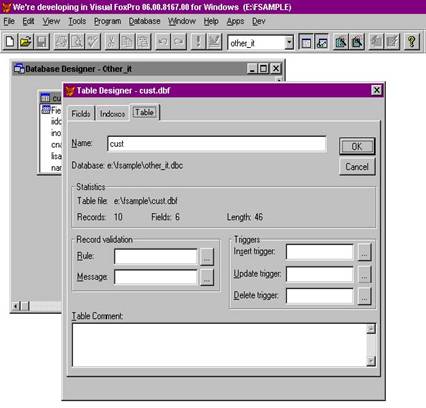
The second attribute that's different, and, again, not immediately obvious, is the Table tab. There's a Table tab in this dialog for a free table, but it doesn't do anything except show you a few statistics. There's a lot more in the Table tab for tables in a database. (See Figure 3.12.)
A record validation is a chunk of code that controls what's allowed to be entered into a record. For example, a rule might be "price >= cost." The record-validation message is a prompt that appears as the error message when a validation rule fails. In the previous example, the text might be "You must enter a price that is at least as much as the cost." A trigger is a procedure executed upon the specific operation to which the trigger belongs. For example, an INSERT trigger is executed each time a record is added to the table.
You can also attach validation rules and text to specific fields in the table by using the controls in the lower half of the Fields tab. The validation rule is an expression executed when the user moves off the field, and can be used to ensure that the field contains data satisfying specific criteria. Unfortunately, if the user enters data that doesn't satisfy the validation rule, VFP will display a generic error message that the user might not understand. Fortunately, you can override this behavior because the contents of the Message property will be displayed instead of the VFP generic error message. You can also specify a default value for a field that will automatically be placed into the field when a new record is added to the table. This is particularly handy for generating primary keys and filling audit fields (such as "date record created" and "record created by <user>").
You can also specify default Formats, Input Masks, and Captions. These options are useful because they're used whenever the field is used. The Format specifies the default expression for the display of the field in forms, reports, and Browse windows. The Input Mask specifies the format of the data as it's entered into the field. Captions are used instead of field names in Browse windows, forms, and reports.
The "Map field type to classes" controls will be discussed later in this book when appropriate.
Triggers, validation rules, and default values can also reference programs that are executed-not just expressions. While these programs can reside anywhere that Visual FoxPro can find them, it's often handy to keep them with the database. In fact, Visual FoxPro (as well as many other true database management systems) has a place to store these programs-and when they are, the programs are called "stored procedures." You can create stored procedures through the appropriate Edit Stored Procedure commands in the main menu, the Database Designer context menu, and the Database Designer toolbar.
Working with persistent relationships
You can store relationships between tables in a single database right in the database, similar to stored procedures. These relationships are called "persistent relationships" because they are defined permanently in the database rather than in code. These relationships are used to create default links between tables accessed in the Form Designer and Query Designer. It seems logical that you could create relationships between fields in two tables, because that's where the data is. For example, you might expect to tie the foreign key in one table to its matching primary key in another table. However, persistent relationships are actually tied to indexes. This is because the persistent relationship is used to create the default join condition between the tables, and joins work best on indexed expressions. (Remember when I shook my finger about indexes and Rushmore?) Furthermore, relations can be based on a complex expression that references more than one field.
Creating persistent relationships
You can create a persistent relationship between two tables either programmatically or visually within the Database Designer. You cannot use the Data Session window to create persistent relationships, nor can you create persistent relationships between tables in different databases or with a free table.
To create a persistent relationship visually, first ensure that both tables can be seen in the Database Designer window. You might have to adjust the position of one or both to do so. You must also have index expressions in both tables that are identical (although the index tags don't have to be named the same-you can have one tag named "cCustNum" and the other named "cCustomerNumber." Next, use the mouse to "drag" the index expression in the parent table over the matching index expression in the child table. You won't actually move the index expression, but the mouse action needed for creating the persistent relationship is the same as dragging: clicking, holding the mouse button down, moving to the second index, and releasing the mouse button.
As you do so, you'll see the mouse pointer turn to a horizontal white bar while in the table window, to a circle with a slash through it while moving the mouse pointer over areas that aren't valid index expressions, and then back to the horizontal bar when it is positioned over the new index expression. A line will appear between the two tables, matching the two index names, when you release the mouse button.
To create a persistent relationship programmatically, use the CREATE TABLE or ALTER TABLE commands. These are discussed later in this chapter.
Deleting persistent relationships
You can also delete persistent relations, either visually programmatically. To do it visually, select the relation line in the Database Designer so it displays in bold, and then press the Delete key. To delete a persistent relationship programmatically, use the ALTER TABLE command, discussed later in this chapter.
Working with table structures programmatically
You can perform all of the above operations-creating tables and modifying their structures, handling persistent relations, and modifying information stored in the data dictionary, such as validation rules-with commands instead of using the interactive interface. This capability is useful both when you can type faster than you can use the mouse, and when you need to perform the operation from within a program. The CREATE TABLE command allows you to create free tables as well as tables that belong to a database; the ALTER TABLE command allows you to change the structure and indexes of free tables as well as the structures, indexes, and data-dictionary information of tables that belong to a database.
Creating tables programmatically
The CREATE TABLE command allows you to write a command to create a table instead of going through the Table Designer dialog. This is particularly handy when you need to create a table from within a program, such as a temporary table. Some people use an empty table as a shell for a temporary table, but that method is fraught with danger. Generally, I've found the fewer files you have to ship with your applications, the less maintenance the application will require. If you include an empty table to use as a shell, all sorts of things can happen: you can forget to include it in the next version, accidentally erase it or one of its related files (such as the .FPT), or mechanical problems can corrupt the table. In any of these cases, you're likely to get a support call-one that could be avoided if you simply created the table on the fly.
The CREATE TABLE command is one of the SQL subset commands in Visual FoxPro, and it tends to get rather long. In addition, there's a generally accepted style for writing all SQL commands by continuing them on multiple lines. As a result, we're going to use a possibly unusual style for this and other commands.
The syntax for a basic CREATE TABLE command requires the CREATE TABLE keywords, the name of the table, and a list of the fields (together with the size and type of each field). A typical command would look like this:
create table TRANS (iIDTr c(5), cDesc c(20), dBegin d, dEnd d, nAmt n(10,2))
A number of additional options allow you to specify a long name (if the table belongs to a database); primary, unique, and foreign key information; and other data. As a result, the command to create a table could get long rather quickly, so we're going to use a special style for these commands. We're going to place each field on a separate line, which will enhance readability and ensure that we don't miss a comma or a parenthesis somewhere. It also makes it easier to add or remove a field in the middle of the command. By the way, as you're practicing with your own CREATE TABLE commands, you might find it easy to type them in the Command window. (Remember, you can use the semicolon to continue lines in the Command window just as you can in programs.) The above command would look like this:
create table TRANS ;
( ;
iIDTr c(5), ;
cDesc
dBegin c(20), ;d, ;
dEnd d, ;
nAmt n(10,2) ;
)
If you're a C programmer, you'll probably find this style easy to read, and if you're not, just a little practice will make this comfortable as well. You'll see I indent each continued line, which makes reading the program listing easier-you don't have to guess when the next actual line of code starts. Next, note that the field list must be surrounded by parentheses, as is each field width. I've found it far too easy to forget a leading or trailing parenthesis when I don't put the parentheses that surround the entire field list on separate lines, and the Visual FoxPro compiler treats both styles identically.
Next, note that each field is followed by a comma, much as you'd separate items in any list by a comma. However, you don't use any sort of separator between the field name and the type and size. You'll see that commas separate clauses both on the table and field levels, but that commas aren't used within a clause. You'll also notice that the field types and descriptions are lined up, which enhances readability.
Finally, I also put a space between the last character in the line and the semicolon continuation character. Visual FoxPro will "jam" each line together when it compiles the command, and there are some combinations of keywords and clauses that must have a space between them. Instead of trying to memorize which cases require a space and which don't, I simply ensure that I'll always have a space where it will be needed.
Now that I've covered the basic syntax of the command, it's time to look at the options. There are two types of clauses available with the CREATE TABLE command. The first type has to do with a specific field and the second type has to do with the table in its entirety. I'll look at table-level clauses first, and then cover the field-level clauses. Note that many keywords are used in both types of clauses.
Table-level clauses
If you have a database open, creating a table automatically adds the table to the database. If you do not want to include it as part of the database, add the FREE keyword. For example:
create table TRANS free ;
( ;
iIDTr c(5), ;
cDesc
dBegin c(20), ;d, ;
dEnd d, ;
nAmt n(10,2) ;
)
The FREE keyword is ignored if you include it when a database isn't open.
If you have a database open, you can specify a long name for the table, and then use that name to refer to the table. Long names can be up to 128 characters and are required if you have two tables with the same file name as part of the database. For example:
create table TRANS name THIS_IS_A_VERY_LONG_NAME ;
( ;
iIDTr c(5), ;
cDesc
dBegin c(20), ;d, ;
dEnd d, ;
nAmt n(10,2) ;
)
The NAME keyword has no meaning if a database isn't open. If you try to include a long name with a table when a database isn't open, you'll get a warning message and the command will fail.
You can create primary, candidate, and foreign keys for a table that belongs to a database. Using these clauses with a table that doesn't belong to a database will generate an error.
You can create a primary key for a table with the PRIMARY KEY clause. You can alternatively create a primary key for a field that would act as the table's primary key. This clause is used differently when the table's primary key spans more than one field. A table can have only one primary key, so Visual FoxPro will generate an error if you attempt to use the PRIMARY KEY clause more than once.
For example:
create table TRANS ;
( ;
iIDTr c(5) primary key, ;
cDesc
dBegin c(20), ;d(9), ;
dEnd d, ;
nAmt n(10,2) ;
)
create table TRANS ;
( ;
iIDTr c(5), ;
cDesc
dBegin c(20), ;d(9), ;
dEnd d, ;
nAmt
primary key str(iIDTr) + cDesc key PKEY1 ;) n(10,2) ;
You can create a candidate key for the table by using the UNIQUE keyword. Note that the use of the UNIQUE keyword here is not the same as it is when you create a specific UNIQUE index tag. As I mentioned earlier, a table can have multiple candidate keys-and each one must be unique. This is what this UNIQUE keyword is specifying. The UNIQUE keyword with regard to an index creates an index with only one entry for each unique value in the index. Note that you cannot use the same expression/field for a primary key and a unique key.
create table TRANS ;
( ;
iIDTr c(5), ;
iIDIn c(5), ;
cDesc
dBegin c(20), ;d(9), ;
dEnd d, ;
nAmt
unique str(iIDTr) + str(iIDIn) tag CKEY1 ;) n(10,2), ;
You can likewise define a foreign key in the table and establish a relationship to the parent table with the FOREIGN KEY clause. This relationship is defined as persistent and is stored in the database. In this example, a persistent relation is created between the transaction table (the child) and the individual table (the parent) explicitly specifying the key iIDIn. A table can have more than one foreign key, but the expressions must be different. Remember that there must be a comma between each table-level clause.
create table TRANS ;
( ;
iIDTr c(5), ;
iIDIn c(5), ;
cDesc
dBegin c(20), ;d(9), ;
dEnd d, ;
nAmt n(10,2), ;
primary key str(iIDTr) + cDesc tag PKEY, ;
foreign key iIDIn tag FKEY1 reference INDIVIDUAL ;)
Field-level clauses
The field data type is indicated by the letter following the field name. The number inside the parentheses following the field type indicates the width of the column. Some field types don't need a width description because they're always the same. For instance, date fields are always eight characters wide and logicals are always a single character wide. If you specify an invalid field width-say, a width of 13 for a date-Visual FoxPro will ignore it. Numeric, Floating, and Double type fields can also have a decimal width specified. If you don't specify a decimal width, it will default to zero. Remember that the decimal point is part of the entire length, so if you want to be able to store the value 123.45 in a numeric field, you'd use a field width description of 6,2-not 5,2 or 3,2.
You can specify whether a field allows or prevents null values in a field with the NULL and NOT NULL keywords. These keywords must go after the field type and width descriptions, and there is a space between "NOT" and "NULL". If you omit NULL and NOT NULL, the current setting of SET NULL determines if null values are allowed in the field. The NULL and NOT NULL keywords can be used with both free tables and tables that are part of a database.
create table TRANS ;
( ;
iIDTr c(5) null, ;
cDesc
dBegin c(20) not null, ;d(9), ;
dEnd d, ;
nAmt n(10,2) ;
)
You can specify a validation rule for the field, an error message that Visual FoxPro will display when the field rule generates an error, and a default value for the field. The validation rule can be an expression made up of native Visual FoxPro functions or a user-defined function. Visual FoxPro can't check the validity of a UDF on the fly, so you'll want to be sure to run the command to make sure it works. The error message is displayed when data is changed in a Browse window and it fails the validation rule. It can be a character expression or a UDF. The default value must be of the same type as the field. You must have a CHECK clause if you include an ERROR clause, but you don't need an ERROR clause with a CHECK clause. Note that all these clauses are allowed only in tables that belong to databases.
create table TRANS ;( ; iIDTr c(5), ;
cDesc
dBegin c(20) default 'BEGINNING BALANCE', ;d check ChkBDate(), ;
dEnd
d check ChkEDate(), ;
nAmt n(10,2) check ChkAmt() error 'Amount must be greater than zero'
;
)
This capability is important to understand-because Visual FoxPro doesn't have an autoincrementing field type that you can use to populate a primary key (like Access or SQL Server does), the popular method to create a primary key value is by using a UDF in the Default property for the key field. You can, obviously, add this primary key UDF generator in the Create Table command.
You can prevent the translation of data in a character or memo field to a different code page with the NOCPTRANS keyword. For example, data in the iIDTr field will not be translated if the table is converted to another code page, but the data in cDesc will be.
create table TRANS ;
( ;
iIDTr c(5) nocptrans, ;
cDesc
dBegin c(20), ;d(9),;
dEnd d, ;
nAmt n(10,2) ;
)
Inclusion of the NOCPTRANS keyword with non-character or memo fields will generate a syntax error.
Modifying tables and databases programmatically
One of the most often asked questions on the electronic forums regards the need to change the structure of an existing table from within a program. Before Visual FoxPro, the developer had to go through a long, convoluted process that involved creating a new structure, appending the records from the old table, and finally renaming the files as needed. Now, the ALTER TABLE command can be used to modify tables programmatically, much in the same way that CREATE TABLE is used to create tables.
The syntax of the command is straightforward; once you learn a few keywords, you'll likely not refer back to Help again except in arcane situations. You can add, modify, delete and rename columns as well as add and delete attributes of those columns, and add and delete attributes of the entire table.
If you're confused about where in the table each of these clauses is going, execute the command and then bring forward the Table Designer and examine which attributes of the table have changed.
To add and delete a column named lIsAlive, the following commands are used:
alter table TRANS ;add column lIsDead L
alter table TRANS ;drop column lIsDead
To rename the column nAmt and then change its width, the following commands are used:
alter table TRANS ;rename column nAmt to nFirstAmt
alter table TRANS ;alter column nFirstAmt n(8,2)
To add and delete a primary key to the table TRANS, the following commands are used:
alter table TRANS ;add primary key iIDTr key iIDTr
alter table TRANS ;drop primary key
Note that you don't have to specify the name of the primary key when you drop it because there's only one key per table. To add and delete a validation rule to the dBegin column of the table TRANS, the following commands are used:
alter table TRANS ;alter column dBegin set check chkdBegin()
alter table TRANS ;alter column dBegin drop check
To add and delete a default value for a field, the following commands are used:
alter table TRANS ;alter column cDesc set default 'Beginning Balance'
alter table TRANS ;alter column cDesc drop default
To add and delete a validation rule to the entire table and provide your own custom error message used when the rule is violated, use the following commands:
alter table TRANS ;set check chkdTrans() ;error 'This is your custom error message'
alter table TRANS ;drop check
Note that the error message will automatically be dropped when you get rid of the validation rule.
Obviously, the ALTER TABLE command is powerful-and dangerous! It is possible to wreak unimaginable havoc in a short period of time through the misapplication of this command. Let's examine what some of the pitfalls are.
First, it's obvious that you should be careful about removing columns that might contain data. What might not be as evident is that if you have index or trigger expressions that reference this field, those rules don't go away. Instead, they'll generate an error at run time.
Second, when renaming columns, you'll want to make sure that you don't have index expressions or rules that reference the original name. Those expressions will not be converted to the new name.
Next, you'll want to be careful when adding validation rules or default values to columns. If the column already contains data, Visual FoxPro will evaluate the validation rule and will issue a warning on every record whose contents violate the rule. Furthermore, the field-validation rules are also executed when you change the width or type of any field.
You can use the NOVALIDATE keyword to specify that Visual FoxPro allow table-structure changes that might violate the integrity of the data in the table. For example, if you specify a .UDF as the default property for a field but that function doesn't exist yet, you'll get an error unless you use this keyword.
|
Politica de confidentialitate | Termeni si conditii de utilizare |

Vizualizari: 830
Importanta: ![]()
Termeni si conditii de utilizare | Contact
© SCRIGROUP 2024 . All rights reserved