Pages in ASP.NET Whidbey
Michele Leroux
Bustamante
IDesign: .NET Design and Business Solutions
October 2003
Applies to:
Microsoft ASP.NET Whidbey
Microsoft Visual Studio .NET 2003
Summary: Learn about the Master Pages feature in
ASP.NET Whidbey and the new level of productivity it brings to development. (29
printed pages)
Download MasterPagesSample.msi.
Contents
Life Without Master
Pages
Introducing Master and
Content Pages
A Little Peek under the
Hood
Overriding Master
Content
Default Master Pages
Location, Location,
Location
Yes, You Can Nest Them
Conclusion
Note This document was developed prior to the product's
release to manufacturing and, as such, we cannot guarantee that any details
included herein will be exactly the same as those found in the shipping
product. The information represents the product at the time this document was
published and should be used for planning purposes only. Information is subject
to change at any time without prior notice.
If I had to
isolate which Microsoft ASP.NET 1.x features gave me the greatest improvement
in productivity I would have to say ASP.NET and HTML controls along with User
Controls. Coming from a C++ background I had spent very little hands-on time
with Microsoft Active Server Pages (ASP) since most of my Web development
efforts were focused on component development for the server-side or plugging
in to Microsoft Internet Explorer and DHTML object models. I was in for a
pleasant surprise when ASP.NET first released, to be able to drag and drop
controls into a page designer and see automatically generated HTML. And just
when I thought I might have to do some reading to learn how to tweak the
resulting layout, I see property window integration and HTML view Microsoft
Intellisense also providing selections to generate syntax for style settings
and other properties. The rich features provided by ASP.NET server controls
such as data-bound controls and validators also significantly reduced the
coding effort required to produce common Web page functionality, so that large
blocks of HTML and client script were replaced with simple <asp:xxx>
control tags. User Controls provided a different type of productivity benefit,
by supplying us with an easy way to design consistent looking headers, footers
and other reusable HTML parts for a consistent site layout, not to mention the
ability to fragment cache those parts.
This newfound
productivity makes it possible for developers to focus on the business problems
they are trying to solve. It enabled them to write code behind a functional Web
page, allowing Web designers to improve on the presentation. Even I was able to
become a pseudo Web designer (minus the graphical talent which I have to admit
I lack), but the upcoming version of ASP.NET, code name ASP.NET
'Whidbey' (after the code name for the upcoming release of Microsoft
Visual Studio .NET), and Master Pages (among many new features) will bring a
new level of productivity to the mix.
Life Without Master Pages
In order to
realize the value of new features, it helps to discuss the reasoning behind
them. I'm going to start by briefly taking you through a few traditional
approaches to designing an ASP.NET Web site today, with Microsoft Visual
Studio .NET 2003, and I'll place emphasis on some of the pain points
that will be removed with Master Pages. I have provided two sample projects
that implement User Controls with two different approaches.
To design a Web
site with a consistent look and feel you'll typically leverage user controls to
design common interface elements. As you add new Web forms to the project, you
can easily drag and drop these reusable controls so that each page shares these
common elements. In my first example, using Visual Studio .NET 2003 I
created a new project, and began by building a header and footer user control
to be used on each page. The header control, hdr.ascx, contains a menu and
header graphic with a logo. In the designer it looks like this:

Figure1. Design view
for the hdr.ascx user control
Then I created a
footer control, ftr.ascx, to look like this:

Figure 2. Design
view for the ftr.ascx user control
I can place these
controls onto each new Web form using drag and drop which generates the control
registration tag and an instance of the control on the page. To refresh your
memory, after adding a new Web form to the project, and placing the header and
footer, it looks like this in the designer:
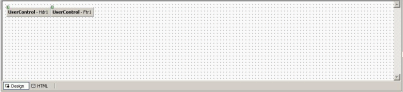
Figure 3. Before
adding content, the design view of a new page consuming the header and footer
controls would look something like this.
The HTML source
includes two registration tags, and entries within the <form> tag for
each control.
<%@ Page
language='c#' Codebehind='default.aspx.cs'
AutoEventWireup='false'
Inherits='DotNetDashboard.ASPNET.UserControls._default'
%>
<%@ Register
TagPrefix='uc1' TagName='hdr' Src='hdr.ascx'
%>
<%@ Register
TagPrefix='uc1' TagName='ftr' Src='ftr.ascx'
%>
<!DOCTYPE HTML
PUBLIC '-//W3C//DTD HTML 4.0 Transitional//EN' >
<HTML>
<HEAD>
<title>.NET Dashboard</title>
<meta name='GENERATOR'
Content='Microsoft Visual Studio .NET
7.1'>
<meta name='CODE_LANGUAGE'
Content='C#'>
<meta
name='vs_defaultClientScript' content='JavaScript'>
<meta name='vs_targetSchema'
content='https://schemas.microsoft.com/intellisense/ie5'>
<LINK href='<%
=Request.ApplicationPath %>/portal.css'
type='text/css'
rel='stylesheet'>
</HEAD>
<body>
<form id='Form1'
method='post' runat='server'>
<uc1:hdr id='Hdr1'
runat='server'></uc1:hdr>
<uc1:ftr id='Ftr1'
runat='server'></uc1:ftr>
</form>
</body>
</HTML>
To insert content
between the header and footer, I usually start by dropping an HTML table from
design view to provide structure, then drop page controls and content within.
So, after adding three pages to the application (default.aspx, register.aspx
and about.aspx) I modified each <form> section to include content in a
consistently formatted table, something like this:
<form id='Form1'
method='post' runat='server'>
<uc1:hdr id='Hdr1'
runat='server'></uc1:hdr>
<TABLE width='95%'
align='center' border='0' cellspacing='5'
cellpadding='5'>
<!-- PAGE CONTENT GOES HERE
-->
</TABLE>
<uc1:ftr id='Ftr1'
runat='server'></uc1:ftr>
</form>
With the help of
a style sheet each page has a consistent looking header, footer, and style,
with individual content as shown in the figures 4, 5 and 6:
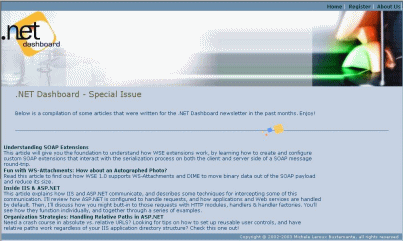
Figure 4.
Default.aspx using header and footer user controls
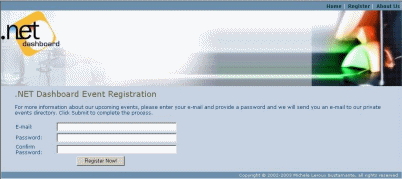
Figure 5.
Register.aspx using header and footer user controls
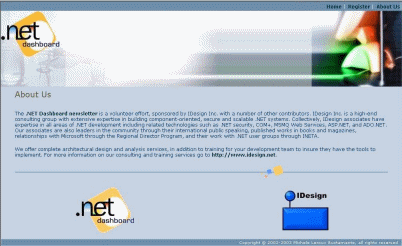
Figure 6.
About.aspx using header and footer user controls
The beauty of
this architecture is that I can edit any of the common user controls and have
changes automatically reflected in each Web form that consumes them.
Furthermore, if I restructure hdr.ascx so that menus are separated into a child
user control, there is no impact on pages that reference the header. Sounds
good, right? I thought so, too. Until after building an entire site map for a
client using these techniques, I was given a new set of graphics from the Web
designer that significantly altered the layout required for each page. Most
creative Web designers don't design using squares and rectangles. They like to
see overlapping graphical regions to make the site look more interesting. That
means layering graphics and cutting them into rectangular parts that can be
worked with in the HTML source. So, not only did I have to modify the contents
of the header and footer controls, I also had to modify how they were
positioned within each page frame, and I had to add some new user controls for
containing sidebar content.
In my example
above, I created a simple header and footer whose HTML tags are simply placed
above and below the content are (as shown in Listing 1). The only effort in
page layout is that for the content area. To add a sidebar that will have an
alternate background color, new content, and that will span the height of the
browser window I have to add table structure to organize the user control
elements and page content. In my UserControlsV2 project sample, I demonstrate
this by adding a sidebar control to the layout that allows users to subscribe
to the newsletter. Consider the following desired result:
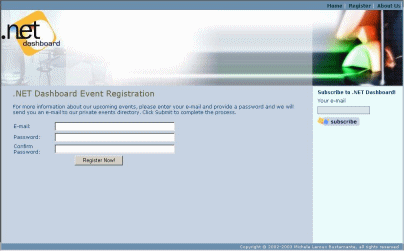
Figure 7. Runtime
view of Register.aspx after modifying the page layout to include a sidebar on
the right
This seemingly
small change requires me to modify some existing user controls, create a new
sidebar user control, and edit each page to massage the organizational layout.
That last part is what really hurts. After a few pages worth of copying and
pasting the new HTML layout and moving existing content into this new layout,
you can imagine that I may introduce some errors even on a good day. And I get
to do it all over again any time a significant change occurs with the site
presentation. Furthermore, regression testing in this type of scenario
literally requires testing every page in the site because I touched each page.
So, if this is a pain for a three-page code sample, imagine the impact with a
significant Web site.
My new HTML
source layout looks like this:
<!-- outer
table -->
<table
width='100%' height='100%' border='0'
cellpadding='0'
cellspacing='0'>
<TBODY>
<tr
valign='top'>
<td
colspan='2'>
<!-- header
goes here -->
<uc1:hdr
id='Hdr2' runat='server'></uc1:hdr>
</td>
</tr>
<tr
valign='top'>
<td>
<!-- content
goes here -->
</td>
<td align='right'
valign='top' class='PaneRight'
height='100%'
nowrap=true width='225'>
<!-- sidebar
goes here -->
<uc1:sidebar
id='Sidebar2'
runat='server'></uc1:sidebar>
</td>
</tr>
<tr>
<td
colspan='2'>
<!-- footer
goes here -->
<uc1:ftr
id='Ftr2' runat='server'></uc1:ftr>
</td>
</tr>
</table>
</TR></TBODY></TABLE>
Using Visual
Studio .NET 2003 there is a workaround for this challenge I present
to you. As you might guess, you can reverse the roles of the Web Form and the
User Control. You can create a single Web form that injects dynamic user control
content as the user navigates. There are several issues with this approach. For
example, you have to come up with a new resource navigation architecture since
you will no longer have a unique *.aspx resource for each page. This also means
that the browser URL may not indicate a resource name that matches the content
being displayed. The following table provides an example for how the three
pages from my previous example might be requested in this new scenario:
|
Old Resource
|
New Resource
|
Functionality
|
|
https:///default.aspx
|
https:///default.aspx
|
Placeholder control has default content for
home page.
|
|
https:///register.aspx
|
https:///default.aspx?page=register
|
Load register.ascx user control into
default.aspx placeholder control.
|
|
https:///about.aspx
|
https:///default.aspx?page=about
|
Load about.ascx user control into
default.aspx placeholder control.
|
You can provide
the user with a URL scheme consistent with the previous example if you create a
custom HTTP handler factory to control how a request for *.aspx are handled,
and make use of some combination of Server.Transfer and Server.Execute
functionality to achieve variations on how the resulting output is generated.
If the core benefit of editing just a few *.aspx page templates, and replacing
some part of the content at runtime is your priority, this is an acceptable
solution with our current ASP.NET architecture. But, I'm sure you'd agree that
all that up front work to make it possible is just wrong because is shouldn't
be so complicated.
Master Pages were
designed to make it easy to edit page templates in a single location, without
modifying how we work with the page model and without the trickery on the back
end. Now I'll show you how ASP.NET Whidbey is going to knock your socks off
with greater productivity.
Introducing Master and Content Pages
ASP.NET Whidbey
introduces a solution for the challenges I mentioned above by creating two new
concepts: Master Pages and Content Pages. Given my introduction so far, you can
imagine how this is going to play out right? You'll create a Master Page for
the site layout and design and create Content Pages for each content resource,
somehow connecting them to the Master Page. As users navigate to *.aspx
resources in your site ASP.NET will serve up the requested page displaying it
within the layout of its associated master, and le voila.
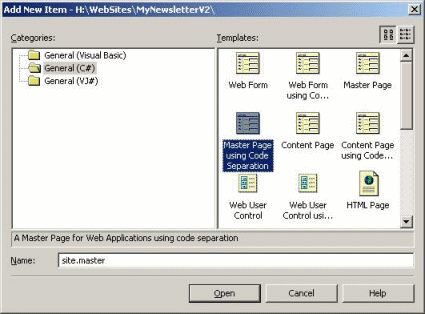
Figure 8.
Creating a new Master Page using the new item templates
Creating a New Master Page
After creating a
new Web Site using Visual Studio 'Whidbey' for ASP.NET you will have
a single default.aspx file to begin with, and an empty Data subdirectory. If
your intention is to standardize the look and feel of each page in the site
(the point of this article) you'll start by adding a new Master Page to the Web
site. Among several new options in the Add New Item dialog you'll see you have
a choice between adding a new Master Page or a new Master Page using Code Separation.
Master Pages have
a *.master extension and, like Web Forms, contain top-level HTML elements such
as <html>, <head>, <body> and <form>. The new Master Page will include default
HTML source similar to this:
<%@ master
language='C#' compilewith='site.master.cs'
classname='ASP.site_master' %>
<html>
<head
runat='server'>
<title>Untitled Page</title>
</head>
<body>
<form runat='server'>
<asp:contentplaceholder
id='ContentPlaceHolder1'
runat='server'>
</asp:contentplaceholder>
</form>
</body>
</html>
Of note is the
new <% @master %> declaration and the new ASP.NET <asp:contentplaceholder> control tag. Clearly the <%@ master %> declaration, similar to the <% @ Page %> declaration for a Web Form identifies the
resource type and supports several attribute settings. If you request code
separation when creating this declaration will include compileWith and classname
attributes to indicate the source file and the partial class definition to
compile with this resource:
<%@ master
language='C#' compilewith='site.master.cs'
classname='ASP.site_master' %>
A
ContentPlaceHolder control was also generated within the <form> tags of the Master Page's HTML source:
<form runat='server'>
<asp:contentplaceholder id='ContentPlaceHolder1'
runat='server'>
</asp:contentplaceholder>
</form>
This control will
be used to place dynamic content from individual content pages that use this
master. If we take a look at the designer view of this new master, it looks
like this before we add content:
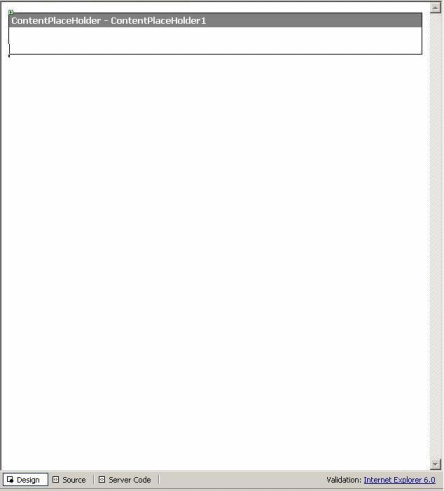
Figure 9. Design
view of a new Master Page prior to modification
So, let's design
the site. The first change I'm going to make to my new master is to edit the <head> section to add a title representative of my site, add some other <meta> tags for site description and keywords, and also insert a <link> tag to pull in the style sheet. The edited <head> section now looks
like this:
<head
runat='server'>
<title>.NET Dashboard
Newsletter</title>
<meta name='keywords'
content='.NET, ASP.NET, Web Services,
development, database, programming, Web
sites, Michele Leroux
Bustamante, IDesign, UCSD Extension,
training, Microsoft, .NET
Framework' >
<meta name='description'
content='A newsletter focused on meeting
the needs of .NET developers, providing
cool tips for the advanced
programmer, and keeping you informed on
what's happening with
.NET!' >
<LINK href='portal.css'
type='text/css' rel='stylesheet'>
</head>
These settings
will apply to every content page that I associate with this master. Next, I'm
going to design the HTML layout. The content placeholder will eventually
contain dynamic page content, so I'll design the Master Page's layout around
this control to build a consistent look and feel for each page. As you would
with Web Forms you can use the designer interface or directly edit HTML source.
Here I added header and footer HTML above and below the content placeholder
control within the <form> tags, to include a top-level menu, a graphic
header, and a footer area:
<form runat='server'>
<table id='tblHeader'
class='HeadBg' width='100%'
cellspacing='1'
cellpadding='1' border='0'>
<tr>
<td height='10'
align=right valign='bottom'
>
<table id='tblMenu'
class='OtherTabsBg' cellspacing='1'
cellpadding='1'
border='0'>
<tr>
<td
class='OtherTabs'><a
href='Default.aspx'>Home</a>
| </td>
<td
class='OtherTabs'><a
href='register.aspx'>Register
</a> |
</td>
<td
class='OtherTabs'><a
href=About.aspx>About Us</a></td>
</tr>
</table>
</td>
</tr>
<tr><td align=left>
<asp:image
id='imgLogo' runat='server'
imageurl='images/dndhdr.jpg'>
</asp:image>
</td></tr>
</table>
<asp:contentplaceholder
id='pageContent' runat='server'>
</asp:contentplaceholder>
<table id='tblFooter'
width='100%' cellspacing='1'
cellpadding='1'
border='0'>
<tr>
<td align=center
class='PageFooter'>Copyright 2002-
2003 Michele Leroux
Bustamante, all rights
reserved
</td>
</tr>
</table>
</form>
The only change I
made to the content placeholder was to provide a new identifier for the id
attribute setting it to 'pageContent'. So, with the help of my trusty
style sheet, the designer view for this Master Page now looks pretty
impressive.
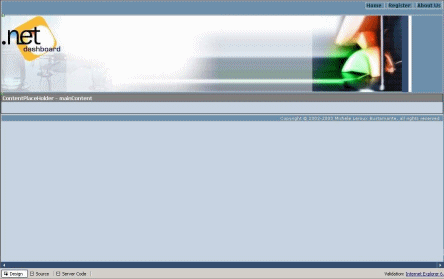
Figure 10. You
can place default content in a Master Page's ContentPlaceHolder control from
design view.
In design view
the content placeholder is presented as a container for default content for
each page, but any default content you supply here can be overridden at the
page level. You can place any arrangement of ASP.NET controls, HTML controls
and user controls within content placeholder area. For now, I will place some literal
text indicating this content should be overridden:
<asp:contentplaceholder
id='pageContent' runat='server'>
h1>Page content goes here!</h1>
</asp:contentplaceholder>
Before we dive
deeper into this process, let's see how we add content pages to the Web site
that will use this new Master Page.
Adding Content Pages
Visual Studio
'Whidbey' provides a few new templates for adding Content Pages to
the Web Site. Instead of using the Web Form item template you will select one
of the Content Page templates (with or without code separation):

Figure 11.
Selecting one of the Content Page templates (with or without code separation)
Content pages
still have the *.aspx file extension, but the new item templates insure that
the HTML source defaults to something appropriate for a content page.
To complete the
process of adding a new content page, you will be invited to associate a
master. In the alpha release of Visual Studio 'Whidbey,' a dialog box
appears allowing you to make a selection from a list of existing masters in
your open project. In my example so far there is only one to choose from:
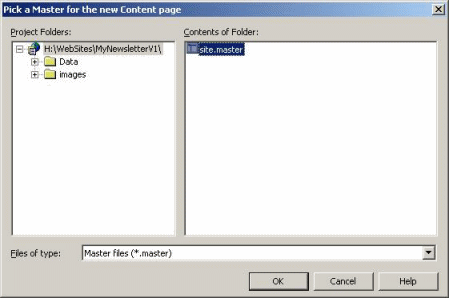
Figure 12. When
adding content pages to an application, the alpha release asks you to select
from a list of Master Pages in your application in a subsequent dialog.
Adding a content
page to the Web site actually adds a new *.aspx resource with the appropriate
settings to make it a valid content page. For my new register.aspx page I
requested code separation so the HTML source looks like this:
<%@ page
language='C#' master='~/site.master'
compilewith='register.aspx.cs'
classname='ASP.register_aspx' %>
No default HTML
content is added, save the <%@
Page %> declaration. Once again the compilewith
and classname attributes indicate the file and partial class to compile
with this Page object. In addition, a new master attribute exists to specify
the master filename to link to this page. But check out the designer view.
Since the master already has content and a style sheet, you can see a muted
version of the master content surrounding the area where this page's content
will go.
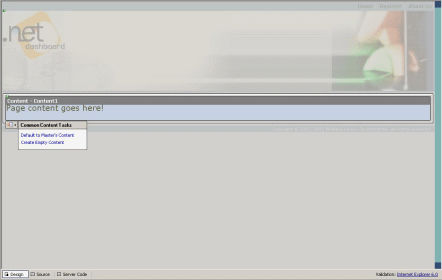
Figure 13.
Content page displaying the master's layout around the Content control at
design time
At design time a
content page will display the master's layout around the Content control where
you design page specific content, and show default content from any of the
Master Page's content placeholders until you begin to customize.
Although the
default HTML source does not have any content, a Content control is presented
in design view. This control appears in the same location as where the
ContentPlaceHolder control is located in the master layout. A list of Common
Content Tasks allows you to default to the master's placeholder content or
begin with an empty content area. From the ToolBox you can begin designing this
content area, and you'll notice you cannot drop controls outside this content
control. Assuming I copy the design for my register.aspx page in my earlier
example, design view looks like this when I'm done:
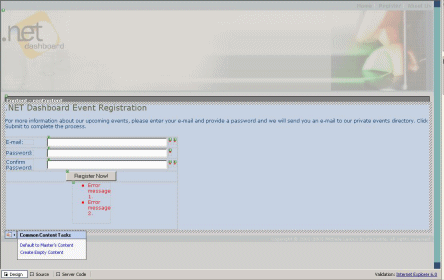
Figure 14.
Designer view of a completed design for the registration.aspx page's content.
Here is its HTML
source:
<%@ page
language='C#' master='~/site.master'
compilewith='register.aspx.cs'
classname='ASP.register_aspx' %>
<asp:content
id='regContent' contentplaceholderid='mainContent'
runat='server'>
<h1>.NET
Dashboard Event Registration</h1>
<p>For more
information about our upcoming events, please enter your e-
mail and provide a password and we will send
you
an e-mail to our
private events directory.
Click Submit to
complete the process.</p>
<table align=left cellspacing='1'
cellpadding='1' border='0'>
<tr>
<td width='100'>
<div style='DISPLAY:
inline; WIDTH: 70px; HEIGHT: 15px'
ms_positioning='FlowLayout'>
E-mail:</div>
</td>
<td >
<asp:textbox
id='txtEmail' runat='server'
width='300px'>
</asp:textbox>
</td>
<td >
<asp:requiredfieldvalidator
id='valEmailRequired'
runat='server'
errormessage='E-mail is a required
field.'
controltovalidate='txtEmail'>
*</asp:requiredfieldvalidator>
<asp:regularexpressionvalidator id='valEmailFormat'
runat='server'
errormessage='Invalid e-mail format.'
controltovalidate='txtEmail'
validationexpression='w+([-+.]w+)*@w+([-
.]w+)*.w+([-.]w+)*'>
*</asp:regularexpressionvalidator>
</td>
</tr>
<tr>
<td width='100'>
<div style='DISPLAY:
inline; WIDTH: 70px; HEIGHT: 15px'
ms_positioning='FlowLayout'>
Password:</div>
</td>
<td >
<asp:textbox
id='txtPassword' runat='server'
width='300px'
textmode='Password'>
</asp:textbox>
</td>
<td >
<asp:requiredfieldvalidator
id='valPasswordRequired'
runat='server'
errormessage='Password is a required
field.'
controltovalidate='txtPassword'>
*</asp:requiredfieldvalidator>
</td>
</tr>
<tr>
<td width='100'>
<div style='DISPLAY:
inline; WIDTH: 70px; HEIGHT: 15px'
ms_positioning='FlowLayout'>
Confirm
Password:</div>
</td>
<td >
<asp:textbox id='txtConfirm'
runat='server'
width='300px'
textmode='Password'>
</asp:textbox>
</td>
<td >
<asp:requiredfieldvalidator
id='valConfirmRequired'
runat='server'
errormessage='You must confirm your
password.'
controltovalidate='txtConfirm'>
*</asp:requiredfieldvalidator>
<asp:comparevalidator
id='CompareValidator1'
runat='server'
controltovalidate='txtConfirm'
errormessage='Passwords must match!'
controltocompare='txtPassword'>*
</asp:comparevalidator>
</td>
</tr>
<tr><td align=center
colspan=3>
<asp:button id='Button1'
runat='server' text='Register
Now!' />
</td></tr>
<tr><td align=center
colspan=3>
<asp:validationsummary
id='ValidationSummary1'
runat='server' />
</td></tr>
</table>
</asp:content>
The new ASP.NET
Content control, identified by the <asp:content> tag, acts as a
container for all HTML and controls for the content page. The IDE automatically
places the HTML for all activities in design view within these tags. You'll
also notice that Content pages cannot have standard HTML tags such as <html>, <body>, <head>, <form> outside the
<asp:content> tag.
A Little Peek under the Hood
In my discussion
so far, you can see that a number of new objects are being introduced to the
page processing architecture, namely MasterPage, ContentPlaceHolder and Content
types. Some of these types are accessible at runtime and some are not, but all
of these new types have a purpose as the runtime generates the actual Page
object to cache in server memory, and indirectly play a role in the process of
rendering HTML output.
As I've
mentioned, the MasterPage object is compiled from the combined content of the
*.master resource and its code-behind file (if specified in the <%@ master %> declaration). The resulting
System.Web.UI.MasterPage type actually inherits System.Web.UI.UserControl and
inherits most of its functionality from that and other base classes up the
chain. Master Pages contain zero or more ContentPlaceHolder controls which are
responsible for rendering output from Content controls of requested content
pages at runtime. When the MasterPage object is compiled its referenced user
controls, ASP.NET server controls, and ContentPlaceHolder controls are also
compiled and cached on the server. Each instance of
System.Web.UI.ContentPlaceHolder within a Master Page acts as a naming
container for the contents of requested page, but does not directly reference a
Content control since this type is not part of the control tree at runtime. In
fact, the ContentPlaceHolder will have a Controls collection that directly
references actual controls generated from its associated Content control on the
requested page.
The Page object
has been extended to support Master Pages so that if a master is used the Page
type will be generated to include a strongly typed reference to its Master Page
through its Master property. In fact, the Controls collection of a content page
now includes a single item-the same MasterPage reference. The MasterPage object
in turn has a Controls collection that includes any HTML literals, user
controls, and content placeholder controls as mentioned previously. The
following diagram illustrates these relationships at runtime, based on my
second project sample.
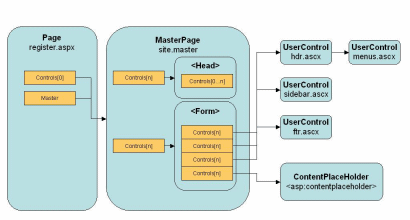
Figure 15. The
hierarchy of access to the Controls collection within the Page, MasterPage, and
its children in terms of runtime ownership and access
In summary, at
runtime your page object can access the strongly typed master and any of its
public properties. Likewise, the MasterPage along with most controls has a Page
property from which it can reference the Page object for this request. You can
leverage this and other available information through the MasterPage and Page
object model to centralize common functionality for all pages sharing a master,
by writing handlers for page events as part of the master's code base. The
order of events begins with the topmost object in the page hierarchy, which
means the Page object receives page events first, followed by the MasterPage,
and then its contained user controls.
This control
hierarchy is generated at runtime when ASP.NET combines the page and its master
into a single page object that will be responsible for writing HTML to the
response output stream. The default behavior of ASP.NET uses the
PageHandlerFactory to drive processing for *. aspx requests. This is consistent
with previous versions of ASP.NET, and is indicated as default configuration in
the <httpHandlers> section of your machine.config file:
<httpHandlers>
<add verb='*'
path='*.aspx'
type='System.Web.UI.PageHandlerFactory' />
<add verb='*'
path='*.ascx'
type='System.Web.HttpForbiddenHandler' />
<add verb='*'
path='*.master'
type='System.Web.HttpForbiddenHandler' />
<!-- many other resource mappings
exists in this section -->
</httpHandlers>
Notice that
Master Pages, along with user controls, are among resource requests that are
rejected by the runtime, by passing those requests to an instance of the
HttpForbiddenHandler object. PageHandlerFactory implements the interface
IHttpHandlerFactory, and is responsible for returning an object that implements
IHttpHandler and that knows how to process the requested resource and send the
appropriate HTTP response. The Page object implements IHttpHandler and is the
type that is returned by the PageHandlerFactory's GetHandler() method.
You can read Inside IIS and ASP.NET for a
backgrounder on ASP.NET 1.x modules, handler factories and handlers.
Requests for
content pages are treated like requests for Web Forms, since they have the same
file extension, however if a Master Page is specified the page build is handled
differently since a merge between the Master Page and its content page will
take place, ultimately returning a Page object that has a reference to its
Master Page. Since this type is generated dynamically, the Master property of
the page is strongly typed.
From a very high
level, when a content page is requested the following things occur. The runtime
checks the output cache to determine if the requested resource lives there, and
returns that cached output in the response with no further processing. If the
output cache does not contain the resource, the PageHandlerFactory is
instantiated and the runtime calls its GetHandler() method. GetHandler()
ultimately returns a compiled Page object representing the requested page
resource. If the server has already cached this type and no source files have
changed, the cached type is returned to handle processing the request.
Note Do not confuse the output cache which stores the HTML
output for the requested resource, with cached server objects that have been
previously JIT compiled.
If the page
resource or any of its dependencies including the referenced master and other
user controls have not been cached, they will be individually compiled and
cached on the server. Ultimately the Page object is returned which will
reference its master and other dependencies in the appropriate object
hierarchy. The runtime calls the Page object's ProcessRequest() method
which triggers a chain reaction driven by the Page object to write HTML from
the hierarchy of masters, user controls, server controls and literal HTML to
the output stream in the correct sequence. This is similar to how things were
handled in past versions of ASP.NET but now a more complex hierarchy may exist
with the existence of one or more Master Pages, with the merging process for
masters and content, and with the choreography required for HTML output
location with content placeholder and content controls. Of course, these
details are encapsulated within participating objects and hidden from you.
Overriding Master Content
Although the
primary use for Master Pages is to provide common content for all pages, it is
feasible that some pages may want to customize some master content. For
example, since content pages cannot include HTML elements such as the <head> section that contains title and other meta tags, the only way to customize
those settings would be to somehow access them through the master. As I
mentioned above, the Page object has access to the Master Page through its
Master property or through the Controls collection. Consider the contents of my
first project's <head> section in the site.master:
<head
runat='server'>
<title>.NET Dashboard
Newsletter</title>
<meta name='keywords'
content='.NET, ASP.NET, Web Services,
development, database, programming, Web
sites, Michele Leroux
Bustamante, IDesign, UCSD Extension,
training, Microsoft, .NET
Framework' >
<meta name='description'
content='A newsletter focused on meeting
the needs of .NET developers, providing
cool tips for the advanced
programmer, and keeping you informed on
what's happening with
.NET!' >
<LINK href='portal.css'
type='text/css' rel='stylesheet'>
</head>
The Page object
could use the Master property to access the HTML header and look for a <title> element to modify, but there is a much easier and more object-oriented
approach. Since the Master property is strongly typed any public properties
exposed by the MasterPage class, including those you create, can be
early-bound. So if I create two string properties, Title and Keywords, along
with their associated data members in the code-behind file:
protected String m_HtmlTitle =
'https://www.dotnetdashboard.net';
public String HtmlTitle
set
}
protected StringCollection m_keywords =
new StringCollection();
public StringCollection Keywords
set
}
Additionally,
here is a function that will build a keyword string:
public String GetKeywords()
,', nextString);
}
sb.Length = sb.Length - 1;
return sb.ToString ();
}
And it will
update the site.master to use those members using rendering statements:
<head
runat='server' id='Head1'>
<title><% =m_HtmlTitle
%></title>
<meta name='keywords'
content='<% =GetKeywords() %>' >
<meta name='description'
content='A newsletter focused on meeting
the needs of .NET developers, providing
cool tips for the advanced
programmer, and keeping you informed on
what's happening with
.NET!' >
<LINK href='<%
=Request.ApplicationPath %>/portal.css'
type='text/css'
rel='stylesheet'>
</head>
I will now be
able to access title and keywords through their respective properties from any
page that references this master. When the master's HTML is rendered, it will
render the current contents of each property as part of the header section. In
the Page_Load for the content page I can modify these properties:
this.Master.HtmlTitle
= '.NET Dashboard - About Us';
this.Master.Keywords.Add
('IDesign');
This approach
provides a measure of control over which elements of the master can be easily
updated with the provision of custom public properties. But, there is an
alternative to this approach that is slightly more appealing and directly
leverages the new page model. Since the <head> element can be
run on the server, you can also embed a content placeholder within this element
as shown here:
<head
runat='server' id='Head1'>
<asp:contentplaceholder
id='headContent' runat='server'>
<title>.NET Dashboard
Newsletter</title>
<meta name='keywords'
content='.NET, ASP.NET, Web Services,
development, database, programming, Web
sites, Michele Leroux
Bustamante, IDesign, UCSD Extension,
training, Microsoft, .NET
Framework' >
<meta name='description'
content='A newsletter focused on meeting
the needs of .NET developers, providing
cool tips for the advanced
programmer, and keeping you informed on
what's happening with
.NET!' >
<LINK href='portal.css'
type='text/css' rel='stylesheet'>
</asp:contentplaceholder>
</head>
As mentioned
earlier, any content placed within a content placeholder of a Master Page will
become default content for its pages. Used in this scenario, the default <head> section will be generated for all pages, unless overridden in the HTML
source as shown here:
<asp:content
id='newHeadContent' contentplaceholderid='headContent'
runat='server'>
<title>.NET Dashboard Newsletter -
Registration</title>
<meta name='keywords'
content='.NET, ASP.NET, Web Services,
development, database, programming, Web
sites, Michele Leroux
Bustamante, IDesign, UCSD Extension,
training, Microsoft, .NET
Framework, IDesign' >
<meta name='description'
content='A newsletter focused on meeting
the needs of .NET developers, providing
cool tips for the advanced
programmer, and keeping you informed on
what's happening with
.NET!' >
<LINK href='portal.css'
type='text/css' rel='stylesheet'>
</asp:content>
Since the <head> element is not part of the design view for a page, you have to modify this
content directly in source view. You'll also see in my sample project
MyNewsletterV3, that I specifically break down the title and keywords part of
the <head> element into separate content placeholders to
make it possible to update fragments from each page. When I discuss nesting
Master Pages below, I'll explain this example further.
Default Master Pages
I made a change
between the samples MyNewsletterV1 and MyNewsletterV2 to move the Master Pages
and user controls into a /templates subdirectory, to better organize the site
as I added new pages. This meant that I had to edit each *.aspx page that
referenced site.master and update the master file path in the <%@ page %> declaration. But, rather than updating the
location I decided to use an alternate method for specifying the master for
each page. Master Pages can be specified at the application level using the <pages> element of your web.config file. After adding the following element to the <system.web> section of my web.config file I have:
<pages
master='~/templates/site.master'
/>
I was able to
remove the master attribute altogether from each *.aspx page that formerly
included one:
<%@ page
language='C#' compilewith='register.aspx.cs'
classname='ASP.register_aspx' %>
With this default
setting, any *.aspx resource that does not specify a master attribute in the <%@ page %> directive will automatically be assumed to
use this master. Effectively, that means all *.aspx pages in the application
directory will be treated as content pages which means that all content should
be contained within the appropriate <asp:content> element. You can
override the default master by providing a master attribute in specific pages.
You can provide an alternate master or an empty string which will result in the
*.aspx resource no longer being treated as a content page but as a traditional
Web form:
<%@ page
language='C#' master=''
compilewith='register.aspx.cs'
classname='ASP.register_aspx' %>
Location, Location, Location
One of my pet
peeves is the issue of handling relative paths. When you navigate between
development, QA and production environments, you'll often find that relative
paths that work perfectly well on production, and sometimes even QA, do not
work on your development environment due to the location from which you run
your code, and the setup of its virtual directories. An article I wrote, Organization Strategies: Handling Relative
Paths in ASP.NET explains some workarounds using ASP.NET server
controls which will give you some background on the issue. I mention this now,
because those issues still exist with ASP.NET Whidbey (as of the alpha) and
also because Master Pages introduce a new twist.
The Master Page
is merged with the requested page at runtime, and the Page object is the
primary resource. That also means that relative paths are 'relative'
to the page, not to the location of the master. In my second example, I moved
the Master Page and all user controls to a /templates subdirectory. Since they
were originally located in the application root, all references to images and
page links were relative to that root. So menus.ascx file specified the
following page links:
<td
class='OtherTabs'><a
href='Default.aspx'>Home</a> | </td>
<td
class='OtherTabs'><a
href='register.aspx'>Register</a> | </td>
<td
class='OtherTabs'><a href='About.aspx'>About
Us</a></td>
And the new
sidebar.ascx specified the following image button:
<TD valign='top'>
<input type='image'
name='imgButton'
id='imgButton'
src='images/btn-subscribe.gif' border='0'
/></TD>
The article I
just mentioned explains why I cannot use the / character or ~/ character as a
prefix, since that requires my development machine to point https://localhost to
this application directory, rather than having a virtual application
subdirectory such as https://localhost/MyNewsletter_V2. So, now that I moved the
files to the /templates directory, I must find a way to refer to the /images
subdirectory (for example) to properly load those files. One way to do this is
to hard code the ../ prefix since I know it is one directory up the chain.
Another way is to use a rendering statement such as shown above for the <link> element in the header:
<LINK href='<%
=Request.ApplicationPath %>/portal.css'
type='text/css'
rel='stylesheet'>
The former
technique will work only if my relative path is correct, the latter makes it
possible for me to move the controls to any directory beneath the application
root, and have it properly find things relative to that root.
As I was going
through this process, however, I discovered an interesting twist. That is that
the Master Page is actually loaded into the context of the requested page
location, thus any reference to relative paths are actually relative to the
location of the page. Furthermore, the user controls referenced by this master,
though also located in the /templates subdirectory, because referenced by the
Master Page also follow this rule. Of course the use of Request.ApplicationPath
throughout would work regardless (at runtime) since it would dynamically return
the correct relative path for the resource. In fact, the only way I can share a
header control between masters and pages that are located in different
directories, is to use the latter solution.
Yes, You Can Nest Them
In my final
example, MyNewsletterV3, I show you how to use nested Master Pages to achieve a
finer level of granular control over site templates. A corporate portal might
have a common header and footer for the entire site, but have slightly
different templates for inner content for individual departments. Each
department may also host a large number of pages. Because masters can be
nested, we are able to introduce layers of consistency and reusability while
maintaining a level of control over what can be overridden by child masters and
pages. To demonstrate this, I made a copy of MyNewsletterV2, and added two new
masters to the /templates directory: departmentA.master and departmentB.master.
The <%@ master %> declaration also has a master attribute
allowing me to specify a parent master, so I can edit the HTML source of each
new master setting the master attribute to site.master. The HTML by default
will look something like this when I'm done:
<%@ master
master='~/templates/site.master' language='C#'
compilewith='departmentA.master.cs'
classname='ASP.departmentA_master'
%>
<html>
<head
runat='server'>
<title>Untitled Page</title>
</head>
<body>
<form runat='server'>
<asp:contentplaceholder
id='ContentPlaceHolder1'
runat='server'>
</asp:contentplaceholder>
</form>
</body>
</html>
I'm actually
presented with Intellisense to provide the master name.
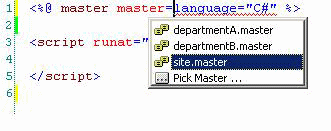
Figure 16.
Masters can reference other masters by setting the master attribute of the <%@ master %> declaration.
The fact that
these masters reference another parent master means that I can only place HTML
content within a Content control, so I'll have to modify the above HTML to
remove all content and create a content control for each of the master's
content placeholders I'd like to override, as is done with content pages. In
this example, departmentA.master and departmentB.master will override the
header logo for all pages that use them by providing and populating a Content
control for the logoContent content placeholder. For example:
<asp:content
id='newLogoContent' contentplaceholderid='logoContent'
runat='server'>
<asp:image id='imgLogo'
width=% runat='server'
imageurl='../images/dndhdr3.jpg'>
</asp:image>
</asp:content>
The site.master
makes it possible to override individual contents of the HTML header section by
providing content placeholders for the title and keyword tags:
<head
runat='server' id='Head1'>
<asp:contentplaceholder
id='titleContent' runat='server'>
<title>.NET Dashboard Newsletter</title>
</asp:contentplaceholder>
<asp:contentplaceholder
id='keywordsContent' runat='server'>
<meta name='keywords'
content='.NET, ASP.NET, Web Services,
development, database, programming, Web
sites, Michele Leroux
Bustamante, IDesign, UCSD Extension,
training, Microsoft, .NET
Framework' >
</asp:contentplaceholder>
<meta name='description'
content='A newsletter focused on meeting
the needs of .NET developers, providing
cool tips for the advanced
programmer, and keeping you informed on
what's happening with
.NET!' >
<LINK href='<%
=Request.ApplicationPath %>/portal.css'
type='text/css'
rel='stylesheet'>
</head>
This means that
pages or masters that use site.master can selectively override each part of the
header, without providing public properties and adding rendering statements as
I discussed earlier. But, even if the new masters decide not to override these
settings in the parent master, if you want to allow pages using
departmentA.master or departmentB.master to override these settings we have to
provide a content placeholder in the new master that can be overridden. Since
content placeholders are not 'passed through' (at least, not in the
2.0 alpha) I achieve this by providing content placeholders within the content
controls for the site.master content. In both child masters, I provide new
values for title and keywords, and allow content pages to override title
further by supplying content placeholders around my new default content:
<asp:content
id='newTitleContent' contentplaceholderid='titleContent'
runat='server'>
<asp:contentplaceholder
id='titleContent' runat='server'>
<title>.NET Dashboard Newsletter -
Department B</title>
</asp:contentplaceholder>
</asp:content>
<asp:content
id='newKeywordsContent'
contentplaceholderid='keywordsContent'
runat='server'>
<meta name='keywords'
content='Department B, .NET, ASP.NET, Web
Services, development, database,
programming, Web sites, Michele
Leroux Bustamante, IDesign, UCSD Extension,
training, Microsoft,
.NET Framework' >
</asp:content>
For page content,
I must also pass through the ability for pages to override by supplying content
placeholders:
<asp:content
id='newPageContent' contentplaceholderid='pageContent'
runat='server'>
<asp:contentplaceholder
id='pageContent' runat='server'>
<h1>Page content goes
here!</h1>
</asp:contentplaceholder>
</asp:content>
Conclusion
From this
article, and from the three sample projects provided here demonstrating the use
of Master Pages, you should gain a pretty clear picture of this new and
exciting feature for ASP.NET Whidbey. Master Pages make it possible for you to
design a set of consistent looking interfaces for one or more pages in your Web
application, with the ability to layer this for departmental hierarchies. While
you can continue to leverage User Controls for fragment caching and segmented
reusability, the beauty of being able to aggregate them so that modifications
to the overall site layout no longer require editing individual pages
throughout the application is priceless.
About the Author
Michele Leroux
Bustamante is an Associate of IDesign Inc., a Microsoft Regional Director, a
member of the International .NET Speakers Association (INETA) and a published
author. At IDesign, Michele contributes her diverse background to .NET training
and high-end corporate consulting. She focuses on the C# language, .NET
Framework architecture, ASP.NET, and Web Services; and she also provides
guidance to technology executives. Contact her at mlb@idesign.net
or visit IDesign: .NET Design and Business Solutions
to find out more. Also, visit .NET Dashboard to subscribe to her
monthly .NET newsletter
