| CATEGORII DOCUMENTE |
| Asp | Autocad | C | Dot net | Excel | Fox pro | Html | Java |
| Linux | Mathcad | Photoshop | Php | Sql | Visual studio | Windows | Xml |
DOCUMENTE SIMILARE |
|||||||
|
|||||||
The objective of any user-interface is to make it easy for users to provide the input values that an application needs. Your goal is to provide the best possible combination of available functionality to make the interface user-friendly. Typing in input values for each and every parameter in an application is the last thing any user wants to do. Choice, menus, and checkbox related classes in the Java Development Kit (JDK) provide a comprehensive set of tools for building windowing applications which allow users to select inputs and actions easily as the program is running.
Devices, ranging from automated greeting card machines to automated bank tellers, offer users a sequence of selection options. When you call a company's customer service, you invariably listen to a series of messages offering selections like "If you are a Java programmer, press 1 now. If you are a C++ programmer, press 2 now. If you are a COBOL programmer please stay on the line and a representative will be with you in a few hours." Negotiating the selections can be maddening at times. Imagine someone whose car has broken down, calling a towing company, making a series of selections, and finally hearing "If you are in a deep pit press 1. If you are in a shallow pit press 2.". Obviously a thoughtfully designed selection interface that's responsive to its user's needs is important to a product's success.
Depending on the characteristics of an application, you can use menus, menu bars, menu items, choice buttons, checkboxes, and checkbox groups to develop such an interface. Java provides the classes Choice, MenuComponent, MenuBar, Menu, MenuItem, Checkbox, CheckboxGroup, and CheckboxMenuItem to implement these selection mechanisms in GUIs. Figure 6-1 shows an example window containing components that use these classes and their member functions.
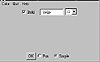
Figure 6-1 A typical window containing choice, menu, and
checkbox buttons
In this chapter, we'll focus on these selection classes and their methods. As usual, we will provide class method summaries followed by detailed descriptions of each class, interface, and method. In the project for this chapter, you'll create the selection interface shown in Figure 6-1 with a little additional twist. You will add functionality to the interface, to display a specified string (or a default string) with a combination of font, color, and size. Now let's take a quick look at each of the three types of classes you'll be using.
The Choice class represents a set of pop-up choices in a user-interface. It subclasses the Component class in the Abstract Window Toolkit in Java. The functionalities of adding options, selecting an item among the choices, and finding the selected choice in a choice button are provided as member functions of this class. A choice button is a component that offers a list of options with the selected item displayed as the title of the button. This is helpful when there is a relatively large number of options, and one of them must be selected to provide input to the application. In Figure 6-1, a choice button is used for selecting the font size. The current selection of 12 is displayed as the title of the choice button. Only the selected item is displayed as the title of the choice button. The other items are hidden and become visible only when the user clicks on the button. Figure 6-2 illustrates another use of Choice. Three selections for the size of a pizza-small, medium, and large-are provided as a choice button. When the user selects Large by clicking on the button and dragging down to the Large option, it is displayed as the title of the button.

Figure 6-2 Use of a choice button to specify the size of a
pizza
A menu enables you to make choices from a small, fixed set of options. The List class, which is used to deal with large numbers of choices, is described in Chapter 5. Small pop-up menus are encapsulated into the Menu class in Java. It pops up a list of menu items when the user clicks on the menu title. In Figure 6-1, Color, Quit, and Help are Menu objects contained in a MenuBar. These menus contain instances of the MenuItem class, which form the list of options in the pull-down menu. Menu and MenuItem are classes that subclass MenuComponent, so they can be contained in a menu container. Menu containers are encapsulated in the MenuContainer interface. The classes, Menu and MenuBar, implement this interface and, hence, they can contain other menu components. The MenuComponent class in Java represents the super-class of all menu related classes in Java. Items are added to a menu either using their label or as instances of the MenuItem class. A menu can also contain submenus of type Menu. Menu items can be individually enabled or disabled from user selection. A disabled menu item is grayed and cannot be selected. Figure 6-3 shows a menu titled Appetizer, which contains three elements: GarlicBread, BreadSticks, and CheeseSticks. The item CheeseSticks is disabled.
![]()
Figure 6-3 An Appetizer menu containing menu items
A menu item can also be a checkbox. Such an item should be an instance of the CheckboxMenuItem class. A CheckboxMenuItem can be selected, and will remain selected in the menu, until the user clicks on it again. A menu can contain many checkbox items, as shown in Figure 6-4. This menu titled Beverage contains the items Java, Tea, Juice, and Soda. A user can select none of the beverages or any number of them. A separator can be used to partition the items in a menu logically. In Figure 6-4, hot drinks are separated from cold drinks.
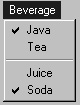
Figure 6-4 A Beverage menu contains checkboxes as menu items
Just as many menu items can be contained in a menu, many menus can be grouped together and attached to a frame. The MenuBar class is the container that encapsulates this behavior in Java. A menu bar appears at the top of the window and is attached to a Frame object. In Figure 6-5, the menus Beverage, Appetizer, and Info are grouped in a menu bar. As is customary, the Help menu, or as in this case, the Info menu, occupies the rightmost position.
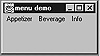
Figure 6-5 A menu bar containing three menus
When you want to provide an option where the variable can take only one of two possible values, you can use a Checkbox. The button labeled Bold in Figure 6-1 is a Checkbox object which, when selected, will display the text in bold style. Two more checkboxes, labeled Fun and Simple, are grouped into a CheckboxGroup so that only one of them can be enabled at any time. A checkbox can have one of the two states, on or off (yes or no). When the state is on (yes), then the checkbox is selected. When it is not selected, it is in off (no) state. You can use a checkbox when a variable or input has a binary value. The Checkbox class in Java represents the checkbox in a windowing context.
Unlike menu or choice items, a checkbox need not have a label; however, depending on the application, you might want to set the label of a checkbox. Figure 6-6 shows a row of checkboxes. The user can select none or many of the options provided as checkboxes, namely: Pepperoni, Sausage, Onions, and Peppers. In the figure, Onions and Peppers have been selected by the user.

Figure 6-6 Multiple checkboxes provided for selection
A set of checkboxes can be specified as a mutually exclusive group. The CheckboxGroup class can contain many checkboxes, but only one of them can be "on" at any time. Selection of one checkbox automatically switches the state of the others. Figure 6-7 shows a checkbox group that contains two checkboxes, Dine-In and Carry-Out, only one of which can be true at any instant. The Dine-In option is selected in the figure.
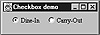
Figure 6-7 Two mutually exclusive checkboxes in a checkbox
group
Table 6-1 summarizes the classes and interfaces necessary for developing user interfaces in Java using choice buttons, menus, and checkboxes.
|
||||||||||||||||||||||||
Choice
Purpose
Represents a pop-up menu of choices in a user-interface.
Syntax
public class Choice extends Component
Description
Choice is used to implement a pop-up menu of options from which the user can select only one. The selected item will form the header of the choice. When a user clicks on the header, a menu of options appears. Users can select one of the options by dragging down with the mouse till the desired selection is highlighted. The newly selected option then becomes visible and other available options are hidden. Figure 6-8 illustrates the inheritance relationship of class Choice.
![]()
Figure 6-8 Class diagram of the Choice class
PackageName
java.awt
Imports
import java.awt.Choice;
Constructors
public Choice()
Parameters
None.
Example
The class implemented in the following example, Listing 6-1, uses the class Choice and all the functions of this class. Enter the following code in a file named choice.java and compile it. Run it using the Java interpreter. Figure 6-9 shows the resultant window.
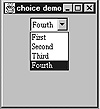
Figure 6-9 Java application demonstrating use of Choice
Listing 6-1 choice.java: Usage of Choice related methods
import java.awt.*;addItem(String)
ClassName
Choice
Purpose
To add an item to the target Choice object.
Syntax
public synchronized void addItem(String item)
Parameters
item
The String representing the item to be added to the Choice.
Description
This method adds an item, with the label passed as parameter, to the list of options in this Choice. The item is added to the end of the list. This method is synchronized, so when multiple Threads are trying to add items to the target Choice object, only one Thread can add an item at a given instant.
Imports
import java.awt.Choice;
Returns
None.
See Also
The Choice class
Example
Refer to Listing 6-1, defining the class choice in Choice class description.
addNotify()
ClassName
Choice
Purpose
This method creates a peer for the Choice. It helps to change the look of the Choice without changing its behavior.
Syntax
public synchronized void addNotify()
Parameters
None.
Description
This method helps change the look of the Choice without changing its behavior. It overrides the addNotify() method of class Component. It creates a peer for this Choice.
Imports
import java.awt.Choice;
Returns
None.
See Also
The java.awt.peer.Choice class; Component class
Example
Refer to the example code, Listing 6-1, defining the class choice in Choice class description.
countItems()
ClassName
Choice
Purpose
To determine the number of items in the Choice.
Syntax
public int countItems()
Parameters
None.
Description
The method counts the number of items in the Choice. The count is automatically increased when a new item is added. It is also the maximum index in this Choice.
Imports
import java.awt.Choice;
Returns
Return type is int. It is the number of items in the Choice at a given instance.
See Also
The getItem() method in class Choice
Example
Refer to Listing 6-1, defining the class choice in Choice class description. The variable count represents the number of items in the choice.
getItem(int)
ClassName
Choice
Purpose
To obtain the item with the specified index.
Syntax
public String getItem(int index)
Parameters
index
The index of the item in the Choice to be retrieved.
Description
This method returns the String that represents the item, at the specified index, in this Choice. The index starts at 0; hence the index of the first item is 0, second item is 1 and so on. If the specified index is greater than or equal to the number of items, an ArrayOutOfBounds exception is thrown at runtime.
Imports
import java.awt.Choice;
Returns
The item at the specified index in its String form.
See Also
The Choice class; method addItem() in class Choice
Example
Refer to Listing 6-1, defining the class choice in Choice class description. The item Third, located at index two, is obtained using this method.
getSelectedIndex()
ClassName
Choice
Purpose
To obtain the index of the selected item in the Choice.
Syntax
public int getSelectedIndex()
Parameters
None.
Description
When an item in the Choice is selected, it is displayed as the title of the menu. Other items are not visible until the user pulls down this Choice menu to view other items. Effectively, this method returns the index of the item that appears as the title of this Choice. The index starts from 0; so if the selected item is in tenth position in the menu, this method returns the value 9.
Imports
import java.awt.Choice;
Returns
The index which is of type int.
See Also
The Choice class; method getSelectedItem() in class Choice
Example
Refer to Listing 6-1, defining the class choice in Choice class description. By default getSelectedIndex selects the first item in the menu which is at index 0; so invoking this method in that example would return 0.
getSelectedItem()
ClassName
Choice
Purpose
To obtain the selected item in its String representation.
Syntax
public String getSelectedItem()
Parameters
None.
Description
This method returns the string representation of the item that is selected. Note that you can achieve the same result by first using the getSelectedIndex() method to obtain the index of the selected item, and then passing this index to the method getItem() and obtaining the String representation.
Imports
import java.awt.Choice;
Returns
The return type is String and it is the string representation of the selected item.
See Also
The Choice class; the getSelectedIndex()method
Example
Refer to Listing 6-1, defining the class choice in Choice class description. The first item in a choice is selected by default. Usage of this method in the example returns the item labeled First.
paramString()
ClassName
Choice
Purpose
To obtain the parameter String of this Choice.
Syntax
protected String paramString()
Parameters
None.
Description
This method returns the String representation of this Choice containing its label, the selected item, and the class information. This method is protected, and hence can be used only by the classes within the java.awt package.
Imports
import java.awt.Choice;
Returns
The parameter string of type String.
See Also
The Choice and Component classes
Example
The following code uses paramString by subclassing the Choice.
package java.awt;select(int)
ClassName
Choice
Purpose
To select the item whose position is specified.
Syntax
public synchronized void select(int index)
Parameters
index
The index of the selected item in the Choice.
Description
This method selects the item specified by the position as the parameter. The internal representation of the Choice will recognize the item to be selected. This is a synchronized method, as the position in the Choice table is shared data and use of this data by different methods should be consistent. If the specified position is out of bounds, this method throws an IllegalArgumentException. This need not be caught using the try and catch construct in Java, as it forms a runtime exception and hence, is not declared to be thrown.
Imports
import java.awt.Choice;
Returns
None.
See Also
The Choice class; methods getSelectedItem(), and getSelectedIndex()
Example
Refer to Listing 6-1, defining the class choice in Choice class description. The item whose index is 3 is selected in the example.
select(String)
ClassName
Choice
Purpose
To add an item to the target Choice object.
Syntax
public void select(String item)
Parameters
item
The String representing the item to be selected.
Description
This method selects the item whose String representation matches the parameter passed. Note that this method need not be synchronized, as you are not accessing any shared data (such as the position in the Choice).
Imports
import java.awt.Choice;
Returns
None.
See Also
The Choice class; methods getSelectedItem() and getSelectedIndex() in class Choice
Example
Refer to Listing 6-1, defining the class choice in Choice class description. The item labeled Fourth is selected in the example.
MenuComponent
Purpose
Represents the super class of all menu-related components.
Syntax
public class MenuComponent extends Object
Description
The common characteristics of all menu related components are encapsulated into this class. The common functionalities, namely setting and getting the font, obtaining a handle to the parent container, posting an event to the component, getting the String representation of the menu components, and handling the peers, are grouped into this super class. You can use a reference to this class when you need to remove a menu component from a menu or menu bar, and when you do not know in advance what component you are removing. The classes Menu, MenuBar, and MenuItem are ultimately subclasses of this class. Figure 6-10 illustrates the inheritance relationship of class MenuComponent.
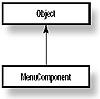
Figure 6-10 Class diagram of MenuComponent class
PackageName
java.awt
Imports
import java.awt.MenuComponent;
Constructors
public MenuComponent()
Parameters
None.
Example
The following example in Listing 6-2 includes instances of MenuComponent, Menu, MenuBar, and MenuItem. All the methods under these classes are also used in this example. You can enter this source in a file named myMenu.java and compile it. Figure 6-11 shows the resultant output on execution (except for the output you see on the terminal giving some information). All the methods in the above mentioned classes refer to this example for their usage. This example shows how these methods can be used effectively. The Quit menu is tearable. On clicking the Exit item, an event is posted to destroy the window. Appropriate action is taken by the event handler. The Rename item under the File menu should be disabled from user selection when this code is executed.
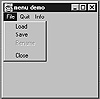
Figure 6-11 Resultant window demonstrating the usage of
menu-related classes and methods
Listing 6-2 myMenu.java: Usage of all menu-related methods
import java.awt.*;getFont()
ClassName
MenuComponent
Purpose
To determine the font used for the target MenuItem object.
Syntax
public Font getFont()
Parameters
None.
Description
The current font, to which the menu item is set, is returned by this method when it is invoked on the menu item. This font corresponds to the style and size of the String label that represents the menu item. Use setFont method to set or change the font. It returns null, if it has not been set to any Font earlier.
Imports
import java.awt.MenuComponent;
Returns
The font of the menu item; the return type is Font.
See Also
The MenuComponent class; the setFont() method of the MenuComponent class
Example
Refer to Listing 6-2 defining the class myMenu in MenuComponent class description. In the example, after setting the font for the Info menu to bold of size 16, this method is used to check it.
getParent()
ClassName
MenuComponent
Purpose
To disclose the parent container object of the target MenuComponent object.
Syntax
public MenuContainer getParent()
Parameters
None.
Description
A menu item or component is contained in a menu container. Any class that implements the interface MenuContainer forms an instance of MenuContainer and hence can be treated as an object. Thus instances of Menu and MenuBar can be considered as objects of type MenuContainer. The parent of a component is the object (Menu or MenuBar, for example) to which this component is added. This is helpful when you handle an event and the target you obtain is MenuItem; you can determine which Menu it belongs to by using this method.
Imports
import java.awt.MenuComponent;
Returns
The parent in which this component is contained.
See Also
The MenuContainer interface
Example
Refer to Listing 6-2, defining the class myMenu in MenuComponent class description. The parent of the Load menu item is obtained using this method and this method returns the File menu.
getPeer()
ClassName
MenuComponent
Purpose
To obtain the peer of this menu component.
Syntax
public MenuComponentPeer getPeer()
Parameters
None.
Description
A peer is created for a component on creation or when addNotify() is called. This method gets the MenuComponentPeer that is created for this component. The peer allows you to modify the appearance of the menu component without changing its functionality. Use this method only if you are writing your own AWT implementation.
Imports
import java.awt.MenuComponent;
Returns
The return type of this method is MenuComponentPeer.
See Also
The MenuComponentPeer class; the addNotify methods of subclasses of MenuComponent
Example
Refer to Chapter 9 on AWT Peer Interfaces.
paramString()
ClassName
MenuComponent
Purpose
The String parameter of this MenuComponent is returned.
Syntax
protected String paramString()
Parameters
None.
Description
This method is used to obtain the String parameter of the MenuComponent, the parameters of a Component object. This is a protected method and, hence, this method can only be called within the java.awt package.
Imports
package java.awt;
import java.awt.MenuComponent;
Returns
The String parameter of this MenuComponent.
Example
The following code uses paramString by subclassing the MenuComponent.
package java.awt;postEvent(Event)
ClassName
MenuComponent
Purpose
To post the specified event to the menu.
Syntax
public boolean postEvent(Event evt)
Parameters
evt
The event which you want to take place on this MenuComponent.
Description
The specified event is posted to the menu when this method is called. The Event encapsulates the target object and the type of event that is thrown. For example, when a user selects Menu item (which is a MenuComponent), you can throw an event using this method. If appropriate action is specified in the handleEvent() method, then the purpose of throwing the event is satisfied.
Imports
import java.awt.MenuComponent;
Returns
The return type of this method is boolean; it returns true if the specified event is successfully posted and false if it is not successfully posted.
See Also
The Event class
Example
Refer to Listing 6-2, defining the class myMenu in MenuComponent class description. When the user selects the Exit menu item under the Quit menu, a window destroy event is posted. This is handled by the handleEvent method.
removeNotify()
ClassName
MenuComponent
Purpose
To remove the peer of this menu component.
Syntax
public void removeNotify()
Parameters
None.
Description
A menu component peer is used to change the appearance of your menu component without changing its functionality. This method removes the component's peer.
Imports
import java.awt.MenuComponent;
Returns
None.
See Also
The MenuComponentPeer class; the addNotify methods of subclasses of MenuComponent
setFont(Font)
ClassName
MenuComponent
Purpose
Sets the font of the target component object to the specified font.
Syntax
public void setFont(Font fnt)
Parameters
fnt
The font to which you want your component to be set.
Description
The current font of the menu item is set to the specified Font fnt. This font corresponds to the style and size of the String label that represents the menu item. Use getFont method to get the font of the component.
Imports
import java.awt.MenuComponent;
Returns
None.
See Also
The getFont()method of the MenuComponent class
Example
Refer to Listing 6-2, defining the class myMenu in MenuComponent class description. In the example, font for the Info menu is set using this method.
toString()
ClassName
MenuComponent
Purpose
The String representation of the values of this MenuComponent s returned.
Syntax
public String toString()
Parameters
None.
Description
The details related to this MenuComponent are returned in a string form. It is useful for debugging purposes.
Imports
import java.awt.MenuComponent;
Returns
The information on this component in string form.
Example
Refer to Listing 6-2, defining the class myMenu in MenuComponent class description. In the example, this method is used to get the String form of the parent menu of load.
MenuBar
Purpose
Encapsulates the concept of a menu bar bound to a Frame.
Syntax
public class MenuBar extends MenuComponent implements MenuContainer
Description
The MenuBar class encapsulates the platform's concept of a menu bar bound to a Frame. It is the list of visible menu components which usually appears at the top of the frame in any user interface. A pull-down menu will appear when one of the menu items in the list is clicked by the user. A MenuBar is associated with the Frame using the setMenuBar() method in the class Frame. Because MenuBar can only be attached to a Frame, you can subclass Frame and set the menu bar in this class. Another way is to invoke the setMenuBar on an appropriate Frame object. The MenuBar class contains the methods to add a menu to the menu bar, to remove a menu, to get a specified menu and to get a help menu. This class is a MenuComponent by itself, as it extends the MenuComponent class. Hence, though the methods to set Font and to get Parent are not listed under this class, these are inherited from the super class MenuComponent. Also, this class implements the MenuContainer interface and thus, acts as a container which can contain other menu components. Figure 6-12 illustrates the inheritance relationship of class MenuBar.
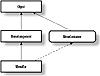
Figure 6-12 Class diagram of the MenuBar class
PackageName
java.awt
Imports
import java.awt.MenuBar;
Constructors
public MenuBar()
Parameters
None.
Example
Refer to Listing 6-2, defining the class myMenu in MenuComponent class description. Members of the class menu are of type MenuBar (variable mbar). This variable is instantiated inside the constructor of menu.
add(Menu)
ClassName
MenuBar
Purpose
Add the specified Menu to this MenuBar.
Syntax
public synchronized Menu add(Menu m)
Parameters
m
The menu that has to be added to the MenuBar.
Description
After MenuBar has been constructed, it is populated with menus and related components using this method. For every addition of a menu, the index of the MenuBar is incremented. The menus are added from left to right when the MenuBar appears at the top of the user-interface. This method is synchronized, so only one Thread of control can add a menu at a given instant.
Imports
import java.awt.MenuBar;
Returns
The return type of this method is Menu. It returns a handle to the Menu, added to this MenuBar for referencing at a later time.
See Also
The Menu class
Example
Refer to Listing 6-2, defining the class myMenu in MenuComponent class description. In this example, using this add method, the menus file_m, quit, info, and tmp are added to the MenuBar object, mbar.
addNotify()
ClassName
MenuBar
Purpose
This method creates a peer of this MenuBar.
Syntax
public synchronized void addNotify()
Parameters
None.
Description
An instance of the MenuBarPeer is created as a peer for this MenuBar item. Using the peer you can change the appearance of the MenuBar without modifying its functionality.
Imports
import java.awt.MenuBar;
Returns
None.
See Also
The MenuBarPeer class
Example
Refer to Chapter 9 describing the peers and interface for more details.
countMenus()
ClassName
MenuBar
Purpose
This method returns the number of menus in this MenuBar.
Syntax
public int countMenus()
Parameters
None.
Description
Whenever you use add method to add a menu to the MenuBar, the count is incremented. This method helps you to obtain the number of Menus in this MenuBar which is also the number of labels in the MenuBar.
Imports
import java.awt.MenuBar;
Returns
The number of menus in the MenuBar; the return type is int.
See Also
The Menu class
Example
Refer to Listing 6-2, defining the class menu in MenuComponent class description. In this example, this method is invoked on the member mbar.
getHelpMenu()
ClassName
MenuBar
Purpose
This method returns the menu which is set as the HelpMenu in the MenuBar.
Syntax
public Menu getHelpMenu()
Parameters
None.
Description
The help menu in this MenuBar is accessed using this method. It returns the menu set by the setHelpMenu method. If you know the index of the Help menu you can also accomplish this using the getMenu method.
Imports
import java.awt.MenuBar;
Returns
An object of type Menu, which is the help menu in this MenuBar.
See Also
The setHelpMenu and getMenu methods of the MenuBar class
Example
Refer to Listing 6-2, defining the class myMenu in MenuComponent class description. In the example, the menu object info is set as Help menu. This method returns a handle to the info menu when invoked on the menu bar.
getMenu(int)
ClassName
MenuBar
Purpose
This method returns the Menu at the specified index.
Syntax
public Menu getMenu(int index)
Parameters
index
The index of the menu to be returned.
Description
The Menus in the MenuBar can be referenced using their respective index. This method gets the Menu when you specify its index as the parameter. Index starts at 0. To obtain the third Menu in the menu bar, you should index it as 2.
Imports
import java.awt.MenuBar;
Returns
The Menu at the specified index.
Example
Refer to Listing 6-2, defining the class myMenu in MenuComponent class description. In the example, the Menu at index 1 is obtained by using this method. The name of the menu is printed by obtaining the string form of the Menu.
remove(int)
ClassName
MenuBar
Purpose
This method removes the Menu at the specified index in this MenuBar.
Syntax
public synchronized void remove(int index)
Parameters
index
The index of the Menu to be removed from the MenuBar.
Description
This method removes a Menu from the MenuBar at the specified index. Index starts from 0. For example, to remove the third menu from the menu bar, specify the index as 2. If the specified index is greater than or equal to the number of menus in the menu bar, an ArrayOutOfBoundsException is thrown at runtime. After removing the Menu, changes are made to the MenuBar structure to reflect the removal. This includes the decrement in the count and updating other indices. To ensure this is performed in a consistent manner by the runtime, this method is declared a synchronized method.
Imports
import java.awt.MenuBar;
Returns
None.
See Also
The add(Menu) method of the MenuBar class
Example
Refer to Listing 6-2, defining the class myMenu in MenuComponent class description. The menu tmp is removed from the MenuBar, mbar, by specifying its index as 3. Un-comment the line mbar.remove(3) in the example code and observe the change.
remove(MenuComponent)
ClassName
MenuBar
Purpose
This method removes the Menu specified by the MenuComponent parameter.
Syntax
public synchronized void remove(MenuComponent mc)
Parameters
mc
The reference to the MenuComponent object to be removed.
Description
This method removes a Menu specified by the reference in the parameter from the MenuBar. After the menu is removed, changes are made to the MenuBar structure to reflect the removal. This includes decrementing the count and updating other indices. To ensure these tasks are performed in a consistent manner by the runtime, this method is declared a synchronized method.
Imports
import java.awt.MenuBar;
Returns
None.
See Also
The method add(Menu) in class MenuBar
Example
Refer to Listing 6-2, defining the class menu in MenuComponent class description. In the example, the object tmp is removed from the menu bar using this method.
removeNotify()
ClassName
MenuBar
Purpose
This method removes the peer of this MenuBar.
Syntax
public void removeNotify()
Parameters
None.
Description
Removes an instance of the MenuBarPeer, which was a peer for this MenuBar item. Using the peer you can change the appearance of the MenuBar without modifying its functionality.
Imports
import java.awt.MenuBar;
Returns
None.
See Also
The MenuBarPeer class; the addNotify()method of the MenuBar class
Example
Refer to the details in Chapter 9 describing the peers and interfaces.
setHelpMenu(Menu)
ClassName
MenuBar
Purpose
This method sets the Help menu in the MenuBar.
Syntax
public synchronized void setHelpMenu(Menu mnu)
Parameters
mnu
The menu, of type Menu, which is to be added to this MenuBar.
Description
The specified menu is set as the help menu in this MenuBar, using this method. It places the menu at the top-right corner in a frame, i.e., at the right end of a Menubar. This is the place where the Help menu is made available in all interfaces. This method is synchronized; hence, only one Thread can be running this method at a given instant.
Imports
import java.awt.MenuBar;
Returns
None.
See Also
The getHelpMenu and getMenu methods of the MenuBar class
Example
Refer to Listing 6-2, defining the class myMenu in MenuComponent class description. The menu object info is set to be the help menu in the example. A call to this method sets info to be the help menu and places the info menu (labeled "Info"), at the rightmost end of the menu bar.
Menu
Purpose
A Menu serves as a component of a menu bar.
Syntax
public class Menu extends MenuItem implements MenuContainer
Description
A menu bar contains many menus. An instance of class Menu is created with an associated label. It can be identified by its label or by using the index of its location in a menu bar. You can specify any menu as a tear-off menu. This means that the menu will remain visible on the screen even after you release the mouse button. A frequently used menu can be declared tear-off so that the users need not pull the menu down from its title every time and then select. A menu which is not a tear-off menu disappears from the screen when the mouse button is released. This class includes methods to add menu items, to add separators, to count items, to get items, and to remove items. It is a subclass of MenuItem and, hence, an instance of this class can be a part of some menu container. This class also implements the MenuContainer interface; it can contain other menu components. Figure 6-13 illustrates the inheritance relationship of class Menu.
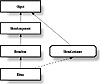
Figure 6-13 Class diagram of the Menu class
PackageName
java.awt
Imports
import java.awt.Menu;
Constructors
public Menu(String label)
public Menu(String label, boolean tearOff)
Parameters
label
The string associated with this menu.
tear-off
The boolean value specifying whether or not you want your Menu to be a tear-off menu.
Example
Refer to Listing 6-2, defining the class myMenu in MenuComponent class description. Four menus are created in the example, namely, file_m, quit, tmp, and info.
add(MenuItem)
ClassName
Menu
Purpose
This method adds the specified menu item to the target menu object.
Syntax
public synchronized MenuItem add(MenuItem item)
Parameters
item
The item of type MenuItem to be added to this menu.
Description
A menu consists of many menu items. Those items can be added to the menu using this method. A handle to this menu item can be obtained by using the getItem method. This method is synchronized; so only one Thread can be running this method at a given instant to add an item to the Menu.
Imports
import java.awt.Menu;
Returns
A reference to the added MenuItem
See Also
The add(String), remove(int), and remove(MenuComponent) methods of the Menu class
Example
Refer to Listing 6-2, defining the class myMenu in MenuComponent class description. A menu item labeled "Load" is created as a MenuItem and then placed in the menu file_m.
add(String)
ClassName
Menu
Purpose
This method adds an item with the specified String label to this Menu.
Syntax
public synchronized void add(String label)
Parameters
label
The label of the item to be added to this Menu.
Description
A Menu consists of many menu items with a unique label identifying each of them. Those menu items can be added to a menu using this method. A handle to any item can be obtained using the getItem method. Because this method is synchronized, only one Thread can be running this method at a given instant to add an item with a specified label to the Menu.
Imports
import java.awt.Menu;
Returns
None.
See Also
The add(MenuItem), remove(int), and remove(MenuComponent) methods of the Menu class
Example
Refer to Listing 6-2, defining the class myMenu in MenuComponent class description. In the example, a menu item in the menu file is added using this method with the label "Save".
addNotify()
ClassName
Menu
Purpose
This method creates a peer for this Menu.
Syntax
public synchronized void addNotify()
Parameters
None.
Description
You can change the appearance of a menu using the peer created by this method. This method overrides the addNotify() method of the super class, MenuItem.
Imports
import java.awt.Menu;
Returns
None.
See Also
The MenuPeer interface; the removeNotify()method of the Menu class
Example
Refer to Chapter 9 describing the peers and interface for more details.
addSeparator()
ClassName
Menu
Purpose
This method adds a separator line or a hyphen at the specified position.
Syntax
public void addSeparator()
Parameters
None.
Description
A Menu consists of many menu items. To help the user scan the list of options in a menu easily you can add a separator between groups of logically related menu items. You can use this method to add a separator line or a hyphen at any position.
Imports
import java.awt.Menu;
Returns
None.
Example
Refer to Listing 6-2, defining the class myMenu in MenuComponent class description. A separator is added before the "Close" menu item in the menu file_m in that example. Also see Figure 6-4, where beverages are listed with a separator between hot and cold.
countItems()
ClassName
Menu
Purpose
To obtain the number of items in a menu.
Syntax
public int countItems()
Parameters
None.
Description
The method counts the number of items in the Menu. The count is automatically increased when a new item is added, and becomes the maximum index in this menu.
Imports
import java.awt.Menu;
Returns
The number of items in the Menu; return type is int.
See Also
The getItem()method in the Menu class
Example
Refer to Listing 6-2, defining the class myMenu in MenuComponent class description.
getItem(int)
ClassName
Menu
Purpose
This method returns the item with the specified index.
Syntax
public MenuItem getItem(int index)
Parameters
index
The index of the item in this Menu to be retrieved.
Description
The method returns the MenuItem object at the specified index in this Menu. Index value starts from 0; hence, the index of the third item is 2, the fourth item is 3 and so on.
Imports
import java.awt.Menu;
Returns
The item of type MenuItem at the specified index.
See Also
The Menu class; the addItem()method of the Menu class
Example
Refer to Listing 6-2, defining the class myMenu in MenuComponent class description.
isTearOff()
ClassName
Menu
Purpose
Determine whether the target Menu object is a tear-off menu or not.
Syntax
public boolean isTearOff()
Parameters
None.
Description
The method determines whether this menu is a tear-off menu. A tear-off Menu is one which stays visible on the screen even after the user releases the mouse button.
Imports
import java.awt.Menu;
Returns
Return type is boolean. True means this menu is a tear-off menu; false means it is not.
See Also
The Menu(String label, boolean tear-off) constructor
Example
Refer to Listing 6-2, defining the class myMenu in MenuComponent class description. The quit menu is created as a tear-off menu in the example. Using this method, it is verified that the quit menu is indeed a tear-off menu.
remove(int)
ClassName
Menu
Purpose
This method removes the item at the specified index position in this Menu.
Syntax
public synchronized void remove(int index)
Parameters
index
The index of the item to be removed from the Menu.
Description
This method removes the item from the Menu at the specified index. The index starts from 0. The first item has an index 0, the second item has an index 1 and so on. If the specified index is greater than or equal to the number of items in this Menu, an ArrayOutOfBoundsException is thrown at runtime. After the item is removed, the Menu structure is changed to reflect the removal. This includes decrementing the count and updating other indices. To perform this in a consistent manner by runtime, this method is declared a synchronized method.
Imports
import java.awt.Menu;
Returns
None.
See Also
The add(MenuItem) and add(String) methods of the Menu class
Example
Refer to Listing 6-2, defining the class myMenu in MenuComponent class description. After the menu quit is created, in the example, two items are added to it: Exit and Hide. The item Hide is removed using this method with the index being 1.
remove(MenuComponent)
ClassName
Menu
Purpose
This method removes the item specified by the MenuComponent parameter.
Syntax
public synchronized void remove(MenuComponent mc)
Parameters
mc
The reference to the MenuComponent object to be removed.
Description
This method removes from the menu an item specified by the reference in the parameter. After the item is removed, changes are made to the Menu structure to reflect the removal. This includes decrementing the count and updating other indices. To perform this in a consistent manner by runtime, this method is declared a synchronized method.
Imports
import java.awt.Menu;
Returns
None.
See Also
The add(MenuItem) and add(String) methods of the Menu class
Example
Refer to Listing 6-2, defining the class myMenu in MenuComponent class description. A menu tmp is created temporarily and is deleted from the menu bar using this method.
removeNotify()
ClassName
Menu
Purpose
This method removes the peer of target Menu object.
Syntax
public void removeNotify()
Parameters
None.
Description
Removes an instance of the MenuPeer which was a peer for this MenuBar item. Using the peer, you can change the appearance of the Menu without modifying its functionality.
Imports
import java.awt.Menu;
Returns
None.
See Also
The MenuPeer class; the addNotify()method of the Menu class
Example
Refer to Chapter 9 describing the peers and interface for more details.
MenuItem
Purpose
Represents a choice as a string item in a menu
Syntax
public class MenuItem extends MenuComponent
Description
A menu contains a list of choices for the user. These choices are represented in their string form and are presented as objects of type MenuItem. MenuItem is a menu component by its inheritance relationship with MenuComponent class. Figure 6-14 illustrates the inheritance relationship of class MenuItem.
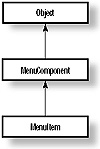
Figure 6-14 Class diagram of the MenuItem class
PackageName
java.awt
Imports
import java.awt.MenuItem;
Constructors
public MenuItem()
Parameters
None.
Example
Refer to Listing 6-2, defining the class menu in MenuComponent class description.
addNotify()
ClassName
MenuItem
Purpose
This method creates a peer for this MenuItem.
Syntax
public synchronized void addNotify()
Parameters
None.
Description
The appearance of a menu item can be changed using the peer created by this method.
Imports
import java.awt.MenuItem;
Returns
None.
See Also
The MenuItemPeer interface; the removeNotify()method of the MenuItem class
Example
Refer to Chapter 9 describing the peers and interface for more details.
disable()
ClassName
MenuItem
Purpose
This method disables this MenuItem so that it cannot be selected from the menu.
Syntax
public void disable()
Parameters
None.
Description
A menu item is, by default, enabled on construction. Invoking this method on the menu item object will disable any action on this item. After this method is called, this menu item will be grayed and the user will not be able to select it. The enable() method must be invoked on this menu item to make it again selectable by the user.
Imports
import java.awt.MenuItem;
Returns
None.
See Also
The enable method of class MenuItem.
Example
Refer to Listing 6-2, defining the class myMenu in MenuComponent class description. The Rename item in the File menu is disabled using this method.
enable()
ClassName
MenuItem
Purpose
This method enables this MenuItem, making it selectable from the menu.
Syntax
public void enable()
Parameters
None.
Description
A menu item is, by default, enabled on construction. Invoking the disable() method on the menu item, disables any action on the item. You use this method to explicitly enable a previously disabled item. After this method is invoked, this MenuItem will be selectable by the user.
Imports
import java.awt.MenuItem;
Returns
None.
See Also
The enable(boolean) and disable()methods of the MenuItem class
Example
Refer to Listing 6-2, defining the class myMenu in MenuComponent class description. The Load menu item in the menu file_m in the example is explicitly enabled using this method.
enable(boolean)
ClassName
MenuItem
Purpose
This method enables this MenuItem if the specified boolean condition is true.
Syntax
public void enable(boolean condn)
Parameters
condn
The condition which, when evaluated, has a boolean value; depending on the value the MenuItem is enabled or disabled.
Description
A menu item is by default enabled on construction. Invoking the disable() method on the menu item disables any action on this item. You can use this method to explicitly enable a previously disabled item depending on a specified boolean condition. After this method is invoked, this MenuItem will be selectable by the user if the boolean condition evaluates to true; if the condition evaluates to false, the MenuItem will remain disabled.
Imports
import java.awt.MenuItem;
Returns
None.
See Also
The enable() and disable()methods of the MenuItem class
Example
Refer to Listing 6-2, defining the class myMenu in MenuComponent class description.
getLabel()
ClassName
MenuItem
Purpose
This method gets the label of this MenuItem.
Syntax
public String getLabel()
Parameters
None.
Description
Each menu item is associated with a string and can be uniquely identified by that string. This method gets the label, of type String, associated with this MenuItem. The label would have been set earlier either during construction or by the setLabel() method.
Imports
import java.awt.MenuItem;
Returns
The label identifying the MenuItem; return type is String.
See Also
The setLabel(String) method of the MenuItem class
Example
Refer to Listing 6-2, defining the class myMenu in MenuComponent class description. The label of the menu item ren is obtained using this method on the ren object.
isEnabled()
ClassName
MenuItem
Purpose
This method checks to see if this MenuItem is enabled.
Syntax
public boolean isEnabled()
Parameters
None.
Description
A menu item is, by default, enabled on construction. Invoking the disable() method on the menu item disables any action on this item. You can use this method to check whether or not this MenuItem is enabled. The MenuItem is enabled and selectable by the user if this method returns true; if it returns false, this MenuItem is disabled and is not selectable by the user.
Imports
import java.awt.MenuItem;
Returns
A value of type boolean indicating whether this MenuItem is enabled or not.
See Also
The enable(boolean), enable(), and disable()methods of the MenuItem class
Example
Refer to Listing 6-2, defining the class myMenu in MenuComponent class description. This method is used to verify that the ren menu item is indeed disabled after the call to disable().
paramString()
ClassName
MenuItem
Purpose
This method obtains the string parameter of this MenuItem.
Syntax
public String paramString()
Parameters
None.
Description
This method is used to obtain the String parameter of this MenuItem which contains the label of the menu item, apart from the other details of itself being a MenuComponent. This method overrides the paramString() method of the super-class MenuComponent. Also, note that this method is public, whereas the method paramString() of class MenuComponent is protected.
Imports
package java.awt;
import java.awt.MenuItem;
Returns
The String parameter of this MenuItem.
Example
The following code uses paramString by subclassing the MenuItem.
package java.awt;setLabel(String)
ClassName
MenuItem
Purpose
This method gets the label of this MenuItem.
Syntax
public void setLabel(String label)
Parameters
label
The label to which this menu item has to be set.
Description
Each menu item is associated with a String label and can be identified by this String. This method sets the label, of type String, associated with this MenuItem. The label can be retrieved on any MenuItem using the getLabel() method.
Imports
import java.awt.MenuItem;
Returns
None.
See Also
The getLabel()method of the MenuItem class
Example
Refer to Listing 6-2, defining the class myMenu in MenuComponent class description. The label of a menu item is changed from "Hi" to "Rename" using this method.
MenuContainer
Purpose
Forms the super-class of all menu related container classes.
Syntax
public interface MenuContainer extends MenuComponent
Description
This is an interface in Java. A class that implements this interface effectively inherits this interface and hence this interface is said to form the super class of all menu related container classes. The classes Menu and MenuBar implement this interface and are container classes. This interface has three methods: getFont(), postEvent(Event), and remove(MenuComponent). Figure 6-15 illustrates the inheritance relationship of interface MenuContainer.
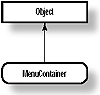
Figure 6-15 Inheritance diagram of MenuContainer interface
PackageName
java.awt
Imports
import java.awt.MenuContainer;
Example
Refer to the usage of the methods of this interface in the class menu, given in the example description for class MenuComponent in Listing 6-2. MenuBar and Menu implement this interface and so these methods are invoked on instances of these classes.
getFont()
Interface
MenuContainer
Purpose
This is an abstract method and has to be implemented by the class implementing this interface.
Syntax
public abstract Font getFont()
Parameters
None.
Description
This method has to be defined in the class that implements the MenuContainer interface. If it is set earlier using the setFont method, it returns the Font.
Imports
import java.awt.MenuContainer;
Returns
The font of the menu item; the return type is Font.
See Also
The Menu and MenuBar classes
Example
Refer to Listing 6-2, defining the class myMenu in MenuComponent class description. After setting the font of the info menu, this method is used to print the details of the font to which it is set.
postEvent(Event)
Interface
MenuContainer
Purpose
This is an abstract method and has to be implemented by the class implementing this interface.
Syntax
public abstract boolean postEvent(Event evt)
Parameters
evt
The event to be posted to a container object is passed as a parameter.
Description
This method has to be defined in the class that implements the MenuContainer interface. You can specify an event to be thrown on this MenuItem. The handleEvent() method should have appropriate action specified to handle this event to make usage of this method effective.
Imports
import java.awt.MenuContainer;
Returns
This method returns true if successful and false if not; return type is boolean.
See Also
The Menu and MenuBar classes
Example
Refer to Listing 6-2, defining the class myMenu in MenuComponent class description. WINDOW_DESTROY event is posted using this method, which is implemented in class Menu.
remove(MenuComponent)
Interface
MenuContainer
Purpose
This is an abstract method and has to be implemented by the class implementing this interface.
Syntax
public abstract void remove(MenuComponent mc)
Parameters
mc
The MenuComponent object that has to be removed from the container.
Description
This method has to be defined in the class that implements the MenuContainer interface.
Imports
import java.awt.MenuContainer;
Returns
None.
See Also
The Menu and MenuBar classes
Example
Refer to Listing 6-2, defining the class myMenu in MenuComponent class description. A menu tmp is created temporarily and is deleted from the menu bar using this method.
Checkbox
Purpose
Encapsulates a user-interface element with a boolean state.
Syntax
public class Checkbox extends Component
Description
The Checkbox class encapsulates a user-interface element with boolean state. It is the radio button representation in Java. A Checkbox is either selected or not selected at any instant. When the user clicks on the Checkbox, its state toggles: if it was "on" it is reset to "off" and vice versa. A Checkbox item can belong to a CheckboxGroup, that is a group of Checkboxes. In this scenario, only one of the checkboxes can be "on" at any time. In case of X-Windows, it is selected in depressed mode and if it is in raised mode, it is unselected. In Windows95, a check mark is placed next to the item if it is selected. You can specify to which group a checkbox will belong, either during construction or by using a method of this class. By default, a checkbox is initialized to a false state. Figure 6-16 illustrates the inheritance relationship of class Checkbox.
![]()
Figure 6-16 Class diagram of the Checkbox class
PackageName
java.awt
Imports
import java.awt.Checkbox;
Constructors
public Checkbox()-constructor to create a Checkbox with no label, no CheckboxGroup, and initialized to false.
public Checkbox(String label)-constructor to create a Checkbox with a specified label, no CheckboxGroup and initialized to false.
public Checkbox(String label, CheckboxGroup group, boolean state) -constructor to create a Checkbox with a specified label, a specified CheckboxGroup and initialized to a specified state.
Parameters
label
The label, of type String, to be associated with the Checkbox.
group
The CheckboxGroup of which the Checkbox is made to be a member.
state
The specified state to which the Checkbox has to be initialized.
Example
The following code Listing 6-3 implements a class named check. Enter the code in a file named check.java and compile it. Executing the Java interpreter by typing java check will pop up the resultant window shown in Figure 6-17. This application prints either the string "hi" or the string "hello" at the center of the canvas. Two checkboxes, hi and hello, are provided. They form a group, so only one of them can be selected and, hence, printed on the canvas at a time. A single Checkbox is provided for the user to make the string print in red. If it is not selected, the string will be typed in blue. An OK button allows the user to approve the changes he makes.
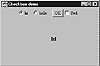
Figure 6-17 Resultant window after compiling and executing
check.java
Listing 6-3 check.java: Usage of checkboxes
import java.awt.*;addNotify()
ClassName
Checkbox
Purpose
This method creates a peer for the Checkbox. It lets you change the look of the Checkbox without changing its behavior.
Syntax
public synchronized void addNotify()
Parameters
None.
Description
This method helps you change the look of the Checkbox without changing its behavior. It overrides the addNotify() method of class Component, and creates a peer for this Choice.
Imports
import java.awt.Checkbox;
Returns
None.
See Also
The java.awt.peer; CheckboxPeer interface; the Component class
getCheckboxGroup()
ClassName
Checkbox
Purpose
This method returns the CheckboxGroup of which this Checkbox is a member.
Syntax
public CheckboxGroup getCheckboxGroup()
Parameters
None.
Description
A Checkbox can belong to a CheckboxGroup. This method returns the CheckboxGroup to which this Checkbox belongs, if it's a part of a CheckboxGroup.
Imports
import java.awt.Checkbox;
Returns
None.
See Also
The CheckboxGroup class; the setCheckboxGroupmethod of the Checkbox class
Example
Refer to the example in Listing 6-3. The CheckboxGroup of the hello Checkbox is obtained in the example using this method.
getLabel()
ClassName
Checkbox
Purpose
This method obtains the label of this Checkbox button.
Syntax
public String getLabel()
Parameters
None.
Description
A Checkbox can be identified by its label. This method is especially helpful when you are trying to handle an event on a Checkbox and you want to find out which checkbox button the user has clicked on. This method returns the label of this Checkbox as a String.
Imports
import java.awt.Checkbox;
Returns
The label of this Checkbox; the return type is String
See Also
The setLabel method of the Checkbox class
Example
Refer to the example in Listing 6-3. This method is used to obtain the label and find out whether it is a "hi" or "hello" checkbox.
getState()
ClassName
Checkbox
Purpose
This method returns the boolean state of this Checkbox, indicating whether it is selected or not.
Syntax
public boolean getState()
Parameters
None.
Description
A Checkbox toggles between an "on" and "off" state on every mouse click on the Checkbox. This method returns the state of the Checkbox at the time of invocation.
Imports
import java.awt.Checkbox;
Returns
A boolean value indicating the state of the checkbox button.
See Also
The setState method of the CheckboxGroup class
Example
Refer to the example in Listing 6-3. This method is used to find whether "red" or "blue" is selected by finding the state of the checkbox.
paramString()
ClassName
Checkbox
Purpose
To obtain the parameter String of this Checkbox.
Syntax
protected String paramString()
Parameters
None.
Description
This method returns the parameter String of this Checkbox which is, effectively, the label associated with this Checkbox and the state of the checkbox button.
Imports
import java.awt.Checkbox;
Returns
Parameter string of type String, of this Checkbox.
See Also
The getLabelmethod of the Checkbox class
Example
The following code uses paramString by subclassing the Checkbox.
package java.awt;setCheckboxGroup(CheckboxGroup)
ClassName
Checkbox
Purpose
This method sets a Checkbox to belong to the specified CheckboxGroup.
Syntax
public void setCheckboxGroup(CheckboxGroup cb_grp)
Parameters
cb_grp
CheckboxGroup to which this Checkbox is added
Description
A Checkbox can belong to a CheckboxGroup. This method sets the group to which this Checkbox will belong. Only one Checkbox can be "on" at any time among all the Checkboxes belonging to a group. This formation is helpful when you are using a CheckboxGroup in your interface to select among a set of options.
Imports
import java.awt.Checkbox;
Returns
None.
See Also
The CheckboxGroup class; the getCheckboxGroupmethod of the Checkbox class
Example
Refer to the example in Listing 6-3. This method is used to set the group of the "hello" checkbox to the same group as the "hi" checkbox.
setLabel(String)
ClassName
Checkbox
Purpose
The label of this Checkbox button is set to the specified string value.
Syntax
public void setLabel(String label)
Parameters
label
The String type value that forms the label of this button.
Description
A Checkbox can be identified by its label. This method can be used when you have created a Checkbox, without specifying a label during construction, because the value might be available only at a later stage and not during construction.
Imports
import java.awt.Checkbox;
Returns
None.
See Also
The getLabel method of the Checkbox class
Example
Refer to the example in Checkbox class description, Listing 6-3.
setState(boolean)
ClassName
Checkbox
Purpose
Sets the boolean state of this Checkbox to the specified state.
Syntax
public void setState(boolean state)
Parameters
state
The state, of type boolean, that indicates whether to set this Checkbox to be enabled or disabled.
Description
A Checkbox toggles between an "on" and "off" state on every mouse click on the Checkbox. This method sets the state of the Checkbox to the specified boolean value. It can be useful when you are initializing your interface environment and setting some of checkbox values to true and others to false. Also you might want to set the state of a checkbox button to reflect the occurrence of an event. When the button is set to true, it will appear in depressed position, and when the value is false, it will appear in raised position.
Imports
import java.awt.Checkbox;
Returns
None.
See Also
The getState() method of the CheckboxGroup class
Example
Refer to the example in Checkbox class description, Listing 6-3.
CheckboxGroup
Purpose
Helps to create a group of mutually exclusive Checkbox items such that only one item can be "on" at a time.
Syntax
public class CheckboxGroup extends Object
Description
A set of Checkbox buttons can be grouped together to form a CheckboxGroup. These buttons are grouped such that only one of them can be "on" at a time. Clicking on any of the Checkbox buttons in a group, enables that Checkbox and all other Checkboxes belonging to that group are automatically disabled, which is also reflected in the appearance of the buttons. This way, you can form a set of options in an interface, where a user can select only one of the options. You can specify which group a Checkbox will belong to, either during its construction or by using a method of Checkbox class. By default, all Checkboxes are initialized to false. Figure 6-18 illustrates the inheritance relationship of class CheckboxGroup.
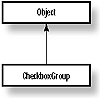
Figure 6-18 Class diagram of the CheckboxGroup class
PackageName
java.awt
Imports
import java.awt.CheckboxGroup;
Constructors
public CheckboxGroup()
Parameters
None.
Example
Refer to the example check.java.
getCurrent()
ClassName
CheckboxGroup
Purpose
This method obtains the currently selected Checkbox among the set of Checkboxes in this group.
Syntax
public Checkbox getCurrent()
Parameters
None.
Description
In a user-interface, you can find out which Checkbox button the user has selected by examining the state of all Checkboxes. When Checkboxes are grouped, they are mutually exclusive. Only one of the Checkboxes can be "on" at a given time. With this knowledge, it is enough if you know which is the current choice in the group. With this method, you can obtain the necessary information about the current choice in a CheckboxGroup without examining each Checkbox. This method finds the currently selected Checkbox and returns a reference to that object.
Imports
import java.awt.CheckboxGroup;
Returns
A reference of type Checkbox to the currently selected Checkbox item in the group.
See Also
The setCurrent method of the CheckboxGroup class
Example
Refer to the example Listing 6-3 in Checkbox class description. The current selection among the "hi" and "hello" checkboxes is found using this method.
setCurrent(Checkbox)
ClassName
CheckboxGroup
Purpose
This method sets the specified Checkbox as the current choice among all Checkbox items in this group.
Syntax
public void setCurrent(Checkbox curr_cb)
Parameters
curr_cb
A reference to the Checkbox item which is to be set as the current choice.
Description
A Checkbox gets selected in a group when the user clicks on the Checkbox button. If you have information that indirectly selects a Checkbox or if you want to explicitly specify the current choice Checkbox in a group, you can use this method. This method sets the specified Checkbox to "on," and other Checkboxes in the same group are automatically disabled.
Imports
import java.awt.CheckboxGroup;
Returns
None.
See Also
The getCurrent method of the CheckboxGroup class
Example
Refer to the example in Checkbox class description, Listing 6-3. The "hi" checkbox is set to be the default selected box, using this method.
toString()
ClassName
CheckboxGroup
Purpose
This method obtains the string representation of the values in this CheckboxGroup.
Syntax
public String toString()
Parameters
None.
Description
A CheckboxGroup contains two or more Checkboxes. Each Checkbox has a unique label associated with it. This method returns the string form of all the values of the Checkboxes that are part of this CheckboxGroup.
Imports
import java.awt.CheckboxGroup;
Returns
Values, of type String, representing the values of this CheckboxGroup.
Example
Refer to the example in Checkbox class description, Listing 6-3.
CheckboxMenuItem
Purpose
Produces a Checkbox to represent a choice in a menu.
Syntax
public class CheckboxMenuItem extends MenuItem
Description
A Menu consists of a set of menu items. This class allows you to specify a checkbox as a menu item. Bacause it subclasses the MenuItem class, an instance of this class can be a part of a Menu. Since it forms part of the menu, you must specify a label for the item. Figure 6-19 illustrates the inheritance relationship of class CheckboxMenuItem.
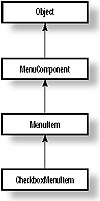
Figure 6-19 Class diagram of the CheckboxMenuItem class
PackageName
java.awt
Imports
import java.awt.CheckboxMenuItem;
Constructors
public CheckboxMenuItem(String label)
Parameters
label
The String value of this menu item which identifies it among other items in a menu.
Example
Refer to the Selections Interface application built at the end of this chapter.
addNotify()
ClassName
CheckboxMenuItem
Purpose
This method creates a peer for this CheckboxMenuItem. It helps you change the look of the Checkbox without changing its behavior.
Syntax
public synchronized void addNotify()
Parameters
None.
Description
This method helps you change the look of the Checkbox menu item without changing its behavior. It creates a peer for this CheckboxMenuItem, and overrides the addNotify() method of class MenuItem.
Imports
import java.awt.CheckboxMenuItem;
Returns
None.
See Also
The java.awt.peer; the CheckboxMenuItemPeer interface
Example
Refer to Chapter 9 on peers and interfaces.
getState()
ClassName
CheckboxMenuItem
Purpose
This method returns the boolean state of this CheckboxMenuItem indicating whether it is selected or not.
Syntax
public boolean getState()
Parameters
None.
Description
A Checkbox toggles between an "on" and "off" state on every mouse click on the Checkbox. This method returns the state of the CheckboxMenuItem at the time of invocation. It can be invoked on an instance of menu item which is also a Checkbox. When the button is depressed or has a check mark next to it, it is "on" and it is "off" when it is in raised position or when no check mark is placed next to it.
Imports
import java.awt.CheckboxMenuItem;
Returns
A boolean value, indicating the state of the checkbox button which is apart of a Menu.
See Also
The setState method of the CheckboxMenuItem class
paramString()
ClassName
CheckboxMenuItem
Purpose
This method obtains the parameter String of this CheckboxMenuItem button.
Syntax
protected String paramString()
Parameters
None.
Description
This method returns the parameter String of this CheckboxMenuItem which is, effectively, the label associated with this checkbox button in a menu and the state of the checkbox menu item.
Imports
import java.awt.CheckboxMenuItem;
Returns
A parameter string of type String which applies to this checkbox item.
See Also
The getLabel method of the Checkbox class
Example
The following code uses paramString by subclassing the CheckboxMenuItem.
package java.awt;setState(boolean)
ClassName
CheckboxMenuItem
Purpose
This method sets the boolean state of this CheckboxMenuItem to the specified state.
Syntax
public void setState(boolean state)
Parameters
state
The state of type boolean that indicates whether to set this item to enabled or disabled.
Description
A Checkbox toggles between an "on" and "off" state on every mouse click on the Checkbox. This property holds true even when it is a menu item and forms a part of a menu. This method sets the state of the CheckboxMenuItem to the specified boolean value.
Imports
import java.awt.CheckboxMenuItem;
Returns
None.
See Also
The getState method of the CheckboxMenuItem class
Now you're ready to develop a user-interface application that uses various GUI components to offer options to the user. The Selections Interface Application is a Java stand-alone user-interface that allows a user to enter a text string and then choose the size and color in which the string will be displayed. There's also an option to use bold style for the text, and even one to make the text stand still or dance in the middle of the canvas. There are many ways to implement this application. In this project, you will follow one method all the way through. Here are the components you will be creating:
1. A text field for the user to enter a string.
2. A menu named Color from which the user can choose red, green, and blue.
3. A tear-off menu titled Quit and that contains Exit as an item.
4. A menu titled Help, that appears at the top right of this application and contains a menu item labeled Info.
5. A checkbox to the left of the text field that allows the user to display the text in bold.
6. A Choice button to the right of the text field that allows users to specify the text font size as 12, 18, 24, or 26 point.
7. You shall place the checkbox, text field, and choice at the top of your window canvas.
8. Two radio buttons labeled Simple and Fun. When Simple is selected, the text string will stand still at the center of the canvas. Since the user should be able to select only one of these two buttons at any time, we'll use the CheckboxGroup class to create them.
9. A button labeled OK, to the left of the radio buttons, which the user must press to confirm any selection. Only when the user presses this button, will any selection take effect. Until the user presses OK, the earlier selection will remain displayed.
1. First create a Selections class. As the interface should contain a menu bar according to the specification, your Selections class should subclass the Frame. You can attach a menu bar only to a Frame object using the setMenuBar() method of Frame. Also, because we're providing the functionality to make the text dance, you need a Thread, running in a loop, to choreograph the text's movements; hence, the class should implement the Runnable interface. Enter the following code in a file named Selections.java. The class should be public.
import java.awt.*;2. To add a text field in your interface, you'll create a member in the class of type TextField and instantiate this member within the constructor for this class. Make the initial string in the text field "Hello" and let ten be the number of columns in the field. Add the following lines in the Selections class.
TextField txt_fld;3. Now let's add the Color menu. You should have three colors as items in this menu. Let a variable, txt_color, be a member in the class so that the selected color is accessible within this class. Initialize this variable to black so that, by default, the text will be displayed in black. Construct the non-tear-off menu with title Color. Enter the following lines inside the class, but outside the constructor.
Color txt_color = Color.black; // add this outside the constructor4. Enter the following code in the constructor. This will create the Quit menu with Exit as a CheckboxMenuItem and will also create a menu titled Help containing one item labeled Info.
Menu quit_menu = new Menu('Quit');5. Having created the menus, you can create a menu bar to contain all these. Then the menu bar should be added to the Frame. As Selections is a subclass of Frame, you can call the setMenuBar() method directly. Position the Help menu on the rightmost side of the menu bar using the setHelpMenu method. Include the following lines in the constructor.
/* Add the menu to the menu bar at the top of the frame */6. You can now create a Choice button for selecting the font size. Add 12, 18, 24, and 26 to the Choice as options for font size. Create a member bold_box of type Checkbox in class Selections. Initialize this checkbox in the constructor. Add the following line outside the constructor.
Checkbox bold_box;7. Now include the following code inside the constructor where the txt_fld is initialized so that the Checkbox, text field, and Choice appear at the top of the canvas in a single row. You're adding these components to a new panel and appending the panel to the "North" of the main panel, the frame.
/* A Checkbox to toggle the text between PLAIN and BOLD styles */8. All that's left in the interface to create are the OK button and the two radio buttons at the bottom of the main frame. Create a panel and add the OK button to it. Also, create two Checkboxes to indicate the selection between Simple and Fun. Form a CheckboxGroup with these two checkboxes so that only one of them can be selected by the user. Add this to a panel placed at the "South" of the main frame. The following code achieves this effect.
/* A button to confirm any action to be taken */9. Create a Thread and pass the CheckboxGroup from the Selection object as the target for the Thread. Call this method from the Selections constructor. Define the method run() as the Selections class implements the interface Runnable. While the Thread exists, pause it so that the CPU becomes idle and executes the paint method. Add the following code inside class Selections.
/* A thread to implement jumping text */10. Having constructed the interface, you must now handle the events that will be generated when the user clicks on the OK button or when the user makes a selection from the Color menu. When the Exit menu item is selected by the user, you should exit from the application. These events can be handled by using the action() method. Enter the following code in the Selections class.
boolean ok = false; // a member to track if ok is11. When OK is pressed, note that we are making a call to the method repaint(). This, in turn, will schedule a call to the paint() method with the Graphics object under current context. You should change the paint() method to implement any graphical changes in the interface. In the paint() method, we make changes only if the user presses the OK button. (Note: Even when the OK button is not pressed, repaint() is called in the run() method ). Check the checkbox for Bold style. If it is enabled, the text should be in bold. Find out which of the Checkboxes in the CheckBox group is selected, i.e., Simple or Fun type. Obtain the text string from the TextField. Then either display it on the canvas or make it dance, depending on the user's selection task. These are tasks performed in the paint() method defined here. Add this method to the Selections class.
public void paint(Graphics g)12.Now that you've implemented all these methods, all that is required to complete this application is to make it stand-alone. Include the following main() method in the class Selections. This constructs an object of type Selections and displays it, which forms our required user-interface for providing selections to the user. Figure 6-20 captures the Selection interface in action.
public static void main(String args[]) throws IOException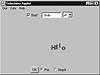
Figure 6-20 The Selections Interface application in action
The Selections Interface application illustrates the use of windowing components that provide the funtionality of implementing selection and confirmation in user-interface applications. When the application starts, the window contains a text field to enter a string. The default string that appears in the text field is "Hello". There is a checkbox button to the left of the text field to specify the string to be displayed in bold font. The choice menu button on the right side of the text field is for selecting the font size of the text to be displayed. There are three menus provided as a part of the menu bar. The menu titled Color is provided to select the color in which the text is to be displayed. The menu titled Quit is to be used to exit from the application and the menu titled Help is placed on the rightmost side of the menu bar.
There are two checkbox buttons labelled Fun and Simple. If the Simple button is selected, the string will be displayed on the window. If the Fun button is selected, the displayed string will start dancing in the window. These two buttons form a mutually exclusive group, i.e., only one of them can be selected at any given instant. Try changing the string in the text field and start playing around by varying all these parameters (size, font, color, Fun, or Simple). Have fun
|
Politica de confidentialitate | Termeni si conditii de utilizare |

Vizualizari: 1077
Importanta: ![]()
Termeni si conditii de utilizare | Contact
© SCRIGROUP 2025 . All rights reserved