| CATEGORII DOCUMENTE |
| Asp | Autocad | C | Dot net | Excel | Fox pro | Html | Java |
| Linux | Mathcad | Photoshop | Php | Sql | Visual studio | Windows | Xml |
DOCUMENTE SIMILARE |
||
|
||
Converting between Grayscale and Bitmap modes
(Photoshop)
Converting an image to Bitmap mode reduces the image to two colors greatly simplifying the color information in the image and reducing its file size. To convert an image to Bitmap mode you must first convert it to Grayscale mode. This removes the hue and saturation information from the pixels and leaves just the brightness values However because few editing options are available for Bitmap-mode images it s usually best to edit the image in Grayscale mode and then convert it.
Keep in mind that a Bitmap-mode image edited in Grayscale mode may not look the same when converted back to Bitmap mode For example consider a pixel that is black in Bitmap mode and then edited to a shade of gray in Grayscale mode If the gray value of the pixel is light enough it will become white when converted back to Bitmap mode.
Making Grayscale and Bitmap mode conversions
Refer to the following instructions for converting images between Grayscale and Bitmap mode.
To convert an image to Bitmap mode:
Do one of the following:
If the image is in color choose Image > Mode > Grayscale. Then choose Image > Mode > Bitmap.
If the image is grayscale choose Image > Mode > Bitmap.
For Output enter a value for the output resolution of the Bitmap-mode image and choose a unit of measurement By default the current image resolution appears as both the input and the output resolutions.
Select one of the following bitmap conversion methods:
Threshold Pattern Dither or Diffusion Dither to use a predefined conversion method (See "Specifying predefined Bitmap conversion methods on section 95
Halftone Screen to simulate the appearance of halftone dots in the converted image.
(See "Specifying halftone screens for Bitmap-mode images on section 96
Custom Pattern to simulate the appearance of a custom halftone screen in the converted image (See "Specifying custom halftone screens for Bitmap-mode images" on section 97
To convert a Bitmap-mode image to grayscale:
Choose Image > Mode > Grayscale.
Enter a value between 1 and 16 for the size ratio.
The size ratio is the factor for scaling down the image For example to reduce a grayscale image by 50% enter 2 for the size ratio If you enter a number greater than 1 the program averages multiple pixels in the Bitmap-mode image to produce a single pixel in the grayscale image. This process lets you generate multiple shades of gray from an image scanned on a 1-bit scanner.
Specifying predefined Bitmap conversion methods
The predefined conversion options in the Bitmap dialog box determine the quality of the converted image.
Threshold Converts pixels with gray values above the middle gray level (128) to white and below to black. The result is a very high-contrast black-and-white represen- tation of the image.
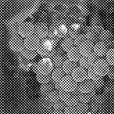
Pattern Dither Converts an image by organizing the gray levels into geometric configu- rations of black and white dots.
Diffusion Dither Converts an image by using an error-diffusion process starting at the pixel in the upper left corner of the image If the pixel s value is above middle gray (128), the pixel is changed to white-if below to black Because the original pixel is rarely pure white or pure black error is inevitably introduced. This error is transferred to surrounding pixels and diffused throughout the image resulting in a grainy filmlike texture. This option is useful for viewing images on a black-and-white screen.

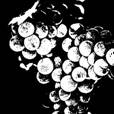
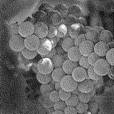
Original grayscale image and 50% Threshold conversion method
Pattern Dither conversion method and Diffusion Dither conversion method
Specifying halftone screens for Bitmap-mode images
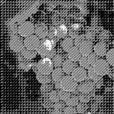
The Halftone Screen option in the Bitmap dialog box lets you convert a grayscale image to simulated halftone dots.
Important: The halftone screen becomes part of the image. If you print the image on a halftone printer it will print with the halftone screen you choose here plus that of the printer On some printers the result probably will be a moir pattern in the image.
To specify the halftone screen for a Bitmap-mode image:
Choose Image > Mode > Bitmap.
Click Halftone Screen then click OK.
For Frequency enter a value for the screen frequency and choose a unit of measurement. Values can range from 1 to 999 for lines per inch and from 0.400 to 400 for lines per centimeter. You can enter decimal values.
The screen frequency specifies the ruling of the halftone screen in lines per inch (lpi). The frequency depends on the paper stock and type of press used for printing. Newspapers commonly use an 85-line screen Magazines use higher resolution screens, such as 133 lpi and 150 lpi Check with your print shop for correct screen frequencies.
Enter a value for the screen angle in degrees from -180 to +180.
The screen angle refers to the orientation of the screen Continuous-tone and black-and- white halftone screens commonly use a 45 angle.
5 For Shape choose the dot
shape you want.
Original grayscale image and Halftone Screen conversion 53 lpi 45 angle round dot
You can save and reuse halftone screen settings by using the Save and Load buttons in the
Halftone Screen dialog box.
Specifying custom halftone screens for Bitmap-mode images
The Custom Pattern option in the Bitmap dialog box simulates the effect of printing a grayscale image through a custom halftone screen. This method lets you apply a screen texture such as a wood grain to an image. To use this option you must first define a pattern (See "Filling and stroking selections and layers on section 249
You can create a pattern representing the texture you want and then screen the grayscale image to apply the texture. To cover the entire image the pattern must be as large as the image Otherwise the pattern will be tiled For example if you apply a 1-inch-by-1-inch pattern to a 4-inch-by-4-inch image the pattern appears as 16 squares Adobe Photoshop comes with several self-tiling patterns that can be used as halftone screen patterns.
(See the procedure to use a pattern from the PostScript Patterns folder in "Filling and stroking selections and layers on section 249
Because the Custom Pattern option simulates dark and light colors by making the halftone pattern thicker and thinner it makes sense to choose a pattern that lends itself to thickness variations typically one with a variety of gray shades.
To prepare a black-and-white pattern for conversion you can first convert the image to grayscale and then apply the Blur More filter several times. This blurring technique
creates thick lines tapering from dark gray to white.
|
Politica de confidentialitate | Termeni si conditii de utilizare |

Vizualizari: 1414
Importanta: ![]()
Termeni si conditii de utilizare | Contact
© SCRIGROUP 2026 . All rights reserved