Installing Your RADEONT
Now that you have prepared your computer, you are ready
to install your RADEONT/RADEONT VE graphics accelerator card.
To install your
graphics accelerator card
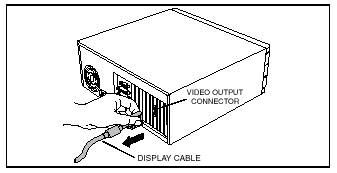
1 Power off the computer and monitor , then disconnect the display cable from the back of your computer.
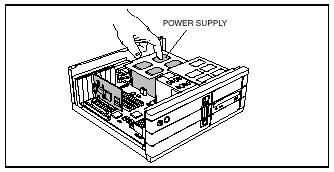
2 Remove the computer cover. If necessary, consult your computer's manual for help
in removing the cover.
3
Remove any existing graphics card from your
computer.
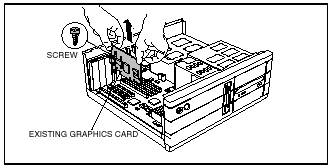
Or, if your computer has any on-board graphics capability, you may need to disable it on
the motherboard. For more information, see your computer documentation.
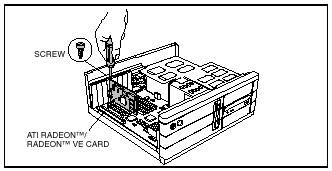
4 Locate the AGP/PCI slot. If necessary, remove the metal cover from this slot;
then align your RADEONT/RADEONT VE with the AGP/PCI slot, and press it in
firmly until the card is fully seated.
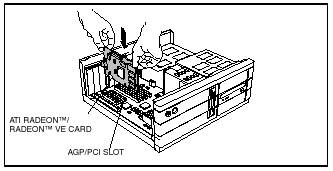
5 Replace the screw to fasten the
card in place, and replace the computer
cover.
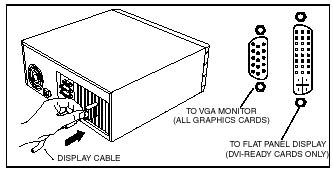
6Plug the display cable into your card; then turn on the computer and monitor. If your RADEONT/RADEONT VE came with a DVIconnector,
you can connect a flat panel display to the appropriate connector, as shown
below
You are now ready to proceed with the
installation of the ATI driver. For detailed instructions, select your
operating system from the list below:
. Windows 98 SE / Windows Me, see Windows "New Hardware Found" on page 5.
. Windows 2000, see page 6.
Windows "New Hardware Found"
New hardware will be
detected after you restart your computer. To finish setting up your hardware
click Yes when prompted to restart
To identify new hardware in Windows 98 SE or
Windows Me
1 Windows 98 SE or Windows Me may launch the "Update Device Driver Wizard" to install the Standard VGA
Driver. If it does, follow the step-by-step instructions below to allow Windows
to correctly identify your new hardware.
If the Wizard does not appear, proceed
directly to Installing the ATI Driver for Windows 98 SE,
Windows Me on page 5.
2 Click Next.
3 Click Finish.
4 Insert your Windows 98 SE or Windows Me CD into your CD-ROM drive.
5 Click OK.
6 Type the following:
D:WIN98 or D:WINME
(If D is not your CD-ROM drive, substitute D with the correct drive letter.)
7 Click OK.
8 Click Ye s to restart your computer.
You are now ready to
install the ATI driver. Proceed to Installing the ATI Driver for Windows 98 SE,
Windows Me on page 5, and follow the
step-by- step instructions to complete the installation.
Installing
the ATI Driver for Windows 98 SE, Windows Me
With Windows 98 SE or Windows Me running on your computer, you need to
install the ATI driver to take advantage of the higher performance,
resolutions, and special graphic features of the RADEONT/RADEONT VE.
To ensure you install
the latest driver, use the ATI Installation CD that shipped with your
RADEONT/RADEONT VE.
To install the ATI driver for Windows 98 SE or
Windows Me
1 Insert the ATI INSTALLATION CD into your CD-ROM drive.If Windows runs the CD
automatically, proceed to step 6.
2 Click Start.
3 Select Run.
4 Type the following:
D:ATISETUP
(If D is not your CD-ROM drive, substitute D with the correct drive letter.)
5 Click OK.
6 Click on ATI Ea s y I ns t a l l to begin the Installation Wizard.
7 Click Next.
8 Click Ye s to the license agreement.
9 Follow the Wizard's
on-screen instructions to complete the installation.
The Express installation option is
recommended. If your RADEONT/RADEONT VE includes a
multimedia component, the software for that component will automatically be
installed, along with the ATI driver, by selecting this option.
Installing the ATI Driver for Windows 2000
With Windows 2000 running on your computer,
you need to install the ATI driver to take advantage of the higher performance,
resolutions, and special graphic features of the RADEONT/RADEONT VE.To ensure you install the latest driver, use the ATI
Installation CD that shipped with your RADEONT/RADEONT VE.
To install the ATI driver for Windows 2000
1 Insert the ATI
INSTALLATION CD into your CD-ROM drive. If Windows runs the CD automatically, proceed to step
6.
2 Click Start.
3 Select Run.
4 Type the following:
D:ATISETUP
(If D is not
your CD-ROM drive, substitute D with the correct drive
letter.)
5 Click OK.
6 Click on ATI Ea s y I ns t a l l to begin the Installation Wizard.
7 Click Next.
8 Click Ye s to the license agreement.
9 Follow the Wizard's
on-screen instructions to complete the installation. The Express installation option is recommended. If your RADEONT/RADEONT VE includes a multimedia component, the
software for that component will automatically be installed, along with the ATI
driver, by selecting this option.
Multiple Display
Support: Windows 98 SE, Windows Me
IMPORTANT: Please read the Readme file on the ATI Installation CD for the latest
information regarding Multiple Display Support.
Troubleshooting Tips
The following troubleshooting
tips may help if you experience problems. Contact your dealer or ATI for more advanced troubleshooting information.
. Check that the card is seated
properly in the AGP/PCI slot.
. Ensure the display cable is
securely fastened to the card's display connector.
. Make sure that the monitor and
computer are plugged in and receiving power.
. If necessary, disable any
built-in graphics capabilities on your motherboard. For more information,
consult your computer's manual or manufacturer. (NOTE: Some manufacturers do
not allow the built-in graphics to be disabled or to become the secondary
display.)
. Make sure you selected the
appropriate display device and graphics card when you installed the ATI driver.
. For more troubleshooting tips,
right-click the ATI icon in the taskbar and select Troubleshooting.
. If you have problems during bootup, start your computer in Safe Mode.In Windows 98 SE and Windows Me, press and hold the CTRL key until the Microsoft Windows Startup Menu appears on
the screen. Then select the number for Safe Mode,
and press Enter. (You can also use F8 to bring up the Microsoft Windows
Startup Menu.) In Safe Mode, bring up the Device Manager and check for duplicate display adapter and monitor
entries if you are only using one graphics card.
. For more assistance, use the Troubleshooting Guide located in the Windows Help or contact your computer
manufacturer.
. To contact ATI Technical Assistance, see your Technical Support and Warranty Service guide
