| CATEGORII DOCUMENTE |
| Asp | Autocad | C | Dot net | Excel | Fox pro | Html | Java |
| Linux | Mathcad | Photoshop | Php | Sql | Visual studio | Windows | Xml |
DOCUMENTE SIMILARE |
||
|
||
Project Hooks
For the most part, the design surfaces that Visual FoxPro makes available to a developer provide fixed functionality-you gets what you gets, and nothing more. If you want additional functionality to, say, the Form Designer, you have to hack the .SCX file produced by the Form Designer-there is no way to hook into the Form Designer and add your own mechanisms (outside of builders). The Class Browser and Component Gallery have broken the mold, allowing a developer to get into the design surface, and, more importantly, to add their own programs to enhance or just simply change the default behavior. Visual FoxPro 6.0 extends this functionality to one of the original tools of FoxPro-the Project Manager-via a pair of mechanisms called Project Objects and Project Hooks. In this chapter I'll discuss each one, explain how they work, and show what you might use them for.
The Project Manager stores its information in a pair of files, the .PJX and .PJT-a table and associated memo file. If you wanted to extend or add functionality to the Project Manager, you had to open the .PJX as a table and manipulate the information inside, just as you did any other database. Developers often did this because there were a whole raft of things they wanted to do with some or all of the files that made up a project.
Visual FoxPro 6.0's Project Manager has two new features. When a project is opened, a project "object" is created. This object contains events, methods, and properties just like any other object you've seen in VFP. You can work with these PEMs just as any other object, thus negating the requirement to open the .PJX as a table.
You can also add your own behaviors to the Project Manager, via a Project Hook class that you specify through the Projects tab of the Tools, Options dialog or the Project tab of the Project, Project Info dialog, just as you can with the Class Browser and Component Gallery.
Accessing the project object
If you decided to blow off the rest of this chapter, thinking you could just spelunk around for the project object, you probably started VFP, opened a project, and then did a DISPLAY MEMORY, looking for an "oProject" variable to show up alongside _oBrowser.
And it didn't work, so now you're back to reading the damn book, right? Don't feel bad; I did the same thing after I heard someone mention the new "project object." In fact, it's a bit more complicated, and requires explanation of a topic I've not covered yet in this book.
Application object
When you start Visual FoxPro, an "application object" is created automatically. This object exposes a set of properties, events, and methods that can be accessed within VFP (and, interestingly enough, from outside VFP as well-see the Note below).
One of the beauties of Windows is the ability of applications to talk to each
![]() other. This is
done through a mechanism called Automation, which began as Dynamic Data
Exchange (DDE)-allowing applications to exchange data-and then became Object
Linking and Embedding (OLE)-allowing applications to directly talk to each
other's data and automatically call the originating program. This finally
spawned OLE Automation, where applications could reference each other's
properties and methods in programs. OLE Automation was then renamed Automation
because the term "OLE Automation" was perceived as being proprietary. (Well, it
was. Duh!) Automation was renamed COM and the interface was opened up, and the
latest player in this scenario is the "new, improved COM"-COM+. But I digress.
other. This is
done through a mechanism called Automation, which began as Dynamic Data
Exchange (DDE)-allowing applications to exchange data-and then became Object
Linking and Embedding (OLE)-allowing applications to directly talk to each
other's data and automatically call the originating program. This finally
spawned OLE Automation, where applications could reference each other's
properties and methods in programs. OLE Automation was then renamed Automation
because the term "OLE Automation" was perceived as being proprietary. (Well, it
was. Duh!) Automation was renamed COM and the interface was opened up, and the
latest player in this scenario is the "new, improved COM"-COM+. But I digress.
An application such as Visual FoxPro (or Excel, or Word) that participates in Automation can be called from another application, and commands and messages can be passed back and forth. For example, Visual FoxPro can open a copy of Excel, pass some data to Excel, tell that copy of Excel to perform a calculation on that data, and have Excel pass the resulting answer back to VFP. This copy of Excel is actually an "instance," created through a CREATEOBJECT command. Visual FoxPro can be treated in the same manner; for example, the instance of VFP that Word might create is this same application object.
The application object has properties such as ActiveForm (an object reference to the active form on the desktop if there is one), Caption (the text displayed in the VFP desktop's title bar), FullName (the file name of an instance of VFP and the path to the directory from which the instance was started), StatusBar (the text displayed in the status bar of the instance of VFP), StartMode (defines how VFP was started-interactively, as an .APP or .EXE, or an in-process or out-of-process server), and VersionNumber (the version number of the instance of VFP).
You can use the following commands to access these properties from within the Command window:
? application.captionMicrosoft Visual FoxPro application.caption = application.caption + ' (Herman rules!)'? application.captionMicrosoft Visual FoxPro (Herman Rules!)? application.version
6.0 ? application.StartMode0
This is pretty long, so you can also use the _VFP system memory variable for the same purpose:
? _vfp.captionMicrosoft Visual FoxPro _vfp.caption = _vfp.caption + ' (Herman rules!)'? _vfp.captionMicrosoft Visual FoxPro (Herman Rules!)? _vfp.version
6.0 ? _vfp.StartMode0
Some methods of the application object include DoCmd(), Eval(), Quit(), and Help(). DoCmd() and Eval(), for instance, allow another application to run a copy of VFP and execute a VFP command or evaluate an expression remotely, respectively.
Projects collection
Two more properties of the application object are ActiveProject and Projects-and those are the ones of interest today.
However, Projects is not a property like the others I just described. Instead, Projects is an array property that contains a list of all open projects, with the most recently opened project at index 1, and the first project opened at the end of the array. (This list of open projects is called a collection; there are other collections in VFP as well, such as the collection of open forms.)
Remember how I said that a project object is automatically created when a project is opened? The Projects collection actually references each of these project objects-so you can drill down from the application object to a project object to specific properties of an individual project.
The ActiveProject is simply a pointer to whichever project in the Projects collection is "on top." Thus, it too is a reference to a project object.
To sum up, when an instance of Visual FoxPro is created, a VFP application object is also created. This application object contains a number of collections, one of which is a collection of open projects. So how about a look at project objects?
Project object
Just as you can run a form and access the properties, events, and methods of that form, once you have a project open, you can access the properties, events, and methods of its project object. Unfortunately, while you can determine the PEMs of a form by opening the Properties window when the form is open, the same Properties window doesn't open when you open a project in the Project Manager. Instead, you have to look in the online help (under Project Object). Table 18.1 lists the properties of the project object that are specific to it.
Because each of these is a property of a project object, you'll need to reference which project you want information from. For example, suppose you have one project open. You can use either of the following commands in the Command window to get the fully qualified name of the project:
? application.activeproject.namef:InterGalacticBooksInventorysourceit.pjx? application.projects[1].namef:InterGalacticBooksInventorysourceit.pjx
Table 18.1. Properties of a project object.
|
Property |
Access |
Type |
Description |
|
AutoIncrement |
R/W |
L |
Specifies if the build version number of a project should |
|
|
|
|
be automatically incremented each time the .EXE or |
|
|
|
|
.DLL is built. |
|
BuildDateTime |
R/O |
T |
The date and time of the last build. |
|
Debug |
R/W |
L |
Specifies if debugging information is included with |
|
|
|
|
compiled source code. |
|
Encrypted |
R/W |
L |
Specifies if files are encrypted as they're compiled. |
|
Files |
R/O |
Coll |
A collection of file objects. |
|
HomeDir |
R/W |
C |
The home directory of the project. |
|
Icon |
R/W |
C |
Specifies the icon for a form when the form is minimized, and the icon displayed for a distributed .EXE. |
|
MainClass |
R/O |
C |
The name of the ActiveDoc class used as the main |
|
|
|
|
program (used only when MainFile contains the name |
|
|
|
|
of the .VCX where this class is defined). |
|
MainFile |
R/O |
C |
The main program in the project, set using the |
|
|
|
|
SetMain() method. |
|
Name |
R/O |
C |
The fully qualified path and file name of the project. |
|
ProjectHook |
R/W |
O |
A reference to the project hook object associated with |
|
|
|
|
the project. |
|
ProjectHookClass |
R/W |
C |
The name of the class the project hook object is |
|
|
|
|
instantiated from. |
|
ProjectHookLibrary |
R/W |
C |
The class library the ProjectHook class is defined in. |
|
SCCProvider |
R/O |
C |
The source code control provider for a project. |
|
ServerHelpFile |
R/W |
C |
The help file for the typelib used for server classes. |
|
ServerProject |
R/W |
C |
The first part of the ProgID for the Automation server |
|
|
|
|
created by the project; the default is the same as the |
|
|
|
|
Name property. |
|
Servers |
R/O |
Coll |
A collection of server objects. |
|
TypeLibCLSID |
R/O |
C |
The typelib Registry CLSID (Class Identifier) for a type |
|
|
|
|
library created for server classes in a project. |
|
TypeLibDesc |
R/W |
C |
The description for a type library created for server |
|
|
|
|
classes in a project. |
|
TypeLibName |
R/O |
C |
The fully qualified path to the typelib for the project. |
|
VersionComments |
R/W |
C |
The comments for a project. |
|
VersionCompany |
R/W |
C |
The company name information for a project. |
|
VersionCopyright |
R/W |
C |
The copyright information for a project. |
|
VersionDescription |
R/W |
C |
The description for a project. |
|
VersionLanguage |
R/O |
C |
The language ID for a project. |
|
VersionNumber |
R/W |
C |
The build number for a project in the format |
|
|
|
|
MMMM.mmmm.bbbb. |
|
VersionProduct |
R/W |
C |
The product name for a project. |
|
VersionTrademarks |
R/W |
C |
The trademark information for a project. |
|
Visible |
R/W |
L |
Specifies whether or not to display the Project |
|
|
|
|
Manager. |
However, suppose you opened projects A, B, and C (in that order). ActiveProject would return the name of the last project you opened (C.PJX), because it was the active project. You could also reference any of the projects like so:
? application.projects[1].namef:InterGalacticBooksInventorysourceC.pjx? application.projects[2].namef:InterGalacticBooksInventorysourceB.pjx? application.projects[3].namef:InterGalacticBooksInventorysourceA.pjx
Notice that the first project that was opened is at the end of the list.
A project object also has methods, and you can probably guess what some of these are. See Table 18.2.
Table 18.2. Methods of a project object.
|
Method |
Description |
|
Build() |
Rebuilds a project or creates an .APP, .EXE, or .DLL. |
|
CleanUp() |
Cleans up a project table by removing records marked for deletion and packing |
|
|
memo fields. |
|
Close() |
Closes a project and releases the project's ProjectHook and Project objects. |
|
Refresh() |
Refreshes a project's visual display. |
|
SetMain() |
Sets the main file in a project. |
Files collection
Just like the application object has a Projects property that is a collection of projects open in the application, a project object has a Files property that is a collection of files in the project, a Count property that identifies how many files are in it, and the Add() method that allows you to add an item to the project.
File object
Similarly, the Files collection is actually a collection of file objects. Table 18.3 lists the properties of a file object.
Because a file object is contained in a project object, the syntax becomes a little long. To get the Type for a File, you'd use the command:
? application.activeproject.files[1].type
And, of course, a file object also has methods. See Table 18.4.
Servers collection
Using Visual FoxPro, you can build a special type of application called an Automation Server. These applications are called from another Windows application, such as Excel. For example, you could build an Automation Server in VFP that would look up a postal code in a table and return the city and state or province for that postal code. Then, you could call that server from Excel to do a lookup of a city based on a postal code.
You can have one or more Automation Servers in a project, and they have special properties. Thus, along with the Files collection, a project object also has a Servers collection and a Count property.
Server object
By now, it probably goes without saying that the Servers collection is actually a collection of server objects. Table 18.5 lists the properties of a server object.
The syntax to address a server object is similar to that of a file object. To get the ProgID for a server, you'd use this command:
? application.activeproject.servers[1].ProgID
Unlike project and file objects, though, a server object does not have any methods.
Table 18.3. Properties of a file object.
|
Property |
Access |
Type |
Description |
|
CodePage |
R/O |
N |
The code page for the file. |
|
Description |
R/W |
C |
The description for the file or server class. |
|
Exclude |
R/W |
L |
Specifies if a file is excluded from an application, |
|
|
|
|
executable, or .DLL. |
|
FileClass |
R/O |
C |
The class a form is based on. |
|
FileClassLibrary |
R/O |
C |
The library the form's class is defined in. |
|
LastModified |
R/O |
T |
The date and time the file was last modified. |
|
Name |
R/O |
C |
Fully qualified path and file name. |
|
ReadOnly |
R/O |
L |
Specifies whether the user can edit the file. |
|
SCCStatus |
R/O |
N |
A numeric value indicating the source code control status |
|
|
|
|
of the file. |
|
Type |
R/O |
C |
A character value indicating the file type, such as V for .VCX, P for program, K for form, and so on. |
Table 18.4. Methods of a file object.
|
Method |
Description |
|
AddToSCC() |
Adds a file in a project to source code control. |
|
CheckIn() |
Checks in changes made to a file in a project under source code control. |
|
CheckOut() |
Checks out a file in a project under source code control. |
|
GetLatestVersion() |
Gets the latest version of a file in a project under source code control. |
|
Modify() |
Opens a file in a project for modification. |
|
Remove() |
Removes a file from its Files collection and project. |
|
RemoveFromSCC() |
Removes a file in a project from source code control. |
|
Run() |
Runs or previews a file in a project. |
|
UndoCheckOut() |
Discards any changes made to a file in a project under source code control and |
|
|
checks the file back into source code control. |
Table 18.5. Properties of a server object.
|
Property |
Access |
Type |
Description |
|
CLSID |
R/O |
C |
Contains the registered CLSID (Class Identifier) for the |
|
|
|
|
server. |
|
Description |
R/W |
C |
The description of the server class. |
|
HelpContextID |
R/W |
N |
Specifies a context ID for a topic in a Help file to provide |
|
|
|
|
context-sensitive Help for the object. |
|
Instancing |
R/W |
N |
Specifies how the server can be instantiated. |
|
ProgID |
R/O |
C |
Contains the registered ProgID (Programmatic Identifier) |
|
|
|
|
for a server in a project. |
|
ServerClass |
R/O |
C |
The name of a server class. |
|
ServerClassLibrary |
R/O |
C |
The library the server class is defined in. |
What next?
So by now you have a pretty good idea of the
object model of the application-project-
file/server hierarchy. But what good is this information? By itself, it doesn't
do you much good;
you're not likely to issue a bunch of application.project[n].build() commands
in the Command
window, are you? Probably not. However, there are two things you would want
to do:
. . Build programs that programmatically manipulate the project.
. . Write programs that are automatically executed when things happen to the Project Manager or its contents.
Project tools
In this section, I'm going to show you how to build a simple program that allows you to edit the descriptions of the files in a project in one step, instead of having to use the Project, Edit Description menu option for each individual file in the project. While this is nothing that I'm going to want to package and try to sell, it will serve nicely as a means of demonstrating the use of the various pieces of the project object model that I went over in the last section.
First, I'll build a version of the routine that replaces any empty description with the phrase "Missing!", and then displays all of the files together with their type and description in a message box. Because many readers of this book are coming into VFP from FoxPro 2.x, I've listed this code in both "traditional" form and with the new-to-VFP FOR EACH construct, which is preferred for working with collections. Note that this code doesn't do any checking at all and depends on having a project open.
* traditional construct with 'FOR I
= n to mm.lcX = ''
for m.li = 1 to application.activeproject.files.count
if empty(application.activeproject.files[m.li].description )
application.activeproject.files[m.li].description = 'Missing!'
endif
m.lcX
;
= m.lcX ;
�.+ chr(13) ;
�.+ application.activeproject.files[m.li].type ;
�.+ ' ' ;
�.+ application.activeproject.files[m.li].name ;
�.+ ' ' ;next+ application.activeproject.files[m.li].description
messagebox( m.lcX )
* construct demonstrating FOR EACHm.lcX
= ''
for each loFile in application.activeproject.files
if empty(loFile.description )
loFile.description
= 'Missing!'
endif
m.lcX ;
= m.lcX ;
�.+ chr(13) ;
�.+ loFile.type ;
�.+ ' ' ;
�.+ loFile.name ;
�.+ ' ' ;next+ loFile.description
messagebox( m.lcX )
The code is fairly straightforward. First, a memory variable that will hold the string of files is initialized. Next, a FOR.NEXT loop is started, looping through all files in the active project. For each file in the project, the description is checked. If it's empty, the description is stuffed with the phrase "Missing!" Next, the type, name, and description are added to the current list of files. Finally, after the loop is done, a message box displays the final string.
Note the syntax for the Files collection-the counter is an argument of the Files collection, so each file in the collection is addressed in turn, but the item in the Files collection has multiple properties, such as type and name. Common mistakes are to forget the argument, just using syntax like this:
application.activeproject.files.type
or to try to append the argument to the Files collection property, like so:
application.activeproject.files.type[m.li]
So far, so good. How about dropping a user interface around this code? The form in
![]() Figure 18.1
shows a simple interface for displaying all files in the project as well as the
description of the highlighted file. The files in this section are in the CH18
directory of the source code downloads for this book.
Figure 18.1
shows a simple interface for displaying all files in the project as well as the
description of the highlighted file. The files in this section are in the CH18
directory of the source code downloads for this book.
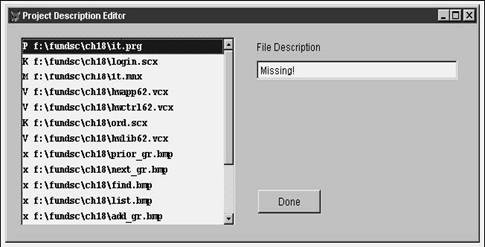
The list box displays the type of file and the actual file name. As you scroll through the list of files, the description for the current file displays in the text box to the right of the list box. The array that supports the list box has four columns as shown in Table 18.6.
If you change the contents of the Description text box for a specific file, the value in the fourth column of the hwlstFiles.aItems array will be changed as soon as the Description text box loses focus. However, this updates just the array-not the description in the project itself. When you click the Done button, the Description values in the fourth column update the project description.
Table 18.6. Contents of the hwlst.aItems array.
|
Column |
Type of Data |
|
Column 1 |
Concatenated string of Type and Name |
|
Column 2 |
Type |
|
Column 3 |
Name |
|
Column 4 |
Description |
The code that fills the list box is in the Init() of the form:
with thisform.hwlstfiles decl .aItems[application.activeproject.files.count,4]for each loFile in application.activeproject.files
.aItems[m.li,2] = loFile.type.aItems[m.li,3] = loFile.name.aItems[m.li,4] = loFile.description.aItems[m.li,1] = .aItems[m.li,2] + ' ' + .aItems[m.li,3]
next
.requery()
.ListIndex = 1
endwith
The code that fills the text box with the description for the highlighted item in the list box is in the AnyChange() method of the list box:
thisform.hwtxtDesc.Value = this.aItems[this.listindex, 4]
The code that updates the fourth column of the array in the list box once the text box loses focus is in the LostFocus() method of the text box:
thisform.hwlstFiles.aItems[thisform.hwlstFiles.listindex, 4] = this.Value
The code that updates the project description from the fourth column of the list box array is in the Done command button:
for m.li = 1 to application.activeproject.files.count
application.activeproject.files[m.li].description =this.hwlstFiles.aItems[m.li,4]next this.release()
Fairly straightforward, isn't it? It used to be quite a chore having to open a project file as a table, grab the contents of the appropriate fields, manipulate them as you wanted, and then mess with the project file's table again to update the information. With the project object model, you have direct access to the project and its contents.
Project hooks
In my Bonus Session at the 1998 Microsoft Visual FoxPro DevCon, I demonstrated a little program that intercepted a programmer's use of the files in a project. For example, when the user tried to open a form, they received a message, purportedly from the Project Manager that was demonstrating a mind of its own, that it wanted to open a report instead, and did so.
This particular example might not be terribly useful during day-to-day production programming work, but it shows that you can now add hooks to the Project Manager to add or replace functionality as you need.
Available functions that can be intercepted
So what all can you do? Just about anything. Technically, you'll instantiate a "project hook object" when opening a project. (I'll describe how this works in the next section.) From then on, certain project hook events are fired when something is done to the project. The following sections describe the places where you can add your own functionality, and the event you would "hook" into in order to do so.
At the beginning of the build process
The BeforeBuild event is fired when you click the Build button in the Project Manager, when you issue a BUILD command (such as BUILD APP or BUILD EXE), or when you call the Build() method of a project object.
You could use this to simply intercept the user before the build starts, to ask them to verify whether or not they really, really want to build the project. If they answer No, you would use the NODEFAULT command to prevent the build from being performed.
The parameters you pass to this method include items such as the name of the results file (the name of the .APP, .EXE, or .DLL you are building), the type of file (an .APP, an .EXE, or a .DLL), whether or not to rebuild all, and so on. Setting these values in the BeforeBuild event would effectively negate any options that the user has set.
After the build process is finished
The AfterBuild event is fired at the end of the build process. You could log the results of the build, such as the name of the project and the date and time of completion, to a table at the completion of the build. If an error occurs during the build, the error number is passed to the AfterBuild event-you could save this as part of the saved data.
When a file is added to the Project Manager
QueryAddFile is fired in a number of places. For instance, after you press the New button, save the file, and close the respective designer, QueryAddFile is executed. It is also fired after you click the Add button and select a file in the Open dialog, or when you call the Add() method of the project object's File collection. Note that the file has already been selected by the time this method is fired-one oft-mentioned enhancement request has been for a "BeforeAdd" method.
Like BeforeBuild, the NODEFAULT command will prevent the file from being added to the project.
When a file is modified in the Project Manager
The QueryModifyFile event is fired when you click the Modify button in the Project Manager, or when you call the Modify() method of a file object.
It does not get fired if you simply modify the file through a MODIFY command in the Command window.
Like BeforeBuild, the NODEFAULT command will prevent the file from being modified.
When a file is removed from the Project Manager
The QueryRemoveFile event is fired when you click the Remove button in the Project Manager, or when you call the Remove() method of a file object.
Like BeforeBuild, the NODEFAULT command will prevent the file from being removed from the project.
When a file is executed from the Project Manager
The QueryRunFile event is fired when you click the Run button in the Project Manager, or when you call the Run() method of a file object.
Like BeforeBuild, the NODEFAULT command will prevent the file from being executed.
When a file is dragged over or dropped on the TreeView control in the Project Manager
You can also add a file to the Project Manager by dragging and dropping a file, say, from Windows Explorer. There are also a couple of OLE Drag and Drop events available with respect to the Project Manager. As a result, you can add your own functionality at these places as well.
The OLEDragOver event is fired when you drag a file over the TreeView control in the Project Manager. If you let go (drop the file), the OLEDragDrop event fires. As noted earlier, the QueryAddFile event is fired after the OLEDragDrop event fires.
Enabling a project hook
Now that you've seen all the places where you can hook into the Project Manager's interactions, you probably want to try this yourself. The basic idea is to create a class
![]() in a class library, based on the new VFP 6.0
ProjectHook class, and either add it to a specific project, or configure VFP to
add the class to all new projects. I'll first go through the steps to add a
project hook to a single project, and then discuss what's different when you
want to do so globally. The source code for this section is in the CH18
directory of the downloads for this book. Enabling a project hook for a specific
project
in a class library, based on the new VFP 6.0
ProjectHook class, and either add it to a specific project, or configure VFP to
add the class to all new projects. I'll first go through the steps to add a
project hook to a single project, and then discuss what's different when you
want to do so globally. The source code for this section is in the CH18
directory of the downloads for this book. Enabling a project hook for a specific
project
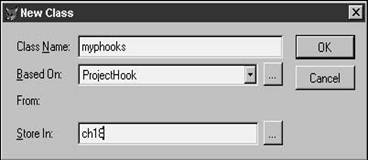
Suppose you've got a project and you want to display a message box to the user in various hooks of the Project Manager. First, create a project, naming it "IT" like always. Next, create a class named MyPHooks, add it to a class library file called CH18 (I'm losing creativity tonight), and base it on the ProjectHook class, as shown in Figure 18.2.
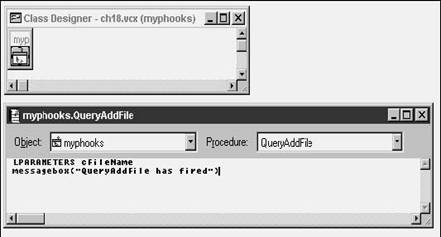
Next, open the Code window of the Class Designer, look for the QueryAddFile() method, and add a line of code, as shown in Figure 18.3:
messagebox('Add file')
Do the same for several other events, such as BeforeBuild, AfterBuild, QueryModifyFile, and so on. Then save the class and close the Class Designer.
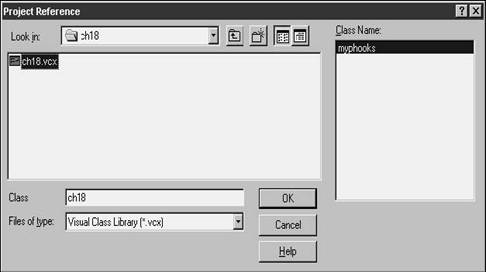
Next, add your new ProjectHook class to the IT project you just created. Select the Project, Project Info menu option, and select the Project tab if it's not already selected. Click the Project Class check box, and select the MYPHOOKS class in the CH18.VCX as shown in Figure 18.4.
Once you click the OK button in the Project Reference dialog, the class name and class library name will appear in the read-only text box in the Project Information dialog as shown in Figure 18.5.
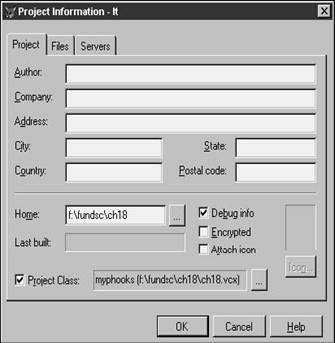
Click OK in the Project Information dialog, and you'll be returned to the Project Manager.
Now here's a trick. If you try executing one of those actions, such as adding a file or building the project, you won't see any message boxes. You have to close the project and open it again for the new project hook to "take." (Underneath the hood, although you've defined the ProjectHook class, the project hook object hasn't been instantiated because it's only created when the project is opened.) Do that now: Close the window and open the project again. Then add a file, and the message box will fire as expected.
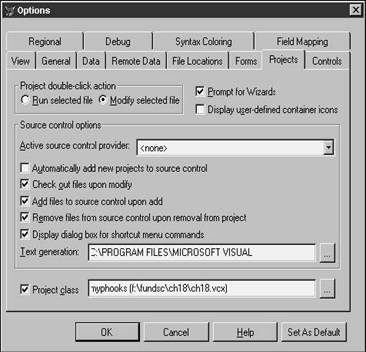
Enabling a global project hook
You can also attach a ProjectHook class to all of your projects. After creating the ProjectHook class as described above, select the Projects tab of the Tools, Options dialog. Add the ProjectHook class as shown in Figure 18.6.
Now, when you create a new project, the ProjectHook class you specified in Tools, Options will automatically be placed in the new project's Project Class field in the Project tab, and you'll have access to it just as if you had added the Project Class only to that project.
Note that you'll have to specify a ProjectHook class for existing projects-setting a ProjectHook class in the Tools, Options dialog does not search for every existing VFP project on your computer!
Getting in and around a ProjectHook setting
As I mentioned earlier, when you open a project that has a ProjectHook class attached to it, the project hook object is automatically instantiated and its methods are available for you to manipulate. There might be times when you don't want those events to fire-you can do this by opening the project with the following command:
modify project MYPROJ noprojecthook
When you create a new project, the global ProjectHook class is automatically added to the project. Of course, you can go into the Project Info dialog and remove it, but that's awkward. A better way is to simply issue the command:
create project MYPROJ noprojecthook
On the flip side, you might want to work with a project but not display the Project Manager window while doing so. This would be particularly applicable if you were building tools for other developers, and automatically creating new projects or editing existing projects as part of the process. You can use the following commands to perform these actions without any visible display:
create project MYPROJ noshowmodify project MYPROJ noshow
The key benefit is that the project and project hook objects are still instantiated, so your program will still have access to all the functionality of your ProjectHook class.
Project hook examples
There are two examples of project hooks with the Visual FoxPro samples. The Activity_Tracker sample, in the Program FilesMicrosoft Visual StudioMSDN9898Vsa1033SamplesVFP98SolutionTahoe directory, tracks actions done with a project and saves relevant information to a log file. It's a good, easy-to-follow example.
The Visual FoxPro Application Wizard comes with its own source code, and you can open it to discover how project hooks are used to update a project file with information gathered from the Wizard's interface.
My technical editor has done a lot with project hooks, and has suggested the following ideas for using them:
. . Create a developer toolbar for common project operations. You could set up different buttons for "one-click operations," such as rebuilding all files, building an .EXE, and other frequent processes.
. . Incorporate changes to various project options and development settings before building. For example, you might want to turn on debug info and asserts for a test build, but turn them off and increment version numbers for production builds.
. . Initialize project-specific items. For example, you might want to assign one set of Field Mapping classes for one project, and another set for a different project. These could be set automatically when the project is opened.
. . A variety of project utilities, including creating documentation, searching tools throughout a project's components, file packing (.SCX, .VCX, and .FRX), and ZIPping for backup and distribution.
|
Politica de confidentialitate | Termeni si conditii de utilizare |

Vizualizari: 1150
Importanta: ![]()
Termeni si conditii de utilizare | Contact
© SCRIGROUP 2025 . All rights reserved