| CATEGORII DOCUMENTE |
| Bulgara | Ceha slovaca | Croata | Engleza | Estona | Finlandeza | Franceza |
| Germana | Italiana | Letona | Lituaniana | Maghiara | Olandeza | Poloneza |
| Sarba | Slovena | Spaniola | Suedeza | Turca | Ucraineana |
DOCUMENTE SIMILARE |
||
|
||
MediaRing Talk
Users Manual
Version 6.5
Table of Contents
Chapter 1 Introducing MediaRing Talk
How MediaRing Talk Works
What you need to use MediaRing Talk
Chapter 2 Installing MediaRing Talk
Chapter 3 Registering MediaRing Talk
Register as a new user
Re-register as a Registered User of MediaRing Talk 99
Register as a registered user of MediaRing Talk 1.x/2.x
Chapter 4 Running Configuration Wizard
Chapter 5 Setting Properties
General
User
Connection
Options
Audio
ValueFone
Chapter 6 Starting and Closing MediaRing Talk
Chapter 7 Making an Internet Phone Call
Making a call while logged off the Internet
Making a call while logged on the Internet
Inviting the party you are calling
Chapter 8 Making a PC to Phone Call
Chapter 9 Receiving an Internet Phone Call
Chapter 10 During an Internet Phone Call
Receiving Second Call Notification
Adjusting Microphone and Speaker Volume
Monitoring Internet Traffic Congestion
Chapter 11 Sending and Receiving Voice Messages
Sending a Voice Message
Sending a VoizMail
Receiving Voice Messages
Chapter 12 Using the Phone Book
Creating an Item (telephone entry)
Editing an Item
Deleting an Item
Creating a Group
Editing a Groups Properties
Deleting a Group
Making a Call from the Phonebook
Advanced Settings (Knocking parameters)
Chapter 13 Using the Call Log
Chapter 14 Using the Chat Box
Appendix Installing Dial-Up Networking
Chapter 1 Introducing MediaRing Talk
MediaRing Talk is an award-winning, Next Generation, Internet Voice
Communications software. It allows you to make long distance and international
calls over the Internet, from your PC to any other PC with Internet access and
MediaRing Talk installed, and, to any regular telephone if you subscribe to
MediaRings ValueFone
service. All you need to do is start MediaRing Talk; dial the number; and let
MediaRing Talk establish a connection for you.
Long-distance charges do not apply for PC to PC calls because MediaRing Talk connects to the other party using IP addresses, not through telephone networks. The telephone number is simply used to signal the other party.
How MediaRing Talk Works
The person you want to contact needs to have MediaRing Talk running in the background and subscribe to an Internet account with their local Internet Service Provider. Neither you nor the person you want to contact need be connected to the Internet before making a call through MediaRing Talk.
If you are already connected to the Internet, you can receive an Internet call directly from anyone using MediaRing Talk.
The following steps take place when you make a PC to PC call using MediaRing Talk:
MediaRing Talk uses the modem to dial the telephone number of the person you want to contact. This signals the copy of MediaRing Talk on the PC of the person you are calling.
MediaRing Talk on your PC logs on to the Internet while the copy of MediaRing Talk on the PC of the person you are calling does the same.
Both copies of MediaRing Talk then
register with the MediaRing Talk Server
(a machine acting as a switch to connect MediaRing Talk calls.)
The call is connected through the MediaRing Talk Server. You can now talk with the party you are calling!
What you need to use MediaRing Talk
You need the following configuration for your personal computer to use MediaRing Talk:
Hardware Requirements (Minimum)
Pentium 133 MHz processor
32 MB random access memory (RAM)
8 MB free Hard Disk space
28,800 bps modem, or leased line/ISDN/cable modem
SVGA Display adapter with minimum 256 colors
16-bit Windows Sound System compatible sound card, half-duplex
Microphone and speakers or earphones
Hardware Requirements (Recommended)
Pentium 166 MHz or higher processor
32 MB random access memory (RAM) or more
10 MB free Hard Disk space
33,600 bps or faster modem, or leased line/ISDN/cable modem
SVGA Display adapter with 16-bit High color
Windows Sound System compatible multimedia card, full-duplex
Microphone and speakers or headset
Software Requirements
Windows 95 operating system or
Windows 98 operating system
Windows Dial-Up Networking installed
Other Requirements
Internet access account with your local Internet Service Provider (ISP)
Telephone line connected to your
modem must be able to make long distance / international calls.
(Private Branch Exchange, PBX line can be used to make and receive calls while
logged on the Internet only)
For making long distance calls, you need a direct telephone line with long
distance call access.
Chapter 2 Installing MediaRing Talk
To install MediaRing Talk from CD-ROM (if you have downloaded MediaRing Talk from a web site, double-click MRTALK99-SETUP.EXE and proceed from Step 8):
Remove the CD-ROM from its packaging.
Switch on your computer and let it boot up.
Insert the CD-ROM into your CD-ROM drive.
Double-click the MY COMPUTER icon on the desktop.
Double-click the CD-ROM drive icon.
Double-click the MRTalk folder.
Double-click the MRTALK99-SETUP.EXE icon in the MRTalk folder. The Install window
appears.
Click Install.
Follow the prompts in the Setup Wizard to complete the installation. The Setup
Wizard will not proceed to the next page until all the necessary information is
entered for the current page. If you encounter difficulties, contact MediaRing
Technical Support.
The first dialog box in the Setup
Wizard is the License Agreement dialog box.
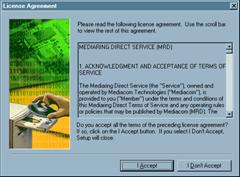
Read the license agreement carefully. You need to use the scroll bar to
scroll the text up in order to read the agreement fully. Click Next when you have finished reading and
agree with the terms and conditions. The
Choose Destination Location dialog box appears.
You can select the default folder: C:Program FilesMediaRing Talk 99,
or enter your own folder. Click Next.
The installation begins. The installation may take a few minutes.
When the Installation Complete
dialog box appears, you can select to run MediaRing Talk now or later. Click Finish to complete the installation
process.
The files necessary to run MediaRing Talk are installed on your computer. The Registration Wizard automatically starts to help you register your MediaRing Talk. Afterwards, the Configuration Wizard automatically starts to help you configure your MediaRing Talk for use.
Important If you do not complete either the Registration Wizard or Configuration Wizard, you will not be able to make or receive calls. You can contact MediaRing Technical Support if you encounter difficulties while running the Registration Wizard or the Configuration Wizard.
MediaRing Talk backs up system files that it modifies during installation and stores them in the following directory:
WindowsSystemTalk99BackupSystemFiles
Chapter 3 Registering MediaRing Talk
Before you can make or receive calls with MediaRing Talk, you must register
yourself so that the MediaRing Talk server knows who you are. You must
re-register if you change the telephone number that is connected to your
MediaRing Talk PC or want to register a second telephone number with your
MediaRing Talk account. You are allowed to register up to two telephone
numbers.
You must register as one of the following:
A new user
Register as a new user if this is the first time you are registering MediaRing
Talk.
Registered user of MediaRing Talk
99
Register as a registered user if you have registered MediaRing Talk 99 before.
Registered user of MediaRing Talk
1.x/2.x
Register in this mode if you have registered MediaRing Talk 1.x/2.x before.
Register as a new user
To register as a new user:
Start MediaRing Talk, if it is not
already started.
Click the Start button, go to the MediaRing Talk 99 folder and click MediaRing Talk 99. MediaRing Talk
starts.
Click the Menu button and click Register
MediaRing Talk. If this is the first time you are using MediaRing Talk 99,
the Registration Wizard should have started automatically when you start MediaRing
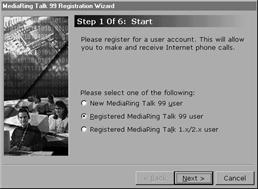
Talk. The Start dialog box appears.

Select New MediaRing Talk 99
user and click Next. If you have
installed the CyberCard, Cyber Agent or Starter Kit versions, the Product dialog box appears. You must
enter the CyberCard Number, Cyber Agent No, or Starter Kit Product ID.
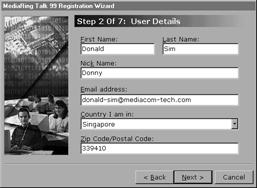
Click Next. The User Details dialog box appears.
Enter your First Name, Last Name, Nickname, Email address, the Country where you reside, and your Zip/Postal Code.
Your first and last names are used in our correspondence with you, whereas your
nickname is used to identify you to the party you are calling.
Enter a valid email address. The email address is used to identify your
account.
The Zip Code is particularly important if you reside in the
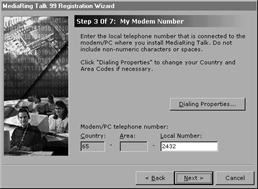
Click Next. The My Modem Number dialog box appears.
Enter your Modem Number. This is the telephone number that connects to the
Modem/PC where you installed MediaRing Talk. This number becomes the MediaRing
Talk-ready number that you give your friends and allows them to make Internet
phone calls to you.
If you do not have a modem connected and are using a leased line, ISDN, cable
modem or AOL connection, you still need to enter your telephone number. This
number becomes the MediaRing Talk-ready number that you give your friends and
allows them to make Internet phone calls to you.

If necessary, click Dialing Properties
to change settings in the Dialing
Properties dialog box. You can also access the Dialing Properties dialog box through the Properties window, User
tab sheet if you need to make changes later.
Click Next. A confirmation box
appears.

Click Yes to confirm the telephone
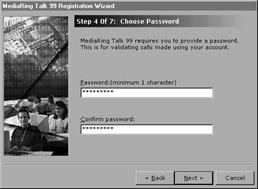
number. The Choose Password dialog
box appears.
Enter your Password and re-enter it to confirm. This password is used to
validate calls made using your account. You must also remember this password to
administer your account through the MediaRing web page.
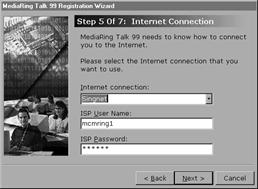
Click Next. The Internet Connection dialog box appears.
Select the Internet Connection that you want MediaRing Talk to connect to your
Internet Service Provider (ISP) with. You need to select at least one Internet
Connection.
If you connect to the Internet through a leased line or cable modem, select Leased Line/Cable Modem.
If you connect to the Internet through America Online (AOL), select America Online (AOL).
If you connect to the Internet through an ISDN modem, select ISDN Connection.
If you connect through a modem, select the Dial
Up Networking Connection you are using.
Important note: MediaRing Talk does
not support XDSL modems (for example, ADSL modems.)
If you select a Dial Up Networking
Connection, enter your User Name
and Password for the selected Dial
Up Networking Connection.
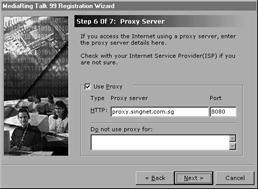
Click Next. The Proxy Server dialog box appears.
Some Internet Service Providers
(ISPs) require that you access the Internet through Proxy Servers.
If you are required to use Proxy Servers, check the Use Proxy box.
Enter your Proxy Server and Port.
Enter the Domains where you do not
need to use the Proxy Server.
Check with your ISP Technical/Customer Support if you are not sure.

Click Next. The On-Line Registration dialog box appears.
You are now ready to start the On-Line Registration. Click Start.

MediaRing Talk will dial up to your Internet Service Provider and connect to
the MediaRing Talk server to register. When the registration is done, a
completion message appears.
Click Finish to exit the Registration Wizard.
Re-register as a Registered User of MediaRing Talk 99
If you have changed your telephone number or want to add a second telephone number, you need to re-register using the Registration Wizard. You can register up to two telephone numbers with your account. If you attempt to register a third telephone number, you will be asked to delete one of the two registered numbers before adding the new number.
To re-register when you are already a registered user:
Start MediaRing Talk, if it is not
already started.
Click the Start button, go to the MediaRing Talk 99 folder and click MediaRing Talk 99. MediaRing Talk
starts.
Click the Menu button and click Register
MediaRing Talk. The Start dialog box appears.
Select Registered MediaRing Talk
99 user and click Next.
If you have installed the CyberCard, Cyber Agent or Starter Kit versions, the
Product dialog box appears. This dialog box shows the Product ID of your copy
of MediaRing Talk.
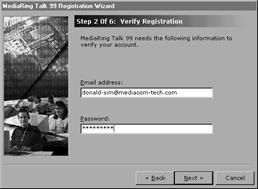
Click Next. The Verify Registration dialog box appears.
Verify that the email address is correct. MediaRing Talk uses your email
address and password to identify you.
Enter your Password. If you have
forgotten your password click the Menu
button, click Web Sites, and click My MediaRing Account. Or, go to the Account Management page in the Members
page: https://www.mediaring.com/members/
.
Click Next. The My Modem Number dialog box appears.
Enter your Modem Number. This is the telephone number that connects to the
Modem/PC where you installed MediaRing Talk. If you change your telephone
number or want to register a second telephone number, enter the new number
here. This number is the MediaRing Talk-ready number that you give your friends
and allows them to make Internet phone calls to you.
If you do not have a modem connected and are using a leased line, ISDN, cable
modem or AOL connection, you still need to enter your telephone number. This
number is the MediaRing Talk-ready number that you give your friends and allows
them to make Internet phone calls to you.

If necessary, click Dialing Properties
to change settings in the Dialing
Properties dialog box. You can also access the Dialing Properties dialog box through the Properties window, User
tab sheet if you need to make changes later.
Click Next. A confirmation box
appears.
Click Yes to confirm the telephone
number. The Internet Connection
dialog box appears.
Select the Internet Connection that you want MediaRing Talk to connect to your
Internet Service Provider (ISP) with. You need to select at least one Internet
Connection.
If you connect to the Internet through a leased line or cable modem, select Leased Line/Cable Modem.
If you connect to the Internet through America Online (AOL), select America Online (AOL).
If you connect to the Internet through an ISDN modem, select ISDN Connection.
If you connect through a modem, select the Dial
Up Networking Connection you are using.
Important note: MediaRing Talk does not
support XDSL modems (for example, ADSL modems.)
If you select a Dial Up Networking Connection, enter your User Name and Password
for the selected Dial Up Networking Connection.

Click Next. The Proxy Server dialog box appears.
Some Internet Service Providers
(ISPs) require that you access the Internet through Proxy Servers.
If you are required to use Proxy Servers, check the Use Proxy box.
Enter your Proxy Server and Port.
Enter the Domains where you do not need to use the Proxy Server.
Check with your ISP Technical/Customer Support if you are not sure.

Click Next. The On-Line Registration dialog box appears.
You are now ready to start the On-Line Registration. Click Start.

MediaRing Talk will dial up to your Internet Service Provider and connect to
the MediaRing Talk server to register. When the registration is done, a
completion message appears. Click Finish
to exit the Registration Wizard.
Register as a registered user of MediaRing Talk 1.x/2.x
If you have registered as a user of MediaRing Talk 1.x/2.x, you need to re-register when you upgrade to MediaRing Talk 99.
To re-register as a registered user of MediaRing Talk 1.x/2.x:
Start MediaRing Talk, if it is not
already started.
Click the Start button, go to the MediaRing Talk 99 folder and click MediaRing Talk 99. MediaRing Talk
starts.
Click the Menu button and click Register
MediaRing Talk. If this is the first time you are using MediaRing Talk 99,
the Registration Wizard starts automatically when you start MediaRing Talk. The
Start dialog box appears.
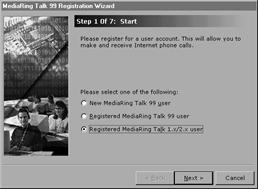
Select Registered MediaRing Talk
1.x/2.x user and click Next.
If you installed the CyberCard, Cyber Agent or Starter Kit versions, the Product dialog box appears. This dialog
box shows the Product ID of your copy of MediaRing Talk.
Click Next. The User Details dialog box appears.
Enter your First Name, Last Name, Nickname, Email address, the Country where you reside, and your Zip/Postal Code.
Your first and last names are used in our correspondence with you, whereas your
nickname is used to identify you to the party you are calling.
Enter a valid email address. The email address is used to identify your
account. If you change your email address, please re-run the Registration
Wizard and update your Email address.
The Zip Code is particularly important if you reside in the

Click Next. The My Modem Number dialog box appears.
Enter your Modem Number. This is the telephone number that connects to the
Modem/PC where you installed MediaRing Talk. If you change your telephone
number or want to register a second telephone number, enter the new number
here. This number is the MediaRing Talk-ready number that you give your friends
and allows them to make Internet phone calls to you.
If you do not have a modem connected and are using a leased line, ISDN, cable
modem or AOL connection, you still need to enter your telephone number. This
number is the MediaRing Talk-ready number that you give your friends and allows
them to make Internet phone calls to you.
If necessary, click Dialing Properties
to change settings in the Dialing
Properties dialog box. You can also access the Dialing Properties dialog box through the Properties window, User
tab sheet if you need to make changes later.
Click Next. A confirmation box
appears.
Click Yes to confirm the telephone
number. The Choose Password dialog
box appears.
Enter your Password and re-enter it to confirm. This password is used to
validate calls made using your account. You must also remember this password to
administer your account through the MediaRing web page.

Click Next. The Internet Connection dialog box appears.
Select the Internet Connection that you want MediaRing Talk to connect to your
Internet Service Provider (ISP) with. You need to select at least one Internet
Connection.
If you connect to the Internet through a leased line or cable modem, select Leased Line/Cable Modem.
If you connect to the Internet through America Online (AOL), select America Online (AOL).
If you connect to the Internet through an ISDN modem, select ISDN Connection.
If you connect through a modem, select the Dial
Up Networking Connection you are using.
Important note: MediaRing Talk does
not support XDSL modems (for example, ADSL modems.)
If you select a Dial Up Networking
Connection, enter your User Name
and Password for the selected Dial
Up Networking Connection.
Click Next. The Proxy Server dialog box appears.
Some
Internet Service Providers (ISPs) require that you access the Internet through
Proxy Servers.
If you are required to use Proxy Servers, check the Use Proxy box.
Enter your Proxy Server and Port.
Enter the Domains where you do not
need to use the Proxy Server.
Check with your ISP Technical/Customer Support if you are not sure.
Click Next. The On-Line Registration dialog box appears.
You are now ready to start the On-Line Registration. Click Start.

MediaRing Talk will dial up to your Internet Service Provider and connect to
the MediaRing Talk server to register. When the registration is done, a
completion message appears. Click Finish
to exit the Registration Wizard.
Chapter 4 Running Configuration Wizard
When you run MediaRing Talk for the first time after installation, the Configuration Wizard starts immediately after the Registration Wizard to help you configure MediaRing Talk for use. The Configuration Wizard ensures that you configure the essential settings needed to use MediaRing Talk. Non-essential settings are set to default. You can change all settings by clicking the Properties button (yellow button). You can also re-run the Configuration Wizard from the Menu button.
To run the Configuration Wizard:
Start MediaRing Talk, if it is not
already started.
Click the Start button, go to the MediaRing Talk 99 folder and click MediaRing Talk 99. MediaRing Talk
starts.
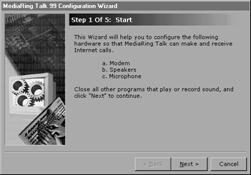
Click the Menu button and click Configuration
Wizard. The Start dialog box
appears.
The Configuration Wizard will help you configure your modem, speakers and
microphone.
Make sure you close all other programs that play or record sound before
continuing. The Configuration Wizard must have full control of the sound card
to work properly.
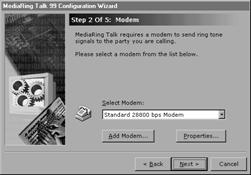
Click Next. The Modem dialog box
appears.
Select your modem from the Select Modem list.
If you do not already have a modem installed and configured, click Add Modem to install your modem. You
need a modem to send ring signals (knocking). Your modem must be physically
connected to your computer and turned on for MediaRing Talk to work properly.
If you want to change your modem properties, click Properties.
If you are using a leased line, ISDN, cable modem, or AOL connections, without
a modem, select No Modem. You will not be able to make or receive calls
when you are not on the Internet nor will you be able to make a call to another
party who is not on the Internet.
Click Next. The Test Speaker dialog box appears.
The Test Speaker dialog box shows the type of sound card (full-duplex
or half-duplex) you have installed.
Click Test Speaker. You will hear an
audio playback.
Drag the slider to adjust the volume
to your comfort.
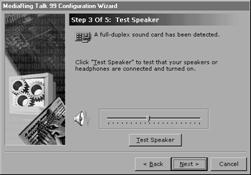
You must test and make sure your speakers are working properly before
proceeding.
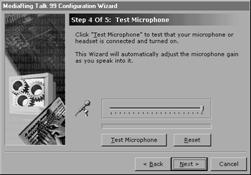
Click Next to proceed. The Test Microphone dialog box appears.
You must now test your microphone.
Click Test Microphone. An
information message appears.
Click OK.
Speak normally into the microphone.
You can read the text above the microphone slider if you do not know what to
say.
The microphone slider adjusts to the volume of your voice.
Click Stop when you have finished
reading the paragraph.
You can click Playback to hear the
quality of your own voice.
If you are not satisfied, click Reset
and redo the test.
After you have tested your microphone, click Next. The Finish dialog
box appears. Click Finish to close
the Configuration Wizard or Back to
retrace the configuration steps and redo them.
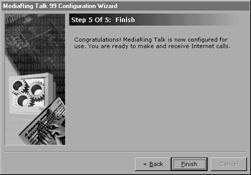
Your installation of MediaRing Talk is now configured properly and ready for
use.
Chapter 5 Setting Properties
The Configuration Wizard guides you through the essential settings. You can set
the values for all settings through the MediaRing Talk Properties dialog box.
You can change the following settings for your MediaRing Talk:
General defines general settings
User defines user-specific settings and information
Connection defines Internet connection specific settings
Options defines Dial History, Call Log and Voice Message settings
Audio defines audio settings
ValueFone defines your ValueFone ID and PIN information
To change MediaRing Talk properties:
Click the Yellow Button in the middle of MediaRing Talk.
The Properties dialog box appears.
Click the tab of the section you want to change.
General
Click the General tab if the Properties
dialog box is showing another tab sheet. In the General tab sheet, you can set answering and hang up options. You
can also associate sounds to events and set upgrade check frequency.
Answering Options When there is an
incoming call
you can set the manner which you want to answer an incoming call.
You can answer the call manually where you need to click Answer or Reject in the
screen prompt message when there is an incoming call.
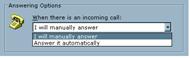
You can also answer calls automatically. You will not be prompted to accept or
reject incoming calls.
Hanging Up Options When hanging up a
call
You can set how you want to handle your ISP connection when you hang up a call.
You can be prompted to disconnect from your ISP or to remain connected.

You can also set not to disconnect from ISP after hanging up.
MediaRing Ready Run when Windows
starts
Check this box if you want to start MediaRing Talk every time Windows starts.
In this way, you are ready to receive and make Internet phone calls as long as
your PC is turned on.
Sound/Display
Click this button if you can associate sounds to events and/or set display
options. The Sound/Display Options
dialog box appears.
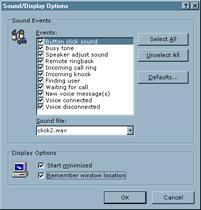
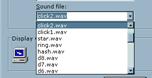
Check an event that you want to associate a sound to and select a sound file
from the Sound file list.
Click Defaults if you want to revert
to default sound associations.
Check the Display Options Start
minimized box if you want MediaRing Talk to start and remain minimized. This
will free up your computer screen and still be ready to receive Internet calls.
Check the Display Options Remember
window location box if you want MediaRing Talk to appear at the same location
every time it starts.
Upgrade
Click this button if you want to change your automatic upgrade check setting or
check for upgrade now.
The Upgrade Checking dialog box
appears.

Select an upgrade check frequency.
You can also click Check Now to
check for an upgrade now. The MediaRing Talk Upgrade Agent appears.
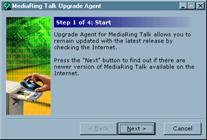
The Upgrade Agent will guide you through the steps to check for, and download,
the latest version of MediaRing Talk.
User
Click the User tab if the Properties dialog box is showing another tab sheet. In the User tab sheet, you can set the telephone number registered with your MediaRing Talk. You can also see the Product ID that identifies your copy of MediaRing Talk.

MediaRing Ready Number
Click Change to update the telephone
number of the telephone line connected to the modem on your PC where you are
running MediaRing Talk.
The Change MediaRing Number dialog box appears.
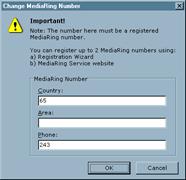
Update the Country and Area Codes (if any), and Phone number.
If you have registered more than one number, you can use this dialog box to
toggle between them. If you want to register a new second telephone number or
change any of the registered telephone numbers, you must run the Registration
Wizard.
MediaRing Talk Account
If you have changed your email address, you must inform MediaRing Technical
Support. Your email address is used to identify you as a MediaRing Talk user.
Connection
Click the Connection tab if the Properties dialog box is showing another tab sheet. In the Connection tab sheet, you can select your modem and set its properties, change your connection settings to your ISP and proxy settings.
Select Modem for Knocking
Modem
Select the modem connected to the telephone line that you use to make Internet
phone calls.
If you are using a leased line, ISDN, cable modem or AOL connections, without a
modem, select No Modem. You will not be able to make or receive calls
when you are not on the Internet nor will you be able to make a call to another
party who is not on the Internet.
Select Modem for Knocking -
Dialing Properties
Click this button if you want to set the dialing properties for your modem. The
Dialing Properties dialog box
appears.
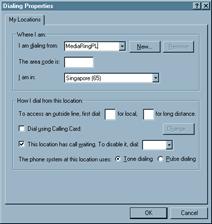
Enter your dialing location information. If you are setting up the dialing
properties for the first time, click New
and enter a name for your dialing location.
Important
You must have a direct telephone
line that can make long distance calls. If you access the Internet through a
PBX or keyphone system, you need to set the access code for obtaining an
outside line in the Dialing Properties
dialog box. If you have set the access code in the Windows Dial-Up Networking Properties dialog box, do not set the
access code here.
However, you will not be able to receive calls while logged off the Internet.
MediaRing Talk requires a direct telephone line to receive calls while logged
off the Internet.
Select Modem for Knocking Modem
Properties
Click this button if you want
to set the properties for your modem. The Modem
Properties dialog box appears showing the General tab.
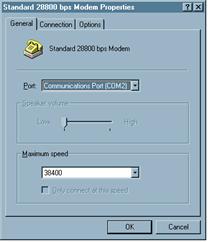
The properties in this dialog box should have been set when you installed the modem to your personal computer. However, you can still change any of the properties here.
Click the Connection tab if you want to define
the connection settings for your modem. The Connection tab sheet appears.
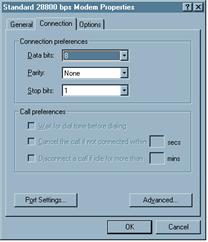
In the Connection tab sheet,
you can define the number of data bits in a frame, set parity checking, and
define the number of stop bits. You can also set dialing to start after
confirming a dial tone. You usually do not need to change any of the settings
in the Connection tab sheet.
Click the Port Settings button if you want to view or change the port
settings for your modem. The Advanced
Port Settings dialog box appears.
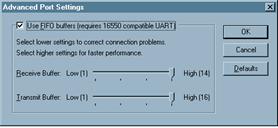
In the Advanced Port Settings dialog
box, you can select to use
FIFO (First In First Out) buffers and adjust the level for the Receive and
Transmit buffers. You usually do not need to change any of the settings in the Advanced Port Settings dialog box.
Click the Advanced button on the Modem Properties dialog box if you want
to view or change the advanced connection settings for your modem. The Advanced Connection Settings dialog box
appears.
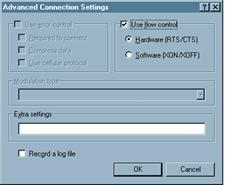
In the Advanced Connection Settings
dialog box, you can set flow control on and select between hardware and
software flow control. You usually do not need to change any settings in the Advanced Connection Settings dialog
box.
Click the Options tab in the Modem
Properties dialog box if you want to view or change connection and control
settings for your modem. The Options
tab sheet appears.
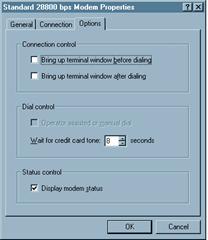
In the Options tab sheet, you can set to bring up the terminal window before or after dialing. The terminal window contains controls for the modem. You can also select between making operator assisted calls or manually dialing non-local calls.
Connection to Internet Connection
Select the Internet Connection you want MediaRing Talk to connect to your
Internet Service Provider (ISP). You need to select at least one Internet
Connection.
If you connect to the Internet through a leased line or cable modem, select Leased Line/Cable Modem.
If you connect to the Internet through America Online (AOL), select
If you connect to the Internet through an ISDN modem, select ISDN Connection.
If you connect to the Internet through a modem, select the Dial Up Networking Connection that you are using.
Important note: MediaRing Talk does
not support XDSL modems (for example, ADSL modems.)
Connection to Internet User name
Enter the User name that you use to connect to your ISP.
Connection to Internet Password
Enter the Password that you use to connect to your ISP.
Connection to Internet Proxy
Settings
Some ISPs require that you access the Internet through a proxy server. Click
this button to change proxy settings.
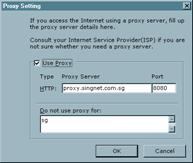
If you are not required to connect to the Internet through a proxy server, you
must not enter any proxy settings.
Connection to Internet
Properties
Click this button to change Dial Up Networking settings for your Dial Up
Networking Connection. See Windows Help for more information.
Options
Click the Options tab if the Properties dialog box is showing another tab sheet. In the Options tab sheet, you can change Dial History, Call Log and Voice Message settings.
Dial History Clear History
The Dial History contains a list of the last 20 numbers dialed. You can click
this button to clear the Dial History.
Call Log Options Number of
days to keep entries
The Call Log records information about outgoing and incoming calls. You can set
the number of days after which the expired entries are deleted from the Call
Log. The first Call Log records that exceed the number of days are deleted.
Voice Message Options Number
of days to keep messages
Voice messages that you received are kept on your hard disk and thus they
occupy disk space. You can set the number of days after which the expired
messages are deleted. The first voice messages that exceed the number of days
set are deleted.
Voice Message Options Check
for message every
Set the number of elapsed minutes that MediaRing Talk will check for voice
messages. You can only retrieve voice messages when you are logged on to the
Internet.
Audio
Click the Audio tab if the Properties dialog box is showing another tab sheet. In the Audio tab sheet, you can set Automatic Echo Cancellation and Half-Duplex operations.
Automatically set sound card
properties
Check this box if you want to set your sound card properties automatically.
Use echo cancellation (AEC)
Check this box if you want to enable echo cancellation.
AEC Automatic Echo Cancellation, is a technology to minimize the echo effect
of the received audio.
Uncheck this box if the quality of the received audio signal is poor.
Force half duplex operation
Check this box to force MediaRing Talk to work in half duplex mode. This option
is only available if you have a full duplex card. MediaRing Talk automatically
detects the duplex mode of your sound card as well as the other partys sound
card and switches to half duplex mode if any one party is using a half duplex
sound card.
Use DirectSound
If you have DirectX installed on your computer and MediaRing Talk is able to
access it, you can check this box to take full advantage of DirectSound
capability. DirectSound optimizes the sound quality from your sound card.
This option is grayed out if you do not have DirectX installed or MediaRing
Talk is not able to access DirectX.
ValueFone
Click the ValueFone tab if the Properties dialog box is showing another tab sheet. In the ValueFone tab sheet, you can type in your ValueFone ID and PIN. You can select to remember your password so that you dont have to enter it every time you make a ValueFone call.
Chapter 6 Starting and Closing MediaRing Talk
You can start MediaRing Talk automatically when Windows starts, start it from the Start button, close it, minimize it and set it to Do-Not-Disturb mode.
You can start MediaRing Talk from the Start button, Programs folder:
Click the Start button and go to Programs.
Go to MediaRing Talk 99 and then click MediaRing Talk 99.
MediaRing Talk appears.
A handset icon also appears in the system tray at the right hand corner of the task bar.
![]()
From MediaRing Talk, you can surf to MediaRings web site by clicking the words MediaRing Talk.
If you are connected in Half-Duplex mode, the Press-to-Talk window appears. You can override the other party by holding down the Press-to-Talk button and speaking into the microphone.
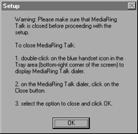
You can close MediaRing Talk any time:
Click the cross (x) at the top right hand corner of
MediaRing Talk.
A confirmation dialog box appears.
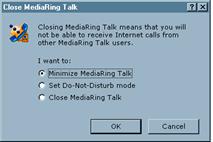
Select Close MediaRing Talk and click OK. MediaRing Talk closes.
You can minimize MediaRing Talk by clicking the cross (x), selecting Minimize MediaRing Talk in the confirmation box and clicking OK. Alternatively, you can minimize MediaRing Talk by clicking the '_' button at the top right corner of the MediaRing Talk window.
Currently, the Set Do-Not-Disturb mode is not operational.
Chapter 7 Making an Internet Phone Call
You can make an Internet phone call when you are logged off the Internet. MediaRing Talk will make the connection for you.
You can also make an Internet phone call while you are logged on to the Internet if the party you want to call is also logged on to the Internet.
Making a call while logged off the Internet
To make a call while logged off the Internet:
Start MediaRing Talk, if it is not
already started.
Enter the telephone number of the
party you want to call. You can also click the Down Arrow and select a
telephone number from the Call History or use the Phone Book to select an
entry.
If you call from the Call History or use the Phone Book, you can just click the
Dial icon (handset icon) or
double-click on the entry.
If you have made a mistake, or want to start over click the Clear/Hang up button (C).
If you are making an international call, enter the Country code. You can also enter the name of the country; MediaRing Talk will automatically match the Country code for you.
If you are making an international call or long distance call, enter the Area code.
Click the Dial button (handset). A
sequence of events occurs to complete the call. These events are collectively
called Knocking and they involve ringing the called partys telephone several
times in a row as a signal that there is a MediaRing Talk call coming in. If
the called party is already logged onto the Internet, knocking is skipped and
the call is connected straightaway. The call status appears as a series of
messages in the MediaRing Talk screen.
|
Call Status Message |
Description |
|
Knocking user |
Dialing remote user to signal PC to log on to the Internet. |
|
Connecting to ISP |
Starting the process to connect to your Internet Service Provider (ISP). |
|
Dialing ISP |
Dialing in to your Internet Service Provider (ISP). |
|
Authenticating with ISP |
Authenticating your user account and password with your Internet Service Provider (ISP). |
|
ISP authentication success |
Successfully authenticated your user account and password with your ISP. |
|
Contacting server |
Trying to contact the MediaRing Talk server. |
|
Finding user |
Searching the MediaRing Talk server for the party you are calling. |
|
Contacting user |
Making the connection to the party you are calling. |
|
Contacted user |
Found the party you are calling. |
|
Negotiating |
Attempting to set up an Internet connection between you and the party you are calling. |
|
Connected with |
Your Internet phone call is connected. You may now begin your conversation. |
When you are connected, the Silence Threshold indicator appears as a horizontal bar in the MediaRing Talk screen. The Silence Threshold is automatically adjusted according to the level background noise. You can override the automatic Silence Detection by dragging on the Down Arrow; the automatic Silence Detection is now turned off. Automatic Silence Detection is restored when you make a subsequent call.
You may speak into the microphone when the microphone icon appears. This is very important especially when you are connected in Half-Duplex mode as your voice is not sent when the microphone icon is not displayed.
If you are connected in Half-Duplex mode, the Press-to-Talk button appears. You can override the other party by holding down the Press-to-Talk button and speaking into the microphone.
To end the Internet phone call, click the Clear/Hangup button (C).
If the party you are calling does not have MediaRing Talk installed, you will be prompted to invite this party to download MediaRing Talk. If you click OK to invite, your default Internet Browser will launch with the Invitation web page. Just enter the called partys name and email address, and MediaRing will send an invitation email to him. You can even include a personal message.
Making a call while logged on the Internet
Making a call while logged on the Internet is very similar to making a call while logged off the Internet. However, there are a few differences and these are highlighted here.
To make a call while logged on the Internet:
Start MediaRing Talk, if it is not already started.
Enter the telephone number of the party you want to call. You can also call from the Dial History or the Phone Book.
Enter the Country code or the name of the country for international calls.
Enter the Area code for long distance calls.
Click the Dial button (handset).
If the party you are calling is logged on the Internet, your call will be
connected straightaway.
Otherwise, you will be asked if you want to disconnect from Internet to Knock
the called party; you must Knock for your call to be connected. If you choose
not to disconnect from Internet, your call is not connected and you can
continue surfing the Internet or attempt to make a call to another party.
If you choose to disconnect from Internet to Knock the called party, the rest of the process is the same as for making a call while logged off the Internet.
Inviting the party you are calling
If the party you are calling does not have MediaRing Talk installed, you will be prompted to invite this party to download MediaRing Talk. If you click OK to invite, your default Internet Browser will launch and bring you to the Invitation webpage. Just enter the called partys name and email address, and MediaRing will send an invitation email to him or her. You can even include a personalized message.
Chapter 8 Making a PC to Phone Call
Making a PC to Phone call with the ValueFone service is similar to making a call with the PC to PC feature. There are a few differences and these are highlighted here.
With the PC to Phone option you can call from MediaRing Talk to any type of phone, except an extension line, intercom or pager.
To make a PC to Phone call:
Sign up for the ValueFone service.
Start MediaRing Talk, if it is not already started.
Select PC to Phone on the LCD screen or in the drop-down menu that appears after you have chosen a name from the phonebook.
Enter the Telephone Number of the party you want to call. You can also call from the Dial History or the Phone Book.
The type of call selected in the phone book overrides the type selected on the LCD screen.
Enter the Country code or the name of the country for international calls.
Enter the Area code for international or long distance calls.
Click the Dial button (handset).
If you have not yet entered your ValueFone ID and PIN in the Properties, ValueFone tab you will be prompted to enter your ValueFone ID and PIN. Check the Save Password box if you do not want to be prompted every time you make a PC to Phone call.
The balance amount for your ValueFone account will display on the LCD screen. This amount is refreshed before your next PC to Phone call get connected. A balance warning will appear 40 seconds before your account runs out of credit. You will be prompted to recharge your account. If you click on Top-up, your default browser will launch and take you to the ValueFone page so that you can recharge your account.
Recharging does not occur immediately. The recharge must be processed before your account can reflect the change. If you are topping up during a call and you have been warned that your account balance is low, you will be disconnected when you balance reaches zero.
To end the call, click the Hangup button (handset) to disconnect.
If the party that you are calling does not answer, click the Hangup button (handset) to disconnect.
Chapter 9 Receiving an Internet Phone Call
As long as your PC is turned on, MediaRing Talk is running in the background, and the telephone line connected to your modem is not engaged in a telephone call, you can receive Internet phone calls.
If you are surfing the Internet when an Internet phone call comes in, MediaRing Talk will prompt you to accept or reject the call. If you accept, the call is connected straightaway and you can start your conversation.
If you are logged off the Internet when an Internet Phone call comes in, you can hear two or three rings (Knocking) followed by a sequence of messages in the MediaRing Talk screen.
|
Call Status Message |
Description |
|
Incoming Knock |
Request for connection is detected. This is accompanied by a ringing tone. |
|
Dialing ISP |
Dialing in to your Internet Service Provider (ISP). |
|
Authenticating with ISP |
Authenticating your user account and password with your Internet Service Provider (ISP). |
|
ISP authentication success |
Successfully authenticated your user account and password with your ISP. |
|
Contacting server |
Contacting the MediaRing Talk server. |
|
Waiting for call |
Waiting for the calling party to log on to the Internet and register with the MediaRing Talk server. |
|
Contacted user |
Found the party calling you. |
|
Negotiating |
Attempting to set up an Internet connection between you and the party calling you. |
|
Connected with |
Your Internet phone call is connected. You may begin your conversation now. |
When the call is established, the MediaRing Talk screen shows the callers particulars. Click Answer to accept the call or Reject to reject the call (if you have set Answering Options to Answer Automatically, the incoming call is connected automatically).
Throughout the duration of the call, you can monitor the performance of the connection. Click the Network Delay button on MediaRing Talk. The Network Delay window appears, showing the minimum, maximum and current delay times in color coded bars; Green indicates good performance, Yellow indicates moderate quality, and Red indicates poor connection with high delay times. MediaRing Talk may need to terminate your call if the Internet traffic congestion is unbearably high over a sustained period.
To terminate the call, click the Cancel/Hang up button (C) on MediaRing Talk.
Chapter 10 During an Internet Phone Call
While you are engaged in an Internet phone conversation, you can do any or all of the following:
Receive second call notification
Adjust microphone and speaker volume
Monitor Internet traffic congestion
Use the Chat Box
Receiving Second Call Notification
If an Internet phone call comes in while you are engaged in a conversation, a prompt message appears in the MediaRing Talk screen asking you to Reject the call. You can return the call after you have finished your current conversation. The calling party can also leave a voice message for you.
Adjusting Microphone and Speaker Volume
You can adjust the microphone and speaker volumes at any time.
Monitoring Internet Traffic Congestion
Throughout the duration of the call, you can monitor the performance of the connection.

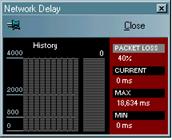
The Network Delay window appears, showing the minimum, maximum and current
delay times in color coded bars; Green indicates good performance, Yellow
indicates moderate quality, and Red indicates poor connection with high delay
times.
You can also see the percentage of packet loss. The Internet carries
information in the form of packets. So, a lower percentage of packet loss means
a lower loss of information, in this case, voice, which translates to a better
voice quality. At high percentage losses, you would encounter choppy voice
quality. In such cases, you may want to disconnect and try again later.
MediaRing Talk may also terminate your call if the Internet traffic congestion
is unbearably high over a sustained period of time.
Chapter 11 Sending and Receiving Voice Messages
MediaRing Talk allows you to send voice messages to other MediaRing Talk users under any of the following circumstances:
Anytime, even when you are not connected to the Internet
When the person you are calling is engaged in a conversation or you are unable to connect
When your call is ended prematurely, for example, due to heavy network congestion
When you do not want to disturb the person you want to contact, say, because of different time zones.
When the person you are calling is not a registered MediaRing Talk user.
You can receive and send voice messages of up to 15 minutes each.
Sending a Voice Message
To send a voice message to a MediaRing Talk user:
Click the Voice Messages button on MediaRing Talk.

The Voice Message window appears.
Click the Record button. The Record Voice Message dialog box appears.
Enter the telephone number (include the country code, and area code where applicable) of the party you want to send the message to.
Click the Record button and record your message. You are allowed a maximum of 15 minutes per message.
Click the Stop button to end your message.
You can replay your message by clicking the Play button.
You can also re-record your message by clicking the Record button.
When you are ready to send the message, click the Send button. If you are already connected to the Internet, your message is sent right away. Otherwise, MediaRing Talk will connect to the Internet to send your message.
Click Close (x) when you are done.
Sending a VoizMail
To send a VoizMail to any e-mail address:
Click the Voice Messages button on MediaRing Talk.
The Voice Message window appears.
Click the Record button. The Record Voice Message dialog box appears.
Select to send Voice Message by using E-mail Address.
Enter the e-mail address of the party you want to send the message to.
Click the Record button and record your message. You are allowed a maximum of 15 minutes per message.
Click the Stop button to end your message.
You can replay your message by clicking the Play button.
You can also re-record your message by clicking the Record button.
When you are ready to send the message, click the Send button. If you are already connected to the Internet, your message is sent right away. Otherwise, MediaRing Talk will connect to the Internet to send your message.
Click Close (x) when you are done.
Note: The recipient will receive an e-mail notification with the URL address of the personalized VoizMail.
Receiving Voice Messages
MediaRing Talk can check your voice message box for messages at regular intervals or you can retrieve them manually.
To retrieve your voice messages manually:
Click the Voice Messages button on MediaRing Talk. The Voice Message window
appears.
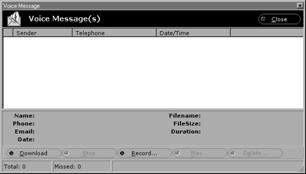
Click the Download button to download any new messages in your voice message box. Unread messages are marked with an Envelope symbol.
You can select a message you want to hear and click the Play button or double-click on it.
You can delete a message by selecting it and clicking the Delete button.
You can delete all messages by clicking the Delete All button.
You can also sort messages by Sender, Telephone number or Date/Time by clicking the appropriate buttons.
Chapter 12 Using the Phone Book
The Phone Book feature allows you to store telephone numbers for easy reference. You can add, delete groups and items (telephone number entries) and specify advanced settings for individual numbers (only in special cases).
To open the Phone Book, click the Phone Book button on MediaRing Talk.
The MediaRing Phonebook window appears.
Creating an Item (telephone entry)
To create an Item:
Click the New button. Alternatively, you can click the Phonebook menu and select New,
Item. The New Item dialog box
appears.
Enter the name of the person.
Enter the Country and Area codes.
Enter the Phone number.
Enter the E-mail Address
Select the type of call: PC to PC, PC to Phone, or Ask when I Dial.
Select an icon from the picture list and click OK. The Item is created.
Editing an Item
To edit an item, select the group and then the item that you want to edit and click the Edit button. Alternatively, you can select the group and then the item that you want to edit. Click the Edit menu and select Item Properties. The Item Properties dialog box appears.
You can now edit the name, icon, telephone number/email address, and type of call, then click OK.
Deleting an Item
To delete an item, select the group and then the item that you want to delete and click the Delete button.
Alternatively, you can select the group and then the item that you want to delete. Click the Edit menu and select Delete Item.
Creating a Group
To create a Group:
Click the Phonebook menu and select New,
Group. The New Group dialog box appears.
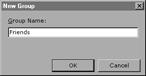
Enter the name of the group and click OK. The new group is created. You can now add items to this group.
Editing a Groups Properties
To edit a groups properties, select the group. Click the Edit menu, Group Properties. The Group Properties dialog box appears.
You can now edit the name of the group and click OK.
Deleting a Group
To delete a group, select the group that you want to delete. Click the Edit menu and select Delete Group.
Making a Call from the Phonebook
Select the group and then the item that you want to call. Click the Dial button. Alternatively, you can click the Phonebook menu and then select Dial or simply double-click on the item. You will be prompted to select the type of call (PC to PC or PC to Phone). The Internet phone call is set up for you.
Advanced Settings (Knocking parameters)
If you persistently encounter difficulties in Knocking (signalling) a particular MediaRing Talk user, you can change the Knocking parameters (that determine the way MediaRing Talk on your PC signals to the MediaRing Talk on the receivers PC).
Select the group and then the item that you want to edit the Advanced Settings.
Click
the Edit Item button. The Properties
dialog box appears.
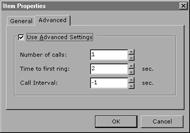
Check the Use Advanced Settings box and enter your own parameters:
No of calls
Enter
the difference in the number of calls to be made to initiate the remote PC.
This must be set to at least two calls. For example, if you enter 1, then the
number of calls made will be incremented by 1. If the default was 2 calls, then
the new setting would be 3 calls.
Time to first ring
Enter
the difference in the maximum time interval (in seconds) allowed between
dialing the last digit in the telephone number and the start of the first ring
at the called party. You can determine this by doing an actual measurement with
a stopwatch. It is recommended that you use a slightly longer interval than the
previous attempt. For example, if you enter 1, then the maximum time interval
is incremented by 1 second.
Call interval
Enter the difference in the maximum time interval
(in seconds) allowed between the calls. This is to allow time for the modem to
reset itself. The default setting is 8 seconds. It is recommended that you do
not change this setting unless you get a busy tone after the number of seconds
has elapsed. For example, if you enter 1, then the maximum time interval is
incremented by 1 second.
Chapter 13 Using the Call Log
The Call Log allows you to view a record of all calls made to and from your PC. The Call Log also includes calls that were rejected and calls that failed to be connected.
To view the Call Log:
Click the Call Log button on MediaRing Talk.

The Call Log window appears.
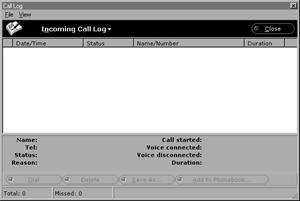
You can select a record and add it to the Phonebook by clicking the Add to Phonebook button.
You can return a call by selecting its record and clicking the Dial button.
You can select a record and delete it by clicking the Delete button.
You can sort the records by Date, Status, Name/Number, and Duration by clicking on the appropriate button.
You can save the contents of the log file to a text file by clicking the Save As button. A Save As dialog box appears. Enter the name of the text file and click Save.
Chapter 14 Using the Chat Box
When you are connected on an Internet call, you can use the Chat Box to send a text message to the person you are speaking with. You can use the Chat Box to send important information such as identification numbers, addresses and names.
To start the Chat Box:
Click
the Chat Box button on MediaRing
Talk.

The Chat Box window appears.
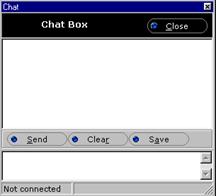
Type your message in the lower window and press Return or Enter. You can also click the Send button. Your message appears in blue in the upper window.
When you receive messages from the person you are connected to, the message appears in red in the upper window.
You can also save your messages into a file. Click the Save button. A Save As dialog box appears. Enter the name of the file, select the file format and click Save. You can save the file in one of the following formats; text (.txt), rich text format (.rtf) and document (.doc).
Click the Clear button to clear the contents of the upper window.
Appendix Installing Dial-Up Networking
You need Windows 95 Dial-Up Networking to use MediaRing Talk. If you did not install Dial-Up Networking when you installed Windows 95 on your computer, follow the instructions below to install Dial-Up Networking. You must have your Windows 95 CD‑ROM available.
Insert the Windows 95 CD-ROM into your CD-ROM drive.
Click the Start button, Settings, Control Panel menu. The Control Panel folder appears.
Double-click the Add/Remove Programs icon. The Add/Remove Programs dialog box appears.
Click the Windows Setup tab. The Windows Setup tab sheet appears.
Click the box for Communications to select it and click Details. The Communications dialog box appears.
Click the box for Dial-Up Networking to select it and click OK. Windows 95 will now install Dial-Up Networking on your computer.
Restart your computer after Dial-Up Networking is installed.
Double-click the My Computer icon on the desktop to open it. The Dial-Up Networking icon appears in the My Computer folder.
Double-click the Dial-Up Networking icon. The Dial-Up Networking Welcome message appears.
Click Next. The Make New Connection dialog box appears.
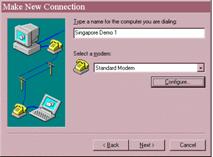
Enter the name of your connection. You can enter any name you want; this name identifies the settings for this connection.
Select the modem you have connected to your computer. Click Configure if you need to configure your modem.
Click Next.
Select your country from the Country Code list.
Click the Telephone Number field and enter the telephone number you call to
dial in to your Internet Service Provider (ISP).
Select the Area Code field and enter
the area code if applicable.
Select the country code of your ISP in the Country
Code field.
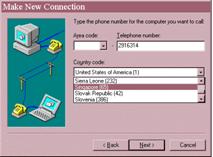
Click Next. The new connection is added. Click Finish.
|
Politica de confidentialitate | Termeni si conditii de utilizare |

Vizualizari: 2402
Importanta: ![]()
Termeni si conditii de utilizare | Contact
© SCRIGROUP 2025 . All rights reserved