| CATEGORII DOCUMENTE |
| Bulgara | Ceha slovaca | Croata | Engleza | Estona | Finlandeza | Franceza |
| Germana | Italiana | Letona | Lituaniana | Maghiara | Olandeza | Poloneza |
| Sarba | Slovena | Spaniola | Suedeza | Turca | Ucraineana |
DOCUMENTE SIMILARE |
|||
|
|||
Guitar Lessons Beginner Intermediate Advanced
Beginner
1. Understanding Notes And The Chromatic Scale 2. Tuning The Guitar And Beginning To Read Tablature 3. Playing Chromatic Scale On Guitar 4. Major Scale I 5. Chords I - Major 6. Chords II - Minor Tuning the Guitar and basic Guitar Tablature
A Step-by-Step process to learning to tune your guitar, with a little about tablature on the way. I hope that by the end of this lesson you should be able to tune your guitar and be able to read basic tablature.
Tuning the Guitar
Well this can be a problem for beginning guitarists who do not have a guitar tuner; e.g. one of those handy little devices, which indicate through a light when each string is in fact at the correct pitch. The theory behind it is that mostly we tune to the following:
Starting from the Thickest String up to the smallest: E,A,D,G,B,E ('Eat All Day, Get Big Easy'. is a useful memory tool for that.)
The question you are probably asking now is 'how do I work out what an 'E' or 'A' is anyway? Well, to assist this what I have done is to record a sample of my guitar playing an open (big) E string so that you can tune your E string to it - from this one string we can tune all the other strings of the guitar.
A good way to do this is to play them together, try to get it close and then play them apart - by switching backwards and forwards between the two you may force your ear to hear the difference. It should be noted at this point that tuning the guitar can be the biggest obstacle that many beginning guitarists can face and that it is very easy to lose enthusiasm at this point. Keep trying! It is only through repetition that your ear can learn to distinguish between what is right and what sounds wrong. Before I show you how to tune the rest of the strings of the guitar, I will introduce you to a way of graphically representing the guitar fretboard. This will make it easier for me to depict the concepts that I am about to explain.
Introduction to Guitar Tablature
As mentioned above this is a graphical representation of the fretboard of the guitar with the thickest string at the bottom and the lightest at the top.
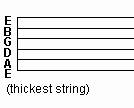
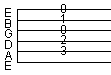
So if we remember the theory of tuning the guitar that we mentioned above we see that starting from the bottom (thickest) string and working upwards the notes are tuned to E,A,D,G,B,E.
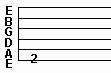
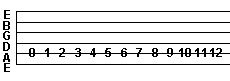
Now sooner or later we are going to play some notes and in tablature, each note that is played is indicated by the number of the fret where it is played. This number is placed on the correct string also.
Therefore to play a single note on the big 'E' string at the second (2) fret then we would write the following:
Tuning the Guitar (Continuation)
Now its all very well reading one note - but we probably want to play more than one, to read multiple notes we just move from left to right playing each note as we come to it. Here is an example of playing the big 'E' string without fretting it (which equates to a 0 on the tab) then playing at the 2nd fret on the 'E' string, and then finishing with an open (unfretted) 'A' string.
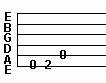
So we see that we move from left to right playing the notes in order as we come to them. To write in tablature some notes that are played together (at the same time) then just put the notes in a straight line on the tab. Here is an example to illustrate this:

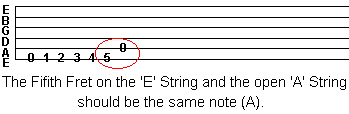
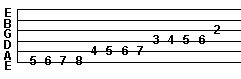
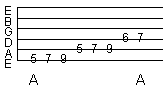
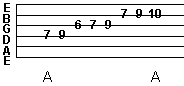
The above tablature indicates that we should play a open 'E' (large string), a note on the second fret of the 'A' string and the second fret of the 'D' string at one time. There are many more symbols used in tablature, but we will come to them later as we need them. By now we should have the big 'E' string of your guitar in tune, from here we will learn how to use that string to tune all the other strings on the guitar. So the first step that we must take it to tune the next string beside the 'E' which of course is the 'A' string. If we remember lesson one which introduced the theory behind the chromatic scale we can see that 'A' is 6 semitones above 'E' in the chromatic scale. We also learned in lesson one that one fret on the guitar was equal to one semitone. So what this means is that we can start on the 'E' string that is in tune and travel 5 frets or 6 semi-tones (remember the 'E' string counts as one note!!) up the string until we find an 'A' note. This is the note that we will tune the 'A' string to.
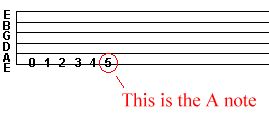
So we see that by going through the chromatic scale starting at 'E' and counting one step of the scale per fret we can work out the notes that are on the fretboard. For example above we started with the open 'E' note and then by moving up one semitone (same as one fret) we came to the 'F' note - when we went up another we got to 'F#' - we continued this (G, G#.) until we reached the goal note - which in this case is 'A'. Remember that whenever you move one fret up on the guitar it is equal to one step of the chromatic scale. On the low 'E' string, holding down the fifth fret and striking it should produce the same sound as an open 'A' string. By playing the 'A' note on the fifth fret on the 'E' string and then getting the open 'A' string to match this is one of the methods we use to tune our guitars. Just keep playing the 'A' note on the 'E' string and compare it to the open 'A' string - listen closely to the 'A' string - if it sounds lower then tighten the string, if it sounds higher then slacken the string off and then try to tune upwards again. Continue this until the 'A' note and the 'A' string sound the same.
Here is an example of going up the neck of the guitar to find 'A' fret by fret and the open A string being played after the 'A' note.
Finishing Tuning the Guitar - The Last four Strings
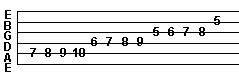
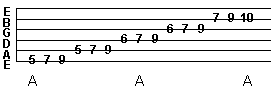
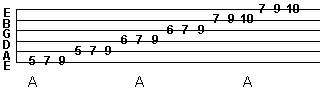
Ok so now we should have the 'A' String tuned as well, but what about the D, G, B, and little e string. Well you will be happy to know that just as you tuned the A string using the E string you can tune the other strings from notes on the next string to them.
For example:
To tune the 'D' String you would tune to the note 'D' that is on the fifth fret of the 'A' String.
To tune the 'G' String you would use the 'G' note on the fifth fret on the 'D' String.
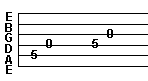
So the above tablature shows the notes to play to tune the open strings that are beside them.
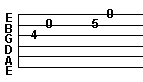
Now the only string that does not follow this rule is the 'B' string - this gets tuned from the fourth fret on the 'G' string, We tune to 'B' on this string as it is one of the best compromises to make chord and scale shapes easy to play. So to tune the 'B' String - use the B note at the Fourth Fret on the 'G' String. The little 'e' string follows the normal rule and is tuned off the 'e' note on the fifth fret of the 'B' string.
Remember to get the sounds of the open strings and the note that you are tuning with to sound almost identical. By the time you tune the top strings the bottom ones may have been pulled out of tune, it may be necessary to retune all the strings many times before they will sit in tune.
A suggestion for beginners who are having trouble tuning their guitars:
Firstly, you could find someone to tune your guitar for you, then grab a tape deck and record the sounds of each string. Begin with the low E string and strike it several times when recording. Let the note ring for a while. Strike them in a slow rhythm, say once every two seconds. Do this for the same string 10 or so times, then move to the next string. This will give you a steady recording of what each string should sound like so you can play the tape back and tune in on it.
Secondly, you could invest in a Tuning fork. Most tuning forks sound an A note when struck. You can use this to tune the open A string.
When tuning, always tune up. This means, loosen the string so it is of a lower note and then tune up to the correct note. Don't tune down to the note. (The reason for this as I understand it is that the tuning heads do not grip the string well enough when you undo them, and they can slip out of tune easier. By always insuring that your last turn of the tuning heads is to tighten the string then the tuners will grab the string quite nicely).
Summary of This Lesson
I hope that you will have learned the following:
What Tablature is?
How to tune your guitar
Introduction to Notes and The Chromatic Scale
The Basics can never be overlooked, and even when you think that you are a good player, you will still find yourself resorting to the basics repeatedly. The purpose of this and upcoming lessons in this series is to form a solid base of knowledge from which you can evolve.
Music is made up from so-called 'Fixed sounds' - that is when we play a single note on a piano-like instrument the sounds slowly fades away but does not go up or down. The guitar is actually capable of playing an infinite number of notes in between any two notes with only a minute difference between the notes but in practice, all instruments generally only use the notes that are on the keyboard of the piano. We tune our guitars so that we are in tune with the 'fixed' notes of the piano (i.e. our 'E' note is in fact an 'E' note).
What is the Chromatic Scale?
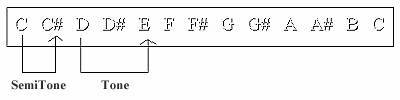
Most of the western music we hear only contains 12 notes; these are the 12 notes of the Chromatic scale and indeed the 12 notes that are present on a piano keyboard. The Notes of the Chromatic Scale are (starting from C in this case) :
C, C#, D, D#, E, F, F#, G, G#, A, A#, B
The '#' character indicates a 'sharp' note, this indicates that the note is one semitone (see below) higher than the note that it is written with for example the A# indicates that it is one semitone higher than the A note.
You will notice that there is no E# or a B# this is because of how the music has been divided up. If you have a look, at a keyboard the sharp (or flat) notes are the black keys and you will notice that there are some missing!!!!Well these are the E# and B#.
The chromatic scale can also be written using flats: C, Db, D, Eb, E, F, Gb, G, Ab, A, Bb, B, C
The 'b' character indicates a flattened note - that is a note that lays one semitone below the note written with it. Therefore 'B Flat' (Bb) is one semitone below B. Right now here is the tricky bit Db and C# are essentially the same note, Db is one semitone below D and C# is one semitone above C. These notes are called 'enharmonic equivalents', so you notice also that there is no Fb just as there was no E#.
Tones and Semitones
The notes of the chromatic scale are one semitone apart, this equates to one fret on the guitar. To move up a full tone then you will need to move up the string two semitones, which is two frets.
1 tone = 2 semitones
1 tone = 2 frets on the guitar
1 semitone = 1 fret on the guitar
This is the end of this lesson - next we will look at tuning our guitar, and learning to read a little guitar tablature.
Summary of This Lesson
Hopefully you will have learned the following :
What the notes are called that we play in music.
That the chromatic scale contains all these notes.
What 'enharmonic equivalents' are.
The difference between tones and semitones.
Playing The Chromatic Scale on Guitar
Ok so we have covered some concepts that you may be finding quite intimidating at this stage, well sorry but its not quite finished. Here is a little primer on playing the chromatic scale on the guitar, a very vital bit of information that once you understand you will always use.
Hello again, welcome to another fun-filled instalment of the beginner guitar lessons. Please write to me and let me know how you are finding these lessons and any problems that you are having so far. So, in the last couple of lessons we have been looking at the chromatic scale and today I am going to show you a couple of ways to play the scale on the guitar.
So how do I play the chromatic scale on the Guitar?
Just to refresh your memory, this is what the chromatic scale is :
If we remember all the way back to lesson one on the chromatic scale we will find the following rule :
One SemiTone = One Fret of the Guitar
So as we move up the guitar string fret by fret we are moving up the chromatic scale one semitone at a time. This is a way of playing the A chromatic scale on the 'A' String.
Notice that it is just moving up in semitones
When playing the above example use alternate picking (a downstroke of the pick followed by an upstroke). This will be good practice for when we enter into the speed picking lessons. This would mean that you had played a full 12-note cycle of the chromatic scale, here is another fingering that is more useful.
The above example is exactly the same notes (the 'A' chromatic scale) but played across different strings, why? Well notice that you do not have to move your left hand very far this makes playing the scale easier, and in time your right hand will be on automatic pilot when it comes to scales so anything that can speed up the left hand will be great.
Here is another fingering that covers all the strings and repeats the sequence of notes.

Please note : because of how the 'B' string is tuned it effects the pattern of notes in the chromatic scale - look in the example above and you will see that rather than following the pattern the 'B' string is played a fret higher than you may expect this is at this stage something to be a little wary of.
When playing this count 1..2..3..4 with your foot and also in your head (or out loud if no-one is watching), and always (at the moment) alternate the pick strokes (down, up, down, up etc).
AND PLAY SLOW..If you try to practice these scales too quick then your hands will never develop the teamwork that is required between them and the result will be sloppy.
Remember that both these examples are the same scale (A chromatic) that are just fingered differently.
The notes of the Chromatic scale from a to a are (using sharps): A, A#, B, C, C#, D, D#, E, F, F#, G, G#, A.x4
In the above examples we are moving from A right up to another higher A moving in semitones, there are notes repeated all over the fretboard, which means that we can change fingering's quite a lot depending on what we want to achieve.
How do I play the Scale in other keys and positions?
As we have seen the chromatic scale can just be played by advancing up a guitar string fret by fret (semitone at a time). What this means is if you wished to play a 'E' chromatic scale then you would just find an 'E' note and ascend semitone by semitone. If you have trouble finding notes high on the fretboard then just start on one of the open strings and using a chromatic pattern work up the fretboard until you have found the correct note. I know (and have taught) guitarist who have been playing for 4-5 years who still do not know the notes on the fretboard and it severely limits their playing because they are trapped in a couple of positions on the fretboard.
Here is a suggested fingering for an E Chromatic Scale:
The last note is played on the 5th fret because that is the E note, it does not fit the pattern because of how the 'B' string is tuned - in the scheme of things it often changes quite a few fingerings as you will see.
So the notes in the above scale are E, F, F#, G, G#, A, A#, B, C, C#, D, D#, E.
A good tip is to say the notes aloud as you are playing them; this will enable you to know where the notes are all over your fretboard. An exercise for you could be to find three different places to play the 'e' chromatic scale on the fretboard.
Well thats about all I want to cover at this stage on the chromatic scale, remember if there is something you don't understand or something that you disagree with on any of these pages then drop me a line and I will try to answer.
Major Scale I
This scale is one of the most important and useful that you will ever learn. I will be using this scale in subsequent lessons to introduce you to the wonders of chord construction, as well as constantly refering to it in other lessons. Have fun with this lesson and keep the facts presented in the back of your mind.
The Major Scale (Ionian Mode)
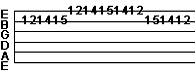
What is the Major Scale? The Major Scale is the first scale that many people learn, it has a 'happy' sound and is used in much of todays music. It is also very useful for learning about how music is constructed, and when I am teaching guitar theory I make references to it constantly. Here is a fingering for the A Major Scale:
Now this is a one-'octave' pattern for the A Major Scale, what this means is that the fingering starts on the root note (which in this case is A) and then goes up eight notes to the next occurrence of the 'root' note. The next occurrence of the note is eight notes higher than the first and so is called an octave. You can go eight notes of the major scale above any other particular note and you would find it an octave higher.
The 'root' note is the note that the key of the music is in, in this case we are in the key of A major. (Actually we could be in other keys.but what we will say is that the 'band' is playing in the key of A major and we are playing this over it!!!)
Often the 'root' note will be the first or last chord in the chord progression that you are playing overoften but not always, music has lots of little tricks :) If this doesn't make sense then just take my word that 'A' is the root note at the moment :), I am trying to keep this as simple to understand as possible.
The Notes of this scale are: A, B, C#, D, E, F#, G#, A.
When playing this scale count the notes as you are playing.eg 'root',2,3,4,5,6,7,'octave' So when playing the major scale if you start on one note and go up eight steps 1.2.3.4.5.6.7.8 then you will be on the same note but one octave up.Mail if this is too confusing and I will endeavor to explain this better!!!
So can I play this scale starting from the note one octave up?
Yes, this following example will show the same A major scale starting on the A note on the seventh fret on the 'D' string.
So in the above example I have started on the A note at the seventh fret on the 'D' String and then gone up the eight notes until I am at another A note an octave up (which is on the b string / 10 fret).
Playing the A major Scale over 2 octaves
To play the scale over 2 octaves just start on the bottom 'A' note (on the fifth fret on the E string) and go up through the two octave patterns that we have already learned.
You are still playing just the same seven notes but repeated up the different octaves.
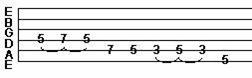
Playing the A major Scale over 2 1/2 octaves
This is the pattern often used for practicing the Major Scale, it has three notes per string and it covers all of the strings on the guitar so it is an excellent picking excercise. Always at this stage pick down then up, down then up.
Ok so we now know a good fingering for the A Major Scale but where do we go from here ? Well in the upcoming lessons, I will show you how to play this scale using any root note, and then how to play and construct many common chords so you can throw away your chord book!.
Chords I
In this lesson, I would just like to introduce you to several different chord shapes that are commonly used in todays music. In subsequent lessons, I will show you how to alter these shapes to play many different chord voicings.
Common Major Chord Voicings
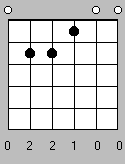
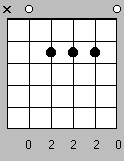
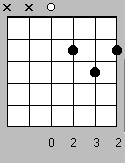
The E major Chord (Emaj)
This is the first chord that many people learn; it is a reasonably easy chord for beginners to pick up and can be easily altered later to make many more voicings that are different.

The A major Chord (Amaj)

The C major Chord (Cmaj)
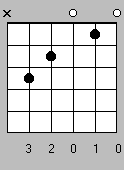
The G major Chord (Gmaj)

The D major Chord (Dmaj)

How do I practice these Chords ?
In order to ensure that you are fretting these chords correctly, I would like you to do the following :
Finger the chord that you wish to play, referencing the chord shapes and tablature above.
Pluck the strings that are included in the chord with your strumming hand, one string at a time. (dont pluck the strings that have a 'x' above them in the chord diagrams).
Listen to each note carefully, if a single note is not sounding correct then check your fingers to ensure that you are playing the note with the tip of your finger and that it is being held down on the fretboard at the correct position.
Do not strain, experiment with moving your thumb to the back of the guitar's neck.
Listen to the examples provided and attempt to play them better!.
So Whats next ?
Try to change from chord to chord quickly; this is one of the trickier aspects of playing chords. I would recommend practicing changes between two of the chords listed here at a single time (e.g. use 'Emaj' then change to 'Amaj' and back until you can do it quick).
In closing ..
I hope that you have increased your chord knowledge with this lesson, which is really only a small primer for the road that we have ahead. Next time I would like to show you some minor chords and perhaps we could learn to play a couple of songs (that would be nice huh?).Thank you to all the people that have written to me and given me such wonderful comments and questions, keep the email coming, honestly it is my pleasure to help
Chords II - Minor
In this lesson I would like to demonstrate some common minor chord voicings and begin to talk
about playing rhythm.
Common Minor Chord Voicings
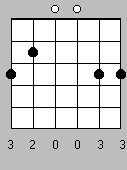
The E minor Chord (Emin)
Ok, so lets look back to the lesson on the common Major chords (Chords I) and play the E major chord. Listen to the sound of the chord, now play the E minor chord below - there is only one note difference. (The G# on the G string is flattened to be an open 'G' note).
The E minor Chord (Emin)


When you play the E major chord and then play the E minor chord, you should hear the contrast between the chords. The E major chord should sound 'happier' while the E minor chord will have a sadder sound to it.
This should demonstrate to you the basic difference between the major and minor chords. In subsequent lessons we will look at the theory behind this. Practice the following chords, along with their major counterparts.
The A minor Chord (Amin)


The D minor Chord (Dmin)

All right, how about a Song?
Lets learn a reasonably simple song to start us off, 'Knocking on Heavens Door' (written by Bob Dylan, played by many others).
The Basic Chords to this song are:
G major , D major , A min
G major , D major , C major
So you are probably saying, 'Well I know the chords but my picking hand doesnt know what to do', lets look at that now. Music is broken up into Bars, inside a Bar there are many Beats.
A basic rock'n'roll bar (4/4 to those who care at this stage) consists of four beats, we could count them like '1-2-3-4'.
Depending on the Tempo (speed) of the music we would count the 1-2-3-4 faster or slower. We measure tempo in beats per minute (i.e. the amount of beats that occur in a minute.)
The tempo that we will use for this song is 95 beats per minute.
Get your foot tapping along with the sound of the click and count '1 2 3 4' - each number landing on a click (When you get to four start counting again).
An occurrence of '1 2 3 4' is a Bar.
To start with lets play one chord to a bar simply using a downstroke with the picking hand (i.e. towards the floor across all the strings that need to be played in a given chord).
However for the song let the A minor and the C major chords last twice as long as the others (2 bars instead of one). That will sound like this (click here to hear a sample)
If you know the words try singing along
Lessons: Chord Harmonization
Harmonizing the Major Scale
This is a very useful exercise that I found helped train my ear quite a lot when it came to figuring out chord progressions off cds that I used to have to play in covers bands.
This is a very useful tool for understanding some of the ways in which chords and scales interact (or even just for learning some new chords) and this can benefit your ear, song writing, soloing and chordal knowledge.
The basic idea here is that we will build a chord off each note of the major scale (but the hard bit is ensuring that we are playing the right notes within these chords so that we remain in key).
We will only use the notes of the underlying major scale available to us in each position - the side effect of this will be that we will have a different chord voicing of each note (minor, major etc.).
Lets look at an example before I confuse you completely ;)
Here are the list of the notes going from I(root note) to VII (the seventh note of the major scale), and some agreeable chords which can be built off each note
Note:Agreeable ChordsIMaj, Maj7, Maj9, Maj13IIMin, Min7, Min9, Min11, Min13IIIMin, Sus4b9, 7#9, 7b9IVMaj7, Maj7#11, Maj9#11V7, 9, 13VIMin, Min7VIIMin7b5
So lets look at this in practice. What we will do initially is to play the G major Scale to remind us of the notes we will be building chords on top of.
The first note(I) we play in the G Major Scale is obviously G, on top of this note we will be building a G major chord - as is shown in the figure above you will see this is an agreeable chord for the first note of the major scale.
The next note in the G major scale is A(II) for this note we will be playing a Amin7 chord - and then we can move through the reminder of the scale matching a chord to each note, as is shown in the example below:
Sample Harmonisation - G Major ScaleIGMajIIAmin7IIIBminIVCMaj7VD7VIEMinVIIF#min7b5
Chord
Shapes Used Above: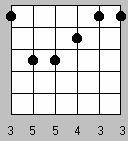 GMaj
GMaj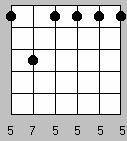 Amin7
Amin7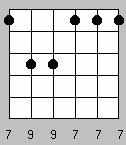 Bmin
Bmin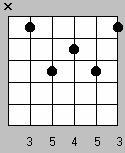 CMaj7
CMaj7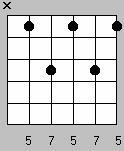 D7
D7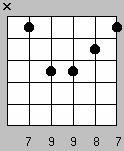 Emin
Emin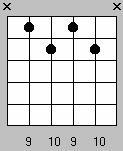 F#min7b5
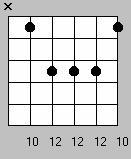 GMaj (Octave)
I have included a little sample of me playing the chord sequence shown above.
Exercise 1
Experiment with creating songs using the rules shown above - find a suitable key (maybe one that you can sing in) and then find some single notes that work together (create a rudimentary bass line) -find a chord from the list above which suits each note in your bass line (eg for the 2nd note of the major scale play a minor 7th or maybe a minor 13th).
Remember that you do not have to play these chords in the exact order of the scale!!!
Exercise 2
Find a song that you like and know the chords to. does it fit in with the chord rules above? (Remember rules are made to be broken - as long as it sounds good :)
Have fun with this and practice those chord shapes - sometime I would like to go into the details why the tonality of the chords you create on each degree(note) of the major scale change
Intermediate1. Introduction To Legato Techniques I2. Introduction To Legato
Techniques II3. Introduction to the Minor Pentatonic and Blues Scales4.
Alternate Picking I
Legato Phrasing: Lesson One - The Basics
Legato phrasing is a technique of playing notes smoothly so that they seemlessly flow together. On the guitar one of the easiest ways to do this phrasing is by the use of hammer-ons and pull offs.
Hammer ons
A hammer on is best explained like this :
Play these two notes just picking them as normal:
(suggested fingering 1 & 3)
Now play them again but this time only pick the first note and then force your third finger down onto the 7th fret without picking the string again.If you had enough force and accuracy then you should have completed a hammer-on.
This is written like this in tablature :
(Notice the hammer-on symbol above the notes)
Pull offs
A pull off is almost the exact opposite of a hammer-on. firstly position your fingers so that they are on two different frets on the same string. (eg put your first finger on the fifth fret of the D string and your third finger on the seventh fret of the D string).Then pick the string (therefore playing the note on the seventh fret) and once you hear the first note then just remove the top most (eg third) finger while still having the bottom most finger fretted - this should execute a pulloff.
Here is a diagram to show this.
So the note on the seventh fret is played first and then by pulling that finger off the fretboard quickly the note on the fifth fret is sounded without having to pick it.
Hammer-ons and Pull offs together
Here is an exercise to build up your strength in legato technique :
Practice this with all combinations of your fingers and repeat it all over the guitar neck.
(Only pick the very first note)
Legato Phrasing: Lesson Two - Multiple hammer-ons and Pull-offs
What I will be covering in this lesson are some ways in which to use legato techniques in your playing. In the last lesson we looked at the basic techniques for hammer-ons and pull-offs, by using these concepts in different ways we can create interesting sounding guitar licks.
The F Major (Ionian) Scale played with hammer-ons and pull-offs
Consider the following lick :
This shows a F major scale that is played over 2 1/2 octaves using hammer-ons, only picking once on each string. This is a good introduction to the hammer -on techniques in that as well as being a good scale to learn it sounds good (in the right place). The next rather obvious way to approach this scale is to play is using pull-offs, starting on the highest note and picking only when changing to a different string
(At this stage still alternate your picking strokes..all will be explained later !)
Beginning Legato Sequences
So we have seen how to play a basic scale using hammer-ons and pull-offs, well after a while as you can imagine this starts to get a little stale. A good technique for increasing speed and dexterity while playing something that sounds a little bit more interesting is to use sequences. A sequence is just a repeating fingering pattern that you use to work your way up a scale, an example may be to start on the first note, go up three, go back down to the start and then repeat the sequence starting on the second note, and then the third note etc.. Etc
Consider the following example:
This is the basic sequence; note how it is only quite short. This is the initial sequence, this is repeated within the same lick that is represented below, the first notes are the same then there is another repetition of the sequence, which begins on the next string up. When the sequence is repeated over it starts to look a bit scarier - and it sounds a lot more impressive
What should be noted is how I start with a simple pattern and then expand it while still just using the same initial sequence that is repeated over (and over) again. Surprised how easy this seems - well the concepts are easy but getting your fingers to play these examples probably will take a bit more work!!!, But if you get the first sequence down then you will be a ways to getting there !!!!
Lessons : Introduction to the Minor Pentatonic and Blues Scales
In this lesson I would just like to introduce two new scales that most guitarists are very familiar with, the minor pentatonic and also the Blues Scale.
Introduction to the Minor Pentatonic and Blues Scales
What is a Pentatonic Scale?
Well as the name implies, a pentatonic scale has just five notes rather than the seven that we are used to with the major scale.
The spelling of the minor pentatonic is 1-b3-4-5-b7.
The way that I think about such spellings is that I compare them to what notes a major scale would have.
The major scale (which has seven notes, spelt 1-2-3-4-5-6-7) in A would be A B C# D E F# G#. In comparison, the Pentatonic Scale has A, C, D, E, F - notice the C is a flattened third note of the major scale (C# flattened becomes C) and the F (Seventh) is a flattened Seventh note of the major Scale (F# flattened becomes F). This is how we get the spelling 1-b3-5-6-b7.
Now lets look at the fingering for the same scale right over the entire six strings.
The Blues Scale
The 'Blues' Scale is very closely related to the Minor Pentatonic Scale, and in fact has only one extra note - a diminished 5th (a flattened fifth in normal speak). This makes the spelling of the Blues Scale become this: 1-b3-4-b5-5-b7. The diminished 5th is often called the blue note and causes the scale to have a bit more of a rougher, less easy on the ear sound.
Here is a fingering pattern for a one octave Blues Scale in A. Notice that I have put a box around the new (Blue) note. This is the only difference between the two scales.
Click here to hear the example.
Now lets look at the fingering for the same scale right over the entire six strings.
Here is a sample lick to give you an idea of the sound of the Blues scale:
Yeah, but I dont like the Blues!
You poor soul, oh well never mind - the blues scale and minor pentatonic are found in many, many different styles of music. Here is a bit of a sample of a rock lick using the blues scale:
In Closing.
Practice these scales along with the major scale covered in earlier lessons. In upcoming lessons I will be providing some blues and rock licks using both of these scales.
Alternate Picking I
Of all the techniques on the guitar, alternate picking is probably the single technique that troubles a guitarist the most. The process of synchronising the right and left hands together is a challenge to us all. In this lesson I have compiled a few exercises that I use to improve my picking accuracy and speed.
Introduction
The idea behind alternate picking is simple, alternate between using a downstroke (towards the floor) and an upstroke (towards the ceiling).An example would be quite simply this, if you were to play a lick starting on a downstroke then the next stroke would be an upstroke, a downstroke, and so on.
Five Tips that MAY improve your picking
Practice Slow. (Train your fingers the right way, if you practice sloppy then you will always be sloppy)Use a Hard Pick. (This increases the 'chop' sound of the pick which enhances the articulation of any picking run)
Pick from your wrist - not from your elbow. (Its harder to move your whole arm rather than movng just your hand)
Try to keep your fingers and thumb that hold the pick rigid. (If you move them the string becomes a moving target!)
Get a metronome - and use it!. (Might as well play those 128th notes in time :)
Well now, thats over with lets try some licks. Begin all these licks with a downstroke, practice them a lot and then try them starting with an upstroke.
Alternate Picking Exercise I
This lick is designed to improve your ability to cross over strings when picking. A major thing to watch out for is to make sure that you are constantly alternating your pick strokes, dont use two upstrokes or two downstrokes in a row (yet).
Alternate Picking Exercise II
Another string crossing exercise, a great lick to use in the right place too!.
Alternate Picking Exercise III
This is an example of 'ascending sixes' (groups of six notes played together that ascend). Start slowly and concentrate on getting this in time first before speeding up, it will take you less time in the long run !.
Alternate Picking Exercise IV
Here is the next step in picking 'ascending sixes' - practice this all over the guitar neck - its a great short run.
Alternate Picking Exercise V
Well we have covered 'ascending sixes' - this is an example of a 'descending sixes' run. Keep alternating those picking runs.
Alternate Picking Exercise VI
All right, here is the big lick for this lesson. Its quite simple conceptually - all based around an D major (Ionian Mode) Scale. Its the next extension of the 'descending sixes' lick. Well next time we will work on some picking sequences to attempt to get away from the 'straight up the scale' syndrome :).
Beyond Theory
For me, scales and chord shapes are excellent ways to understand the theory behind music - but I feel people should realise there needs to be a time when you can just forget about what is 'correct' or even what is musically impressive and concentrate instead on 'what sounds good'.
We all start off learning pretty much the same scales and chords - and to me even if you are only armed with some basic scales and a few chords there is no reason why you cannot create meaningful, melodic and most importantly enjoyable, emotional music.
I often play songs around people and they inquire as to what a particular chord is as they havent seen it before. Although I have an idea of the tonality of each chord that I play (i.e. is it major, minor, minor 7th sounding etc - my ear tells me this), I cannot always be sure of the exact spelling of the chord.
To be honest when I am creating these chord sequences I am not thinking about the chords or even the notes that I am playing, I am simply chasing the sound that I can hear in my head. Later on I can sit down and work out the chords that I am playing if I need to communicate this to another musician.
Often I will sit down with my guitar and I will experiment with just putting my fingers on the fretboard in places that I normally wouldnt and just see what kind of sound comes out, sometimes just moving a finger here or there leads into a nice chord sequence.
Sometimes you might end up playing a familiar chord - but perhaps in a different inversion and the timbre of the chord might suit certain chord sequences better than others (i.e. it sounds more suitable than the standard shape that you might normally use).
Some Exercises you may Try
I realise that this might be one of the strangest online internet guitar lessons that you have read in a little while - but please try the following exercises - hey if it works then more power to you - otherwise then by all means consider my advice as just that, advice not a rule or something you need to do :)
Imagine a simple melody (single note) in your head and then try to find it on the guitar.
Create some chords by simply putting your fingers in random positions on the fretboard - if it sounds rubbish then move one or two and see what comes out - remember you wont be hurting anyone (unless your Amp is REAL LOUD!!)
Play a chord and remove a finger from the fretboard so that an open string is played - this is a common way to add a certain difference to a common chord progression.
Just go Nuts - you dont have to tell anyone what you do - pick strings with your teeth (I dont advise this - and I am not paying for your dentist), detune strings, experiment with weird digital effects, play drums on your pickups with an Allen key, use a slide, tap your pick against your strings, pull strings off the neck and behind the neck, pick your tremolo springs - whatever it takes to widen your ears (and possibly others ears if they are listening).
Dont forget about theory - I spent many nights with pieces of paper working out some of the mathematics of music (not that I am a theory nut either ;)but also dont forget music is about expression.
If any of these techniques work for you then that is great - If not then why not create some of your own always strive to create something wonderful (I will let you know if I ever do :)
Hope you are still with me after that - be yourself and if something sounds good to you then do it :)
Lessons : Octaves
Octaves
Octave Licks are used by a great number of players, from Jazz greats like George Benson to Rockers like Jimi Hendrix. Octave Licks are great for inclusion in your lead and your rhythm playing.
First of all what is an octave? Well lets refer back to the major scale (I hope you remember that - if not then you may wish to refer back to an earlier lesson of mine).
In the aforementioned Major Scale lesson, I stated the following:
'This is a one-'octave' pattern for the A Major Scale, what this means is that the fingering starts on the root note (which in this case is A) and then goes up eight notes to the next occurrence of the 'root' note. The next occurrence of the note is eight notes higher than the first and so is called an octave.
You can go eight notes of the major scale above any other particular note and you would find it (the same note but) an octave higher.'
So there we have it, to find octaves we can use the major scale. Just pick any note - play a major scale pattern from that note and count 'root'-2-3-4-5-6-7-'octave' ensuring that you are playing a note for each step (i.e. A=Root B=2 C=3 etc)
(Alternatively you could just memorise the octave patterns which I am showing in this lesson - but I would sleep easier knowing you understood the theory too ;)
The eighth note that you played was the same note as you started with except only one octave higher.
So in the following sample you will see that I start on the A note on the 5th fret of the E String and just follow the major scale up until I find the A note on the D string at the 7th fret.
Play the two notes together (The Root and Octave - I do this at the end of the example above) - sounds somewhat cool huh? Try playing these notes with a pick with a single downstroke (mute the string in between so it doesnt sound) and try plucking them with your fingers.
Often using a pick and strumming the octaves while muting the strings around them gives us a nice rhythmic sound.
One of the coolest things that we can do with octaves is to play melodies that we would normally play with a single note and play the octave/s above as well.
For example, we could play the following simple melody:
 Here is the above but played using octaves - finger plucked.
 Here is the same little melody (notice the same tab as above) but this
time the octaves are strummed - I often use this when playing funky stuff.
Here is the same little melody (notice the same tab as above) but this
time the octaves are strummed - I often use this when playing funky stuff.
You may or may not realise this but notes are repeated a number of times
all over the fretboard - in various different octaves (and also repeated in the
same octave also). This means that there are a few very useful octave-fingering
patterns we can employ.
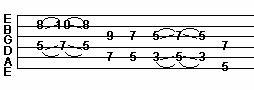
Octave Shapes
Below are some octave patterns that I use all the time - In all of these examples, just play the black dotted frets and mute or miss the strings in between.
Notice that the basic shape of an octave is often influenced by the tuning of our b string (pay attention to the difference between shapes 1&2 and 3&4 to see this).
By far the most common and widely used shapes are 1 and 2. use them all over the fretboard :)
Use Shape 1 or 3 if your low (deepest) note is played on the Big E or A strings and shape 2 or 4 if your lowest note is played on the D or G strings.
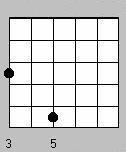 Octave Shape 1
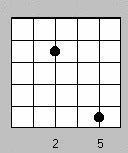 Octave Shape 2
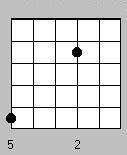 Octave Shape 3
 Octave Shape 4Exercise
Try using octaves in place of some of the single note runs that you normally use - the same notes just add the octave. This technique can really add something to an otherwise ordinary lick and is great for filling things out if you are playing in a three piece.
Advanced
Introduction To Sweep Arpeggio Techniques
Sweep Arpeggio Techniques Part II
Sweep Arpeggio Techniques Part III
Advanced Two Hand Tapping I
Pedal Tones
A Brief Introduction to Sweep Arpeggios
This page is just a taste to see what will be ahead in the future; this is designed to demonstrate an approach to playing sweep arpeggios.
Triad Arpeggios
Triad Arpeggios are probably the most common form of sweep arpeggios that we hear in guitar music. As the name indicates, they are simply three note chords. The way we play these examples is to play each note individually and mute them as we play them before playing the next note. So it rather is like: Play note - mute it - Play the nextetc. They can be played with a 'Sweep' technique that is played with consecutive upstrokes or downstrokes.
Lets illustrate this by examining our first example, a simple D major (D, F#, A) triad arpeggio.
Lets examine the tablature - you will see that the first five notes are played with one downstroke. This stroke should be a continuous downward motion (a long sweep if you will). The individual notes should be articulated with the left-hand; after a note is played the finger with, which it was played should be removed enough for the note to be muted.
Muting can also be applied with the right hand palm, just moving behind the pick stopping the strings that have already been played below it (the low, big strings) from sounding. Muting is 'mission-critical' in this technique.
Here is a D minor triad arpeggio (1, b3, 5) (D, F, A) in the same position.
Remember to play these examples ALL over the neck of the guitar, I hope that this has been informative and remember if you have, any questions dont hesitate to write.
Most of all.I hope you have fun with these examples!.
Sweep Arpeggios: Lesson Two - Combining with other Techniques
Today I am just going to show you a couple of ideas for expanding on the rapid-fire triad arpeggios that I showed you in lesson one on sweep arpeggios. By further expanding these ideas and including other techniques in with the sweeps, we begin to further evolve our abilities to create.
The examples in this lesson are going to be using an A major triad arpeggio shape starting at the 12 fret on the A string, it looks like this:
Remember to play all the notes up until the hammer-on with a single sweeping downstroke. Pretty familiar huh? Well a technique that I use to add another root note above the highest note is to use my right hands middle finger to 'tap' the highest A note - on the seventeenth fret on the high e string this looks like this:
Ok so using the same middle finger we can play another note above without even having to remove it from the fretboard. How? Well by sliding the middle finger up to the C# note on the 21st fret - that looks like this:
Ok so now all we have to do is to work our way back down from there by sliding back down to the fifteenth fret with the right hand middle finger then pull it off the fretboard and continue down the arpeggio as normal, here is what the whole thing looks like:
I have recorded a sample of me going through the following in two speeds (slow and a bit quicker):
First through the A Arpeggio without any taps
Then through the A Arpeggio with the one tap
Then the A Arpeggio with the tap and slide
Remember in all these exercises to drag your pick downwards or upwards in a long continuous sweeping motion, paying particular attention to muting any unwanted noise. Have fun with these exercises, and I will post another bunch soon, dont hesitate to write to the email address below if there are any points that you would like clarified or any comments that you would like to make
Playing Sweep Arpeggios Part III
Info
Hi there, yeah I am back again (at last?). This lesson is designed to introduce some different arpeggio shapes, for inclusion in your trick bag.
Playing Sweep Arpeggios Part III
The shapes below should show you a couple of different ways of playing arpeggios than we have already covered. These shapes are great for fast position changes and can get us away from sticking to strictly scalar type licks.
Minor Shape
The following is a simple minor arpeggio shape that I use a lot, and when combined with other similar shapes can be a very efficient and effective way of playing very fast arpeggio sequences.
Major Shape
This is the major equivalent of the above minor shape:
It is possible to create some cool licks from these simple shapes - try following a chord sequence using these arpeggios. Here is an example of such a lick:
At the end of the last repetition of the lick, I just threw in an A minor Arpeggio like in one of our earlier lessons (ending at the 12th fret of the A String). Remember this shape?
This next shape is slightly out of place here as it is a dmin7 arpeggio rather than just a simple triad arpeggio - however I have included it as I use it a lot with the above patterns. Note that the lowest note on the e string is at the 9th fret - it looks a bit like an 8 in the tablature. : o)
One of the coolest things about this arpeggio is that the shape can be repeated every four frets up the fretboard (creates a different inversion of the notes). This is illustrated in my final lick below. This lick demonstrates the use of the dim7 arpeggio shape that I introduced above, and it is a very common lick heard in many neo-classical songs. It starts very simply with a series of a minor diminished 7th arpeggios in different inversions up the neck (notice how the shape is simply repeated every four frets) and is finished of with a A minor arpeggio (a cut-down version of the first shape we will cover in another lesson).
The shapes below should show you a couple of different ways of playing arpeggios than we have already covered. These shapes are great for fast position changes and can get us away from sticking to strictly scalar type licks.
Minor Shape
The following is a simple minor arpeggio shape that I use a lot, and when combined with other similar shapes can be a very efficient and effective way of playing very fast arpeggio sequences.
Major Shape
This is the major equivalent of the above minor shape:
It is possible to create some cool licks from these simple shapes - try following a chord sequence using these arpeggios. Here is an example of such a lick:
At the end of the last repetition of the lick, I just threw in an A minor Arpeggio like in one of our earlier lessons (ending at the 12th fret of the A String). Remember this shape?
This next shape is slightly out of place here as it is a dmin7 arpeggio rather than just a simple triad arpeggio - however I have included it as I use it a lot with the above patterns. Note that the lowest note on the e string is at the 9th fret - it looks a bit like an 8 in the tablature. :o)
One of the coolest things about this arpeggio is that the shape can be repeated every four frets up the fretboard (creates a different inversion of the notes). This is illustrated in my final lick below.
This lick demonstrates the use of the dim7 arpeggio shape that I introduced above, and it is a very common lick heard in many neo-classical songs. It starts very simply with a series of a minor diminished 7th arpeggios in different inversions up the neck (notice how the shape is simply repeated every four frets) and is finished of with an A minor arpeggio (a cut-down version of the first shape we will cover in another lesson).
Two Handed Tapping I
We all have probably heard 'Eruption' - Eddie Van Halen's 1978 Solo Guitar piece - like most of us we have used that technique of hammer-ons with the right hand at sometime or another. In this lesson, I would like to show a couple of ways of using this technique that are a little different.
Integrating with hammer-ons and pull-offs
I often just use tapped notes quickly as an extension to hammer-ons and pull-offs, in these cases I use the right hand middle finger to execute the taps.
This next example is an expansion of the idea above, using the middle finger of the right hand and the third finger of the right hand to tap notes. The tough bit about this lick is probably keeping the middle finger on while tapping the third finger down, keep at it and in time it will realise what it is supposed to do!.
As you can hear, these techniques add quite a few possibilities for adding some life to some old legato licks. Have fun with these and if you create some real cool licks of your own then send them to me. To finish this lesson I would like to show you a lick in the style of a favourite player of mine (as far as two handed playing goes) Jeff Watson.
Some Jeff Watson (Night Ranger) Type Licks
This first part of the lick is reasonably straightforward and uses the right hand 1 and 2 fingers to play the notes on the 12 and 13 fret. Ditch the pick !!!! you wont need it in these licks, just pluck the first note with your finger and then hammer away!.
This lick can be expanded simply by changing the highest note in each repetition of the sequence, in this case the highest notes are played by the 2nd finger (13 fret), 3rd finger (15 fret) and finally the little right hand finger (17 fret).This creates a pretty wide tonal grouping and makes for an interesting sounding lick.
Well I hope that this has helped to give you a couple of new ideas as far as the two handed tapping technique are concerned. Come back for the next instalment very soon. Feedback..(not on the guitar).I need it, please send me an email if you have read these lessons, I am quite willing to answer any queries that you may have. Until next time keep on playing.
Pedal Tones
In this lesson, I would like to Introduce you to Pedal Tones, and some of the ways that I use them in my playing.
What is a Pedal Tone ?
Basically, a Pedal Tone lick involves the repetition of a single note, or series of notes throughout a lick. The pedal note or notes are repeated with other notes, which change around it. This is a hard concept to explain, but it should be very easy to grasp after studying the examples below. Consider the following lick:
The repeated note in the above example is the note 'g' at the 15th fret on the 'e' string, so we are using the 'g' note as our pedal tone. 'Wow, thats a simple idea', you say ?? Well yes, it is but it can sound great, and we can do lots to add new sonic textures to the technique. This technique is derived from classical music, but you can hear examples of this in music from many different artists including Metallica, Vinnie Moore, and Eric Johnson.
Here is another example of using a single note as our pedal tone:
In this case, the pedal tone is the 'b' note on the 12 fret of the b string. When playing this lick hold down the 'b' note constantly, but try to stop it sounding at the same time as any of your other notes.
Using more than one note as our pedal tone.
In the following lick, we are using a short sequence of two notes as our pedal tone lick.
So obviously the pedal tones in this lick are the notes on the 17th and 19th fret of the 'e' string, a small sequence is played with these notes and a changing note is added at the end of each sequence.
A bigger example to Practice.
The following example is intended to improve your chops and hopefully to tune your ears to the way that pedal tone licks sound. Use alternate picking in all of these licks.
I have included a couple of pictures of me playing this lick to help you visualise the pattern and fingering:
Part A - thumb on the back of neck to facilitate easy position shifts
Part B - notice the stretch to the 12th fret note
Well I hope that this has helped to introduce you so another idea that is extremely useful in playing guitar. I use this particular technique a lot, in many different genres of music. Thank you all for your supports recently, the e-mails have been fantastic, I am glad that so many of you are finding my lessons helpful. Next time we will probably look at picking sequences to
create picking licks like this.
|
Politica de confidentialitate | Termeni si conditii de utilizare |

Vizualizari: 1538
Importanta: ![]()
Termeni si conditii de utilizare | Contact
© SCRIGROUP 2025 . All rights reserved