|
|
|

|
|
|
|
Symantec AntiVirus Implementation Guidelines
|
|
|
|
|
Document Reference:
|
|
|
|
Version:
|
|
|
|
Date:
|
|
Document Change History
|
Version
|
Date
|
Editor
|
Description of Change
|
|
|
22nd Aug 2006
|
S Bhardwaj
|
Text for installation and implementation
Started
|
|
|
24th Aug 2006
|
S Bhardwaj
|
All pictures and picture text for
installation added
|
|
|
26th Aug 2006
|
Thomas Falk
|
Review of Guideline Proposal of changes
and additional information
|
|
|
27th Aug 2000
|
S Bhardwaj
|
Changes in Document made
|
|
|
28th Aug 2006
|
S Bhardwaj
|
Reporting Document created.
|
|
|
29th Aug 2006
|
S Bhardwaj
|
Configuration Document created.
|
|
|
29th Aug 2000
|
Thomas Falk
|
Changed and added suggestion in
configuration document.
|
|
|
8th Sepp 2006
|
S Bhardwaj
|
Reviewed all three documents.
|
|
|
26th Sep 2006
|
S Bhardwaj
|
Document submitted before changing Layout.
|
|
|
05th Oct 2006
|
K Starring
|
Minor additions and suggestion for template
into one document
|
|
|
21st Oct 2006
|
S Bhardwaj
|
Additions with Template change and documents
combined
|
|
|
25th Oct 2006
|
S Bhardwaj
|
Document submitted
|
|
|
|
|
|
|
|
|
|
|
|
|
|
|
|
|
|
|
|
|
OVERVIEW
1.1
Introduction
1.2 Objectives
1.3 Scope
1.4 Intended
Readership
2.
Requirements before installing NAV
2.1 Hardware
requirements
2.2 Software
requirements
2.3 Symantec
Antivirus on Windows 2000/2003 server
3.
Installing Symantec Antivirus and ITs Components
Uninstalling Previous Symantec System Center
3.2
Installation of Symantec Antivirus
3.3
Installation of Symantec System Centre.
4.
INSTALLATION OF REPORTING AGENT
5.
Configuration
5.1 Configuring
System Centre Console
5.2 Configuring
Reporting Agent
Configuring Virus Definition Manager
Configuring Quarantine Options
5.5 Configuring
Client Tamper Protection
5.6 Configuring
Client Administrator Options
5.6 Configuring
Server Tuning Options
5.7 Root
Certificates Configuration
6.
Naming CONVENTIONS STANDARD
OVERVIEW
1.1 Introduction
This document defines the correct way to install and
configure Symantec Antivirus Corporate Edition, as intended for the Electrolux
Group. The document contains general information on the Groups Symantec
Antivirus structure, as well as full documentation for installing and
upgrading.
1.2 Objectives
The objectives of this document is to ensure that
A global Antivirus infrastructure is in
place, to ensure global standardisation.
No business critical applications are
compromised do to malicious viruses.
Antivirus protection is increased to a
secure level.
Centralise reporting
1.3
Scope
The scope is to have Symantec Antivirus Corporate Edition
installed on all Windows based Intel platforms, excluding the exceptions stated
in chapter 2.3, within the Group. This includes both Workstations and Servers.
1.4 Intended
Readership
This document is intended for all personnel directly or
indirectly involved in installing or configuring Norton Antivirus Corporate
Edition on any Windows based Intel platform.
2. Requirements before installing NAV
Before
you install Symantec Antivirus you need to calculate how many Servers you need
to cover your Site.
Before you continue you need to dedicate one of the
Server(s) identified as a Primary Server, and the other(s) as a Parent
Server(s). Just make sure you know which one is which. In case you only need to
install one Server to cover all your clients, you will just have one Primary
Server and not a Parent Server. Your Primary Server will then act as a Parent
Server.
2.1 Hardware requirements
System requirements for Windows 2000/2003 Servers from
Symantec:
128 MB RAM or
higher recommended.
Intel Pentium
processor (Pentium Pro or higher recommended)
140 MB free disk
space for Symantec Antivirus Server files and 550 MB free disk space for temp
files during the installation
15 MB free disk
space for AMS2 Server files
MAC volumes not
supported
Symantec Antivirus does not support the scanning of MAC
volumes on Windows Servers for Macintosh viruses.
2.2 Software requirements
Windows 2000/Professional/Server/Advanced
Server
Windows 2003
Server/Web/Standard/Enterprise/Datacenter.
Internet Explorer
5.5 with Service Pack2 or higher
Static IP addresses
recommended
The
Servers must of course be connected to the network and have TCP/IP installed.
2.3 Symantec Antivirus on Windows 2000/2003 server
All the Windows 2000/2003 Servers with Intel platform should
have Symantec Antivirus installed.It is recommended that all your Windows 2000/2003
servers are members of an own Server Group. The reason is that if you make any
configuration changes on the Server Group, all the NAV Servers in that Server
Group inherits the settings
3. Installing Symantec Antivirus
and ITs Components
Uninstalling Previous Symantec System
Center
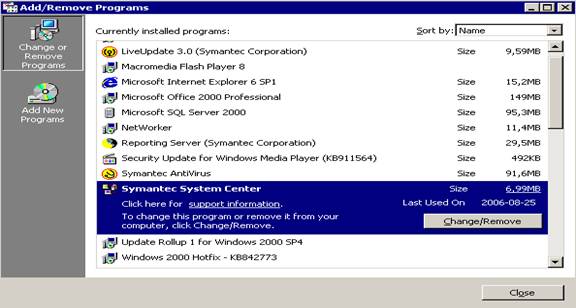
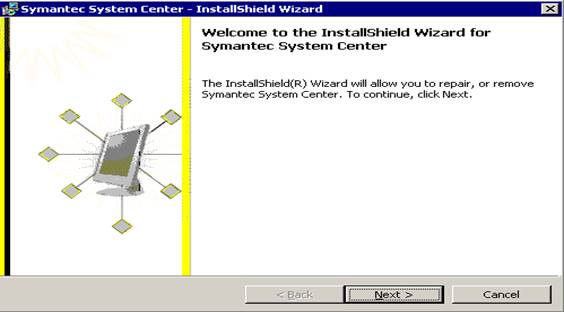
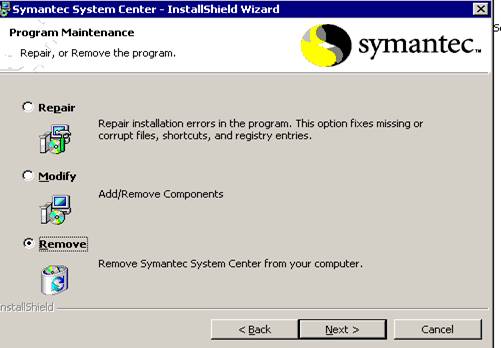
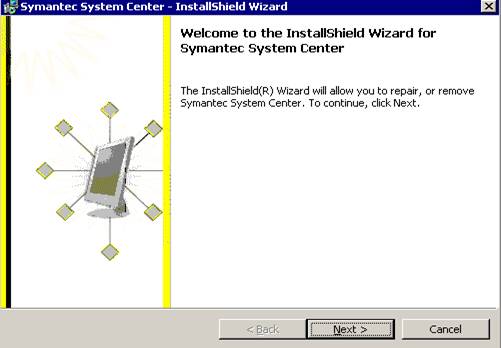
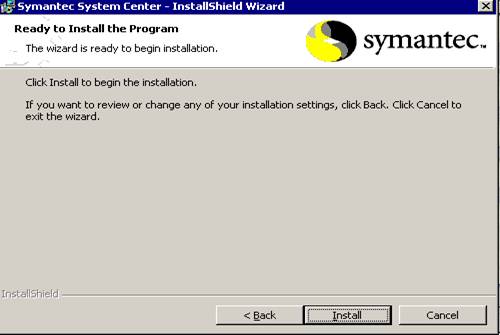
Fig1: Before you start Installation please make sure that you have uninstalled the old
version of Symantec System Center.Goto Control Panel> Add Remove Program
>Select Symantec System Centre and Click on Change /Remove button as shown
below, and then follow the screens to completely remove it as shown in Fig1 to
Fig6.
- Fig3: Select Remove as
shown in Fig and then Click Next

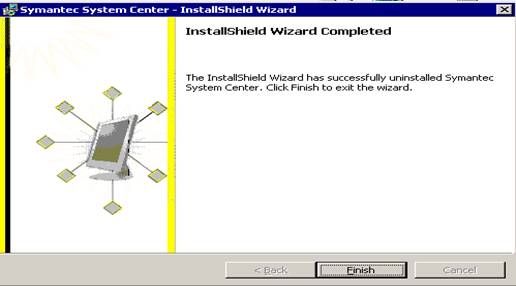
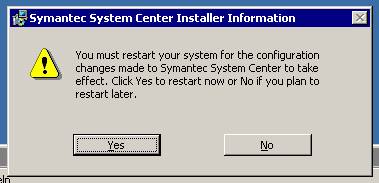
- Fig6: Click on Restart
before you install the new version of Symantec System
Centerand Symantec
Antivirus
3.2
Installation of Symantec Antivirus
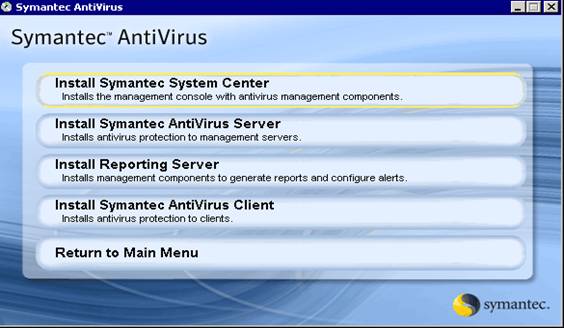
Please insert the CD in drive it should auto play and
show you the screen given below. Incase it doesnt then please browse your CD
and click on setup.exe and follow
bullet points with Print screens.
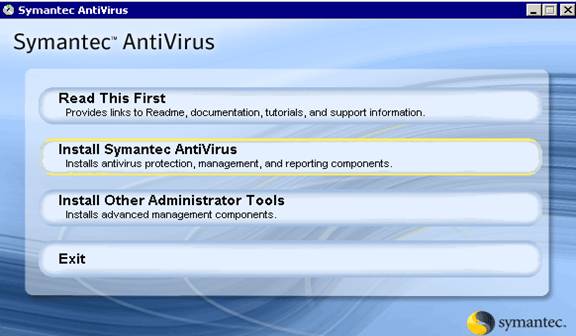
- Fig7: Click on Highlighted Tab
Install Symantec Antivirus.
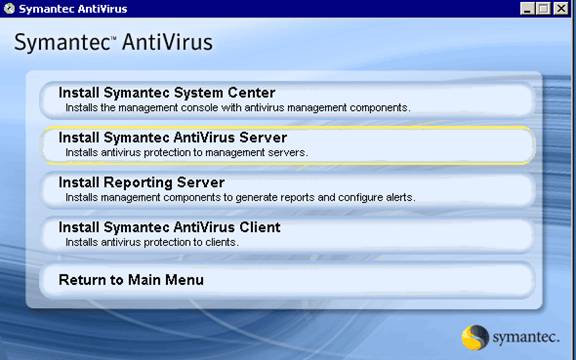
- Fig8 : Click on Install Symantec
Antivirus Server
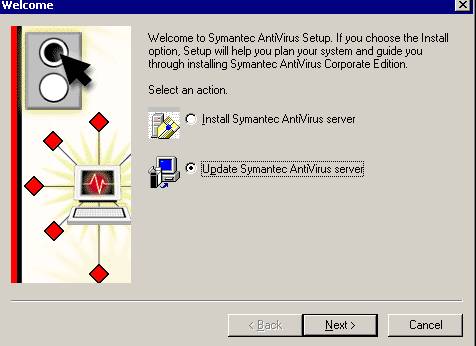
- Fig9: Please click on Update
Symantec Antivirus option if you are updating the existing server from
previous versions.
- Fig10:This screen on Left
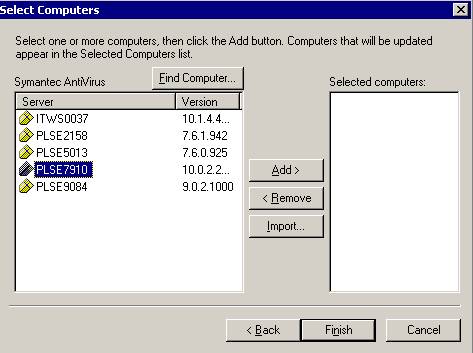
Window Pane will ask you to select your server which you want to update
.Please select and Highlight your server as shown below and click on Add Tab . E.g. we are upgrading
PLSE7910 as shown below :
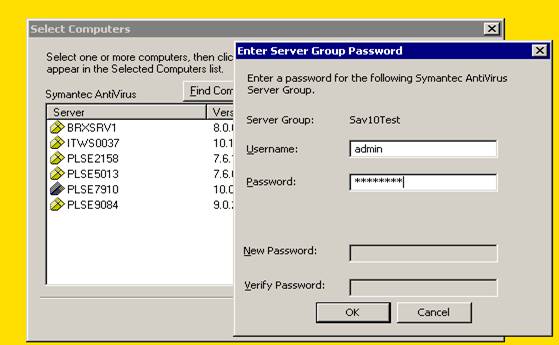
- Fig11: You will be asked for
the Username and Password for your antivirus server which you should be
aware of as a Local Responsible. Please enter the information as shown
below and click OK. Username is only
valid for SAV v10; previous versions only have one user. (Please explain
that SAV10 can hold multiple users)
- Fig12: You will see your
server has been added into Right hand Window pane called Selected
Computers. E.g. in this case you can see PLSE7910

>>>Click Finish.
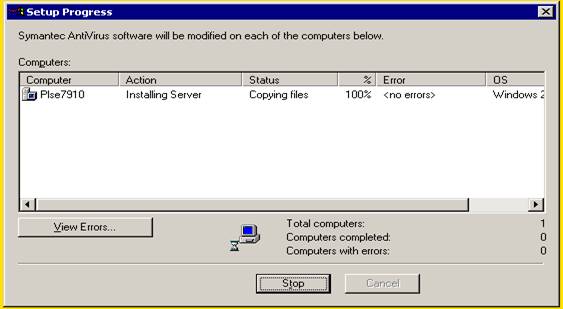
- Fig13: It will show
you the installation progress, it will take few mintes before it says
finished .When it will finish it will show you in Status, and ask you to
restart the server. There is no need to restart the server if you are
going to install Symantec
System Center
right away. This will finish the
Antivirus server upgrade and after this we will start installing Symantec System Center
from next screen.
3.3
Installation of Symantec System Centre.
- Fig14: Browse the CD again
and if it doesnt auto play, click on Setup.exe. You will see the screen
below, Click on Install Symantec antivirus

- Fig15: Click on Install Symantec System Center
but please make sure that you have successfully uninstall as mentioned in
Fig8 to Fig13.
- Fig17:Select the option as
shown in Fig and Click Next
- Fig18: Select components as
shown in Fig

- Fig19: Please note the
destination Folder should be the same as where you have Symantec installed
already so below fig location is just an example
- Fig20:Click Install and
wait on next screen
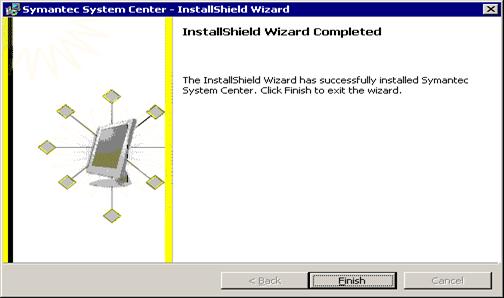
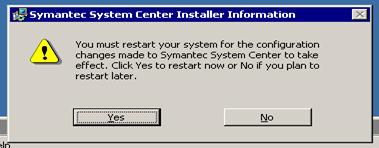
- Fig22: Click on Yes to restart
your system for successful installation.
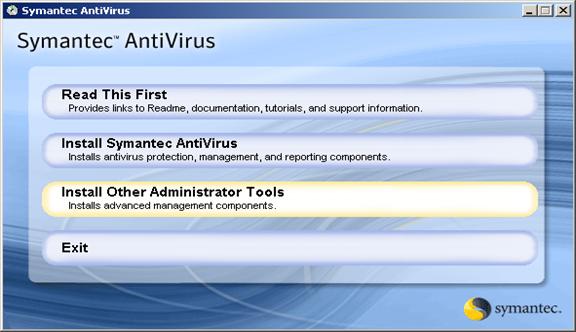
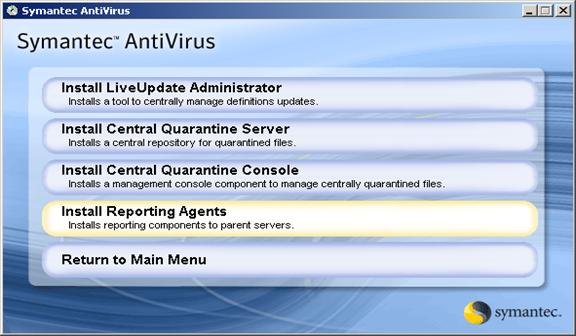
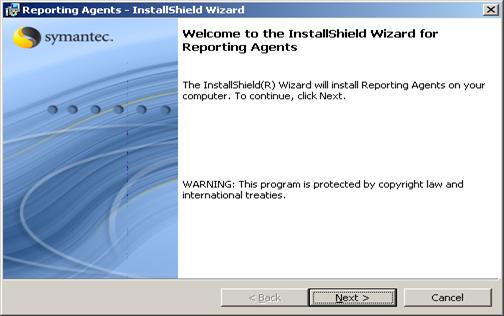
4. INSTALLATION OF REPORTING AGENT
Please insert the CD in drive it should auto play and show
you the screen given below. Incase it doesnt then please browse your CD and
click on setup.exe and follow
bullet points with Print screens.
- Fig1:
Please Click on Install Other Administrator tools as shown below
- Fig2:
Click on Install Reporting Agents
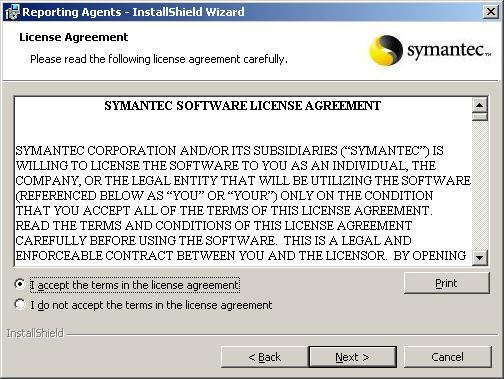
- Fig4:
Select as shown I accept the terms in License agreement
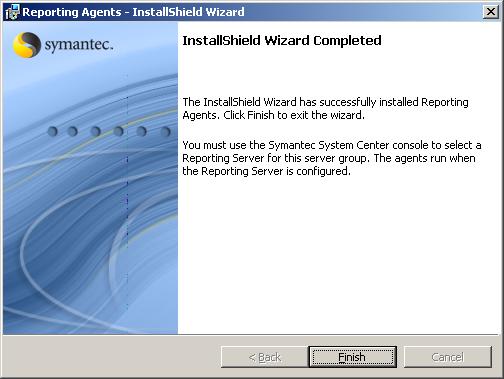
- Fig6:Click
Finish to complete the installation.
5. Configuration
5.1
Configuring System Centre Console
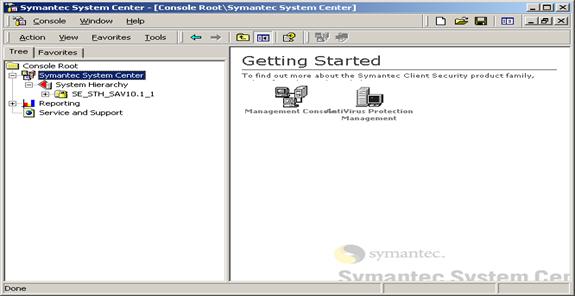
- Fig1:
Please click on Start >>>Program>>>Symantec System
Center Console>>>Drop down Symantec System
Center>>>System
Hierarchy .This will show you the all Server Group for various countries.
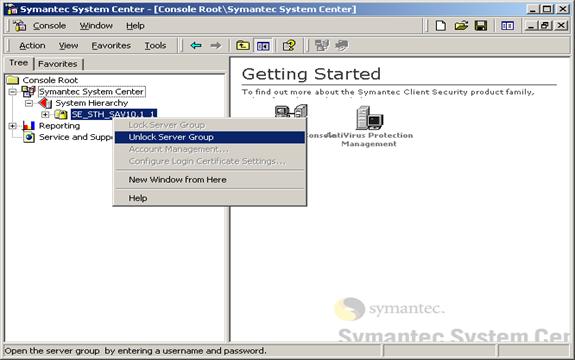
- Fig2:
Select your Country Group and Right click and select Unlock Server
Group.
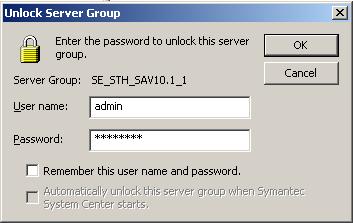
- Fig3:
Enter your password, as a local administrator you should aware of your
password. For security reasons dont select Remember this username and
password.
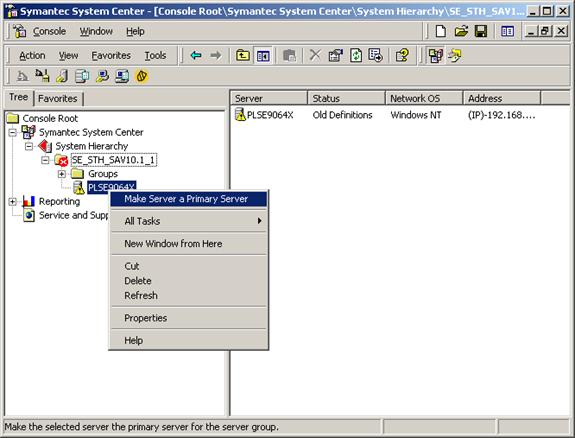
- Fig4:
As shown in figure please note that in your Group you may already have
primary server (incase of upgrade) you can then skip this step, but incase
you are doing a new installation then follow the steps below to assign
your primary server.
- Fig5:
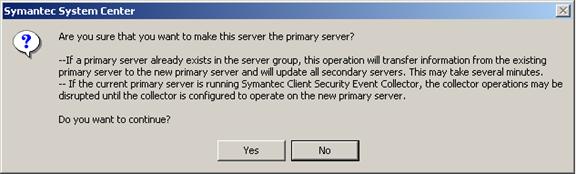
You will see this message only if you are making the server as Primary
mentioned in Fig4, in that case press Yes .Incase if you are not making it
Primary as mentioned above, then you dont need to follow this step.
5.2 Configuring
Reporting Agent
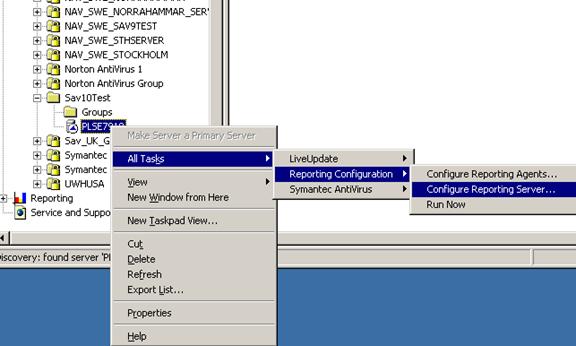
- Fig6:
This Figure will make you aware for configuring Reporting server and this
is a new feature we will be using in SAV10.1.Right Click on your server
inside the SAV group as shown >>>Go to All
Tasks>>>Reporting Configuration>>>Configure Reporting
server
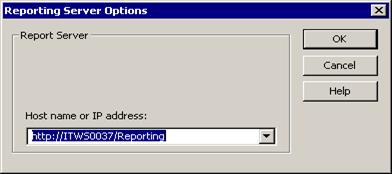
- Fig7:
Please enter the Hostname as shown in Fig ITWS0037 .Also check that if
you can ping this server with Hostname from your SAV server incase not
then ping it with IP address 10.4.197.161 and enter IP address instead of
Hostname.You can also provide full Qualified domain name
ITWS0037.biz.electrolux.com.
Configuring Virus Definition Manager
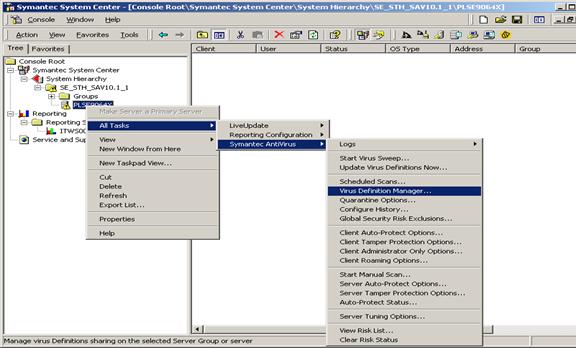
- Fig8:Again
Right Click on your server as shown in Fig below and Go to All
Tasks>>>Symantec Antivirus>>>Virus definition Manager
which will take you to the next screen.
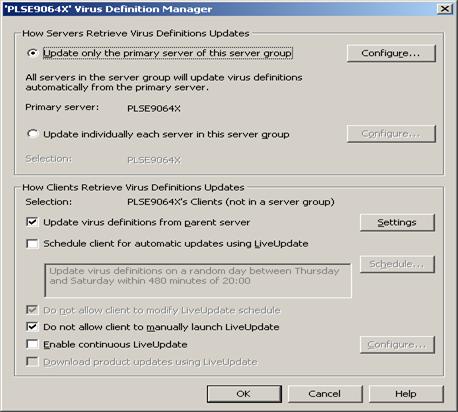
- Fig9:
Select the option Update only the primary server of this server group
and all options as shown in fig below and click on Configure.
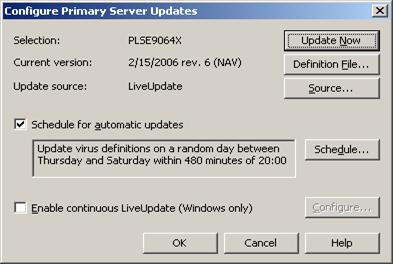
- Fig10:
Please select the options as shown in Fig then click on Source and you
will see the next screen. (Please note that this screen options will be
modified in next few step as you follow the document)
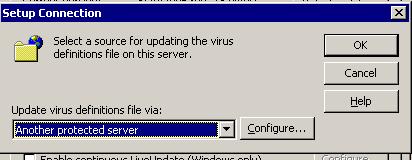
- Fig11:
Please click on Configure
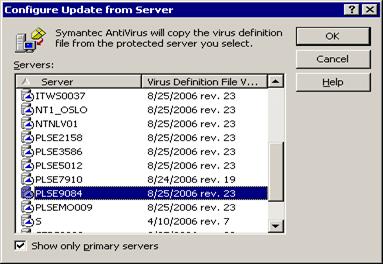
- Fig12:
Select the server from the list as shown below and say OK .It will take
you back on screen as shown in Fig10.
- Fig13:
Click on Schedule as shown in Fig10 and you will see the screen below
and click on Advanced
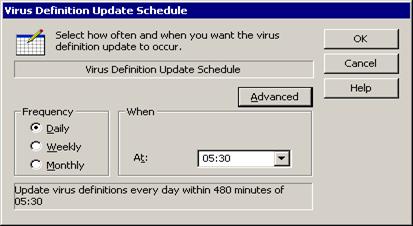
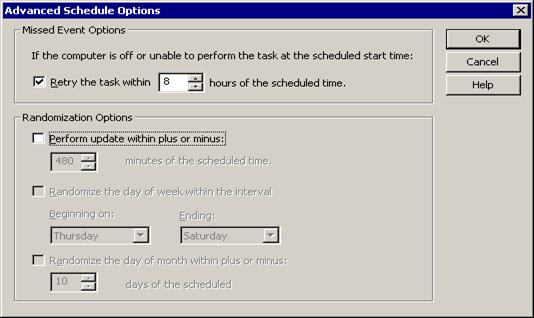
- Fig14:
Please select the options as shown in Fig below and click OK.
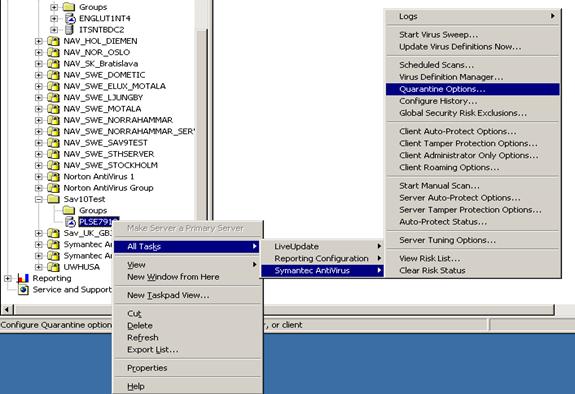
Configuring Quarantine Options
- Fig15:
From this Figure we will configure Quarantined option so again right click
on the server and Go to All Tasks>>>Symantec
Antivirus>>>Quarantine Options as shown in fig below :
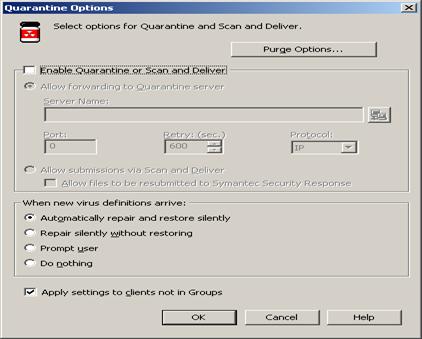
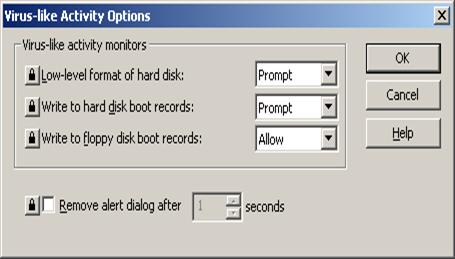
- Fig16:
Please select the options as shown below and click OK. Please clarify that
we are not using the Quarantine.
- Fig17:
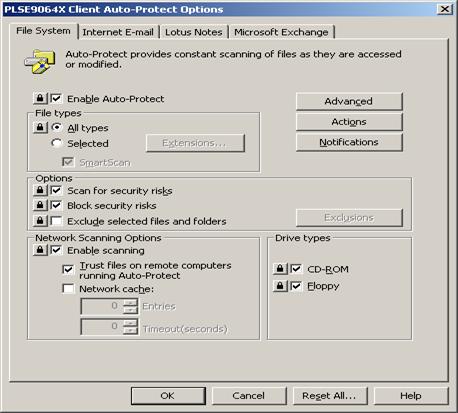
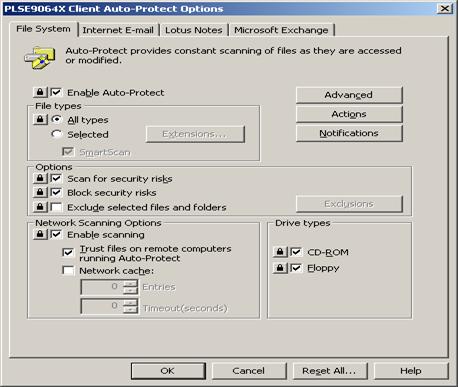
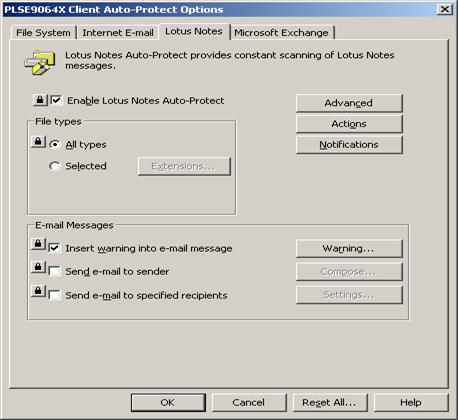
Again right click on server as shown in Fig 15 and Go to All
Tasks>>>Symantec Antivirus>>>Client Auto Protect Options
and you will see the screen below. Please follow the settings and click on
Advanced
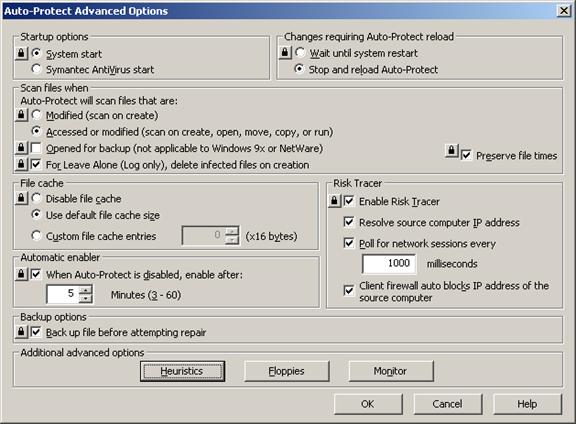
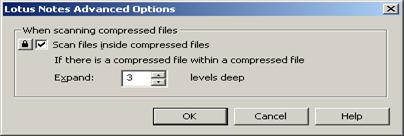
- Fig18:
When you click on Advanced from previous screen you will see this
screen, please select the setting as shown in Fig below and click on
Heuristics tab to move to next screen.
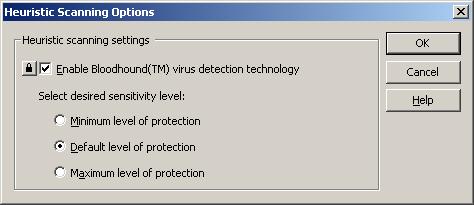
- Fig19:
Please select the scanning options as shown in Fig below and click on the
OK button. This will take you to previous screen .Please dont close that
screen
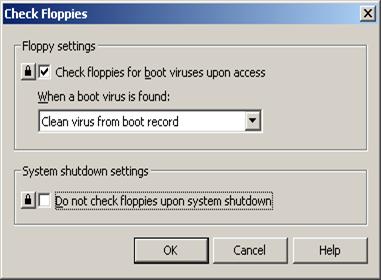
- Fig20:
Please select Floppies tab from the screen as shown in Fig18 and you
will see the below screen, Please select the settings as shown and click
OK.
- Fig21:
Please select Monitor tab from the screen as shown in Fig18 and you will
see the screen as shown below .Please select the settings as shown and
click OK and again until you come to the screen shown in next fig22
- Fig22:
We have finished Advanced options from Fig17 to Fig21 .Please click on
Actions tab.

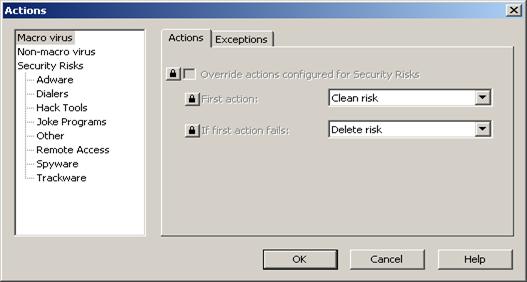
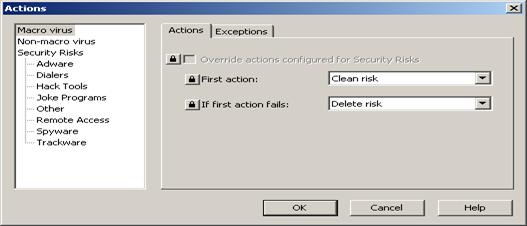
- Fig23:
Select the options as shown in Fig below by selecting Macro Virus from
left Window pane and dont click OK as you need to modify other settings.
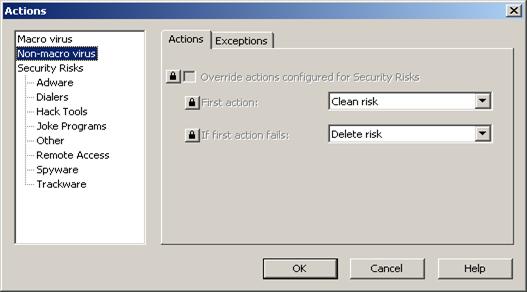
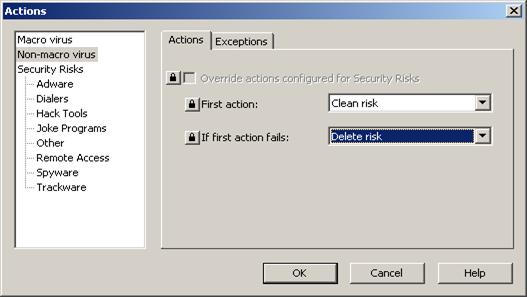
- Fig24:
Please select Non-macro virus from left Window pane and adjust the
setting accordingly as shown in Fig below and again dont click OK yet.
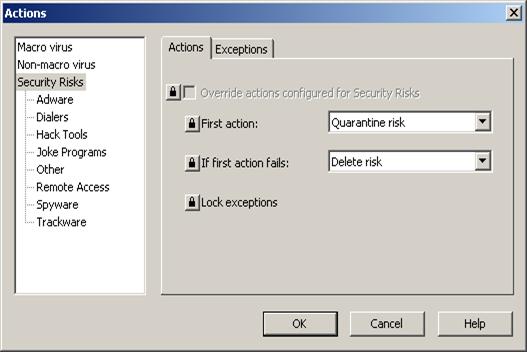
- Fig25:
Please select Security Risks from left Window pane and adjust settings
accordingly as shown in fig below and Click on OK. It will take you to the
same screen as shown in Fig22
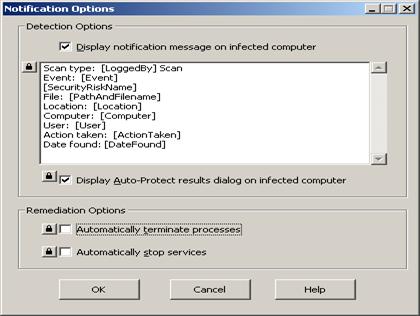
- Fig26:
Click on Notification tab from the below screen and you will see next
screen.
- Fig27:
Please select the options as shown in Fig below and click OK and it will
take you back on Fig26 again
- Fig28:
Please click on Internet E-mail tab and select the options as shown
below and click on Advanced
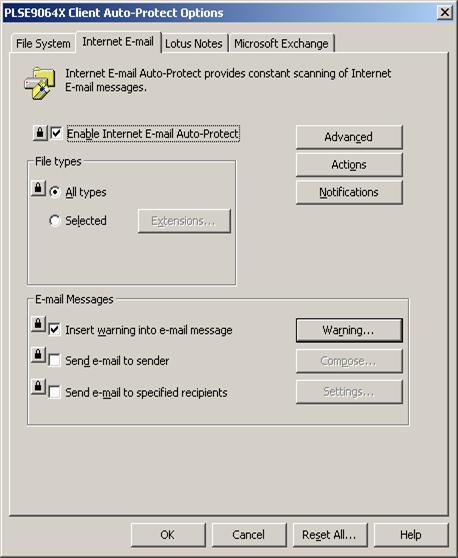
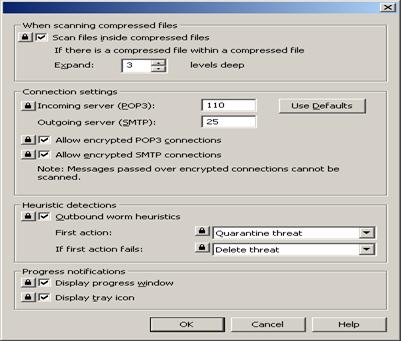
Fig28: Please select the settings
as shown in fig below and click OK.
- Fig29:
You will see this screen again as you have seen in Fig 28 .Please click on
Lotus Notes from the top of the screen as shown below and click on
Advanced Tab
- Fig30:
Please select the Options as shown below and click OK.
- Fig31:
When you will click OK on previous Fig it will show you the screen as
shown in Fig29.Please click on Actions tab .You will see this screen
please select Macro virus from left window pane and select options as
shown below and dont click Ok
- Fig32:
Please select Non Macro virus in left window pane and select options as
shown below: dont click Ok yet
- Fig33:
Again from Left Window Pane please select Security Risks and adjust the
setting accordingly as shown below in Fig and click OK.
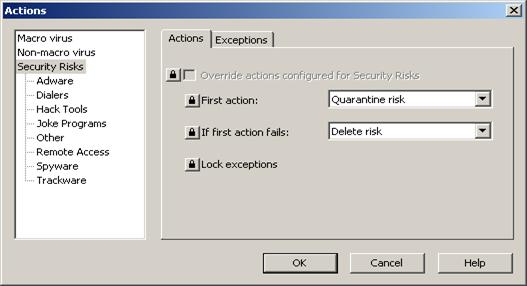
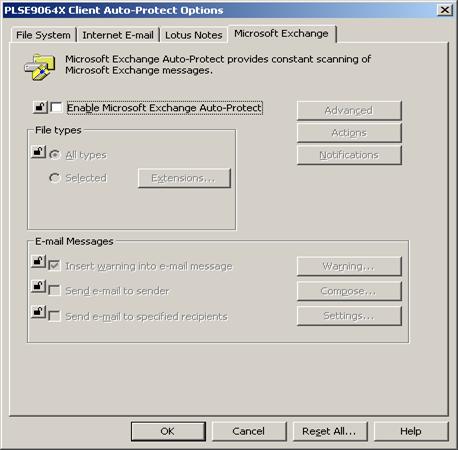
Fig34: After Clicking Ok on Previous screen it will take you
back on the screen as seen in Fig29.Please click on Microsoft exchange and
select settings as shown below
5.5 Configuring Client Tamper
Protection
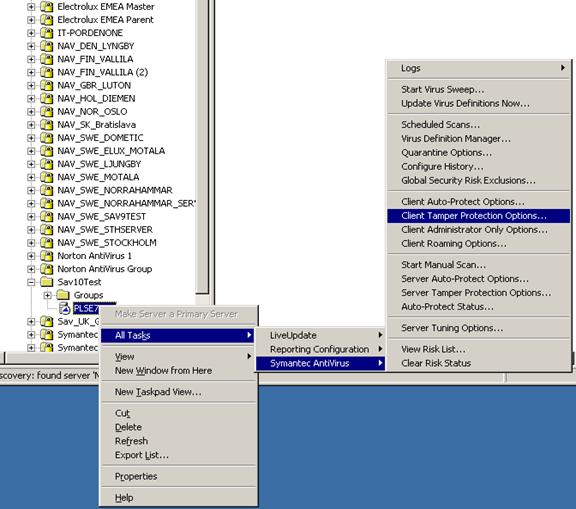
Fig35: Again right click on server from Symantec system
Centre console as shown in Fig below and Go to All Tasks>>>Symantec
Antivirus>>>Client Tamper Protection Options and you will see the
screen below. Please follow the settings in next fig:
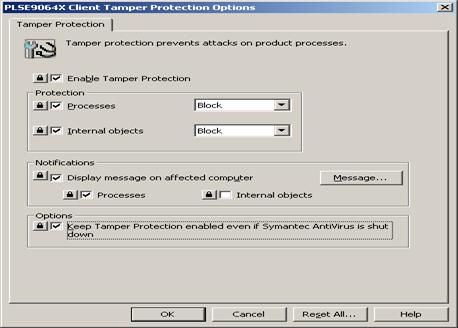
- Fig36:
Please do the setting as shown in Fig below and click OK .
5.6 Configuring Client
Administrator Options
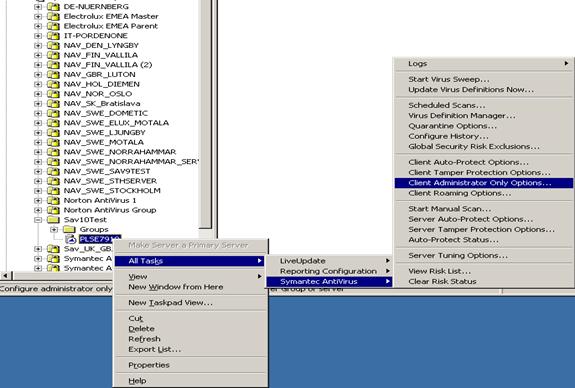
- Fig37:
Again right click on server from Symantec system Centre console as shown
in Fig below and Go to All Tasks>>>Symantec
Antivirus>>>Client Administrator only Options and you will see
the screen below. Please follow the settings in next fig
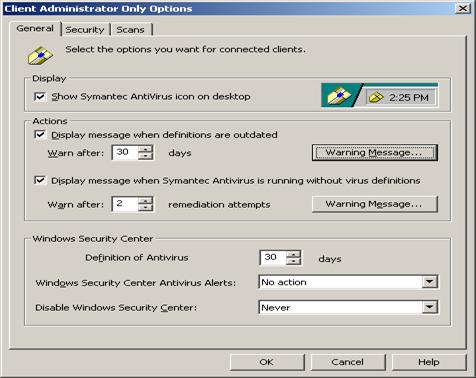
- Fig38:
Click on General Tab and do the settings as shown below
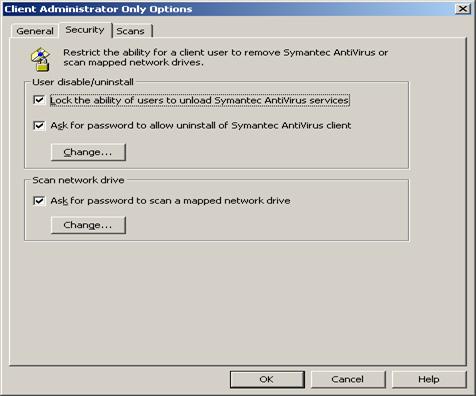
- Fig39:
Click on Security Tab on top as shown below and do the settings as shown
in fig below and Click OK .
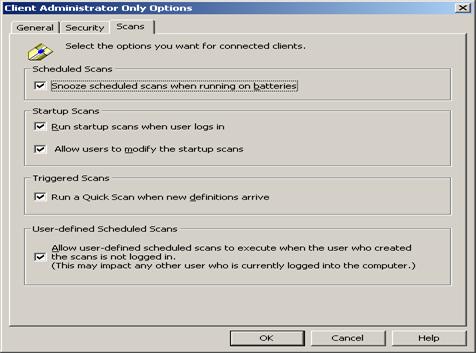
- Fig40:
Click on Scans tab as shown below from the top of the screen and do the
settings as shown .Click OK
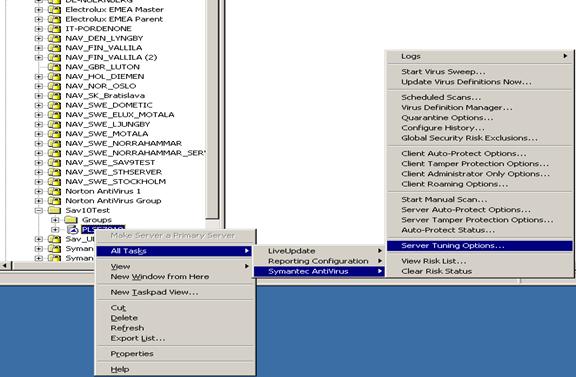
5.6 Configuring Server Tuning
Options
- Fig41:
Again right click on server from Symantec system Centre console as shown
in Fig below and Go to All Tasks>>>Symantec
Antivirus>>>Server Tuning Options and you will see the screen
shown in Fig42
- Fig42:
Please click on Rollout and Management Tab and select the options as
shown below: Please dont click OK and move to next fig

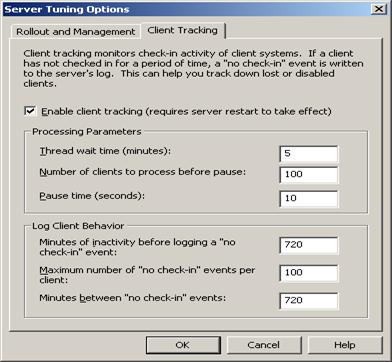
- Fig43:
Please click on Client Tracking tab on top of the screen and adjust
settings accordingly as shown in Fig below:Click OK after you finished all
settings .
5.7 Root Certificates
Configuration
In order to get the server to update definition files, you
will need to send the certificate from this server to the SAV team and to add
the certificate from the Electrolux Master Server to your server.
Find the folder called pki, this is normally in
C:Program FilesSymantec Antivirus, make a zipfile of the entire folder and
send to the SAV team, after we have received this file from you we will add
your servers certificate to the Electrolux Master Server and send you the
certificate from the Electrolux Master Server that you will need to add to your
server.
It is a file named xxxxxxxx.servergroupca.cer that you need
to add to the folder C:Program FilesSymantec Antiviruspkiroots. After you
have added this file, all you need to do is to restart the Antivirus services,
or the entire server.
The server should now be able to update definition files
from the Electrolux Master Server.
6. Naming CONVENTIONS STANDARD
Rename Server group according to naming standard.
Naming standard is 2 letters for country, 3 letters for
site, SAV version and running number, separated by underscores _. For a
SAV10.1 server in Stockholm,
Sweden name
would be: SE_STH_SAV10.1_1
Open SSC and unlock your server group you wish to change
name for, then right-click and select rename and type in the new server group
name.
