| CATEGORII DOCUMENTE |
| Bulgara | Ceha slovaca | Croata | Engleza | Estona | Finlandeza | Franceza |
| Germana | Italiana | Letona | Lituaniana | Maghiara | Olandeza | Poloneza |
| Sarba | Slovena | Spaniola | Suedeza | Turca | Ucraineana |
Mobile Line of Business Solution Accelerator 2008 Elements
Mobile Line of Business Solution Accelerator 2008
The Mobile Line of Business Accelerator 2008 (the Hardware Distributor) showcases a mobile supply chain application written in Visual C# using Visual Studio 2008. This .NET Compact Framework 3.5 application performs different tasks based on specific user roles. Implementing a role-based design reduces complexity since users only see the portion of the application thats designed just for them.
In the Customer Service role, a user can place new orders, check on delivery status, and cancel orders.
In the Warehouse role, a user can pick items from bins and load them on the truck with a forklift.
In the Delivery Driver role, a user can retrieve route maps from the MapPoint web service, deliver items to customers, and capture signatures for proof of delivery purposes.
All the devices used by the various roles are kept in sync with each other through the use of Sync Services for ADO.NET and Windows Communication Foundations Store and Forward capabilities and requires SQL Server Compact, SQL Server 2008, and Exchange Server 2007, over wireless.
Many of the elements that make a mobile application ready and able to support mission critical line of business operations are documented below.
The Windows Mobile application stack for a rich client is composed of Windows Mobile 6, .Net Compact Framework 3.5, SQL Server 2008, SQL Server CE 3.5 and then the actual client.
This mobile computing platform has the same memory and processing power as most of the enterprise-class PC workstations found in the late 1990s. You trusted your desktop line of business applications to that platform back then and you can trust your mobile line of business application to Windows Mobile 6 today. With the wireless capabilities of most Windows Mobile 6 devices, your mobile workforce will have the added advantage of being able to capture data at the point of activity and send it to your back office systems immediately so that it can be acted on more quickly. This kind of mobile agility is what facilitates the Real-Time Enterprise and gives your company an edge. Windows Mobile 6 supports persistent storage so theres no danger of losing critical data even if the battery runs out. It also provides numerous managed-code APIs that can be easily utilized by .NET Compact Framework developers. The Hardware Distributor takes advantage of these APIs to determine the presence or absence of the network in order to make database replication decisions.
This new managed-code runtime comes with a compact version of the Windows Communications Framework, Language Integrated Query (LINQ), new and improved diagnostic and performance analysis tools, and many smaller improvements as well. A subset of the desktop and server .NET Framework, the .NET Compact Framework 3.5 provides a rich set of UI controls and includes support for ADO.NET, XML, Web Services, Threading, Custom Controls, Serial Ports, MSMQ, Cryptography, COM Interop, Native Interop, Sockets, Bluetooth, HTTP, and Infrared.
Combined with Visual Studio 2008, there is no faster way to build powerful mobile applications. The Hardware Distributor uses a wide range of the Compact Frameworks features, including:
Sync Services for ADO.NET with SQL Server 2008
Store and Forward Transport with Exchange Server 2007
Web Service retrieval of maps from MapPoint
Custom Controls
State and Notification Broker
ADO.NET Communication with SQL Server Compact.
CAB deployment project
Use of LINQ
Yet, an application with all of this functionality can be built by single developer in just a couple of months. The .NET Compact Framework is the very definition of productivity in mobile development.
This enterprise database serves as the heart and soul of any enterprise mobile line of business deployment. While SQL Server 2008 is well-known for its high-performance, scalability, and ease of use, its probably not as well-known for its ability to keep the data on thousands of Windows Mobile devices synchronized. The Hardware Distributors inventory and order management database resides on SQL Server 2008 and is published out for synchronization. In this version of the Hardware Distributor we used Sync Services to synchronize the data between the device and the server. Sync Services along with SQL 2008 offers detailed control over change tracking, table and column filters, compression, and conflict resolution. In addition to synchronizing data, it supports the replication of schemas, indexes, and even referential integrity down to SQL Server Compact databases running on the device. Windows Mobile devices can securely replicate their data with SQL Server 2008 in a firewall-friendly manner over HTTP(S) via IIS whether they are on the corporate LAN or coming in from over the Internet. Keeping the devices synchronized is a critical function in the Hardware Distributor because the different users of the application, all with different job functions. The different users have to know the status of all the orders in the system in order to do their jobs.
This is a high-performance embedded database that runs on the desktop as well as on the server, Tablet PCs, and on Windows CE and Windows Mobile devices. A mobile line of business application cant live without a mobile database, and SQL Server Compact is a robust solution for mobile data sources. It runs in-process with the Hardware Distributors executable and supports row-level locking and multiple connections which allow the application to stay connected even while its replicating with SQL Server. Data remains secure on the device thanks to the 128-bit encryption and data stays secure over the air thanks to TLS. SQL Server Compact supports three scalable methods of synchronizing with SQL Server 2005. Remote Data Access (RDA) is easy to set up and is a good choice when device users will all be working with their own sets of data. Merge Replication is the right way to go if you need built-in conflict resolution when device users work with each others data. Sync Services is a good choice for larger scale deployments and more complex infrastructures since you can set up an n-tier structure.
Just as large, distributed applications are physically broken up into multiple tiers, .NET Compact Framework applications should also be divided into logical layers. These separate tiers within your executable include a User Interface Layer, Business Layer, and Data Layer.
Some people who may have read the examples in a computer book, or may have seen a developer marketing presentation, might be under the misguided belief that all application logic belongs inside the Click events of the forms button controls. This tight-coupling of application logic inside the applications forms is definitely not advisable. It would require you to change the same business logic over and over again in dozens or hundreds of forms, instead of just changing it in one place, in the Business Layer.
The loose-coupling of multiple application layers ensures that UI designers dont have to deal with database access logic, Application Layer developers dont have to concern themselves with combo boxes, and the whole application can be moved to a different .NET-based platform just by changing the GUI. Alternatively, the database can be swapped with a different data source, just by changing the Data Services Layer.
Figure - Client Architecture
Application services layer consists of functionality that is used across the various layers. This includes functionality like application settings and error logging.
The .NET Compact Framework supports the throwing, catching and display of error messages, collections of errors, and complex stack traces. What doesnt come out of the box is a facility to log those errors to a file or other data structure so that they can be analyzed later to help improve the software. This means developers have to fend for themselves and either roll their own error logger, buy a commercial product, or utilize one of the open source error logging frameworks.
The Hardware Distributor takes a simple approach to error logging and writes the error messages and stack traces to a text file called ErrorLog.txt. When an error is caught, the Exception object is passed to the LogError method found in the Service class of the Data Layer, where it gets written to the persistent storage as shown below.
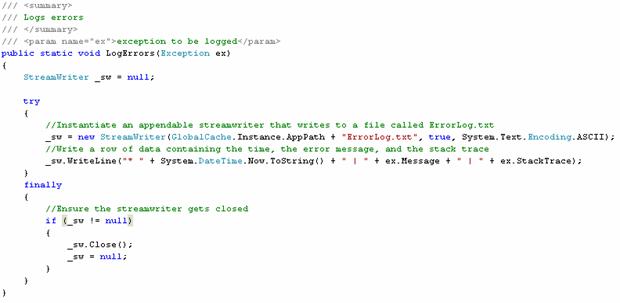 Figure 2 - LogError Method
The important message here is to find a method of error logging that you like and stick with it because any kind of error logging is better than none at all.
On the desktop and server, the .NET Framework supports the use of application configuration files based on XML, to store and retrieve various application settings such as connection strings. Like error logging, the .NET Compact Framework doesnt include support for utilizing these XML configuration files. As a developer, you can use the registry or text files to perform this vital function.
The code in the Hardware Distributor will show you how to use the same appname.exe.config XML files that are found on the desktop and server. It stores synchronization information, connection strings, and MapPoint web service URLs in this file, as shown below.
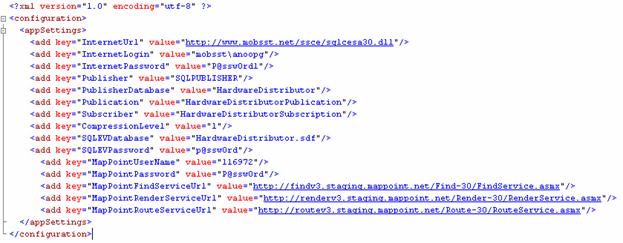 Figure 3 XML Configuration Data
The config file is accessed via the GetAppSetting and SetAppSetting methods found in the Services class in the Business Layer. These functions take advantage of LINQ to greatly simplify reading and writing to the XML file.
The Business Layer provides services to the UI Layer. This allows for the UI to be isolated from the implementation details like how data is stored. This allows for changing the underlying model with little to no changes to the UI.
The GlobalCache, Services class and the various Business Entities are grouped together in the Business Layer and are found inside the HardwareDistributor.Business namespace as shown below.
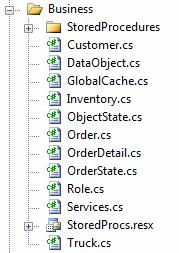
Figure 4 - Business Layer
The GlobalCache is a singleton object used to cache items that are expensive to retrieve, and are used throughout the system.
The Services class provides business services and logic to the rest of the application.
The Business Entities are classes that abstract away the rows and columns of database tables and accurately model the real-world objects you would find in a hardware distribution business. Customers, Orders, Inventory, OrderDetails, Roles, Trucks and their associated attributes are the concrete objects that are modeled in this system. These strongly-typed objects are added to strongly-typed Generic Collections in order to transport their state between the Data Layer and the UI layer.
StoredProcedures folder contains the files that have some of the SQL used by the application.
StoredProcs.resx is a resource file setup to hold the SQL files in StoredProcedures folder as resources providing strongly typed StoredProcedures and Intellisense.
While the use of global variables is usually frowned upon in programming, there are often a number of items used throughout the application that are useful. Using a singleton class allows you to cache a single instance of primitives and objects in order to boost the performance of your application, by eliminating the constant re-fetching of data. The Hardware Distributor uses a singleton called GlobalCache to store things like database connection strings, replication information, MapPoint information, the database connection object, device metrics, and collections of objects, as shown below. All of these items are fetched when the application launches its splash screen.
There are several ways to implement a singleton. In the case of the GlobalCache an instantiated object is used. It is created the first time the GlobalCache type is loaded by the CLR. Using the readonly keyword in the declaration of the variable holding the actual instantiated objects makes sure only one instance is created.

Figure 5 - Singleton
In a potentially unreliable wireless environment, having a mobile application thats aware of the conditions around it, makes for happier users. Utilizing information provided by the SystemState object in Windows Mobile 6, an application can be aware of network availability, battery life, phone signal strength, and whether or not a user is currently making a phone call. This kind of information can be used to change the applications state, appropriately alter its UI, or make decisions about when to perform background sync. In the Hardware Distributor, the presence or absence of a network is tested before performing synchronization with SQL Server, as shown in Listing 4. Furthermore, the URL of the synchronization is tested to see if its reachable before the synchronization is attempted. This gives users and administrators more granular data as to why a device might not be able to sync with SQL Server at a given time. It also prevents the user from performing an operation that is already guaranteed to fail.
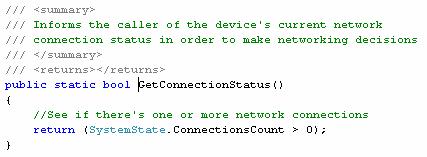
Figure 6 Checking for network connections
Classes that facilitate communications with the database are grouped together in the Data Layer and are found inside the Microsoft.Mobile.Data namespace, as shown below.
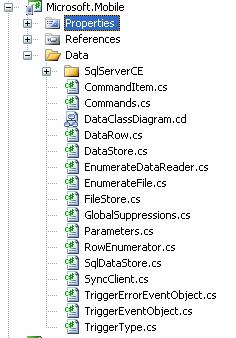
Figure 7 - Data Layer
The Data Layer is based on the concept that it accesses a data store in a unified fashion. The data store can be a database, flat file, XML or even web services call. The only requirement of a data store is that data must be represented in a row and column fashion. The current Data Layer implements 2 kinds of data stores; SQL databases or flat file. SQLDataStore can access anything that uses ADO.Net to communicate with Compact Framework applications. Currently a driver exists to access SQL Server Compact. FileStore can access a flat file where each row of the file is a single column data row.
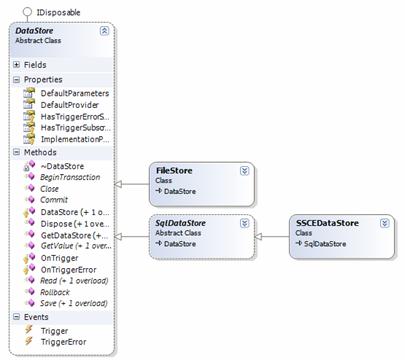
Figure 8 - DataStore Class Diagram
Data store functionality can be grouped into three main areas:
Opening and closing the data store
Retrieving data
Saving data
When a data store is created, it automatically opens the data store. In the case of a SQL data store this creates a DBConnection to the database. In addition a Close method exists to close the connection as necessary for example when doing a synchronization the connection needs to be closed. When the DataStore object is disposed the connection is also closed. Multiple connections can be created by creating multiple DataStores with the same connection string.
To retrieve data, two methods are used Read or GetValue. The Read method returns an enumeration of DataRows. A DataRow object is a strongly typed dictionary composed of a string key and an Object value. The key is the name of the column while the value is the value of the column for that row. The GetValue method returns a single object representing a value for example the count of rows in a table.
In the case of SqlDataStore both retrieval methods build or re-use a DBCommand. [Note: commands are cached in a fixed size cache. It uses a least used algorithm to remove commands when new commands need to be cached and no more room exists.] The GetValue method uses the ExecuteScalar method of DbCommand to return the value from a given SQL. Read method executes ExecuteReader method of DBCommand. The returned IDataReader is then put into a custom object that implements the interfaces IEnumerator and IEnumerable. This allows for using the foreach keyword and even LINQ to transfer data from the IDataReader.
The last set of methods is related to saving data. This consists of an overridden method called Save and methods for starting, committing or rolling back transactions. The Save method uses the ExecuteNonQuery method of DbCommand.
In addition, an event Trigger can be used to allow other objects to be notified about changes. This Trigger can be used like a database trigger. It tells subscribers what table was changed and whether the action is update, delete or insert. The trigger can used to update auto-incrementing fields.
The data layer in saving data does the following:
Build the SQL command
Execute non-query
Build the event object
Fire the trigger ensuring every subscriber gets the event
This last point about every subscriber is important. If an exception is thrown another event happens, TriggerError. By subscribing to TriggerError if the subscribers event code fails the exception can be gracefully handled rather than causing all subsequent subscribers to not be notified.
The event argument consists of the action being performed and an identifier. The action can be update, delete or insert. The identifier in the case SQL is the table being affected.
So for example, a trigger is setup to handle inserts on OrderHeader and OrderDetail. When the trigger fires, the new row identity is retrieved. Then the object is updated with the new identity value.
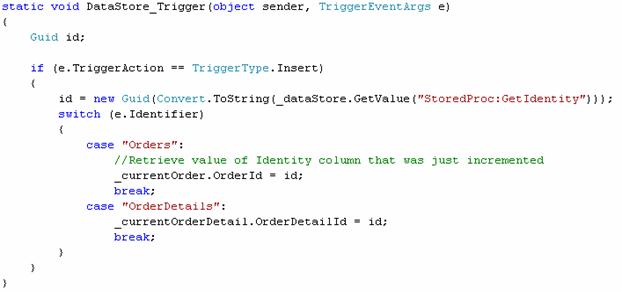 Figure 9 - Trigger
In retrieval and save methods the methods are overloaded with a selector and a selector with parameters. The selector parameter is a generic way to specify to the actual DataStore implementation what is to be done. In the case of SqlDataStores the selector is one of three things SQL, StoredProc or Table.
A SQL string with or without parameters can be used. The Data Layer supports
SELECT used to retrieve data
INSERT used to insert data
DELETE used to delete data
UPDATE used to update data
Managed stored procedures allow developers to separate out the SQL from the code. Developers can use embedded resource files containing SQL. These files are then housed in a resource file and can be accessed by name with Intellisense support. The contents of the file are passed in to the Read, GetValue, or Save method. In addition, parameters can be passed in as well to give parameterized queries.
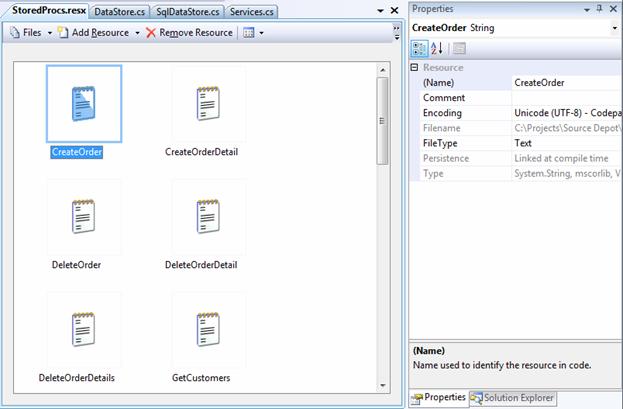
Figure 10 Embedded Resource Files
An added benefit of using embedded resource files is the editor can provide some support to writing the SQL in the form of syntax highlighting. In addition, the SQL can be tested by running them against a test database.
So for example, a stored procedure in a file named CreateOrder.sql in the StoredProcedures folder contains how to create the order header in the database. To use it, simply pass to the Save method the selector StoredProcs.CreateOrder along with parameters.
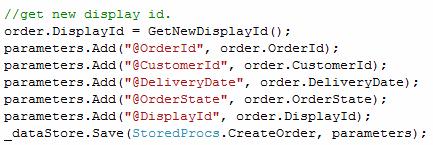
Figure 11 Creating a New Order
To create your own stored procedures you do the following:
Create a new resource file or use the project default resource file.
Bring up the resource designer
Select the File resource designer
Drag or add the files that contain the SQL
The resource designer will give you a class with properties that returns strings. The property names are the filename without extensions. So if you have a file called CreateOrder.sql it would be the property CreateOrder.
The last type of selector supports table direct using Table:tablename. By specifying Table: the SqlDataStore knows to use TableDirect as the command type and the tablename as the command text. As long as the underlying database supports TableDirect it can be used. This can give significant boost to performance when using SSCE which bypasses the SQL parser and reads the table directly in the order the rows were written. You can also use this in a stored procedure so for example the contents of the GetCustomers.sql file is Table:Customers.
For more information see the class reference.
Those of you who believe that data needs to be transferred back and forth between the user interface and the database via ADO.NET objects like SqlCeDataReaders, DataSets, and SqlCeResultSets might be scratching your head right now. The Hardware Distributor maps Domain Objects like Customer and Order to relational database tables found in SQL Server Compact. To high-octane, object oriented developers who are accustomed to using O/R Mappers or code generators, this method of working with data will look quite familiar. The best way for everyone to understand how this mobile line of business works with data is to break it down into pieces:
 Figure
12 - Layer Interactions
Figure
12 - Layer Interactions
When the UI needs data, it makes a request to the Service class for what it wants, in this case a list of Orders. The Service class then requests from a DataStore the information it is trying to find. The DataStore gives the Services an enumerator that it can use to retrieve the requested data. At this point, the Service can transform the return data into a collection of Orders that are returned to the UI. As you look at 12, each of the layers communicate via a specific set of data objects. The UI and Business Layer communicate via Business Entities. The Business and Data Layer communicate via DataRows. The next sections will step through how these interactions work.
The UI makes requests to the Services class in this case GetOrders method. The GetOrders method builds the SQL and parameters required to find the requested orders.
Next, the method takes the SQL and parameters and passes them to the Data Layer. One issue that is common to interactions between layers is extra looping. Extra looping can occur when the Data Layer loops through the data building a collection to return to the calling Business Layer method. The Business Layer method then loops through the returned collection to build specific business entities. The UI then also loops through the collection. The new Data Layer gets around this issue using custom enumerators. The DataReaderEnumerator contains a pointer to an IDataReader acting like a cursor in the table. When the method in the Business Layer asks for the first DataRow, it is built on the fly. When it asks for the next DataRow it is created and so one. Thus the Business Layer actually drives looping through the returned IDataReader.
Now you might be asking yourself why the Business Layer does not use the same approach by putting the DataReaderEnumeration inside an OrderEnumerator. In testing just this scenario it turns out that it is slower not faster. This most probably due to the overhead of the method stack used to do a single loop. Thus looping through the Orders twice once to create them and once to put them in the UI is faster.
One of the exciting things in .NET Framework 3.5 is Language Integrated Query or LINQ for short. The Compact Framework 3.5 has a subset of the LINQ functionality. The most notable feature missing in CF LINQ is LINQ for SQL. However this is not a big deal and CF LINQ gives you the standard operators and the ability to query objects and XML.
Rather than looping through the cached collection of Customer objects a LINQ statement was created. Prior to LINQ developers had to loop through collections while it is easy for simple logic more complex logic can be harder to debug.
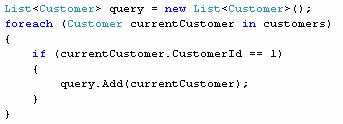
Figure 13 Old Style Query
With LINQ developers can now use SQL like syntax to query collections and even act upon the results. The heart is a var statement which is composed of a from clause a where clause and an action clause in this case a select.
![]()
Figure 14 Get a Specific Customer
The query essentially generates for developers the code to retrieve out of the Customers in the GlobalCache any customers with a specific CustomerId and put it in a collection. The only thing left to do is extract the customer.
Due to fully implementing the DataReaderEnumeration used to return DataRows, the Enumeration can be used with LINQ. This allows for simplified looping code that almost looks like LINQ for SQL. In the case of GetCustomers, the LINQ statement takes the current row coming from the enumerator and transforms it when selected into a new customer object.
 Figure 15 GetCustomers
The Mobile LOB Accelerator operates on data stored locally in SQL Server Compact 3.5. Many mobile applications, however, require the ability to share data with other entities. The primary model for sharing data is with a single central server data repository and multiple clients that keep their data synchronized with this server data source. Data synchronization in Mobile LOB Accelerator is implemented using Microsoft Synchronization Services for ADO.Net (Sync Services). Sync Services provides the ability to synchronize data from disparate sources. Rather than simply replicating a database and its schema, the Synchronization Services application programming interface (API) provides a set of components to synchronize data between data services and a local store.
The server synchronization provider (Microsoft.Synchronization.Data.Server.dll) must be hosted on the desktop server or on the web. The server synchronization provider components used to build synchronization solution for desktops can be reused to synchronize devices. However, the Synchronization Agent and Client Synchronization Provider that connects to SQL Server Compact database run on the device and synchronize with the desktop server or web in N-tier architecture. The server synchronization provider components cannot be hosted on the mobile device.
Figure 16 Sync Services Architecture
The Hardware Distributor application uses SQL Server 2008 as the server backend database. SQL Server 2008 (Nov CTP) introduces a built in Change Tracking mechanism that can be leveraged for Synchronization. Prior to this, in SQL Server 2005 or using other databases, we would have to add a bunch of extra columns and tables to maintain tracking information.
How the built-in mechanism for SQL Server 2008 works is that when change tracking is enabled, the SQL Server engine maintains information about changes made to the table internally. The tracked data is then made accessible by system functions that allow you to query for specific tracking information.
First we must prepare the database and the tables for change tracking by switching it on for both the database and the tables -
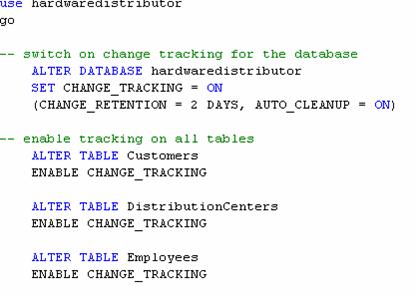
Figure 17 Turning Change Tracking On
Once the above commands have been issued, a tracking version number is initialized for the database which can be accessed by calling the internal function CHANGE_TRACKING_CURRENT_VERSION(). Initially, this will be defaulted to 0. When a row in a tracked table changes, this version is incremented by 1 and the new row is now associated (virtually) with the new version number.
The CHANGETABLE function retrieves the tracked information.
The Sync Services API requires that you create a DbServerSyncProvider. The principal activities of the server synchronization provider are as follows:
Stores information about tables on the server that are enabled for synchronization.
Enables applications to retrieve changes that occurred in the server database since the last synchronization.
Applies incremental changes to the server database.
Detects conflicting changes.
DbServerSyncProvider.SelectNewAnchorCommand: contains the query to retrieve the new anchor value from the database. The anchor defines the upper bound for the set of changes to be synchronized during the current session. In SQL Server 2008, we will set this to the value returned by CHANGE_TRACKING_CURRENT_VERSION()

Figure 18 Select New Anchor Command
SyncAdapter.SelectIncrementalInsertsCommand: Query that is used to retrieve inserts made in the server database since the last synchronization for all the tables in synchronized tables.
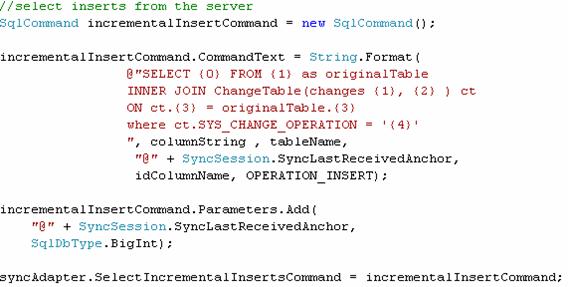
Figure 19 Select Incremental Inserts Command
The command above is used for selecting the new inserts in the server for all the tables by passing the correct parameters for each of the tables. All we are doing is constructing the sql command to retrieve the new inserts for a particular table. SyncSession.SyncLastReceivedAnchor contains the version number held by the client requesting for new inserts from the server. OPERATION_INSERT = I which signifies an INSERT operation for the row.
SyncAdapter.SelectIncrementalUpdatesCommand: query that is used to retrieve updates made in the server database since the last synchronization.
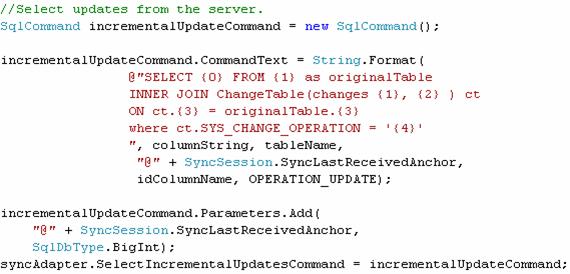
Figure 20 Select Incremental Updates Command
SyncAdapter.SelectIncrementalDeletesCommand: query that is used to retrieve deletes made in the server database since the last synchronization
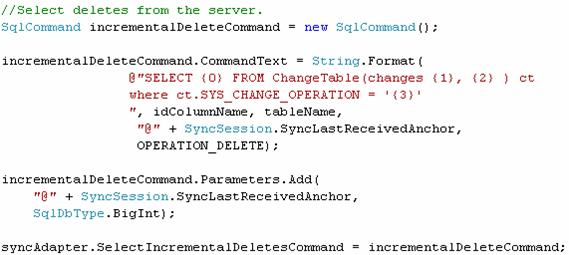
Figure 21 Select Incremental Deletes Command
SyncAdapter.InsertCommand: query that is used to insert data into the server database.
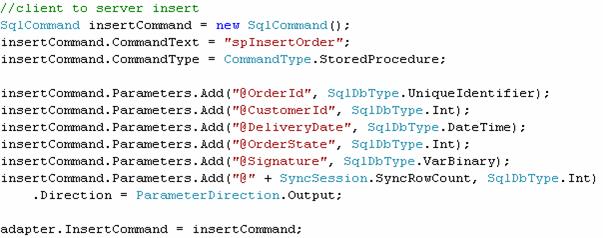
Figure 22 Insert Command
For the Orders table, we have to configure this command to use the Stored Procedure spInsertOrder. The stored procedure accepts the values for the columns and an additional output parameter SyncSession.SyncRowCount that is used to indicate success or failure of the operation. Typically this parameter is set to @@ROWCOUNT.
SyncAdapter.UpdateCommand: SQL that is used to update data in the server database. This query is used when there are client updates to be applied at the server
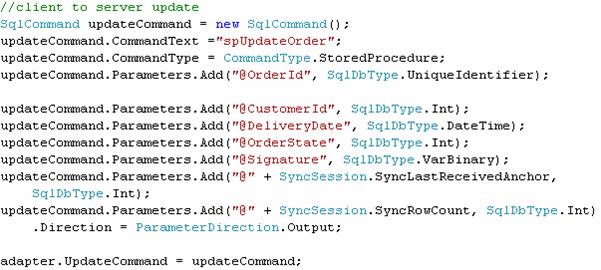
Figure 23 Update Command
For the Orders table, we have configured this command to use the Stored Procedure spUpdateOrder to perform the update. The stored procedure accepts additional parameters which are used for conflict detection and handling
SyncSession.SyncLastReceivedAnchor: internally to the stored procedure, this parameter is used to ensure that in case of conflicts, the server wins.
SyncSession.SyncRowCount: we use this parameter to indicate to Sync Services in case an update operation failed. This is an output parameter, which can be set to 0 to indicate failure of update. Typically this is done by setting the parameter to @@ROWCOUNT after the update operation.
The stored procedure is responsible for detecting conflicts in the server updates. We do this by allowing updates only if the passed in client version is greater than or equal to the current server version
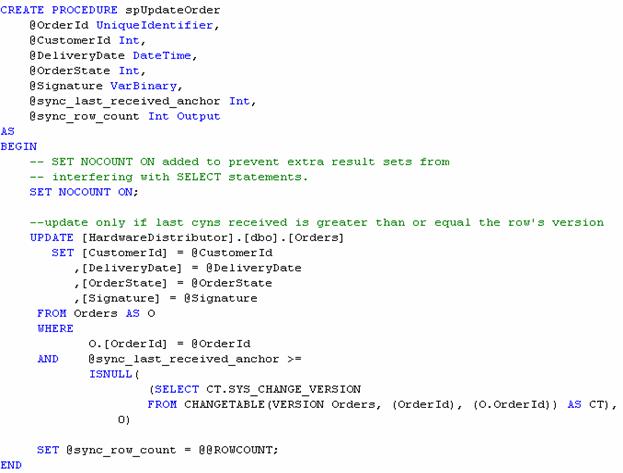
Figure 24 Update Order Stored Procedure
SyncAdapter.SelectConflictUpdatedRows : query that is used to identify updated rows that conflict with other changes. When the UpdateCommand returns to 0, this command is invoked by sync services to retrieve the rows under conflict. The retrieved rows are then applied to the Client DB
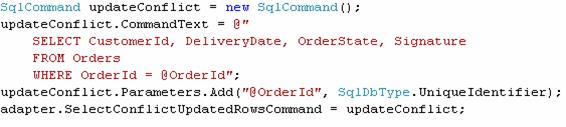
Figure 25 Select Conflict Updated Rows Command
SyncAdapter.DeleteCommand: query that is used to delete data from the server database.
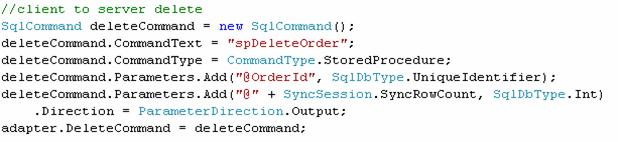
Figure 26 Delete Command
Again, here is a possibility that row being requested for delete had already been updated server with a newer version. The output parameter SyncSession.SyncRowCount is used to indicate that a conflict occurred. We can similarly configure the SelectConflictDeletedRowsCommand property to retrieve the latest version of the row to sync the client with.
SyncAgent: On the client side, Sync Services require that we create a SyncAgent. The SyncAgent orchestrates the synchronization by looping through each of the tables to be synchronized and calls the client synchronization provider to retrieve and apply changes at the client database. Then it calls the server synchronization provider to retrieve and apply changes at the server database.
We configure the following on the SyncAgent
LocalProvider: implementation of the abstract class ClientSyncProvider, that is used to communicate with the local data store
RemoteProvider: implementation of the abstract class ServerSyncProvider that is used to communicate with the remote data store.
Configuration.SyncTables: Collection of tables that need to be synced.
ClientSyncProvider: Similar to the DBServerSyncProvider, we require an implementation for ClientSyncProvider. Luckily, the Sync Services framework provides a default ClientSyncProvider for SQL Server Compact in the namespace Microsoft.Synchronization.Data.SqlServerCe called SqlCeClientSyncProvider. This Sync Providers takes care of the change tracking for us.
The .Net Compact Framework 3.5 features Store and forward transport with Exchange Server 2007. This provides a reliable messaging mechanism using WCF end points based on email. The Direct push mechanism on Windows Mobile 6 ensures the prompt delivery of messages on a peer to peer basis.
The Hardware distributor application uses the messaging mechanism to notify the users of change in the order status. For instance, when a new order is created by the Customer Service role, in addition to immediately synchronizing with the Server database, the application also messages the Warehouse role indicating that a new order has been created. When the Warehouse role receives the message, it triggers off a background sync to retrieve the order details on its device.
The emails for the roles are configured in the database in the roles table.
All the WCF Store and Forward implementation is implemented in a separate component:
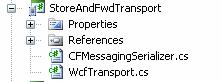
Figure 27 Store and Forward Transport
This project encapsulates all the details of creating the appropriate channels for incoming and outgoing messages. This part of the implementation will not change significantly even for other application and can be seamlessly integrated without any changes. This component exposes the ability to create input and output channels. From within the HardwareDistributor application, we access this functionality using the NotificationAgent Singleton class.
The application registers with NotificationAgent to listens for messages on startup and provides a callback function to process the messages. This is analogous to the Event Handling model, where the event is arrival of a new message.
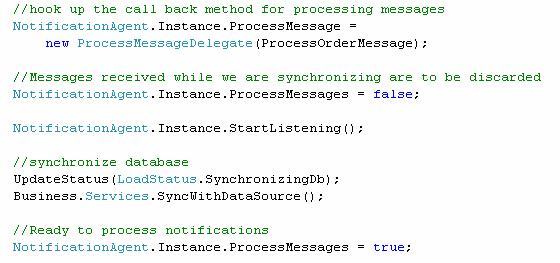
Figure 28 Notification Agent
The callback function is primitive but can be easily enhanced to provide more logical processing. In its current form, it simply starts off synchronization with the server database
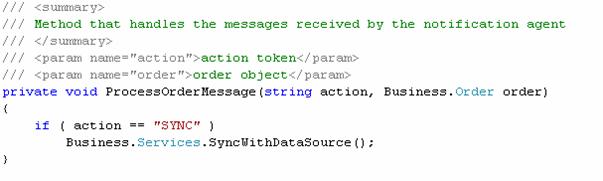
Figure 29 Process Order Message
When an instruction to start listening is provided to the notification agent, it spawns a background thread which blocks on the input channel until a new message arrives. When a new message does arrive, the callback function is invoked by the notification agent. It is critical that this is done on a separate thread to free up the main thread for use interaction and other processing.
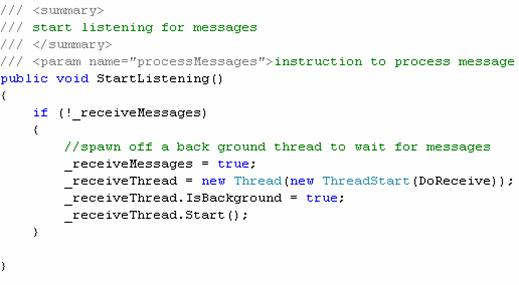
Figure 30 Listen for Messages
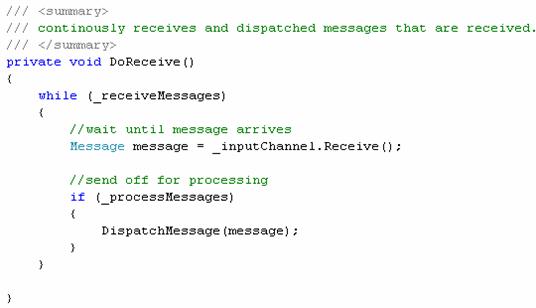
Figure 31 Receive Messages
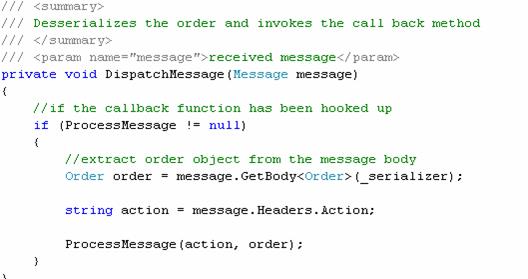
Figure 32 Dispatch Messages
An important point to note here is that the function invoked by NotificationAgent will always be on a background thread since we are listening in the background. This has implications when updating a forms controls. A forms controls cannot be updated directly by a background thread it must use the Form.Invoke function to do so.
Messages are sent out from the application essentially on change of Order state. None > Created; Created > Picked; Picked > Staged; and finally Staged > Delivered.
To send out a message over the email channel we require an endpoint address, which is the receivers email address. The database is configured for each roles emails address and we determine the receiver depending upon the particular state change. In the case when a new order is created, the Customer Service role must notify the Warehouse role.
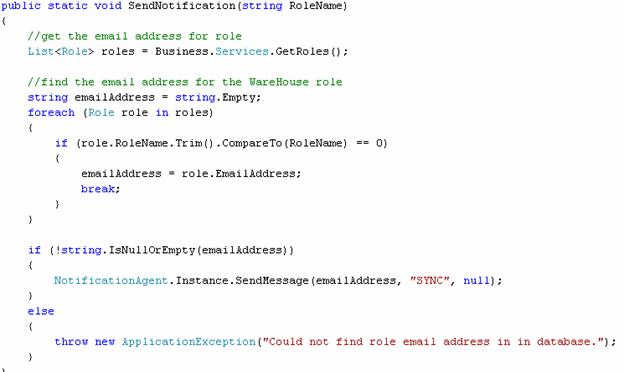
Figure 33 Send Notifications
Internally, this message is serialized by a generic serializer and passed on to the Outbox. Whenever the device gains connectivity via ActiveSync, the message is pushed out and Exchange relays it to the intended recipient. If the recipient is also listening for messages, it gets picked up on arrival. In any case, this mechanism allows us to step away from the internals and all we need to do is configure the channels appropriately.
The early Pocket PCs all had the same screen size - 240x320 portraits. This made creating user interfaces quite a predictable job for developers. Today, Windows Mobile devices have screens that come in all shapes, sizes, resolutions, and orientations. In fact, applications even have to deal with switching from portrait to landscape or different screen sizes, on the fly.
The .NET Compact Framework 3.5, in conjunction with Visual Studio 2008, has the ability to dock a child control against a parent control. A control can be docked to one edge of its parent container or can be docked to all edges and fill the parent container. For example, if you set this property to DockStyle.Left, the left edge of the control will be docked to the left edge of its parent control. Additionally, the docked edge of the control is resized to match that of its container control. Controls are docked in order of their z-order. As shown below, the help label is docked to the top of the screen, which is the parent control. This will ensure that regardless of screen size and resolution, the help label will always be right at the edge of the screen.
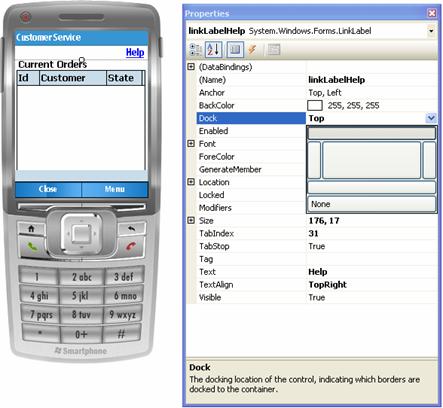
Figure 34 Docking
It also has the ability to specify that one or more sides of a child control stay anchored a certain distance from the edge of a parent control, no matter how the parent control or form gets resized.

Figure 35 Anchoring
Additionally, forms and panels have the ability to automatically create scroll bars when child controls exist outside the viewable area as shown below:
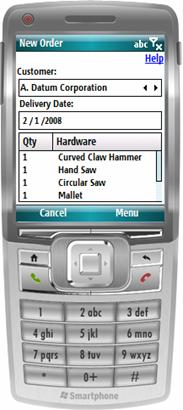
Figure 36 Automatic scrolling
All the child controls in the Hardware Distributor are set up to support anchoring so that all the forms are just as usable in portrait mode as they are in landscape mode or on Windows Mobile Professional and Windows Mobile Standard. While docking can be used as well, we used it sparingly because it does not allow you to control the number of pixels away from the edge of the screen a control is laid out, and when you are laying out multiple controls, anchoring is easier to use. We used docking for the status bar control that shows up at the bottom of the screen when syncing, and for the online help and notifications forms. The reasons for using docking in these cases were that we wanted the controls to take up the entire bottom of the form or the entire form respectively. AutoScrolling forms ensure that controls that are visible in a tall 240x320 screen can still be reached in a square 240x240 screen, although we avoid scrolling when possible. In general, if you are going to develop a form and it works on Windows Mobile Standard for both portrait and landscape, it will work on all other platforms and orientations. By using these principles you can create a single binary for all your Windows Mobile devices.
Since in many cases screen real estate is very important, it is important to only show the controls that are relevant to the user at that point in time. The Hardware Distributor exhibits this characteristic in two important ways. The first is that the Hardware Distributor often uses wizard-like user interfaces to perform actions. This means that several forms are chained together to perform an action by adding soft keys like back, next, and finish to the user interface. Until a user completes this chain of screens, no definitive action is taken, and if a user backs out of the wizard, the action is cancelled completely.
Another way the Hardware Distributor exhibits valuing screen real estate is by the use of stacking controls versus placing them side by side. An example of this is how the status bar does not appear on the screens until it has some action to display. When the status bar appears is appears on top of existing UI that is no longer being used. In this way we are able to use the same screen real estate for two different controls.
Since this version of the Hardware Distributor work on both the Windows Mobile Professional, Classic, and Standard platforms, it is necessary to use only controls that work well on all platforms. Controls that appear by default on the Professional and Classic platforms such as the control box and minimize box need to be removed, and control needs to be handled by input such as the soft keys that are available on both platforms. This actually lends itself very well to both the wizard style user interface that we talked about in the Valuing Screen Real Estate section and allowing one handed input. Buttons are another example of controls that do not work well on the Standard platform. In this case, the user interface designer must decide if the control should become a link label, menu item, or if another custom control like the gradient button makes more sense.
Although docking and anchoring provide a robust framework for handling screen resolutions and orientation, there may be situations when you might want finer control over the display.
In hardware distributor, the orders list view is controlled programmatically to hide and show extra columns depending on the availability of space which usually changes drastically when switching between Portrait and Landscape mode.
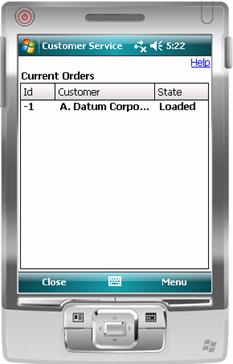
Figure 37 Customer Service in Portrait mode
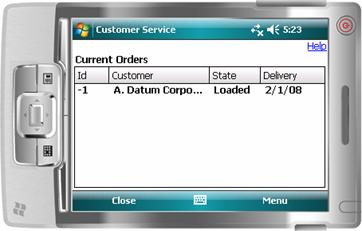
Figure 38 Customer Service in Landscape mode
This is done by examining the width available at runtime and adjusting the column headers accordingly:
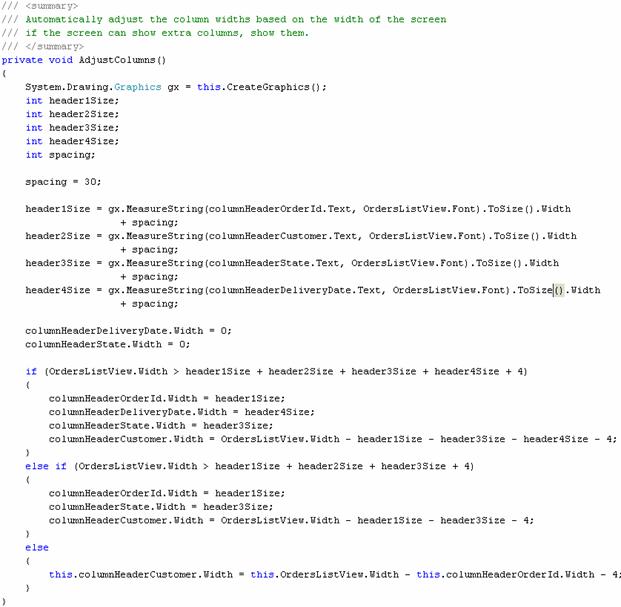
Figure 39 Automatically adjusting columns of list view control
This calculation is invoked every time the screen is repainted to ensure optimal use of the screen area
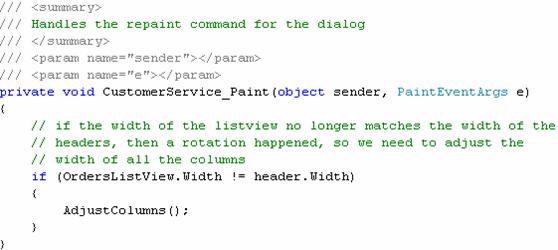
Figure 40 Adjusting columns on re-paint
There are some cases where the UI on one platform just does not make sense in another. This is the case with the signature control for the HardwareDistributor. In this case, a runtime check can be made and a different form can be brought up depending on the platform and input types available.
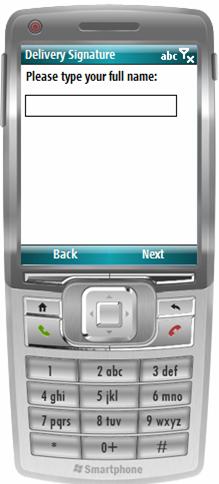
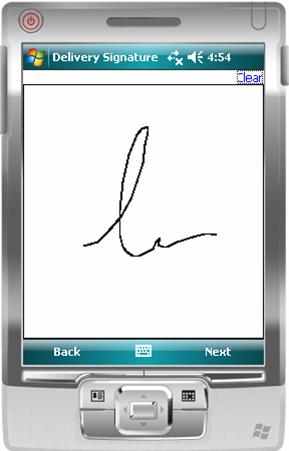
Figure 41 Signature Control on Std Figure 42 Signature Control on Pro
The .Net Compact Framework 3.5 introduces a new property to check the device platform using the Microsoft.WindowsCE.Forms.SystemSettings.Platform property. This can be checked against the Microsoft.WindowsCE.Forms.WinCEPlatform enumeration as shown below:
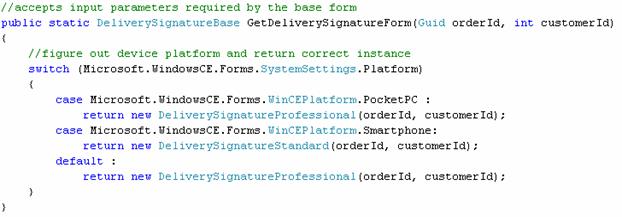
Figure 43 Determining the platform at runtime
Its important to note that a call from the UI layer to the Business Layer set this whole sequence of events in motion and now that a CustomerCollection has arrived at a form, its time to figure out what to do with it. If youre interested in data binding, you will set the appropriate controls DataSource property equal to the CustomerCollection. For a combo box you would also set its DisplayMember and ValueMember properties equal to your Customer objects public properties as appropriate. Alternatively, if you want to manually fill a control like a ListView, you would iterate through your CustomerCollection with either a for or for-each loop and populate the ListViews SubItems with data from your Customer objects public properties. An example of filling both a combo box and a ListView control is shown below.
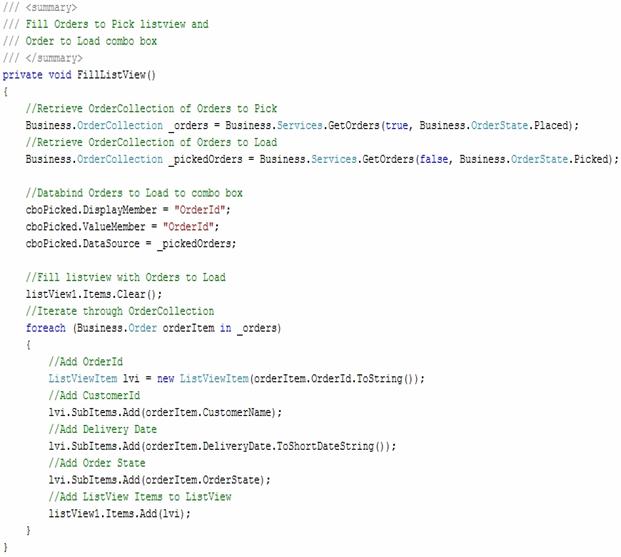
Figure 44 Filling a combo box and ListView control
Mapping web sites is very popular, since this helps people get where they want to go. Windows Mobile users can also have access to this service. Developers can sign up for a free MapPoint development account and download the MapPoint SDK that integrates with Visual Studio. From there, .NET Compact Framework applications can be built that integrate with and call the various MapPoint web services in order to retrieve maps for display on a Windows Mobile device. The Hardware Distributor utilizes the MapPoint web service to retrieve and display maps that show a route delivery driver how to get from the Distribution Center out to a customer location. A call to the MapPoint web service is shown below.
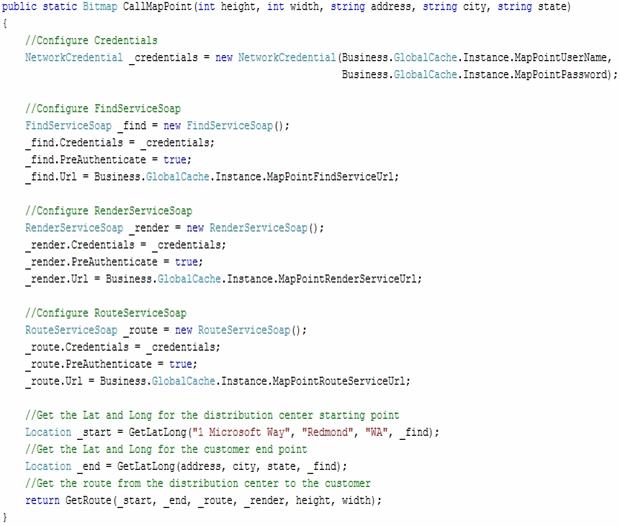
Figure 45 Calling the MapPoint Web Service
Localization is defined as adaptation of computer software for non-native environments, especially other nations and cultures. Broadly this encompasses language, currency, metrics etc. localization for a particular locale. Unlike the full .NET Framework, the .NET Compact Framework has a limited space for providing resources to localize or globalize applications.
The HardwareDistrbutor application implements language localization for Spanish, but can be extended for other supported languages as well. Resource localization requires that we determine the current culture and apply resources specific for that culture.
The .Net Compact framework does not support Culture information on a thread level, as culture settings are at per-device and not per-thread. Resources are maintained at both Form and application scope.
At the form scope, we can configure the resources at design time in Visual Studio by turning on localization for the form and attaching the translated text to the relevant controls as shown below:
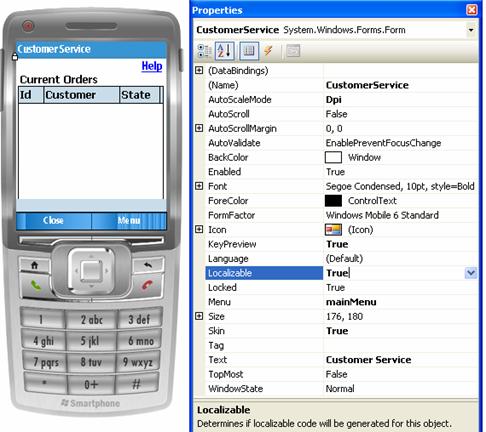
Figure 46 Localization set to true
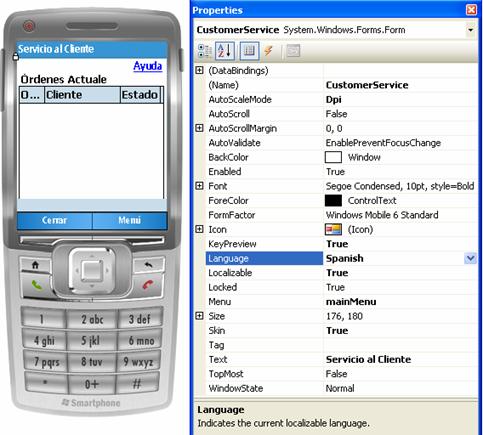
Figure 47 Form in Spanish
The strings for the different languages are maintained in culture specific resource files for the form. At design-time switching a language and providing translated string automatically results in the creation of a new resource file with the extension of the locale tacked on Customer-es-resx. The locale specific resource file only stores information for resources that have been modified. Any keys that cannot be discovered in the localized form are reverted back to the default resource file.
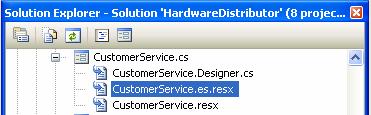
Figure 48 Resource files for form
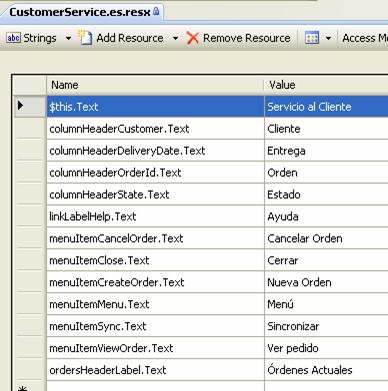
Figure 49 Spanish Resources in the Editor
The resources manager implicitly takes care of switching between the localized resources depending upon device culture settings.
Visual studio 2008 supports design time implementation of form level localization, but we also need to localize strings in the code such as error messages, user information. These resources are not specific to any one form and are common across the application. They are configured in the resource files for the application as shown below
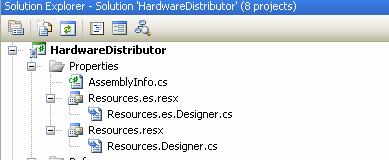
Figure 50 Solution Explorer
All the error messages and their Spanish equivalents are configured in Resources.resx and Resources.es.resx. If you want to configure for another locale, create a new file with the format Resources.<locale>.resx, and insert the strings there. To access the resources, we use the generated Resources class:
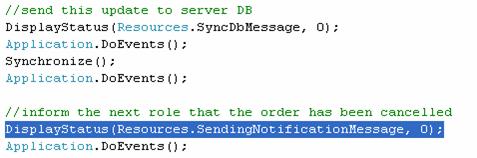
Figure 51 Resources
The hardware distributor has a help module that displays help content for the forms. The help files are displayed using the OnlineHelp Form. Each of the screens implemented help create an instance of this form passing the help file name and show the OnlineHelp form. The online help form internally determines the current culture and retrieves the correct localized help file for the screen.
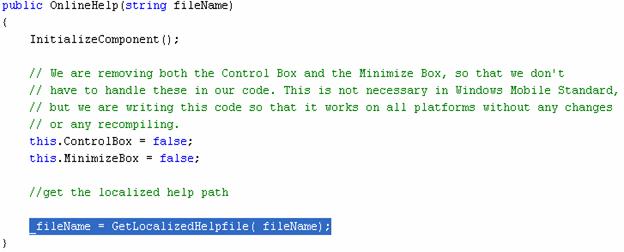
Figure 52 Calling GetLocalizedHelpFile
The GetLocalizedHelpFile retrives the localized help file if one is available, or if not available, retrieves the default help file. This function follows a similar file name + local concatenation scheme to the internal Resource manager to determine the correct help file.

Figure 53 GetLocalizedHelpFile
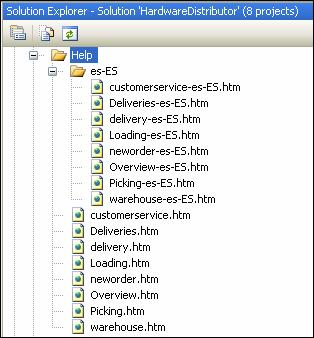
Figure 54 Organization of help files
The help files are organized into a separate folder for each locale and the file names are concatenated with the locale strings as shown above
As mentioned earlier, culture on devices is at a device level and can be changed in the device settings. The Hardware Distributor allows the users to change the language from within the application before logging on:
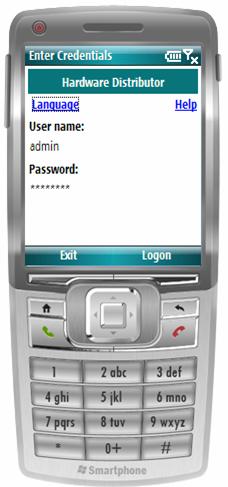
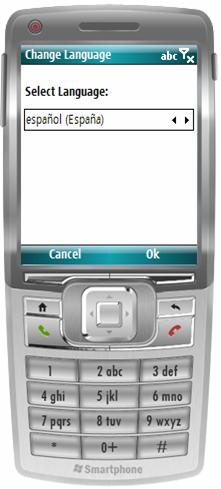
Figure 55 Logon Screen Figure 56 Select Language
Only the languages available on the phone are displayed as choices to the user.
This information is stored in the registry for devices that have multi-language user interfaces (MUI).
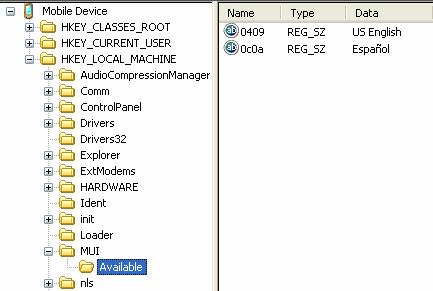
Figure 57 Registry for languages
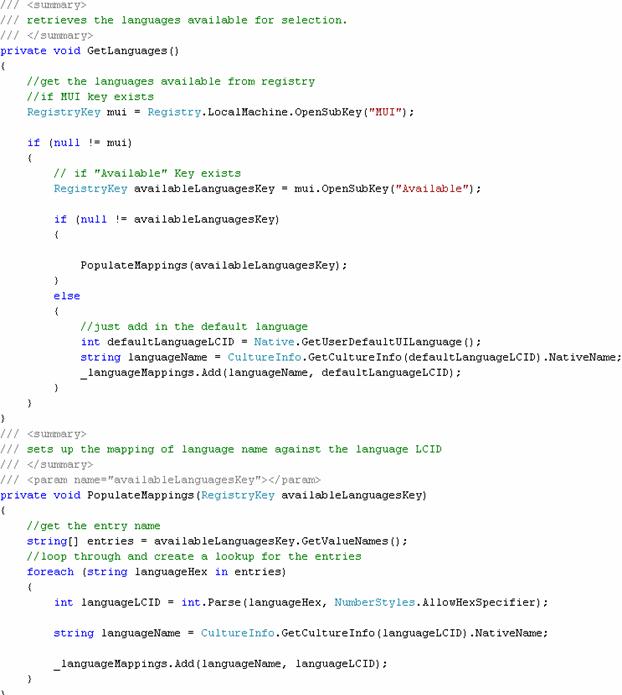
Figure 58 Retrieving the languages available
When the user changes the language, we use the native call to SetUseDefaultUILanguage to update the device.
![]()
Figure 59 SetUseDefaultUILanguage
If the user changes the language from the current, it requires a soft-reset of the device for the change to take effect. This is affected by another native call.
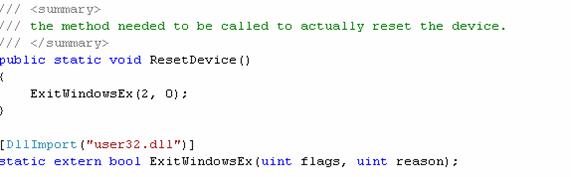
Figure 60 ResetDevice
For devices that do not support MUIs, the device relies on the current locale to determine which language to display. In this case, we use the native call EnumSystemLocales to determine the locales that are supported by the device.
This function takes a callback function as a parameter, which is given the next locale available on the device and the callback is continuously called until all the locales have been iterated. We then use the native call SetUserDefaultLCID to change the current locale on the device. If the locale is different from the one that the device has already been running with, then the device requires a reboot just as it did if the language was changed.
Sometimes, the Toolbox does not have the right controls for the job. As an answer to this problem, Visual Studio 2008 supports the creation of custom controls that can be used in your .NET Compact Framework applications. Whether youre building a composite control based on the aggregation of other controls, or youre building something from scratch where you control the drawing, the Smart Device Control Library Project template will get you started in the right direction. The Hardware Distributor solution includes a Signature Capture custom control project, as shown below. This control handles all its own drawing and allows users to sign their names on the drawing surface. The captured signature can then be saved as a tiny Gif file on the device. The Hardware Distributor application goes one step further by converting the Gif file into a byte array and inserting the signature into the SQL Server Compact database, where it can be replicated back to SQL Server 2008 to ensure proof of delivery.
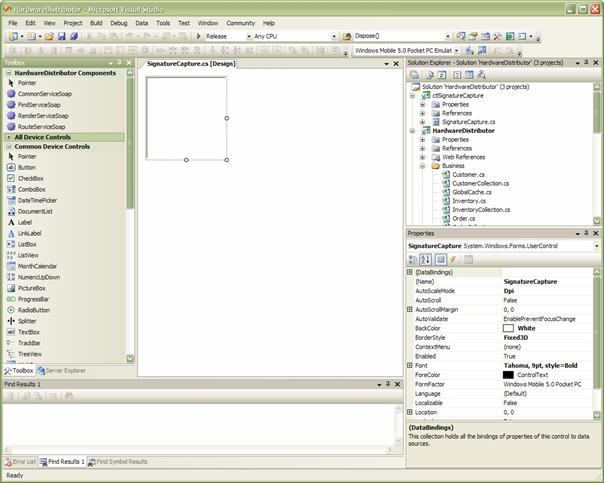
Figure 61 Signature Capture custom control project
Another use of custom controls is to enhance the out of the box experience that .NET CF provides. These modifications can be relatively simple to do, but make a dramatic improvement in the user experience. An example of this is with the gradient button and gradient header controls in the Hardware Distributor.
These controls show how easy it can be to create a powerful user experience with relatively little effort. These controls basically mimic the behavior of already existing controls, but enhance the experience by using a gradient fill to give a much more interesting visual experience.
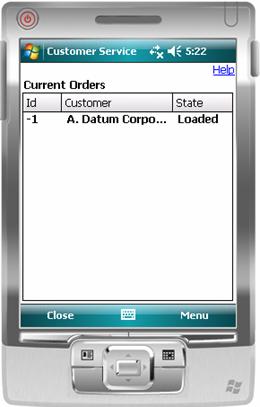
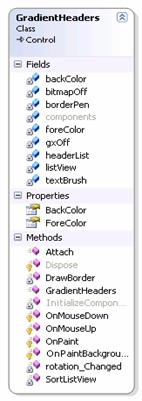
Figure 62 Gradient Header control on a listview Figure 63 Class diagram
The gradient header control changes the look of the default header for a listview. This class is derived from the main control class and is attached to a specific listview. The control then checks the existing headers in the listview and takes over painting this area of the listview by hiding the original headers and adjusting the size and position of the listview down to give this control space to paint the headers itself. Once the control has the ability to paint the area of the header, the entire look and feel of the header can be changed from font, background, and style. In this case, we chose to use a similar font and style, but used a gradient background.

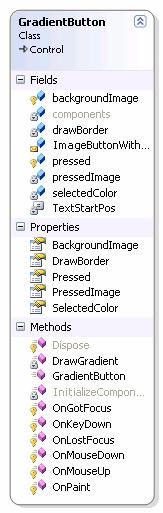
Figure 64 Gradient Button control Figure 65 Class diagram
The gradient button control is similar to the gradient header control in that the control is a custom control that paints itself. The difference between these two controls is that the gradient button control can be used on its own. This control can be added to any form by using the designer and visually dragging it from the toolbox in visual studio. The text displayed, size and image displayed can all be controlled by changing properties of the object.
Once all the properties are set, the control paints the area of the screen that it was specified, and it able to use the gradient paint to give an enhanced look and feel. One unique part of this control is that if you have more than one of this control on the same form, it will track which button is currently pressed, so that only one of the buttons has the pressed look and feel at a time.
In many cases, you may want your application to perform a number of expensive operations up-front when the application is loading, rather than take a performance hit during the course of normal usage. While you may be tempted to perform these operations in the load-event of your main screen, you risk creating a bad impression with a user who thinks your application is too slow. A splash screen is a form designed to distract the user at load time by providing text, graphics, and perhaps even a progress indicator, as shown below. A splash screen can either be a form that loads before your main form, a form thats launched on a separate thread in the load event of the main form, or a separate application that launches your main application.
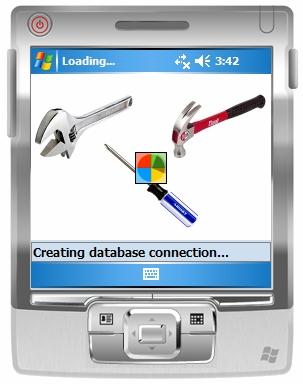
Figure 66 Splash Application
In the first case, the splash screen performs all the up-front work, like reading configuration files, loading system-wide variables, and creating database connections. When its done, it launches the main form. In the second case, when the main form loads, it launches the splash screen on a background thread to distract the user while it performs the up-front work. In the third case, when the splash app loads, and it launches the splash screen on a background thread to distract the user while it launches the main app in the background while the main app performs all the up-front work.
In the Hardware Distributor, the splash screen is a separate app (Launcher.exe) that launches the Main app (HardwareDistributor.exe ) process. The reason for this is because large Compact Framework exes can take a long time to load. Using a tiny exe for a Splash Screen gives the user a better experience because it pops up right away. Then you can load the main app exe in the background and relay its status to the Splash Screen even if it takes a while to load.
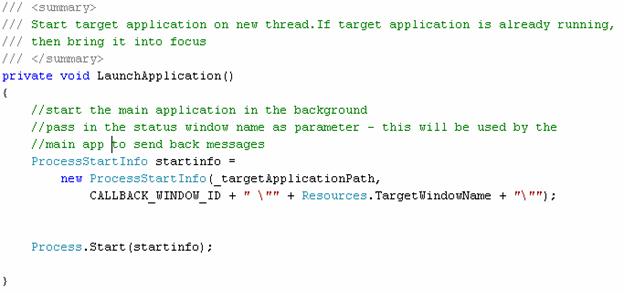
Figure 67 Splash Application
The main app keeps itself hidden until it has completed loading. While the loading is in progress, the user is continually updated with the status of the load on the splash screen. Since the splash screen and the main app are in separate processes, we require some sort of inter process communication for the app to relay the status of loading operation to the splash screen. While there are various options for IPC, the HardwareDistributor application uses Windows messages for this communication wherein a process sends messages directly to another window.
The receiving window must be setup to listen for the messages and process them. The splash screen creates a MessageWindow derived class to help listen for such messages.
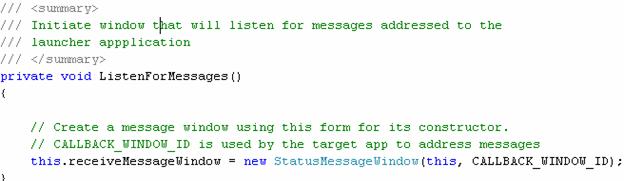
Figure 68 Listen for Messages
The CALLBACK_WINDOW_ID is the name of the StatusMessageWindow and is passed to main app, which uses it to identify the splash screen listener window and send it messages.
The StatusMessageWindow overrides WndProc function that receives messages and provides specialized logic for handling our application specific events.
All other messages are forwarded onto the base class for default processing.
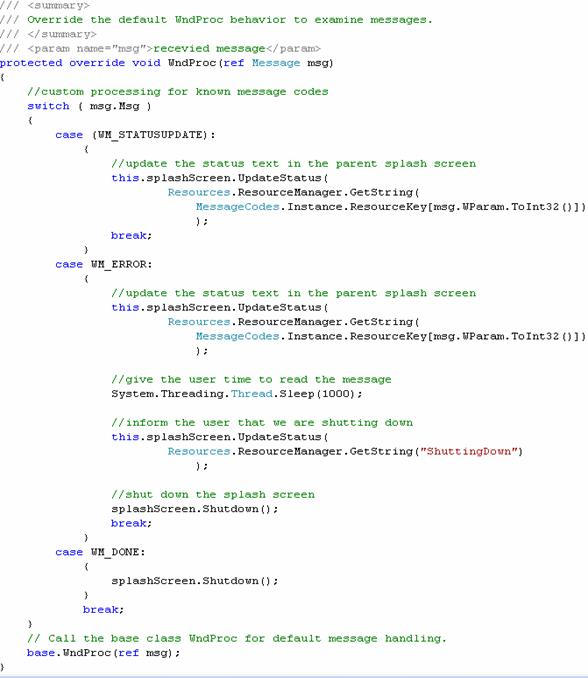
Figure 69 WndProc
Here WM_STATUSUPDATE, WM_ERROR, and WM_DONE are user defined message codes that are intercepted and used to update the splash screen status and finally shut it down on successful load.
On the sender side of messaging, the main app, first discovers the splash screen window by name (which was passed in as a startup parameter)
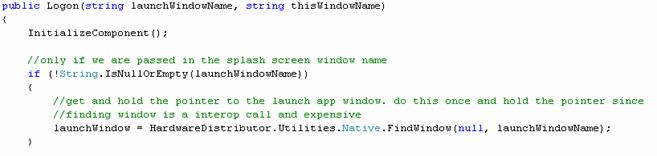
Figure 70 Launch Window
Then, using the window handle / pointer send it messages with the latest status of the load operation.

Figure 71 Update Status
Providing help to the user on a screen-by-screen basis is one of the best things you can do to make your application more usable and therefore more successful. Windows Mobile provides built in support for displaying application specific help, but this works only for Professional devices and has limitations in how much the display can be controlled. To fix this limitation, the Hardware Distributor has a cross device, localizable help module that can be easily extended.
Heart of this module is the OnlineHelp Form consisting of a single WebBrowser control docked to Fill the entire screen, and a dismiss menu item to close the form.
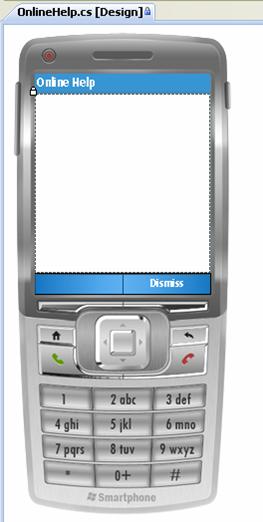
Figure 72 - Online Help - design time view
This form loads up the passed in help file and sets this as the document to be displayed by the WebBrowser control
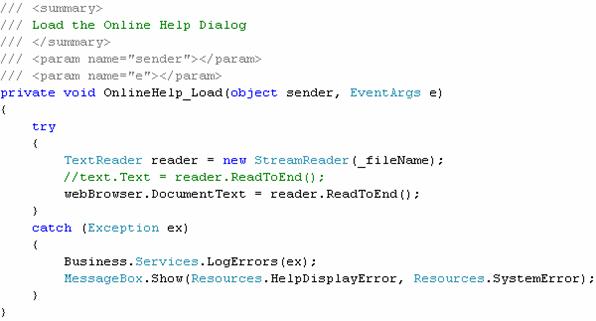
Figure 73 Load Online Help
In Hardware Distributor a Help hyperlink is provided at the top right corner of every screen so the user can find out what that screen is for, what it does, and how to use it, as shown below
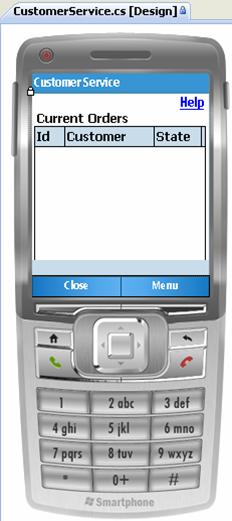
Figure 74 - Including Help link in form
This is an easy feature for a developer to include, since it only requires a single, specially formatted web page and a form with a single control to host the page. Using this method is not only easy, but it also works across all platforms.
Any screen wishing to use this control, only needs to pass in the help file name for the screen, and a localized version of the help file will be displayed in this form.
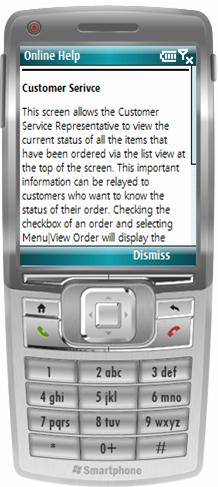
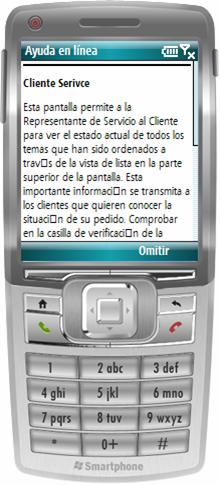
Figure 75 - Help in English Figure 76 - Help in Spanish
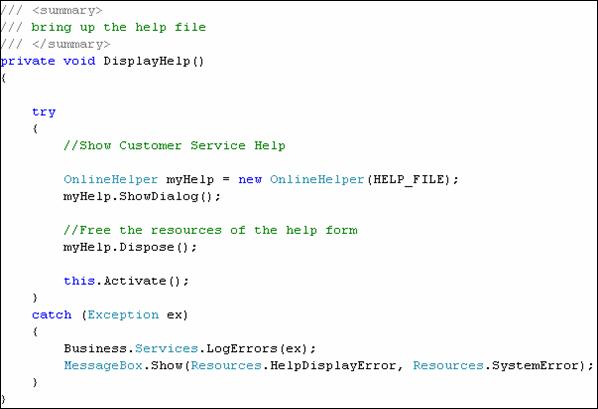
Figure 77 Display Help
Note:
How the OnlineHelp Form implements localization is described in detail in the localization section of this document
We use a wrapper Form OnlineHelper to invoke OnlineHelp to overcome a bug in the WebBrowser control. This is described in detail later in this document.
A Windows Mobile substitute for the standard Message Box, notification balloons pop up from the bottom of the screen. Unfortunately, this control only works with the Windows Mobile Pro and Classic platforms. The notification balloons for Pro devices allow display of HTML content and are visible for a controlled period of time. As a substitute for this control, we have developed a form that will mimic this behavior, but will work on all platforms.
In addition to serving notifications, the Hardware Distributor uses this notifications form to display contents of an order.
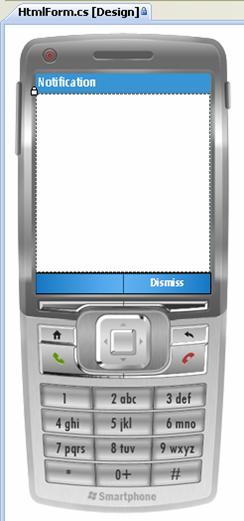
Figure 78 HTML Form
This form contains WebBrowser control that is docked to Fill the screen and a timer control that is configured to fire every 5 secs.
To use this form, create an instance of it in your form by passing in the HTML to be displayed in the notification.
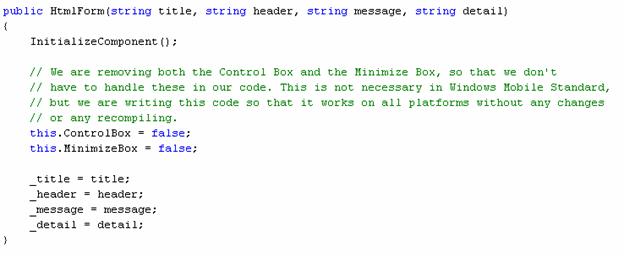
Figure 79 - Notifications form constructor
The notifications form uses this information to construct a html document in memory and sets this document as the input to the WebBrowser control.
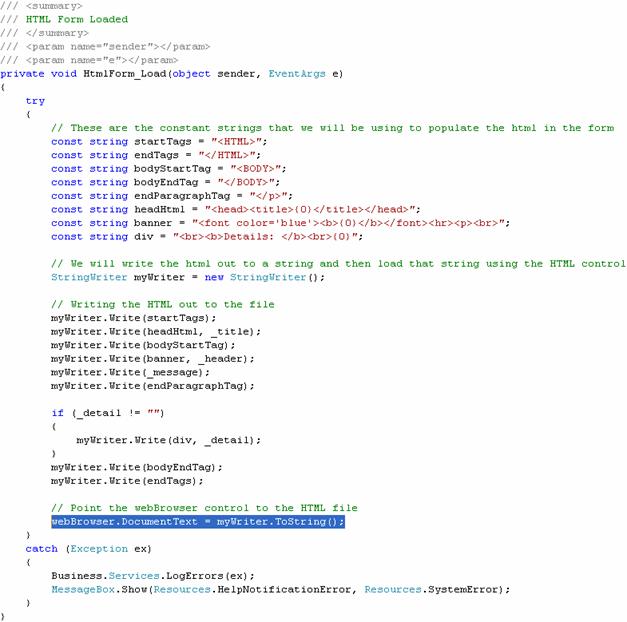
Figure 80: Creating HTML form in memory
When the timer fires after the configured number of milliseconds, the form automatically shuts itself down (unless a shut down has already been initiated by the user manually by clicking on the Dismiss button.
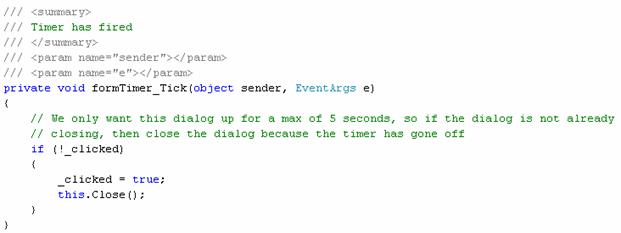
Figure 81: Automatic shutdown on timer tick
Forms can use display this notification form as simply as any other form by using ShowDialog.
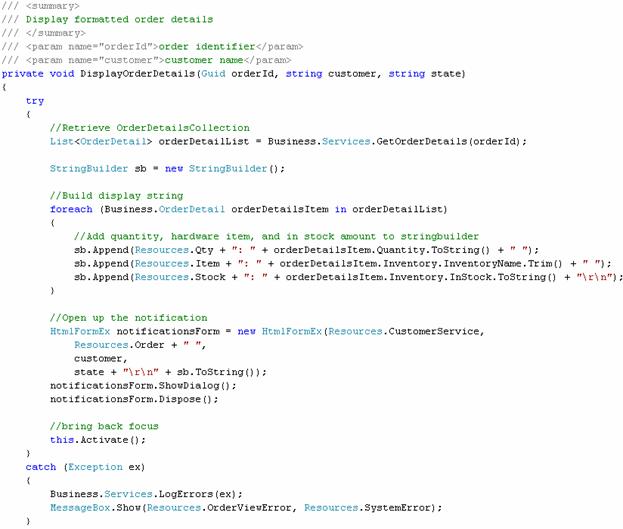
Figure 82: Using the Notifications form
Note: The HtmlForm is wrapped by HtmlFormEx to overcome a bug in the web browser control which is described in detail further in the document
In the Windows Mobile Standard device SDK, there is a bug in the WebBrowser control. When a WebBrowser control is used in a form (form A) that is called by another form (form B); closing form A also closes the parent form B.
This occurs because the Web browser control does a PostQuitMessage() upon receiving a WM_CLOSE message. For those of you familiar with Windows programming model will realize that a PostQuitMessage is not a real message that is inserted into the thread's message queue. It is a virtual message that will be presented once all messages in the queue are processed. This means that since the control is calling PostQuitMessage, we do not have a deterministic point to handle this message.
The workaround options are
Don't shut the sub-form: do not do formA.Dispose(). Simply hide it. Your application design may not allow this workaround as is the case for Hardware Distributor.
Handle the message pump in the StartForm by creating a message loop that exits on seeing the WM_QUIT event.
The second option is used in Hardware Distributor. The two forms that have a web browser control are OnlineHelp and HtmlForm. To work around the bug, these forms are wrapped by OnlineHelper and HtmlFormEx forms respectively.
The wrapper forms set up a message listener loop and discard WM_QUIT events received from the child form (OnlineHelp / HtmlFormEx).
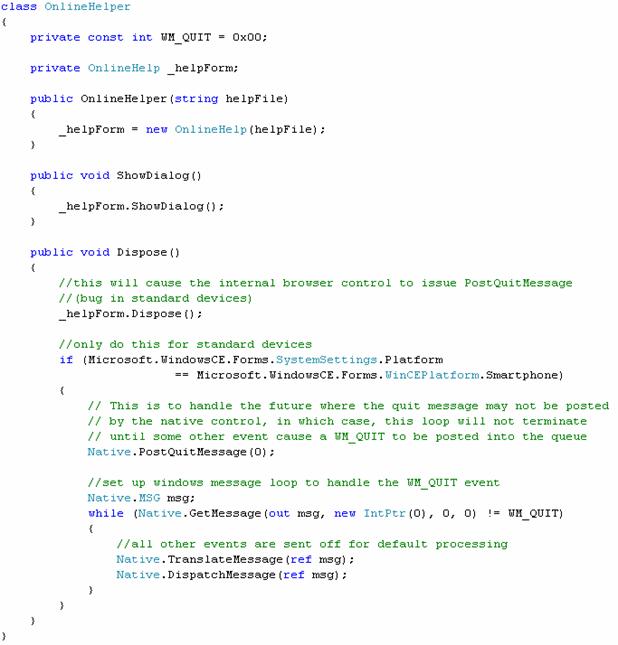
Figure 83: Online Helper
No software project can be considered complete without a deployment solution. In the world of Windows Mobile, the primary means of distribution is through the CAB file. Luckily, Visual Studio 2008 provides the ability to package your .NET Compact Framework application into a CAB file via the Smart Device CAB Project. This project automatically detects your solutions dependencies and allows you to specify the location of your application, as well as shortcuts and registry entries.
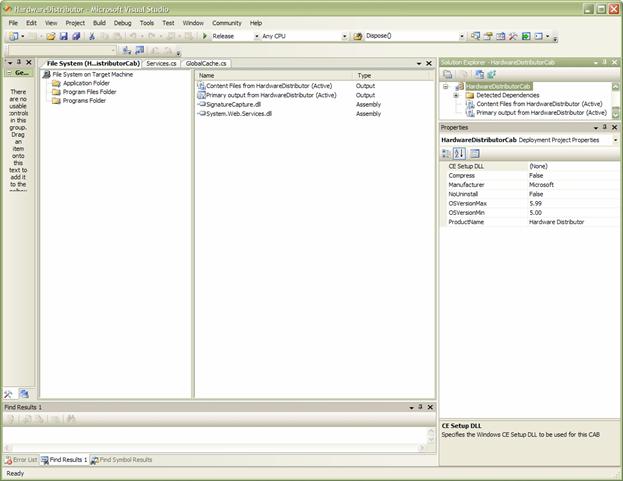
Figure 84: CAB Project
The Hardware Distributor solution includes a CAB project to ensure the deployment of the primary executable, and content files such as the configuration XML file, the SQL Everywhere database file, and the Help files.
The example companies, organizations, products, domain names, e-mail addresses, logos, people, places, and events depicted herein are fictitious. No association with any real company, organization, product, domain name, email address, logo, person, places, or events is intended or should be inferred.
|
Politica de confidentialitate | Termeni si conditii de utilizare |

Vizualizari: 1639
Importanta: ![]()
Termeni si conditii de utilizare | Contact
© SCRIGROUP 2025 . All rights reserved