| CATEGORII DOCUMENTE |
| Asp | Autocad | C | Dot net | Excel | Fox pro | Html | Java |
| Linux | Mathcad | Photoshop | Php | Sql | Visual studio | Windows | Xml |
DOCUMENTE SIMILARE |
|||
|
|||
Comments, queries and scripts are called text components because they contain text.
![]()
In the case of comments the text contained is whatever we want it to be.
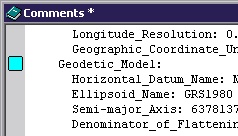
Comments are often created when importing formats such as SDTS that contain 'readme' information, metadata or other text information along with GIS data of various sorts.
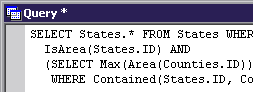
Queries contain text that makes up SQL statements.
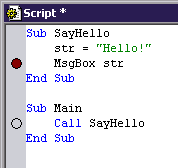
Scripts contain text that forms programs written in the scripting language in use.
All three types of windows accept standard Windows text editing shortcuts such as CTRL-X to Cut, CTRL-C to Copy, CTRL-V to Paste and so on. Text component windows also support Edit - Find and Edit - Replace . However, since text components only allow highlighting of one block of text at a time the Find All command will be disabled.
All text components support bookmarks , which are icons that can be placed in the left margin to mark a line of text, as seen in the comments component illustrated above. Place a bookmark at any line of text by pressing F8 or by choosing Edit - Bookmarks - Toggle from the main menu. The Edit - Go To command can be used to jump to any bookmark.
To set a bookmark:
1. Open the component.
2. Click on the line where the bookmark is to be placed. This positions the cursor on that line.
3. Press F8 or choose Edit - Bookmarks - Toggle from the main menu.
Script components also support breakpoints , which are icons that mark a line of code at which script execution automatically stops. Breakpoints are used for debugging scripts. Place a breakpoint at any line of text by pressing F9 or by choosing Edit - Breakpoints - Toggle from the main menu. Breakpoints can temporarily disabled to allow code to flow through the breakpoint line without losing the marked position. The script component seen above shows two breakpoints. The Edit - Go To command can be used to jump to any breakpoint.
To set a breakpoint:
1. Open the component.
2. Click on the line where the breakpoint is to be placed. This positions the cursor on that line.
3. Press F9 or choose Edit - Breakpoints - Toggle from the main menu.
Bookmarks and breakpoints are most frequently used when writing large, complex scripts.
Go To

The Go To command can jump to any line number, bookmark or breakpoint. In the above example we can jump to the breakpoint set at line 27 for the line that begins with the text 'Numerator ='.
See Also
Edit - Bookmarks
Edit - Breakpoints
Edit - Go To
Queries
Programming Manifold
![]() Many Manifold commands can be undone using
the Undo button. The keyboard shortcut for Undo is CTRL-Z.
Many Manifold commands can be undone using
the Undo button. The keyboard shortcut for Undo is CTRL-Z.
![]() Once undone with Undo, a command may be
redone with Redo. The keyboard shortcut for Redo is CTRL-Y.
Once undone with Undo, a command may be
redone with Redo. The keyboard shortcut for Redo is CTRL-Y.
The Undo command is extremely literal, and will undo each and every command, including zooming and panning, in the reverse order from which it was done. For example, making a selection and then using ALT-right clicks to pan a display window and then pressing Undo will result in each pan motion being undone in reverse order until finally the selection is undone.
Very important: Not all commands and operations in Manifold may be undone. Routine image editing and drawing editing commands, transform operators, selections, copy and paste operations, renaming and other commands can in general be undone. However, some operations with tables and external tables linked into a Manifold project may or may not be undone. Even simple changes to tables if they are linked to an external data provider might not be undoable if the external provider does not support undo. Before making sweeping changes to tables, please take time to make a copy of the table data by exporting it to a file.
Note
The CTRL-Z keyboard shortcut for Undo is frequently used with editing when operating with the mouse with one hand and commanding cut, copy and paste commands with CTRL-X, CTRL-C and CTRL-V keyboard shortcuts to reverse unintended keyboard commands.
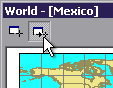
Manifold can automatically pan the view in one window based on where we look in a different window that is the active window, a capability that is managed using the World pane . When a window is set to track the view in the active window we say that the two windows have linked views.
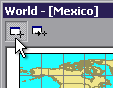
The World pane shows the current center point of the active window on a simplified map of the world. In addition, the World pane is used to control linked views by specifying Show Position Reticule and Track Position settings for individual windows. Open the World pane by choosing View - Panes - World or by using SHIFT- ALT-W to toggle the pane on or off. The World pane may be docked underneath the project pane when using docked panes.
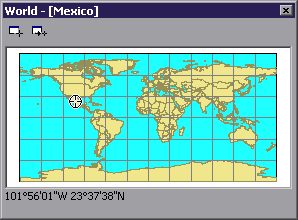
The World pane is context sensitive: it shows the current Show Position Reticule and Track Position settings for the active
window. The World pane announces the active window
in the title bar and marks the center point of the active window with a
reticule. In the example above, we have
opened the
|
|
Show Position Reticule - Show a reticule in this window that always marks the center position of the currently active window (if it falls within the view seen in this window). Push in to activate. |
|
|
Track Position - Pan this window so the center position of the currently active window is centered in this window's view. Push in to activate. |
|
(Coordinates Readout) |
The bottom of the World pane reports the coordinates of the center point of the active window. |
To instruct a window to show a reticule at the current position
1. Open a component in a window.
2. Open the World pane and push in Show Position Reticule.
If any other window is now opened (even a second copy of the component opened above) the center point of the current position of the active window will be shown with a reticule.
To instruct a window to track the current position
1. Open a component in a window.
2. Open the World pane and push in Track Position.
If any other window is now opened (even a second copy of the component opened above) the tracking component will be panned so that it always shows the current position of the active window centered in view.
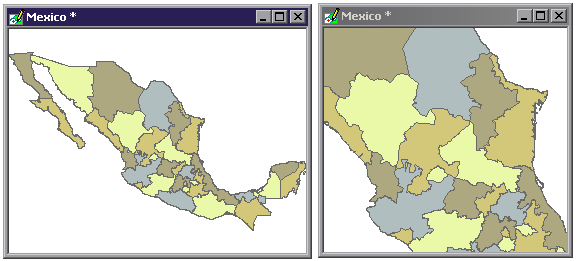
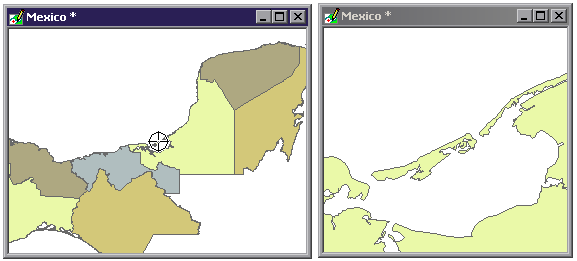
Example: Displaying Position
For our first example we will use two drawings showing the same subject. The right-hand drawing will be a zoomed in view. The left-hand drawing will always show where the zoomed-in view is positioned by placing a reticule at that spot.
We begin by importing the sample
Note that the focus is on the window on the left (because it has an 'active window' title bar.
With the focus on the window on the left, we push in the Show Position Reticule button in the World pane.

A reticule appears in the center of the left-hand window. The reticule appears in the center because the active window is the same window.
Suppose we now click on the right-hand window and use Zoom Box to zoom into a region in that window.
With the focus on the window on the right, the reticule in
the left-hand window will move to the position of the center point of the
active window. Because the right-hand
window view is zoomed into a location on the East coast of

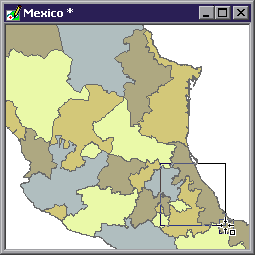
![]() We can now use a command like Center Point to click in various
locations within the right-hand window. As we move to different locations, the reticule in the left-hand window
will move to show the current position seen in the right-hand window.
We can now use a command like Center Point to click in various
locations within the right-hand window. As we move to different locations, the reticule in the left-hand window
will move to show the current position seen in the right-hand window.
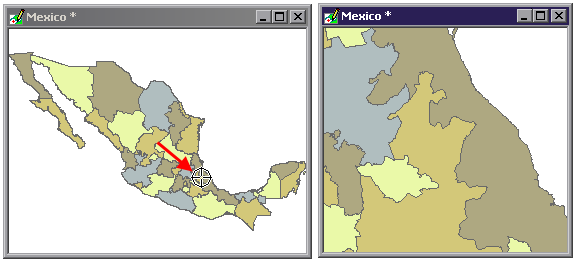
Example: Tracking Position
For our second example we will use the same drawings and arrange things so that as we pan the left-hand drawing the right-hand drawing will provide a zoomed-in 'moving map' view.
With the focus on the right-hand pane, we press in the Track Position button in the World pane. This commands the window to move so that the center point of the active window is centered in it.
![]() We can now click back to the left-hand
window to move the focus there and use Center
Point to move about in the window. As we move, the right-hand window automatically pans to follow. In the illustration above we first zoomed
into the right hand window to show greater details and then we clicked on the
left-hand window and zoomed in. We then
used Center Point to move around in
the left-hand window. If we click on a
position on the Northern coast the right-hand window pans to show us that
location in greater detail.
We can now click back to the left-hand
window to move the focus there and use Center
Point to move about in the window. As we move, the right-hand window automatically pans to follow. In the illustration above we first zoomed
into the right hand window to show greater details and then we clicked on the
left-hand window and zoomed in. We then
used Center Point to move around in
the left-hand window. If we click on a
position on the Northern coast the right-hand window pans to show us that
location in greater detail.

If we click Center Point on a spot on the Southern coast the right-hand window again moves to show us that location.
Example: Linked Views with Maps
Linked views can be an essential tool for
navigating within very dense and detailed maps. In this example we've
downloaded CD 155 of the VMAP 1 set from NIMA (www.nima.mil), showing parts of Central and
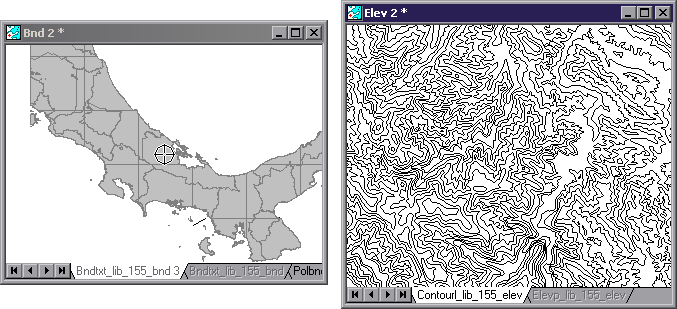
We click on the left-hand map to make it the active window and then we press Show Position Reticule in the World pane. We then click on the right-hand map to make it the active map and then we press Track Position in the World pane. Now, whenever we move the right-hand map (say, by scrolling with CTRL right clicks of the mouse or by using the Center Point command), the reticule in the left-hand map will show us where our right-hand view is located.
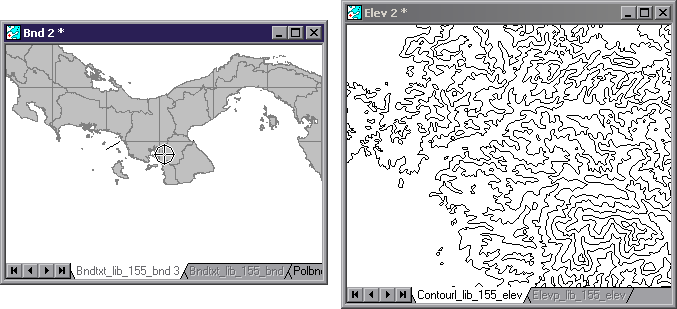
If we click on the left-hand map we can use Center Point to move the center position to any spot and see that spot greatly enlarged in the elevation contour lines map on the right.
Example: Navigating a Terrain using a Surface as a Guide
One of the many excellent uses
for linked views is to use a surface to steer
a view in a terrain. In this example
we've imported a surface showing terrain elevation in the Grand Canyon area of
the
To set up the linked views we click on the terrain window and press Track Position. We then click on the surface window and press Show Position Reticule. We don't really need to press Show Position Reticule for the surface window to move the terrain window, but it is usually convenient to have the position reticule appear at the center of the surface window so we can see exactly where the terrain is positioned.
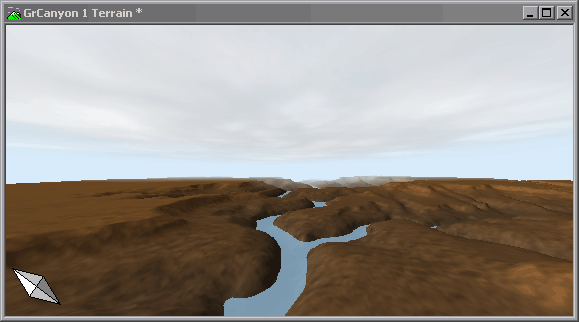
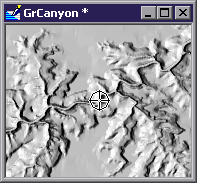
![]() We can now use commands like Center Point to navigate in the surface
window and the terrain window will automatically jump to whatever location we
center in the surface window. In the
views above we've clicked onto the river channel. Note that the terrain window has been rotated
a bit to provide a view to the East aligned with the river.
We can now use commands like Center Point to navigate in the surface
window and the terrain window will automatically jump to whatever location we
center in the surface window. In the
views above we've clicked onto the river channel. Note that the terrain window has been rotated
a bit to provide a view to the East aligned with the river.
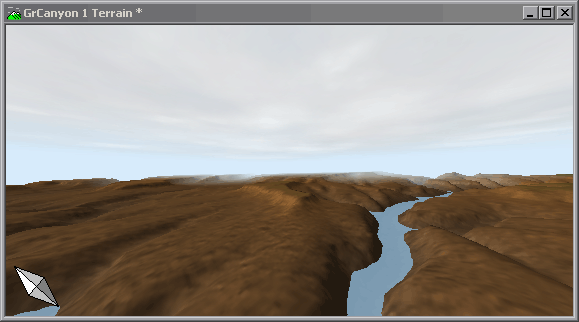
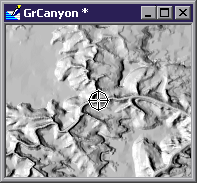
If we click on a different location (again, on the river channel) the terrain jumps to that location as well.
Comments
Many GIS programs have some sort of 'minimap' navigation pane where one can click into the pane and move the position of the main display to that location. Manifold's linked views capabilities allow us to use any window as a 'minimap' control to move any other window.
Newbies will sometimes get mixed up between Show Position Reticule and Track Position. To help keep things straight:
Track Position is a 'moving map' command. It tells the window to move to whatever is the current position.
Show Position Reticule shows a reticule at the current position. It does not move the map.
It's slightly redundant, but one can have both Show Position Reticule and Track Position pushed in at the same time. In that case, the reticule shown by Show Position Reticule will always appear at the center of the display.
Do the contents of a window disappear when it has Track Position set? If the active window shows a geographic location that is not covered by the data set in the window, Manifold will still merrily pan the window to a location far beyond the contents of the window. Check to see if the window is correctly georegistered if you think the contents should appear.
More than one window can be set to use Track Position. In that case, all windows with Track Position set will be panned to the new location whenever the active window is panned. Panning lots of windows that contain large amounts of dense data is, of course, computationally intensive and will slow system response.
It's easy to think that linked views work only between two windows. That's not so: linked views settings of Track Position and Show Position Reticule apply to all windows that are open and have these buttons set in the World pane.
A geocoded table is a table where every record has a location given in latitude and longitude, using standard decimal degrees notation for the latitudes and longitudes. Unless each record is geocoded with a latitude and longitude location Manifold can not know where that record is located. Once a table is geocoded it may be used to create drawings.
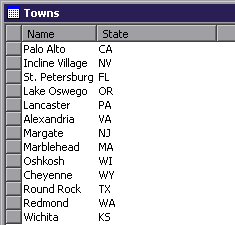
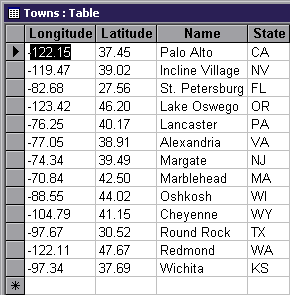
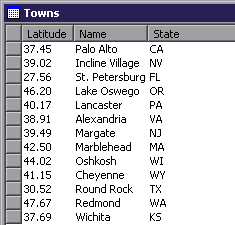
For example, the table above is not geocoded. It lists the names of towns in the
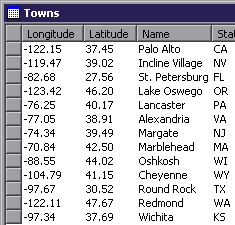
In contrast the above table is geocoded. Each record now has a latitude and longitude
location given in decimal degrees notation. We could use the latitude and longitude values to draw a point for each
town on a paper map of the
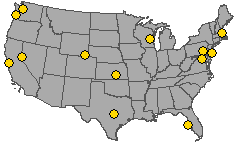
If a table is geocoded it can be used to create a drawing, which in turn can be used in a map like the illustration above. Right away, the positions of the towns convey an immediate visual impression of their locations that one does not get in a table presentation. That's part of the great power of a GIS like Manifold so obviously everyone who has important data and a GIS package would like their data to be geocoded so the data can immediately be displayed visually within the GIS.
The problem is that a lot of the important data sets we deal with, whether they are lists of customer addresses or lists of oil wells or lists of fire hydrants that need maintenance, are not geocoded. The central problem for many GIS users is getting their data geocoded. Depending on the contents of the table, geocoding the table can be a reasonably straightforward process or it can be very difficult or even impossible.
Let's take a look at three geocoding tasks to see what approaches to geocoding are possible in different cases. We will look at geocoding a table of towns, geocoding a table of fire hydrants and geocoding a table of street addresses.
Geocoding a Table of Towns
Suppose we have a table with town names like the first example above. How can we geocode it? In the simplest case we look up the latitude and longitude of each town in a reference book or atlas and we add the latitude and longitude to the table for each record by hand.
If we have a table somewhere that already lists latitudes
and longitudes for towns we could, of course, extract information from that
table automatically. If we have another
database table that contains the town name and latitude and longitude we could
use SQL facilities such as
If we have a drawing that shows points for cities in the
Because there are many geocoded tables of populated places that are easily obtained by free download from the Internet it is usually a straightforward matter to geocode a table of place names.
Geocoding a Table of Fire Hydrants
Suppose our town would like to create a GIS database of all fire hydrants in the town. We plan to use the power of GIS to help keep track of the status of all fire hydrants and to help plan regular maintenance, cleaning, flushing of water systems and so on. Let's say we have inherited a database of fire hydrants that provides an identification number for each hydrant, some status information on the hydrant and a 'location' field that consist of a text comment noting what street the hydrant is on and what is the nearest crossing street. Our task is to geocode the table with the latitude and longitude location of each hydrant.
In the
Although recording the locations of fire hydrants in an entire town in this way requires a substantial amount of driving, the process goes very rapidly when the GPS Console and Instant Data are used. WAAS-enabled GPS devices can achieve 2-meter (about 6 feet) accuracy, which is sufficient accuracy to locate fire hydrants.
Unfortunately, WAAS is generally available within the
One way to accomplish this geocoding task outside of the
Another alternative might be to acquire an aerial photograph of sufficient resolution that hydrants are visible, to scan in the photograph, georegister it and then use tracing to create a drawing of hydrant points and Match to geocode based on the drawing. Although overhead photography is probably not very practical in the case of fire hydrants (which would be obscured by trees in many cities) it is a very practical way of geocoding other infrastructure items, such as bridges or electrical transmission towers.
Note that the task of geocoding a table of fire hydrants is directly analogous to the task of geocoding a table of oil wells, a table of monitoring stations in a forest or, for that matter, any table of items whose location is not known. In all such cases we must determine the latitude and longitude location of each item by either physically measuring the latitude and longitude with a GPS, by marking the location accurately on a map or by determining the locations using an aerial photograph. If the items to be geocoded are easy to reach and a GPS is available the geocoding process might be very straightforward. If they are far away and there is no aerial photograph or other map that can be used, then it could well be impossible to find their locations and thus geocode the table.
Geocoding a Table of Street Addresses
If we had a table of street addresses like the one below we could not plot these on a map because the table is not yet geocoded. Without a latitude and longitude location for each record we would not know where to place it on a map.
It is easy to make the conceptual mistake of thinking of a street location as being an exactly defined location, the same as a latitude/longitude location. However, that mistake arises mainly from how people use addresses to find locations for the delivery of mail or to go to a particular restaurant or other location. Street addresses, of course, do not really convey an exact latitude and longitude for the address. They simply provide a means by which a postal carrier or someone else physically traversing the streets can find a particular address. To find an address we have to find the street (with the help of a map if we don't know a particular town), orient ourselves to the address system used on that street and then locate the address. As anyone who has tried to find an out-of-sequence address in an unfamiliar town knows, there is a great difference between hunting down a particular street address and going directly to a latitude/longitude location.

It is one thing to be able to find a given street address by physically going there (perhaps with the help of a local street map) and it is quite another thing to plot a table of street addresses, such as the table of restaurant addresses, on a map as seen above without ever going to the actual address. To plot each restaurant shown in the table we need to know the actual latitude and longitude address at which it is located. To do that, the table must be geocoded as seen below.
In recent years the adoption of geocoding technology by
consumer computer applications (at least in many
As a result, it is quite common for people to expect to be able to enter a street address into a web site or a map and to see a physical location for that address, a sort of 'geocoding on the fly.' Some applications may give the appearance of taking a list of addresses and displaying them straightaway as points in a map; however, in all cases the software will internally take the intermediate step of using the address to determine a latitude and longitude location for the record. The latitude and longitude location is then used to plot the location of the point.
Software packages use many different strategies to geocode street addresses into latitude and longitude locations. The basic approach is to maintain a large database of streets and address ranges so that the location of a particular address can be estimated from the database. Software that can perform street address geocoding may be built into a GIS package, it may be sold as separate geocoding software, or it may be provided as an Internet web service.
Manifold includes street address geocoding capability for the
However, when using any street address geocoder it is important to understand that the output of the geocoder is an approximate location.
How Street Address Geocoding Works
To geocode street addresses, any geocoding software
(including Manifold) must find the address and an equivalent location in a
database. However, there is no database
anywhere in the world that specifies an accurate location for each street
address. To take the
The closest approximations to a national database of address
locations that exist in the
Based on data sets like those created by the Census Bureau,
geocoding software can be created that compares a record's address, such as
'
It is important to understand that the geocoding software
has no idea where the actual address is located. It simply interpolates the location of the
address by making what is hopefully a reasonable guess based on the address
range recorded for a given street segment. Clever software can use a variety of strategies to make better guesses,
but at the end of the day the results are usually accurate to only within a
city block in urban areas and are wildly inaccurate in rural areas. Addresses of the form
''Rural Route
Creating geocoding software that can accurately assign an exact, non-interpolated location for each individual address requires a database of all addresses and their exact latitude and longitude locations. To support 911 service and other emergency response services, some towns are using GPS equipment to create precise databases that show the exact location of each address in their town.
For information on using Manifold's street address geocoding system, see the Street Address Geocoding topic.
Street Address Geocoding Outside the
Unfortunately, the
As a result, there are many fewer choices for street address
geocoding software outside of the
Geocoded Tables use Decimal Degree Notation
Geocoded tables in Manifold must have valid latitude and longitude fields consisting of degrees from 0 to +/- 180 longitude and 0 to +/- 90 latitude, with partial degrees denoted as decimal fractions. A minus sign denotes West longitudes and South latitudes. This style of writing latitudes and longitudes is called decimal degrees.
Like all modern GIS packages, Manifold uses decimal degree notation because it is an unambiguous standard that is well suited for arithmetic operations and can be written in database tables as text fields or numeric fields. Older methods of writing latitudes and longitudes, such as the use of the letters 'E', 'W', 'N' and 'S' or the use of degrees, minutes and seconds notation are not well standardized and involve clumsy notation that is not very useful in computing operations. Manipulating values such as East 32 42' 15' is somewhat akin to trying to do longhand multiplication using Roman numerals. not very efficient or sensible.
In modern times most databases of geocoded information use decimal degrees. However, over the years there have been many different styles used to write latitude and longitudes in database tables. Older tables might use text fields to express coordinates in the form of degrees, minutes and seconds, for example. Other tables may use degrees, minutes and decimal fractions of degrees. Some tables will denote longitudes in degrees from 0 to 360. Others might use text strings and prefix a letter, such as 'N', 'S', 'E' and 'W' to indicate North or South latitudes and East or West longitudes.
Manifold's approach to dealing with such tables is to import them into Manifold where Transform toolbar operators and other tools can be used to convert coordinates into standard decimal degree notation. This allows the full power of Manifold tools to be brought to bear to adjust the table into the desired form. Clever use of token operations will allow transformation of any format into the desired decimal degrees. See, for example, the Using Tokens and Text Strings topic and the Extract Last Names using Tokens example.
If you have a table that has latitude and longitude values using some old-fashioned notation you must first translate those values into modern decimal degree notation. Only then is it a geocoded table.
'Generic' Geocoding Strategies
Geocoding a table by specific addresses is often not required. Although it is easy to understand the conceptual appeal of adding an exact latitude and longitude position for each customer record by address, such geocoded tables also lay a conceptual trap for the unwary in that they are intrinsically inaccurate. Sometimes it is better to have an approximate table that does not lay claims to false accuracy. For many GIS purposes it may be enough to simply pin down a customer location to a specific ZIP code and not to a specific city block. See the Spatial Geocoding with Match topic for spatial geocoding within Manifold.
By spatially geocoding tables using key fields we can often
end up with a geocoded table that combines our desired records with a latitude
and longitude position for each record. The classic example is displaying customer address records using their
ZIP codes. If we have a drawing that shows
a point for each ZIP code centroid we can merge the customer address table into
this drawing using the ZIP code as a key field. In that case, customer records will appear as a point at the ZIP code
centroid for their ZIP code. [The
This 'generic' method of geocoding is often the only possible method of geocoding for international users who do not have access to a street address geocoder for their locations but who do have postal code or telephone code maps or other data sets that can be used as guides for spatial geocoding based on Match.
See Also
Creating Drawings from Geocoded Tables
Linked Drawings and Geocoded Tables
Geocoding
Street Address Geocoding
Spatial Geocoding with Match
Create a Linked Drawing from a Geocoded Table
Create a Map from a Geocoded Table
Notes
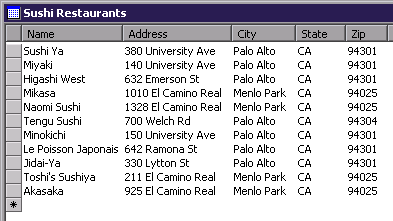
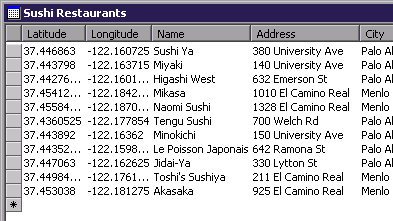
The table of sushi restaurants lists sushi restaurants
approximately within one mile (1.6 km) of the main USGS facility in
A geocoded table is a table where every record has a location given in latitude and longitude. In Manifold, it is easy to create a drawing from a geocoded table. We simply copy the table and paste it as a drawing.
For an example of a geocoded table consider the following table:
Each record has a value in the latitude and longitude columns. The latitude and longitude of each record specify where that record is located. Note that the latitude and longitude values are expressed in decimal degrees, the standard GIS notation for latitudes and longitudes. For an introduction to geocoding, see the About Geocoding topic.
Creating a Drawing from a Geocoded Table
Geocoded tables may be used to create drawings. Drawings created from geocoded tables contain points at the latitude and longitude positions of each record in the table.
The illustration shows a map where a drawing of points
created from the geocoded table is overlaid in a layer above a drawing showing
the
There are three ways to create a drawing from a geocoded table. The first method is to copy the table and paste it as a drawing. The second method is to import a drawing directly from an external geocoded table. The third method, which is discussed in the Linked Drawings and Geocoded Tables topic is to create a linked drawing from a geocoded table that is external to Manifold.
To create a drawing from a geocoded table:
1. Import the table into a Manifold table.
2. In the project pane, use Edit - Copy to copy the table and then use Edit - Paste As - Drawing to paste it as a drawing.
To import a drawing from an external geocoded table:
Choose File - Import - Drawing and open the desired database file or connect to the desired OLE DB or ODBC data source.
2. Choose the table desired and check the desired fields. Specify the fields that contain latitude and longitude values (by default, the system will guess that any fields named 'Latitude' and 'Longitude' are the fields to use). Press OK. A new drawing will appear in the project pane.
Pasting New Drawings and Copying Fields
Pasting a geocoded table as a drawing in the project pane will create a new drawing together with a new associated table in the project. The drawing will contain points at the location of each record.
The associated table (like the tables for all drawings) will be created with at least one field, the object ID field. During the paste process a Paste As Drawing dialog will appear asking if any additional fields should be pasted from the geocoded table into the new drawing table. If the Latitude / longitude coordinates check box in the Paste As Drawing dialog is checked, drawings will be created in Latitude / Longitude unprojected form.
For example, if copying the geocoded table illustrated above we might wish to paste the table into a new drawing as points without copying any of the data fields. In that case, the new table created with the drawing will be empty except for the object ID field. In another example, we might wish to copy the Name field as well so that each point record has an object ID field and a Name field containing the name of the town at that point. Depending on our desired use of the data we might import all of the fields from the original table. We might even wish to import the latitude and longitude fields as well.
Very Important: If we copy the latitude and longitude fields from the original table into the table associated with the drawing, it is very important to realize that these are just copies of the latitude and longitude fields that were part of the original table's records. They are not a 'handle' into the geometric coordinates that define the position of the points within the drawing's internal structure. If we click open the table and change these values they will not move the points in the drawing about. See the Editing Data in Tables topic for some additional notes on this concept.
Geocoded Data and Projected Coordinates
This section involves expert level concepts. So far this topic has discussed geocoded tables where each record has valid latitude and longitude fields in decimal degrees. Geocoded tables can also have locations for each record expressed in projected coordinate measures within a certain projection. Such geocoded tables can be copied and pasted to create a new drawing, imported to create a new drawing or used to create a linked drawing.
When using a table that is geocoded using projected coordinates as a new drawing into the project pane we must uncheck the Latitude / Longitude coordinates box in the import or pasting dialog. Manifold will then create the new drawing using default Orthographic projection values. Once the drawing is created we can open it and change the drawing's coordinate properties into whatever projection coordinate system was being used by the coordinate values in the table. To do this, we use the Edit - Projection - Current Projection dialog after the import to make any necessary adjustments. This dialog is called by pressing the Current Projection button in the Edit - Projection dialog. See the Import a Shapefile example topic for a simple example and the Import Drawing - SHP, Shapefiles topic for a more extensive example of using Edit - Projection - Current Projection to adjust projection parameters after import.
To paste a table geocoded with UTM coordinates
1. Import the table.
2. Copy the table and paste as a drawing.
3. In the Paste As Drawing dialog, uncheck the Latitude / longitude coordinates box.
4. Choose the fields giving UTM coordinates for X / longitude and Y / latitude and press OK.
5. Open the drawing created by the Paste As operation.
6. Choose Edit - Projection - Current Projection.
7. In the projection dialog, choose the UTM zone that was used for the table's coordinates and press OK.
Geocoded Tables Define Points by Default
When we consider a geocoded table like the examples above it is pretty obvious how each record in such a table corresponds to a single point. Each record has a single latitude/longitude location, so it makes sense to create a point at that table. GIS newbies will often ask, 'Why not have a geocoded table that defines lines and areas too?'
That's actually not a bad idea except for the problem that there is no obvious, single standard for defining what records in a table represent a line or an are. A line, for example, consists of a sequence of locations, each of which must be specified. What would such a table look like? Would there be one record that gives the beginning location of a line followed by a series of records that give each location in the body of the line until the last one? Where would the data attributes go? Would they be repeated for each record that gives one of the locations in a line? How would the table indicate that some records define points, some define locations in a line and some define locations in an area? How are multi-branched objects, like areas with holes or islands in them, represented?
It's fairly easy to work out a simple standard for representing points, lines and areas in tables. The problem is that everyone who has done so seems to have worked out a different standard. As a result, there is no single recognized way of encoding anything other than points within geocoded tables. Instead, people use various GIS formats, such as shapefiles or mid/mif files or other typical formats to save and exchange GIS information that contains lines and areas as well as points.
Manifold does allow one exception to the above, when creating linked drawings or when importing drawings from geocoded tables. Although there is no standard GIS method for representing lines in geocoded tables, Manifold uses a simple convention that can be used to create lines in linked drawings from tables. When importing or linking a drawing from a geocoded table, we may optionally specify a LineID column that will be used to identify which points will be used to draw lines. However, note that this convention applies only when creating linked drawings or importing drawings from geocoded tables and does not apply when copying a table and pasting it as a drawing. In the copy / paste operation only points are created.
Tech Tip: Changing Ordinary Fields in Tables does not Move Objects
This is a challenging idea for newcomers to GIS who may find it difficult to keep in mind the distinction between the original geocoded table used to create a drawing and the drawing's table.
Recall that every drawing in Manifold has its own table associated with the drawing. The drawing's table contains the data attributes (if any) for the objects in the drawing. If there are no data attributes, then the drawing's table will simply contain one column, the object ID, for each object.
The positions of objects in drawings are embedded within the geometry of the drawing without need to have latitude and longitude values listed in a table. Sometimes we create drawings from geocoded tables that have a latitude and longitude for each record. We might wish to have the latitudes and longitudes that were used to position the points immediately at hand in the drawing's table and so when pasting the geocoded table as a drawing we may tell Manifold to bring along the latitude and longitude fields along with the other fields.
Whatever the motive or process that was used to create a drawing, it is often the case that 'latitude' and 'longitude' numbers will be copied to fields in a table as well as being embedded within the geometry of a drawing. GIS beginners often mistakenly think that the positions of items in the drawing are determined from the listings of latitude or longitude fields in the table, so that editing these fields will move the objects. That's not the case.
We can use intrinsic fields to display in a table the actual latitudes and longitudes of objects associated with records. However, intrinsic fields are special, system-generated fields and are different than 'latitude' and 'longitude' fields we might bring into a table that are ordinary text or numeric fields. The rest of this topic explains why this is so.
Drawings are often created in Manifold from geocoded tables. A geocoded table is a table where each record has latitude and longitude fields that specify the location of that record.
Suppose we have an Access database that contains a list of towns together with their latitude and longitude coordinates:
We can import this Access table into a table in Manifold [either by importing the data or by linking to the external table]:
To create a drawing from this table we use Edit - Copy to copy the table and then we use Edit - Paste As - Drawing in the project pane to create a new drawing based on the data in the table. Each geocoded record will appear as a point in the drawing.
We can combine this new drawing in a map together with a
base map of the
When we use the Edit - Paste As - Drawing command to create a new drawing, Manifold will automatically create the associated data attribute table for that drawing. By default, that new table will have at least one field, the object ID field. During the Paste As operation Manifold will give us the option of copying additional fields from the original table into the new data attribute table for the drawing. The dialog presents a list of check boxes for each field in the original table. We can copy any of the fields we desire.
For example, if our geocoded table is a list of customer records containing fields such as name, address, city, state, and so forth together with a latitude and longitude for each record, we might wish to copy the name, address and other informational fields. There is no particular technical reason to copy the latitude and longitude fields (these fields in the original table will be used automatically to position the points in the drawing for each record) but we can do so if for some reason we want to have this information in the table.
If we do copy the latitude and longitude fields into a table associated with the drawing, we will see them in the table window when the table is opened. It is very important to realize that these are just table fields that were copied from the original table. They are not a 'handle' into the geometric coordinates that define the position of the points within the drawing's internal structure. Altering the values will not move the points, nor are the fields even necessary to keep the points 'positioned' at the right spots.
For example, in the Table window we could delete the 'Longitude' field.
We could delete the 'Latitude' field as well. If we do so the points do not magically disappear from the drawing. They will still be there. All that we have done is delete a field from the data table associated with the drawing. The points in the drawing have already been created when Manifold read the original database. Changing the text data in the table (either the original one or the new table created with the drawing) changes nothing about those points and does not alter the coordinate numbers inside the drawing.
The above discussion may seem obvious to experienced GIS users; however, for new users it is easy to look at a drawing's table that is full of records with latitude and longitudes values for each and to forget that changing the values in the table does not actually move the points about.
How then can we change the actual location of points in a drawing? There are four main ways:
We can show the Latitude (I) and Longitude (I) intrinsic fields and then change their values. See Editing Intrinsic Fields in Tables . This is the best method when points must be moved to given coordinates.
We can right click on individual points in the drawing and use the Object - Coordinates dialog to change the location of the geometric coordinates that define the points. This is a seriously tedious approach.
We can use any one of a wide variety of interactive editing tools in a map or drawing window to move the points by selecting them and dragging them to a new location.
If the drawing is a linked drawing we can directly edit the latitude and longitude values in the external table to move the points.
Note that neither of the above options will change the contents of any 'latitude' or 'longitude' text fields we might see in a drawing's table.
A final subtlety: Remember that this discussion is about latitude/longitude values that might be copied into a drawing's table when that table is created. The situation with a table that controls a linked drawing is different. Linked drawings are drawings of points that are automatically created from and controlled by an external geocoded table. In addition to the external table that controls them, linked drawings (like all drawings) have their own tables as well. Attempting to change values in a linked drawing's own table won't move the points about in the drawing (primarily, because a linked drawing is a read-only drawing). However, changing values in the external table that controls the linked drawing will move points about. See the Linked Drawings topic for more information.
Note
The Skip zero latitude / longitude records option is checked by default in the Paste As Drawing dialog. If checked, any records in the table that have a zero value in the latitude and longitude fields will not have an object created in the drawing. This is a safety measure so that when pasting geocoded tables that have zero values for latitude and longitude (and thus, are not really geocoded) spurious points will not be created for the zero valued records.
See Also
About Geocoding
Linked Drawings and Geocoded Tables
Geocoding
Street Address Geocoding
Spatial Geocoding with Match
Create a Linked Drawing from a Geocoded Table
Create a Map from a Geocoded Table
Project Pane - Paste as Drawing
A geocoded table is a table where every record includes latitude and longitude values in decimal degrees notation that give the position of that record. A linked drawing is a drawing that is created under the control of an external geocoded table. Linked drawings are read-only drawings that by default contain points and optionally may be configured to include lines as well. The location of each point in a linked drawing is taken from the geocoded table that controls the linked drawing. Lines may be created from the points in a linked drawing.
Before proceeding with this topic, please review the Creating Drawings from Geocoded Tables topic.
For an example of a geocoded table consider the following table:
Each record has a value in the latitude and longitude columns. The latitude and longitude of each record specify where that record is located. Note that the latitude and longitude values are expressed in decimal degrees, the standard GIS notation for latitudes and longitudes.
There are three ways to create a drawing from a geocoded table. The first method is to copy the table and paste it as a drawing. The second method is to import a drawing directly from an external geocoded table. For a discussion of these first two methods, see the Creating Drawings from Geocoded Tables topic.
The third method is to create a linked drawing from a geocoded table that is external to Manifold.
To create a linked drawing from an external geocoded table:
Choose File - Link - Drawing and open the desired database file or connect to the desired OLE DB or ODBC data source.
2. Choose the table desired and check the desired fields. Specify the fields that contain latitude and longitude values (by default, the system will guess that any fields named 'Latitude' and 'Longitude' are the fields to use. Press OK.
![]() A linked drawing
will appear in the project pane, shown using a drawing icon that includes a
yellow 'database' cylinder to indicate it is created from a table.
A linked drawing
will appear in the project pane, shown using a drawing icon that includes a
yellow 'database' cylinder to indicate it is created from a table.
The three methods for creating a drawing from a geocoded table are closely related but are critically different. The first two methods, copy and paste and importing a geocoded table as a drawing, accomplish the same thing: they create a new drawing that stands on its own and is completely independent of the geocoded table that was used to create it. If the table changes, the contents of the drawing will not change.
In the first case, the geocoded table is first imported into Manifold and then copied and pasted into a new drawing. If we are not sure of the contents of the table this is a good method to use because it allows us a chance to review the table in Manifold and, if necessary, make changes using the transform toolbar or other methods. The second method simply directly imports a drawing by reading an external geocoded table. In this case what happens in the copy and paste portion of the first method occurs during the import process. This method is fine if we know that the table contains valid latitude and longitude values in decimal degree format and that it will import OK.
The third method creates a linked drawing, the contents of which are defined by the table that controls it. If the table changes, the drawing will change as well. For example, if records are added to or deleted from the table then points will be added to or deleted from the drawing as well. If the latitude and longitude values for a record are changed then the associated point in a drawing will also change.
See the Linked Drawings topic for details on creation and use of linked drawings, including the creation of lines in linked drawings
Exchanging Files
Beginners who wish to exchange data with other users should employ linked drawings with care. The table controlling a linked drawing is by definition outside of Manifold and so is not stored within the Manifold .map project file. Sending a colleague a copy of your .map file will not also send them the database table that controls the linked drawing.
See Also
Linked Drawings
Create a Linked Drawing from a Geocoded Table
Formatting Lines in a Linked Drawing
About Geocoding
Creating Drawings from Geocoded Tables
Linked Drawings and Geocoded Tables
Geocoding
Street Address Geocoding
Spatial Geocoding with Match
Create a Map from a Geocoded Table
Projections are used within GIS and mapping for three main reasons:
To provide a more natural looking map,
To enable measurements of areas and lengths in printed maps.
To enable easy measurement in linear units such as meters or feet when performing analyses.
Manifold System has a very flexible approach to projections. In particular, the 'native' projection in which the data of a particular component is kept can be different from the projection used to show that component within a map. Any projected component can be re-projected into a different projection at will.
Using projections does not require much thought or study if one uses projections in a simple way. However, it does require some reading of this documentation. Begin with the Projections topic and the Projecting a Map topic.
Projections and Maps
Maps can use any projection desired no matter what the projections used by the components within them. The view of the components within the map will be re-projected on the fly to suit the projection requested of the map. Since dynamic re-projection requires processing time, the system can work faster if the projection used by the map is the same as the projection of the constituent components.
To change the projection used by a map:
1. Open the map.
2. Choose View - Projection .
3. Choose the projection to be used (see tips in the Projections topics).
4. Choose sensible parameters for that projection if parameters are required. Use the Suggest button to automatically enter reasonable parameters.
5. Press OK.
The above procedure changes only the view used by the map. It does not re-project the data in the components within the map.
A map can display faster if it uses the same projection as the components that make up the layers of the map. If one component is very large (such as an image) it may be helpful to use the same projection for the map as well as for that large component layer.
To use a layer's projection as the map's projection:
1. Open the map.
2. Right click on the layer tab for the component whose projection is to be used for the map.
3. Choose Use Projection.
The above procedure instructs the map to use the same projection as a particular component in the map.
Projections and Components
We may wish to change the projection used by a component (drawing, image, surface, etc.). Perhaps, for example, we have imported a drawing that uses a UTM projection and we would like to re-project the drawing into Latitude / Longitude projection before exporting the drawing into a 'dumb' GIS format that cannot save projection information.
To re-project a component:
1. Open the component.
2. Choose Edit - Projection .
3. Choose the projection to be used (see tips in the Projections topics).
4. Choose sensible parameters for that projection if parameters are required. Use the Suggest button to automatically enter reasonable parameters.
5. Press OK.
The above procedure changes the constituent data within the component into the new coordinate system and units of measure used by the new projection.
At times we would like to use a particular projection in a map and for faster performance would like to re-project the components that make up the layers of the map into that same projection. To do so, open the map and note the projection parameters used in the View - Projection dialog. Next, open the component in its own window by double clicking on it and then use Edit - Projection to change the component's projection into the same projection and parameters used by the map.
Very Important
To re-project a component, use the Edit - Projection command. Do NOT use the Edit - Projection - Current Projection command (a button within the Edit - Projection dialog). This latter command is a relatively rarely used command that is used only to manually correct the projection of a component imported from a format that is unable to provide projection information.
Differences between Major Projection Dialogs
View - Projection appears with map windows only. It changes the projection used in the view without actually changing the data in the components. Map windows have dynamic projections that can show their contents in whatever projection is desired regardless of the native projections of what is inside them.
Edit - Projection does not appear with map windows. It appears with individual component windows such as drawing, image, labels or surface windows. This command changes the actual data in the component into a new coordinate system. There is no ability in a drawing window to see the drawing in a projection other than its native projection. We use Edit - Projection to re-project a component.
Edit - Projection - Current Projection is called by pressing the Current Projection button within the Edit - Projection dialog, so it is not available with map windows. It is available with individual component windows such as drawing, image, labels or surface windows. It changes the interpretation of the existing internal coordinate system data. This is a specialized function that is utilized only to manually adjust projection properties when importing from formats that do not correctly store projection information.
|
Politica de confidentialitate | Termeni si conditii de utilizare |

Vizualizari: 1577
Importanta: ![]()
Termeni si conditii de utilizare | Contact
© SCRIGROUP 2026 . All rights reserved