| CATEGORII DOCUMENTE |
| Asp | Autocad | C | Dot net | Excel | Fox pro | Html | Java |
| Linux | Mathcad | Photoshop | Php | Sql | Visual studio | Windows | Xml |
Prior to the advent of the .NET Framework, the ability to develop sophisticated Windows-based networking applications was limited to advanced C++ programmers using the convoluted WinSock library for the most part. There was, of course, the WinInet control that Visual Basic developers could utilize in order to accomplish relatively simple tasks. Other controls were available for other languages. However, one did not have to attempt too much before facing functional impediments with the simple and limited services offered in that control.
Fortunately, the System.Net namespace within the .NET Framework brings a slew of effective functionality packaged in a simple and consistent object model. The ease of use of these classes does not compromise functionality, as almost all the core functions of WinSock 2.0 have been wrapped and abstracted in the System.Net namespace. Developers can easily develop at any level from sockets all the way up to HTTP. Also, unlike the raw use of the WinSock library, the System.Net namespace relieves developers from having the dubious pleasure of manually coding many imperative resource management tasks, such as dealing with overlapped IO and completion ports.
So, without further delay, let's briefly explore the System.Net namespace.
The System.Net namespace actually comprises two namespaces, System.Net and System.Net.Socket.
We will primarily be using the System.Net.Sockets namespace in our application. The layered approach of the System.Net classes provides applications with the ability to access networks with various levels of control based on the demands of the application. In addition to the extensive support for sockets, System.Net classes also offer an impressive array of functionality to use with the HTTP protocol. For the most part, the System.Net offerings are categorized in three layers, Application protocols, Transport protocols, and Web protocols. The System.Net.Sockets namespace consists primarily of classes and utilities for dealing with the transport protocol. Let's look at some of the more important classes within the System.Net namespace, as listed in the table opposite.
|
Description |
|
|
Authorization |
Provides authentication messaging for a web server. |
|
Cookie |
Provides a set of properties and methods used to manage cookies. This class cannot be inherited. |
|
Dns |
Simple domain name resolution functionality. |
|
EndPoint |
Identifies a network address. This is an abstract class. |
|
GlobalProxySelection |
Global default proxy instance for all HTTP requests. |
|
HttpVersion |
Defines the HTTP version numbers supported by the HttpWebRequest and HttpWebResponse classes. |
|
HttpWebRequest |
HTTP-specific implementation of the WebRequest class. |
|
HttpWebResponse |
HTTP-specific implementation of the WebResponse class. |
|
IPAddress |
Internet Protocol (IP) address. |
|
IPEndPoint |
A network endpoint consisting of an IP address and a port number. |
|
IPHostEntry |
Container class for Internet host address information. |
|
NetworkCredential |
Provides credentials for password-based authentication schemes such as basic, digest, NTLM, and Kerberos authentication. |
|
SocketAddress |
Stores serialized information from EndPoint-derived classes. |
|
SocketPermission |
Controls rights to make or accept socket connections. |
|
WebClient |
Provides common methods for sending data to and receiving data from a resource identified by a URI. |
|
WebException |
The exception that is thrown when an error occurs while accessing resources via the HTTP protocol. |
|
WebPermission |
Controls rights to access HTTP Internet resources. |
|
WebPermissionAttribute |
Specifies permission to access Internet resources. |
|
WebProxy |
Contains HTTP proxy settings for the WebRequest class. |
|
WebRequest |
Makes a request to a Uniform Resource Identifier (URI). This class is abstract. |
|
WebResponse |
Provides a response from a Uniform Resource Identifier (URI). This class is abstract. |
As you can see, the System.Net namespace contains a cornucopia of classes and utilities that are quite useful for a wide range of web and network programming needs.
The
System.Net.Sockets
namespace primarily focuses on the transport layer: the socket layer for which
it contains a comprehensive set of classes. These classes do an excellent job
of abstracting much of the complexity associated with socket programming, while
offering a powerful and productive socket stack that also adheres to the
|
Class |
Description |
|
LingerOption |
Contains information about the amount of time it will remain available after closing with the presence of pending data (the socket's linger time). |
|
MulticastOption |
Contains IP address values for IP multicast packets. |
|
NetworkStream |
Provides the underlying stream of data for network access. |
|
Socket |
Implements
the |
|
SocketException |
The exception that is thrown when a socket error occurs. |
|
TcpClient |
Provides client connections for TCP network services. |
|
TcpListener |
Listens for connections from TCP network clients. This is essentially the TCP server class. |
|
UdpClient |
Provides User Datagram Protocol (UDP) network services. |
A varying level of control is offered to the developer, such as lower-level classes like the Socket class, and higher-level classes, such as the TcpClient class, which offers slightly less control with added productivity. An in-depth discussion of these classes would go beyond the scope of this book - Professional .NET Network Programming (ISBN 1-86100-735-3) is the ideal book for this, but we will take a closer look at some of the above classes as we design and develop our sample application a little later in this chapter.
Now that you've had a brief introduction to network programming in .NET, let's actually start discussing the application that we are going to build in this chapter. The purpose of this example is to create a simple application to familiarize you with the use of threading in building networking applications in .NET. The application will actually consist of two small Windows Form applications, with one acting as the server and the other as the client. We will be using Visual Studio .NET to design and implement these applications.
We want to create two applications that interact with one another. The first application is a multithreaded/multi-user stock quote server program that looks up stock quotes from a database table and sends the data back to the requesting client asynchronously. The second application is the client and simply queries the server with a stock symbol for which it wishes to get the quote information. All this will happen asynchronously, such that the client's user interface is not paused while the server is responding to the request.
Within the .NET Framework there are a number of methods that will handle the asynchronous operations for us; with these methods the need to explicitly spawn and manage the required threads ourselves is removed.
The list below outlines and summarizes the basic requirements we are going to abide by when building the applications:
There will be two autonomous applications (one serving as the client and the other as the server) that can communicate with each other over the Internet
The user interface of the client should not pause or freeze because of slow network connections, or any other delays, when querying the server for stock quotes
The server should be capable of handling numerous simultaneous client connections and queries, and have the ability to communicate with the client in an asynchronous manner
Network settings must be abstracted away from the application and be modifiable
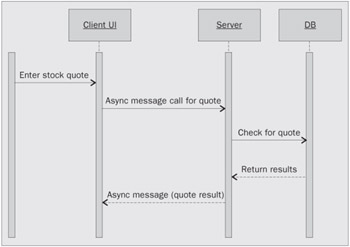
To help us understand the typical user interaction within the application, let's look at a simple UML sequence diagram overleaf.
So far, we've discussed the basic design guidelines for the applications from a very high-level standpoint. If you are like most developers, you probably can't wait to see some code. So without further delay, let's actually start building the two applications and examining code segments and concepts as we go along (as always, the code is available at https://www.apress.com).
As mentioned before, the sample application in this chapter really consists of two autonomous applications: a client and a server. The two applications will communicate with each other via a specific TCP/IP port, which can be changed by altering the configuration file of the application (as we'll see later, both the client and the server need the same configuration file). Enough said, let's start by building our client application, which performs the simple task of querying the server for the result of a stock quote.
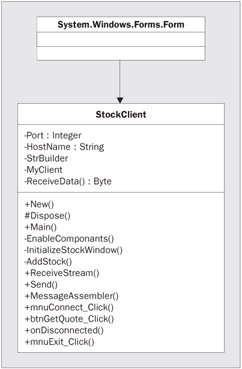
Before we start building the application, let's take a moment or two to see the UML view of the client form class, which is going to contain all the code for the client application:
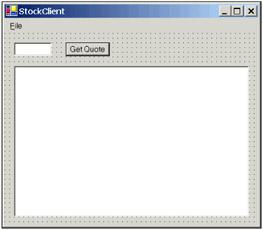
The StockClient application simply has a Windows form and contains all the code for the client application, such as the private member variables and the methods. To create the StockClient application, we start by creating a new Windows Application project in Visual Studio .NET and naming it StockClient. On the default form, we create three controls on the page; a textbox called txtStock, a button called btnGetQuote with its Text property set to Get Quote, and a new ListView control from the Visual Studio .NET Toolbox called lstQuotes. Change the Name and Text properties of the form to StockClient. Also, add a MainMenu control to your form, and create a menu item &File with two sub-items &Connect (called mnuConnect) and E&xit (called mnuExit). Lastly, ensure that all the controls on the form, except the menu, have their Enabled property set to False; these will remain disabled until the user connects to the server.
We'll start with the set of using directives that reference the namespaces we need:
using System.Threading;We are going to need some private member variables that will be used throughout the StockClient application:
privateWe will examine the variables and their use later on, but for now let's amend our ListView control so that it can keep track of all the stock quotes that we enter. We need it to contain six columns: one column for each of the returned fields for the stock quote. The desired fields are Symbol, Price, Change, Bid, Ask, and Volume. Let's create a method called InitializeStockWindow() to add these columns to the ListView control as shown below:
private void InitializeStockWindow()The code segment above simply enables the grid lines of the ListView control, as well as assigning six columns of various widths to it. We will call this function upon connecting to the server when the application is ready to start retrieving stock quotes from the server. We also need a method to enable and disable the controls as required, for instance upon the successful connection, as listed below:
private void EnableComponents(bool enable )Now we create a simple delegate called DisconnectedHandler, an event called Disconnected, and an implementation of the event handler called OnDisconnected() which would be called once the event is actually raised. The OnDisconnected() method simply enables the Connect option in the File menu as well as displaying an error message via a message box. It also disables the remaining input controls on the form:
public delegate void DisconnectedHandler ( object sender );To bind the OnDisconnected() method to the Disconnected event, we use the code below:
Disconnected += new DisconnectedHandler(OnDisconnected);As you may know, one of the greatest features of .NET is its ability to dynamically bind and unbind event handlers to events at run time. You can use the += operator to assign a method to an event and, in much the same manner, use the operator to detach an event handler method from an event. Indeed, the ability to dynamically assign functionality to an event is very useful when you need to start or stop the event handler for an event or need to override the behavior of an event handler. In the case of the Disconnected event, we assign it to the OnDisconnected delegate. Technically, we have the opportunity to accomplish this anytime before the invocation of the event. However, it's usually best to declare all the event handlers early on in the application's execution, so we will declare it in our mnuConnect_Click event as soon as a connection to the server is established.
Speaking of the mnuConnect_Click event, double-click the Connect sub-item of the File menu to enter code for the actual connection to the server. This is where we start to get our feet wet in network programming. First we need to instantiate a TcpClient object, which is a member of the System.Net .Sockets namespace. In order to that, we are going to need a host address and a port with which the client contacts the server. We will abstract that information away from the core of the application by storing it in an application configuration file. .NET configuration files are well-formed XML files and are accompanied by a useful namespace in the .NET Framework, System.Configuration. With that in mind, let's look at the contents of the external configuration file that we can easily create in Notepad or Visual Studio.NET:
<configuration>The XML above contains an entry with two attributes storing the host information. We used localhost, and the port could be just about any port (just as long as it's not a reserved port) and you can choose just about any port number between 1024 and 65000. Save the file as StockClient.exe.config (the configuration file has the name of the assembly followed by .config), and place it in the bin subdirectory where the compiled version of the application is going to reside.
Now add the following code to the mnuConnect_Click event handler:
private void mnuConnect Click(object sender, System.EventArgs e)The first portion of the code above reads the host information from the configuration file. The HostName, Port, and MyClient fields have already been declared as private at the start of the class. At this point we just declare a local dictionary object to read in all the attributes of the HostInfo node in the configuration file.
An instance of the TcpClient class is instantiated by passing the DNS host name and a port number into the constructor. As you probably know, the host name maps to a specific host (or, more accurately, interface) on the network; the port number identifies the specific service on that host to connect to. The combination of host name and a service port is typically called an endpoint, which is represented in the .NET Framework by the EndPoint class. The TcpClient class constructor may take in an instance of the IPEndPoint class, but is also overloaded to accept a host name and a service port number.
You can use the DNS class to resolve a host name into an IP address and then use a service port to construct an IPEndPoint class.
If we've done everything right and there is a server running with the same host name and port, a new connection will be established. Upon obtaining a connection, we must spawn a background thread to get data from the server asynchronously to enable the input controls for the user to receive stock symbols. Here's where things start to get a little interesting.
As mentioned previously, we need the receiving method of our application to be asynchronous. This is the only way the client can function without delays and serial user interaction. It is simply unacceptable to have the client application remain suspended while waiting for data to arrive from the server. Thanks to the .NET Framework, the solution is relatively simple and easy to implement. We first have to identify the TcpClient's NetworkStream object. We can do that by calling the GetStream() method of the TcpClient object instance, which returns the underlying NetworkStream used to send and receive data. GetStream() creates an instance of the NetworkStream class using the underlying socket as its constructor parameter. The NetworkStream class inherits from the Stream class, which provides a number of methods and properties used to facilitate network communications. Once we have an underlying stream, we can use it to send and receive data over the network. Much like its cousin classes FileStream and TextStream, the NetworkStream class exposes read and write methods designed to send and receive data in a synchronous manner. BeginRead() and BeginWrite() are nothing more than the asynchronous versions of those methods. As a matter of fact, most of the methods in the .NET Framework whose names start with Begin, such as BeginRead() and BeginGetResponse(), are intrinsically asynchronous without the programmer having to provide additional code when they are used with delegates. Therefore, there's no need to manually spawn new threads, and as the process reading the data is running on a background thread, the main thread of the application is free to remain attentive and responsive to UI interaction. Let's look at the signature of the BeginRead() method:
public override IAsyncResult BeginRead(The table below explains each of the parameters of this method.
|
Parameter |
Description |
|
buffer |
A byte array data buffer in which the data will arrive |
|
offset |
The location in buffer to begin storing the data to |
|
size |
The size of buffer |
|
callback |
The delegate to call when the asynchronous call is complete |
|
state |
An object containing additional information supplied by the client |
Before we proceed further, let's take a moment to have a word or two about asynchronous calls, since they are a very important concept. As mentioned earlier, the problem with synchronous operations is that the working thread can be blocked until a certain operation is complete and that's not always desirable. Asynchronous calls run in a background thread and allow the initial thread (the calling thread) to continue as normal. .NET allows asynchronous calls via the help of delegates to just about any class and/or method. However, certain classes, such as the NetworkStream class, contain methods like BeginRead() that have asynchronous capabilities built into them. Delegates are used to act as placeholders for the functions against which asynchronous calls are made. Remember that delegates are essentially type-safe function pointers.
As you can see, the BeginRead() method requires byte arrays as opposed to strings or text streams and, as such, is going to require a little more processing. We have already defined a variable named ReceiveData and another integer constant for the size of the byte array named PacketSize. Now we need to pass in the name of the method that is going to actually receive the data - the method that is going to be invoked by the callback delegate when the data arrives. Bear in mind that this method is going to be running in a background thread, so we have to be careful if we wish to interact with the UI. Therefore, we simply spawn a background thread to receive the data as it arrives from the server over the network by just one line:
MyClient.GetStream().BeginRead(receiveData, 0, packetSize,We create a method called ReceiveStream() that deals with the data in the byte packets as it arrives:
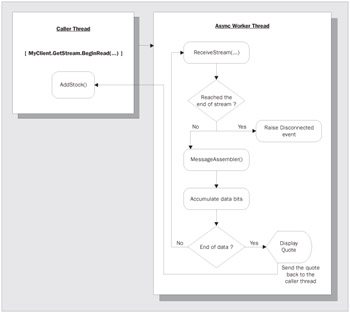
private void ReceiveStream( IAsyncResult ar )First off, we have to check to see if there are any bytes in the byte array packet. There always has to be something in there. You can think of this as the pulse of the connection; as long as the client is connected to the server, there will be some data in that incoming packet, however small. We use the EndRead() method of the Stream object to check the current size of the byte array. We pass an instance of IAsyncResult into the EndRead() method. The BeginRead() method of the GetStream() method initiates an asynchronous call to the ReceiveStream() method, which is followed by a series of under-the-hood actions built in by the compiler in order to expedite the asynchronous operation. The ReceiveStream() method is then queued on a thread-pool thread. If the delegate method, ReceiveStream() throws an exception, then the newly created Async thread is terminated, and another exception is generated in the caller thread. The diagram below further illustrates the situation:
If the number returned from the EndRead() method is anything less than one, we know that the connection has been lost and we can raise the Disconnected event to take care of the appropriate work that needs to be done to handle that situation. However, if the number of bytes in the byte array is bigger than zero, we can start receiving the incoming data. At this point, we are going to need the assistance of a helper method to help us construct a string from the data that we retrieve from the server.
In fact, in .NET you can call almost any method asynchronously in much the same manner that we used the BeginRead() method. All you have to do is declare a delegate and call that delegate using the BeginInvoke() and the EndInvoke() methods -methods that are automatically added when you define a delegate. The intricacies of the asynchronous infrastructure are abstracted away from you and you don't have to worry about background threads and synchronization (not entirely, however). It is important to note that the BeginInvoke() and EndInvoke() methods are not found with IntelliSense within the VS.NET IDE. These methods are added at compile time.
OK, now let's move on to the next portion of the code in which you see a call to the MessageAssembler() method. Due to the asynchronous nature of the BeginRead() method, we really have no way of knowing for sure when and in what quantity the data will arrive from the server. It could arrive all at once, or it could arrive in a hundred smaller pieces, each being only one or two characters long. So, we have to perpetually read the data until we receive some sort of a signal indicating the end of the data for now. In this case, we will append a single character ( ) to the end of our message, which will act as a trigger agent for the MessageAssembler() method indicating the end of the incoming string, at which point the MessageAssembler class can stop waiting for more data and work with the data. We'll make use of the StringBuilder class from the System.Text namespace - this class is designed for higher-performance string manipulation operations. Let's take a closer look at the MessageAssembler() method:
private void MessageAssembler(byte [] Bytes, int offset , int count)As you can see, the MessageAssembler() method loops through the byte array of data and accumulates the data as pieces of a string using the instance of the StringBuilder class until it encounters the character. Once it encounters the character, signaling the end of the incoming string, it will stop and flush out the string by calling the ToString() method of the StringBuilder instance. We don't have to worry about manual conversion of bytes to strings at this point since the StringBuilder class takes care of that for us. It will then call the DisplayData() method to process the data:
object [] Params = ;This is the second time we've encountered something similar to the code above, and you may be wondering what it is doing. Remember that this method is running in the background worker thread and is in the same thread that the UI form is. Although we can call the methods anywhere in the application, it is definitely not a good idea since that operation would not be thread-safe. Windows Forms are based on Win32 Single Threaded Apartments (STA) and thus are not thread-safe, which means that a form can't safely switch back and forth between operating threads (including the background threads spawned by an asynchronous operation) once it has been instantiated. You must call the methods of a form on the same thread in which the form is residing. To alleviate this issue, the CLR supports the Invoke() method, which marshals calls between the threads.
If you doubt the above claim, you can always see for yourself by stepping through the code and looking at the Threads window and seeing the thread ID of the code that indicates the current thread in which the code is executing. By creating a delegate and calling it through the form's Invoke() method, it's executed in the form's thread and interaction with the form's controls is safely executed. Without marshaling, you often find that the code runs just fine and the desired functionality is accomplished initially, but you can run into problems later on as this can cause instability in the application, with at times unpredictable behavior. This can get worse the more the application spawns threads. Therefore, don't talk to the GUI without marshaling the threads. In addition, the signature of the delegate must always match that of the Invoke() method, and therefore we have to create an object array and insert the string in it; this is the only way we can use the Invoke() method. We call on the DisplayData() method to display the data as we wish:
private void DisplayData(string stockInfo)In the DisplayData() method, we simply check the string to see whether its value is . As we shall see later, the server has been configured to simply return a string if the requested stock quote cannot be returned as we've submitted an invalid symbol. Of course, in our case, an invalid symbol is any symbol that does not happen to be in our tiny database table of stocks, tbl_stocks (which we'll see later). Otherwise, we can go ahead and pass the stockInfo variable to the AddStock() method, which will gracefully add it to the lstQuotes control on the form:
private void AddStock(string stockInfo )We will be configuring the server to return the data values in a string with the individual values being separated by a comma:
Symbol, Price, Change, Bid, Ask, VolumeSo,
the very first thing we have to do is to separate the individual values from
one another by using the
We are nearly done with the client code; we just need to create a few smaller methods to finish off. First, we need to add code to the click event of btnGetQuote:
private void btnGetQuote_Click(object sender, System.EventArgs e)This method simply gets the string value of the txtStock textbox, appends a character to the end of it to indicate the end of this string, and passes it to the Send() method. Remember that we needed the character in the MessageAssembler() method to tell us when the end of the string was reached.
Once the data is passed on to the Send() method, the Send() method creates a new instance of the StreamWriter class by passing the underlying TcpClient stream to it as its constructor and calling its Write() method, which sends the data across the socket in the form a stream. We also call the Flush() method to ensure that the data is sent immediately and is not sitting in buffer until some point in the future:
private void Send(string sendData )We're almost done here, but we have to do some minor clean-up code. For the most part, the Windows Form class does most of the cleanup by calling on its own Dispose() method and that of its base, but since .NET has non-deterministic garbage collection, it would a good idea for us to manually close the TcpClient connection. We can write a small function to do that, which will be called from the SocketClient_Closing() method, which is invoked when the user closes the form:
private void StockClient Closing(object sender , EventArgs e )We
also need to instantiate a copy of the StockClient form in the
form's
Lastly, we need to call the Application. Exit() method on the Click event of the exit menu item to shut down the application:
private void mnuExit_Click(object sender, System.EventArgs e)We're done with the client portion of the application.
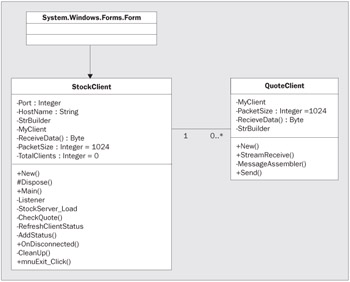
OK, let's move on to creating the server application. Due to the multi-client nature of the target environment, we have to take a slightly different approach while creating the StockServer application. We want to be able to keep track of clients and know when they connect and disconnect. Client management would be far more effective with the use of a single class instance per client. Therefore, we are going to have to create a separate client class that will represent the clients that are connected to the server as you can see in the UML class diagram below:
Figure
4
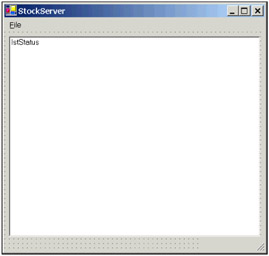
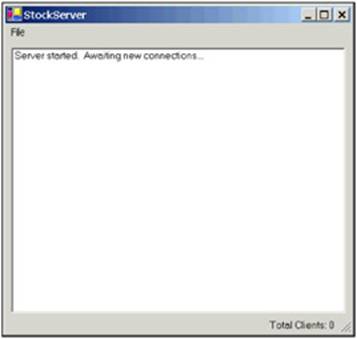
A new instance of the QuoteClient class is created for each new client that connects to the server and so the StockServer class and the QuoteClient class have a one-to-many relationship. The QuoteClient class is always instantiated in a newly spawned thread made to handle the new client that has just connected. The QuoteClient class takes in a TcpClient object, responsible for the new client, as its constructor. We will talk about the QuoteClient class a bit more later on. First, let's see what the user interface is going to look like. The server application is a bit simpler than the client in terms of the UI. We are going to have a single ListBox control to display some information along with the standard File menu with only the Exit sub-item. In addition to those controls, drag and drop a new StatusBar and change its Anchor property to Bottom, Right, such that you can place it in the lower right portion of the form. Be sure to change the Name and the Text property of the form to StockServer. Your form should now look something like the form below:
We will also need a class file that we will call QuoteClient.cs. This application is going to access a SQL Server database to get the stock quote information, and so we are going to need to make references to the necessary data namespaces in addition to the others shown below:
using System.Threading;We are also going to need some private variables that will be used throughout the application. You will see their use as we explore the code for this application:
private Thread ListenerThread ;The server application is going to start running just as soon as it is opened and so we will start by entering some code in the StockServer_Load() method of the application. We will discuss the server's Listener() method, which is the core of the server itself, shortly; but first we start by spawning a new thread to run our Listener() method in the background:
private void StockServer Load(object sender, EventArgs e)Just as we did in the client application, we assign the port number from the configuration file into the Port variable, which we have already defined. We don't need the host name when creating server listeners since the server itself is the host. Since this application is really two autonomous parts running entirely independently of each other, please be sure to use to the same configuration file for both the client and the server as nothing is going to work if the port numbers of the two applications don't match precisely. If an error occurs, we notify the user by using the AddStatus() method and do some manual cleaning up by calling the CleanUp() method, both of which we will see later. But for now, let's look at the Listener() method:
This is a very important part of the server application since it basically represents the underlying engine of our server. As you can see, upon initialization of the port number, we called the AcceptTcpClient() method of the TcpListener class instance to accept incoming requests for connections. In essence, the TcpListener class is the server. It builds upon the Socket class to provide TCP services at a higher level of abstraction. However, the reason for spawning a new background thread to handle the Listener() method is the AcceptClient() method, which is a synchronous method that waits for connections while keeping the thread it's running on blocked, therefore we need to run it as a background thread. Once again, since this method is running in a background thread, we need to marshal between the current working thread and the thread in which the UI controls are running by using the Invoke() method of the form. We also start the asynchronous process of listening for incoming data, which in this case is going to be stock quote requests from the client. In much the same manner as we did in the client application, we will use the StreamReceive() method that is located in the QuoteClient class:
public void StreamReceive(IAsyncResult ar)The major difference between this and its sister method in the client application arises from the fact that we are now in a multithreaded, multi-user environment and that we can't just get the default stream and do whatever we want with it. There would be a very good chance of resource collisions, such that while we're reading data from it here, another thread in our server might attempt to send data to that same stream; and so we need to use synchronization. For simple synchronization, we are going to use the keyword lock to lock the requested stream while we read from it. lock is the most basic thread synchronization tool available. Don't forget to use good judgment when it comes to locking resources, as it can be detrimental to your application's performance if used in excess. For more sophisticated and custom tailored thread synchronizations, you can use some of the other classes available in the System. Threading namespace, such as Interlocked, which allows you to increment and decrement interlocks. Other than that, the ReceiveStream() method is more or less the same as the one in the client application.
The MessageAssembler() method also very closely resembles its counterpart defined in the client application. The only difference is that it calls the CheckQuote() method to connect to the database and retrieve the stock quote by raising the QuoteArrived event, which is dealt with in the Listener() method discussed previously:
private void MessageAssembler(byte [] Bytes, int offset, int count)Before we move on to the CheckQuote() method, let's briefly discuss the data source from which the server retrieves its quote information.
We need to start by creating a SQL Server database called StockDB, which will contain a single table called tbl_stocks with a structure as outlined in the following table.
Database setup and population scripts will be available at the Apress web site https://www.apress.com along with all the code from the book.
|
Field |
Description |
|
Symbol |
The actual stock symbol |
|
Price |
The last price of the stock |
|
Change |
The price change of the stock |
|
Bid |
The last bid price of the stock |
|
Ask |
The last bid price of the stock |
|
Volume |
The total traded volume of the stock in a trading session |
That's all we need for the database so back to the code and the CheckQuote() method. The CheckQuote() method resides in the main form of the application and is called by the local event handler when the QuoteArrive() method is triggered. The role of this method is to make a connection to the database, query it to retrieve the quote information, and pass the data back to the client. You can use the SqlConnection control in Visual Studio .NET and follow the wizards to generate a connection string to the database, or you can simply instantiate the SqlConnection class, which resides in the System.Data.SqlClient namespace, and manually assign it a connection string, as shown here:
private void CheckQuote(QuoteClient sender,We also need a SQL query to return all six fields of the table for the individual stock the client has requested:
string SqlStr =Now that we have the necessary SQL string and connection, we can instantiate the Sql Command and SqlDataReader objects to read the data from the database server.
Finally, we execute the query by creating a new SqlDataReader class instance, and setting it to the result of the ExecuteReader() method of the SqlCommand object. After that, we iterate through each of the columns of returned data and append the values into a StringBuilder object, with a comma in between each value. If ExecuteReader() does not return any rows of data, then we have to send a string with a value of back to the user to notify them of the non-existence of the requested data. Otherwise, we replace the last comma in the string with a (to indicate the end of string) and send it back to the client using the Send() method. Lastly, we must ensure that the database connection is closed once we're finished with it. As you can see, the code in the Finally clause checks to see if the connection to the database is still open. If so, it will close it.
The Send() method of the server application resides in the QuoteClient class and requires slightly different code from the same method in the client application. The main difference is that we now are going to send the message asynchronously back to the client:
public void send(string sendData)The BeginWrite() method is quite similar to the BeginRead() method in terms of interface. We first have to convert the string message to a byte array, which can be easily accomplished by using the ASCII class in the System.Text namespace. Once again, we have to lock the stream to ensure that other threads are not writing to it as well. That's all that is required to asynchronously write the data to the client.
Build each project in its own instance of Visual Studio .NET and don't forget to include the configuration files that we created earlier in the same directory as the application executables.
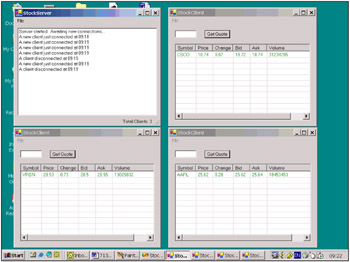
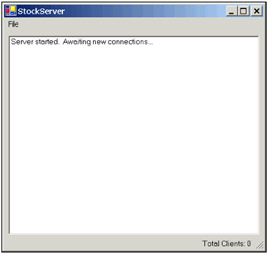
OK, let's now run the compiled applications. We need to run the StockServer.exe first so that it will start listening for clients:
Now run an instance of the client application. As you probably recall, we had disabled all the UI controls on the form until the user successfully connected to the server. So, let's go ahead and click on the Connect item of the menu:
All the controls (except the Connect option of the menu) are now enabled and the ListView control has been instantiated with all the right columns. Enter a valid stock symbol from tbl_stocks table. Let's try CSCO, for example:
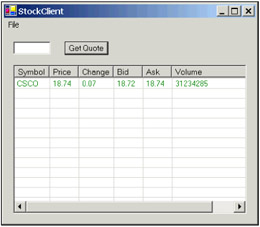
The Stock Server successfully returned a quote and, since the change amount is positive, the entire row appears in the color green. Let's go ahead and create a few other instances of the StockClient class and see if they all function correctly:
As you can see, the StockClient and the StockServer applications work very well with each other. The server keeps tracks of how many clients connect and disconnect and displays it in the ListBox. In addition, the multithreaded server is very easily able to handle numerous connections, as well as send and receive data in an asynchronous fashion. You can step through the code for both the client and the server application and get a better feel for the application workflow.
|
Politica de confidentialitate | Termeni si conditii de utilizare |

Vizualizari: 1048
Importanta: ![]()
Termeni si conditii de utilizare | Contact
© SCRIGROUP 2025 . All rights reserved