| CATEGORII DOCUMENTE |
| Asp | Autocad | C | Dot net | Excel | Fox pro | Html | Java |
| Linux | Mathcad | Photoshop | Php | Sql | Visual studio | Windows | Xml |
Several utility classes and interfaces are included in the Java API for image processing. Using these APIs, Image objects can be created from raw data, the raw data of an existing Image object can be examined, and filters can be used to make modified versions of existing images. Image objects that you create from raw data or using filters can be used in exactly the same ways as Image objects created by the Java runtime system.
In the Java language, Image data is presented in a consistent format by objects which implement the ImageProducer interface. Image data is used by objects which implement the ImageConsumer interface. The ImageProducer and ImageConsumer interfaces are the basis for image processing in the Abstract Windows Toolkit (AWT) of Java.
This chapter details how ImageProducers, ImageConsumers, and ImageFilters work, and how you use them to create and modify images in Java. First, we will see how image pixel data is represented using arrays of bytes or integers in Java, and how the ColorModel object is used to interpret image pixel data. Next, we will see how the ImageProducer interface passes image pixel and ColorModel information to ImageConsumers. Finally, this chapter explains the ImageFilter, which is really both an ImageConsumer and an ImageProducer.
The project for this chapter, "MultiFilter," is an extensible image filtering application. It allows the user to apply filters to arbitrary sections of Images. MultiFilter is designed to be extensible-after you see how it is designed and built, you will be able to drop in and test any ImageFilter you create.
As with most computer representation of images, images in AWT are conceptually a two-dimensional array of pixels. Each pixel has color data associated with it. According to the color storage model for the Image, this data can be stored in either a single 8-bit byte, or in a 32-bit integer.
The default color model stores eight bits each of red, green, blue, and "alpha" or "transparency" information packed into a single integer. This is the RGBα color model. Figure 8-1 illustrates the packing of RGBα data into a single integer. All Image objects have an associated ColorModel object capable of converting the specific Image's color data into an RGBα representation. The ColorModel class encapulates the methods necessary to convert the Image pixel data for single pixels into the default RGBα packed bits format. Whenever raw Image pixel data is passed to a method, the ColorModel for that pixel data accompanies it. Sometimes the ColorModel is assumed to be the default RGBα model, such as in the RGBImageFilter.filterRGB method, which is passed RGBα pixel data but no ColorModel.
Figure 8-1 RGBα color model
The ColorModel class is an abstract class that defines the methods which must be implemented by actual ColorModels. The two ColorModel classes included with the AWT are IndexColorModel and the DirectColorModel, both of which are also summarized in this chapter.
For example, an Image may use an IndexColorModel, where each pixel's single byte of data is actually an index into a color table of 256 RGBα integers. Given a pixel's 8-bit index into its color table, the IndexColorModel for the Image can supply the specific RGBα data for that pixel. All ColorModels implement getRGB to supply RGBα information for all pixels in the Image. This listing uses getRGB to retrieve RGBα information associated with pixel value 0.
URL urlImage;The other ColorModel included in AWT is the DirectColorModel. The DirectColorModel can store packed bits of red, green, blue, and alpha values using arbitrary bitmasks for each of the color component fields in an integer. The width of the bitfields for each color component is completely configurable. The DirectColorModel internally computes the method for converting data stored using arbitrary bitfields into default RGB data. Like all ColorModel-derived classes, the DirectColorModel implements getRed, getGreen, getBlue, getAlpha, and getRGB.
For example, you can define a DirectColorModel that stores 12 bits of red data in the 12 highest bits, 4 bits of green data in the bottom 4 bits, 16 bits of blue data in the middle 16 bits, and no alpha data at all. The DirectColorModel can automatically convert this kind of pixel data into the default RGBα representation.
There are many other ColorModels which could be implemented, each best suited to a particular real-world application. For example, television images are encoded in the so-called "YIQ" or "luminescence/chromaticity" color model. One could define a YIQColorModel so that Images storing pixel data using the YIQ schema could be rendered on display surfaces by Java.
The AWT creates Image objects from data provided by ImageProducers. An ImageProducer delivers Image pixel data to ImageConsumers through the member methods of that interface. There are three types of ImageProducers implemented in the Java API:
. The Toolkit has built-in ImageProducers which can create Images from files stored on the local file system, or accessed through the network. The Toolkit's createImage method takes Image data and an associated ColorModel from an ImageProducer, and transfers it into structures appropriate for rendering the Image in a particular operating system.
. Any Image object can provide an ImageProducer which will deliver the Image's data to ImageConsumers. Image.getSource returns an ImageProducer that delivers the pixel data to ImageConsumer objects.
. The MemoryImageSource class is an ImageProducer which can deliver image data taken from an array of pixel data in memory.
You can create your own ImageProducers to accomplish additional Image creation tasks. For example, you may want to implement an ImageProducer to create images from lesser-known or unsupported graphic format files, like PostScript. To do so, just create a class which implements the ImageProducer interface and delivers pixel data to consumers through the member methods of the ImageConsumer interface.
ImageProducers require one or more ImageConsumer objects to accept image data. Figure 8-2 illustrates this relationship as a faucet and one or more buckets. The ImageProducer funnels its image data to ImageConsumers which have been associated with the producer.

Figure 8-2 The flow of Image pixel data from ImageProducer to
multiple ImageConsumers
The ImageConsumer interface is implemented by objects wishing to process pixel data. The ImageProducer passes pixel data in one or, more usually, multiple calls to the ImageConsumer's setPixels:
class myConsumer extends ImageConsumerTwo overloaded versions of setPixels must be implemented, one to accept 8-bit pixel data, and the other to accept 32-bit pixel data. A rectangle of pixels from the Image is passed to setPixels. This rectangle might be the entire Image's two-dimensional array of pixels, a single row or "scanline" of the Image, or even a single pixel of data. Multiple calls to setPixels may even define data for overlapping regions of the Image, in which case only the last piece of Image data for a particular region should be used. Images may also contain multiple frames, such as with a video sequence of animation frames.
The ImageProducer calls the ImageConsumer's setHints method to tell the consumer a little about how the Image data will be passed. These hints can be used by a consumer to optimize its processing of the pixel data. Always before the first call to setPixels, setHints is called. A bitwise ORing of ImageConsumer flags is passed to setHints. See the API summary of the setHints method later in this chapter for a comprehensive listing of the ImageConsumer flags.
Producer hints should be used by a consumer to optimize its processing of image data. For example, one custom ImageConsumer might be an average color calculator which calculates the average red, green, and blue intensities of an image. For non-SINGLEPASS images, such a consumer would have to keep a history of data sufficient to subtract overlapping regions passed to setPixels.
Several other important pieces of information about an image are presented to a consumer before individual pixel data is sent to setPixels. The ImageConsumer methods used to pass this additional information are
. setDimensions is called to inform the consumer of the Image's width and height.
. setProperties is called to pass the consumer an extensible list of Image properties. These properties are all stored in a Hashtable as text. The individual properties might include the name and configuration of any filters used to produce the Image, any copyright on the Image, etc.
. setColorModel is passed a copy of the ColorModel used predominantly by the producer. Similar to the hints passed to setHints, the ColorModel may be used by the consumer to optimize processing of Image color data.
When the producer has finished sending the consumer all information about the image (or a single frame of the image), the imageComplete method is invoked. Similar to setHints, imageComplete is passed a bitwise ORing of ImageConsumer flags indicating the status of the completed image. Here are the ImageConsumer flags that may be passed to imageComplete:
|
Flag |
Meaning |
|
|
|
|
IMAGEERROR |
An error was encountered while producing the Image data. The error is unrecoverable, and the image data received so far is not necessarily viable. |
|
SINGLEFRAMEDONE |
A single frame in a multiframe Image has been completed. |
|
STATICIMAGEDONE |
The Image data for a complete single-frame image has been sent to the consumer. For multi-frame images, this flag implies all frames have been delivered to the consumer. |
|
IMAGEABORTED |
The production of the Image has been deliberately aborted. |
|
|
|
As you can see, the interpretation of most of these flags is somewhat vague. For example, the IMAGEERROR flag simply indicates that "some error" has occurred: There is no way to discover more about what that error is.
The CountFramesConsumer (see the Example section of the ImageConsumer API Summary below) counts the number of frames in a multiframe Image. The individual pixel data for the frames is actually ignored by the methods in this class. About the only information CountFramesConsumer is interested in is the SINGLEFRAME flag to setHints and the SINGLEFRAMEDONE or STATICIMAGEDONE flags to imageComplete. The CountFramesConsumer's constructor is passed an Image object, whose getSource method returns a Producer to pass the Image's pixel data to a consumer. See the API summary of the ImageConsumer interface for an example of an ImageConsumer.
An ImageFilter is a special type of ImageConsumer which passes image data on to another ImageConsumer after suitable processing. Figure 8-3 illustrates ImageFilters as intermediate compartments in the flow of image data from its producer to its ultimate consumer. You can see that multiple filters can be chained together.
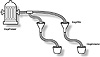
Figure 8-3 ImageFilters are consumers able to pass modified
pixel data on to other consumers (including other ImageFilters)
The default implementation of ImageFilter is a null filter. That is, it actually does nothing to the image data, but simply passes it through to another consumer. The filter keeps track of the ImageConsumer to which it is passing data. All other image filters are derived from the ImageFilter class, and override its default implementations of the ImageConsumer interface to actually perform some action on Image data.
Filtering an image involves creating a FilteredImageSource. The FilteredImageSource requires two parameters to its constructor: an ImageProducer and an ImageFilter. The FilteredImageSource simply makes the ImageFilter a consumer of the ImageProducer's data, and funnels the output of the ImageFilter to a new Image object. This code snippet shows how to use an ImageFilter to create a filtered version of a particular image.
Image img;The simplest image filters to create are ones which modify each pixel's RGBα data independant of the pixel data for other pixels in the Image. An example of this type of filter would be a TintFilter, which modifies the tint of each pixel in an Image uniformly, much the same as the tint dial on a television set. AWT provides an RGBImageFilter class to make the creation of such filters much easier.
To create an RGBImageFilter, you need only implement the RGBImageFilter.filterRGB method in your derived RGBImageFilter class. The filterRGB method is passed the coordinates of a single pixel and the color data for that pixel (before any filtering) as an RGBα integer. This method returns a replacement RGBα integer for that particular pixel. In all RGBImageFilters, each individual pixel in an image is passed through filterRGB. The following listing is the code for a simple Color2BWFilter. Color2BWFilter converts a color image to a black-and-white image by making the red, green, and blue components of each individual pixel equal, essentially converting the image to grayscale.
class Color2BWFilter extends RGBImageFilterNotice that the constructor of the Color2BWFilter sets a canFilterIndexColorModel member to true. That flag tells the RGBImageFilter implementation that if the image being filtered is based on an IndexColorModel, then passed the IndexColorModel's 256 entries through the filter, not the actual pixel data. In the case of the Color2BWFilter, this means the filter will actually change the values associated with each color index to be a grayscale color. The pixel data doesn't change at all. This feature makes RGBImageFilters remarkably efficient at filtering images based on an IndexColorModel, since only 256 values need to be modified no matter how big the input image is (or, at most the number of color entries in the IndexColorModel, which is usually 256).
More complex filtering than RGBImageFiltering, filtering which is not uniform for all pixels in an image, requires an ImageFilter-derived class which overrides the default implementations of ImageFilter's ImageConsumer methods. An example of such a filtering operation is an image convolution, also known as blurring or sharpening an image. In convolution, the resultant color data for a particular pixel is dependent on the color values of the pixels adjacent to it. To perform this type of operation, your ImageFilter would have to remember the pixel data around the border of regions given to setPixels for filtering.
For example, let's say you need the pixel data of nine pixels from the input image (3 x 3 square of pixels) in order to figure out the pixel data of the center pixel in the output image. You would not be able to calculate the output pixel values for pixels within one pixel of the edge of a rectangle sent to setPixels. You would not be able to calculate these pixel values until the adjacent region was sent to setPixels. In this case, you would have to keep track of the pixel values for these border pixels until you get all adjacent regions.
Table 8-1 lists the classes related to AWT Image processing, which are described in this chapter. Table 8-2 lists the methods associated with the AWT Image processing classes and interfaces, including a short description of each method.
|
|||||||||||||||||
|
|||||||||||||||||||||||||||||||||||||||||||||||||||||||||||||||||||||||||||||||||||||||||||||
ColorModel
Purpose
Encapsulate methods for interpreting raw pixel data.
Syntax
public abstract class ColorModel
Description
Encapsulates methods for interpreting raw pixel data. Image data is associated with a particular ColorModel. The ColorModel can then be used to convert the raw pixel data in RGBα data for the pixel. Figure 8-4 shows the hierarchy of the ColorModel class.
Package
java.awt.image
Imports
None.
Constructors
public ColorModel(int pixel_bits);
Since this is an abstract class, this constructor is only called from the
constructors of derived classes. Specify the number of bits used to store a
single pixel's data; this is the same value returned by getPixelSize.
Parameters
int pixel_bits
This member stores the number of bits required to store a single pixel's data. It is protected, so it is available to derived classes.
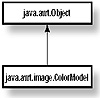
Figure 8-4 The hierarchy of the ColorModel class
getRGBDefault
ClassName
ColorModel
Purpose
Gets a ColorModel object which describes the default RGBα color storage scheme.
Syntax
public static ColorModel getRGBDefault();
Parameters
None.
Imports
None.
Description
Returns a DirectColorModel object that defines the default storage schema for RGBα data in an integer. You can use the default RGB ColorModel to unpack red, green, and blue color components from RGBα data. But since the packing schema of the default RGB ColorModel is so well known, it is easier just to unpack the bits yourself. Default RGB packed color data is packed like this: 0xααrrggbb.
Returns
The default RGB ColorModel object.
Example
The example below actually unpacks default RGB color data using two methods: directly unpacking the data using bitshift operators, and unpacking the data using the default RGB ColorModel:
class MyFilter extends RGBImageFiltergetPixelSize
ClassName
ColorModel
Purpose
Gets the width of pixel data described by this ColorModel.
Syntax
public int getPixelSize();
Parameters
None.
Imports
None.
Description
Gets the number of bits required to store a single pixel's color data. This will be either 8 or 32 bits. IndexColorModels use 8 bits to store the index into a color table. Most other schemas use 32 bits.
Returns
The number of bits required to store the color data for a single pixel encoded using this ColorModel.
Example
You can use the results of the getPixelSize method to allocate storage for pixel data using a particular ColorModel, as in this example:
ColorModel cm;getRed
ClassName
ColorModel
Purpose
Gets value of the red color component for a pixel.
Syntax
public int getRed(int pixel);
Parameters
int pixel
The value of a single pixel's data. If original pixel data is a byte, then it must be cast to an integer.
Imports
None.
Description
Gets the value of the red color component from an integer of pixel data. This is an abstract method which must be implemented by all ColorModel-derived classes.
Returns
The red color component from the pixel data.
Example
See the example under the getAlpha method of the ColorModel class, later is this section.
getGreen
ClassName
ColorModel
Purpose
Gets value of the green color component for a pixel.
Syntax
public int getGreen(int pixel);
Parameters
int pixel
The value of a single pixel's data. If original pixel data is a byte, then it must be cast to an integer.
Imports
None.
Description
Gets the value of the green color component from an integer of pixel data. This is an abstract method which must be implemented by all ColorModel-derived classes.
Returns
The green color component from the pixel data.
Example
See the example under the getAlpha method of the ColorModel class, later in this section.
getBlue
ClassName
ColorModel
Purpose
Gets value of the blue color component for a pixel.
Syntax
public int getBlue(int pixel);
Parameters
int pixel
The value of a single pixel's data. If original pixel data is a byte, then it must be cast to an integer.
Imports
None.
Description
Gets the value of the blue color component from an integer of pixel data. This is an abstract method which must be implemented by all ColorModel-derived classes.
Returns
The blue color component from the pixel data.
Example
See the example under the getAlpha method of the ColorModel class, later is this section.
getAlpha
ClassName
ColorModel
Purpose
Gets the transparency value from a single single's data.
Syntax
public int getAlpha(int pixel);
Parameters
int pixel
The value of a single pixel's data. If original pixel data is a byte, then it must be cast to an integer.
Imports
None.
Description
Gets the value of the alpha transparency value from an integer of pixel data. Transparency is generally measured from 0-255, where 255 is fully opaque, and 0 is fully transparent. Note also that the IndexColorModel allows you to specify a single index as being fully transparent, similar to the GIF format's transparent color indicator. getAlpha is an abstract method which must be implemented by all ColorModel-derived classes.
Returns
The alpha transparency value from the pixel data.
Example
In this example, the ColorModel passed to an ImageFilter's setPixels method is used to get the red, green, and blue color components from individual pixels.
public MyFilter extends ImageFiltergetRGB
ClassName
ColorModel
Purpose
Converts pixel data to RGBα schema.
Syntax
public int getRGB(int pixel);
Parameters
int pixel
Raw pixel data stored in the ColorModel's storage schema.
Description
Converts raw pixel color data to the default RGBα storage schema. The output pixel data is equivalent in color and transparency to the raw color data.
Returns
A packed integer of red, green, blue, and alpha color values packed using the default RGB storage schema.
Example
This example demonstrates the technique used by the RGBImageFilter to pass all pixel data through the filterRGB method. That is, all pixels passed to RGBImageFilters are converted to the default RGBα storage schema using getRGB:
class MyRGBConverter implements ImageConsumerDirectColorModel
Purpose
Encapsulates methods for interpreting image pixel data based on packed bitfields of red, green, blue, and alpha color components.
Syntax
public class DirectColorModel extends ColorModel
Description
The DirectColorModel encapsulates methods for interpreting image pixel data based on packed bitfields of red, green, blue, and alpha color components. The size and presence of the bitfields for each of these components is completely configurable. You could, for example, create a DirectColorModel object which can interpret 5-6-5 16-bit RGB pixel data (16 bits of each pixel's data are used, top 5 bits are red, next 6 are green, and bottom 5 are blue). The example below demonstrates how to create such a DirectColorModel. Figure 8-5 shows the hierarchy of the DirectColorModel class.
Package
java.awt.image
Imports
java.awt.AWTException
Constructors
public DirectColorModel(int pixel_bits,
int redmask, int greenmask, int bluemask);
public DirectColorModel(int pixel_bits, int redmask, int greenmask,
int bluemask, int alphamask);
The pixel_bits parameter can be 8 or 32 bit, and it specifies how many
bits of pixel data are used per pixel. Specify bitmasks for each of the color
components in the mask parameters. If it is left out, the alphamask is
assumed to be 0x00000000.
Parameters
None.
Example
This example builds a DirectColorModel that interprets color data using the default RGBα storage schema: 0xααrrggbb.
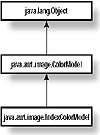
Figure 8-5 The hierarchy of the DirectColorModel class
This example creates a DirectColorModel that interprets color data using a 5-6-5 16-bit RGB shema:
DirectColorModel dcm =getRedMask
ClassName
DirectColorModel
Purpose
Gets bitmask of packed red component values.
Syntax
public int getRedMask();
Parameters
None.
Imports
None.
Description
Gets the bitmask defining the bitfield in which red color data is stored in packed integers using this DirectColorModel.
Returns
The red bitmask passed to the DirectColorModel's constructor.
Example
See the example under the getAlphaMask method of the DirectColorModel, later in this section.
getGreenMask
ClassName
DirectColorModel
Purpose
Gets bitmask of packed green component values.
Syntax
public int getGreenMask();
Parameters
None.
Imports
None.
Description
Gets the bitmask defining the bitfield in which green color data is stored in packed integers using this DirectColorModel.
Returns
The green bitmask passed to the DirectColorModel's constructor.
Example
See the example under the getAlphaMask method of the DirectColorModel, later in this section.
getBlueMask
ClassName
DirectColorModel
Purpose
Gets bitmask of packed blue component values.
Syntax
public int getBlueMask();
Parameters
None.
Imports
None.
Description
Gets the bitmask defining the bitfield in which blue color data is stored in packed integers using this DirectColorModel.
Returns
The blue bitmask passed to the DirectColorModel's constructor.
Example
See the example under the getAlphaMask method of the DirectColorModel, later in this section.
getAlphaMask
ClassName
DirectColorModel
Purpose
Gets bitmask of packed alpha or transparency component values.
Syntax
public int getAlphaMask();
Parameters
None.
Imports
None.
Description
Gets the bitmask defining the bitfield in which alpha color data is stored in packed integers using this DirectColorModel.
Returns
The alpha bitmask passed to the DirectColorModel's constructor.
Example
Given an Image which uses a DirectColorModel, this example method displays how many bits are used to store each color component in the packed raw image data.
public void displayBitSizes(Image img)IndexColorModel
Purpose
Encapsulates methods for interpreting image pixel data based on an indexed color palette. Most IndexColorModels describe a 256-color palette, although the IndexColorModel class constructor allows you to specify any number up to 4 billion.
Syntax
public class IndexColorModel extends ColorModel
Description
For some images, the image pixel data is really an index into a color table. The IndexColorModel represents the color table. The class provides methods for converting pixel data into actual red, green, blue, and alpha color component values. Figure 8-6 shows the hierarchy of the IndexColorModel class.
Package
java.awt.image
Imports
None.
Constructors
public IndexColorModel(int bits,
int size, byte[] r, byte[] g, byte[] b);
public IndexColorModel(int bits, int size, byte[] r,
byte[] g, byte[] b, int trans);
public IndexColorModel(int bits, int size, byte[] r,
byte[] g, byte[] b, byte[] a);
public IndexColorModel(int bits, int size, byte[] cmap,
int offset, boolean hasalpha);
public IndexColorModel(int bits, int size, byte[] cmap,
int offset, boolean hasalpha, int trans);
The bits parameter specifies the number of bits of pixel data associated
with each pixel. The size parameter indicates the size of the color map,
and the color map is described by the r, g, b, and a arrays, or
by the cmap array.
The cmap array is assumed to have the pattern [r|g|b|a|r|g|b|a|.] or
[r|g|b|r|g|b|.]. That is, every third or fourth byte specifies the red color
component value for index entry (byte number/4). Every third or fourth starting
at index 1 encodes the green color component value for successive index
entries. Every third or fourth starting at index 2 encodes the blue component
value for successive entries, and so on.
If the hasalpha parameter is true, then every fourth cmap byte,
starting at index 3, encodes the alpha values for successive index entries.
The trans parameter indicates the index which is to be interpreted as
"transparent." For example, GIF images allow you to specify a "transparent color."
All pixels of that color are rendered as transparent when the image is drawn.
Parameters
None.
Example
This example builds a 256-entry IndexColorModel with colors distributed evenly around the color wheel. A black color is defined, a white color and a transparent color, which leaves room for 253 more colors. Even distribution using 6 increments of red, 6 increments or blue, and 7 increments of green creates 252 more color entries. That leaves a single entry which will be defined as gray:

Figure 8-6 The hierarchy of the IndexColorModel class
getMapSize
ClassName
IndexColorModel
Purpose
Gets the number of color entries in the IndexColorModel.
Syntax
public int getMapSize();
Parameters
None.
Imports
None.
Description
Gets the number of color entries in the IndexColorModel. This is the same value as the size parameter to the IndexColorModel's constructor. The arrays you pass to the getReds, getGreens, getBlues, or getAlphas methods must be at least this long.
Returns
Returns the number of color entries in the IndexColorModel.
Example
This code creates a two-dimensional array to hold the indexed color entries.
public byte[][] getRGBAs(IndexColorModel icm)getTransparentPixel
Class
IndexColorModel
Purpose
Gets the index of the "transparent color" of the IndexColorModel.
Syntax
public int getTransparentPixel();
Parameters
None.
Imports
None.
Description
Gets the index of the "transparent color" of the IndexColorModel. This is the same as the trans parameter to the IndexColorModel constructor.
Returns
The value of the "transparent index" is returned. If there is no transparent color, then -1 is returned.
Example
In this example ImageFilter, that assumes the ColorModel is an IndexColorModel, all pixels of a particular color are converted to the transparent color.
public class TransColorFilter extends ImageFiltergetReds
ClassName
IndexColorModel
Purpose
Gets index of red color component values.
Syntax
public void getReds(byte[] r);
Parameters
byte[] r
Array of bytes. This array must have as many elements as indicated by the getMapSize method.
Imports
None.
Description
Gets an array of red color components. The values of the internal array of red color values is copied to the passed byte array.
Returns
None.
Example
See the example for the getAlphas method.
getGreens
ClassName
IndexColorModel
Purpose
Gets index of green color component values.
Syntax
public void getGreens(byte[] g);
Parameters
byte[] g
Array of bytes. This array must have as many elements as indicated by the getMapSize method.
Imports
None.
Description
Gets an array of green color components. The values of the internal array of green color values is copied to the passed byte array.
Returns
None.
Example
See the example for the getAlphas method.
getBlues
ClassName
IndexColorModel
Purpose
Gets index of blue color component values.
Syntax
public void getBlues(byte[] b);
Parameters
byte[] b
Array of bytes. This array must have as many elements as indicated by the getMapSize method.
Imports
None.
Description
Gets an array of blue color components. The values of the internal array of blue color values is copied to the passed byte array.
Returns
None.
Example
See the example for the getAlphas method.
getAlphas
ClassName
IndexColorModel
Purpose
Gets index of alpha transparency component values.
Syntax
public void getAlphas(byte[] a);
Parameters
byte[] a
Array of bytes. This array must have as many elements as indicated by the getMapSize method.
Imports
None.
Description
Gets an array of transparency components. The values of the internal array of transparency values is copied to the passed byte array.
Returns
None.
Example
This example writes any IndexColorModel's full palette of colors to System.out.
public void displayPalette(IndexColorModel icm)ImageConsumer
Purpose
Implement the ImageConsumer interface in your object to receive image pixel data from an ImageProducer.
Syntax
interface ImageConsumer
Description
The ImageConsumer interface is implemented by objects wishing to process image data. The ImageConsumer is associated with an ImageProducer, and the producer sends image pixel data to the consumer through the setPixels method. Figure 8-7 shows the hierarchy of the ImageConsumer interface.
Package
java.awt.image
Imports
None.
Example
This ImageConsumer counts the number of frames in an image.

Figure 8-7 The hierarchy of the ImageConsumer interface
setDimensions
Interface
ImageConsumer
Purpose
Called to indicate the dimensions of the image being processed by the ImageConsumer.
Syntax
public void setDimensions(int width, int height);
Parameters
int width
The width of the Image being presented to the consumer.
int height
The height of the Image being presented to the consumer.
Imports
None.
Description
The consumer is passed the dimensions of the Image that is being passed to it by the consumer through this method. The setDimensions method is called by the producer exactly once. This call is guaranteed to occur before any call to setPixels.
Example
This example allocates storage for processing an Image based on the size of the Image. The setColorModel method is also implemented so that the ImageConsumer knows the size of each pixel's data.
class MyConsumer implements ImageConsumersetProperties
Interface
ImageConsumer
Purpose
Called to give the ImageConsumer a list of the image's properties.
Syntax
public void setProperties(Hashtable props);
Parameters
Hashtable props
Image properties are stored under String keys in the props Hashtable. Properties may include the filters used to create the Image data, the source of the Image data, etc.
Returns
None.
Description
An extensible list of Image properties is passed to the consumer by the producer. The properties are stored in a Hashtable object. Currently, there are only two documented image properties: comments and filter. The comments property has a textual description of the image. The filter property describes which filters were applied to the original Image to get the pixel data being received by this ImageConsumer. setProperties is guaranteed to be called before any calls to setPixels.
Example
This example displays all the Image properties on System.out.
class MyConsumer extends ImageConsumersetColorModel
Interface
ImageConsumer
Purpose
Sets the ColorModel for the majority of the image pixel data.
Syntax
public void setColorModel(ColorModel model);
Parameters
ColorModel model
The ColorModel, which will be used in the majority of calls to setPixels().
Imports
None.
Description
The producer passes to the consumer a ColorModel that will be used in the majority of calls to setPixels. No assumption should be made by the ImageConsumer that model will be the only ColorModel passed to the consumer's setPixels method, since each set of pixels can be sent with a unique ColorModel object. For example, an ImageFilter may pass a majority of pixels on to the consumer without modification. For a minority of those pixels, the filter may use a ColorModel conducive to the ImageFilter's filtering process. In that case, the original producer's ColorModel will be passed to the consumer through the filter in the majority of calls to setPixels, and it will be passed to setColorModel. Note also that setColorModel will be called before the first call to setPixels.
Returns
None.
Example
See the example under the setDimensions method of the ImageConsumer interface.
setHints
Interface
ImageConsumer
Purpose
Provides the consumer with some practical information about how pixel data will be sent to it.
Syntax
public void setHints(int flags);
Parameters
int flags
A set of ImageConsumer flags OR together bitwise. The valid flags, and a description of each, is presented in the following table:
|
Flag |
Meaning |
|
|
|
|
RANDOMPIXELORDER |
No assumption can be made about the order in which pixels will be delivered to the consumer. |
|
TOPDOWNLEFTRIGHT |
Pixels will be delivered to the consumer in top-down, left-right order. |
|
COMPLETESCANLINES |
Pixels will be delivered to the consumer in multiples of complete scanlines. That is, all calls to setPixels() will have a width parameter equal to the width of the Image. |
|
SINGLEPASS |
Each pixel's data will appear in exactly one call to setPixels(). |
|
SINGLEFRAME |
The Image includes only a single frame. A JPEG image, for example, includes only a single frame. An MPG Image, on the other hand, includes multiple frames of an animation sequence. |
|
|
|
Imports
None.
Description
The producer can pass to the
consumer some hints about the order that pixels will be passed to the consumer
through setPixels. Those hints are flags passed to the setHints method.
The hints passed to the consumer in setHints can be used by the consumer to
optimize its processing of image data. For example, a Fourier Transform
consumer could realize significant optimizations in its storage and processing
using the so-called "fast-Fourier transform" algorithm if the Image data is
passed as complete scanlines, indicated by the COMPLETESCANLINES flag being
passed to this method.
Returns
None.
Example
This ImageConsumer calculates the average red, green, and blue color component values for all the pixels it is passed. The consumer is pretty simple, however, and requires that each pixel's value be sent to it only once. This consumer waits for the SINGLEPASS flag to be passed to its setHints method. If this flag is not passed, then the consumer doesn't even try to accomplish its task, since it would be too hard to keep track of the number of times each pixel was re-sent to the consumer.
public class MyConsumer implements ImageConsumersetPixels
Interface
ImageConsumer
Purpose
All pixel data sent to a consumer is sent through one or both of the overloaded setPixels methods.
Syntax
public void setPixels(int x, int y, int width, int height, ColorModel model, byte[] pixels, int offset, int scansize);public void setPixels(int x, int y, int width, int height, ColorModel model, int[] pixels, int offset, int scansize);
Parameters
int x, int y
The origin or upper-left corner of the rectangle of pixels being passed to the consumer.
int width, int height
The dimensions of the rectangle of pixels being passed to the consumer.
ColorModel model
The ColorModel defining the storage schema of color and transparency data for the pixels[] array.
byte pixels[]
An array of 8-bit pixel data. The x, y, width, height, offset and scansize parameters must be used to determine which elements of this array contain valid pixel data for the Image.
int pixels[]
An array of 32-bit pixel data. The x, y, width, height, offset and scansize parameters must be used to determine which elements of this array contain valid pixel data for the Image.
int offset
Used along with scansize to determine the valid elements of the pixels[] array.
int scansize
Used along with offset to determine the valid elements of the pixels[] array.
Imports
java.awt.image.ColorModel
Description
Image pixels are passed from the producer
to the consumer in multiple calls to setPixels. Each call defines the pixel
data for a rectangle of the image. Two overloaded versions of this method
exist, one to accept 8-bit pixel data, and the other to accept 32-bit pixel
data.
Use this formula to find the pixels array element for pixel (M, N):
Returns
None.
Example
The following example, which assumes the SINGLEPASS flag has been passed to setHints, calculates the average pixel values of red, green, and blue for all pixel data passed to MyConsumer:
class MyConsumer implements ImageConsumerimageComplete
Interface
ImageConsumer
Purpose
Called to notify the consumer that all image pixel data has been sent.
Syntax
public void imageComplete(int flags);
Parameters
int flags
A bitwise ORing of ImageConsumer flags indicating the state of the production sequence upon termination. The following table lists the ImageConsumer flags which can be passed to imageComplete.
|
Flag |
Meaning |
|
|
|
|
IMAGEERROR |
The producer encountered an error while processing the Image data. No more image data will be passed to the consumer for this Image. |
|
SINGLEFRAMEDONE |
A single frame in a multiframe Image has been completed. |
|
STATICIMAGEDONE |
The entire image, whether a single-frame or a multiframe Image, has been completely sent to the consumer. |
|
IMAGEABORTED |
The Image creation process was deliberately aborted. |
|
|
|
Imports
None.
Description
This method is called by the
producer to notify the consumer that all image pixel data has been sent to the
consumer. The reason for the completion can be an error, a single-frame of a
multiframe Image has been completed, or the entire Image has been completed.
The flags passed to this method indicate the nature of the completion.
Unfortunately, more specific information about the interpretation of IMAGEERROR
or IMAGEABORTED flags is not available to the consumer, unless you implement
custom methods in your consumers and producers to provide this information.
Example
See the Example for the setPixels method.
ImageProducer
Purpose
An ImageProducer generates image pixel data and sends it to one or more ImageConsumers.
Syntax
interface ImageProducer
Description
To have your object generate images for display, have it implement the ImageProducer interface. The interface sends image pixel data based on a ColorModel. The image pixel data is sent in potentially overlapping rectangles of image data. Figure 8-8 shows the hierarchy of the ImageProducer interface.
Package
java.awt.image
Imports
None.
Example
This example ImageProducer generates a color gradient. Specify to the constructor the size of the image you want produced and the colors at the top and bottom of the image.

Figure 8-8 The hierarchy of the ImageProducer interface
addConsumer
Interface
ImageProducer
Purpose
Registers an ImageConsumer with the ImageProducer. Only registered consumers can receive pixel data.
Syntax
public void addConsumer(ImageConsumer ic)
Parameters
ImageConsumer ic
A new ImageConsumer that the producer is to send pixel data to. Note that the producer should take care not to allow the same consumer to be added multiple times.
Imports
None.
Description
The producer is asked to send pixel
data to a new ImageConsumer. The producer must keep track of more than one
consumer, making sure to send each of its consumers all pixel data for an
Image.
The producer may wait for an explicit call to startProduction, or it may begin
sending pixel data to the consumer as soon as it is ready.
Returns
None.
Example
This code stores the list of currently active consumers in a Vector. This code is suitable for use in your own ImageProducers to keep track of ImageConsumer objects.
class MyProducer implements ImageProducerisConsumer
Interface
ImageProducer
Purpose
Checks to see if an ImageConsumer is registered with this ImageProducer.
Syntax
public boolean isConsumer(ImageConsumer ic)
Parameters
ImageConsumer ic
The ImageConsumer to check.
Imports
None.
Description
Tells whether or not an ImageConsumer is currently registered with this producer.
Returns
True if the ImageConsumer is currently registered with the ImageProducer. Otherwise, false.
Example
See the example listed for addConsumer.
removeConsumer
Interface
ImageProducer
Syntax
public void removeConsumer(ImageConsumer ic)
Parameters
ImageConsumer ic
The ImageConsumer to remove as a consumer of this producer's pixel data.
Imports
None.
Description
Removes the ImageConsumer as a consumer of pixel data from this producer. If the consumer is not currently registered with this producer, this method should return benignly.
Example
See the example listed for addConsumer.
startProduction
Interface
ImageProducer
Purpose
Tells the ImageProducer to start sending pixel data to a specific registered ImageConsumer.
Syntax
public void startProduction(ImageConsumer ic)
Parameters
ImageConsumer ic
The consumer to begin sending pixel data to.
Imports
None.
Description
This method can be called by any
external object to kick-start an image production process. An ImageProducer may
start sending image pixel data to an ImageConsumer as soon as the consumer gets
registered with the producer using addConsumer. The ImageProducer is not
required to send any pixel data to a consumer until startProduction is called.
If the consumer has not been added to this producer yet, then this method
should return benignly. The minimum implementation of startProduction should
call these ImageConsumer methods:
Returns
None.
Example
See the example under the description of the ImageProducer interface.
requestTopDownLeftRightResend
Interface
ImageProducer
Purpose
To force the producer to re-send all image data in a single pass, in top-down-left-right order.
Syntax
public void requestTopDownLeftRightResend(ImageConsumer ic)
Parameters
ImageConsumer ic
The consumer to re-send the Image data to. If the consumer has not been added to this producer yet, then this method should return benignly.
Imports
None.
Description
A request to re-send Image pixel
data in TOPDOWNLEFTRIGHT order. The producer can choose whether or not to grant
or ignore this request.
Producers, which present Image data from sources which are too diffucult to
deliver in TOPDOWNLEFTRIGHT order, need not grant this re-send request.
Returns
None.
The MultiFilter application is a generic application for testing ImageFilters. It is able to load and display Images from the Internet, or the local file system. MultiFilter's user-interaction involves selecting filters to apply to an image as a whole, or to a selected rectangle of the image. MultiFilter is extensible, so you can add your own ImageFilters to it easily. Once you understand the workings of MultiFilter, you are encouraged to try adding some of the sample filters presented earlier in this chapter, or filters of your own.
Two new ImageFilters are included in the MultiFilter application: The ContrastFilter demonstrates how to build RGBImageFilters. The InvertFilter is a more complex image filter, capable of flipping an Image horizontally or vertically, and is thus directly derived from ImageFilter.
In addition to the AWT Image Processing techniques demonstrated by MultiFilter, this project also demonstrates a user-interface model using modeless dialogs to configure the individual ImageFilters. In this model, user interactions with floating modeless dialogs are reported to the application's main Frame window using the Event delivery pipeline inherited by all Component objects.
Figure 8-9 is a screenshot of the MultiFilter application running. You can see the image that is loaded has had both the contrast and invert filters applied to it. Figures 8-10 and 8-11 are before and after pictures of this image, illustrating how image filtering can be applied to an image.
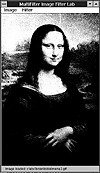
Figure 8-9 Screenshot of the MultiFilter application running
in Windows
![]()
Figure 8-10 Before an image is processed by MultiFilter
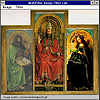
Figure 8-11 After an image is processed by MultiFilter
Note that all the files listed here are also available on the CD packaged with this book in the directory "PROJECTSGOHEREMultiFilter". Please feel free to copy those files directly.
1. Create a new directory called MultiFilter.
2. Create a new file in the MultiFilter directory called "MultiFilter.java". Start by importing the necessary packages, declaring our application object, and implementing the static main() method.
import java.awt.*;3. The application's main window is a MultiFilterFrame object. Its job is to display a filtered image (if one has been loaded), and to react to user menu selections. Here we declare the MultiFilterFrame class, its internal member variables, and its constructor:
class MultiFilterFrame extends Frame4. The ImageLoaderThread class is responsible for loading images from the local file system or from the Internet. The Thread keeps a reference to the MultiFilter application's main window and posts custom Events to that window to indicate the progress of image loading. Here is the code for the ImageLoaderThread class:
public class ImageLoaderThread extends Thread5. The application's main window will receive the custom Event notifications from ImageLoaderThreads. In its handleEvent implementation, the MultiFilterFrame must process these messages, as well as any WINDOW_DESTROY messages. Here is the code for the Event handling (i.e., MultiFilterFrame.handleEvent):
public boolean handleEvent(Event evt)6. The MultiFilterFrame's action method is where menu click Events are handled. Here is the code:
7. The main frame must insure that only appropriate menu items are enabled. For example, the "Applet to Image" menu item would be inappropriate if no images were loaded into the application. Whenever a user action is detected which may affect the state of one or more menu items, MultiFilterFrame.updateMenu is called to update the state of the various menu items. Here is the code for that method:
// updateMenu() is called whenever the program state8. The Workspace image, which is the filtered copy of the loaded image, is displayed by a WorkspaceCanvas class object. This Canvas is responsible for displaying the image, and for tracking user mouse actions so that the user can select a rectangle of the image for filtering. Here is the declaration of the WorkspaceCanvas class, its member variables, and its constructor:
class WorkspaceCanvas extends Canvas9. The WorkspaceCanvas class implements methods to get, set, and delete the Image object it is supposed to display:
private synchronized Image getDisplayImage()10. The WorkspaceCanvas' update and paint methods are implemented to avoid flicker and to draw the image to display:
// Avoid flicker in paint() by overriding update11. The WorkspaceCanvas uses XOR mode to draw the selection rectangle. This ensures that no matter what color the display image is, the boundaries of the selection rectangle are always visible to the user. Here's the code for the drawSelRect method:
// Draw the selection rectangle. Use XOR mode so the selection12. The user defines the selection rectangle using mouse clicks and drags. The WorkspaceCanvas keeps track of these mouse Events through mouseDown and mouseDrag. Here's the code for those methods:
// mouseDown() and mouseDrag() notification methods13. The WorkspaceCanvas also defines helper methods to get, set, and clear the boundaries of the selection rectangle. Here is the code:
public synchronized Rectangle getSelRect()14. The OpenObjectDialog simply gathers a string from the user. This string can be either a filename on the local file system or a URL pointing to a file somewhere on the Internet. An OK and a Cancel Button are also provided. The MultiFilterFrame uses an OpenObjectDialog whenever the user clicks on the "Open." menu item. Here is the code for that class:
class OpenObjectDialog extends Dialog15. Create a new file named "ConfiguredFilterFactory.java". This file holds the declaration of the ConfiguredFilterFactory class. The ConfiguredFilterFactory class is a base class. In the MultiFilter application, both the ContrastFilterFactory and the InvertFilterFactory are based on this class. In general, a ConfiguredFilterFactory should be able to create a new ImageFilter that should be configured according to the value of an Object. Here is the declaration:
import java.awt.image.ImageFilter;16. Create a new file called "ContrastFilterFactory.java". Start off by declaring the ContrastFilterFactory class, and importing the necessary packages into this file:
import java.awt.image.ImageFilter;17. A ContrastFilter is a type of RGBImageFilter. In its filterRGB implementation, it increases or decreases the contrast of a particular pixel, based on its constructor parameters. Here is the code:
class ContrastFilter extends RGBImageFilter18. The ContrastFilterConfigurationDialog is used to make the user select a contrast parameter for a new ContrastImageFilter. It uses a Scrollbar as its principal input device. A ContrastDisplayCanvas is used in the dialog to display the contrast function as indicated by the state of the Scrollbar. Here is the code for those two classes:
class ContrastFilterConfigurationDialog extends Dialog19. Create a new file named "InvertFilterFactory.java". Start off by declaring the InvertFilterFactory. This is very similar to the ContrastFilterFactory, except that it creates InvertFilters, and gets its configuration from InvertFilterConfigurationDialogs. Here is the code for the InvertFilterFactory:
import java.awt.image.ImageFilter;20. The InvertFilter can be configured to invert an input image along either the X or Y axis, or both. Its setPixels implementation works by swapping individual pixel values to invert the image. Here is the code for that class:
class InvertFilter extends ImageFilter21. The InvertFilterConfigurationDialog is a simple dialog with two checkboxes, one each of horizontal and vertical invert. Here is the code:
class InvertFilterConfigurationDialog extends Dialog22. Compile the project. In the MultiFilter directory, execute this command to compile the MultiFilter project using the JDK's javac compiler:
> javac MultiFilter.java
Correct any errors in typing, which will be reported as errors on the command
line.
23. Run the MultiFilter application. Provide an image's full pathname on your local system, or an image URL as the first and only argument to this program. Use this command line:
> java MultiFilter <your-image-file-or-URL>A lot of MultiFilter's code implements the user-interface of the application. You are encouraged to study the MultiFilter application's user-interface model and techniques, but this discussion will be restricted to the AWT Image Processing functionalities demonstrated by MultiFilter and how you can extend MultiFilter by adding your own ImageFilter objects its interface.
At the heart of MultiFilter are two Image objects: MultiFilterFrame._imgBase is a pristine copy of an Image as it was loaded from a local file system file, or from a network URL. MultiFilterFrame._imgWorkspace is a modified version of the base image. Whenever a filter is applied to either the entire displayed image, or to a region of it, it is _imgWorkspace which is modified.
The base image is loaded and prepared for use by the ImageLoaderThread object. The ImageLoaderThread is designed to load Image objects from a local file system file, or from a network URL, on behalf of a Component. All downloading and preparing of the Image are done by a background Thread. When the Image has been fully downloaded, the ImageLoaderThread delivers the Image, as the arg member of a custom Event, to the Component. The Event ID is ImageLoaderThread.IMAGE_COMPLETE.
To make MultiFilter as extensible as possible, the ConfiguredFilterFactory was developed to make creating and configuring generic ImageFilter objects a simple operation for the MultiFilter application. The jobs of a ConfiguredFilterFactory are
. To perform user-interaction in a modeless dialog, allowing the user to dynamically modify the configuration of an ImageFilter. createConfiguration is overridden by classes derived from ConfiguredFilterFactory to create such a modeless dialog. Enough information to describe a filter configuration must be able to be stored in a single Object instance, though since all objects in Java ultimately derive from Object, this is not a constraint on the amount of information you can cull from the user to configure a filter.
. To create configured ImageFilter objects, the configuration reflecting the user-input to the modeless dialog is passed to createFilter. This method should return an ImageFilter object initialized using the configuration information the user input into the modeless dialog.
The default implementation of ConfiguredFilterFactory creates objects of class ImageFilter. These objects are null-filters. That is, when applied to an Image, the filtered output looks exactly the same as the unfiltered input. Furthermore, no user-interaction is necessary for such an object, since the ImageFilter class takes no parameters. Thus the default implementations of createConfiguration and createFilter are pretty simple.
The ContrastFilter is an RGBImageFilter. The filter is created with a "contrast" parameter, which defines how much contrast the output Image should have in it. This contrast parameter is interpreted as a degree which defines the slope of the linear relationship between input and output RGB color. If the angle is low, then the slope is near-horizontal, and the output RGB color components are right around 128. If, on the other hand, the angle is high then the slope of the linear relationship is high, and slight differences in the brightness between pixels is magnified in the output image. Figure 8-12 shows the ContrastFilterConfigurationDialog, which is the modeless dialog the user uses to modify the contrast settings.
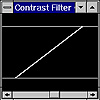
Figure 8-12 The ContrastFilterConfigurationDialog
The InvertFilter is an ImageFilter-derived class. Because the filtered output of each pixel of this filter is dependent on other pixels in the image, the InvertFilter could not be derived from RGBImageFilter.
The internal state of an InvertFilter object is stored as two flags: HORIZONTAL and VERTICAL, which are both set when the filter is created by parameters to the InvertFilter constructor. The InvertFilter.setPixels() method flips each individual rectangle of the input image in the filtered version of the image. Two separate flipping operations may be necessary: HORIZONTAL flipping, and VERTICAL flipping, according to the internal state of the InvertFilter.
"Flipping" of a rectangle involves tranforming the coordinates of the rectangle to the output Image. This transformation ensures the width and height of the rectangle are preserved in the output image, but the origin of the rectangle in the Image is moved. The individual pixel values of the rectangle are flipped symmetrically about either the X or Y axis, according to the internal state of the InvertFilter object. Figure 8-13 illustrates how a rectangle of pixel data is transformed for the filtered output.
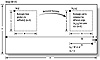
Figure 8-13 InvertFilter translates rectangles so the
rectangle covers a symmetrical area with respect to the horizontal or vertical
axis
Once the pixel data has been flipped in the pixels[] array, and the origin of the rectangle has been transformed for the output Image, the pixel data is passed through to the filter's consumer.
A FilteredImageSource object is used to apply the currently selected filter to the whole Workspace image, or to a selected region of it. This is handled in the MultiFilterFrame.action() method, where the MenuItem selection action is detected by the MultiFilterFrame.
In response to the "Apply to Image" menu item being selected, MultiFilter creates a new Image object which is the output of applying the currently selected filter to the entire Workspace image. This new Image object then paints over the contents of the Workspace image, thus essentially replacing the Workspace image with itself.
The WorkspaceCanvas displays the current contents of the Workspace image, so that as soon as the filter is applied and the Workspace is filled with a copy of the filtered image, the Workspace is displayed on the screen.
In response to the "Apply to Region" menu item being selected, MultiFilter first creates a copy of just the selected region using a CropImageFilter and a FilteredImageSource. A new image is created which is the result of sending the cropped image selection through the currently selected filter. This filtered version of the selected region is then painted onto the Workspace image at precisely the same location as the selected region. When the Workspace is redisplayed, the filtered version of the selected region replaces the original pixel data there.
MultiFilter was designed to make adding new filters as easy as possible. Follow these steps to add a new filter to MultiFilter:
1. Create your ImageFilter.
2. Create a modeless Dialog so that the user of MultiFilter can configure your ImageFilter. For example, if your filter requires, say, a "zoom factor" in its constructor, then create a Dialog that allows the user to pick a "zoom factor". This Dialog object should deliver a ConfiguredFilterFactory.CONFIGURATION_UPDATE Event to its parent (result of getParent()) frame whenever the user modifies the values in the Dialog. See ContrastFilterConfigurationDialog in the MultiFilter application (Step 18) for an example.
3. Create a ConfiguredFilterFactory for your ImageFilter class. The overridden version of createConfiguration should create and show a new instance of the Dialog you defined in Step 2. The overridden version of createFilter should create and return a new instance of the ImageFilter you defined in Step 1, configured using the configuration Object passed as a parameter. See ContrastFilterFactory of the MultiFilter application (Step 16) for an example.
4. Add code to MultiFilterFrame constructor to add a menu item for your new filter. In the same constructor method, you should also add an entry to Hashtable _hashMonikerToFactory. For example, if I created a filter class called MakeImagePretty and corresponding factory and configuration objects called MakeImagePrettyFactory and MakeImagePrettyConfigurationDialog, then I would change MultiFilterFrame's constructor like so:
public MultiFilterFrame(String strTitle)That's it! Recompile MultiFilter and try out your filter on a test image.
|
Politica de confidentialitate | Termeni si conditii de utilizare |

Vizualizari: 1183
Importanta: ![]()
Termeni si conditii de utilizare | Contact
© SCRIGROUP 2026 . All rights reserved