| CATEGORII DOCUMENTE |
| Asp | Autocad | C | Dot net | Excel | Fox pro | Html | Java |
| Linux | Mathcad | Photoshop | Php | Sql | Visual studio | Windows | Xml |
Creating Rollovers and
Animations (ImageReady)
About working with layers in rollovers and animations Working with layers is an essential part of creating
rollovers
and animations in ImageReady. Placing the image content
for a rollover on its own layer
allows you to use Layers palette commands and options
to create rollover effects.
Likewise, placing each element of an animation on its own layer
enables you to change the position and appearance of the element across a series of frames.

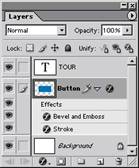
Illustration of a rollover. The button is on its own layer; effects are added to the layer to create a new appearance of the button for the over state.
![]()
![]()
![]()
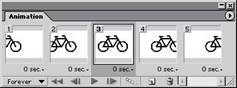
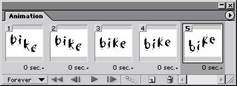
Illustration of an animation. The bicycle image is on its own layer; the position of the layer changes in each frame of the animation.
Editing layers in rollover states and animation frames
Some changes you make to layers affect only the active rollover state or animation frame, while others affect every state and frame in which the layers are included:
State and frame-specific changes Affect only the active animation frame or rollover state. By default, changes you make to layers using Layers palette commands and options-including layer opacity, blending mode, visibility, position, and style-are state and frame-specific. However, you can apply layer changes to all states in a rollover and all frames in an animation using the unify buttons in the Layers palette. (See "Unifying and matching layers rollovers and animations" on section 397.)
Important: Changes you make to layers in the Normal state or Frame 1-including layer opacity, blending mode, visibility, position, and style-affect all states or frames in which the layers are identical. For example, take a slice that has a Normal state, an Over state, and a Down state. If the layers in the Normal and Over states are identical, and you apply a layer style in the Normal state, the layer style will also be applied in the Over state. However, the Down state will not be affected.
Inclusive changes Affect every state and frame in which the layers are included. Changes you make to layer pixel values, using painting and editing tools, color and tone adjustment commands, filters, type, and other image-editing commands, are inclusive. Unifying and matching layers rollovers and animations
By default, changes you make to layers using Layers palette commands and options- including layer visibility, position, and style-apply only to the frame or state (unless you are working with the Normal state or Frame 1). However, you can use the unify buttons in the Layers palette and the Match command to apply changes to all states in a rollover and all frames in an animation:
. The unify buttons determine how the changes you make to a layer in the active state or frame apply to the other states in a rollover or frames in an animation. When a unify button is selected, changes apply to all states and frames; when a button is deselected, changes apply to only the active state or frame.
. The Layer > Match command lets you apply the layer attributes for an existing state or frame to other states in a rollover and frames in an animation.
To unify layers in rollover states and animation frames:
Select one or more unify buttons in the Layers palette:
. Unify Layer Position button ![]() to
apply changes you make to a layer's position to all states in a rollover
and all frames in an animation.
to
apply changes you make to a layer's position to all states in a rollover
and all frames in an animation.
. Unify Layer Visibility button ![]() to
apply changes you make to a layer's visibility to all states in a rollover
and all frames in an animation.
to
apply changes you make to a layer's visibility to all states in a rollover
and all frames in an animation.
. Unify Layer Style
button ![]() to apply
changes you make to a layer's style to all states in a rollover and all frames in an animation.
to apply
changes you make to a layer's style to all states in a rollover and all frames in an animation.
To match an existing layer across rollover states and animation frames:
1 In the Rollovers palette, select the state or frame with the layer attributes you want to use.
2 Select the layer you want to match in the Layers palette.
3 Choose Layer > Match, or choose Match from the Layers palette menu.
4 Select one of the following:
. Current Animation to apply layer attributes for the selected frame to all frames in the animation.
. Current Slice/Image Map's States to apply layer attributes for the selected state to all states in the rollover.
. All Rollovers to apply layer attributes for the selected state to all states in all rollovers in the image that include the layer.
5 Select the layer attributes you want to match, and click OK.
Note: Choose Propogate Frame 1 Changes from the Layers palette pop-up menu to dynamically update all rollover states and animation frames, based on a change in the first frame's position, visibility, or layer style.
Using the Rollovers palette
The Rollovers palette lets you create, view, and set options for the rollover states in an image. By default, every image has one state-the Normal state. The Normal state corre- sponds to the appearance of an image when it is first loaded into a Web browser and no rollover effects have occurred. You can add states to an image that will occur when a viewer performs a mouse action-such as rolling or clicking-over an area of the
Web page.
In addition to rollover states, the Rollovers palette can display slices, image maps, and animations frames. Displaying slices and image maps helps you keep track of the elements in an image that contain rollover effects. Displaying animation frames makes it easy to see which states of an image contain animations.
A
B
C
D
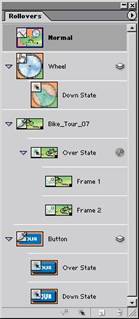
The Rollovers palette with slices, image maps, and animation frames showing:
A. Normal state B. Image map with Down state C. Slice with animation frames in Over state
D. Layer-based slice with Over state and Down state
Displaying the Rollovers palette Choose Window > Rollovers. A check mark indicates that the palette is showing.
Using the Rollovers palette
menu Click the
triangle ![]() in the upper right corner of the palette to access commands
for working
with rollovers.
in the upper right corner of the palette to access commands
for working
with rollovers.
Displaying slices and image maps in the Rollovers palette Choose Palette Options from the Rollovers palette menu. Select or deselect Include Slices and Image Maps, and click OK.
Displaying animation frames in the Rollovers palette Choose Palette Options from the Rollovers palette menu. Select or deselect Include Animation Frames, and click OK. Changing the size of rollover thumbnails Choose Palette Options from the Rollovers palette menu, and select a thumbnail size. For sizes other than None, select Object Bounds or Entire Document to determine the contents of thumbnails.
Expanding and collapsing states, slices, and image maps Click the triangle to the left of an item in the Rollovers palette.
Creating and editing rollovers
You use the Rollovers palette, in conjunction with the Layers palette, to add rollover effects to an image. When you save the image as a Web page, ImageReady adds JavaScript code to the resulting HTML file to specify rollover states.
About rollovers
A rollover is a Web effect in which different states of an image appear when a viewer performs a mouse action-such as rolling or clicking-over an area of the Web page.
A state is defined by a specific configuration of the Layers palette, including layer location, styles, and other formatting options.
You use a slice or image map area to define the active area for a rollover. When you add a new state to the image, you capture a snapshot of the slice or image map area in the previous state. You can then use the Layers palette to make changes to the image in the new state. When you save an image with rollover states as a Web page, each rollover state is saved as a separate image file.
A
![]()
B
![]()
C
![]()
Illustration of an image with three rollover states:
A. Normal state B. Over state C. Down state
You can use layer styles to create instant rollover effects. When working with layer- based slices, you can also save the series of states as a rollover style. (See "Applying
and creating rollover styles" on section 402.)
Creating slices for rollovers
You can quickly create layer-based slices for rollovers using the Rollovers palette. Layer- based slices are recommended when creating rollovers because the dimensions of a layer's content may change in the course of creating a rollover, and layer-based slices automatically adjust to encompass the new pixels. For more information on the different types of slices, see "Creating and viewing slices" on section 368.
To create a layer-based slice for a rollover:
1 Select the layer in the Layers palette. The content of the layer will define the active area for the rollover.
2 Click the Create
Layer-based Rollover button
![]() in the Rollovers palette. By default, ImageReady adds an Over state
to the new slice.
in the Rollovers palette. By default, ImageReady adds an Over state
to the new slice.
Creating rollover states
You can add a variety of different states to the slices and image maps in an image.
To add a rollover state to a slice or image map:
1 In the Rollover palette or the image, select the slice or image map you want to add the rollover state to.
Note: If slices are not visible in the Rollovers palette, select Include Slices and Image Maps in the Palette Options dialog box to display them. (See "Using the Rollovers palette" on section 398.)
2 Do one of the following in the Rollovers palette:
.
Click the Create Rollover
State button .
![]()
. Choose New Rollover State from the palette menu.
3 Use the default rollover state assigned by ImageReady, or select a different rollover state. (See "Editing rollover states" on section 400.)
4 Modify the layers used in the rollover state. (See "About working with layers in rollovers and animations" on section 396.)
Editing rollover states
When you create a rollover state, ImageReady assigns the type of state by default; however, you can easily change the state. You can also use the Rollovers palette to target the image content of a state for editing.
To edit the image content of a state:
1 Select a state in the Rollovers palette. If necessary, expand the slice or image map to view its states. (See "Using the Rollovers palette" on section 398.)
2 Modify the layers used in the rollover state. (See "About working with layers in rollovers and animations" on section 396.)
To edit the mouse action for a rollover state:
1 Do one of the following:
. Double-click a rollover state in the Rollovers palette.
. Select a rollover state in the Rollovers palette, and choose Rollover State Options from the palette menu.
2 Select a state, and click OK:
Over Activates the image when the user rolls over the slice or image map area with the mouse while the mouse button is not pressed. (Over is automatically selected for the second rollover state.)
Down Activates the image when the user presses the mouse button on the slice or image map area. The state appears as long as the viewer keeps the mouse button pressed down on the area.
Click Activates the image when the user clicks the mouse on the slice or image map area. The state appears until the viewer moves the mouse out of the rollover area.
Note: Different Web browsers, or different versions of a browser, may process clicks and double-clicks differently. For example, some browsers leave the slice in the Click state after a click, and in the Up state after a double-click; other browsers use the Up state only as a transition into the Click state, regardless of single- or double-clicking. To ensure your Web page will function correctly, be sure to preview rollovers in various Web browsers.
Custom Activates the image of the specified name when the user performs the action defined in the corresponding JavaScript code. (You must create JavaScript code and add it to the HTML file for the Web page in order for the Custom rollover option to function. See a JavaScript manual for more information.)
None Preserves the current state of the image for later use, but does not output an image when the file is saved as a Web page.
Selected Activates the rollover state when the user clicks the mouse on the slice or image map area. The state appears until the viewer activates another selected rollover state, and other rollover effects can occur while the selected state is active. For example, a selected state for one button and an over state for another button can occur simultaneously. However, if a layer is used by both states, the layer attributes of the selected state override those of the over state.
Select Use as Default Selected State to activate the state initially when the document is previewed in ImageReady or loaded into a Web browser.
Out Activates the rollover state when the user rolls the mouse out of the slice or image map area. ( The Normal state usually serves this purpose.)
Up Activates the rollover state when the user releases the mouse button over the slice or image map area. ( The Normal state usually serves this purpose.)
Previewing rollover states
You can preview rollover effects directly in the ImageReady document window by switching to document preview mode. To preview the rollover effect in your computer's default Web browser, click the Preview in Default Browser button in the toolbox. (See
"Previewing an image in a browser" on section 53.)
To use rollover preview mode:
1 Do one of the following:
. Click the Preview
Document button ![]() in the toolbox.
in the toolbox.
. Choose Image > Preview Document.
2 In the document window, perform the action that activates the rollover state. For example, position the mouse over the rollover slice or image map area to preview the Over state. Then click the slice or image map area to preview the Click state.
Note: If a document contains a Selected state, synthetic states are generated for the other states in the Rollovers palette. The synthetic state represents the appearance of the document when the Selected state is active. Synthetic states are generated automatically and cannot be edited.
To exit rollover preview mode:
Do one of the following:
. Select any tool in the toolbox.
. Click the Cancel
button ![]() in the options bar.
in the options bar.
Adding animation to rollover states
You can add a multiple-frame animation to a state in an image. Adding an animation to the Normal state will cause the animation to play when the image is loaded in a Web browser. Adding an animation to another type of state will cause the animation to play when a user activates the state.
To add animation frames to a rollover state:
1 In the Rollovers palette, select the state in which you want to display an animation. If necessary, expand the slice or image map to view its states. (See "Using the Rollovers palette" on section 398.)
2 Do one of the following to add frames to the animation:
.
Click the Create Animation Frame button
in the Rollovers
palette or choose New
![]()
Animation Frame from the palette menu.
Note: If the Create Animation Frame button and the New Animation Frame command are not visible, select Include Animation Frames in the Palette Options dialog box. (See " Using the Rollovers palette" on section 398.)
. Create frames in the Animation palette. (See "Creating and editing animations" on section 404.)
Applying and creating rollover styles
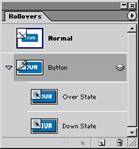
Rollover styles (indicated by a triangle in the upper left corner of the style thumbnail) simplify rollover creation by allowing you to turn a layer into a rollover effect with a single click. A rollover style includes all the attributes of a rollover, including its states and layer effects. When you apply a rollover style to a layer, the layer becomes a layer-based slice.
To apply a rollover style to a layer:
1 Select a layer in the Layers palette.
2 Choose Window > Styles, or click the Styles palette tab, to display the Styles palette.
3 Click the thumbnail for the rollover style you want to apply. Rollover style thumbnails have a triangle in the upper left corner.
402
To create a rollover style:
1 In the Rollovers palette, create the desired rollover states. (See "Creating rollover states"
on section 400.)
Note: You must use a layer-based slice in order to create a rollover style.
2 Apply the effects to each state using predefined styles in the Styles palette or by manually setting layer effects in the Layers palette. (See "Using layer effects and styles" on section 301.)
3 In the Styles palette, click the Create New Style button
, or choose New Style from the palette
menu.
![]()
4 Enter a name for the style, set style options, and click OK. The Include Rollover States option must be selected in order to create a rollover style.
The new rollover style appears in the Styles palette. The thumbnail preview displays the effects in the Normal state.
Copying and pasting rollover states
You can copy a rollover state and paste it into another state in the current rollover or into a state in another rollover. Layers in the source state replace layers in the destination state. You can also copy frames from the Animation palette and paste them into the Rollovers palette as states, or copy states from the Rollovers palette and paste them into the Animation palette as frames.
Note: Copy commands in the Animation palette and the Rollovers palette use an internal clipboard available to these commands only. Copying frames or rollover states does not overwrite the primary ImageReady clipboard.
To copy and paste rollover states:
1 Select a rollover state, and choose Copy Rollover State from the Rollovers palette menu.
2 Select a rollover state in which to paste the copied state:
. Select a state in the current rollover.
. Open or display another rollover, and select a state.
3 Choose Paste Rollover State from the Rollovers palette menu.
Duplicating rollover states
Duplicating a state is an easy way to add existing animation frames to a new state.
To duplicate a rollover state:
Select a rollover state, and do one of the following:
. Choose Duplicate Rollover State from the Rollovers palette menu.
.
Drag the state to
the Create Rollover State button .
![]()
The duplicate state and frames appear below the original state in the Rollovers palette.
Rearranging and deleting rollover states
You can move states between slices and image maps by dragging them to a new location in the Rollovers palette. You can also delete individual states or all states in a rollover.
To move states between slices and image maps:
Drag the state up or down in the Rollovers palette. When the highlighted line appears in the desired position, release the mouse button.
To delete rollover states:
. To delete one state, select a rollover state, and either click the Trash button
![]() on the
on the
Rollovers palette or choose Delete Rollover State from the Rollovers palette menu.
. To delete all states in a rollover, choose Delete Rollover from the Rollovers palette menu.
Creating and editing animations
You use the Animation palette, in conjunction with the Layers palette and Rollovers palette, to create animation frames from an original, multilayer image. You can assign a delay time to each frame, use the Tween command to generate new frames, and specify looping for the animation. The number of frames you can create is limited only by the amount of memory available to ImageReady on your system.
About animation
An animation is a sequence of images, or frames, that is displayed over time. Each frame varies slightly from the preceding frame, creating the illusion of movement when the frames are viewed in quick succession.
An image can have multiple animations that are associated with different rollover states. For example, adding an animation to the Normal rollover state causes the animation to play when the Web page is first loaded by a Web browser. Adding an animation to another rollover state causes the animation to play only when the Web user performs the specified action (such as placing the mouse over the rollover or clicking on the rollover).
Using the Animation palette
The Animation palette lets you create, view, and set options for the frames in an animation. You can change the thumbnail view of frames in the Animation palette-using smaller thumbnails reduces the space required by the palette and displays more frames in a given palette width.
Displaying the Animation palette Choose Window > Animation. A check mark indicates that the palette is showing.
Using the Animation palette
menu Click the triangle ![]() in the upper right corner of the
palette to access commands for
working with animations.
in the upper right corner of the
palette to access commands for
working with animations.
Changing the size of animation thumbnails Choose Palette Options from the
Animation palette menu, select a thumbnail size, and click OK.
Adding frames
Adding frames is the first step in creating an animation. If you have an image open in ImageReady, the Animation palette displays the image as the first frame in a new animation. Each frame you add starts as a duplicate of the preceding frame. You then make changes to the frame using the Layers palette.
Note: Always create and edit frames in Original view. While you can view frames in an optimized view, the editing options are very limited.
To add a frame to an animation:
1 In the Rollovers palette, select the state in which you want to display an animation.
(See "Using the Rollovers palette" on section 398.)
Adding an animation to the Normal state will cause the animation to play when the image is loaded in a Web browser. Adding an animation to another type of state will cause the animation to play when a user activates the state.
2 Do one of the following:
.
In the Animation palette,
click the Duplicate Current
Frame
button or choose New
![]()
Frame from the palette menu.
.
In the Rollovers
palette, click the Create
Animation Frame button or choose New
![]()
Animation Frame from the palette menu.
Note: If the Create Animation Frame button and the New Animation Frame command are not visible in the Rollovers palette, select Include Animation Frames in the Palette Options dialog box. (See "Using the Rollovers palette" on section 398.)
3 Modify the image for the frame using the Layers palette. (See "About working with layers in rollovers and animations" on section 396.)
Selecting frames
Before you can work with a frame, you must select it as the current frame. The contents of the current frame appear in the document window.
You can select multiple frames, either contiguous or discontiguous, to edit them or apply commands to them as a group. When multiple frames are selected, only the current frame appears in the document window.
In the Animation palette, the current frame is indicated by a narrow border (inside the shaded selection highlight) around the frame thumbnail. Selected frames are indicated by a shaded highlight around the frame thumbnails.
To select the current frame:
Do one of the following:
. Click a frame in the Animation palette.
. Click a frame in the Rollovers palette. If necessary, expand the state that contains the animation to view its frames. (See "Using the Rollovers palette" on section 398.)
.
In the Animation
palette or the Layers palette, click the Forward button to select the next frame in the series as the current
frame.
![]()
.
In the Animation palette
or the Layers palette, click the Backward button to select the previous frame in the series
as the current frame.
![]()
.
In the Animation palette,
click the Select First Frame
button to select the first frame in the series as the current frame.
![]()
To select multiple frames:
In the Animation palette, do one of the following:
. To select contiguous multiple frames, Shift-click a second frame. The second frame and all frames between the first and second are added to the selection.
. To select discontiguous multiple frames, Ctrl-click ( Windows) or Command-click
(Mac OS) additional frames to add those frames to the selection.
. To select all frames, choose Select All Frames from the Animation palette menu.
To deselect a frame in a multiframe selection:
Ctrl-click ( Windows) or Command-click (Mac OS) a frame to deselect it.
Editing frames
You can use the Animation palette or the Rollovers palette to target the image content of a frame for editing.
To edit the image content of a frame:
1 Select a frame. (See "Selecting frames" on section 405.)
2 Modify the image for the frame using the Layers palette. (See "About working with layers in rollovers and animations" on section 396.)
Rearranging and deleting frames
You can change the position of frames in an animation and reverse the order of selected contiguous frames. You can also delete selected frames or the entire animation.
To change the position of a frame:
1 Select the frame you want to move in the Animation palette or the Rollovers palette.
2 Drag the selection to the new position.
Note: In the Animation palette, you can select and change the position of multiple frames.
(See "Selecting frames" on section 405.) However, if you drag multiple discontiguous frames, the frames are placed contiguously in the new position.
To reverse the order of contiguous frames:
1 Select the contiguous frames you want to reverse.
2 Choose Reverse Frames from the Animation palette menu.
To delete selected frames:
Do one of the following in the Animation palette or the Rollovers palette:
. Select Delete Frame from the palette menu.
. Click the Trash button ![]() , and click Yes to confirm
the deletion.
, and click Yes to confirm
the deletion.
. Drag the selected frame onto the Trash button.
To delete an entire animation:
Select Delete Animation from the Animation palette menu or the Rollovers palette menu.
Copying and pasting frames
To understand what happens when you copy and paste a frame, think of a frame as a duplicate version of an image with a given layer configuration. When you copy a frame, you copy the configuration of layers (including each layer's visibility setting, position, and other attributes). When you paste a frame, you apply that layer configuration to the desti- nation frame.
To copy and paste layers between frames:
1 Select the frame you want to copy in the Animation palette or the Rollovers palette. Note: In the Animation palette, you can select and copy multiple frames. (See "Selecting frames" on section 405.)
2 Choose Copy Frame(s) from the Animation palette menu or the Rollovers palette menu.
3 Select a destination frame or frames in the current animation or another animation.
4 Choose Paste Frame(s) from the Animation palette menu or the Rollovers palette menu.
5 Select a Paste method:
. Replace Frames to replace the selected frames with the copied frames. When you paste frames into the same image, no new layers are added to the image; rather, the attributes of each existing layer in the destination frames are replaced by those of each copied layer. When you paste frames between images, new layers are added to the image; however, only the pasted layers are visible in the destination frames (the existing layers are hidden).
. Paste Over Selection to add the contents of the pasted frames as new layers in the image. When you paste frames into the same image, using this option doubles the number of layers in the image. In the destination frames, the newly pasted layers are visible, and the original layers are hidden. In the nondestination frames, the newly pasted layers are hidden.
. Paste Before Selection or Paste After Selection to add the copied frames before or after the destination frame. When you paste frames between images, new layers are added to the image; however, only the pasted layers are visible in the new frames (the existing layers are hidden).
6 Select Link Added Layers if you want to link pasted layers in the Layers palette. Use this option when you need to reposition the pasted layers as a unit.
7 Click OK.
Tweening frames
You use the Tween command to automatically add or modify a series of frames between two existing frames-varying the layer attributes (position, opacity, or effect parameters) evenly between the new frames to create the appearance of movement. For example, if you want to fade out a layer, set the opacity of the layer in the starting frame to 100%; then set the opacity of the same layer in the ending frame to 0%. When you tween between the two frames, the opacity of the layer is reduced evenly across the new frames.
The term "tweening" is derived from "in betweening," the traditional animation term used to describe this process. Tweening significantly reduces the time required to create animation effects such as fading in or fading out, or moving an element across a frame. You can edit tweened frames individually after you create them.
Example of using tweening to animate warped text
To create frames using tweening:
1 To apply tweening to a specific layer, select it in the Layers palette.
2 Select a single frame or multiple contiguous frames.
If you select a single frame, you choose whether to tween the frame with the previous frame or the next frame. If you select two contiguous frames, new frames are added between the frames. If you select more than two frames, existing frames between the first and last selected frames are altered by the tweening operation. If you select the first and last frames in an animation, these frames are treated as contiguous, and tweened frames are added after the last frame. ( This tweening method is useful when the animation is set to loop multiple times.)
Note: You cannot select discontiguous frames for tweening.
3 Do one of the following:
.
Click the Tween button in the Animation palette.
![]()
. Select Tween from the Animation palette menu.
4 Specify the layer or layers to be varied in the added frames:
. All Layers to vary all layers in the selected frame or frames.
. Selected Layer to vary only the currently selected layer in the selected frame or frames.
5 Specify layer attributes to be varied:
. Position to vary the position of the layer's content in the new frames evenly between the beginning and ending frames.
. Opacity to vary the opacity of the new frames evenly between the beginning and ending frames.
. Effects to vary the parameter settings of layer effects evenly between the beginning and ending frames.
6 If you selected a single frame in step 2, choose where to add frames from the Tween
With menu:
. Next Frame to add frames between the selected frame and the following frame. This option is not available when you select the last frame in the Animation palette.
. First Frame to add frames between the last frame and first frame. This option is only available if you select the last frame in the Animation palette.
. Previous Frame to add frames between the selected frame and the preceding frame. This option is not available when you select the first frame in the Animation palette.
. Last Frame to add frames between the first frame and last frame. This option is only available if you select the first frame in the Animation palette.
7 Enter a value, or use the Up or Down Arrow key to choose the number of frames to add.
(This option is not available if you selected more than two frames. In this case, the tweening operation alters the existing frames between the first and last frames in the selection.)
8 Click OK.
Specifying looping
You select a looping option to specify how many times the animation sequence repeats when played.
To specify looping:
1 Click the looping option selection box at the lower left corner of the Animation palette.
2 Select a looping option: Once, Forever, or Other.
3 If you selected Other, enter a value in the Set Loop Count dialog box, and click OK.
Specifying delay for frames
You can specify a delay-the time that a frame is displayed-for single frames or for multiple frames in an animation. Delay time is displayed in seconds. Fractions of a second are displayed as decimal values. For example, one-quarter second is specified as .25.
To specify a delay time:
1 Select one or more frames.
2 In the Animation palette, click on the Delay value below the selected frame to view the
Delay pop-up menu.
3 Specify the delay:
. Choose a value from the pop-up menu. ( The last value used appears at the bottom of the menu.)
. Choose Other, enter a value in the Set Frame Delay dialog box, and click OK.
If you selected multiple frames, specifying a delay value for one frame applies the value to all frames.
Note: Delay time may not be accurate during an animation preview in ImageReady. For an accurate preview of delay time, preview animations in a browser.
Adding layers to frames
When you create a new layer, it is visible in all frames of an animation. To hide a layer in a specific frame, select the frame in the Animation palette, and then hide the desired layer in the Layers palette.
You can use the Create Layer for Each New Frame option to automatically add a new layer to the image every time you create a frame. The new layer is visible in the new frame but hidden in other frames. Using this options saves time when you are creating an animation that requires you to add a new visual element to each frame.
To add a new layer every time you create a frame:
Choose Create Layer for Each New Frame from the Animation palette menu. A check mark indicates that the option is turned on.
Setting the frame disposal method
The frame disposal method specifies whether to discard the current frame before displaying the next frame. You select a disposal method when working with animations that include background transparency in order to specify whether the current frame will be visible through the transparent areas of the next frame.


A


B

Illustration of frame disposal methods:
A. Frame with background transparency with Restore to Background option B. Frame with background transparency with Do Not Dispose option
The Disposal
Method icon indicates whether the frame is set to Do Not
Dispose
![]()
![]() or Restore to
Background .
(No icon appears when disposal method
is set to Automatic.) To
choose a disposal method:
or Restore to
Background .
(No icon appears when disposal method
is set to Automatic.) To
choose a disposal method:
1 Select a frame or frames for which you want to choose a disposal method.
2 Right-click ( Windows) or Ctrl-click (Mac OS) the frame thumbnail to view the Disposal
Method context menu.
3 Choose a disposal method:
. Automatic to determine a disposal method for the current frame automatically, discarding the current frame if the next frame contains layer transparency. For most animations, the Automatic option yields the desired results and is, therefore, the default option.
Note: Choose the Automatic disposal option when using the Redundant Pixel Removal optimization option, to enable ImageReady to preser ve frames that include transparency.
. Do Not Dispose to preserve the current frame as the next frame is added to the display. The current frame (and preceding frames) may show through transparent areas of the next frame. To accurately preview an animation using the Do Not Dispose option, preview the animation in a browser.
. Restore to Background to discard the current frame from the display before the next frame is displayed. Only a single frame is displayed at any time (and the current frame will not appear through the transparent areas of the next frame).
Flattening frames into layers
You can flatten animation frames into layers. A single, composite layer is created for each frame, containing all of the layers in the frame. The original layers in the frame are hidden but preserved (the original layers will be available if they are needed for another frame). Note: If you save an animation as a GIF, the animation frames are flattened and the original layers are lost. You should save the original file in Photoshop file format to preser ve layers for reediting.
To flatten frames into layers:
In the Animation palette, choose Flatten Frames into Layers from the palette menu.
Viewing animations
Viewing an animation lets you preview the frames in timed sequence. You can preview an animation in ImageReady or in a Web browser.
To view an animation in ImageReady:
1 Click
the Play button in the Animation palette. The
animation is displayed in the
document window. The animation repeats indefinitely
unless you specified another repeat value
in the Play Options dialog box.
(See "Specifying
looping" on section 409.)
![]()
2 To stop
the animation, click the Stop button .
![]()
3 To rewind
the animation, click the Select First Frame button .
![]()
To preview an animation in a browser:
1 Click the Preview
in Default Browser tool ![]() ,
, ![]() in the toolbox, or choose File > Preview In and select a browser from
the submenu.
in the toolbox, or choose File > Preview In and select a browser from
the submenu.
2 Use the browser's Stop and Reload commands to stop or replay the animation.
Optimizing animations
You can apply optimization settings to animated images just as you do to nonanimated images. You should always optimize an animation in GIF format because GIF is the only format in ImageReady that supports the display of animated images on the Web.
Note: While you can optimize an image that includes animation in JPEG or PNG format, these formats do not support animation. The resulting Web page will display only the current frame of the animation.
In addition to the standard optimization options for GIF format, you can optimize frames to include only areas that change from frame to frame. ( This greatly reduces the file size of the animated GIF.) ImageReady also applies a special dithering technique to animations to ensure that dither patterns are consistent across all frames and to prevent flickering during playback. Due to these additional optimization functions, ImageReady may require more time to optimize an animated GIF than to optimize a standard GIF.
To optimize an animated image:
1 Choose Optimize Animation from the Animation palette menu.
2 Set the following options:
. Bounding Box to crop each frame to the area that has changed from the preceding frame. Animation files created using this option are smaller but are incompatible with GIF editors that do not support the option. ( This option is selected by default and is recommended.)
. Redundant Pixel Removal to make transparent all pixels in a frame that are unchanged from the preceding frame. This option is selected by default and is recommended.
The Transparency option in the Optimize palette must be selected for redundant pixel removal to work. (See "Optimization options for GIF and PNG-8 formats" on section 420.) Important: Set the frame disposal method to Automatic when using the Redundant Pixel
Removal option. (See "Setting the frame disposal method" on section 410.)
3 Click OK.
4 Apply optimization settings. (See "Optimizing images" on section 415.)
When optimizing the colors in an animation, use the Adaptive, Perceptual, or Selective palette. This ensures that the colors are consistent across frames. (See "Generating a
color table" on section 431.)
Viewing animated images in Photoshop
When you open a file containing an animation in Photoshop, only the frame that was selected when you saved the file in ImageReady is displayed. You cannot edit the animation frames separately, play the animation, or save the animation as an animated GIF.
If you add a new layer to the file while in Photoshop, the layer is added to all frames of the animation. However, the new layer will only appear in the selected frame when you reopen the file in ImageReady. If you change the stacking order of layers while in Photoshop, the stacking order of layers will be changed when you reopen the file in ImageReady.
Saving animations
You can save an animation as a series of GIF files or as a QuickTimeT movie.
Saving animations as animated GIFs
Animations that you view in a Web browser are called animated GIFs. When you save an optimized document containing an animation, you can choose to generate an HTML file that contains code for displaying the animated GIF in a Web page. The resulting Web page can contain just the animated GIF or additional Web features, such as links and rollovers, depending on the source document.
To save an animation as an animated GIF:
1 Optimize the animation. (See "Optimizing animations" on section 411.)
2 Save the optimized image. (See "Saving optimized images" on section 441.)
Saving animations as QuickTime movies
You can save an animation as a QuickTime movie. The resulting file is viewable in the QuickTime player and can be opened in other applications that support QuickTime movie format.
To save an animation as a QuickTime movie:
1 Choose File > Export Original.
2 Select QuickTime Movie from the format pop-up menu.
Note: On Windows, QuickTime Movie format is only available when QuickTime is installed on your computer.
3 Type a filename, and choose a location for the file.
4 Click Save.
5 If desired, adjust the compression settings, and click OK.
Opening and importing files as animations
You can use the animation features in ImageReady to edit animated GIFs, multilayered
Photoshop files, and QuickTime movies.
Opening animated GIFs
You can open an existing animated GIF in ImageReady using the File > Open command. The file is opened as a stack of layers. Each layer corresponds to one frame. In each frame, the layer for that frame is visible, and the layers for the other frames are hidden.
Opening existing animated GIF files in ImageReady is useful primarily for applying optimi- zation settings to the files. The one-layer-per-frame structure of imported animated GIF files may make it impractical to edit animation frames in other ways.
Opening Photoshop files as animations
You can easily create animated GIFs from existing one-layer-per-frame images in Adobe
Photoshop file format or from a group of single-layer images.
You can make each layer in a multilayer Photoshop file a separate frame in the Animation palette. The layers are placed in the Animation palette in their stacking order, with the bottom layer becoming the first frame.
You can also import a folder of files and use each file as a frame in ImageReady. Files can be in any format that ImageReady supports. Each file becomes a frame in the Animation palette. The files are placed in the Animation palette in alphabetical order by image filename.
To open a multilayer Photoshop file as frames:
1 Choose File > Open, and select the Photoshop file to open.
2 Choose Make Frames From Layers from the Animation palette menu.
Each layer in the image appears as a frame in the Animation palette. The bottom layer in the Photoshop image is frame 1 in the Animation palette.
Choose Reverse Frames from the Animation palette menu to reverse the order of frames.
To import a folder of files as frames:
1 Place the files to be used as frames into a folder. Make sure that the folder contains only those images that are to be used as frames. The resulting animation will display more successfully if all files are the same pixel dimensions.
To have frames appear in the correct order in the animation, name the files in alphabetical or numeric order, with the file to be used as frame 1 the first in order. (You can also change the order of the frames in the Animation palette after you import the files.)
2 Choose File > Import > Folder As Frames, and choose the folder to be imported.
The files appear in the Animation palette as frames and in the Layers palette as layers, with each layer assigned to a separate frame. The image that is first alphabetically or numeri- cally by filename is frame 1 in the Animation palette and the bottom layer in the Layers palette.
Opening QuickTime movies as animations
You can open movies in MOV, AVI, and FLIC formats to view and edit in ImageReady.
To open QuickTime-compatible movies:
1 Choose File > Open, and select the movie to open.
2 Select the range of frames to import:
. From Beginning to End to open the full file.
. Selected Range Only to open selected frames. Drag the slider below the movie thumbnail to specify the starting point for the range, then Shift-drag to specify the ending point. (A black bar on the slider indicates the range you select.)
3 Select Limit to Every <number> Frame to specify which frames to include from the selected range. (You can use this option with either Range option.)
4 Click Open.
|
Politica de confidentialitate | Termeni si conditii de utilizare |

Vizualizari: 1007
Importanta: ![]()
Termeni si conditii de utilizare | Contact
© SCRIGROUP 2025 . All rights reserved