| CATEGORII DOCUMENTE |
| Asp | Autocad | C | Dot net | Excel | Fox pro | Html | Java |
| Linux | Mathcad | Photoshop | Php | Sql | Visual studio | Windows | Xml |
Creating and viewing image maps (ImageReady)
Image maps enable you to link an area of an image to a URL. You can set up multiple linked areas-called image map areas-in an image with links to text files other images; audio video or multimedia files other pages in the Web site or other Web sites. You can also create rollover effects in image map areas.
The main difference between using image maps and using slices to create links is in how the source image is exported as a Web page Using image maps keeps the exported image intact as a single file while using slices causes the image to be exported as a separate file. Another difference between image maps and slices is that image maps enable you to link circular polygonal or rectangular areas in an image while slices enable you to link only rectangular areas If you need to link only rectangular areas using slices may be preferable to using an image map.
Note: To avoid unexpected results, do not create image map areas in slices that contain URL links-either the image map links or the slice links may be ignored in some browsers. Creating image maps
You can create image map areas using an image map tool or a layer.
Tool-based image map areas Are created using an image map tool-you drag in the image to define the image map area. You can view and set options for tool-based image maps in the Image Map palette.
Layer-based image map areas Are created from a layer-the layer s content defines the shape of the image map area and the image map inherits the name of the layer If you edit the layer s content the image map area automatically adjusts to encompass the new pixels. You can view and set options for layer-based image map areas in the Image Map palette.
If you plan to add a rollover effect to an image map area it is often preferable to use a layer-based image map area rather than a tool-based image map area For example if you create a rollover button that displays a glow effect in the Over state a layer-based image map area will automatically adjust to encompass the pixels that are produced by the glow. Important If you overlap image map areas the topmost area is active.
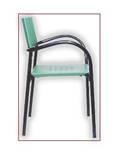
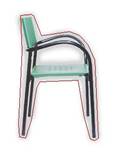
Layer-based rectangle image map compared to polygonal image map
To create an image map area using an image map tool:
1 Select the rectangle image map tool ![]() the circle
image map tool
the circle
image map tool ![]() or the polygon image map tool
or the polygon image map tool ![]() in the toolbox.
in the toolbox.
2 For the rectangle or circle image map tool select Fixed Size to specify set values for the image map area s dimensions Enter pixel values in whole numbers.
3 Do one of the following to define the image map area:
With the rectangle or circle image map tool drag over the area you want to define. Shift-drag to constrain the area to a square Alt-drag ( Windows) or Option-drag
(Mac OS) to drag an image map area from its center.
With the polygon image map tool click in the image to set the starting point Position the pointer where you want the first straight segment to end and click Continue clicking to set endpoints for subsequent segments Hold down Shift to constrain the segment to 45 increments. To close the border double-click or position the pointer over the starting point (a closed circle appears next to the pointer) and click.
To add points to a polygon image map area select the image map select tool and
Shift-click where you want to add a point. To remove points from a polygon image map area select the image map select tool and Alt-click ( Windows) or Option- click
(Mac OS) the points you want to remove.
To create an image map area from a layer:
1 In the Layers palette choose a layer from which to create an image map area ( To use multiple layers in one image map area first merge the layers.)
2 Choose Layer > New Layer Based Image Map Area.
Converting layer-based image maps to tool-based image maps
Because a layer-based image map area is tied to the pixel content of a layer the only way to move resize or align it is to edit the layer. You can convert a layer-based image map area to a tool-based image map area to unlink it from the layer.
To convert a layer-based image map area to a tool-based image map area:
1 Select a layer-based image map area using the image map select tool ![]() .
.
(See "Selecting image maps on section 386
2 Choose Promote Layer Based Image Map Area from the Image Map palette menu If the layer contains multiple non-overlapping areas of pixel content multiple tool-based image map areas are produced.
Viewing image maps
When you select the image map select tool image map areas show automatically. You can also show or hide image map areas using the Image Map Visibility button.
Image map preferences determine how image map areas appear in the document window. You can set preferences for image map lines line color and color adjustments. To show or hide image map areas:
Do one of the following:
Click the
Image Map Visibility button ![]() in the toolbox.
in the toolbox.
Choose View > Show > Image Maps.
Choose View > Show Extras. This command also shows or hides selection edges slices, text bounds text baseline and text selections (See Working with Extras on section 47
To set image map display preferences:
1 Do one of the following:
In Windows and Mac OS 9.x choose Edit > Preferences > Image Maps.
In Mac OS X choose ImageReady > Preferences > Image Maps.
2 To change the color of image map lines choose a color from the Line Color pop-up menu Changing the color of image map lines also changes the line color of selected image map areas to a contrasting color.
3 To change the strength of image map color adjustments enter a value or choose a value from the Image Map Overlay pop-up slider. The value determines the extent of color adjustments that dim the brightness and contrast of unselected image map areas.
4 To display image map lines only and deselect color adjustment display select Show
Lines Only.
5 To show a bounding box for circular image map areas select Show Bounding Box.
|
Politica de confidentialitate | Termeni si conditii de utilizare |

Vizualizari: 901
Importanta: ![]()
Termeni si conditii de utilizare | Contact
© SCRIGROUP 2025 . All rights reserved