| CATEGORII DOCUMENTE |
| Asp | Autocad | C | Dot net | Excel | Fox pro | Html | Java |
| Linux | Mathcad | Photoshop | Php | Sql | Visual studio | Windows | Xml |
DOCUMENTE SIMILARE |
|||||
|
|||||
Working with brushes
Working with brushes is an important part of using the painting and editing tools. The brush you select determines many characteristics of the resulting stroke. Photoshop and ImageReady provide a variety of preset brushes to fill a wide range of uses. In Photoshop, you can also create custom brushes using the Brushes palette.
Using the Brushes palette (Photoshop)
The Brushes palette lets you select preset brushes and design custom brushes.
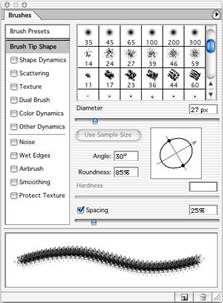
Brushes palette with Brush Tip Shape options displayed
Displaying the Brushes palette Choose Window > Brushes, or click the palette
button ![]() on the right side of the options bar for the painting tools, erasing
tools, toning
tools, and focus
tools.
on the right side of the options bar for the painting tools, erasing
tools, toning
tools, and focus
tools.
Displaying options in the Brushes palette Select an item name on the left side of the palette. The available options for the selected item appear on the right side of the palette. Click the checkbox to the left of the item name to enable or disable the item without
viewing its options.
Selecting preset brushes
The Brush pop-up palette in the options bar for the painting and editing tools lets you view, select, and load preset brushes. In Photoshop, you can also use the Brushes palette to view, select, and load preset brushes.
To display the Brush pop-up palette:
1 Select a painting tool or editing tool.
2 Click the brush sample in the options bar.
To select a preset brush:
1 Click a brush in the Brush pop-up palette or Brushes palette.
Note: If you are using the Brushes palette, be sure that Brush Presets on the left side palette is selected to view the loaded presets.
2 (Photoshop) Specify a Master Diameter for the brush by dragging the slider or entering a value. If the brush has a dual tip, both the primary and dual brush tips are scaled. (See
"Creating dual brushes (Photoshop)" on section 236.)
3 (Photoshop) Click Use Sample Size to use the original diameter of the brush tip. This option is available only if the brush tip shape is based on a sample.
To change how preset brushes are displayed (Photoshop):
Choose a display option from the Brush pop-up palette menu or Brushes palette menu:
. Text Only to view the brushes as a list.
. Small or Large Thumbnail to view the brushes as thumbnails.
. Small or Large List to view the brushes as a list with thumbnails.
. Stroke Thumbnail to view a sample brush stroke with each brush thumbnail.
To dynamically preview brush strokes in the Brushes palette, position the pointer over a brush until the tool tip appears, then move the pointer over different brushes. The
preview area at the bottom of the palette will display sample brush strokes.
To load a library of preset brushes:
Choose one of the following from the Brush pop-up palette menu or Brushes palette menu:
. Load Brushes to add a library to the current list. Select the library file you want to use, and click Load.
. Replace Brushes to replace the current list with a different library. Select the library file you want to use, and click Load.
. A library file (displayed at the bottom of the palette menu). Click OK to replace the current list, or click Append to append the current list.
Note: You can also use the Preset Manager to load and reset brush libraries. For more information, see "Managing libraries with the Preset Manager (Photoshop)" on section 54. To return to the default library of preset brushes:
Choose Reset Brushes from the Brush pop-up palette menu or Brushes palette menu. You can either replace the current list or append the default library to the current list.
Customizing brush tips (Photoshop)

A brush stroke is
made up of many individual brush marks. The brush tip you select determines
the shape, diameter,
and other characteristics of a brush mark. You
can customize brush tips by
editing their options and create new brush tip shapes by sampling pixels in an image.
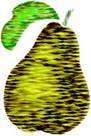
Pear painted with custom brush shown in inset
To create a new brush tip shape:
1 Use the rectangle marquee ![]() with
Feather set to 0 px to select part of an image to use as a custom brush.
with
Feather set to 0 px to select part of an image to use as a custom brush.
The brush shape can be up to 2500 pixels by 2500 pixels in size. To be most effective, the shape should appear on a solid white background. If you want to define a brush with soft edges, select pixels with gray values. (Colored brush shapes appear as gray values.)
2 Choose Edit > Define Brush.
3 Name the brush, and click OK.
To set brush tip shape options:
1 In the Brushes palette, select Brush Tip Shape on the left side of the palette.
2 Select the brush tip you want to customize, and set one or more of the following options:
Diameter Controls the size of the brush. Enter a value in pixels or drag the slider.

Brush strokes with different diameter values
Use Sample Size Resets the brush to its original diameter. This option is only available if the brush tip shape was created by sampling pixels in an image.
Angle Specifies the angle by which an elliptical or sampled brush's long axis is rotated from horizontal. Type a value in degrees, or drag the horizontal axis in the preview box.
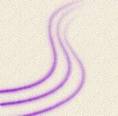
Angled brushes create a chiseled stroke
Roundness Specifies the ratio between the brush's short and long axes. Enter a percentage value, or drag the points in the preview box. A value of 100% indicates a circular brush, a value of 0% indicates a linear brush, and intermediate values indicate elliptical brushes.
Hardness Controls the size of the brush's hard center. Type a number, or use the slider to enter a value that is a percentage of the brush diameter.


Brush strokes with different hardness values
Spacing Controls the distance between the brush marks in a stroke. To change the spacing, type a number, or use the slider to enter a value that is a percentage of the brush diameter. When this option is deselected, the speed of the cursor determines the spacing.


Increasing the spacing makes the brush skip
While using a preset brush, press the [ key to decrease the brush width; press the ] key to increase the width. For hard round, soft round, and calligraphic brushes, press
Shift+ the [ key to decrease the brush hardness; press Shift+ the ] key to increase the brush hardness.
About brush dynamics (Photoshop)
The Brushes palette provides many options for adding dynamic (or changing) elements to preset brush tips. For example, you can set options that vary the size, color, and opacity of brush marks over the course of a stroke.
You work with two components when adding dynamics elements to a brush:
. Jitter percentages specify the randomness of dynamic elements. At 0%, an element does not change over the course of a stroke; at 100%, an element has the maximum amount of randomness.
. Options in the Control pop-up menus specify how you want to control the variance of dynamic elements. You can choose to not control the variance of an element, to fade an element over the specified number of steps, or to vary an element based of pen pressure, pen tilt, or position of the pen thumbwheel.
Note: Pen controls are only are available only when you're using a pressure-sensitive digitizing tablet such as the Wacom tablet. A warning icon appears if you select a pen control but have not installed a tablet.
Specifying brush shape dynamics (Photoshop)
Shape dynamics determine the variance of brush marks in a stroke.

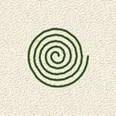
Brush stokes without shape dynamics and with shape dynamics
To edit shape dynamics for a brush:
1 In the Brushes palette, select Shape Dynamics on the left side of the palette. Be sure to click the name, rather than the check box, to select the item.
2 Set one or more of the following options:
Size Jitter and Control Specifies how the size of brush marks vary in a stroke. For more information, see "About brush dynamics (Photoshop)" on section 231.
To specify the maximum percentage of jittering, type a number or use the slider to enter a value. To specify how you want to control the size variance of brush marks, choose an option from the Control pop-up menu:
. Off to not control the size variance of brush marks.
. Fade to fade the size of brush marks between the initial diameter and the minimum diameter in the specified number of steps. Each step is equal to one mark of the brush tip. The value can range from 1 to 9999. For example, entering 10 steps produces a fade in 10 increments.
. Pen Pressure, Pen Tilt, or Stylus Wheel to vary the size of brush marks between the initial diameter and the minimum diameter based on the pen pressure, pen tilt, or position of the pen thumbwheel.
Minimum Diameter Specifies the minimum percentage by which brush marks can scale when Size Jitter or Size Control is enabled. Type a number, or use the slider to enter a value that is a percentage of the brush tip diameter.
Tilt Scale Specifies the scale factor applied to the height of the brush prior to rotation when Size Control is set to Pen Tilt. Type a number, or use the slider to enter a value that is a percentage of the brush diameter.
Angle Jitter and Control Specifies how the angle of brush marks varies in a stroke. For more information, see "About brush dynamics (Photoshop)" on section 231.
To specify the maximum percentage of jittering, type a number or use the slider to enter a value that is a percentage of 360 degrees. To specify how you want to control the angle variance of brush marks, choose an option from the Control pop-up menu:
. Off to not control the angle variance of brush marks.
. Fade to fade the angle of brush marks between 0 and 360 degrees in the specified number of steps.
. Pen Pressure, Pen Tilt, or Stylus Wheel to vary the angle of brush marks between 0 and
360 degrees based on the pen pressure, pen tilt, or position of the pen thumbwheel.
. Initial Direction to base the angle of brush marks on the initial direction of the brush stroke.
. Direction to base the angle of brush marks on the direction of the brush stroke. Roundness Jitter and Control Specifies how the roundness of brush marks varies in a stroke. For more information, see "About brush dynamics (Photoshop)" on section 231.
To specify the maximum percentage of jittering, type a number or use the slider to enter a value that is a percentage indicating the ratio between the brush's short and long axes. To specify how you want to control the roundness variance of brush marks, choose an option from the Control pop-up menu:
. Off to not control the roundness variance of brush marks.
. Fade to fade the roundness of brush marks between 100% and the Minimum
Roundness value in the specified number of steps.
. Pen Pressure, Pen Tilt, or Stylus Wheel to vary the roundness of brush marks between
100% and the Minimum Roundness value based on the pen pressure, pen tilt, or position of the pen thumbwheel.
Minimum Roundness Specifies the minimum roundness for brush marks when Roundness Jitter or Roundness Control is enabled. Type a number, or use the slider to enter a value that is a percentage indicating the ratio between the brush's short and long axes.
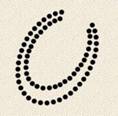
Specifying brush scattering (Photoshop)
Brush scattering determines the number and placement of marks in a stroke.

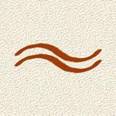
Brush strokes without scattering and with scattering
To edit scattering options for a brush:
1 In the Brushes palette, select Scattering on the left side of the palette. Be sure to click the name, rather than the check box, to select the item.
2 Set one or more of the following options:
Scatter and Control Specifies how brush marks are distributed in a stroke. When Both Axis is selected, brush marks are distributed in a radial direction. When Both Axis is deselected, brush marks are distributed perpendicular to the stroke path.
To specify the maximum percentage of scattering, type a number or use the slider to enter a value. To specify how you want to control the scattering variance of brush marks, choose an option from the Control pop-up menu:
. Off to not control the scattering variance of brush marks.
. Fade to fade the scattering of brush marks from the maximum scattering to no scattering in the specified number of steps.
. Pen Pressure, Pen Tilt, or Stylus Wheel to vary the scattering of brush marks based on the pen pressure, pen tilt, or position of the pen thumbwheel.
Count Specifies the number of brush marks applied at each spacing interval. Type a number, or use the slider to enter a value.
Note: If you increase the count without increasing the spacing or scattering values, painting performance may decrease.
Count Jitter and Control Specifies how the number of brush marks varies for each spacing interval. For more information, see "About brush dynamics (Photoshop)" on section 231.
To specify the maximum percentage of brush marks applied at each spacing interval, type a number or use the slider to enter a value. To specify how you want to control the count variance of brush marks, choose an option from the Control pop-up menu:
. Off to not control the count variance of brush marks.
. Fade to fade the number of brush marks from the Count value to 1 in the specified number of steps.
. Pen Pressure, Pen Tilt, or Stylus Wheel to vary the number of brush marks based on the pen pressure, pen tilt, or position of the pen thumbwheel.
Creating textured brushes (Photoshop)
A textured brush uses a pattern to make strokes look like they are painted on textured canvas.

Brush strokes without texture and with texture
To edit texture options for a brush:
1 In the Brushes palette, select Texture on the left side of the palette. Be sure to click the name, rather than the check box, to select the item.
2 Click the pattern sample, and select a pattern from the pop-up palette.
3 Set one or more of the following options:
Invert Inverts the high and low points in the texture based on the tones in the pattern. When Invert is selected, the lightest areas in the pattern are the low points in the texture and therefore receive the least paint; the darkest areas in the pattern are the high points in the texture and therefore receive the most paint. When Invert is deselected, the lightest areas in the pattern receive the most paint; the darkest areas in the pattern receive the least paint.
Scale Specifies the scale of the pattern. Type a number, or use the slider to enter a value that is a percentage of the pattern size.
Texture Each Tip Specifies whether or not to render each tip individually as it is painted. When this option is not selected, the Depth variance options are not available.
Mode Specifies the blending mode used to combine the brush and the pattern. (See
"Selecting a blending mode" on section 241.)
Depth Specifies how deep the paint penetrates into the texture. Type a number, or use the slider to enter a value. At 100%, the low points in the texture do not receive any paint. At 0%, all points in the texture receive the same amount of paint, therefore hiding the pattern.
Minimum Depth Specifies the minimum depth paint can penetrate when Depth Control is set to Fade, Pen Pressure, Pen Tilt, or Stylus Wheel and Texture Each Tip is selected. Depth Jitter and Control Specifies how the depth varies when Texture Each Tip is selected. For more information, see "About brush dynamics (Photoshop)" on section 231.
To specify the maximum percentage of jitter, type a number or use the slider to enter a value. To specify how you want to control the depth variance of brush marks, choose an option from the Control pop-up menu:
. Off to not control the depth variance of brush marks.
. Fade to fade from the Depth Jitter percentage to the Minimum Depth percentage in the specified number of steps.
. Pen Pressure, Pen Tilt, or Stylus Wheel to vary the depth based on the pen pressure, pen tilt, or position of the pen thumbwheel.
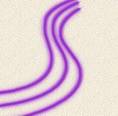
Creating dual brushes (Photoshop)
A dual brush uses two tips to create brush marks. You set options for the primary tip in the Brush Tip Shape section of the Brushes palette. You set options for the secondary tip in the Dual Brush section of the Brushes palette.

Brush strokes created with a single tip and with dual tips
To edit dual tip options for a brush:
1 In the Brushes palette, select Dual Brush on the left side of the palette. Be sure to click the name, rather than the check box, to select the item.
2 Select a blending mode to use when combining brush marks from the primary tip and the dual tip. (See "Selecting a blending mode" on section 241.)
3 Select a tip for the dual brush from the list below the Mode pop-up menu.
4 Set one or more of the following options:
Diameter Controls the size of the dual tip. Enter a value in pixels, drag the slider, or click Use Sample Size to use the original diameter of the brush tip. ( The Use Sample Size option is only available if the brush tip shape was created by sampling pixels in an image.) Spacing Controls the distance between the dual tip brush marks in a stroke. To change the spacing, type a number, or use the slider to enter a value that is a percentage of the tip diameter.
Scatter Specifies how dual tip brush marks are distributed in a stroke. When Both Axis is selected, dual tip brush marks are distributed in a radial direction. When Both Axis is deselected, dual tip brush marks are distributed perpendicular to the stroke path. To specify the maximum percentage of scattering, type a number or use the slider to enter a value.
Count Specifies the number of dual tip brush marks applied at each spacing interval. Type a number, or use the slider to enter a value.
Specifying color dynamics (Photoshop)
Color dynamics determine how the color of paint changes over the course of a stroke.
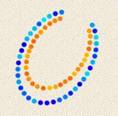
Brush strokes without color dynamics and with color dynamics
To edit color dynamics for a brush:
1 In the Brushes palette, select Color Dynamics on the left side of the palette. Be sure to click the name, rather than the check box, to select the item.
2 Set one or more of the following options:
Foreground/Background Jitter and Control Specifies how paint varies between the foreground color and background color. For more information, see "About brush dynamics (Photoshop)" on section 231.
To specify a percentage by which the color of the paint can vary, type a number or use the slider to enter a value. To specify how you want to control the color variance of brush marks, choose an option from the Control pop-up menu:
. Off to not control the color variance of brush marks.
. Fade to vary the color of paint between the foreground color and the background color in the specified number of steps.
. Pen Pressure, Pen Tilt, or Stylus Wheel to vary the color of paint between the foreground color and the background color based on the pen pressure, pen tilt, or position of the pen thumbwheel.
Hue Jitter Specifies a percentage by which the hue of the paint can vary in a stroke. Type a number, or use the slider to enter a value. A lower value changes the hue while
maintaining a close proximity to the hue of the foreground color. A higher value increases the difference between hues.
Saturation Jitter Specifies a percentage by which the saturation of the paint can vary in a stroke. Type a number, or use the slider to enter a value. A lower value changes the saturation while maintaining a close proximity to the saturation of the foreground color.
A higher value increases the difference between saturation levels.
Brightness Jitter Specifies a percentage by which the brightness of the paint can vary in a stroke. Type a number, or use the slider to enter a value. A lower value changes the brightness while maintaining a close proximity to the brightness of the foreground color. A higher value increases the difference between brightness levels.
Purity Increases or decreases the saturation of the color. Type a number, or use the
slider to enter a percentage between -100 and 100. At -100, the color is fully desaturated;
at 100, the color is fully saturated.
Specifying paint dynamics (Photoshop)
Paint dynamics determine how paint changes over the course of a stroke.
Brush strokes without paint dynamics and with paint dynamics
To edit paint dynamics for a brush:
1 In the Brushes palette, select Other Dynamics on the left side of the palette. Be sure to click the name, rather than the check box, to select the item.
2 Set one or more of the following options:
Opacity Jitter and Control Specifies how the opacity of paint varies in a brush stroke, up to (but not exceeding) the opacity value specified in the options bar. For more infor- mation, see "About brush dynamics (Photoshop)" on section 231.
To specify a percentage by which the opacity of the paint can vary, type a number or use the slider to enter a value. To specify how you want to control the opacity variance of brush marks, choose an option from the Control pop-up menu:
. Off to not control the opacity variance of brush marks.
. Fade to fade the opacity of paint from the opacity value in the options bar to 0 in the specified number of steps.
. Pen Pressure, Pen Tilt, or Stylus Wheel to vary the opacity of paint based on the pen pressure, pen tilt, or the position of the pen thumbwheel.
Flow Jitter and Control Specifies how the flow of paint varies in a brush stroke, up to
(but not exceeding) the flow value specified in the options bar. For more information, see "About brush dynamics (Photoshop)" on section 231.
To specify a percentage by which the flow of the paint can vary, type a number or use the slider to enter a value. To specify how you want to control the flow variance of brush marks, choose an option from the Control pop-up menu:
. Off to not control the flow variance of brush marks.
. Fade to fade the flow of paint from the flow value in the options bar to 0 in the specified number of steps.
. Pen Pressure, Pen Tilt, or Stylus Wheel to vary the flow of paint based on the pen pressure, pen tilt, or the position of the pen thumbwheel.
Adding noise to brush strokes (Photoshop)
The Noise option adds additional randomness to individual brush tips. This option is most effective when applied to soft brush tips (brush tips that contain gray values).
To enable or disable noise in brush strokes:
In the Brushes palette, select Noise on the left side of the palette. A check mark indicates that the option is enabled.
Using wet brush edges (Photoshop)
The Wet Edges option causes paint to build up along the edges of the brush stroke, creating a watercolor effect.
To enable or disable wet brush edges:
In the Brushes palette, select Wet Edges on the left side of the palette. A check mark indicates that the option is enabled.
Creating airbrush effects (Photoshop)
The Airbrush option in the Brushes palette lets you apply gradual tones to an image, simulating traditional airbrush techniques.
Note: The Airbrush option in the Brushes palette corresponds to the Airbrush option in the options bar.
To enable or disable the Airbrush option:
In the Brushes palette, select Airbrush on the left side of the palette. A check mark indicates that the option is enabled.
Note: The Airbrush option in the Brushes palette corresponds to the Airbrush option in the options bar.
Smoothing brush strokes (Photoshop)
The Smoothing option produces smoother curves in brush strokes. This option is most effective when you are painting quickly with a stylus; however, it may produce a slight lag time in stroke rendering.
To enable or disable smoothing in brush strokes:
In the Brushes palette, select Smoothing on the left side of the palette. A check mark indicates that the option is enabled.
Protecting texture in brush strokes (Photoshop)
The Protect Texture option applies the same pattern and scale to all brush presets that have a texture. Select this option to simulate a consistent canvas texture when painting with multiple, textured brush tips.
To enable or disable the Protect Texture option:
In the Brushes palette, select Protect Texture on the left side of the palette. A check mark indicates that the option is enabled.
Copying textures between tools (Photoshop)
When you specify a texture for the current tool, you can copy the texture's pattern and scale to all tools that support textures. For example, you can copy the current texture pattern and scale for the brush tool to the pencil, clone stamp, pattern stamp, history brush, art history brush, eraser, dodge, burn, and sponge tools.
To copy a texture pattern and scale to other painting and editing tools: Choose Copy Texture to Other Tools from the Brushes palette menu. Clearing brush options (Photoshop)
You can easily clear all brush options for a tool using the Clear Brush Controls command.
To clear brush options:
Choose Clear Brush Controls from the Brushes palette menu.
Creating and managing preset brushes (Photoshop)
After you customize a brush, you can save it as a preset brush. Preset brushes appear in the Brushes palette, Brush pop-up palette in the options bar, and Preset Manager. You can create libraries of preset brushes, rename preset brushes, and delete preset brushes. Note: New preset brushes are saved in a Preferences file so that they persist between editing sessions. If this file is deleted or damaged, or if you reset brushes to the default library, the new presets will be lost. To permanently save new preset brushes, save them in a library.
To create a new preset brush:
1 Customize a brush.
2 Do one of the following in the Brushes palette or Brush pop-up palette:
. Choose New Brush from the palette menu, enter a name for the preset brush, and click OK.
.
Click the Create New Brush button .
![]()
To rename a preset brush:
Do one of the following:
. Select a brush in the Brush pop-up palette or Brushes palette, and choose Rename
Brush from the palette menu. Enter a new name for the brush, and click OK.
. If the Brushes palette is set to display brushes as thumbnails, double-click a brush, enter a new name, and click OK.
. If the Brushes palette is set to display brushes as a list or text only, double-click a brush, enter a new name inline, and press Enter ( Windows) or Return (Mac OS).
To delete a preset brush:
Do one of the following:
. In the Brush pop-up palette or Brushes palette, select a brush, and choose Delete Brush from the palette menu.
. In the Brush pop-up palette or Brushes palette, Alt-click ( Windows) or Option-click
(Mac OS) the brush you want to delete.
. In the Brushes palette, select a brush and click the Trash button
![]() ,
or drag a brush to the Trash
button.
,
or drag a brush to the Trash
button.
To save a set of preset brushes as a library:
1 Choose Save Brushes from the Brush pop-up palette menu or Brushes palette menu.
2 Choose a location for the brush library, enter a filename, and click Save.
You can save the library anywhere. However, if you place the library file in the Presets/ Brushes folder inside the Photoshop program folder, the library name will appear at the bottom of the Brush pop-up palette menu and Brushes palette menu after you restart Photoshop.
Note: You can also use the Preset Manager to rename, delete, and save libraries of preset brushes. For more information, see "Managing libraries with the Preset Manager
(Photoshop)" on section 54.
|
Politica de confidentialitate | Termeni si conditii de utilizare |

Vizualizari: 1112
Importanta: ![]()
Termeni si conditii de utilizare | Contact
© SCRIGROUP 2025 . All rights reserved