| CATEGORII DOCUMENTE |
| Asp | Autocad | C | Dot net | Excel | Fox pro | Html | Java |
| Linux | Mathcad | Photoshop | Php | Sql | Visual studio | Windows | Xml |
Making pixel selections
You can select pixels in an image by dragging with the marquee tools or lasso tools or by targeting color areas with the magic wand tool In Photoshop you can also use the Color Range command Making a new selection replaces the existing one Additionally you can create selections that add to a selection subtract from a selection select an area inter- sected by other selections or select the union of a new selection and the current selection.
Using the Select menu
You can use commands in the Select menu to select all pixels to deselect or to reselect.
To select all pixels on a layer within the canvas boundaries:
Select the layer in the Layers palette.
Choose Select > All. To deselect selections: Do one of the following:
Choose Select > Deselect.
If you are using the rectangle marquee rounded rectangle marquee (ImageReady), elliptical marquee or lasso tool click anywhere in the image outside the selected area.
To reselect the most recent selection:
Choose Select > Reselect.
Using the marquee tools
The marquee tools let you select rectangles ellipses rounded rectangles (ImageReady), and 1-pixel rows and columns By default a selection border is dragged from its corner. To use the marquee tools:
Select a marquee tool:
Rectangle marquee ![]() to
make a rectangular selection.
to
make a rectangular selection.
(ImageReady)
Rounded rectangle marquee ![]() to
select a rounded rectangle such as a
to
select a rounded rectangle such as a
Web-page button.
Elliptical
marquee ![]() to
make an elliptical selection.
to
make an elliptical selection.
Single row or single column
![]()
![]() marquee to define the border as a 1-pixel-wide row or column.
marquee to define the border as a 1-pixel-wide row or column.
In the options bar specify whether to add a new selection
add to a selection
![]()
![]() , subtract from
a selection
, subtract from
a selection ![]() , or
select an area intersected
by other selections
, or
select an area intersected
by other selections ![]() .
.
Specify a feathering setting in the options bar. Turn anti-aliasing on or off for the rounded rectangle or elliptical marquee (See "Softening the edges of a selection on section 166
For the rectangle rounded rectangle or elliptical marquee choose a style in the options bar:
Normal to determine marquee proportions by dragging.
Fixed Aspect Ratio to set a height-to-width ratio Enter values (decimal values are valid) for the aspect ratio For example to draw a marquee twice as wide as it is high enter 2 for the width and 1 for the height.
Fixed Size to specify set values for the marquee s height and width Enter pixel values in whole numbers Keep in mind that the number of pixels needed to create a 1-inch selection depends on the resolution of the image (See About image size and resolution on section 62
For aligning your selection to guides a grid slices or document bounds do one of the following to snap your selection:
(Photoshop) Choose View > Snap or choose View > Snap To and choose a command from the submenu. The marquee selection can snap to a document bound and more than one Photoshop Extra. This is controlled in the Snap To submenu (See "Using the Snap command on section 172
(ImageReady) Choose View > Snap To > Guides.
Do one of the following to make a selection:
With the rectangle rounded rectangle or elliptical marquee drag over the area you want to select Hold down Shift as you drag to constrain the marquee to a square or circle. To drag a marquee from its center hold down Alt ( Windows) or Option (Mac OS) after you begin dragging.
With the single row or single column marquee click near the area you want to select, and then drag the marquee to the exact location If no marquee is visible increase the magnification of your image view.
To reposition a rectangle rounded rectangle or elliptical marquee first drag to create the border keeping the mouse button depressed. Then hold down the spacebar and continue to drag If you have finished drawing the border drag from inside the selection.
Using the lasso polygonal lasso and magnetic lasso tools
The lasso and polygonal lasso tools let you draw both straight-edged and freehand segments of a selection border. With the magnetic lasso tool (Photoshop) the border snaps to the edges of defined areas in the image.
The magnetic lasso tool is especially useful for quickly selecting objects with complex edges set against high-contrast backgrounds.
To use the lasso tool:
Select the
lasso tool ![]() and select options (See "Setting
options for the lasso, polygonal
lasso and magnetic lasso tools on section 160
and select options (See "Setting
options for the lasso, polygonal
lasso and magnetic lasso tools on section 160
Drag to draw a freehand selection border.
To draw a straight-edged selection border hold down Alt ( Windows) or Option
(Mac OS) and click where segments should begin and end. You can switch between drawing freehand and straight-edged segments.
To erase recently drawn segments hold down the Delete key until you ve erased the fastening points for the desired segment.
To close the selection border release the mouse without holding down Alt ( Windows)
or Option (Mac OS).
To use the polygonal lasso tool:
Select the
polygonal lasso tool ![]() and select options (See "Setting
options for the lasso
polygonal lasso
and magnetic lasso tools on section 160
and select options (See "Setting
options for the lasso
polygonal lasso
and magnetic lasso tools on section 160
Click in the image to set the starting point.
Do one or more of the following:
To draw a straight segment position the pointer where you want the first straight segment to end and click Continue clicking to set endpoints for subsequent segments.
To draw a freehand segment hold down Alt ( Windows) or Option (Mac OS) and drag. When finished release Alt or Option and the mouse button.
To erase recently drawn straight segments press the Delete key.
Close the selection border:
Position the polygonal lasso tool pointer over the starting point (a closed circle appears next to the pointer) and click.
If the pointer is not over the starting point double-click the polygonal lasso tool pointer or Ctrl-click ( Windows) or Command-click (Mac OS).
To use the magnetic lasso tool (Photoshop):
Select the
magnetic lasso tool ![]() and select options (See "Setting
options for the lasso
polygonal lasso
and magnetic lasso tools on section 160
and select options (See "Setting
options for the lasso
polygonal lasso
and magnetic lasso tools on section 160
Click in the image to set the first fastening point Fastening points anchor the selection border in place.
To draw a freehand segment move the pointer along the edge you want to trace.
(You can also drag with the mouse button depressed.)
The most recent segment of the selection border remains active As you move the pointer, the active segment snaps to the strongest edge in the image based on the detection Width set in the options bar Periodically the magnetic lasso tool adds fastening points to the selection border to anchor previous segments.
If the border doesn t snap to the desired edge click once to add a fastening point manually Continue to trace the edge and add fastening points as needed.
To switch temporarily to the other lasso tools do one of the following:
To activate the lasso tool hold down Alt ( Windows) or Option (Mac OS) and drag with the mouse button depressed.
To activate the polygonal lasso tool hold down Alt ( Windows) or Option (Mac OS), and click.
To erase recently drawn segments and fastening points press the Delete key until you ve erased the fastening points for the desired segment.
7 Close the selection border:
To close the border with a freehand magnetic segment double-click or press Enter or
Return.
To close the border with a straight segment hold down Alt ( Windows) or Option
(Mac OS) and double-click.
To close the border drag back over the starting point and click.
Setting options for the lasso polygonal lasso and magnetic lasso tools
The lasso tool options let you customize how the different lasso tools detect and select edges.
To set options for the lasso tools:
If needed select the tool.
![]()
In the options bar specify whether to add a new selection
add to an existing selection
![]()
![]() ,
subtract from a selection
,
subtract from a selection ![]() , or
select an area intersected
by other selections .
, or
select an area intersected
by other selections .
Specify feather and anti-aliasing options (See "Softening the edges of a selection on section 166
For the magnetic lasso tool (Photoshop) set any of these options:
To specify a detection width enter a pixel value for Width. The magnetic lasso detects edges only within the specified distance from the pointer.
To specify the lasso s sensitivity to edges in the image enter a value between 1% and
100% for Edge Contrast A higher value detects only edges that contrast sharply with their surroundings a lower value detects lower-contrast edges.
To specify the rate at which the lasso sets fastening points enter a value between 0 and
100 for Frequency A higher value anchors the selection border in place more quickly. On an image with well-defined edges try a higher width and higher edge contrast and trace the border roughly On an image with softer edges try a lower width and lower edge contrast and trace the border more precisely.
To change the lasso cursor to indicate the lasso width press the Caps Lock key on the keyboard Change the cursor while the tool is selected but not in use.
If you are working with a stylus tablet select or deselect the Stylus Pressure option. When the option is selected an increase in stylus pressure will cause the edge width to decrease.
While creating a selection you can press ] to increase the magnetic lasso edge width by 1 pixel press [ to decrease the width by 1 pixel.
Using the magic wand tool
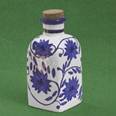
The magic wand tool lets you select a consistently colored area (for example a red flower) without having to trace its outline. You specify the color range or tolerance, for the magic wand tool s selection.
Note: You cannot use the magic wand tool on an image in Bitmap mode.
To use the magic wand tool:
Select the
magic wand tool ![]() .
.
In the options bar
specify whether to add a new
selection add to an existing
selection
![]()
![]() ,
subtract from a selection
,
subtract from a selection ![]() , or
select an area intersected
by other selections
, or
select an area intersected
by other selections ![]() . The
magic wand cursor changes depending on which option is selected.
. The
magic wand cursor changes depending on which option is selected.
For Tolerance enter a value in pixels ranging from 0 to 255 Enter a low value to select colors very similar to the pixel you click or enter a higher value to select a broader range of colors.
To define a smooth edge select Anti-aliased (See "Softening the edges of a selection"
on section 166
To select only adjacent areas using the same colors select Contiguous Otherwise all pixels using the same colors will be selected.
To select colors using data from all the visible layers select Use All Layers Otherwise, the magic wand tool selects colors from the active layer only.
In the image click the color you want to select If Contiguous is selected all adjacent pixels within the tolerance range are selected Otherwise all pixels in the tolerance range are selected.
Using the Color Range command (Photoshop)
The Color Range command selects a specified color or color subset within an existing selection or an entire image If you want to replace a selection be sure to deselect every- thing before applying this command.
To refine an existing selection use the Color Range command repeatedly to select a subset of colors For example to select the green areas in a cyan selection select Cyans in the Color Range dialog box and click OK. Then reopen the Color Range dialog box and select Greens ( The results are subtle because the technique selects parts of colors within a color mix.)
To select a color range using sampled colors:
Choose Select > Color Range.
For Select choose the Sampled Colors tool
![]() .
.
Select one of the display options:
Selection to preview only the selection as you build it.
Image to preview the entire image For example you might want to sample from a part of the image that isn t on-screen.
To toggle between
the Image and Selection previews in
the Color Range dialog box, press
Ctrl ( Windows) or Command (Mac
OS).
Position the pointer over
the image or preview area
and click to sample the colors you
want included.
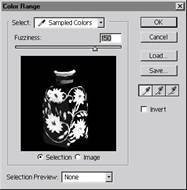
Sampling color
Adjust the range of colors using the Fuzziness slider or by entering a value. To decrease the range of colors selected decrease the value. The Fuzziness option partially selects pixels by controlling the degree to which related colors are included in the selection
(whereas the Tolerance option for the magic wand and paint bucket options increases the range of colors that are fully selected).
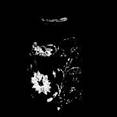
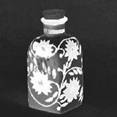
Increasing Fuzziness expands selection
Adjust the selection:
To add colors select the plus eyedropper and click in the preview area or image.
To remove colors select the minus eyedropper and click in the preview area or image. To activate the plus eyedropper temporarily hold down Shift Hold down Alt
(Windows) or Option (Mac OS) to activate the minus eyedropper.
To preview the selection in the image window choose an option for Selection Preview:
None to display no preview in the image window.
Grayscale to display the selection as it would appear in a grayscale channel.
Black Matte to display the selection in color against a black background.
White Matte to display the selection in color against a white background.
Quick Mask to display the selection using the current quick mask settings (See
Creating temporary masks in Quick Mask mode (Photoshop) on section 278
To revert to the original selection hold down Alt ( Windows) or Option (Mac OS) and click Reset.
To select a color range using preset colors:
Choose Select > Color Range.
For Select choose a color or tonal range. The Out-of-Gamut option works only on RGB and Lab images (An out-of-gamut color is an RGB or Lab color that cannot be printed using process color printing See "Color gamuts (Photoshop) on section 91
Click Selection to display the selected areas in the preview area.
To preview the selection in the image window choose an option for Selection Preview:
None to display no preview in the image window.
Grayscale to display the selection as it would appear in a grayscale channel.
Black Matte to display the selection in color against a black background.
White Matte to display the selection in color against a white background.
Quick Mask to display the selection using the current quick mask settings.
(See "Creating temporary masks in Quick Mask mode (Photoshop) on section 278
To revert to the original selection hold down Alt ( Windows) or Option (Mac OS), and click Reset.
Note: If a message appears stating "No pixels are more than 50% selected, the selection border will not be visible. You may have selected a color such as red when the image didn't contain the fully saturated color.
To save and load color range settings:
Use the Save and Load buttons in the Color Range dialog box to save and reuse the current settings.
Creating selections from slices (ImageReady)
If you create a slice in ImageReady it can be converted into a selection.
To create a selection from a slice:
Select a slice (See "Selecting slices on section 373
Choose Select > Create Selection from Slice.
|
Politica de confidentialitate | Termeni si conditii de utilizare |

Vizualizari: 1016
Importanta: ![]()
Termeni si conditii de utilizare | Contact
© SCRIGROUP 2025 . All rights reserved