| CATEGORII DOCUMENTE |
| Asp | Autocad | C | Dot net | Excel | Fox pro | Html | Java |
| Linux | Mathcad | Photoshop | Php | Sql | Visual studio | Windows | Xml |
Installing Microsoft SQL Server 7.0
Microsoft Product Support Services
Table of Contents
Process Overview
Running Setup
Scripting
Windows 95/98 Limitations
Additional Tools
Remote Installation
Frequently Asked Questions
Microsoft SQL Server 7.0 is the latest version of the SQL Server relational database product. With SQL Server 7.0, the Setup program has been changed from earlier versions of SQL Server Setup. This document is intended to provide information on the installation of Microsoft SQL Server 7.0.
Why a new Setup program?
The install time for the product has been significantly reduced.
New component and sub-component options are provided.
A new infrastructure provides more robust version checking, file copying, and cleanup on failure.
Enhancements and maintenance are substantially easier.
With the new Setup, one executable file can be used on multiple platforms.
What do I do if I encounter an error in the new Setup?
Review the Sqlstp.log file in the Windows directory.
Review the both the SQL error log in the MSSQL7Log directory and the Cnfgsvr.out file in the MSSQL7Install directory.
If your installation fails and you are unable to determine the cause, you should look for and save the Sqlstp.log file in the Windows directory and the Cnfgsvr.out file in the MssqlInstall directory, along with any other files that are left under your target program directory location (for example, C:Mssql7). Of particular interest is the Cnfgsvr.out file and any error logs in the Mssql7Log directory. If the Setup application fails, it will roll back changes to the file system, including removing any copied files, and also remove changes to the registry.
This section provides you with all the facts you need to know to install SQL Server 7.0, such as the minimum system requirements for your server computer. This section also provides a high-level overview of the setup process.
System Requirements
A minimum of 183 MB free disk space (but as little as 30 MB for a compact installation).
An Intel-compatible or DEC Alpha processor; there is no Power PC or MIPS support.
A 133 MHz or better Pentium, Pentium Pro or Pentium II processor.
A minimum of 32 MB RAM (but only 16 MB if you will not be doing any replication).
Microsoft Windows NT Server 4.0 Service Pack 4, Windows NT Workstation 4.0 Service Pack 4, Windows 95, or Windows 98.
Microsoft Internet Explorer 4.01 SP1.
Microsoft Systems Management Server, version 1.2 or later. SQL Server 7.0 is not compatible with Systems Management Server versions earlier than 1.2.
Not Required
Network support or the Microsoft loopback adapter.
Autorun
Upon inserting the SQL Server 7.0 CD into your computer, you will be presented with the main SQL Server 7.0 installation screen. If this screen is not presented, browse the CD and double-click the Autorun.exe file. This application presents you with options to read the release notes, browse Books Online, connect to the Microsoft SQL Server Web site, or to install the product and prerequisites. Prerequisites for the appropriate platform should be installed prior to installing SQL Server 7.0.
After all of the prerequisites are installed, you are ready to continue with the SQL Server 7.0 installation. After the SQL Server 7.0 setup begins, it will check to see if the ODBC files are available for updating. If any application or service is using the ODBC drivers, a dialog box will be presented showing the services or applications that should be stopped before Setup continues. A retry option is presented to help determine if the ODBC files are "unlocked." If Setup is run in the "Maintenance mode," this check is not reformed.
Installation Options
Users are prompted to select one of three setup installation options: Typical, Minimum, or Custom. A Typical setup installs the SQL Server binary files to the Mssql7 directory. The Typical option installs the data devices in the Mssql7Data directory, uses Named Pipes and Sockets listening on port 1433. To change these default settings, you must select the Custom installation option. If SQL Server Setup detects that SQL Server 6.x is installed on the computer, the Upgrade option is presented on the dialog boxes that appear. The following lists show what components are or are not installed with each installation option:
Typical
Named Pipes, TCP/IP, and Multi-Protocol network libraries
ISO Character Set (1252)
Dictionary order, case-insensitive sort order
SQL Server Books Online
Installs to the Mssql7 directory
Minimum - Does not install
SQL Server Enterprise Manager
SQL Server Profiler
SQL Server Query Analyzer
Version Upgrade Wizard
Client Diagnostic Utilities
SQL Server Books Online
Replication objects
MS DTC Client Support
Development files
Sample files
Server Debug symbols
Custom
Offers choices of network protocols; Named Pipes, TCP/IP, and Multi-Protocol are selected by default. NWLink IPX/SPX, AppleTalk ADSP, and Banyan VINES are also available options.
Allows sort order selection. Splits Scandinavian into Danish/Norwegian, Icelandic, and two Swedish/Finnish options. Drops strict compatibility with 1.x and alternate dictionary choices. Unicode collation defaults to general, case-insensitive. There are also 34 other choices.
Provides management tools choices, but always installs BCP, ISQL, OSQL, ODBC, and DB‑Library.
Offers a choice to run the SQL Server Books Online from disk or CD.
Development files are available in the custom installation, but are not selected by default.
Full text search is available in the custom installation, but it is not selected by default.
After the components have been selected, the Setup program has enough information to continue. Setup informs the user it has sufficient information and starts the process. The file copy process moves all required files to the selected installation path and to the Windows directories. Next Setup attempts to stop the MSSQL and the SQL Executive service if a previous version is installed (6.0 or 6.5). A failure to stop these services is not considered a fatal error, and Setup continues. Distributed Transaction Coordinator (DTC) is handled by the DTC package; it has its own Setup routine to stop the service and install components.
The next step is to install the packages that are needed for additional support components. These consist of: Microsoft Data Access Components, Microsoft Management Console, MSDTC, HTML Help viewer, DLT Tape driver, and the Monarch full text search engine. The selection of packages is based on the platform Setup is running on and the selections made by the user. Each package self-registers itself with the operating system and with SQL Server Setup. The appropriate entries for SQL Server, SQL Agent, and SQL Server-related components are also added.
After the registry values have been modified, the system path is updated to include the new Mssql7 entry and the SQL Server service is started. When the SQL Server service is running, Setup then runs Cnfgsvr.exe to set up the initial SQL Server configurations. If a character set or sort order other than the default was selected during the Setup choices, system tables are updated with the new code page, sort order, and unicode collation. The SQL server is stopped at this time and then restarted with a trace flag to reindex all system tables.
After all of the preceding steps have occurred, the following will be done:
Windows NT Performance Monitor entries are added to the registry.
Replication is installed.
Program groups and icons are created.
The Setup.iss file in the Windows directory is updated.
The Setup Completed dialog box appears.
Informational Files Created
During setup, the following informational files are generated to help locate any problems that may occur. Should you encounter any difficulties during setup, save these files and review them for possible causes.
WindowsSqlstp.log
C:Mssql7LogErrorlog
C:Mssql7InstallCnfgsvr.out
One of the most significant changes from moving to an InstallShield-based Setup has to do with unattended installations and uninstallations. Unfortunately, conversion or support of existing .ini files in the new Setup is not provided. For each existing .ini file, a new .iss file must be created as described below.
Unattended Installation
To invoke an unattended installation, you must first generate an InstallShield .iss file. Start SQL Server Setup with the k=Rc switch and proceed through the dialog boxes to install SQL Server as normal. Doing this causes Setup to record your dialog box choices in a file named Setup.iss, which is located in your Windows directory - this will not install SQL Server on the local computer. After this process is completed, the file can be moved or copied to another location for use on other servers. For subsequent automated installations, start Setup and specify a previously generated .iss file as input by using the -f1 setup command-line option. The syntax for this command is:
Setupsql.exe -f1 <full path to iss file> -SMS -s
If the -SMS switch is not specified the underlying InstallShield setup process, Sqlstp.exe, starts a process to perform the Setup and will immediately return control back to the user. The -s switch causes Setup to run in a silent mode.
Unattended Uninstallation
To start an unattended uninstallation, run Isuninst.exe with the -y switch to suppress confirmation of the uninstallation. The -a switch will suppress the dialog box that asks if you want to remove shared files, and the -f switch to point UnInstallShield at the uninstallation script file that was generated during the initial Setup. The file "Isuninst.isu" is created during Setup and is found in the MSSQL7 directory. Lastly, specify the SQL Server uninstall .dll file name (Sqlsun.dll), This DLL file contains specific SQL Server actions that are taken during the uninstallation. An example of the syntax for the uninstall command is:
isuninst.exe -f <path to the isu file>uninst.isu -cc:mssql7sqlsun.dll -y -a
Note: when you attempted to uninstall SQL Server in earlier versions of SQL Server, Setup would attempt to stop a list of applications if they were running. This was not always successful and resulted in non-deterministic behavior. Setup now stops any of the SQL Server services that are running, but also reports back to the user if any of the SQL Server 7.0 applications are running and could not be stopped. The user must stop these applications or services before running the uninstallation process, either manually or by using a tool such as the Windows NT KILL command or Net Stop.
Sample Sequence to Install
The following example shows the commands used to generate the setup.iss file:
Setupsql -r
'creates the initial iss file'
Copy c:winntsetup.iss to c:myinstallssample.iss
Setupsql -f1
c:myinstallssample.iss -SMS -s 'uses the iss file for an unattended
install'
Check for required restart as indicated in the sqlstp.log and restart if necessary. Run any verifications that are required
Sample Sequence to Uninstall
The following example shows the commands needed to uninstall SQL Server 7.0:
Terminate any running SQL Server executables (e.g. sqlmanager.exe) isuninst.exe -f c:mssql7uninst.isu -cc:mssql7sqlsun.dll -y -a
Return Error Codes from the Sqlstp.log files Created by Running the Unattended Installation
When you run the unattended installation, an error may be returned. The errors you might receive are designated by error code numbers. Below is a list of possible error code numbers and their explanations.
The most common error code is -12, because a user will use an .iss file that is generated when an unexpected dialog box appears (because of a condition of the system).
If the -f2 option is not used to specify the path for this output file, it will be placed in the Windows root directory.
0 Success
-1 General error
-2 Invalid mode
-3 Required data not found in the Setup.iss file
-4 Not enough memory available
-5 File does not exist
-6 Cannot write to the response file
-7 Unable to write to the log file
-8 Invalid path to the InstallShield Silent response file
-9 Not a valid list type (string or number)
-10 Data type is invalid
-11 Unknown error during setup
-12 Dialogs are out of order
-51 Cannot create the specified folder
-52 Cannot access the specified file or folder
-53 Invalid option selected
Because of system limitations of the platform and performance issues, Windows 95/98 installations do not have the following capabilities:
Incoming Named Pipe connections
Windows NT Authentication
Asynchronous IO
Transaction-based publishing
Clustering
Full text search
Auto-detection of unicode files
Windows NT Event log
The following additional tools are also available. These tools are available on all platforms, unless otherwise noted.
Regrebld.exe - RegistryRebuild Utility (Command Line Only)
Regrebld.exe is run automatically when Setup completes the initial installation. This creates an image of all the Mssql7 registry entries with file names of Mssql7*.rbk. Running regrebld -Restore will place the registry key images into the registry. If the keys already exist, they will be overwritten. If changes are made to the SQL Server installation, backups of the registry keys are not automatically updated. In this case, you will need to rerun Regrebld.exe manually to update the information. You may want to consider rerunning regrebld after adding additional network support or changing the security options. The following shows the syntax of the Regrebld command, along with the valid arguments it can take:
F:mssql7BINN>regrebld /?
Microsoft SQL Server Registry Rebuild App accepts the following command-line arguments:
-Backup <Directory to put backup files (Defaults to same directory as regrebld.exe)>
If the backup files already exist this will fail
-Restore <Directory location of backup files (Defaults to same directory as regrebld.exe)>
-ShortcutsOnly 1 <can only be used in Restore mode>
No command line arguments indicates to do a full Registry Rebuild with backup, recreating shortcuts, and verifying state of services on WinNT. When verifying state of services Registry Rebuild should always be run from the SQL Server BINN directory.
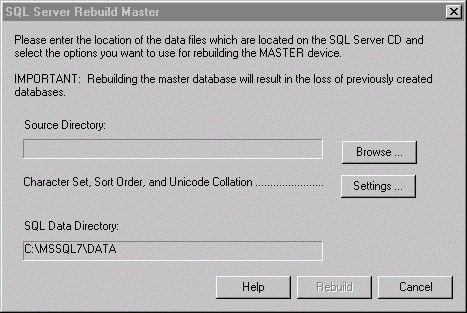
Rebuildm.exe -- Rebuild Master Database
The source directory in the following dialog box refers to the location of the original SQL Server files (i.e. the distribution CD or network share point).
VSwitch.exe -- Switches Between SQL Server 7.0 and 6.x Installations (Windows NT Only)
This utility can be located by clicking the Start button, point to Programs, point to Microsoft SQL Server - Switch, and then click SQL Server 7.0. This utility is included to offer systems in transition from SQL Server 6.x to 7.0 the capability to move between SQL Server versions 6.x and 7.0. The utility does not allow both versions of SQL Server to be run simultaneously, and is only intended to be used during the migration phase, not in daily production. The utility copies the current registry value to either the MSSQLSERV6.x or 7.0 registry key and then moves the desired version information (6.x or 7.0) to the MSSQLServer entry. Additionally it changes the PATH statement to reflect the Mssql or Mssql7 directory.
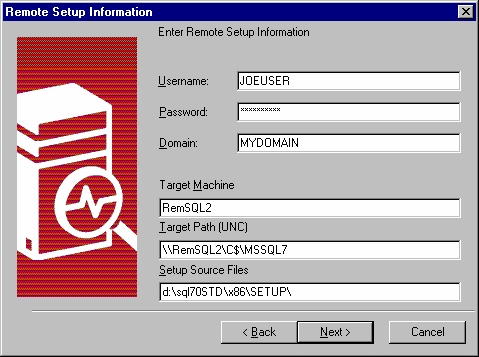
Remote Setup is supported on Windows NT-to-Windows NT computers only; both computers must be of the same processor type. Remote setup is not supported on a clustered Windows NT Server. Remote setup can only be used for a new installation. Upgrades, maintenance mode, or build-to-build upgrades are not supported.
Remote setup will only install the same version of SQL Server 7.0 on the remote computer as the one that is being run on the source computer. For example, if you are running the SQL Server 7.0 standard edition on Windows NT Server computer and attempt to remotely install SQL Server 7.0 Standard version to a Windows NT Workstation computer, the setup will fail because Windows NT Workstation only supports the client installation of the standard SQL Server 7.0 edition (Windows NT Workstation does support the desktop version of SQL Server 7.0). Use the same version of SQL Server on the local computer as the one you will be installing on remote computers.
The user account specified must be an administrator on the remote computer and have read access to the UNC path that is specified for the source files. The 'logon as service' right is granted to this account on the remote computer during the remote setup process.
The "remsetup.exe" copies the generated setup.iss file to targetmachineadmin$, then runs the Service Control Manager to create a remote service, therefore account supplied must be an administrator on the remote computer since it is creating a service and copying files to admin$ share.
After the user has inputted all of the setup information, setup records this information in an iss file. On the local computer setup then launches remsetup.exe and exits. Remsetup.exe installs the remote service, copies all files to the admin$ share and runs an unattended installation on the remote computer.
How
do I start an unattended setup?
To start an unattended installation, you must first generate an .iss file. You
can create this file by starting SQL Server Setup with the -r option and then going through Setup, interactively making the
selections you want. After the installation completes successfully, you will
have a Setup.iss file in your Windows directory. You can copy or move this file
to another location if you want. On subsequent installations, you can start
Setup and specify a previously generated .iss file as input by using the -f1 setup command-line option. For
detailed information on scripting, see the Scripting section earlier in this
document.
How
do I uninstall SQL Server 7.0?
With SQL Server 7.0, you now have three ways to uninstall the program.
On the Start menu, point to Programs, then point to Microsoft SQL Server 7.0 and click Uninstall SQL Server 7.0.
On the Start menu, point to Settings and click Control Panel. Double-click Add/Remove Programs. Select Microsoft SQL Server 7.0 from the list and then click Add/Remove.
Run a scripted uninstallation. For detailed information on how to do this, see the 'Scripting' section earlier in this document.
How
do I start an unattended uninstallation?
One of the results of a successful installation is the generation of an
uninstallation script file, called Uninst.isu that is located in the directory
you installed the program files to. To start an unattended uninstallation, you
must start the UnInstallShield executable file named Isuninst.exe, and direct
it to your uninstallation script file. For detailed information on how to do
this, see the 'Scripting' section earlier in this document.
Why
do I loose my dialog box selections? Whenever I type information into a dialog
box, click "Back" and then click "Next" again, the information that I typed in
the dialog box is lost. Why does this happen?
This is the result of InstallShield dialog boxes. Unfortunately, at this time,
there is no workaround other than to simply re-type the original text again.
What
do I need to do if I have an unsuccessful installation?
If
your installation fails and you are unable to determine the cause, look for and
save the Sqlstp.log file in the Windows directory, as well as any other files
that are left under your target program directory location (for example,
C:Mssql7). Of particular interest are the Cnfgsvr.out file and any error logs
in the Mssql7Log directory.
How
do I rebuild the registry? How do I rebuild the master database? How do I
reconfigure my server network protocols?
Rebuild Registry, Rebuild Master, and Configure Network Protocols have all been
removed from the SQL Server Setup code. However, the same functionality will be
granted through new utilities.
Why
do I have to exit the SQL Server Service Manager before I uninstall the
program? In earlier versions of SQL Server, Setup stopped SQL Server Service
Manager when it initiated an uninstallation. Now I get an error message
informing me that I need to exit this application. Why is this and why can't
Setup close this application for me?
In earlier versions of SQL Server, Setup would attempt to shut down these
services, without being able to completely guarantee success. This was changed
so that the applications must be closed manually.
Why
aren't some directories deleted when the product is uninstalled? Why does the
final uninstall report always report that it cannot remove folders?
The UnInstallShiled installer only removes what it installs. In general, this
is the correct behavior. However, some files, such as tempdb, are created
outside the bounds of the InstallShield installation. When the InstallShield
uninstaller runs, it tries to delete the folders that it created (Mssql7, Binn,
Data, and Log) and finds that these folders are not empty. However, the .dll
that is run after UnInstallShield is complete (Sqlsun.dll) removes files such
as tempdb and these folders.
Note: If error logs, trace files, or
user data remain in these directories, they will not be removed.
|
Politica de confidentialitate | Termeni si conditii de utilizare |

Vizualizari: 1800
Importanta: ![]()
Termeni si conditii de utilizare | Contact
© SCRIGROUP 2025 . All rights reserved