| CATEGORII DOCUMENTE |
| Asp | Autocad | C | Dot net | Excel | Fox pro | Html | Java |
| Linux | Mathcad | Photoshop | Php | Sql | Visual studio | Windows | Xml |
|
|
Microsoft Office XP
Speech Recognition in Office XP
icrosoft Product Support Services White Paper
Written by
Published on
Abstract
This white paper provides an overview of speech recognition in Microsoft Office XP. Topics include system requirements, installation and setup, the user interface, using Dictation mode, and more.
The information contained in this document represents the current view of Microsoft Corporation on the issues discussed as of the date of publication. Because Microsoft must respond to changing market conditions, it should not be interpreted to be a commitment on the part of Microsoft, and Microsoft cannot guarantee the accuracy of any information presented after the date of publication.
This White Paper is for informational purposes only. MICROSOFT MAKES NO WARRANTIES, EXPRESS OR IMPLIED, AS TO THE INFORMATION IN THIS DOCUMENT.
Complying with all applicable copyright laws is the responsibility of the user. Without limiting the rights under copyright, no part of this document may be reproduced, stored in or introduced into a retrieval system, or transmitted in any form or by any means (electronic, mechanical, photocopying, recording, or otherwise), or for any purpose, without the express written permission of Microsoft Corporation.
Microsoft may have patents, patent applications, trademarks, copyrights, or other intellectual property rights covering subject matter in this document. Except as expressly provided in any written license agreement from Microsoft, the furnishing of this document does not give you any license to these patents, trademarks, copyrights, or other intellectual property.
2001 Microsoft Corporation. All rights reserved.
Microsoft, Microsoft Office XP, Microsoft Word, Microsoft
Excel are either registered trademarks or trademarks of Microsoft Corporation
in the
The names of actual companies and products mentioned herein may be the trademarks of their respective owners.
Contents
Introduction 1
System Requirements 1
Installing the Components 1
Setting up Speech Recognition 1
The Language Bar 10
Correction 10
Microphone 11
Dictation and Voice Command 11
Tools 12
Handwriting or Writing Pad 13
On-Screen Keyboard 13
Options 14
Language Bar Menu 15
Turning Speech Recognition On and Off 17
Using Dictation Mode 18
Using Voice Command Mode 18
Special Considerations for Word Input Modes 20
General Tips to Increase Speech Recognition Accuracy 21
Things You Should Not Do 22
For More Information 23
Speech recognition allows you to dictate text into any Microsoft Office XP program. You can also select menu, toolbar, dialog box (U.S. English only), and task pane (U.S. English only) items by using your voice.
This feature is available in the English (
To use speech recognition, you need the following:
A high-quality close-talk (headset) microphone with gain adjustment support. A universal serial bus (USB) microphone is recommended.
A 400-megahertz (MHz) or faster computer.
128 megabytes (MB) or more of memory.
60 MB of free disk space.
Microsoft Windows 98 or later, or Microsoft Windows NT 4.0 SP 6a or later.
Microsoft Internet Explorer 5 or later.
To use speech recognition for the first time, start Microsoft Word 2002 and then click Speech on the Tools menu. If Speech does not appear on the Tools menu, you may need to perform a custom installation to add the speech recognition feature. In Office XP Setup, you can find the Speech option in the Office Shared FeaturesAlternative User Input feature tree.
NOTE: Speech recognition is not available when Office XP is installed on a Microsoft Windows Terminal Server. Speech recognition is not available in Microsoft Outlook 2002 if you are not using Word as your e-mail editor.
After speech recognition is installed, start it from any Office program by clicking Speech on the Tools menu, or by clicking the Microphone button on the Language bar. If the Language bar is not visible, right-click the language indicator button in the status area on the Windows taskbar, and then click Show the Language bar. For example, if you are working in English, you will see EN in the status area.
Training in speech recognition is essential. After installing speech recognition, you can increase speech recognition accuracy by taking a few minutes to train the computer to recognize how you speak. When you read aloud the prepared training text, the training wizard looks for patterns in the way you speak and gathers voice data that helps interpret the words that you will dictate into Office programs. The training session includes help with adjusting your microphone. It is important to go through at least one training session before you begin dictating. This should take less than 15 minutes to complete. Later you can take additional training to increase speech recognition accuracy.
After setting up speech recognition in Word, restart your computer. Now you can use speech recognition in other Office XP programs. You do not have to restart your computer for speech recognition to work in Word.
To run the Microsoft Speech Recognition Training Wizard, start Word and then click Speech on the Tools menu.
On the Welcome page, click Next.
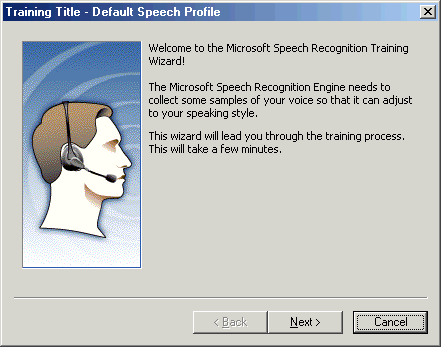
Figure - Welcome page
On the Adjust Your Microphone Volume page, you will be asked to speak, so that the microphone can find the right level. When the wizard finishes processing your speech, click Next.
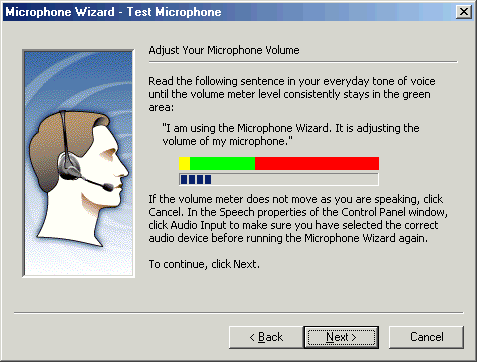
Figure - Adjust Your Microphone Volume page
Answer the questions about gender and age, and then click Next.
It is vital that you select the correct choices to these questions. The main reasons for this are:
o There are differences between male voices and female voices.
o There are differences in the frequencies of the speech of post-adolescent males versus the speech of females or pre-adolescent males.
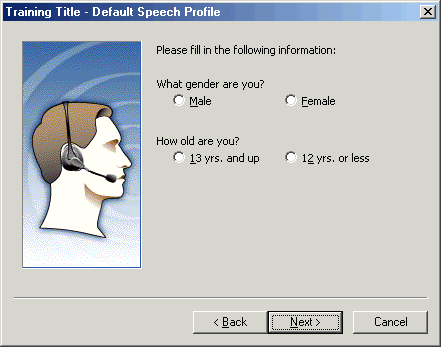
Figure - Requests for gender and age
Click Sample to hear how you should read a simple sentence, and then click Next.
You will be given instructions about the upcoming training session, including the opportunity to hear a sample playback. This is intended to give you guidance on how to speak during training.
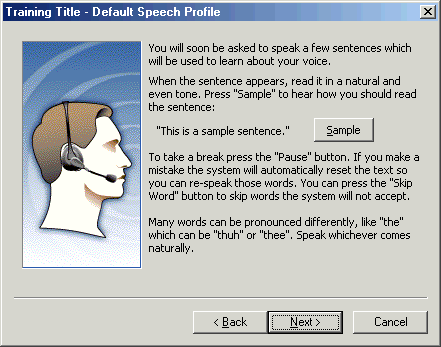
Figure - Preparing for speech recognition training
Set aside time for training. This should typically take about 15 minutes but could take longer. Make sure you have a quiet room and that you will not be disturbed during this training. Position your microphone correctly. To begin training, click Next.
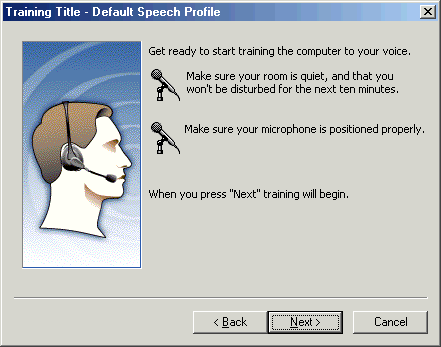
Figure - Prepare your room and microphone for speech recognition training
Read aloud the sample text provided by the wizard. As you speak, the wizard selects (highlights) the text. As the wizard matches what it hears to the text you are reading, the wizard processes these into a confirmed match, and the highlighting changes to a darker blue. Try not to focus on this process, and instead concentrate on speaking in a clear, consistent tone and pace. If you do not do this, the wizard may have difficulty recognizing your speech.
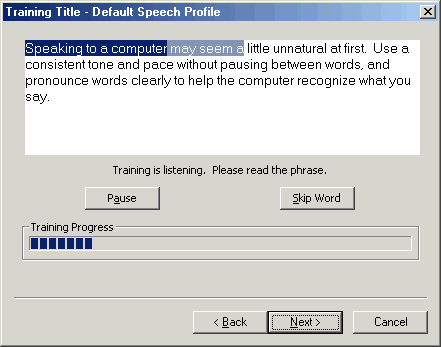
Figure - Training in progress
If the text is not being highlighted, or the wizard is having
difficulty recognizing your speech, stop speaking and then click Pause.
Start again after a short pause of about one or two seconds. You also may pause
after completing a sentence or phrase to allow the system to catch up, but do
not pause after each word or change your inflection. Doing so will actually
decrease the effectiveness of speech recognition. If repeated attempts to
progress beyond a particular word fail, click
The training advances automatically through several pages of the wizard. You can determine your progress by looking at the Training Progress indicator in the wizard.
NOTE: If you stop speaking for a while-for example, a minute or two-the wizard automatically pauses the training.
You can click Cancel at any time to stop the training session and start again later.
When your training session is completed, the Speech Recognition Wizard creates a user profile that contains the data it has collected. Typically, this update takes around 30 to 60 seconds.

Figure - Profile update progress indicator
When the Profile update progress indicator shows that your user profile is updated, click Next.
On the Thank you for training page, click Finish.
A page listing additional training sessions appears. If you want to continue training, select an additional training session, and then click Next. If you do not want to perform additional training now, click Cancel.

Figure - Passage Choice dialog box for speech recognition training
If your computer supports video playback, after training is completed, you see a 90-second video about using speech recognition in Office XP.
The Language bar provides access to the modes and settings of speech recognition in Office. It also provides a balloon element that gives feedback on the most recent input and indicates the completion of some operations, such as switching into Voice Command mode.

Figure - The Language bar shown with text labels

Figure - The Language bar shown without text labels
NOTE: The Correction option shown in Figure 9 is available only in Word and Outlook (when you are using Word as your e-mail editor).
To correct speech recognition errors, you can select the error and then click the Correction button on the Language bar, or you can right-click the misrecognized word and then select a word from the list of alternatives that appears. You can also select the word or words and type the correction.
You can also use voice commands when you make corrections. These commands and a description of each are listed in the following table.
|
Spoken command |
Description |
|
Cancel |
Closes the correction list |
|
Cancel that |
Closes the correction list |
|
Next |
Selects the next item on the correction list |
|
Page down |
Scrolls down one page in the correction list |
|
Page up |
Scrolls up one page in the correction list |
|
Select that |
Selects the item that currently has focus and closes the correction list |
|
One |
Selects the first item on the correction list |
|
Two |
Selects the second item on the correction list |
|
Three |
Selects the third item on the correction list |
|
Four |
Selects the fourth item on the correction list |
|
Five |
Selects the fifth item on the correction list |
|
Six |
Selects the sixth item on the correction list |
|
Seven |
Selects the seventh item on the correction list |
|
Eight |
Selects the eighth item on the correction list |
|
Nine |
Selects the ninth item on the correction list |
Table Voice Commands in Correction Mode
Turn the microphone on or off by clicking the Microphone button on the Language bar, by pressing the Windows logo +V key combination, or by saying "microphone" when the microphone is active to disable it.
NOTE: Some headsets have a Mute button that enables you to turn your microphone on or off. Muting a headset does not turn off the microphone as far as speech recognition is concerned, but it overrides the button on the Language bar for all practical purposes.
Two modes of operation are available with speech recognition: Dictation and Voice Command. The Dictation and Voice Command options do not appear unless speech recognition is turned on. Choosing one of these commands selects the respective mode.
Dictation mode runs everything you say through a language model and, unless your words are rejected, produces text where the insertion pointer is located. Voice Command mode checks everything you say to determine which command was issued. In Voice Command mode, you can select menu, toolbar, dialog box (U.S. English only), and task pane (U.S. English only) items by saying their names. This means that you can give voice commands for just about anything that you can read in an Office program.
NOTE: Dictation mode literally takes in everything you say. The speech recognition feature cannot interpret whether your speech was intentional or unintentional. Therefore, you should be deliberate and careful when using Dictation mode.
You cannot dictate in Voice Command mode; but it is possible to issue a few commands in Dictation mode. Using the correct mode is important, because it helps speech recognition interpret what you are saying-for example, do you mean to use the word "file" as plain text, or do you mean to use it to open the File menu?
Be aware of which mode you are in, so that you do not spend time dictating when you are in Voice Command mode. To switch between modes, choose one of the following methods:
Click one of the mode buttons on the Language bar.
Press Windows logo +T on your keyboard.
Say the name of a command on the Language bar.
The commands that are available in Dictation mode allow you to interact with the Language bar. For example, you can turn off the microphone or switch modes and delete the last phrase of dictated text. The following commands are available in Dictation mode.
|
Spoken command |
Description |
|
Correct that |
Invokes the correction user interface (UI). |
|
Correction |
Invokes the correction UI. |
|
Enter |
Inserts a carriage return. |
|
Enter | |
|
Force num |
Inserts a number or symbol rather than spelling it out. For example, if you want to insert the numeral "2", rather than the word "two", say "force num", followed by the number or symbol. Pause after saying the number or symbol to return to Dictation mode. |
|
Microphone |
Turns the microphone off. |
|
New line |
Inserts a carriage return. |
|
New paragraph |
Inserts two carriage returns. |
|
Next cell |
Inserts a TAB (same as Tab). |
|
Next line |
Inserts a carriage return (same as Enter). |
|
Reconvert that | |
|
Scratch that |
Undoes the last action. For example, deletes the last word or phrase recognized. |
|
Spelling mode |
Switches to Spelling mode, so that you can spell out the next word. When you pause after spelling the word, you return to Dictation mode. |
|
Tab |
Inserts a TAB. |
|
Undo that |
Undoes the last action. For example, deletes the last word or phrase recognized. |
|
Dictation |
Switches to Dictation mode. |
|
Voice Command |
Switches to Voice Command mode. |
Table Commands available in Dictation Mode
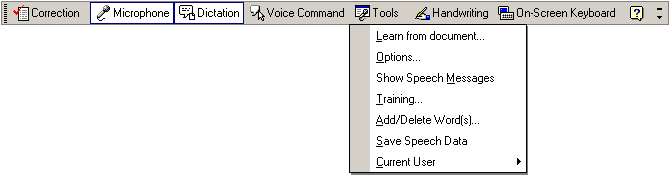
Figure -Tools menu
Clicking Tools on the Language bar allows you to do the following:
Learn from the document by having speech recognition scan the active Word document for words that are not in the speech recognition lexicon. Words that are missing from the speech dictionary are presented to you for review in decreasing order of frequency, so that you can decide whether to add them to the dictionary.
Set options to configure speech properties, such as setting the speech recognition language and configuring the microphone.
Show or hide speech messages in toolbar balloons to provide feedback about your most recent input.
Train speech recognition (opens the Speech Control Panel).
Add and delete words from the speech recognition dictionary.
Save speech data, so that a recording of dictated text is available on the corrections list after a file is saved. When the file is reopened, you can right-click an error and hear what was originally said.
Choose a profile if you have multiple profiles set up on your computer.
To use the handwriting recognition feature, click Writing Pad on the Language bar. If Writing Pad is not available, click Handwriting on the Language bar. For a discussion about handwriting recognition, see the "Handwriting in Office XP" white paper.
The On-Screen Keyboard enables you to type characters that may not appear on your keyboard.
The on-screen keyboards that are provided with the handwriting recognition feature are intended for use with English and other European languages. On-screen keyboards that are available with Input Method Editors (IMEs) are documented in the IME Help.
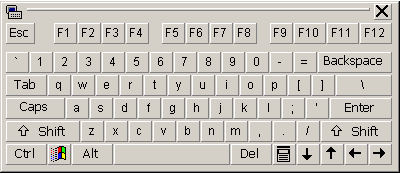
Figure 12 -On-screen keyboard
To use an on-screen keyboard, follow these steps:
On the Language bar, click Handwriting, and then click On-Screen Standard Keyboard or On-Screen Symbol Keyboard. Or click On-Screen Keyboard on the Language bar.
Place the insertion point where you want to insert text.
Do one of the following:
If you have a touch-screen computer, point to the buttons on the on-screen keyboard to enter text or move the insertion point.
If you do not have a touch-screen computer, use your mouse to click buttons on the on-screen keyboard to enter text or move the insertion point.
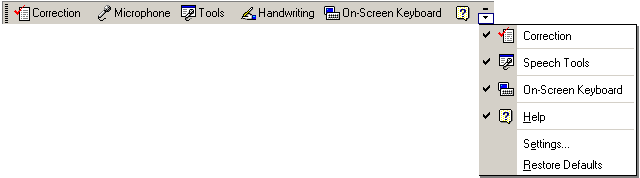
Figure 13 - Options menu
Clicking Options on the Language bar allows you to do the following:
Show or hide the Correction button on the Language bar
Show or hide the Tools button on the Language bar
Show or hide the On-Screen Keyboard button on the Language bar
Access Help topics about the Language bar
Specify settings such as the default input language
Restore default settings
The Settings
command on the Options menu opens
the Text Input Settings dialog box, where you can set the default input
language. The only languages that are supported by speech recognition are
English (
If one of the three supported languages is not currently available in the list, you can add it from the Text Input Settings dialog box. In addition, you can set display settings, such as toolbar transparency, and accessibility keys for switching languages or keyboard layouts.
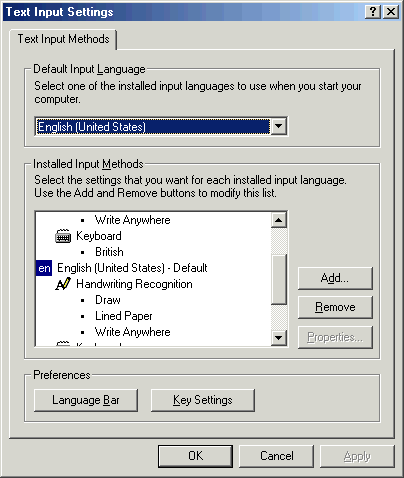
Figure 14 - Text Input Settings dialog box
NOTE: You can also access the Text Input Settings dialog box from the Speech Control Panel. To do this, point to Settings on the Windows Start menu, click Control Panel and then double-click Speech.
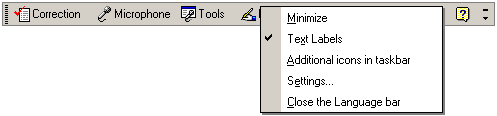
Figure 15 - Language Bar menu
When the Language bar is visible, you can right-click it to display a menu. Use this menu to change settings for the Language bar, make it transparent, add text labels, minimize it, or close it.
Figure 16 - The Language bar shown with text labels
Figure 17 - The Language bar shown without text labels
Turn speech recognition on by using any of the following methods:
On the Tools menu, point to Speech Recognition, and then click Speech.
On the Language bar, click Microphone.
Press Windows logo +V on your keyboard.
Turn speech recognition off by using any of the following methods:
On the Tools menu, point to Speech Recognition, and then click Speech.
On the Language bar, click Microphone.
From Dictation mode or Voice Command mode, say "microphone".
Press Windows logo +V on your keyboard.
NOTE: When you minimize a program or move the insertion point so that your program does not have focus, the speech recognition feature is temporarily turned off. When you maximize or return focus to the program, speech recognition resumes where you left off.
To turn on Dictation mode, use any of the following methods:
On the Language bar, click Dictation.
From Voice Command mode, say "dictation".
From Voice Command mode, press Windows logo +T on your keyboard.
As you speak, you see blue highlighting and a dotted line. This expands as data is received. When you reach the end of your paragraph or want to move to another cell in your worksheet, say "enter". Give the speech recognition software time to show the result before you say "enter"; if you do not do this, "enter" will be treated as part of the text that you are inputting.
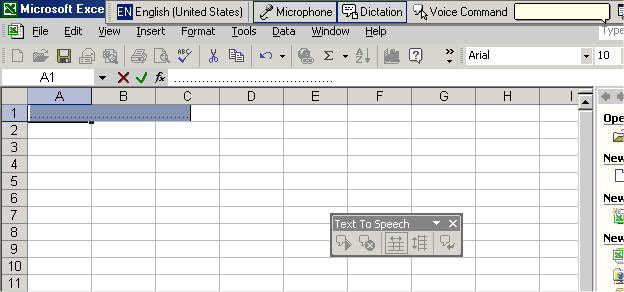
Figure - Highlighting and dotted line in a Microsoft Excel worksheet during speech recognition
To turn on Voice Command mode, use any of the following methods:
On the Language bar, click Voice Command.
From Dictation mode, say, "voice command".
From Dictation mode, press Windows logo +T on your keyboard.
In Voice Command mode, the software expects you to say either
The name of a menu, such as File or Edit, followed by a menu item or sub-item.
The name of a general command, such as Chart Wizard or Print.
For example, to open the Format Cells dialog box in Microsoft Excel, say "format" pause a moment, and then say "cells". To select individual tabs or select formatting effects, say the name of the tab or command. The following table lists the voice commands for some items in the Format Cells dialog box and the effect of issuing the command.
|
Voice command |
Effect |
|
Bold |
Sets font style to Bold |
|
Arial Black |
Sets font to Arial Black |
|
Twelve |
Sets font size to 12 point |
|
Underline (pause) single |
Shows the Underline list and then selects Single underlining |
|
Font color |
Shows the Color palette |
Table - Format Cells dialog box examples for voice commands
NOTE: Although you can display the Color palette in Office XP, you cannot say a color to select the color. The color palette is not speech-recognition enabled.
Overtype mode does not work with Dictation mode.
Extend Selection mode does not work with speech recognition. That is, you can select dictated text by using Extend Selection mode, but after you are in Extend Selection mode, you cannot extend the selection by spelling, as you can by pressing a key on the keyboard.
Word supports dictating text into limited-length text fields. Text longer than the length limit will be truncated.
The Don't replace selection option works for speech recognition, just as it does for typing and the Input Method Editor. With Don't replace selection turned on (on the Tools menu, click Options and then click the Edit tab), Word places the insertion point in front of the selected text but does not delete the selected text. Dictated text is then inserted at the location of the insertion point.
When you are in a read-only document, the Dictation button will be unavailable (dimmed), because dictation mode will not be available.
Perform the speech-recognition training. The more training that you perform, the more accurate your results will be. When training, follow these guidelines:
Restrict your vocabulary.
Pause between sentences to give speech recognition sufficient time to process (recognize) your words. Do not pause between words; if you do, speech recognition will not recognize words that rely on pattern matching.
Eliminate background noise.
Speak naturally. The technology behind speech recognition uses the syntax and pattern of speech to determine the words you are dictating. Because of this, it is recommended that you speak as though you are speaking to a person two to three feet in front of you.
Select the right type of microphone. Speech recognition will be enhanced if your microphone supports noise cancellation. In other words, can your microphone reject sounds that are not coming from nearby, without distorting the primary sound? A close-set headset microphone is recommended, because it allows you to place the mouthpiece close to your mouth and retain that same spacing and position from session to session.
Do not continue to repeat a word or command. If speech recognition does not recognize the word or command by your third or fourth try, use an alternative method to run a command or insert text. This type of repetition causes speech recognition to learn incorrectly and can increase your frustration with using the tool.
Do not place your microphone in different positions during a single session or each time you have a speech session. The position of your microphone in relation to your mouth should never change. Moving your microphone back and forth results in a totally different quality of sound recognition.
Do not use an existing speech profile if you change your hardware. And do not move a profile from one computer to another. When speech recognition creates your profile, it incorporates information about the sound card, the microphone, and system noises.
Do not speak one word at a time. Speech recognition works in part by examining words in context with other words. Using sentences or groups of words improves speech recognition.
For the latest information about Microsoft Office XP, see the following resources:
https://support.microsoft.com/directory/content.asp?ID=FH;EN-US;offxp
https://www.microsoft.com/office
|
Politica de confidentialitate | Termeni si conditii de utilizare |

Vizualizari: 1374
Importanta: ![]()
Termeni si conditii de utilizare | Contact
© SCRIGROUP 2026 . All rights reserved