| CATEGORII DOCUMENTE |
| Asp | Autocad | C | Dot net | Excel | Fox pro | Html | Java |
| Linux | Mathcad | Photoshop | Php | Sql | Visual studio | Windows | Xml |
Together, message routing and transport are responsible for message delivery internally and externally. Message routing is the way that messages flow between servers within the organization and to other servers outside of the organization. Your routing topology, based on the routing groups and connectors you define, dictates the path these messages take to reach their final destination. Transport determines the way that messages are delivered.
Simple Mail Transfer Protocol (SMTP) is the transport protocol that Exchange servers use to communicate with each other and send messages using the routing topology. SMTP is part of the Microsoft Windows ServerT 2003 or Microsoft Windows 2000 Server operating system. When you install Microsoft Exchange on a server running Windows Server 2003 or Windows 2000 Server, Exchange extends SMTP to support additional SMTP commands for additional functionality. This functionality includes the ability to communicate the link state status, available messaging routes status, and other Exchange functionality.
Because routing is the path messages travel from a sender to a recipient, a well-planned routing topology is essential for efficient mail flow within your Exchange organization. You should carefully evaluate your existing network infrastructure, before you plan your routing topology.
Note
Although this section focuses on the components of your routing
topology and how they affect message flow within your organization, it does not
discuss all of the planning considerations and various routing topologies in
detail. For information about planning your routing topology, see the book Planning an Exchange 2003 Messaging System https://www.microsoft.com/exchange/library .
In its default state, Exchange Server 2003, like Exchange 2000 Server, functions as though all servers in an organization are part of a single, large routing group. That is, any Exchange server can send mail directly to any other Exchange server within the organization. However, in environments with varying network connectivity and geographical distribution, you can increase message flow efficiency by creating routing groups and routing group connectors in accordance with your network infrastructure. By creating routing groups and routing group connectors, servers within a routing group still send messages directly to each other, but they use the routing group connector on those servers with the best network connectivity to communicate with servers in another group.
This section discusses what routing groups are, as well as how to create and configure routing groups and routing group connectors to manage internal mail flow. Then, because network topologies and environments change, this section also covers how to make adjustments to your routing topology, such as moving servers between routing groups, renaming routing groups, and deleting routing groups.
A routing group is a collection of servers connected by high-bandwidth, reliable network connections, such as a local area network (LAN). Within a routing group, all servers communicate and transfer messages directly to one another, as follows:
A user in your Exchange organization uses a mail client to send mail to another user.
Using SMTP, the sender's client submits this mail to the SMTP virtual server on the Exchange server on which the client's mailbox resides.
The Exchange server looks up the recipient of the mail message to determine which server the recipient's mailbox resides on.
One of two things happens:
If the recipient's mailbox is on the same Exchange server, Exchange delivers the message to the recipient's mailbox.
If the recipient's mailbox is on another Exchange server, the first Exchange server sends the message to the recipient's home mailbox server, and it is the recipient's home mailbox server that delivers the message to the recipient's mailbox.
Although all servers communicate with each other directly within a routing group, this is not the case when a server in one routing group needs to communicate with a server in another routing group. To allow servers to communicate with servers in other routing groups, you need to create a routing group connector. Although you can use an X.400 connector or an SMTP connector to connect routing groups, the routing group connector is specifically designed for this purpose and is the preferred method of connecting routing groups.
By default, all servers within a routing group can send mail over the routing group connector. Servers that are capable of sending mail over a routing group connector are bridgehead servers. These bridgehead servers are each a combination of an SMTP virtual server and an Exchange server responsible for delivering all messages through a connector.
When creating a routing group connector, you have the option of keeping all the servers as bridgehead servers for that connector or of specifying that only a selected set of servers act as bridgehead servers for that connector. Table 5.1 compares the advantages of each approach.
Table 5.1 Number of bridgehead servers in a routing group
|
Number of bridgehead servers |
Advantages |
|
All servers in a routing group |
Provides more efficient message flow because all of the servers in the routing group can directly deliver messages to other routing groups. Capitalizes on those configurations where all of the servers in a routing group have the same network connectivity to the servers in other routing groups. |
|
Only a select few servers in a routing group |
Makes troubleshooting message flow easier because there are limited points of contact between routing groups. Distributes messaging if you anticipate heavy message flow between routing groups. Makes mail flow more reliable and efficient in those configurations where some servers have better network connectivity than others. |
Figure 5.1 illustrates the basic components of routing discussed thus far. Figure 5.1 shows message flow between servers within a routing group and between routing groups. It also illustrates a topology that uses only a single bridgehead server in each routing group.
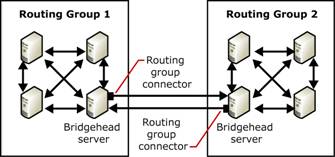
Figure 5.1 Communication within and between routing groups
When a topology is as simple as that shown in Figure 5.1, you do not have to consider how to best route messages between routing groups. As topologies become more complex, with large numbers of routing groups spread over varying geographical distances, message routing among groups becomes critical. You configure routing among routing groups by assigning costs to the routing group connectors used by these groups. When a user on a server in one routing group sends mail to a user on a server in another routing group, Exchange uses these costs (part of the link state information maintained by Exchange) to determine the most efficient route. Exchange always uses the route with the lowest cost unless a connector or server in that route is unavailable. So that every routing group knows what the various costs are for each connector and the status of those connectors, each routing group has a routing group master that updates and coordinates this information with all of the other servers in a routing group.
Exchange 2003, like Exchange 2000, uses link state information to determine the most effective route for delivering messages. The link state table contains information about the routing topology and whether each connector within the topology is available or unavailable. Additionally, the link state table contains costs associated with each available connector. Exchange uses this information to determine the route with the lowest cost. If a connector along the lowest cost route is unavailable, Exchange determines the best alternate route, based on cost and connector availability.
To understand how link
state information and connector costs work, consider the routing topology shown
in Figure 5.2, in which four routing groups exist:
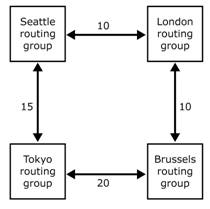
Figure 5.2 Routing topology and costs
If all connections
between the routing groups are available, a server in the
When you create a routing group, the first server in that routing group is assigned the role of routing group master. The routing group master keeps track of the link state information and propagates it to the other servers within the routing group, and other servers communicate back any changes in link state. For example, if a member server tries to contact another server over a connector, and this link is unavailable, the member server immediately notifies the routing group master. Likewise, when a non-master receives new link state information, it immediately transfers the link state information to the master, so that other servers can receive the information about the routing change.
Within a routing group, the routing group master and the other Exchange servers communicate link state information over TCP/IP port 691 using SMTP. However, communication of link state information between routing groups is different. If the routing group master is not a bridgehead server for the routing group, the routing group master sends the link state information to the group's bridgehead server over TCP/IP port 691. The bridgehead server then forwards this information (over TCP/IP port 25 using SMTP) to the bridgehead servers of other routing groups.
If you do not want the first server installed in the routing group to be the routing group master (the default setting), you can change the routing group master to another server using the following procedure.
To change which server is the routing group master
In Exchange System Manager, expand the routing group, click Members, right-click the server, and then select Set as Master.
Important
There is no automatic failover for routing group masters. If a
routing group master fails, you must manually configure a new routing group
master in Exchange System Manager. If a routing group master fails, the other
servers in the routing group use the last known link state information until a
routing group master becomes available or another routing group master is
designated.
In Exchange 2003 and Exchange 2000, the administrative and routing functions are split into different units:
Administrative groups define the logical administrative boundary for Exchange servers.
Routing groups define the physical routes that messages travel over the network.
If your Exchange organization is in native mode, where all servers are running Exchange 2000 or later, this split between administrative groups and routing groups enables you to create routing groups that span administrative groups, and move servers between routing groups that exist in different administrative groups. This functionality also allows you to separate routing and administrative functions. For example, you can administer servers in two central administrative groups, placing servers from each administrative group in different routing groups, based on your network topology.
However, the functionality of routing groups in mixed mode, where some servers are running Exchange 2003 or Exchange 2000 while others are running Exchange 5.5, is different than in native mode. In mixed mode, you:
Cannot have a routing group that spans multiple administrative groups.
Cannot move servers between routing groups that exist in different administrative groups.
This is because the routing topology in Exchange 5.5 is defined by sites-logical combinations of servers connected by a high-bandwidth reliable network. Sites provide the functionality of both the administrative group and routing group in Exchange 2003 and Exchange 2000. This difference in routing topology limits routing groups in mixed mode.
Note
For more information about native and mixed mode Exchange
organizations, see Chapter 2, 'Managing an Exchange
Organization.'
By design, Exchange functions as though all servers are connected by high-speed reliable networks. When your servers do not share this type of network connectivity, you can group servers with reliable network connectivity into routing groups to enable Exchange to maximize message flow efficiency.
By default, all servers in a native-mode Exchange organization are placed in a single routing group, called First Routing Group, and these servers communicate directly with one another. In mixed mode (where some servers are running Exchange 5.5 or earlier), each Exchange 5.5 site becomes a routing group.
Note
To understand the difference between routing groups in mixed and
native mode, see 'Using Routing Groups in Native and Mixed Modes'
earlier in this chapter.
After installation, you can create additional routing groups in your Exchange organization. When you install additional Exchange servers into an existing organization, you can then designate the appropriate routing groups where these servers belong. After installation, you can also move servers between routing groups.
When you create a routing group, two containers display beneath the routing group:
Connectors Displays any connectors installed on the servers within the routing group. This list includes any connectors to third-party mail systems, such as the Lotus Notes or Novell GroupWise connector, as well as any routing group connectors, X.400 connectors, and SMTP connectors that you configure.
Members Displays the servers within this routing group. By default, the routing group master is the first server added to a routing group.
Note
Before you can create routing groups, you must configure your
Exchange organization to display routing groups. In Exchange System Manager,
right-click your Exchange organization, click Properties,
and then select the Display routing groups check box.
To create a routing group
In Exchange System Manager, right-click Routing Groups, point to New, and then select Routing Group.
On the General tab (see Figure 5.3), in the Name box, enter a name for the routing group, and then click OK.

Figure 5.3 General tab for routing group
As discussed earlier, you can only add a server to a routing group during installation. However, you can move servers between routing groups at any time. The capability to move servers between routing groups is useful if your network topology changes, and you need to combine servers with reliable connections into different routing groups. You may also need to move servers between routing groups if you are consolidating your physical sites and moving more servers into a central location.
In native mode, you can move servers between routing groups that exist in different administrative groups. In mixed mode, you can only move servers between routing groups within the same administrative group.
Note
You cannot move a server that is configured as the bridgehead
server for any connectors. You must first designate a new bridgehead server, or
remove the connectors before you can move the server.
To move servers between routing groups
In Exchange System Manager, expand the routing group that currently has the server to be moved, and then expand the Members folder within that routing group.
Expand the routing group that will be the new location for the server, and then expand the Members folder within that routing group.
In the Members folder of the routing group that currently has the server to be moved, do one of the following:
Select the server and drag it to the Members folder of the routing group that will be the new location for the server.
-or-
Right-click the server, and then click Cut. In the Members folder of the routing group that will be the new location for the server, right-click, and then click Paste.
If necessary, you can rename a routing group after it is created. You may need to rename a routing group if you are consolidating routing groups or expanding a routing group to include more regions, and want to change the name to reflect the new membership.
If any servers in a routing group are bridgehead servers for an X.400 connector, ensure that no messages are in the Exchange message transfer agent (MTA) queue. (Messages are submitted to this queue if they are destined for an X.400 system or an Exchange 5.5 server.) If messages are in the Exchange MTA queue when you rename a routing group, wait 15 minutes for Exchange to apply these changes, and then restart the Microsoft Exchange MTA Stacks service.
You can use Queue Viewer to verify that no messages are in the Exchange MTA queue. Figure 5.4 shows the Exchange MTA queue with no messages.
Note
Messages in other queues are not affected when you rename a
routing group.
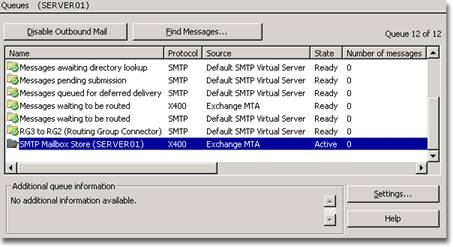
Figure 5.4 Exchange MTA queue in Queue Viewer
To rename a routing group
In Exchange System Manager, right-click the routing group, click Rename, and then type a new name for the group.
Before you can delete a routing group, you must move all member servers to another routing group. After you remove the servers from the routing group, you can delete the group.
To delete a routing group
Right-click the routing group, and then click Delete.
When you create a routing group, you designate a group of servers that can communicate directly with one another. As discussed earlier, for servers in different routing groups to communicate with each other, you need to connect the routing groups.
It is possible to connect routing groups with an SMTP connector or an X.400 connector. However, using these types of connectors is generally not recommended. The preferred connection method is a routing group connector because this connector is designed and intended specifically for connecting routing groups.
Routing group connectors are one-way routes for outgoing messages, which means messages travel outbound to the connected routing group. For two routing groups to communicate, a routing group connector must exist in each routing group to send messages outbound to the other routing group. When you create a connector to a routing group, Exchange displays a message asking if you want to create a routing group connector in the remote routing group so you can send messages from the remote routing group to the routing group where you are creating the first connector.
Before you create and configure a routing group connector, you should think about the following questions:
To which routing group does this connector deliver messages? This information is critical. Identifying the routing group to which the connector delivers messages establishes the relationship between the sending and receiving routing groups and the rest of your topology. You need to know how the sending and receiving routing groups fit into your topology in order to intelligently assign a cost for the associated connector.
What cost should this connector have? Cost is the variable Exchange uses to determine the most efficient messaging route. Exchange considers the lowest cost route the most efficient. Exchange uses a more expensive route only if a server or connector is unavailable on the route with the lowest cost. You should assign the lowest costs to the routes with the highest available network bandwidth.
Which servers in the routing group can act as bridgehead servers? Only designated bridgehead servers can send messages across the connector to the connected routing group. The default and preferred setting is to have any of the servers in the local routing group send mail using this connector. Use this default option when all servers in the routing group can connect directly over the network to the remote bridgehead server. Connecting directly to the remote bridgehead servers provides more efficient message flow.
However, you may have better direct network connectivity between specific servers in the local routing group and the designated remote bridgehead server. For example, Server A has a direct connection of 56 kilobits per second (Kbps) to a remote bridgehead server, while Server B and Server C each have a direct connection of 10 megabits per second (Mbps) to the same remote bridgehead server. In this case, you would want to specify the servers that have the better direct network connectivity (that is, Server B and Server C) as the bridgehead servers, and you would add those specific servers to a list of allowable bridgehead servers.
Should users access public folders that are not available locally using this connector? By default, public folder referrals are enabled across connectors connecting routing groups. However, network traffic increases when users access a public folder in a remote routing group. If your routing groups are connected by slow network connectivity or if your network may not be able to handle the additional traffic, disable public folder referrals. For more information about public folder referrals, see 'Understanding Public Folder Referrals' in Chapter 7, 'Managing Mailbox Stores and Public Folder Stores.'
What are the remote bridgehead servers to which this connector can send messages? The remote bridgehead servers are the servers in the connected routing group that receive all messages destined for this routing group. The remote bridgehead servers also send link state information to the bridgehead servers for the connector.
After considering these questions, you answer the first four by setting the configurations options on the General tab in the Routing Group Connector Properties dialog box. You can answer the last question by specifying remote bridgehead servers on the Remote Bridgehead tab.
To configure the options for a routing group connector
In Exchange System Manager, expand the routing group, right-click Connectors, point to New, and then click Routing Group Connector.
On the General tab (see Figure 5.5), select from the following options:
For the name of the routing group
connector, it is a common practice to use the two routing groups it connects.
For example, you could use the name ParisToSeattle to define a connector
connecting your
In Connects this routing group with, select the routing groups to which you want to connect.
In Cost, assign a cost for the connector.
To have all servers within the local routing group function as bridgehead servers, select Any local server can send mail over this connector.
To specify which servers within the local routing group can function as bridgehead servers for this connector, select These servers can send mail over this connector, and then click Add to add the appropriate servers to the list.
To prohibit users from accessing public folders that are not available locally using this connector, select Do not allow public folder referrals.
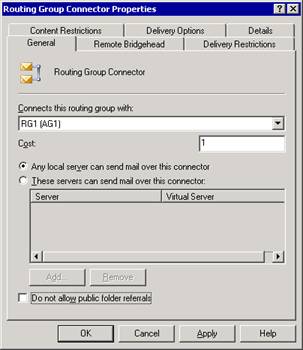
Figure 5.5 General tab of the Routing Group Connector Properties dialog box
To specify a remote bridgehead server for a routing group connector
In the Routing Group Connector Properties dialog box, on the Remote Bridgehead tab (see Figure 5.6), click Add, and then select the remote bridgehead server from the list of servers in the routing group to which you are connecting.
Note
You must specify a remote bridgehead server. For redundancy, you
should specify more than one remote bridgehead server, if possible.
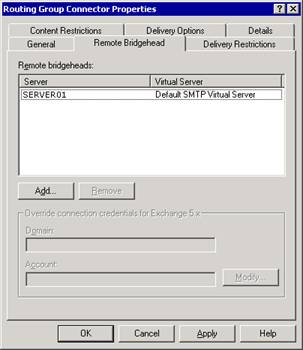
Figure 5.6 Remote Bridgehead tab in the Routing Group Connector Properties dialog box
If you are creating a routing group connector between routing groups that includes Exchange 5.5 servers, in Override connection credentials for Exchange 5.x, click Modify, and then enter the Exchange 5.5 service account credentials for the Exchange 5.5 server to which you are connecting.
Click Apply to create the connector.
When a message appears that asks if you want to create a routing group connector in the remote routing group, click Yes.
After clicking Yes, Exchange creates a routing group connector in the remote routing group. This new routing group connector allows the remote routing group to send messages to the local routing group. When creating this new routing group connector, Exchange does the following:
Exchange designates the bridgehead servers for the remote routing group connector as those servers listed on the Remote Bridgehead tab of the local routing group connector.
Note
When Exchange designates servers in this way, only those servers
listed on the Remote Bridgehead tab become bridgehead
servers for the new connector. If you would rather have all of the servers in
the remote routing group (not just those listed) function as bridgehead servers
for the new connector, you must manually select the Any local server can
send mail over this connector option on the General
tab of the new connector.
Exchange designates the remote bridgehead servers for the remote routing group connector as those servers listed as bridgehead servers on the General tab of the local routing group.
Internet connectivity depends on SMTP and Domain Name System (DNS), as well as some other components. As stated earlier, SMTP is the protocol used by Exchange to deliver mail internally and to the Internet. To enable Internet mail delivery in your Exchange organization, you manage the SMTP protocol by configuring SMTP virtual servers and connectors. Additionally, you must ensure that DNS is properly configured because DNS is responsible for locating mail servers outside of the organization, so that SMTP can deliver mail to them.
Note
Before connecting to the Internet, you should configure your
Exchange server in accordance with your company's security policy.
After you install Exchange, you can send and receive mail using the default configuration of an SMTP virtual server on an Exchange server if the following conditions exist:
You have a direct connection to the Internet.
Note
Dial-up connectivity requires some additional configuration. For
more information, see Configuring SMTP in Exchange 2000
Server ( https://go.microsoft.com/fwlink/?LinkId=15084
You have DNS configured correctly to resolve Internet names and to send mail to your Exchange server. Specific DNS settings are discussed later in this section.
This section describes how to configure Internet mail delivery. It includes:
Understanding SMTP dependencies and how to configure SMTP Exchange relies on SMTP to deliver mail internally and externally. Because of this reliance, you need to understand on which components SMTP depends and how to properly configure them to support SMTP. After you have set up these components properly, you need to know how to control the configuration of SMTP.
Using a wizard to configure Internet mail delivery Internet Mail Wizard is intended primarily for small and medium companies with less complex environments than large or enterprise companies.
Manually configuring Internet mail delivery In large or enterprise environments, you may need to manually configure Internet mail delivery, in accordance with your organization's policies. When manually configuring Internet mail, there is a separate set of tasks associated with configuring Exchange to send Internet mail and to receive Internet mail.
Controlling junk mail using filters Exchange supports connection, recipient, and sender filtering. Using these various filtering options helps you control the amount of junk mail your users receive.
Note
For detailed information about large or enterprise environments
and common deployment scenarios for those environments, see Configuring SMTP
in Exchange 2000 Server ( https://go.microsoft.com/fwlink/?LinkId=15084
As discussed earlier in this chapter, Exchange relies on SMTP to deliver mail internally and externally. This means that, for Internet mail delivery, Exchange depends on SMTP. However, before configuring Exchange for Internet mail delivery, you need to understand the components on which SMTP depends:
Internet Information Services (IIS)
As mentioned earlier, the SMTP service is installed as part of the Windows Server 2003 or Windows 2000 Server operating system. SMTP is a component of IIS and runs under a process called Inetinfo.exe. If you remove IIS from a server running Exchange, mail flow stops working.
IIS provides a framework process for Internet services such as HTTP, SMTP, and Network News Transfer Protocol (NNTP). IIS should not be confused with HTTP because several other services, such as SMTP, depend on IIS to function. After you install Exchange, the management of SMTP virtual servers moves to Exchange System Manager, even though the service itself continues to run within IIS. Because of this integration between Exchange and IIS, both the IIS component and the SMTP service that runs in IIS are required for Exchange and SMTP to function properly.
Active Directory
Exchange Server 2003 is tightly integrated with the Microsoft Active Directory directory service. Exchange stores all of its configuration information in Active Directory, including information about recipient policies, SMTP virtual server configuration, and user mailboxes. However, SMTP reads its settings from the IIS metabase. Therefore, to supply IIS with the information it needs for SMTP functionality, Exchange System Attendant, using a component called DS2MB (directory service to metabase), replicates the configuration information from Active Directory to the IIS metabase.
DNS
SMTP depends on DNS to determine the Internet protocol (IP) address of its next internal or external destination server. Generally, internal DNS names are not published on the Internet. Therefore, SMTP must be able to contact a DNS server that can resolve external DNS names to send Internet mail, as well as a DNS server that can resolve internal DNS names for delivery within the organization.
Additionally, for your Exchange servers to receive Internet mail, your DNS server must contain a mail exchange (MX) resource record that points to the A record with the IP address of the SMTP virtual server on your Exchange server that receives Internet mail for your organization. If you are supporting multiple domains, an MX record must exist for each of these domains for DNS to accept mail for the domain.
Recipient Policies
Recipient policies establish the default e-mail addresses that use a specific protocol (such as SMTP) for a set of users. E-mail addresses define the valid formats for addressing inbound e-mail messages to the Exchange system. The default recipient policy sets the mail domain for which the virtual server accepts incoming e-mail messages. It specifies the default SMTP and X.400 addresses for all Exchange-based mailbox-enabled objects. You can also create additional recipient policies if your organization receives mail for multiple domains, or if your default domain is used strictly for internal purposes and you use a different external mail domain.
Any SMTP domain specified in the recipient policies is replicated into the IIS metabase and set as authoritative local domains. Setting these domains as authoritative local domains means that SMTP accepts inbound mail for these domains and is responsible for sending all non-delivery reports for this domain. The only time an SMTP address is not considered local is when you add the address to the recipient policy because you clear the This Exchange Organization is responsible for all mail delivery to this address check box in the SMTP Address Properties dialog box.
Installing and correctly configuring the previous components ensures that SMTP functions properly with Exchange. With SMTP functioning properly, you can focus on configuring SMTP to meet your organization's needs.
In Exchange, you use SMTP virtual servers and SMTP connectors to control the configuration of SMTP.
SMTP virtual servers
Essentially, an SMTP virtual server is an SMTP stack (a process or server that both receives e-mail messages and acts as a client for sending e-mail). Each SMTP virtual server represents an instance of the SMTP service on a server. Consequently, a single physical server can host many virtual servers.
An SMTP virtual server is defined by a unique combination of an IP address and port number. The IP address is the address on which the SMTP virtual server listens for incoming SMTP connections. The default IP address is All Unassigned, which means that the SMTP virtual server listens on any of the available IP addresses. The port number is the port through which the SMTP virtual server receives communications. The default port number for inbound connections to an SMTP virtual server is port 25.
You use Exchange System Manager to control most of the SMTP settings. The property settings of the SMTP virtual server control inbound mail and, to a lesser degree, outbound mail settings.
SMTP connectors
An SMTP connector designates an isolated route for mail. You can use SMTP connectors to establish a gateway for Internet mail or to connect to a specific domain or mail system. Connectors allow you to define specific options for the designated mail route.
Although you can send and receive Internet mail using an SMTP virtual server, most companies configure an SMTP connector to route Internet mail. Using an SMTP connector is recommended because it provides an isolated route for mail destined to the Internet. Additionally, more configuration options are available on an SMTP connector than on the SMTP virtual server. Because of the benefits of an SMTP connector, the following sections that describe both the Internet Mail Wizard and the manual procedure for configuring Exchange to send Internet mail include information about creating and configuring an SMTP connector to route Internet mail.
Exchange Server 2003 implements a new version of Internet Mail Wizard that helps you configure Internet mail connectivity with Exchange Server 2003 or Exchange 2000 Server. Using Internet Mail Wizard, you can configure an Exchange server to send Internet mail, receive Internet mail, or send and receive Internet mail. Furthermore, using Internet Mail Wizard means that you do not have to configure the SMTP connector and SMTP virtual server manually. Internet Mail Wizard automatically creates the necessary SMTP connector for outgoing Internet mail and configures your SMTP virtual server to accept incoming mail.
Note
If you have already set up SMTP connectors, modified the IP
address or port number of your default SMTP server, or created additional SMTP
virtual servers on your Exchange server, you cannot run Internet Mail Wizard.
However, if you reset your server configuration to its default state, you can
then run Internet Mail Wizard.
Important
Internet Mail Wizard is intended primarily for small and medium
companies with less complex environments than large enterprise companies. If
you have a complex or enterprise messaging environment, you should manually
configure Exchange for Internet mail delivery.
To start Internet Mail Wizard
In Exchange System Manager, right-click your Exchange organization, and then click Internet Mail Wizard.
Note
To run Internet Mail Wizard, you must use the version of Exchange
System Manager that comes with Exchange Server 2003.
Follow the instructions in the wizard to perform the configuration tasks (see Tables 5.2 and 5.3) necessary to configure Internet mail delivery.
Table 5.2 Using Internet Mail Wizard to configure the sending of mail
|
Task |
Description |
|
Select an Exchange server within your organization that will send Internet mail |
As mentioned earlier, you cannot run the wizard on a server on which you have already set up SMTP connectors or created additional SMTP virtual servers. You can only use the wizard to designate Exchange 2000 or later servers. |
|
Designate a bridgehead server |
This is both the Exchange server and the SMTP virtual server on this server. The wizard creates an SMTP connector on the selected SMTP virtual server and Exchange server. The outbound bridgehead server handles all mail sent through this connector. |
|
Configure an SMTP connector to send Internet mail |
Internet Mail Wizard guides you through the process of configuring your SMTP connector. You can allow Internet mail delivery to all external domains, or you can restrict Internet mail delivery to specific domains. You can specify whether the SMTP connector sends outbound mail using DNS to resolve external domain names, or whether it uses a smart host that assumes responsibility for resolving external names and delivering mail. |
|
Verify that your SMTP virtual server is not open for relaying |
With open relaying, external users can use your server to send unsolicited commercial e-mail, which may result in other legitimate servers blocking mail from your Exchange server. If your server is secured for relay, only authenticated users can send mail to the Internet using your server. |
Table 5.3 Using Internet Mail Wizard to configure the receiving of mail
|
Task |
Description |
|
Select an Exchange server within your organization that will receive Internet mail |
As mentioned earlier, you cannot run the wizard on a server on which you have already set up SMTP connectors or created additional SMTP virtual servers. You can only use the wizard to designate Exchange 2000 or later servers. |
|
Configure your SMTP server to receive Internet mail |
To receive incoming Internet e-mail messages, the server must have only one SMTP virtual server, and that virtual server must have a default IP address of All Unassigned and an assigned TCP port of 25. If more than one SMTP virtual server exists on the Exchange server, or if the IP address or the port assignment is different than the default settings, the wizard will not continue. You can then either restore the Exchange server to its default configuration and rerun the wizard, or you can use Exchange System Manager to configure Exchange manually. |
|
Verify that your SMTP virtual server allows anonymous access |
Other servers on the Internet expect to connect anonymously to your SMTP virtual server. Therefore, anonymous access must be permitted on your SMTP virtual server. If anonymous access is not configured, the wizard guides you through enabling anonymous access. |
|
Configure your recipient policies with the SMTP domains for which you want to receive inbound mail |
The SMTP domains for which you want to receive Internet mail are configured in Exchange System Manager in Recipient Policies. You must have a recipient policy configured for every SMTP domain for which you want to accept Internet mail, and Exchange must be authoritative for this domain. If your default recipient policy contains the correct mail domain for your organization, use this policy. If you have created multiple recipient policies in Exchange System Manager, you cannot use the wizard to create additional recipient policies. In this case, to add or modify your recipient policies, you must use Exchange System Manager. To configure recipient policies manually, see 'Configuring Recipient Policies' later in this chapter. You must configure MX records in DNS for all mail domains. If you do not have an MX record for your mail domain, DNS cannot accept messages for your domain. |
When you use Internet Mail Wizard to configure Internet mail delivery on a dual-homed server (a server configured with two or more network addresses, usually with two network interface cards), the wizard performs the necessary configuration steps described in Tables 5.2 and 5.3.
The wizard also creates an additional SMTP virtual server on the Exchange server. It configures Internet mail delivery in the following ways:
To configure a server to send Internet mail, the wizard guides you through the process of assigning the intranet IP address to the default SMTP virtual server on which it creates the SMTP connector to send outbound mail. You assign the intranet IP address to this virtual server so that only internal users on your intranet can send outbound mail.
To configure a server to receive Internet mail, the wizard guides you through the process of assigning the Internet IP address to the Internet SMTP virtual server. You assign an Internet IP address to this virtual server because external servers need to be able to connect to this SMTP virtual server to send Internet mail. Additionally, you must have an MX record on your DNS server that references this server and the IP address of the Internet SMTP virtual server.
Important
To increase the security on a dual-homed server, use Internet
Protocol security (IPSec) policies to filter ports on the Internet network
interface card and strictly limit the users that you allow to log on to this
server. For more information about IPSec, see your Windows documentation.
If your messaging environment is large or complex, you cannot use Internet Mail Wizard to configure Exchange to send Internet mail. Instead, you must manually configure Exchange to handle outbound messaging over the Internet.
Configuring Exchange to send Internet mail involves:
Verifying that your SMTP virtual server uses the standard port for SMTP (port 25).
Configuring an SMTP connector through which Internet mail is routed.
Verifying that your DNS server can resolve external names, so that SMTP can deliver messages.
This section explains how to configure these settings on an Exchange server.
As discussed earlier, you configure most of the outbound settings that SMTP uses on the SMTP connector. However, you cannot configure the SMTP connector to control the ports and IP addresses through which Exchange sends outbound mail. To control these ports and IP addresses, you need to configure the SMTP virtual server. SMTP connectors configured on the virtual server inherit these settings.
Two of the SMTP virtual server properties relate directly to configuring Exchange to send Internet mail:
The outbound TCP port You need to ensure that the outbound port is set to port 25 (the default setting). Of the two settings related to sending Internet mail, this is the setting that you must verify.
Note
Changing the default settings on your default SMTP virtual server
can cause mail flow problems.
The use of an external DNS server To send Internet mail, the DNS server Exchange uses must be able to resolve external (Internet) names. Two common methods for configuring DNS to resolve external names include:
Configuring Exchange to point to an internal DNS server that uses forwarders to an external DNS server (this is the easiest and most common method).
Configuring Exchange to point to an internal DNS server that does not have a forwarder to an external DNS server, and then configuring an external DNS server on the SMTP virtual server that is responsible for sending external mail.
The following procedures describe how to verify that the outbound TCP port is set to 25, and how to specify an external DNS server.
To verify that the outbound port used to deliver mail is set to 25
In Exchange System Manager, expand Servers, expand <server_name>, expand Protocols, expand SMTP, right-click Default SMTP Virtual Server, and then click Properties.
On the Delivery tab, click Outbound connections.
In the Outbound Connections dialog box (see Figure 5.7), verify that the TCP port is set to 25.
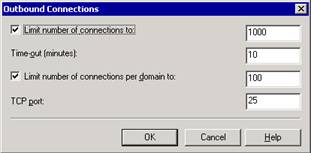
Figure 5.7 Outbound Connections dialog box
Note
Remote servers on the Internet expect your server to use TCP
port 25. Changing this setting is not recommended because other SMTP
servers generally accept connections on port 25 only.
To specify an external DNS server used by the SMTP virtual server
In the Default SMTP Virtual Server Properties dialog box, on the Delivery tab, click Advanced.
In the Advanced Delivery dialog box, click Configure.
In the Configure dialog box (see Figure 5.8), click Add to enter the IP address of an external DNS server. If you are using more than one external DNS server, use the Move Up and Move Down buttons to set the order of preference for the DNS servers.
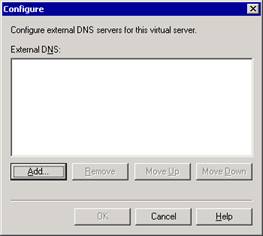
Figure 5.8 Configure dialog box for external DNS servers
The primary uses of an SMTP connector are to connect to the Internet or to other mail systems, and to define additional options on an SMTP Internet gateway. Because an SMTP connector creates an isolated route for Internet mail, it eases administration and troubleshooting if you encounter mail flow problems.
This section focuses on the connector's use as a connection method to deliver Internet mail. To configure an SMTP connector to deliver Internet mail, you first need to consider the following configuration requirements:
How to route mail for outbound delivery?
When you configure a connector, you can either use DNS to route all outgoing mail through the connector, or you can specify a smart host to which the connector routes all mail.
Using DNS to route all outgoing mail through the connector If you use DNS to route outgoing mail, the SMTP connector uses DNS to resolve the IP address of the remote SMTP server, then it delivers the mail.
If you select this routing method, verify the following information:
Verify that your DNS server can successfully resolve names on the Internet.
If you use an external DNS server to resolve names, and this server is configured at the SMTP virtual server level (that is, using a different DNS server than the one specified on your network connection), ensure that this external DNS server can resolve names on the Internet.
Specifying a smart host The smart host handles DNS resolution and delivers the mail. Although you can specify a smart host on an SMTP virtual server, you should set the smart host on the connector itself. The smart host setting on the SMTP connector overrides any smart hosts configured on the SMTP virtual server.
If you select this routing method, you specify an IP address or name for the smart host. The IP address and name for the smart host must meet the following requirements:
If you specify an IP address for the smart host Enclose the IP address in brackets (for example, [10.0.0.1]), and ensure that the IP address is not the IP address of the Exchange server.
If you specify a name for the smart host Ensure that the name is a fully qualified domain name (FQDN). (For example, 'Server Name' is not an FQDN. However, servername.contoso.com is an FQDN.) Also, ensure that the name is not the FQDN of the Exchange server.
If you do not have a smart host within your network, contact your Internet service provider (ISP) to find out what IP address or FQDN to use for the smart host. After you have the IP address or FQDN, make sure that the IP address or FQDN meets the previous requirements.
Which servers to use as local bridgehead servers?
An SMTP virtual server hosts a connector. When you create a connector, you designate at least one Exchange server and one SMTP virtual server as bridgehead servers. The connector inherits size restrictions and other settings from the SMTP virtual server. However, you can override these settings on the connector. You can also designate multiple bridgehead servers for load balancing, performance, and redundancy.
To send outbound mail, the connector uses the outbound port configured on the SMTP virtual server. If your organization sends a large amount of mail externally, you should designate dedicated Exchange servers and SMTP virtual servers as gateway servers or bridgehead servers receiving Internet mail. Using dedicated servers as gateway servers means that other mailbox servers do not have to assume the additional overhead of a gateway server.
Which domains should be included in the address space?
The address space defines the mail addresses or domains for the e-mail messages that you want routed through a connector. For example, an address space of * (asterisk) encompasses all external domains. A connector with this address space is capable of routing all external e-mail messages.
Exchange routes messages through a connector based on the closest match to an address space. If you had a connector with the * address space and then created a second connector with an address space of *.net, Exchange would route all mail sent to a domain with a .net extension through the second connector. This routing difference occurs because Exchange selects the connector that has the most similar address space to the outbound mail.
On connectors with an identical address space, costs work the same way as they do on routing group connectors. For example, you create two SMTP connectors to the Internet, Connector1 and Connector2, and each has the address space of *. Because Connector1 has better network connectivity, you always want to use this connector (unless it becomes unavailable) to send mail to the Internet, and you give Connector1 a cost of 1. Then, you give Connector2 a cost of 2. As long as Connector1 is operating properly, Exchange always sends messages through that connector because it has the lowest cost. If Connector1 becomes unavailable, Exchange uses the connector with the next lowest cost, Connector2.
Important
Do not list your inbound domains on an SMTP address space for a
connector. Your inbound domains are listed in your recipient policies. (For
more information, see 'Configuring Recipient Policies' later in this
chapter.) If you list some or all of your inbound domains in the SMTP address
space, you may receive non-delivery reports (NDRs) that indicate a mail loop.
(These NDRs may have the diagnostic code 5.3.5.) By specifying domains on the Address Space tab in the connector's Properties
dialog box, you can configure these domains as routable domains.
What is appropriate scope for the connector?
You can select either an entire organization or a routing group for the connector's scope. For example, you have two routing groups and each routing group has a server that has an SMTP connector to send mail to the Internet. For this configuration, you may choose to specify a routing group scope for each of the connectors. Specifying a routing group scope forces the servers in each routing group to use the connector in that routing group. However, a routing group scope also means that, if the group's SMTP connector becomes unavailable, messages queue in the routing group until the connector becomes available again. Given the restrictions imposed by a routing group scope, you would most likely set an SMTP connector to this scope if it is acceptable to have messages queuing when a connector becomes unavailable, or if the network cannot accommodate the extra traffic from one routing group sending Internet mail through an SMTP connector of another routing group. Otherwise, you must assign the connector an organization-wide scope and allow users in your entire organization to use any acceptable SMTP connector.
After you have thought about the configuration requirements for the SMTP connector and know what your configuration decisions are, you are ready to create and configure an SMTP connector. The first step is to configure the settings on which you have decided. Then you need to enable anonymous access for outbound connections because other servers on the Internet expect your SMTP server to connect anonymously.
After creating and configuring the connector using the following procedures, your SMTP connector is ready to send mail to the Internet. However, these procedures do not cover all the configuration settings for the connector. There are additional configuration settings that control how the connector delivers mail to the Internet. For more information about configuring these additional settings, see 'Customizing Mail Delivery' later in this chapter.
To configure a connector for Internet mail delivery
In Exchange System Manager, expand the routing group, right-click Connectors, point to New, and then click SMTP Connector.
The Properties dialog box (see Figure 5.9) for the new connector appears.
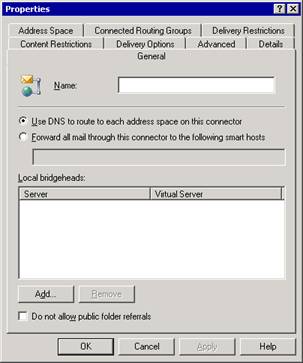
Figure 5.9 Properties dialog box for a newly created SMTP connector
On the General tab, select one of the following options:
To use the DNS settings configured on the SMTP virtual server that is hosting the connector, select Use DNS to route to each address space on this connector.
The SMTP connector uses DNS to resolve the IP address of the remote SMTP server, and then it delivers the mail.
To route mail to a Windows SMTP server or another server in your perimeter network (also known as a DMZ or demilitarized zone, and screened subnet), select Forward all mail through this connector to the following smart hosts.
The SMTP connector then routes mail to the selected server, which handles DNS resolution and delivers the mail.
On the General tab, click Add, and add at least one bridgehead server and one SMTP virtual server.
The servers that you add appear in the Local bridgeheads list on the General tab.
Click the Address Space tab.
On the Address Space tab, click Add.
In the Add Address Space dialog box (see Figure 5.10), in the Select an address type list, click SMTP, and then click OK.
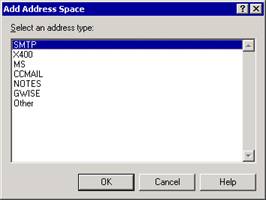
Figure 5.10 Add Address Space dialog box
In the Internet Address Space Properties dialog box (see Figure 5.11), select the following options:
In the E-mail domain box, type an e-mail domain for the connector.
Important
In the E-mail domain box, there is a default value of that
represents all addresses. At least one connector in your organization should
have this address space to ensure that all external domains are routed to the
Internet.
In the Cost box, assign an appropriate cost. By default, the cost is 1.
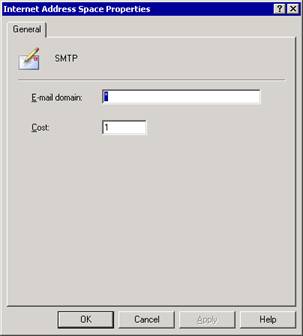
Figure 5.11 Internet Address Space Properties dialog box
Click OK to return to the Address Space tab (see Figure 5.12).
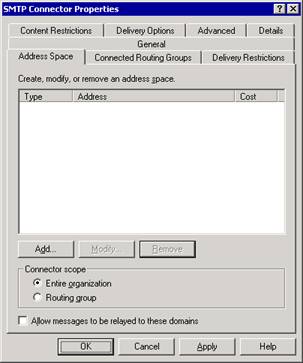
Figure 5.12 Address Space tab
On the Address Space tab, under Connector scope, select one of the following options:
To allow all servers in your Exchange organization to use this connector, select Entire organization.
To allow only servers in the routing group to use this connector to send Internet mail, select Routing group.
Note
If you select Routing group, ensure that
you have another way for servers in different routing groups to send Internet
mail.
To enable anonymous access
In the Properties dialog box for your SMTP connector, on the Advanced tab, click Outbound Security.
In the Outbound Security dialog box (see Figure 5.13), select Anonymous access.
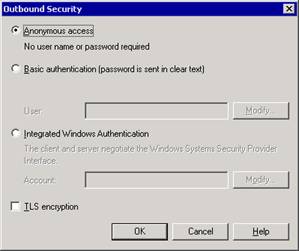
Figure 5.13 Outbound Security dialog box
As discussed earlier in this chapter, one advantage to using an SMTP connector for outbound mail, rather than using an SMTP virtual server, is that you can specify additional configuration settings to affect how mail is delivered (see Table 5.4). Whether you need to adjust the default values for these settings depends on how you want your SMTP connector to deliver mail.
Table 5.4 Additional configuration settings for an SMTP connector
|
Settings |
Description |
|
Delivery restrictions |
Restricts who can send mail through a connector. By default, the connector accepts mail from everyone. You configure these settings on the Delivery Restrictions tab of the SMTP connector's Properties dialog box. |
|
Content restrictions |
Specifies what types of messages are delivered through a connector. You configure these settings on the Content Restrictions tab of the SMTP connector's Properties dialog box. |
|
Delivery options |
If you connect to a network service provider to retrieve your mail, configure a connector to run on a specified schedule, and implement advanced queuing and dequeuing features. You configure these settings on the Delivery Options tab of the SMTP connector's Properties dialog box. |
|
SMTP communication |
Controls how the connector uses SMTP to communicate with other SMTP servers. Specifically, you can specify whether the connector uses SMTP or Extended Simple Mail Transfer Protocol (ESMTP) commands to initiate a conversation with another server and control the use of the ERTN and TURN commands. (These commands request that another SMTP server sends the e-mail messages that it has.) You configure these settings on the Advanced tab of the SMTP connector's Properties dialog box. |
|
Outbound security |
Ensures that any mail flowing through the connector is authenticated. This setting is useful if you want to establish a more secure route for communicating with a partner company. With this setting, you can establish an authentication method and require Transport Layer Security (TLS) encryption. You configure these settings on the Advanced tab of the SMTP connector's Properties dialog box. |
To send Internet mail using DNS rather than forwarding mail to a smart host, the Exchange server resolves the receiving domain and IP address of the recipient's SMTP server. The server then uses SMTP over TCP port 25 to establish a conversation with the recipient's SMTP server, and deliver the mail.
When you use DNS, the most important thing to remember is that all DNS servers that an Exchange server uses must be able to resolve external domains (also referred to as Internet domains).
There are two methods that you can use to configure DNS for outbound mail:
Method 1 You can configure Exchange to rely on your internal DNS servers. These servers resolve external names on their own or use a forwarder to an external DNS server.
Method 2 You can configure Exchange to use a dedicated external DNS server. (For more information about external DNS servers, see 'To specify an external DNS server used by the SMTP virtual server' in the section 'Verifying Outbound Settings on SMTP Virtual Servers' earlier in this chapter.)
For more information about how to configure and verify your DNS configuration, see Configuring SMTP in Exchange 2000 Server ( https://go.microsoft.com/fwlink/?LinkId=15084 ) and your Windows documentation.
Manually configuring Exchange to receive Internet mail involves:
Creating the proper recipient policies, so that your Exchange server receives mail for all e-mail domains that are used by your company.
Configuring inbound SMTP virtual server settings to allow anonymous access, so that other SMTP servers can connect and send mail to your SMTP virtual server.
Verifying that the correct MX records exist in DNS, so that other servers on the Internet can locate your server to deliver mail.
This section explains how to configure these settings on your Exchange server.
Exchange uses recipient policies to determine which messages should be accepted and internally routed to mailboxes in your organization. Recipient policies that are configured improperly can disrupt message flow for some or all recipients in your messaging system. Recipient policies are configured in Exchange System Manager under the Recipients container in Recipient Policies.
To ensure that your recipient policies are configured properly, verify the following:
That recipient policies do not contain an SMTP address that matches the fully qualified domain name (FQDN) of any Exchange server in your organization. For example, if you have an Exchange server with an FQDN of server01.contoso.com and you also have this same FQDN (@server01.contoso.com) listed as an SMTP address and as a domain name on any recipient policy, this entry prevents mail from routing to other servers in the routing group.
That the domain for which you want to receive SMTP mail is listed on a recipient policy-either on the default policy or another recipient policy. By verifying this information, you ensure that your users can receive mail from other SMTP domains.
That you configured the necessary SMTP e-mail addresses to receive e-mail messages for additional domains. If you are not receiving e-mail messages for all of your SMTP domains, you may need to configure additional SMTP addresses for your recipients. For example, some of your users may currently receive e-mail messages addressed to contoso.com, but you also want them to receive e-mail messages addressed to adatum.com. In this situation, the SMTP address of @adatum.com and the SMTP address of @contoso.com must exist on a recipient policy for your Exchange organization.
For more information about recipient policies, see Chapter 4, 'Managing Recipients and Recipient Policies.'
To configure your SMTP virtual server to receive Internet mail, you must perform the following tasks:
Configure the inbound port as 25 and specify the IP address Other servers on the Internet expect to connect to your SMTP virtual server on port 25. By default, all SMTP virtual servers use this port.
Verify that your SMTP virtual server allows anonymous access To receive Internet mail, your SMTP virtual server must permit anonymous access. Other servers on the Internet expect to communicate anonymously with your SMTP virtual server to send Internet mail to your users.
Verify that default relay restrictions are configured on your SMTP virtual server By default, the SMTP virtual server allows only authenticated users to relay e-mail messages. This setting prevents unauthorized users from using your Exchange server to send e-mail messages to external domains.
The following procedures describe how to perform each of these tasks.
To configure or verify the inbound port and IP address
In Exchange System Manager, in the Properties dialog box of the SMTP virtual server, on the General tab, click Advanced.
The Advanced dialog box appears (see Figure 5.14). By default, your SMTP virtual server uses an IP address of All Unassigned, which means that the virtual server listens for requests on all available IP addresses. You can keep the default IP address, or click Edit to change the address. By default, your SMTP virtual server uses TCP port 25. It is recommended that you do not modify the default port assignment.
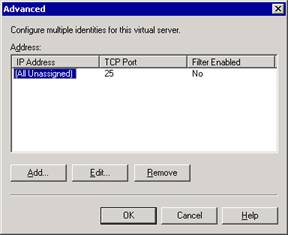
Figure 5.14 Advanced dialog box
To verify that your SMTP virtual server is configured to allow anonymous access
In Exchange System Manager, in the Properties dialog box of the SMTP virtual server, on the Access tab, click Authentication.
In the Authentication dialog box (see Figure 5.15), select the Anonymous access check box (if it is not already selected).
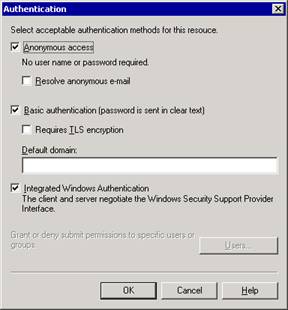
Figure 5.15 Authentication dialog box
To verify that your SMTP virtual server is not set to open relay
In Exchange System Manager, in the Properties dialog box of the SMTP virtual server, on the Access tab, click Relay.
In the Relay Restrictions dialog box (see Figure 5.16), select Only the list below (if it is not already selected), click Add, and follow the instructions to add only those hosts that you want to allow to relay mail to the list.
Note
If you select All except the list below,
your server may be used by unauthorized users to distribute unsolicited e-mail
messages on the Internet.
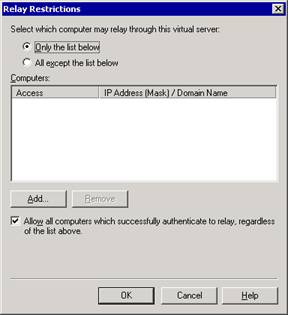
Figure 5.16 Relay Restrictions dialog box
Select Allow all computers which successfully authenticate to relay, regardless of the list above (if it is not already selected).
This setting allows you to deny relay permissions to all users who do not authenticate. Any remote Internet Message Access Protocol version 4 (IMAP4) and Post Office Protocol version 3 (POP3) users who access this server will authenticate to send mail. If you do not have users who access this server through IMAP4 or POP3, you can clear this check box to prevent relaying entirely, thereby increasing security. You can also designate a specific server for IMAP4 and POP3 users, and then clear this check box on all other Internet gateway servers.
To receive Internet mail, the following DNS settings are necessary:
Your DNS server must be configured correctly.
Your external DNS servers must have an MX record pointing to an A record with the IP address of your mail server. The IP address must match the IP address configured on your SMTP virtual server that receives Internet mail.
For external DNS servers to resolve your mail server's MX record and contact your mail server, your mail server must be accessible from the Internet.
Your Exchange server must be configured to use a DNS server that can resolve external DNS names.
To ensure that your MX records are configured correctly, you can use the Nslookup utility. To verify that your server is accessible on port 25 to other servers on the Internet, you can use Telnet.
Note
For more information about how to configure and verify your DNS
configuration, see Configuring SMTP in Exchange 2000
Server ( https://go.microsoft.com/fwlink/?LinkId=15084 ) and
your Windows documentation.
Exchange Server 2003 supports three types of filters: connection filtering, recipient filtering, and sender filtering. These filters are useful in reducing the amount of junk e-mail messages your users receive.
You configure filtering in Message Delivery Properties under Global Settings. However, you must enable these filters on each SMTP virtual server to which you want to apply the filters. Generally, you should enable filtering on your Internet gateway servers because filtering is applied only to mail submitted from external users. On Exchange servers designated for internal mail, you do not need to enable filtering.
To enable filtering
On the General tab of the SMTP virtual Properties dialog box, click Advanced.
Select an IP address, and then click Edit.
In the Identification dialog box (see Figure 5.17), enable the filters that you want applied on this virtual server.
Figure 5.17 shows a virtual server with sender, recipient, and connection filtering enabled.
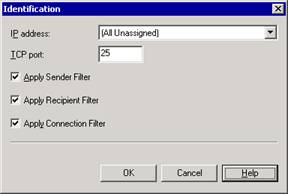
Figure 5.17 Identification dialog box
This section focuses on using the X.400 protocol and X.400 connectors to connect to Exchange 5.5 servers or other third-party X.400 mail systems. The X.400 connector relies on the X.400 protocol and its accompanying transport stack to provide the underlying transport functionality.
Three components control the behavior of the X.400 protocol on an Exchange server:
X.400 protocol An X.400 node appears under the Protocols container in Exchange System Manager on an Exchange server. Properties that are configured on the X.400 protocol determine how the protocol works on an individual server.
X.400 transport stacks An X.400 transport stack contains configuration information about network software, such as TCP/IP network services, and information about hardware, such as an X.25 port adapter or dial-up connection on the computer running Exchange. Each X.400 connector requires a transport stack on which to run and communicates using the configuration information within that stack. You can create either an X.400 TCP transport stack or an X.400 X.25 transport stack.
X.400 connectors X.400 connectors provide a mechanism for connecting Exchange servers with other X.400 systems or Exchange 5.5 servers outside of the Exchange organization. An Exchange 2003 server can then send messages using the X.400 protocol over this connector.
Important
X.400 connectors are only available in
Exchange Server 2003 Enterprise Edition.
The X.400 protocol provides the underlying functionality used by X.400 connectors and protocol stacks. The X.400 service message transfer agent (MTA) stack, located in the Protocols container under your Exchange server in Exchange System Manager, provides addressing and routing information for sending messages from one server to another. Use the X.400 Properties dialog box (see Figure 5.18) to configure basic settings and messaging defaults used by the X.400 protocol on your server. Any X.400 transport stacks and X.400 connectors that you create on this server inherit these settings by default, although you can override this configuration on individual connectors.
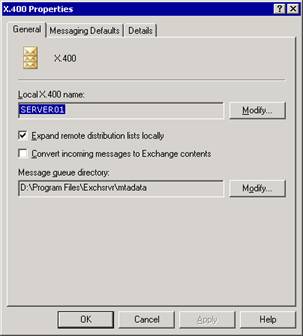
Figure 5.18 The General tab on the X.400 Properties dialog box
The following general properties can be set on the X.400 protocol.
The entry in the LocalX.400 name box identifies the X.400 account that Exchange uses when it connects to the remote system. This name identifies the MTA to other mail systems. By default, this name is the name of the server where the X.400 service is installed. You can change the local X.400 name by using the Modify button. You can also set a local X.400 password. Third-party systems use this password when connecting to the X.400 service.
The Expand remote distribution lists locally option makes a remote distribution list available to users in your organization. When this option is selected and a user sends a message to a remote distribution list, the distribution list expands locally (on the server to which the user is currently connected). Exchange finds the best routing for the message, based on the location of recipients in the list. This method ensures the most efficient message handling. However, note that processing large distribution lists can affect server performance.
The Convert incoming messages to Exchange contents option changes the address and contents of incoming messages to a format compatible with MAPI clients, such as Microsoft Outlook and Exchange. Do not select this option if your users do not use a MAPI client.
The Modify button in Message queue directory allows you to change the location of the X.400 message queue directory.
Note
When you modify the location of the queue directory, you are
modifying only the MTA database path and moving only the database (.dat) files.
You are not moving any of the run files or the run directory. The database
files are the core files that are required for starting the MTA, queue files,
and message files.
Generally, you use X.400 connectors in the following situations:
If your environment has an existing X.25 network.
If you are connecting to an X.400 system or an Exchange 5.5 server outside of your organization.
Note
Although you can use X.400 connectors to connect routing groups
within Exchange, the routing group connector is recommended.
You can create two types of connectors on Exchange Server 2003 Enterprise Edition: TCP X.400 connectors and X.25 X.400 connectors. The TCP connector enables connectivity over a TCP/IP network, and the X.25 connector enables connectivity using X.25.
To configure an X.400 connector, you perform the following steps:
Create an X.400 protocol stack.
Create an X.400 connector.
The following sections detail these steps.
Before you create an X.400 connector, you must create a protocol stack on the Exchange server that will host the connector. The protocol (or transport) stack is created on individual Exchange servers and provides the underlying functionality for the connector to transport messages. The server on which you create the protocol stack processes all messages that are sent by connectors that use this stack.
You create a transport stack using TCP or X.25, based on your network and the system to which you are connecting. Creating a transport stack involves the same steps for either protocol.
To create a transport stack
In Exchange System Manager, expand Protocols, right-click X.400, point to New, and then select either TCP/IP X.400 Service Transport Stack or X.25 X.400 Service Transport Stack.
On the General tab, type a name for this transport stack.
The following names are the default names:
X.25 <server name>
TCP <server name>
(Optional) Under OSI address information, select the character set and the selector information if other applications use this transport stack.
Figure 5.19 shows the General tab of the Properties dialog box for a TCP/IP X.400 transport stack. On this tab, you can configure the transport stack. Any connectors that you configure to use this transport stack appear on the Connectors tab.
Note
When you first create the connector, the Connectors
tab does not list any connectors.

Figure 5.19 General tab of the Properties dialog box for a TCP/IP X.400 transport stack
(Optional) On the General tab of an X.25 transport stack (see Figure 5.20), set the following X.25-specific configuration options:
Based on the information supplied by your X.400 service provider, type in the appropriate values for Call user data, Facilities data, and the X.121 address of the remote X.25 provider.
For I/O port, type in the port number used by the X.25 adaptor. (If you have multiple X.25 X.400 transport stacks on a single server, each stack must use a different port number.)
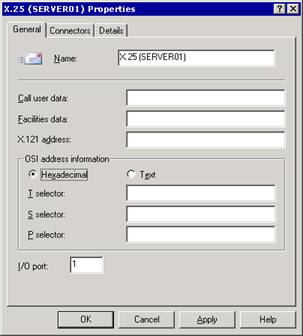
Figure 5.20 General tab of the Properties dialog box for an X.25 protocol stack
After you create a TCP X.400 or X.25 X.400 transport stack, you can create an X.400 connector to connect to another X.400 system. Remember that connectors send mail in only one direction, so the X.400 connector enables mail to flow from your system to the remote system or routing group. If you are connecting to a remote system, the administrator of that system must also create a connector to send mail to your organization.
Table 5.5 lists the configuration settings that are available for an X.400 connector. These settings are available in the Properties dialog box for an X.400 connector (see Figure 5.21).
Table 5.5 Configuration settings for an X.400 connector
|
Settings |
Description |
|
Remote X.400 name |
When you configure an X.400 connector, you need to specify a valid account and password for the remote X.400 system to which you are connecting. You configure these settings on the General tab of the X.400 connector's Properties dialog box. |
|
Address space |
The address space defines the mail addresses or domains for the e-mail messages that you want routed through a connector. You can specify the X.400 address of a third-party X.400 system or an Exchange 5.5 server to which you are connecting, so that all mail destined to the specified X.400 system is routed through this connector. You configure these settings on the Address Space tab of the X.400 connector's Properties dialog box. |
|
Transport address information for the remote system |
You must specify transport address information for the remote X.400 system to which you are connecting. You configure these settings on the Stack tab of the X.400 connector's Properties dialog box. |
|
Settings |
Description |
|
|
Content restrictions |
You can specify what types of messages are delivered through a connector. You configure these settings on the Content Restrictions tab of the X.400 connector's Properties dialog box. |
|
|
Scope |
You can select either an entire organization or a routing group for the connector's scope. For example, if you create an X.400 connector to send mail to an X.400 system on a server in one routing group, and an X.400 connector exists on a server in another routing group, you may choose to specify a routing group scope for these connectors so that servers in each routing group are forced to use the connector. If an X.400 connector that is set to a routing group scope becomes unavailable, messages queue in the routing group until the connector becomes available. If your user requirements permit this, you could implement the connectors with a routing group scope. You configure these settings on the Address Space tab of the X.400 connector's Properties dialog box. |
|
|
Override options |
By default, the X.400 connector inherits the settings that are configured on the X.400 protocol. To override these settings, you use the Override tab of the X.400 connector's Properties dialog box. |
|
|
Delivery restrictions |
You can restrict who can send mail through a connector. By default, mail is accepted from everyone. You configure these settings on the Delivery Restrictions tab of the X.400 connector's Properties dialog box. |
|
To create an X.400 connector
In Exchange System Manager, right-click Connectors, point to New, and then click X.25 X.400 Connector or TCP X.400 Connector.
On the General tab (see Figure 5.21), in the Name box, type the connector name.
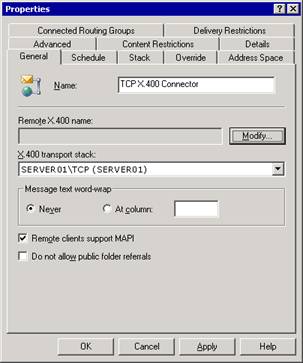
Figure 5.21 General tab of the Properties dialog box for an X.400 connector
On the General tab, under Remote X.400 name, click Modify.
In Remote Connection Credentials, in Remote X.400 name, type the name of the remote X.400 connector on the remote server. (The remote connector name defaults to the remote server name.) In the Password box, type the password for the remote X.400 connector. In the Confirm password box, type the password again.
Select one of the following options:
On the Address Space tab, click Add, select an address type, and then, in the Address Properties box, type all necessary information, including cost.
On the Connected Routing Groups tab, click New. On the General tab, in the Organization box, type the name of the organization that contains the routing group to which you want to connect, and then in the Routing Group box, type the name of the routing group to which you want to connect.
Note
The organization must exist on an Exchange server so that the
naming conventions are known. Optionally, you can type address space
information and cost on the Routing Address tab. By
default, the address space is created from the organization and routing group
names, and the cost is 1.
If the remote system is not an Exchange server, on the Advanced tab, clear the Allow Exchange contents check box.
If you do not clear the check box, addresses on messages are in domain name form and not in X.400 form, and replies are not possible.
On the Stack tab for an X.25 X.400 connector, in the X.121 address box, type the X.121 address of the remote server as specified in the X.25 network service setup.
-or-
On the Stack tab for a TCP X.400 connector, choose one of the following options:
Select Remote host name, and then, in the Address box, type the fully qualified domain name (FQDN).
Select IP Address, and then, in the Address box, type the remote server's IP address.
You can also use the General tab of the X.400 connector (see Figure 5.21) to configure public folder referrals and specify how messages are delivered by this connector. These additional options include:
The Message text word-wrap option controls whether or not text wraps at a specific column in a message.
The Remote clients support MAPI option results in Exchange sending messages through the connector in rich text format. Do not select this option if clients do not support MAPI because it can cause problems with message formatting on non-MAPI clients.
The Do not allow public folder referrals option prevents public folder referrals when you connect to another routing group. Public folder referrals enable users in a connected routing group or a remote system to access public folders through this connector.
By default, each X.400 connector inherits the settings that are configured on the X.400 protocol. You can use the Override tab (see Figure 5.22) on the X.400 connector to override the options that are set on the X.400 protocol.
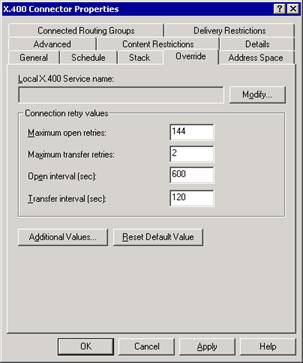
Figure 5.22 Override tab
The configuration options that are available on the Override tab are as follows:
The name entered in the Local X.400 Service name box overrides the local X.400 name of the X.400 transport stack. Some X.400 systems do not support certain characters. If your local X.400 name contains characters that are not supported by the remote system to which you are connecting, use this option to connect to the remote X.400 service using a name that it can support.
The Maximum open retries option sets the maximum number of times that the system tries to open a connection before it sends a non-delivery report (NDR). The default is 144.
The Maximum transfer retries option sets the maximum number of times that the system tries to transfer a message across an open connection. The default is 2.
The Open interval (sec) option sets the number of seconds that the system waits after a message transfer fails. The default is 600.
The Transfer interval (sec) option sets the number of seconds the system waits after a message transfer fails before resending a message across an open connection. The default is 120.
Tip
To restore Exchange default values, click Reset
Default Value.
To set additional override values, you use the Additional Values dialog box (see Figure 5.23). To open this dialog box, click the Additional Values button on the Override tab in the X.400 connector's Properties dialog box.
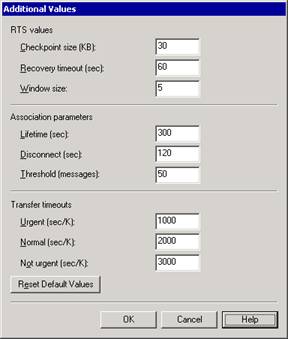
Figure 5.23 Additional Values dialog box
In the Additional Values dialog box, you can set these options:
The options under RTS values set the Reliable Transfers Service (RTS) values. RTS values determine message reliability parameters, such as the checkpoints to include in data and the amount of unacknowledged data that can be sent. You can use the options on an X.400 connectors' Override tab to override the default X.400 service attributes, such as RTS values.
The options under Association parameters determine the number and duration of connections to the remote system. Each X.400 connector uses the association parameters that are configured on the X.400 protocol, but you can configure association parameters on each individual connector to override the settings.
The options under Transfer timeouts determine how long the X.400 connector waits before sending an NDR for urgent, normal, and not urgent messages. Each X.400 connector uses the transfer timeout values that are configured on the X.400 MTA, but you can configure specific transfer timeout values on each individual connector that override these settings.
If necessary, you can disable or remove existing connectors in your organization.
You can disable a connector that you do not want Exchange to use by setting the connection schedule to Never. Disabling a connector rather than deleting it allows you to retain the configuration settings if you want to enable it again in the future.
To disable a connector
In Exchange System Manager, right-click a connector, and then click Properties.
Select one of the following options:
For an X.400 connector, click the Schedule tab, and then click Never.
For an SMTP connector or a routing group connector, click the Delivery Options tab. Under Specify when messages are sent through this connector, in Connection time, select Never run from the drop-down list.
You can remove a connector that you no longer use by deleting it. You can remove a connector at any time. When you remove a connector, you are not warned of the connections you are breaking. (For example, you may be breaking an established connection between two routing groups.) However, you are prompted to verify that you want to remove the connector.
To remove a connector
In Exchange System Manager, right-click the connector that you want to remove, and then click Delete.
Queue Viewer is a feature in Exchange System Manager that allows you to monitor your organization's messaging queues, as well as the messages that are contained within those queues. Queue Viewer works at a server level. In Exchange System Manager, you expand the server and then click Queues to open Queue Viewer and display the messaging queues associated with the server (see Figure 5.24).
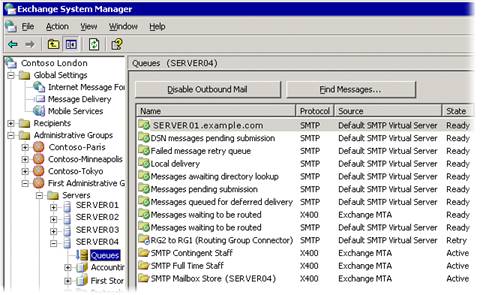
Figure 5.24 Queue Viewer in Exchange 2003
In Exchange Server 2003, Queue Viewer is enhanced to improve the monitoring of message queues. In Exchange 2003, you can view all of the messaging queues for a specific server from the Queues node under each server. This is an improvement over Exchange 2000, where each protocol virtual server has its own Queues node, and you cannot view all queues on a server from a central location. For example, using Exchange 2003, you can now use Queue Viewer to view both the X.400 and SMTP queues on a server (as in Figure 5.24), rather than having to view each of these queues separately in each of their respective protocol nodes.
Other enhancements to Queue Viewer in Exchange 2003 include:
Disabling outbound mail You can use a new option called Disable Outbound Mail to disable outbound mail from all SMTP queues.
Setting the refresh rate You can use the Settings option to set the refresh rate of Queue Viewer.
Finding messages You can use Find Messages to search for messages based on the sender, recipient, and message state. This option is similar to enumerating messages in Queue Viewer in Exchange 2000.
Viewing additional information You can click a specific queue to view additional information about that queue.
Viewing previously hidden queues Queue Viewer in Exchange 2003 exposes three queues that were not visible in Exchange 2000: DSN messages pending submission, Failed message retry queue, and Messages queued for deferred delivery. (For descriptions of these queues, see Table 5.9.)
The remainder of this section highlights two of these new enhancements, disabling outbound mail and finding messages, as well as provides guidelines for how to use the SMTP and X.400 queues shown in Queue Viewer to troubleshoot message flow.
Using the Disable Outbound Mail option, you can disable outbound mail from all SMTP queues. For example, disabling outbound mail can be useful if a virus is active in your organization.
To disable outbound mail
In Queue Viewer, click Disable Outbound Mail.
Note
The Disable Outbound Mail option does not
disable the MTA or system queues. System queues are default queues for each
protocol that hold messages only while certain essential routing tasks are
performed, such as content conversion and address resolution. If you find
messages in your system queues for extended periods, it means that one or more
basic routing functions are failing somewhere in your Exchange organization.
For more information about working with message accumulation in queues, see the
sections 'Using SMTP Queues to Troubleshoot Message Flow' and
'Using X.400 (MTA) Queues to Troubleshoot Message Flow' later in this
chapter.
If you want to prevent outbound mail from a particular remote queue, instead of disabling all SMTP queues, you can freeze the messages in that particular queue.
To freeze all of the messages in a particular queue
In Queue Viewer, right-click the queue, and then click Freeze.
To unfreeze a queue
In Queue Viewer, right-click the queue, and then click Unfreeze.
You can use the Find Messages option to search for messages by specifying search criteria (such as the sender or recipient) or the message state (such as frozen). You can also specify the number of messages that you want your search to return. Using Find Messages in Exchange Server 2003 is similar to the Enumerate messages option in Exchange 2000.
To search for messages by a particular sender (or recipient)
In Queue Viewer, click Find Messages, click Sender (or Recipient), and then search by typing the name or using the search criteria.
To specify the number of messages that you want returned by a search
In Queue Viewer, click Find Messages, click the Number of messages to be listed in the search list, and select the number of messages (for example, 500) that you want listed in the search.
To search for messages in a particular state
In Queue Viewer, click Find Messages, click the Show messages whose state is list, and select from the following options:
All Messages This option shows all of the messages in the list regardless of the state that they are in.
Frozen This option shows the messages that are in a frozen state. Besides freezing all messages in a specific queue, a single message can also be frozen. If a single message or a few messages in a queue are frozen, other messages can still flow into or out of this queue. The entire queue is not frozen.
Retry This option shows the messages that are awaiting another delivery attempt. Messages in the retry state have failed one or more delivery attempts.
After you have specified your search criteria, click Find Now to begin the search.
The results of the search appear under Search Results.
During message categorization and delivery, all mail is sent through the SMTP queues of an SMTP virtual server. If there is a problem delivering the message at any point in the process, the message remains in the queue where the problem occurred until the problem is remedied.
Use the SMTP queues to isolate possible causes of mail flow issues. If a queue is in a Retry status, in Queue Viewer, select the queue and check the properties of the queue to determine the cause. For example, if the queue properties display a message similar to 'An SMTP error has occurred,' you should review your server's event logs to locate any SMTP errors. If there are no events in the log, you should increase the SMTP logging level, by right-clicking the Exchange server, clicking Properties, clicking the Diagnostics Logging tab, and then selecting MSExchangeTransport.
Table 5.6 lists the SMTP queues, their descriptions, and troubleshooting information for message accumulation in each queue.
Table 5.6 SMTP queues
|
Description |
Causes of message accumulation |
||
|
DSN messages pending submission |
Contains delivery status notifications, also known as non-delivery reports (NDRs), that are ready to be delivered by Exchange. Note |
Messages can accumulate in this queue if the store service is unavailable or not running, or if problems exist with the IMAIL Exchange store component, which is the store component that performs message conversion. Check the event log for possible errors with the store service. |
|
|
Failed message retry queue |
Contains messages that Exchange has failed to deliver, but that the server will attempt to send again. Note |
Messages can accumulate in this queue if a problem exists with DNS or SMTP. Check the event log to determine whether an SMTP problem exists. Verify your DNS configuration using NSlookup or another utility. On rare occasions, a corrupted message can remain in this queue. To determine whether a message is corrupted, try to look at its properties. If some properties are not accessible, this can indicate message corruption. |
|
|
Messages queued for deferred delivery |
Contains messages queued for delivery at a later time, including messages sent by earlier versions of Outlook clients. (You can set this option in Outlook clients.) Messages sent by earlier versions of Outlook treat deferred delivery slightly differently. Previous versions of Outlook depend on the MTA for message delivery because SMTP, not the MTA, now handles message delivery. These messages remain in this queue until their scheduled delivery time. |
Possible causes of message accumulation include: Messages are sent to a user's mailbox while the mailbox is being moved. The user does not yet have a mailbox created, and no master account security identifier (SID) exists for the user. For more information, see Microsoft Knowledge Base Article 316047, 'XADM: Addressing Problems That Are Created When You Enable ADC-Generated Accounts' ( https://support.microsoft.com/?kbid=316047 The message may be corrupted, or the recipient may not be valid. To determine if a message is corrupted, check its properties. If some properties are not accessible, this can indicate a corrupted message. Also check that the recipient is valid. |
|
|
Local delivery |
Contains messages that are queued on the Exchange server for local delivery to an Exchange mailbox. |
Messages can accumulate in this queue if the Exchange server is not accepting messages for local delivery. Slow or sporadic message delivery can indicate a looping message or a performance problem. This queue is affected by the Exchange store. Increase diagnostic logging for the Exchange store as described in 'Configuring Diagnostic Logging for SMTP later in this chapter. |
|
|
Queue name |
Description |
Causes of message accumulation |
|
|
Messages awaiting directory lookup |
Contains messages addressed to recipients who have not yet been resolved against Active Directory. Messages are also held here while distribution lists are expanded. |
Generally, messages accumulate in this queue because the advanced queuing engine is unable to categorize the message. The advanced queuing engine may not be able to access the global catalog servers and access recipient information, or the global catalog servers are unreachable or performing slowly. The categorizer affects this queue. Increase diagnostic logging for the categorizer as described in 'Configuring Diagnostic Logging for SMTP' later in this chapter. |
|
|
Messages waiting to be routed |
Holds messages until their next-destination server is determined, and then moves them to their respective link queues. |
Messages accumulate in this queue if Exchange routing problems exist. Message routing may be experiencing problems. Increase diagnostic logging for routing as described in 'Configuring Diagnostic Logging for SMTP' later in this chapter. |
|
|
[Connector name | Server name | Remote domain] |
Holds messages destined for a remote delivery. The name of the queue matches the remote delivery destination, which may be a connector, a server, or a domain. |
If messages accumulate in this queue, you must first identify the status of the queue. If the queue status is Retry, check the queue properties to determine the reason that it is in this state. For DNS issues, use Nslookup and Telnet to troubleshoot. If the host is unreachable, use Telnet to ensure that the remote server is responding. |
|
|
Queue name |
Description |
Causes of message accumulation |
|
|
Final destination currently unreachable |
Contains messages for which the final destination server cannot be reached. For example, Exchange cannot determine a network path to the final destination. |
Messages can accumulate in this queue if no route exists for delivery. Additionally, any time a connector or a remote delivery queue is unavailable or in Retry for a period of time, and no alternate route exists to the connector or remote destination, new messages queue here. Messages can remain in this queue until an administrator fixes the problem or defines an alternate route. To get new messages to flow to their remote destination queue, allowing you to force a connection and get a Network Monitor (NetMon) trace, restart the SMTP virtual server. |
|
|
Pre-submission |
Holds messages that have been acknowledged and accepted by the SMTP service. The processing of these messages has not begun. |
Messages that are accumulating constantly may indicate a performance problem. Occasional peaks in performance can cause messages to appear in this queue intermittently. Message accumulation in this queue can also indicate problems with a custom event sink or a third-party event sink. |
|
Exchange Server 2003 uses the X.400 queues to submit mail to and receive mail from Exchange 5.5 servers and to send mail through connectors to other mail servers. If you experience mail flow problems when you are sending mail to an Exchange 5.5 or earlier server, or to another mail system to which you are connecting using X.400, check the X.400 queues on the Exchange server. If you experience mail flow problems when sending mail to servers that are running Exchange 5.5 or earlier, you should also check the MTA queues on those servers.
Table 5.7 lists the X.400 queues, their descriptions, and troubleshooting information for message accumulation in each queue.
Table 5.7 X.400 queues
|
Queue name |
Description |
Causes of message accumulation |
|
PendingRerouteQ |
Contains messages that are waiting to be rerouted after a temporary link outage. |
Messages can accumulate in this queue if a route to a connector, to a different mail system, or to an Exchange 5.5 server is unavailable. |
|
Next hop MTA |
Contains messages destined to one of the following: Another gateway, such as a connector for Lotus Notes or Novell GroupWise. An X.400 link to an Exchange 5.5 site or a destination outside of the organization. An Exchange MTA over the LAN-for example, destined to an Exchange 5.5 server in a mixed-mode environment. |
Messages can accumulate in this queue when Exchange 2003 experiences problems sending to another mail system, to an Exchange 5.5 server, or through an X.400 link. Increase diagnostic logging for the X.400 service as described in 'Configuring Diagnostic Logging for the X.400 Service (MSExchangeMTA)' later in this chapter. |
To help you determine the cause of a transport issue, you can view events that relate to MSExchangeTransport. If you experience problems with Exchange message flow, immediately increase the logging levels relating to MSExchangeTransport. Logging levels control the amount of data that is logged in the application log. The more events that are logged, the more transport-related events that you can view in the application log. Therefore, you have a better chance of determining the cause of the message flow problem. The SMTP log file is located in the ExchsrvrServer_name.log folder.
As discussed in 'Using SMTP Queues to Troubleshoot Message Flow' and 'Using X.400 (MTA) Queues to Troubleshoot Message Flow' earlier in this chapter, issues with specific routing and transport components can cause messages to accumulate in a queue. If you are having problems with a specific queue, increase the logging level for the component that is affecting the queue.
The following procedure explains how to modify diagnostic logging related to MSExchangeTransport.
To modify logging settings for MSExchangeTransport
In the console tree, expand Servers, right-click <server name>, and then click Properties.
Click the Diagnostics Logging tab.
Under Services, click MSExchangeTransport.
Under Categories, click the category for which you want to configure the logging level:
To troubleshoot routing issues, select Routing Engine/Service. Increase the logging level for this component if messages are accumulating in the Messages waiting to be routed SMTP queue.
To troubleshoot problems with address resolution in Active Directory, distribution list expansion, and other categorizer issues, select Categorizer. Increase the logging level for this component if messages are accumulating in the Messages waiting to be routed SMTP queue.
To troubleshoot issues with dial-up and virtual private network connectivity through Connection Manager, select Connection Manager.
To troubleshoot problems with the queuing engine, select Queuing Engine. Increase the logging level for this component if you are experiencing mail flow problems, and mail is not accumulating in any of the queues.
To troubleshoot issues with the Exchange store driver, select Exchange Store Driver. Increase the logging level for this component if messages are accumulating in the local delivery SMTP queue, the X.400 queues, or if you have problems receiving mail from Exchange 5.x servers or other mail systems.
To troubleshoot general SMTP issues, select SMTP Protocol. Increase the logging level for this component if messages are accumulating in the Remote delivery SMTP queue to determine if SMTP errors are causing the bottleneck.
To troubleshoot issues with the NTFS store driver, select NTFS Store Driver. Increase the logging level for this category if messages are accumulating in the local delivery SMTP queue.
Under Logging level, click None, Minimum, Medium, or Maximum.
Click Maximum for troubleshooting purposes.
Caution
If you increase the logging levels for Exchange services, you
will experience some performance degradation. It is recommended that you
increase the size of the application log to contain all of the data produced.
If you do not increase the size of the application log, you will receive
frequent reminders that the application log is full.
If you are experiencing mail flow issues and want to view all events, you can modify a registry key to set logging to the debugging level, which is the highest level (level 7).
Caution
Incorrectly editing the registry can cause serious problems that
may require you to reinstall your operating system. Problems resulting from
editing the registry incorrectly may not be able to be resolved. Before editing
the registry, back up any valuable data.
To enable logging at the debugging level
Start Registry Editor.
In Registry Editor, locate and click the following registry key:
HKEY_LOCAL_MACHINESystemCurrentControlSetServices
MSExchangeTransportDiagnosticsSMTP Protocol
Set the value to 7, and then click OK.
This section explains how to configure diagnostic logging for the X.400 service (MSExchangeMTA) on Exchange Server 2003. If you have to troubleshoot mail flow problems for servers running Exchange 5.5 and earlier, for other mail systems, or for X.400 connectors, it is useful to increase the logging level for MSExchangeMTA.
To configure logging for MSExchangeMTA
In the console tree, expand Servers, right-click <server name>, and then click Properties.
Click the Diagnostics Logging tab.
Under Services, click MSExchangeMTA.
Under Categories, click X.400 Service to troubleshoot delivery problems to servers running Exchange 5.5 and earlier, and other systems.
Under Logging level, click None, Minimum, Medium, or Maximum.
Click Maximum for troubleshooting purposes.
|
Politica de confidentialitate | Termeni si conditii de utilizare |

Vizualizari: 1528
Importanta: ![]()
Termeni si conditii de utilizare | Contact
© SCRIGROUP 2026 . All rights reserved