| CATEGORII DOCUMENTE |
| Bulgara | Ceha slovaca | Croata | Engleza | Estona | Finlandeza | Franceza |
| Germana | Italiana | Letona | Lituaniana | Maghiara | Olandeza | Poloneza |
| Sarba | Slovena | Spaniola | Suedeza | Turca | Ucraineana |
Sands of Fate 3 Pyramid of the Ancients
Walkthrough
Pyramid of the Ancients is the third and final part of Sands of Fate, the epic levels Neverwinter Nights Module series. This walkthrough provides a comprehensive guide through the module and, since this adventure is more combat-focussed than the previous parts, some advice on combat as well. It would also be an invaluable reference for DMs running the module.
You should already have played through
Shadows over
It might be a bit late to give this advice now, but some top ten tips I can offer from playtesting include:
Fighter types will probably have the easiest time (as usual in NWN due to play (im)balancing). I playtested with a fighter/weapon master with a double-sided sword and maximised for attack bonus and damage bonus (max strength). This proved also to be a double-edged sword as I believe at maximum levels and hasted, a single-wielding PC gets 5 attacks per round and my PC only one extra (with less strength damage bonus). While extra attacks are great at intermediate levels, the single extra attack might be outweighed by an extra 13 AC you might get for a +10 shield! Also I could have spent two feats on something else. Perhaps katana and shield is best.
A fighter type should be desperate to get devastating critical useful on all the living opponents. Champions of Torm/ Paladins should focus instead on extra divine might feats with maximised charisma as this ability does amazing extra damage and is particularly useful against undead. Also go for divine shield. You have enough turn undeads to use them several times between rests.
I found improved knockdown invaluable, used as much as possible, and it works against most opponents, especially the Long-Dead Cultists, who are so slow that you can knock one down, retreat and repeat.
I recommend that spellcasters do not multiclass too much. You should focus on making the DC of your spells as difficult as possible, also considering that you must penetrate spell resistance. Good spells are many Isaacs Greater Missile storms, and metamagic enhancements thereof. Chain lightning is also good, and Bigbys Crushing Hand against single powerful opponents. Try Mestils Acid Sheath and Elemental Shield (with e.g. greater stoneskin) if meleeing so your enemies take the pain as well. But note that many opponents will have +6 or greater attack to bypass greater stoneskin.
Thieves will have problems. Dont go in alone If youre going to raid a place thats been lost for a thousand years, dont expect all your enemies to be susceptible to sneak attacks!
You should have some skill points on search, and trap handling and lock picking are useful but not essential. If not, potions of secret door and enemy detection are a MUST.
Blind fight is a useful feat against the many invisible opponents, and spot is useful for the same reason.
You should plan on having about 30+ potions of heal! All the other potions, especially the custom ones, are highly recommended. Note the potions of regeneration, super aid and warding. There may be long periods where you have no or limited access to traders.
If you are serious about surviving Pyramid, you need some serious equipment. You should be aiming for +12 protection and ability enhancement items, and even higher for weapons and armour if possible. Try for +12 deflection AC protection (e.g. ring of protection), +12 natural AC protection (e.g. amulet), +12 universal saving throws (you cant get any higher because of a bug in the engine treating +13 and above as +0!), +12 on your primary ability (e.g. strength, intelligence, wisdom, charisma), a ring of universal elemental resistance, and items with freedom, mind affecting immunity, level/ability drain immunity, fear immunity, knockdown immunity, critical immunity. At the end, critical immunity is particularly critical. Often you will have to swap out items according to the opponents you are likely to face. Then you will need a big FO weapon, preferably already powered up in HOTU, then enhanced by the Powers in Heliopolis and then enhanced more by the statue of Horus in the ruins north of Aqualis. There is not much extra enhancing to be had in the Pyramid, unfortunately. Finally, you should either go down the full plate (+ shield, see above) route and each being at least +12, or find some robes that are +10 at least and maximum dexterity bonus. So a fighter or cleric should aim for AC 20+12 (armour)+12 (shield) +12 (deflection)+12 (natural) +4 (haste) +2 (natural armour skin feat yes it seems to stack with amulets of natural armour)= 74, or even higher if some dodge bonus AC e.g. boots. A wizard should have AC 10+10 (robes) +10 (enhanced dexterity) + 12 (natural) + 12 (deflection) +4 (haste)= 58. Thieves should have better AC than wizards because they have higher dexterity, perhaps AC 70. And monks should have the same because of enhanced wisdom. So if you have an AC of 44 (like my playtest character armour +10 shadow plate, no shield, no natural armour, ring of protection +9, armour skin, haste, +1 dexterity), dont moan when you start haemorrhaging hit points in a continual stream floating above your head. Many opponents have attack bonuses around +40 to +50, which is nothing like anything you have probably encountered before
There are some opponents whom you should run away from, until you are ready for them, no matter how powerful you think you are. Save often (duh!). You may die or have other unpleasant things happen automatically in some circumstances. Sometimes respawn might not work; you have been warned.
Secret Doors and Walls. Secret doors have a specific difficulty class (DC) and a search radius, typically 1 to 5 yards. A search (not spot) check is made every 6 seconds when within the radius, with a substantial bonus for being in search mode and a further racial bonus for dwarves. (Elves always get the search mode bonus.) Blindness incurs a severe penalty. When more than one ally is within the radius, the best (not closest) searcher is the one that makes the roll. If it is a henchman or familiar who finds the door, they alert their master to its presence. As many rolls as desired can be made, simply by staying in the area longer. There are normally clues to the presence of a secret door, such as tracks, narrative triggers, story events or spaces in floor plans, or simply being stuck somewhere! The way back through a secret door is usually discovered easily by checking very close to the point of entry into the new area. Special potions available in this module aid in the detection of secret doors. Unfortunately, a bug in the engine means that effects such as true seeing bestowed by items rather than by spells or potions are not detected as effects in scripts. I could correct this but decided not to.
In Pyramid, in addition to secret doors, there are secret walls discovered similarly. Discovering the opening mechanism automatically and permanently pivots the wall open. There are other pivoting walls opened by discovering hidden levers and operating them.
Illusion Walls. Some of these are discovered automatically simply by passing through, but most require a save vs. illusion to disbelieve the wall and then the PC will receive a message alerting them to the illusion. They may then pass through, even though it is still visible as a wall. Of course, gnomes and others with save bonuses vs. illusion will be better at this, and being in search mode will also help.
Spot checks. There are various instances where spot or listen checks are automatically made during the adventure. Being in search mode helps such checks, as does being a halfling or ranger or druid, depending on the circumstances. Sometimes being a ranger will yield more information about the nature of tracks once spotted.
Narrative triggers. There are many points during the adventure where the PC is stopped to be told a snippet of story or given an area description. These provide important clues, or even trigger plot events or awards. Do not try and cancel out of them! They do not interfere with combat or conversation.
Pits. PCs may fall through traps into dead-end pits or into other dungeon areas. Sometimes in a narrow corridor the pit must somehow be crossed to travel onward. This can be done by jumping across or climbing along the wall to the side. For pits with valves, you determine the direction you wish to jump according to the direction you are facing when you start your jump (when you triggered the conversation by interacting with the pit). You may also jam shut the valves on a disable trap roll, but that is not so good if someone is in the pit at the time! A nice way to get rid of irritating party members
Jumping is a strength check that also factors in tumbling skill with a penalty for short PCs and a bonus for barbarians. A penalty for wearing armour is also applied. Climbing is a strength and dexterity check that factors in moving silently skill (as the nearest approximation to the climbing skill).
Alternatively, PCs may jump (or tumble safely) down a pit that blocks their way, attempt to climb down, or use a rope they have in their possession to climb down and then back up again. A non-valve pit may be crossed by climbing down a rope on one side and back up a rope someone has left on the other side!
Breaking the law. Unlike the Forgotten Realms and other cRPG worlds, innocent townsfolk do not like it when PC paladin types smash up all their treasure chests and loot every crate before their very eyes! Any item, such as a door or container, that looks as if it might belong to an innocent commoner probably does belong to that commoner and they will warn you to stay away. If you ignore the warning and steal something or destroy something, they will call the alarm and attack or run away. After a while, they may calm down again, or in an isolated area you may kill them (with evil alignment shift if they are not evil) and with luck no-one else will notice. But as you keep doing this, the whole faction becomes increasingly suspicious and eventually openly hostile. Fortunately, in Pyramid there are only two or three civilised areas where this is relevant.
Of course, a PC might not get caught stealing, and instead turn it into an art form. Complex scripts check for getting caught when stealing or damaging property and factor in stealth, thieving skills, invisibility, silence spells, the environment, the alertness of the potential witness, the distance from the witness to the crime scene, and the line of sight to the crime. Whether or not the PC is caught, a chaotic alignment shift occurs for each criminal act. (Killing innocents after getting caught results in evil alignment shifts.)
Thirst and Heat. Much like
Gas, silos and water. You will not be able to breathe in some areas in the Pyramid. PCs can hold their breath for a number of rounds depending on their constitution. After the PC can no longer hold his breath, progressively harder constitution checks are made every round. Failing a check results in collapsing, losing almost all hit points and suffocating the following round. Certain spells may bypass this (e.g. etherealness).
Resting. This is a real-time process in Pyramid. A typical full rest may take around or a little over 15 hours. Time is advanced whenever the party leader rests. During this time, day and night may pass and opportunities for quests may come and go. Even more important, wandering monsters may stumble upon the resting PC. They may appear some distance away and it is even possible that they might not notice and interrupt the PCs rest but just loiter around the area. (A good tactic is to rest in a small enclosed hiding place.) Resting may be cancelled part of the way through, proportionally reducing the time spent and reducing the chance of a random encounter, but of course the PC now only recuperates a proportion of the total lost hit points and spells.
Henchmen. There are three full henchmen in Pyramid familiar from previous chapters: Ramana (wizard-fighter), Amira (fighter-rogue) and Narlak (fighter). In addition, there are animal and mechanical pseudo-henchmen. You may also meet a fourth henchmen in the Catacombs, the former High Priest of Horus (cleric). You may have two henchmen at a time. Sometimes, conversations and interacting with objects have more options if henchmen are nearby.
Slimes, Oozes and Jellies. Like
Green slime and its cousins may dissolve equipment. Each melee attack upon such a creature requires a special saving throw by the weapon. This depends upon the weapons total magical enhancements (not just the enhancement bonus) but there is always a fail on rolling a 1 on a d20. Similarly, successful attacks by creatures such as black puddings may damage PC or NPC armour, helmet or shield.
Poisoned darts. The residents of the Pyramid were very mistrustful of one another, and some of their doors and chests were trapped to deter prying. These include poisoned darts that fire out from within the doors when the latter are tampered with or damaged. And the poisons are much more virulent than those you may have laughed at in your previous adventures. They may also affect you despite ability drain immunities
Poisoned needles. The locks on some chests are similarly trapped with poisoned needles that fire into the hand of someone tampering with the lock without the proper key. Such poisons are sometimes also very virulent.
Ear Seekers. Feared by adventurers, thieves and delvers, but little encountered till now, are the tiny bugs called ear seekers that nest in doors, but seek the opportunity to burrow into an ear conveniently pressed against the doors surface while the ears owner listens for what might lie beyond. The human ear (or halfling or elven ear they are not fussy) is a good warm moist environment in which to lay their eggs. If you were paranoid enough before to listen to every door before opening it, now you will be too paranoid to do so! Only wooden doors have such seekers for obvious reasons, but you are not likely to hear anything through a stone or metal door anyway.
Rot Grubs. Another favourite sadly neglected in recent times is the rot grub. Dont think to loot every rotting corpse in the Pyramid with impunity. For nesting in some of them are rot grubs, small unpleasant worms that burrow under the skin of your exposed arm as you loot your corpse and then make their way straight to your heart, eating their way through all the tissues in between. This is how they reproduce, so you at least have the satisfaction that anyone going to loot your corpse, such as your multiplayer so-called friends, may suffer the same fate. Like the ear seeker, there is not much an epic character can do against the lowly rot grub, aside from burning the grub out of your own body with a flaming weapon. Your friends might also like the excuse to join in this exercise, as it will hurt them a lot less than it will hurt you (unless you got the Ring of Elemental Immunity like I told you).
Jump, Swim and Climb Checks. Remember such activities are not so easy wearing heavy armour. If you dont want to appear a complete fool in front of the thief in your party, take the armour and shield off and put them in your backpack first!
Immunities. Having just warned you to get immunity to everything, I now have to inform you that some of the magical defences of the pyramid are so powerful that they may temporarily bypass such immunities.
Your adventure
recommences, not with a trip to the Realm of the Powers, but directly where you
left off when you defeated the two Banespirits at the top of the
Your goals, however, are somewhat unclear. Perhaps you wish to return home and hope the Pyramid may provide you with the means to do so. Perhaps the Pyramid, with its fabled traps, defences and dead pharaohs, has piqued your curiosity or aroused your avarice. Possibly, you may find some artefacts of power there, such as the Stone of Sesustris, that you can use to help the land or take it over and become Pharaoh yourself! Perhaps you realise the Powers still have work for you to do, even though the enemies threatening the land seem already to be defeated. Or perhaps you have heard so much about Sesustris that you simply wish to visit his tomb and find out more about him.
If you had henchmen with you from
When you are ready and wish to head onward,
you are interrupted by a (probably) familiar figure flying down to greet you.
Now you are out of the
The transition south leads you to the Jungle.
This large area involves you following the beam (sometimes at certain camera angles the beam is not visible) to find a route under the mountains to the hidden valley of the Pyramid.
Encounters. You will encounter Ur-Tigers and Shadow Cats during the day and night respectively. Also there is a Dire Ant colony under this part of the jungle and they may periodically burrow out from underneath you. Finally, there are Giant Poisonous Spitting Snakes to the south. If the snakes provide you with much more of a problem than the Jungle Fowl, perhaps you should rethink your intentions to complete this module The Shadow Cats are the hardest opponents, as they have camouflage. Spot and blind fight will be helpful here. The Ur-Tigers will wear you down if encountered in numbers.
Bridge. A fallen tree trunk is all that now spans a broken bridge across a deep gorge. But it is likely the trunk will snap and you will fall into the chasm.
Vines. Swinging across some vines to the west of the area is the best way across the gorge. Success depends on strength and dexterity.
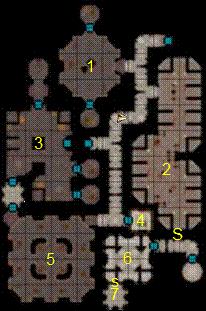
1 Start 2 Collapsed
Bridge 3 Hanging
Creepers 4 Chasm 5 Hidden
Opening 6 Crystal
Prism 7 Promontory
Crystal Clearing. To the south-east
is a clearing of trees of foliage unusual for this jungle. The beam refracts
through a tall crystal in its centre to strike the southern cliff face. Once
you investigate the cliff face where the beam strikes, and then return to the
crystal, you may realise that rotating the crystal will change where the beam
strikes. Doing this results in the beam now pointing west to a large promontory
of rock.
Jungle Legend
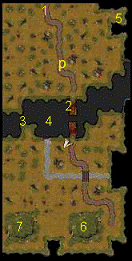
Rock Promontory. Once you have manipulated the beam, it points to the face of this promontory to the south-west of the area. Investigation allows you to open a magical portal within the rock face transporting you to subterranean passages that lead under the cliff blocking your way south.
Jungle Chasm
When you fall from the bridge or perhaps from the vines, you will land painfully in this rocky defile amid the mocking chatter of unseen gibbons hiding in the treetops and in nooks in the cliff faces. You cannot climb the cliffs, so must find another way back to the jungle above.
Encounters. You may meet more Ur-Tigers and Dire Ants here.
The Lurker. Anyone who has
heard fireside tales of the War of the Ring in the
This natural tunnel winds its way upwards and northwards to end in a hidden entrance in the eastern cliff face of the jungle above. The entrance is north of the chasm, so you will still have to navigate the latter.
From the jungle, the entrance is hidden by creepers, but once you have come out that way it should be easy enough to find the entrance again should you wish to return to the chasm.
Encounters. More Dire Ants may be encountered here, sometimes more than once.
This area enables you to travel south under the cliff to reach the hidden valley of the Pyramid, which became closed off from the outside world by great upheavals of the land during the Cataclysm a thousand years ago. The area is entered from the rock promontory in the jungle.
Encounters. You will find
Greater Sand Beetles in these natural tunnels, the same as those found in the
deserts outside
Under the Cliffs Legend 1 Entrance
from Jungle 2 Collapsing
Ceiling 3 Sink Hole 4 Gas Vents 5 Mustard Gas 6 Skeletal
Remains 7 Mother
Beetle 8 Brown Mould 9 Exit to
Pyramid valley

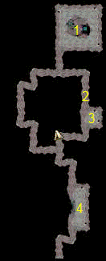
Sink Hole. Inside a sink hole lair several Black Puddings. Beware their resistance to all physical damage, and their tendency instead for melee attacks to split them into smaller (fewer hp) and faster halves. They are also resistant to magical damage, but not energy forms. Their substance is corrosive to your weapons, and their attacks corrode your equipment.
Water Pool and Gas Vent. Vents here betray the volcanic origins of these tunnels, and the gases released cause susceptibility to mental confusion. This is inconvenient, because the area is precisely where a group of Greater Umber Hulks burst forth from the ground and use their confusion attack.
The tunnels continue southward, eventually to reach the valley of the Pyramid.
Encounters. You will find more Greater Sand Beetles here (see above).
Green Gas. To the south-west of the area is another gas vent, exuding chlorine gas, which the Mustard Jellies lairing here find quite homely. Mustard Jellies split into two smaller halves when attacked. They are susceptible to physical attacks, but resistant to more energy attack forms than are the Black Puddings.
Skeletons. In the centre of the area, you will find a pair of long-dead skeletons, corpses of soldiers from the time of Sesustris a thousand years ago. Who knows how they died, or what stories they had to tell? For they may have been the last people to set foot through these tunnels before you.
Mother Beetle. South of the
skeletons is the lair of the Sand Beetles. You have met many before in the
land, but you have not met the mother of all beetles! She is much like the two
giant progenitor spiders with psionic powers whom you encountered in the Desert
Folk lair and in the Jungles north of the
Brown Mold. Past the beetle lair, heading north, then east and south is the tunnel leading to the area exit. However the air is chill here and growing over the walls is a colony of brown mould. As all PnP players will tell you, making a fire to combat the chilly mould is not a good idea! And because life is hard in these epic times, there is a nasty fire-trap half way down the tunnel just to encourage the mould.
At last, after travelling along the tunnels under the cliffs, you find under a pale moon in a hidden valley the object of your quest, the Pyramid of the Ancients. Now blocked on all sides by sheer impassable cliffs, you are probably the first person to set eyes upon the great Pyramid in a thousand years.
The entrance to the Pyramid is in its south face, opposite to the cliff stair down which you descend to the barren valley floor.
This may be your last chance to stock up on goods for some time, so use the Air Spirits teleport while you can.
Getting inside the pyramid is easy. But getting through the outer passage into the pyramid proper is a different matter. The outer entrance slopes steeply down to the inner entrance and heads due north. During the day, opening the entrance door will let in some light, but the door automatically closes again after a few moments. (You may always simply reopen it again.)
Heading east or west along the outer passage are teleport traps. When you cross heading away from the pyramid entrance, nothing happens. But when you head back the other way, you jump to the teleport on the opposite side. So there is no way back to the entrance!
The outer passages continue right around the perimeter of the Pyramid. Along the way are alcoves covered by illusionary walls made to look like the rest of the passage, but you can pass through them as if they were not there. Within the alcoves are Elder Gelatinous Cubes; sometimes they have trouble getting out of their alcoves.
In the alcove along the west passage is the corpse of a tomb raider from the time of Sesustris before the Cataclysm. This is as far as he got! However, he left a map for you and clues about how to get within the pyramid proper.
In the central alcove along the north passage is a corridor that apparently leads south into the pyramid proper. However, a teleport here jumps you southward so you are facing the outer pyramid entrance. This is the only way back to the pyramid entrance once you have passed the two south passage teleports.
To get inside the pyramid, reading the carved walls just opposite the outer entrance provides a clue. You must wait until midday, then open the outer door. At this time, the angle of the doorway passage is just right for the rays of the sun to strike the carved wall on the north side of the passage. And this makes the wall disappear, allowing you to pass through! Note that resting will advance time. A full rest for a 35th level PC takes about 15 hours. You may take short rests to advance just a short time (minimum 2 hours).
Unfortunately, at 1pm the wall becomes solid again, and if no-one is outside to open the outer pyramid door, the sun wont be able to strike the wall at its zenith the next day. In the Curators Chambers is a special device that remotely opens the outer door. This is the only way back out of the pyramid through the front door. The Pyramid was constructed with security in mind!
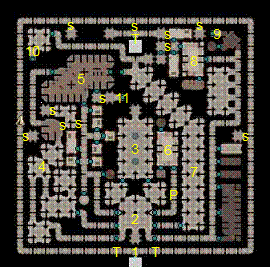
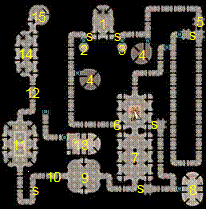
The Living Quarters levels of the Pyramid are huge and contain numerous areas of interest.
Vestibule. Here lies
evidence of a great combat fought long ago. A thousand years ago, the defenders
of the Pyramid were assailed by an army of a fanatical group known as the
Cultists. You may also note in this area, and in many others, evidence that the
decay of time has taken place very slowly within the pyramid. In fact in many
areas, time itself has slowed so that a
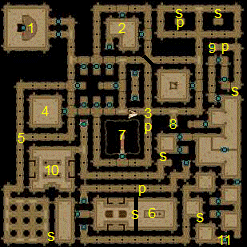
1 Entrance 2 Vestibule 3 Temple of
Water 4 Suits of
Armour 5 Great
Library 6 Curator 7
Processional Way 8 Officers
Quarters 9 Garrison
Stair 10 Artisans
Stair 11 Secret
Stair to Mages Lab
year seems
to pass in but a day! It therefore may appear that only three years have passed
since the pyramid was last occupied.
Level 1 Legend
Chamber of Records. The Pyramid Mages kept records in this chamber in the south-west. Here may be your first encounter with corpses of Cultists that actually animate as zombies when approached by a living being. The long-dead Cultists wield wicked scythes with high attack bonuses and are tough to defeat. Use their weakness against them they walk very slowly.
Holy Font. North of the Chamber of Records is a small area with a holy font. Approaching this to within 3 yards grants a bonus to all PC allies within 10 yards of the font at that moment. The bonus provides immunity to mind affecting effects, protection from evil and immunity to critical hits and lasts one hour. The font resets after 24 hours so can be used again. The bonuses are useful against nearby Cultists and Suits of Armour.
Ancient Suits of Armour. These lie in the south-west part of the level. Predictably enough, these animate and attack but only if disturbed. They are tough when faced in numbers. If you wish to fight them, perhaps for their equipment, the key is to engage them individually. If you attack one of the two Mighty Suits of Armour, all the Ancients suits will animate at once and you will have big problems.
Mages Quarters. Also to the west are the quarters of the Mages of Sesustris, his personal assistants and secret and not so secret police in life and guardians of his Pryamid in death. The corpses here do not animate. To the south of their area is a bathroom. One of the Mages loved himself so much that he created a magical mirror that reproduces a living image of whoever looks at his reflection. This copy will attack PCs looking in the mirror, however. (Copies of equipment are not recoverable). In the Mages Quarters are Desert Robes of the Mystic and an Epic Headband of Intellect.
Arch Mages Quarters. Like many of his ilk, and many of the Pyramid Priests, the archmage chose to stay in his secret room rather than help defend against the assault by the Cultists. He is now cursed to remain there forever as one of the undead. A secret pivoting wall to the west of the corridor just south of the south entrance to the main library is the way into his room. There is also a secret door leading here in the curved wall of the small library north of the Suits of Armour. In combat, the mage has a nasty habit of casting Mestils Acid Sheath that reflects damage done upon him. After the fight is over, glowglobes may be used to light up his room. Inside are numerous treasures and an illusionary wall to the west leading to a further treasure room with Epic Battle Robes on display upon a stand.
The library. The main
library is home now to library lurkers, undead spirits who sow confusion among
their enemies. Poltergeist spirits also animate some of the books, which fly
off the shelves to attack. There are a number of magical books left out here in
the library, some beneficial, some not. There are in addition a number of
volumes distributed here among the shelves and throughout the Pyramid that
provide a mine of information to explorers, as well as magical tomes that are a
source of inspiration to certain readers. A door in the south wall of the
library leads to a small ransacked room with a corpse. A trail of blood points
to a secret pivoting wall to the east of this room. Otherwise, there are three
exits from the library, one to the west, one to the south and the main double
doors lead to the
Processional Way. A wide corridor leads east from the Vestibule and then north and north-west. This is the ceremonial route taken by those who carried the body of Sesustris down through the levels of the Pyramid eventually to rest in his specially-constructed mausoleum. It was also a major avenue of a diversionary assault by the Cultists trying to penetrate the Pyramid and many bodies on both sides testify to the running battle fought here. The bodies of the Cultists, but not those of the defenders, have a nasty habit of animating when approached.
Artisan Stair Guard Room This room guards one of the two stairs down to the Second Level. A key-stone is required for the blocking wall to slide aside. This key-stone is in a chest in the Garrison Commanders secret treasury (see below). A number of Cultist Zombies block your way to the stair.
Curators Quarters. The third exit to the east of the Vestibule leads along a corridor with a pit trap to these well-appointed quarters. In the centre is a device that will open the outer door for a few moments. If this is done at midday, the direct sunlight will dissolve the blocking wall for about an hour, allowing egress from the Pyramid. Also here is the corpse of the Curator. He was so obsessed with his status in life that taking his Badge of Office will result in a visitation by his outraged spirit. This will happen each time someone newly takes possession of the Badge, wherever they may be. To the north-east is a bath that hides a crystal ooze, a difficult to spot opponent. In the Curators library are Lenses of Identification and Epic Gloves of the Spellspinger.
Stores. These storerooms in the south-east part of the level have within them black puddings and a number of decayed corpses infested with rot grubs.
Upper Garrison Barracks. An ever-burning lantern lies near the back wall of these long-abandoned barracks, highly useful in this nearly pitch-dark level if you do not have another light source.
Prison. North of the barracks is a jail cell with a corpse of a Cultist prisoner. His spirit still thinks he is being tortured for information and will reveal all he knows about what he thinks is the coming assault. He also reveals the locations of the stairs and their key-stones.
Garrison Stair. You cannot initially descend to the second level by this stair, as the only remaining key-stone for the stair is already on the second level.
Upper Garrison Officers Quarters. Just north of the barracks is a short passage to these quarters. Here the Garrison Commander lies fallen, surrounded by a whole host of Cultist invaders. As you approach, both the Commanders skeleton and several Cultists animate. The skeleton will help you defeat the cultists. When you then talk to the undead Commander, he threatens to attack you but, if you persuade him that he is no longer alive himself, his mind clarifies. He relates how he failed to defend the Pyramid and how the Cultists took the Garrison Stair key-stone from him. But a key-stone for the Artisan Stair to the north-west remains in his hidden treasure vault. This is reached via the west door using his key (the repeating trap is still active). Then an illusion wall to the west allows entry to a second small area; the vault door, opened by the same key, lies to the south. As well as the key-stone, there is a suit of armour on display called The Tank. On wearing this, you will become a veritable tank, but it slows your movement and impairs your dexterity small handicap for some PCs. On a weapon rack is the Garrison Commanders Bastard Sword.
Finally, the undead Commander gives you a quest to destroy all the remaining living Cultists within the Pyramid. Yes, some are still here lurking in the lower levels after a thousand years! This is something to which you might readily agree, since their Cult was based on worship of your old enemies the Banespirits. But the Commander warns you that on the lower levels his own guards will be likely to attack you in their state of undead confusion and even he may lose his mind and attack you if you keep bothering him before returning with the (separated) head of the Cultist leader.
Not to be missed in this area are the Garrison Commanders quarters through a door to the north of the illusionary wall. In here is the log book of the Commander which provides extensive story background. Also here, in the west wall, is a secret door that allows you to get back quickly to the outer Pyramid passage. Finally, an annotated map of the first level lies on his bed where he last left it a thousand years ago.
In the Officers Quarters opposite are an Officers Helm and a Magical Reflector Shield.
Encounters. There are no random encounters if resting on this level.
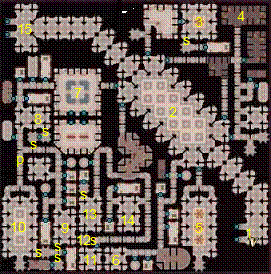
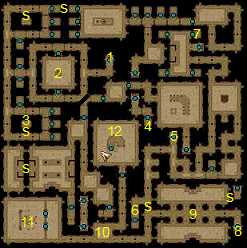
Pyramid Living Quarters Level 2
Compared to the floor above, the walls of this level are dour and utilitarian, and a thick uncanny purple mist provides unnatural illumination. The level is first reached via the Artisan Stair using the key-stone in the Commanders treasury.
Artisan Stair. As soon as you enter, a Skeletal Officer animates and accosts you. But there is no persuading him you are not an invader. The other skeletons will then animate on your approach, but they fortunately do so more gradually and haphazardly than do the Cultists. Off the stair are altars and four large statues of gods of the land.
Praying to Bast one time only (not per PC) removes all negative effects and provides +4 dexterity to non-evil PCs for one day.
Praying to Ra once only provides temporary hit points effectively to double the PCs current maximum hit points for a day and makes their right hand weapon become a holy avenger for a day. Only non-evil and non-chaotic PCs get this bonus.
Thoth similarly helps lawful PCs. They receive a +4 wisdom bonus for a day and all negative effects are removed.
1 Artisans Stair 2 Processional Way 3 Artisans Quarters 4 Master Artisan 5 Great Refectory 6 Jail 7 Garrison Stair 8 Officers Quarters 9 Temple of Fire 10 Elemental Priests 11 3rd Level Stair
Anubis helps evil PCs. They receive a damage
shield that does 2d6 negative damage to all opponents striking the PC perhaps
not very useful against Anubis own undead! And non-evil PCs suffer 2 levels of
energy drain for praying, even if they have level drain immunity items.
Level 2 Legend

Processional Way. Continuing south-east down the main passage opens you to attack by more skeleton Pyramid defenders. Towards the end, your way become irreversibly blocked when a section of ceiling collapses.
Artisans Quarters. There are various undead encounters and traps here. To the south some hapless artisans slain by the Cultists have left a useful heavy crossbow of advanced design. At the back of a latrine is a secret door to the east that allows entry into a small library and bypasses a pit trap. Treasures in these quarters include Lenses of Identification and a Ring of Spell Storing.
Chief
Artisans Quarters. At the end of the artisans
quarters, to the south of the area, is the room of the former Chief Artisan. He
has no 3rd level stair key-stone, but he does possess an annotated
map of the whole level. This reveals a secret area used by the Elemental
Priests accessed by a secret door in the east wall of the
Communal Quarters. In this area to the north are a grand hall, a private hall for the high-ranking priests, mages, artisans and garrison and store rooms. In a store-room to the north is a hidden stash left by one of the servants, but there is also a colony of green slime there. The stash includes a Helm of the Bat. The area is populated by Cultist zombies and Skeleton defenders; they will fight each other as well as you, continuing on their bitter struggle into undeath. You may use this to your tactical advantage. In the private hall are a Belt of the Warrior and a Martial Artist Robe. The south storerooms have a Ring of Epic Magic Defence lost in a crate.
Lower Garrison Quarters. To the north and east are the quarters of the Pyramid garrison. The north section is a jail, guarded by some now-skeletal hounds, and in the jailers room the jailer has become an angry spirit. On a stand in his room is a Rogues Delight outfit. Further south are the officers quarters. A training area within these quarters holds some excellent magical weapons, including a Spear of Light. In the large central room are a number of fallen defenders and Cultists. One defender has a Thumper Longbow, only useable by Arcane Archers. Elsewhere in the quarters are Monks Sledgehammer Gauntlets and Boots of the Swordsman.
Garrison Stair. To the east of the Garrison area are stairs leading up to the Garrison area on the first level. On the steps is a Cultist corpse and next to it is the garrison stair key-stone. The invader was clearly killed just after he got through the stair. With the key-stone, this allows you another way back up to the first level, and perhaps outside the pyramid to restock on equipment (and off-load your mountain of loot good job gold in NWN is weightless, as 10 million gold would be a bit heavy!).
Elemental
Priests Area. This hidden area is accessed from
the
Stair to the 3rd level. This double stair leads down to the third level and you require the 3rd level key-stone from the library of the Elemental Priests Area to move the blocking wall.
Random Encounters. Resting on this level may be interrupted by wandering maleficient spirits (death mists).
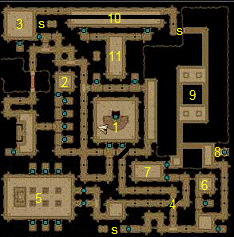
Pyramid Living Quarters Level 3
Here on the lowest level of the living quarters, you make a surprising discovery. You are hailed by a man in rags who greets you as his saviour! He belongs to an enclave of Cultists, part of the original assault force a thousand years ago. They were not able to continue on to the lower levels, and those that tried died with their 3rd level key-stone in their possession, so that the survivors on this level could not get back up the stairs to the second level. (The key-stone walls close themselves after a few moments.) There are in fact two further 3rd level stair key-stones on this level: one on the corpse of a female Cultist assault commander (now undead), and one in the hidden library of the Anubis Priest quarters.
To
progress to the Catacombs below, you must obtain the four Elemental Daggers.
Two were on the levels above. A further one is in the
While talking to the Cultists, you discover that there is a merchant in the great pillared hall to the north, in a tent near the east wall. The merchant will usefully buy up all your loot and has a few useful items to sell, besides. These include holy water useful for sanctifying evil altars in the levels below and useful against Demi Liches to boot.
The leader of the Cultists is at the north end of the hall, beyond a small shrine where somewhat familiar gods are worshipped. He sits on a throne in the middle of a chamber guarded by Cultist Zealots and Masters.
Level 3 Legend 1 3rd
Level Stair 2 Hypostyle
Hall 3 Cultist
High Priest 4 Garden 5 Temple of
Earth 6 Cultist
Excavation 7 Statue of
Sesustris 8 Temple of
Thoth 9 Temple of
Anubis 10 Temple of
Air 11 Temple of
Nephthys 12 Secret
Shaft 13 Temple of
Horus 14 Temple of
Osiris 15 Elemental
Gate & Stair
Cultist
Enclave. The east part of the level is given over
to quarters for the cultists, including sleeping quarters, a well and even a
garden to the north-east. All the statues of the old gods that were here have
not surprisingly been defaced, and their shrines now serve as squats. The
Cultist areas are delineated by purple energy barriers set up to prevent entry
by the undead beyond to the west. These barriers do not harm those friendly to
the Cultists, but will affect PCs if they are no longer friendly. Looting from
the Cultists while on friendly terms with them incurs chaotic alignment shifts
for theft. (Once you have fallen out with them, you may of course loot away
with impunity.) To the south of this area is a Suit of Blackguard Plate in a
chest. There are also useful items in a private room to the east, and a Skin of
the
Cultist Leaders Chambers. In the south wall of the Cultist Leaders audience chamber is a secret door and beyond this a locked and trapped door leading his private room. The door is unlocked, and the resetting trap inactivated, by a key on his person which he drops when slain.
Cultist Excavation. Against the wishes of their leader, some renegade Cultists have grown fed up after three years stuck in the pyramid and attempted to blast their way down to the lower levels. Their efforts may be seen in a room to the south-west of the Cultists areas. But the structure of the room is unstable and a rock fall will occur on moving near the hole in the ground. The hole is filled with hundreds of tons of rock, and you cannot get down this way. But later on, when exploring the Wards level 1, you may be able to clear the rocks from below and gain quick access back to this level and the Cultist trader.
There are two ways you may proceed in dealing with the Cultists. You may incite the Cultists (quite difficult as they assume you are confused from your ordeals in rescuing them) and fight them all, or you may treat with the Cultist leader (at least temporarily). He will want your 3rd level stair key-stone in exchange for information about the four Elemental Daggers and opening the Elemental Gate. He says he will give you his dagger, the Dagger of Earth, to help you do this, possibly in exchange for the key-stone. Telling the Cultist leader obvious lies, such as saying that you are one of many Cultists on the surface above, or telling him you slew his gods, the Banespirits, will start a combat instead, in which all the other Cultists join in against you apart from the Cultist merchant. However, if you bring him the dagger of Air on this level, as well as the Daggers of Water and Fire above, he will later betray you anyway. Foolish it was to trust those who worship the Banespirits!
Praying to Statues of the Old Gods. The power of the old gods is still strong in this area, where they were worshipped by their priests. They grant boons or inflict curses according to their individual natures.
Statue of Nut no longer any effect.
Statue of Thoth lawful PCs get remove negative effects and +4 wisdom one day.
Statue of Nephthys evil PCs get damage shield dealing negative energy damage, other PCs die with no save.
Statue of Anubis evil PCs get damage shield dealing negative energy damage, other PCs lose 2 energy levels.
Statue of Apep any PC will set off a Storm of Vengeance and the statue breathes acid. The elemental damage bypasses PCs immunities.
Statue of Bes any PC (imposter) will be cursed to be silent for a day. The Maul named Righteous Might lies before the statue.
Statue of Horus non-evil PCs are granted a 2d6 divine damage bonus to all attacks for a day, while evil PCs suffer 2 negative energy levels.
Statue of
Statue of Khnum non-evil PCs are bestowed a rod of resurrection.
Statue of Osiris good PCs receive +6 wisdom for a day, evil PCs suffer a permanent 6 wisdom and neutral PCs are just told off!
Sanctum of Sesustris. Although not strictly a god, he was clearly virtually considered as such even at the time of his death. A short passage heading west from the Cultists pillared hall leads into this chamber where a large statue of the Pharaoh, familiar from the city centre of Aqualis and elsewhere, is surrounded by pools of water. Lawful PCs approaching the statue receive a +10 bonus to will saving throws for a day (one time only), while others are confused for 30 seconds (even if equipping items bestowing immunity to mind-affecting spells). A magical item lies under the water in the south-west pool.
Library. To the east, connected to the Cultists pillared hall by a passage heading south from the hall, is the priests library, now haunted by library lurkers as well as by undead former Cultists. Retreating north will entice these enemies through the Cultists barrier and they will suffer damage accordingly. The still-living Cultists will in fact help you against them, but they tend to retreat back to their own zone after any combat.
3rd level Priests Quarters. Throughout the western part of the level is ample evidence of the strife and rivalries between priests of different factions. Many had ideas of taking control for themselves, while others felt embittered at being ignored by Sesustris. Those more evilly aligned may rise as vengeful undead. Another (!) secret area on the level is a small pair of rooms just south of the temple of the beneficent Thoth. The priest himself lies dead in his temple just north. He still holds a Mornigstar, the Star of the Heavens.
Elemental Gate. This gate lies to the north-west and is reached through a wide passage continuing on from the Cultists pillared hall. The gate can only be opened by means of the four Elemental Daggers. These daggers drop to the floor when the gate opens and can be used as weapons thereafter. (The gate remains open). Just west of the gate is the stair down to the Catacombs.
Mages Lab
This level lies between the 2nd and 3rd living quarters levels and is reached by a hidden entrance from a small room south of the 1st level library (see above). The stair continues down through the 2nd level.
On this level, the Mages conducted experiments that largely consisted of trying to create a golem army. To imbue the golems with a will of their own and other magical abilities besides, they fused the created flesh with the spirits of the dead from the catacombs. In this they enlisted the aid of the High Priest of Nephthys. However, during the Cultist Invasion, they lost control of the golems, called the Created Ones, who ran riot through the level, killing all the mages who did not succumb to the Cultists. The spirit of the Chief Researcher remains here still locked in his room and will tell the tale. It becomes apparent on exploration of the level that the High Priest was using their experiments for his own ends, as he secretly wielded control over the spirits animating the monsters. Perhaps this conflict between the wills of the mages and priest led them to break free of control altogether.
1 North Lab 2 Library 3 Stores 4 Chief Researcher 5 South Lab 6 Priest of Nephthys Quarters 7 Descending Platform
Mages Lab
Legend
North Lab. Here are bodies of Cultists and some still-imprisoned golems to the north. These ones have innate invisibility. Vats in the lab hold a liquid rather like the liquid that the Grand Master of the Free wizards of Aqualis was wont to bathe in when sleeping. It can be decanted off to provide healing potions with minor side effects.
Library. In here hide library lurkers and ethereal bookworms, strange larvae related to ethereal scarab beetles. To the south is a secret door leading to the High Priest of Nephthys hidden area.
Stores. Amid piles of rubbish and sundry goods is a skeletal golem to the north. Such golems can take mountains of damage before falling. They also deliver stunning fist attacks. In an urn has been dropped a Rapier of Life Stealing.
Chief Researcher. At the southern end of the central passage beyond a locked door in the east wall is the spirit of the Chief Researcher, now atoning for his crimes against nature. You may help him by destroying all of his creations, allowing his spirit to go free, but it would be more lawful to let him continue on suffering his eternal punishment trapped at the scene of his sins. Return to this spirit, after slaying all the active enemies on the level, including the chained golem, to complete this sub-quest.
South lab. This can be reached only via the stores as the south entrance suffers a ceiling collapse as you approach (evidence of intelligent behaviour?). In here you will face the main attack by the golems. There are three types: in addition to the invisible and skeletal ones, there are large demonic ones that stamp on the ground to set off earthquakes and deal heavy damage with their blows. In the centre of the chamber is a chained golem whose animation was never quite finished before being permanently interrupted a thousand years ago.
High
Priest of Nephthys secret quarters. These are
accessed from the secret door from the library or via an ascending platform
near the
Pyramid Catacombs Levels 1 and 2
These levels were the catacombs of the original Pyramid of the Ancients before being adapted for Sesustris by building the Living Quarters above and the Wards and Mausoleum below. They house the remains of centuries of dead Pharaohs and their servants. In the time of Sesustris, the Priests of Anubis and others woke many of the dead here to serve as guardians of the tomb of Sesustris and for their own ends. Many other traps were also added.
The upper two levels are considered together as they form a maze of passages interweaving on two floors. Many corridors have diagonal corners. Some of these may be rotated to open up new ways and block others.
Ghosts. One of the most difficult encounters of these catacombs are the four ghosts that haunt these areas. They have proper P&P magic jar ability, meaning that on a successful hit the victim must make a will save or become possessed by the ghost. The ghost enters the victim, who now glows with a ghostly light and attacks any former companions. You may end up having to incapacitate or kill the hapless victims body. If the body is slain, the ghost is ejected, free to seek a new victim. When possessed, the victims soul is transported to the ghosts phylactery, seen from within as a featureless grey area. The victim may be rescued by finding the phylactery, typically hidden nearby, and smashing it (earning a hefty XP award). The soul will fly to the victims body, ejecting the ghost if the body was not already slain. If the body had been slain, it may now be resurrected. The ghost can no longer possess victims if its phylactery is destroyed.
Wearing an Amulet of Protection against Possession will prevent the ghosts magic jar attack from working.
Resting
and Random Encounters. On resting, wandering
mummies may disturb you, or you may be tracked down by one of the four ghosts
on these levels. Once the ghosts are all dispatched, you will obviously not
encounter any more of these. The ghosts when still alive may also be met in the
Catacombs corridors. The corridors also randomly hide skeletons within burial
alcoves. Some of these animate as random types of skeleton. Skeletal Chieftains
are easy to destroy. Skeletal Warlords, first encountered in the crypts under
the Desert Folk lair near
Level 1 Entrance Chamber. The stairs from the Elemental Gate wind down and down eventually to end in an open chamber of ancient crumbling architecture lined with standing sarcophagi against the walls. Different sarcophagi hold different surprises: some contain treasure, some release a mummy when opened and some burst open as the mummy within senses your approach. Greater Sarcophagus Mummies have clerical powers and notably cast Unholy Word, blinding enemies. Warrior Mummies wield huge mauls that deafen on impact and deal large amounts of damage. Martial Mummies wield dual kukris with great skill and cunning, dealing large amounts of damage through accumulated blows and frequent critical hits. Ascete Mummies employ unarmed combat with stunning fists and are difficult to hit themselves.
1 Entrance from Elemental Stair 2 Slabs and Stairs Down 3 Dead Priest and Rotating Wall 4 Fear Trap 5 Rotating wall and Lever 6 Tomb of Ramesh 7 Demilich 9 Stairs Down 10 Giant
Skeleton & Platform Down 11 Stairs Down
Catacombs Level 1 Legend
8
Stairs Down
1 Stairs Up 2 Archer Ossuary 3 Hidden Lever 4 Bottom of Pit Trap 5 Stairs Up 6 High Priest of Horus 7 Stairs Up 8 Stairs Up 9 Good and Evil Alcoves 10 Rotating Wall and Lever 11 Demilich 12 Stairs to Catacombs 3rd
Level
Catacombs Level 2 Legend
Level 1 Trapped Chamber. South of the entrance stair is a chamber reached from the east and divided by a low fence. An altar lies at its far end. The west half of the room is trapped. Unfortunately, magical effects in this area prevent find traps spells from working. There are a series of trap tiles delivering shooting spikes repeatedly when stepped upon. Half of these are deactivated. Those that are more readily detectable are activated. On approaching the altar, you will suffer fear effects even if normally immune and flee in panic out of control back through the trapped area. Unfortunately, this also deactivated the traps and activated the other half which are much more difficult to detect. It is likely that several sets of spikes will be discharged in your panic, no matter if you had carefully disabled the first set! The setting of traps is swapped over again on leaving the chamber.
Level 1 Fallen Priest. Towards the middle of the first level, next to a diagonal wall blocking the passage eastward, is a fallen priest of Anubis who lost his way in the Catacombs. His note provides clues that the way forward is to rotate this diagonal wall by operating a lever on the lower level. Picking up the note activates a map-pin marking the location of the secret door to the room with the lever (on the 2nd catacmb level). West and north of the priest are a number of small crypts. Behind one is a secret area, concealing the very valuable Ring of the Planes Slayer.
Level 1 Demi Lich. South of the fallen Priest are two passages heading southward that join to form a square in the centre of which is a deep crevasse. The east passage is trapped by a pit and further south blocked by a collapsing ceiling. The crevasse is approached from the south. A rickety bridge leads out onto a narrow platform in the centre. And here lies a resting Demi-Lich. Approaching the creature interrupts its dark reverie, and it attacks. Once defeated, however, the Demi-Lich will slowly reform. You will only defeat it completely by pouring holy water onto the remains. You did get some from the Cultist Merchant, didnt you? Among its treasures is a Double-Sword, the Blades of Thunder and Lightning.
Level 1 Mummy Slabs. East of the entrance stair is a largish chamber entered from the north and east containing mummification slabs and an assortment of undead mummies. Some of these attack from the corridor behind. To the south-west of the chamber is an illusionary wall blocking a stair leading to level 2.
Level 2 North-West Section. This area is reached by the stair from the mummy slabs or by the secret trap-door from the north-east section.
In the centre of a 30ft square room is an ossiary pillar. Approaching this releases a huge number of skeletal archers and one or two skeletal marksmen. Run away, unless you have great piercing damage resistance. You may instead face them at the entrances as they approach in ones and twos.
To the north-west of this area are a number of small crypts, holding the usual assortment of undead, including sarcophagus spectres. A secret room inside a square of passages hides a Mummys Maul. A trap door in the north east small crypt leads to the eastern part of this catacomb section.
To the south-west are more small crypts. Hidden crypts are in the centres of squares formed by the complexes of passages. The hidden crypt to the west is entered by a secret door from the south, at the point where the wall juts out a little as a bare surface. In the crypt is a lever that rotates the diagonal wall next to the fallen priest above and is the means to penetrate further into the Catacombs.
Level 2 North-East Section. This section is where a number of pit traps will drop you. To the south is a prison room blocked by a tough portcullis where a pit trap near the demi-lich on the level above drops you. A stairway north of the chamber leads up and immediately down again to a 20ft square room with a coffin and an altar. Praying here will bestow healing repeatedly, but also an evil alignment shift. Destroying the altar will damage you but yield a good alignment shift. Pouring holy water on the altar to sanctify it will destroy it to yield a good alignment shift without delivering damage.
Among a number of small crypts to the north of the area is one with a ceiling that will collapse and another infested with Mustard Jellies.
Further west is a larger room containing a large sarcophagus in its centre. Touching this magically summons a huge number of skeleton chieftains. A small crypt to the west of this room has an Ancient Short Sword inside a sarcophagus. Just to the north, another small crypt has a concealed trap door in the floor that connects to the north-west level 2 catacomb section. This is the way out of the north-east section.
Level 1 South-West Section. This section is reached by rotating a diagonal crypt corridor wall to the south-west of the spike trap room. The lever is hidden opposite the diagonal wall just to the east of the corridor corner. Pass south to a room made up of interlocking corridors. You will be attacked by invisible Shadowdancer Skeletons that retreat and turn invisible again when damaged in combat. In the south-east corner of this area in the east wall is a secret door leading to another chamber with Skeleton Warlords. A stone door in the north-east corner leads to a large room with a tough fight against different types of skeletons, including mages who cast Greater Missile Storms and probably Skeleton Marksmen. It is best to run to the north or south alcove to receive cover from much of the missile and spell fire. In the south-east corner of this room is a hidden lever that rotates the centre section of the east wall, opening the way to the tomb of the Cursed Pharaoh. Approaching the central tomb will awaken the Cursed Pharaoh, a greater mummy, and also his wraith minions. Inside the south jar next to the central tomb are many valuable items: the Helm of the Pharaoh and Pharaoh Full Plate armour, as well as Epic Boots of the Sun Soul.
Level 1 North-East Section. This area lies beyond a diagonal corridor wall once it has been rotated by the lever in the level 2 north-west section. To the south is a 30ft square room with a central sarcophagus surrounded by a broken fence. There is a repeating trap in front of the fence opening marked by runes upon the floor. Inside is a longsword: the Blade of Wrath. Further south is a stair going down, the exit from this section.
To the north of this area, you will encounter your first ghost. Secret doors in the north passages lead to small hidden rooms enclosed within the squares formed by the passages. The one to the east has a ghosts phylactery and also Bracers of the Mage, while the one to the west leads only to a pit trap.
Level 2 East Section. This area is reached by a stair leading down from level 1 north-east section. To the south-west you meet the body of the High Priest of Horus; he was possessed long ago by a ghost. Killing the priest will eject the ghost, who will continue to attack. South of here is the ghosts phylactery. Destroying this will free the priests soul. The soul will re-enter his body, probably already slain by you. But you may raise the priest, who will talk to you and will offer to become your henchman. In the sarcophagus here is a Helm of the Kings.
West of the stair is a 20ft square room infested with green slime that drops from the ceiling. To the north from here is a large room with an ossiary. Here you will be attacked by a horde of Skeleton Beasts. In the south wall is a pivoting section opened by a hidden lever and behind this is a suit of Chromatic Dragon Armour. Further north of the Skeleton Beast room is an area of Guardian Zombies (a creature you already met rising up out of the desert sands in previous modules.) There are High Priest Robes in a chest here. A stair heads east out of this area to level 1 east section.
Level 1 East Section. This area is reached by a stair leading up from Level 2 east section. Just to the east of the stair is another pit trap dropping you to Level 2 north-east section. To the south, beyond a whole series of fire traps, are a number of skeletons, mainly weak Archers and much tougher Marksmen. A secret door provides a brief short-cut bypassing the traps. This area will be almost impossible unless you explore the small tomb chamber to the west and open the secret pivoting wall using a lever just inside the door to the north. Inside an Egyptian-style chest is an Epic Archers Belt giving piercing damage resistance. Cold resistance is also essential against the skeletons.
South, beyond the long fence, are tombs of mummies. In one is a book providing information about the Terror, the main danger on the Catacombs third level. In another is a Master Defender Greatsword.
West beyond the fence is a short corridor to an open portcullis, the way onward. There is a secret door near here that is actually a trap and leads nowhere.
Beyond the portcullis is a chamber magically darkened by an orb in its centre. Here the portcullis locks shut and you are attacked in the darkness by Greater Shadow Fiends. There is a small room to the east free of the darkness zone, and in a jar here is an Amulet of Protection against Possession, useful against the ghosts. Destroying the central orb on its pedestal will remove the darkness effect. The only way out is through a secret door to the south.
Level 1 Centre Section. From the secret door in the Shadow Fiends area, a long corridor heads west. A ghost haunts this passage. At its end the passage turns north leading to stairs upwards. But this is just a trap. A side corridor further west leads to a large room, in the south of which is a Skeleton Giant sitting upon a large throne The Giant has a huge magical club. The floating orb east of the throne controls a platform that will transport you to the level below. There is also a suit of Fiendish Plate in a chest here.
Level 2 Centre Section. The platform from level 1 centre section heads to a similar large chamber on the second level. There is a secret door in the west alcove leading to an area guarded by more guardian zombies. The chest to the south contains a Titans Bow. The final ghost lurks in the east alcove. This ghosts phylactery is beyond an illusion wall in the back of a small crypt to the south.
North of the platform chamber is a wide passage heading south-east guarded by skeletons and leading to a dead end (with collapsing ceiling). Instead head north-east past another collapsing ceiling to a large room guarded by Skeletons. The Skeletons are all on the central raised platform; the lower area is covered in traps. ON a glowing weapon rack on the platform is the Life Blade, a powerful halberd. A stair to the south leads up to level 1 south section.
Level 1 South Section. This final section of the 1st level is reached from the stairs leading up from Level 2 centre section. A passage runs round the Cursed Pharaohs tomb, past a pit trap, and stairs heading up and immediately down, to a misty area. Here is the lair of a Skeleton Dragon. The lair contains much treasure, including the Dwarven Axe Fiery Biter and the Shield of the Dragonslayer. You may avoid the Skeleton by finding a hidden lever in the section of passage heading northward. The lever pivots a section of the east corridor wall, giving access to the area beyond and simultaneously trapping the Skeleton to the north. In the area beyond there is yet another secret door in the south-east corner. This leads to a small room with three altars. The central one may be prayed at or destroyed with holy water. The other two conceal hidden compartments. There are a number of treasures here, including a Pharaohs Spear in a weapon rack. A stair to the east heads downward.
Level 2 South Section. From level 1 south section the passage turns west and to either side are corridors leading to areas north and south. The south area is tainted by evil while the north area is blessed by good. In the former area are a horde of Guardian Zombies; they are almost impossible to slay while protected by the taint of this area. Retreat to the north area where the forces of good will weaken them considerably. If you manage to kill them in the south area, let me know! The central passage has a nasty tendency for the ceiling to collapse.
The northern blessed area has chests containing an Enhanced Magical Reflector Shield and Titan Gauntlets. The southern cursed tainted area has a Helm of the Executioner and the Mace named Sets Fiat.
Just west of the north-south divide passage is an altar in a corner. A secret door in the north wall provides a short-cut back to level 2 centre section near where you met the Horus Priest. Such short-cuts will quicken your route back to replenish supplies from the Cultist Merchant.
At the end of a long passage is a large chamber. On the tall platform is the resting place of a Demi-Lich. This one is guarded by Skeleton Marksmen. The Demi-Lich hordes a number of items, including Smiling Death, a Mace so nasty you cannot sell it.
Halfway along the passage is a secret lever against the south wall. This opens a wall section to the north of the passage, leading (finally!) to a spiral stair heading down to Level 3.
Pyramid - Catacombs Level 3
The main danger in this deep and dark catacomb is the Terror, an undead spirit called into being by evil rites performed by the Priests of Set. The Terror was formed in its pit from the tortured spirits of many dead pharaohs buried within the catacombs, and is the embodiment of pure terror. While the link with its pit is maintained, the Terror is too powerful and regenerates too rapidly to be destroyed (let me know if you do!). It phases randomly in and out throughout this level. The only way to survive an encounter is to flee until is randomly phases out to another part of the level. If not in melee with the spirit, and yet not too far away (less than 30 ft.) you may fall prey to its Terror attack, like a phantasmal killer but much more powerful (immunity to fear will not help you here).
1 Entrance Stair from Level 2 2 Vampyrs
Rest 3 Temple of
Ra 4 Rotating
Wall 5 Temple of
Set 6 Sarcophagi
& Lever 7 Vampyr
Sarcophagi 8 Escape
Stair to Level 2 9 The Pit 10 Illusion
Wall 11 Embalming
Chamber
To
destroy the Terror, you will need to find the Flame of Ra (see below).
Catacombs Level 3 Legend
Temple of Ra. This lies to the north-west of the level. In the centre is a beam of welcoming light from above. To the south is a jail cell where lie some skeletal remains. Disturbing these brings into being the spirit of the High Priest of Ra, a good priest who was imprisoned here by the Priests of Set. He tells his tale, providing information about the Terror, and telling you to find the Flame of Ra, hidden in a room beyond a secret door that he tells you how to find in the east wall of his temple. (The secret door cannot be found without talking to the priests spirit). The secret area also holds a Helm of Ra.
Vampyrs Rest. Near the centre of the level is a small chamber lit by a fiery brazier in the centre. One of the coffins here has a Ring of Epic Utility.
The Pit. To reach the pit to the east of the level, you must manipulate a pivoting diagonal wall to the south-east of the level. This lies south of a ledge running along the west side of a large cavern. The diagonal wall first allows you to head west, which will eventually take you to the Temple of Set guarded by its skeletal High Priest and by his many skeletal minions who attack you in waves the further you penetrate into the Temple. The High Priest possesses a number of powerful items: a +14 Flail of Set, an unholy symbol of Set and his Priests Battle Vestments. (The first two items are only useable by evil people evil is the new good!)
Behind the altar in the Temple of Set is a hidden lever that rotates the diagonal wall; now it will allow you to head south. It is also worth checking the altar itself for what it holds. To the west is a crypt and a hidden chamber beyond with a number of treasures, including the Double Axe Blades of Thunder and Lightning and an Amulet of Epic Power. To the east, and then north, is a route leading to the cavern of the Pit. But again a collapsing ceiling blocks your way. Instead, head to a chamber with a large number of standing sarcophagi. The one to the east has a hidden lever next to it that will cause the pivoting wall to rotate back again, now allowing you to head east then north to a chamber with large sarcophagi. Approaching these will release Proto-Vampyr Masters, whom you first encountered guarding the Statue of Horus in the ruins outside Aqualis. The westernmost sarcophagus contains a Ring of Fire Throwing Axe and a Ring of the Undead Slayer (a bit late!).
To the east of the vampyr chamber is another way to the Pit cavern. Head east (near the collapsed ceiling you may have caused) to stairs leading up. These stairs head up to the second level, and a secret door leads to the good-aligned and blessed area of the north-south divide passage. This makes for a nice short-cut and a place to hide from the Terror. You cannot initially discover the secret door from the blessed area.
Head north into the centre of the Cavern to discover the Pit. When you are in this area, the Terror will tend to phase in here and remain here, defending the pit. If you have the Flame of Ra in your left hand, you will be protected against the Terror attack, but not its melee attacks. Throw the Flame into the pit to break its evil power and its sustaining effect on the Terror. Now you can pay the Terror back for making you act like a scared chicken earlier!
The Embalming Chamber. North of the Pit, head along the platforms to a dead-end. A secret door leads to a long passage heading west. Halfway along is an illusion wall. Head through and go south to the embalming chamber. Here are many potions in canopic jars or lying around loose on ledges. To the south is a bare embalming slab. Lying upon this, or asking your henchmen to do so, will transform them into a lifeless corpse that collapses into dust when you disturb it! You may take your dead friends equipment and items. But your friend is not really dead, only transported naked into a standing sarcophagus far below in the 3rd level of the Wards. Possibly the victim may as well be dead
The original occupant of the sarcophagus, a mummified corpse, is likewise transported back to the slab inside the victims clothing, making others think that the corpse is their friend. (I use the term friend loosely now.)
If a PC gets transported, they may try and break out of the sarcophagus, using strength, manual dexterity, by casting an appropriate stilled spell or by shapechanging. Although you have bypassed two whole levels this way, the going will not be pleasant wandering around nude without equipment! (A challenge for monks, anyone?)
In the centre of the embalming chamber is a wide pit with a winch and platform mechanism. This leads down to the Wards levels.
Pyramid Wards Level 1
Think you must be near the end now? Well you are only half-way, and the easy parts are over! The platform from the Catacombs drops you to a complex of levels specifically designed by Sesustris as a series of traps and guards. These are maintained and patrolled by the shades of his personal servants who remained entombed here on the death of their master.
Entrance Chamber. Signs upon the walls provide some information about this level. Illusionary walls cover exits heading east and west.
East Passages. Past a pit full of jellies and a haunted library, you come to a shallow pit blocking the way. But a ladder leads down. At the bottom, the passage slopes upwards to the south. At the foot of the ladder is a pressure plate that releases a number of wheeled mechanical constructs. These run down the sloping passages, picking up speed and eventually colliding into you. You may evade this encounter by running uphill past the constructs. They travel much more slowly uphill. Or you may find a secret door near the pressure plate in the west wall that leads up into a viewing chamber where the constructs were originally kept.
Past a portcullis is a passage heading south to the Statue of Sesustris.
1 Platform from Embalming Chamber 2 Black Pudding Pit 3 Mustard Jelly Pit 4 Library 5 Ladder 6 Mimic Wall 7 Caryatid 8 Mouldy Dining Room 9 Weird Well 10 Open Pit 11 Death Sphere 12 Metal Gratings 13 Chamber of the Keeper 14 Suits of Armour 15 Spiral Stairs Down
Wards Level 1 Legend
West Passages. Head onward past a pit full of puddings, a scything blade trap and another haunted library and the passage ends at a dead-end. However this is actually a Mimic disguised as a wall. It lashes out pseudopodia if you come close and these may paralyse you, sticking you to the wall. Once the Mimic is dead you may reach the Statue of Sesustris.
Statue of Sesustris. In the centre of this largish square chamber is another Statue of the Man himself. It has the same effects of causing confusion to non-lawful characters, and benefits to lawful ones. The north entrance has a a whirling blades trap that continues dealing damage when crossing the area until destroyed.
To the south-east, you may feel a draught; an illusion wall leads to the Mouldy Dining Room.
Hall of the Caryatid. From the Statue of Sesustris this wide hall heads south, flanked by a number of statues. Hiding within these is a Ward Guardian, the Caryatid. This is a living being of stone, and able to take the form of a statue or hide within a statue. What is more, the being can dimension-door to another statue nearby. These abilities are much like those of a Dryad in relation to trees. The Caryatid also has a pretrification attack.
The Caryatid is a bit of a coward, and she always hides in a statue when she is damaged. She wont come out unless the particular statue she is hiding in is approached, damaged or destroyed. Obviously, the best way to defeat her is to destroy all the statues she may hide in. She drops an Amulet of Natural Armour +14 when she dies. Or you can simply leave her hiding.
Mouldy Dining Room. This oval room is reached via illusion walls from the Statue of Sesustris or from the passage just south of the Hall of the Caryatid. The room is covered with chilly brown mould that acts like the mould encountered earlier in the passages under the cliff north of the Pyramid. But there are treasures in the room, including Desert Robes of Nature, arrows and Boots of the Thunderwalker.
Wishing Well (wishing you had left well alone). Inside the well lurks a huge Water Weird that deals a very nasty drowning attack on occasion. The Weird has 90% resistance to slashing and piercing attacks and 100% immunity to magical and most energy damage, but suffers double damage from cold (which turns part of its substance to fragile ice). It may move slowly a short distance from the well, but too far and it collapses, reforming once the well is approached again.
Pit and Footprints. West of the wishing well, the way is blocked by an open pit. On the other side are dirty footprints that lead to its edge, but not back again
You may jump or climb over the pit. Or you may climb down (or fall). At the bottom, there is an infestation of Green Slime. Pillars allow you to climb back up the east or west sides.
Wall Breach. The footprints come from a breach in the wall here. You can only imagine what caused this breach, as this is the impervious stone Sesustris used in modifying the Pyramid. More footprints head south. Investigating the breach, you may be surprised (or not) to find a Cultist popping his head out at the same time. The latter retreats inside again.
Secret Excavation. The Cultist renegades who blasted the shaft down from their enclave in the Living Quarters Level 3 have ended up here. After defeating them, and perhaps reading their accounts under a tattered bedroll, you may set off a collapse of the rock and debris piled above the point where they are delving. This releases all the debris above, freeing the way to climb back up to the Living Quarters. This is therefore an excellent short-cut all the way back up to the latter area and the nearby Cultist Merchant.
Death Sphere. In the centre of a rounded chamber is a sphere of annihilation. Clues to the danger lie in the shrivelled corpse of a Cultist who wandered in here from the wall breach. Once someone approaches the sphere, it activates and fires death rays at nearby creatures. The closer you are, the more accurate it is. When a ray touches you it spells instant death. The best way past is to retreat so the sphere inactivates, and then run through before it can activate again.
Floor Grid. The floor of the passage here is a grid of metal bars overlying a pit. Walking over the pit opens you to attack by a barrage of tail spikes from Manticores lairing below. You may bash parts of the grating (useable parts) to north or south to open a hole in the grating and get at the Manticores.
Manticore Lair. The Manticores here will attack on sight. A ladder leads up to the south edge of the grid above and a passage leads south to the Keepers Lair.
Keepers Lair. Here sleeps the Ogre Mage keeper of the Manticores. He has been geased to remain here by Sesustris and has no idea how long he has been down here. If you act like you belong in the Pyramid, and dont admit to killing his pets, he will not attack. He may get angry if you try and loot his stuff, which is a shame as near the door are a number of Potions of Diminution. Here you may also find the Battleaxe named Big Biter.
The Keeper may assume gaseous form and escape up through his chimney outside the Pyramid. You may also do so using Potions of Diminution, but do not tarry too long as the chimney is a tight squeeze. You will come out just outside the Pyramid, and may use the Air Spirits Teleport to trade with her. Make sure you are stocked with Potions of Diminution in case you wish to make return trips.
Mighty Suits of Armour. Along the west side of the passage heading north from the floor grid is a long alcove lined with suits of Mighty Armour. You can fight them if you feel youre out of combat practice or need to sell their stuff. Only the one fought will animate.
Spiral Stair. A spiral stair leads down to the second wards level. Half-way down, the staircase is trapped by wall spikes that are poisoned. This poison may be virulent much more so than standard NWN poison DCs.
Pyramid Wards Level 2
Similar to the level above, this area is a series of traps for would-be raiders of the tomb of Sesustris. It is patrolled by the shades of the Servants of Sesustris, as you may discover if you rest here.
1 Spiral Stair up to Level 1 2 Dinosaur Summoning 3 Pantheon 4 Secret Spiral Stair from Level 3 5 Servants of Sesustris 6 Servants Temple 7 Valets Quarters 8 Window to the Eternal Flame 9 Wind Walkers 10 Secret Shaft from Grain Silo 11 Karnak Floor Plan 12 Spiral Stair to Level 3
Wards Level 2 Legend
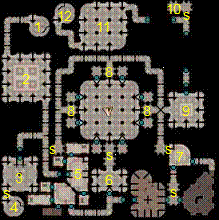
Dino-Crisis. South of the spiral stair from level 1, you come into a large and lofty chamber. As you enter, you realise something ominous is happening. On the four platforms are summoned huge predators from a bygone age of the land. To them you are simply a small morsel.
Illusion wall. South of the dinosaur summoning chamber you may hear a faint whistling along the passage. This comes from an illusionary wall to the east.
Chamber of the Pantheon. Beyond a set of double-doors in the south-west of the area is a square chamber with many defaced statues of the pantheon of the old gods. One to the north-west has a secret compartment.
Quarters of the Servants of Sesustris. On turning the handle of a beaten bronze door, a magic mouth calls an alarm, triggering the appearance of three Servants of Sesustris in the dining area beyond. The Servants are all undead shades, having faded away over centuries of vigilance. They have few powers, but possess spellbooks given to them by Sesustris ages ago. From these they may read out spells as if they were scrolls. Some cast Greater Missile Storms. Some are quite tough, casting Time Stop and fighting with clubs. Some cast Chain Lightning and Elemental Shield.
The Servants quarters consist of private rooms and storerooms. Here you may find a Sun Bow that fires special arrows that you call forth and Epic Gloves of the Spellslinger.
In addition, there is a temple, now guarded by Guardian Zombies. There are negative energy traps between the pillars of the temple that work despite items protecting against level/ability drain. The alcove with the altar has a secret door leading to a small room. Inside is a Shield of Force and a Helm of the Berserker. There is a secret trap-door here leading down to one of the Demon Cells (see below).
To the east is a large library. If you came in from the alarmed door, here you will first meet the Chief Servant, the Valet of Sesustris. He is still alive after a thousand years, and possesses full wizardly powers. He will retreat to save his library from the ravages of combat.
The Shades and Valet will make their final stand in the Laboratory further east. There is an illusion wall to the Valets private chamber in the north wall of the short corridor between the library and laboratory.
The Valets private room may be reached via the illusion wall or via a passage from the laboratory. It may also be reached by a secret door from the Whistling Passages. If you first enter the Servants Quarters by this route you will surprise the Valet alone here. In the room are tomes revealing what life was like for the Servants. There is also a strange device attached to the bed. If activates and the dial turned anticlockwise, you or your henchman will sleep for a short time and be fully refreshed with all spells relearnt. If the dial is turned fully clockwise, you will sleep for several years, missing the adventure unless there is a friend or henchman on hand to wake you up early! There are Greater Vestments of Faith here, among other items useful to Wizards.
Whistling Passages. These passages form the north, east and west parts of a large square. They may be entered by the illusion wall to the west or via the Valets private bedroom to the east. Along their length are side passages heading to the centre. They stop at windows in the end walls. You may look through these to view the Chamber of the Eternal Flame below, but you may not enter the latter chamber this way. In the floor near the windows are secret trap-doors leading down to Demon Cells (see level 3 below).
Wind Walkers Lair. To the east of the Whistling Passages is the source of the noise. A number of air elemental Wind Walkers are here, and they stir up a sandstorm from the loose sand in the chamber when roused. Once the Wind Walkers are defeated, you may exit through the north arch.
Cavern Heights. Here a bridge used to span a large gap high up in a lofty cavern. But now the bridge is broken. A reverse gravity effect prevents you from falling or climbing down to the cavern floor (level 3) which would have provided a short-cut. However, the gravity effect does at least allow you to leap safely right over the gap.
Flooded Passage. This short passage between two flights of steps is hardly flooded. The water is only ankle-deep! But it is no ordinary water; it oxidises all items it comes into contact with in the same way as do rust monster antennae. Boots will fall apart and so will metal armour. Nasty.
City Plan. Beyond the paddling pool is a chamber whose whole floor is a large scale plan of the ancient city of Karnak. All but one route through the city is trapped. In fact nearly the whole surface of the floor is a mosaic of traps. But if you have the High Priest of Horus with you, he will be familiar with the layout. The correct route to take is of course the State Funeral route. Follow Horus closely as he guides you along, stopping at turns so you can keep up.
Spiral Stair. Another spiral stair leads down to level 3 of the Wards. This one is not trapped.
Pyramid Wards Level 3
This wards level is seldom travelled, even by the former Servants of Sesustris.
1 Spiral Stair to Level 2 2 Snake Signpost 3 Water Trap 4 Grain Silo 5 Stairs to Gas-Filled Passages 6 Furnished Room 7 Shadow Library 8 Endless Stair 9 Hall of the Pharaohs 10 Portal Arch to Arena 11 Eternal Flame 12 Doors to Cavern 13 Chamber of the Sphinx 14 Secret Spiral Stair to Level 2
Wards Level 3 Legend
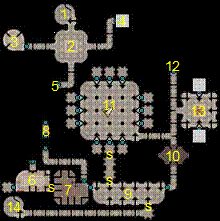
Snake Signpost. Heading south from the spiral stair, you are greeted by a large snake statue. Examining this statue will reveal that it pivots on its axis. Touching it will cause it to do so, stopping at each of the four passages exiting the chamber. At each position, the statue speaks a riddle providing a clue on what may be faced if you head in that direction.
Granary. East of the snake statue, you come to a small room that appears to be a grain store, with some barrels in the corner and some loose grain on the floor. But the room is a trap. On walking over a pressure plate, a torrent of fine grain is released and the silo rapidly fills up, behaving like quicksand and suffocating those inside.
The only way out is to wait for the flow to subside and then crawl up through the vent that discharged the grain. Here there is some air where you can catch your breath. But then you will have to drop into the larger silo to the east. A ladder in the north-east corner leads up a shaft out of this silo. The shaft leads up to the wards second level. An easy to find secret door leads to the passage between the Cavern Heights and Flooded Passage. The secret door cannot initially be found from the other direction, but you may pass back and forth once you have discovered the door from the shaft side.
Water Trap. West from the Snake Statue is a room with a nice water fountain. Observant players might notice a grate high up in the far wall. Approaching the west part of the room released a water trap, and water comes flooding into the room through the grate.
The way out is to go near the fountain, just to the east of the fountain, where a stream of bubbles comes up from the floor (you may have to shift your view under the water to see the bubbles). There you may find a hidden sluice grate in the floor. Open the grate to allow the water to drain away.
The entrance door slams shut from the water pressure when the trap is activated and cannot be broken down. It can open again once the water drains away.
Gas Passages. South of the Snake Statue are steps descending further downward. Issuing forth from below is greenish gas denser than air. The gas is not toxic but you will not be able to breathe it.
The way through is simply to hold your breath and run, hoping that you might get to the other side before you expire. But along the way you will meet a number of gem golems. The emerald (green) ones are immune to spells, while the obsidian (black) ones are 75% immune to physical damage. Perhaps you may defeat the golems by taking each one at a time, running back to the north stair to get your breath back. Being ethereal means you do not have to breathe, or you might still have an underwater helmet from the sewers of Aqualis.
At the door blocking the stairs to the south, there is one final surprise. The door is spring-loaded. On opening the door, it flies outward, knocking you back down the stair, and forcing you to hold your breath that little bit longer.
Animated Room. The gas-filled passages lead to a long-abandoned living room, perhaps formally used by the Servants of Sesustris when they were still alive. But now the furniture in the room is imbued with malevolent life on approaching or damaging tables or chests, they animate and attack!
The door in the south-west corner is false. Attempting to open it causes a number of poison darts to shoot out. Those that miss hit the opposite wall with a dull hollow thud, hardly to be expected if the opposite wall was stone. It is in fact a secret door, the way onward. One chest that does not animate contains the Kukri Halfling Death and a Holy Defender sword.
Shadow Library. The living room leads to yet another library. This one is haunted by Greater Shadow Fiends and ethereal bookworms. An effect in this area blocks item immunity to level drain so you may find your strength rapidly decreasing from the Shadows! A chest to the south has a Ring of Negative Energy Immunity.
Endless Stair. The door north from the library leads to a corridor, at the end of which is a stair leading upward. You get the idea it may lead out of the pyramid, but why would you want to leave when youre having so much fun down here? The stair goes up and up, and if you do not decide to turn back soon, eventually you may become enthralled and journey on an endless ascent up a never-ending stair.
Hall of the Pharaohs. Some of the greater former Pharaohs of the land were considered worthy enough by the Servants of Sesustris to have their sarcophagi moved here in state away from the Catacombs, where they would hardly have been treated with respect by the Priests of Anubus and Set. Some of these mummified remains are restless nevertheless.
The easternmost sarcophagus on the north side is the one to where somebody who lay upon the instant embalming slab in the 3rd catacomb level would be teleported. Successive victims would be teleported to other sarcophagi distributed around the hall. Opening the sarcophagus rescues the unfortunate victim if they had not burst out themselves.
The easternmost sarcophagus on the south side has a false rear that is a door to a secret escape passage formerly used by the Servants of Sesustris.
The second sarcophagus from the west on the north side has a similar false rear. It leads to an illusion wall in the back of one of the Demon Cells, the same one as that below the Servants Temple on the level above. The illusion cannot initially be discovered from the Demon Cell.
Among the sarcophagi are to be found Epic Chakrams and a Scythe of Set.
Escape Passage. From the false sarcophagus, this passage heads west to a spiral stair. This leads up to the wards level 2 in the Pantheon Hall. The secret door to this hall cannot initially be found from the other side.
Arena of Difficult Choices. If you cant beat delvers with all the traps and guardians you set out for them, why not use their greed and egos to let them defeat each other? So thought Sesustris and his servants when they designed this arch leading to an extradimensional pocket. The pocket is an arena, and a diamond inside a casket is required to activate the arch and return safely. But there is one less diamond than there are individuals who teleported into the arena. There is always at least one diamond. (Every trap has to have an escape, right?)
Fellow players or their henchmen might come to blows over who gets to escape and who gets to die of thirst or starvation in the arena. (Henchmen here suddenly develop survival instincts!)
The Eternal Flame. This large rounded chamber may already be familiar from looking through the windows on the level above. Around the outside are a number of doors protected by impervious fields of energy. On the other side of each door is a Demon Cell imprisoning a number of Greater Manes Demons.
The Flame is what powers the fields of energy. It is a powerful symbol of Law created by Sesustris himself. Putting your blade within the fame yields an enhancement bonus against chaotic enemies. Extinguishing the flame releases all the Demons. Perhaps if you had explored some of the cells from the Whistling Passages, from the Servants Temple or from the Hall of the Pharaohs, there may be a few less to fight. Otherwise you will need that chaotic enhancement bonus
Demon Cells. The doors to these cells can only be opened by extinguishing the Eternal Flame. This will also release all the Demons from their prison vats. Otherwise, approaching vats closely (by entering the cell) will release those imprisoned Demons. The Greater Manes Demons have poisoned spikes that may independently prick opponents when they get close in melee.
Cavern of the Devourer. From the arch leading to the Arena, the passage ends at a set of double doors. Beyond is a cavern, the same as that crossed much higher up on the first wards level. In the centre of the cavern is an area cleared of debris. This is because of the antigravity effect here. (The stalagmite is actually a stalactite!) So passing across here will make you float up to the Cavern Heights area above.
There is a sinister atmosphere and light coming from a cutting through the rock walls of the cavern heading west. And at the passages end is its source, the Abyssal Devourer. Who knows how long this creature has remained here, or why it ever came to be here in the first place? The devourer is sessile, but shoots out sticky tendrils (like a roper) that literally draw enemies into its huge maw. You may have a chance to break free. If drawn into the maw, you have only a few seconds for your friends to kill off the devourer before you are spat out again as a lifeless husk.
The Sphinx. This chamber has two exits north and south that lead to different places and times, and a teleport upon a central platform. The area is guarded by a Sphinx, who flies down from a nook in the ceiling of the chamber. The Sphinx is an unwilling guardian. Conversing with her may enable you to appreciate this and play along with her game of acting like she is going to attack you without actually doing so. On repeated conversation you may think to pose the Sphinx a riddle (not the other way around for once!). By these means you may discover that to activate the teleport you must first place upon the pedestal a lock of the hair of Sesustris and a piece of the fallen sun, neither item exactly in plentiful supply.
But you can obtain the items by passing through the north and south arches. The north arch takes you to the Temple of Ra in Karnak a thousand years ago, while the south arch takes you forward in time billions of years to when the world and its sun are dying. These two sub-quests may be completed in either order.
Moving onto the teleport while it is still red will simply spread your molecules throughout the cosmos.
The sphinx will drop a Helm of Telepathy that will make the Fallen Star quest much easier.
Once you have completed the two sub-quests, you must put the two items on the pedestal. It will now turn green, signalling that it will now safely transport you to the Mausoleum of Sesustris.
If the Sphinx lives, you may converse with her before or after you put the items on the pedestal. She is resigned to die at your hands, but with insight (an easy intelligence roll) you may work out that the geas is now void and she may escape the Pyramid. As thanks, she will give you the very powerful and useful Scarab of the Sphinx.
Fallen Star
This is a large sub-quest that starts on passing through the south arch in the Chamber of the Sphinx. If you did not slay the Sphinx you will know that you are here to collect a fragment of the sun that has fallen to earth. Otherwise, you must guess that there is something of significance to be found here that may allow you to activate the teleport.
1 Portal Arch 2 Fresh Crater 3 Gas Vent 4 Frozen Waterfall 5 Bridge 6 Entrance to Ice Caves
The Future Earth
Legend
The Future Earth. South of the portal arch is a freshly formed crater. A piece of the sun has just landed here; the Sphinx had set the arch to precisely the right place and time, even if you then killed her. But unknown intelligent beings have taken the fragment! You must journey deeper into this alien and hostile world to retrieve the fragment.
The air is thin here, resulting in momentary giddiness from time to time depending on your constitution. Such giddiness is more likely during the exertions of combat. In addition it is very cold; after a while it will become more than you can bear and you will take damage. Warming yourself up near a volcanic gas vent will abort and reset this chilling cycle.
Enemies include Giant Polar Worms. These worms do not swallow you whole, but may do heat damage. You will also encounter much smaller burrowing worms, whose mandibles chew rapidly through the ice softened by their fiery breath. Possibly the burrowing worms are a larval stage of their giant cousins.
After finding a place to cross south over a large chasm, you may eventually find a tunnel entrance in the south-east corner. Beyond lies the ice caves.
Ice Caves Legend 1 Exit to Outside 2 Slippery Bridge 3 Dead Polar Worm
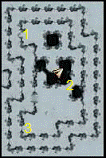
Ice Caves. It is a little warmer in the ice caves shielded from the elements, but the air is still unnaturally thin. There is an additional hazard here, namely very slippery patches of ice. If you slip near the edge of a crevasse, you may fall in to your death many hundreds of feet below!
In the southern parts of the cave, you may encounter your first somewhat intelligent aliens, the Hive Guardians. They are frightening indeed, moving at great speed and with great agility. They shoot out gouts of organic acid from their tails and when slain their acid blood splashes all those nearby.
At the south edge of the cave is the frozen corpse of a polar worm. The way on is to walk right into the dead worms mouth! The worms body leads to and merges with the semi-organic construction of the Hive.
Hive Legend 1 Exit to Ice Caves 2 Passage to Inner Caves 3 Ice Wall 4 Hive Queen
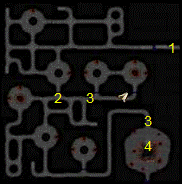
The Hive of the Tlikli-Li. The only intelligent life remaining in the world are the insectoid Tlikli-Li who live in this Hive. They keep the Hive Guardians you met in the Ice Caves as pets and guards. Wandering around the Hive, you may encounter some more Guardians, some of them already fighting off Burrowing Worms.
A little south, you will encounter the Tlikli-Li themselves. They are not immediately hostile. You may just kill them all, or you may converse using the Helm of Telepathy. However, the conversation is a delicate business, and you may provoke hostilities (honesty is the best policy when communicating telepathically!).
You may request a fragment of the sun that the Tlikli-Li worship and you may be invited to have an audience with the Tlikli-Li queen. The ice barriers previously guarding private areas will be removed and even the Hive Guardians will now be friendly. The queens chamber lies south and then east.
One you reach her chamber, talk to her before taking the sun fragments. She will allow you to request a maximum of two, otherwise they will all attack you for your greed. And then you must actually take no more than two. (You only actually need one the Sphinx teleport will always stay open once activated). Then you must return all the way back to the portal arch outside.
If the Sphinx lives, do not speak to her if you have only one item. She will then be forced to attack you because of the dangerous progress you are making.
The Child Sesustris
The north arch from the Sphinx chamber takes you to the Temple of Ra in Karnak, a rare chance to meet some reasonably friendly NPCs. If you conversed with the Sphinx, you will know that you must retrieve the Crown of Sesustris, a lock of his hair. Otherwise, you must piece together where and when you are, and what you are required to do.
There are two merchants in the Temple compound. Considerable inflation over a thousand years means that prices are much cheaper (for selling as well as buying). The merchant inside the tent to the west has a good supply of potions. Both have one or two useful items as well.
You may get water from a well near the west merchant or in the east guardroom.
To the north are two fountains with naturally aged follies. In the undergrowth of the east folly someone dropped a bag containing a valuable jewel and a more valuable Ring of Magical Energy Immunity.
To the north, two sets of doors lead to the temple proper.
1 Portal Arch 2 Sphinx Statue 3 Merchant 4 Guard Barracks 5 Dropped Bag 6 Entrance to
Inner Temple
Temple of Ra Legend
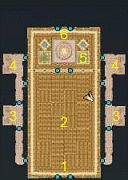
Inner Temple. There are a number of worshippers here that may remind you of worshippers of Sesustris in Heliopolis and Aqualis, except these are true priests and they worship the old gods, in this case Ra, God of the Sun.
At the altar is the preoccupied High Priest of Ra. (You already met a High Priest of Ra, or at least his spirit, in the Catacombs.) You must talk to him three times before you will get him to reply.
There are a number of ways to get the High Priest to reveal what ails him. If you conversed with the Sphinx, you may talk about the large Sphinx statue outside as an entre. Or you may return the ring of magic immunity you found outside. Finally, you may work the conversation around to explaining where and when you have come from, perhaps working it out yourself as you go on. In this you may have the aid of the High Priest of Horus or your other Henchmen.
It turns out that the High Priest of Ra is the father of Sesustris. (There are clues to this elsewhere in the Pyramid.) The child has gone missing, however, and guess who must rescue him? When you are ready, the High Priest will teleport you to the area of desert where Sesustris was kidnapped by the Sand Trolls. You must find the Sand Trolls lair.
Note that the Sand Trolls cannot be slain by blows (unlike NWN trolls, they are proper trolls!). Nor does fire bother them. You will need acid.
Desert
Legend 1 Arrival from Temple 2 Path to Desert Oasis 3 Ruined Buildings 4 Path to Desert Canyon 5 Trickle over Cliff
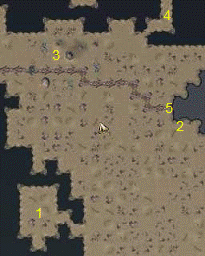
The Desert outside Karnak. Enemies in the desert include huge scorpions attacking from beneath the sands, and Blue Dragons attacking from the day-time skies above. Various undead spirits roam the desert by night. You will be susceptible to heat damage here, depending on your armour and any desert gear (just like the deserts elsewhere in the Sands of Fate). Also you may need water, though you will probably not be here long enough to need too many waterskins.
To the west of the desert are ruins from a time long ago when the desert was less hostile.
To the east a dried up stream bed leads over a cliff. Just south of here is a path down the cliff and leading to a tunnel inside the cliff face.
Among the cliffs to the north is a ravine leading to the Desert Canyon, where the Sand Troll lair is to be found.
Desert Oasis. The cliff tunnel leads down to an oasis in the desert, somewhat sheltered from the sun by towering cliffs overhead. Here camp the Desert Folk. They are not the monstrous Desert Folk of Aqualis and Heliopolis, but merely nomads scratching a living from the harsh desert. (But who knows what a cataclysm and a thousand years may bring. There are disturbing similarities between them and the modern Desert Folk, and between the latter and the Sand Trolls. Perhaps a certain boy later made them pay for their insular ways and their truce with the Sand Trolls in the form of some kind of unnatural hybridisation)
The Desert Folk accost you of course, but you may convince them that you are also a hardy desert traveller. If a Desert Folk tells you to leave, and then accosts you again, hostilities may break out.
At the east end is a tent outside which sits the Desert Folk Elder. You may trade with him for goods or information if you are polite. He may tell you a little about the Sand Troll lair where the boy has been kidnapped, and may suggest you buy some censers of acid to sprinkle upon the trolls and cauterise their wounds to prevent regeneration.
Desert Canyon. This narrow way leads north, and is guarded by Sand Trolls hiding in ambush under a thin layer of sand. Further on, some unseen Trolls in the cliffs above drop rocks onto you. And beyond this, a trip wire triggers the attack of Trolls guarding the lair entrance. Among this last group are some tougher Sand Troll Berserkers. In the middle of this area is a hidden pit trap. You may fall in here in the middle of combat. The trolls will wait for you to climb out again. But if you needed to take off your armour to climb up, the trolls will not wait for you to put it back on again!
Sand Troll Caves Legend 1 Entrance from Desert Canyon 2 Bridge & Rock Fall 3 Swimming Point 4 Sand Troll Shaman 5 Sand Troll Chief 6 Prison Huts 7 Tunnel from Deeper Caves
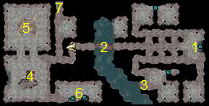
Sand Troll Caves. Throughout these caves you will have numerous encounters with Sand Trolls. The caves are divided by an underground stream running south. A bridge spans this rapid stream, but the Trolls have set a collapsing ceiling trap blocking this route.
Further south, a cave opens out onto the stream. Once you have already ascertained that the bridge is blocked, you may choose to attempt to swim upstream to the bridge. Disrobing first makes this easier. There is no swimming back again. Failure means you are swept downstream and drown.
Beyond the bridge, you come to a large cavern overlooked by a ledge on which stands a Sand Troll Shaman who casts Wail of the Banshee (in case you roll a 1 on your save!). You may also be greeted by Sand Troll Berserkers from the Chiefs cavern to the north, and perhaps the Sand Troll Chief himself, who wields the Greatsword named the Great Ripper. There is some treasure by the Chiefs throne, including a Helm of Emperors.
To the south of the Shamans cavern is a passage heading east and in the second Prison Hut you will find the child Sesustris sitting in a corner.
Rescuing Sesustris. Conversing with the boy, you may find him somewhat precocious and irritating. He will be aggrieved that his father has not come in person, spelling future trouble for the priests of the land, and for the Priests of Ra in particular. You might decide to be clever and slay Sesustris there and then, guessing that he is the villain, but if you are a horrible enough gamer to do this to an innocent child you will get your comeuppance.
You may decide to take Sesustris back, but of course the swim back from the bridge might be difficult. There is in fact no gong back to the desert now. The only way back to the Temple is to use the teleport token given to you by the High Priest of Ra. If you forgot, then Troll reinforcements will continue to turn up from a passage to the north of the Sand Troll Caves and eventually the child will prompt you.
Return to the Temple. Sesustris will have an argument with his father and when this is over you may request the lock of hair. If you do not know about the hair, the High Priest will suggest you take it as a momento. You may now return through the arch portal to the Sphinx chamber.
Again, if the Sphinx lives, do not speak to her if you have not already obtained the sun fragment. She will otherwise be forced to attack you because of the dangerous progress you are making.
Pyramid Mausoleum Level 1
From the Sphinx teleport, you find yourself in the Mausoleum of Sesustris. The end is near!
The first level of the mausoleum is a maze with one guardian, the Juggernaut. There are various shifting walls in the maze that move at random every so often, blocking some routes and opening others.
Mausoleum
Level 1 Legend 1 Teleport from Sphinx 2 The Juggernaut 3 Sliding Wall 4 Open Pit 5 Hypostyle Hall
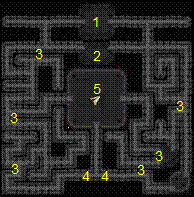
A chamber directly south of the entrance chamber is where the Juggernaut is first encountered and entering this chamber activates it. The gate behind the Juggernaut will only open when you have already entered the final chamber, the central Hypostyle (pillared) Hall. Entering this area will also activate the Juggernaut, who might enter through the opened gateway.
The Juggernaut is virtually impossible to destroy by combat, dealing huge amounts of damage, frequent devastating criticals and regenerating rapidly. The only way you can destroy it is to lure it near one of two open pits to the south and jump across. The Juggernaut will attempt to follow, but fall into the pit to its doom. Jumping or climbing down a pit leads only to a pool of lava at the bottom.
Rather than destroying the Juggernaut, you may simply lure it away from the pillared hall and explore the latter before it returns. The Juggernaut lumbers along only very slowly. But there is a risk you may become trapped behind a moving wall.
The central pillar in the hall conceals a hidden catch. Operating this opens a small door through which you may enter the hollow core of the pillar. Metal rungs lead down to a similar pillar in the Mausoleum level 2.
To the south-east of the central pillar, you may notice that one pillar rings hollow. There is no opening here, but the pillar can be entered from the level below and it leads right up to the Forgotten Vault lying above this level (see below).
Forgotten Vault
This secret area can only be entered via the south-east pillar in the Mausoleum Level 2 (see below). Approaching the dwarf statue sets off a pit trap that drops you back into the Mausoleum Level 1. To the south is a huge cache of unguarded treasure. This includes a Ring of the All-Rounder, the Bastard sword Deathstrike and Master Titan Gauntlets.
Pyramid Mausoleum Level 2
This level is entered by the shaft inside the central pillar of the level above. You come out into a hall with a smaller number of pillars. The pillar to the south-east conceals a similar catch and door allowing you to climb upwards inside the pillar to the Forgotten Vault.
To the south of the chamber is another guardian, the Naga. She will advance upon you if you enter the southern part of the pillared chamber, launching spells as she does so. She is very difficult to hit in melee.
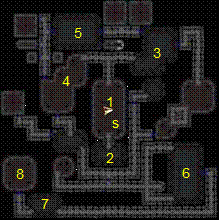
To the north
of the chamber you may head west or east. The remainder of the level is
occupied by its Guardians. These are Yuan-Ti who have been promised power and
glory after fulfilling their duty. There are Invokers and Assassins; the latter
have a nasty tendency to run off when injured, become invisible and sneak up on
you again.
Mausleum
Level 2 Legend 1 Pillar Door 2 Spirit Naga 3 Balors 4 Solars 5 Yuan-Ti Temple 6 Balors and Solars 7 Mouth of Hell 8 Teleport
The Yuan-Ti have summoned a number of other guardians to do much of the dirty work, not that they have ever had any work to do. No-one has ever got down this far. These include powerful Salamanders, Greater Balors and somewhat confused Solars. The Solars will attack other guardians as well as attacking you. One Solar drops its weapon and clothing as it falls, as does one Greater Balor. These are worth picking up! The southern parts of the level are closed off by two locked doors, guarded by resetting traps. The Yuan-Ti High Priestess to the north has a green key that will open both locked doors and deactivate the traps. The doors may actually be bashed open eventually, but you might fall prey to the trap in front more than once. The west door trap is electrical, the east door trap is fire.
Beyond a chamber to the south-east, in which you encounter both Solars and Balors (see above), is a passage heading west. Towards its end, after some final Yuan-Ti encounters, you come to a rough carving of a huge skull. Its mouth is the Mouth of Hell and regularly disgorges skeletal undead and mummies when living beings are nearby. Fighting these increasing numbers of undead within the room can become very unpleasant very quickly. Instead, simply run past, and finish off any that you had already summoned from the safety of the corridor. Alternatively, retreat, kill off those already present, and then rapidly run to the mouth and bash the mouth to destruction before too many more can be summoned.
The passage turns north to the final chamber of the level, a teleport that is already green and activated. Perhaps the third and final Mausoleum level holds the tomb of Sesustris.
Pyramid Mausoleum Level 3
You enter a large triangular chamber that initially appears to be somewhat of an anticlimax as it is completely empty. But if you were not already disturbed by triangles, and by the number three in general, the flash of familiar teleportation bars as soon as you leave the teleport area should make you worry. The full triad of Banespirits have just dropped in. Apparently you had not destroyed them as permanently as you had thought.
It seems the Banespirits Father, their creator, gave them three cracks at the whip, once during the first Cataclysm, once when you destroyed them in the Shadow World and in the Gem Tower, and now they have a final chance for revenge.
Combat with all three Banespirits if single-handed will be near impossible without immunity to critical hits. This is because of the Stunning Fist attack of the Banespirit of War. You will also need resistance to negative damage to face Famine, who deals this damage every time you hit him.
Take on Plague first to stop his offensive spells, then War and all his pieces, and then Famine, who is more defensive. Famine will heal his allies, so if you take him on last he might have used his heals up already. There may be alternative strategies you might prefer.
Once you have slain all the Banespirits, the teleport will transport you to the Tomb of Sesustris!
The Tomb of Sesustris
After the Banespirits area, the teleport sends you shooting back up to the very centre of the Pyramid, where lies the Tomb of Sesustris. In the centre of the area, through arches to east and west, is the Tomb itself. A glow of light bathes the golden sarcophagus from above. After a hopefully suspenseful narrative you open the sarcophagus and out comes the spirit of Sesustris to congratulate and thank you for freeing him at last.
Sesustris tells you that you have achieved your quest. You were to free his spirit to allow him to avert a second Cataclysm. You may be happy with this explanation and just want to return home, or you may be unsatisfied with a number of inconsistencies, such as who or what is going to be responsible for the new Cataclysm and how his story fits poorly with what little the Powers told you. Or you may have designs on Sesustris and the power his spirit might still hold.
Regardless, at some point Sesustris will offer you the chance to become the new Pharaoh. But sooner or later you will guess or be told the monstrous truth. The whole Pyramid was transformed by Sesustris into a device by which he may achieve Godhood. And after a thousand years the time is ripe for his apotheosis. He has become mad, obsessed with the corrupting influence of Chaos upon his land. He was responsible for the first Cataclysm, which was to cleanse the land after his death, creating the Banespirits as tools and to take the blame. Meanwhile, when the Banespirits work was done, his spirit recalled them and took the credit for saving the land. A thousand years later, the second cataclysm was to cleanse the land for his return as a god, as the god, to rule in person over the land forever. Your mortal body will provide the sustenance he needs. (Any would do, but what better mortal shell than yours?) Your body and soul will be consumed in the process.
So much for the plan. How do you stop it? Sesustris has no reason to parley, and is totally immune to attack. And every so often, more of your hard-won experience points are drained off by the spirit.
Attacking the spirit, and then calming down enough for someone to talk to you, will trigger the arrival of the Powers. A voice in your mind speaks, explaining the situation, and then you are sent to the Shadow World where the material form of Sesustris is slowly taking shape. In this form he is vulnerable, but he is also free to retaliate and will continue to drain your experience exponentially.
The spirit starts as a wraith, and then as it drains off your power each minute, it changes. It first becomes a more substantial wraith. With each subsequent draining, the spirit appears as a humanoid shade, then a skeletal frame knits together, and then flesh forms upon the skeletal form in two stages. Finally Sesustris appears whole and starts to mock you, saying you are too late. He phases out back into the material world now his material transformation is complete.
But the Powers again return you to resume the battle. Now it is a race against time before Sesustris achieves full godhood, which will occur in but a minute or two. The renewed Pharaoh casts a number of powerful spells in quick succession, and then attacks with blindingly fast fists, dealing multiple stunning fist attacks.
When he achieves godhood, his form glows with a golden light and he becomes irresistible in power. See how long you last, Mr./Ms. 40th level PC!
You must finish him before he reaches godhood. When that happens, all the power and experience he stole are returned, and the Powers transport you to the Realm between Realms just as the whole Pyramid crumbles apart around you. You have won! (And if you have time, loot the corpse and the sarcophagus!)
Tactics to defeat Sesustris. Immunity to critical hits is virtually necessary in the final combat, as the power of Sesustris stunning fists is well . stunning. Before that, try and trigger the transition to the Shadow World as soon as possible by attacking the spirit, then stopping quickly and waiting for the Powers to intervene. If you delay too long, when you do go to the Shadow World, Sesustris may be more advanced in his transformation and might skip straight to one of the later stages.
While in the Shadow World, take the opportunity to wear Sesustris down. Although he recovers a fixed amount of health with each transformation stage, you must aim to wear him down to the brink by the last transformation (he will not die outright). That way, he has as few hp remaining as possible for the final fight back in the material world.
Epilogue
Back in the Realm between Realms, and without your henchmen, you have a final conversation with the Gate Guardian whom you met all that time ago when you were first plucked from your dreams and found yourself outside Heliopolis.
You may take the opportunity to trade with the Spirit of the Air using her teleport device, and rationalise your inventory.
But you are 40th level. There is nowhere else to go, nothing else to do. Do not suppose that there are many other modules out there that will offer you a challenge at maximum level and with all the equipment you have just obtained. Bioware are not bringing out a God Expansion Pack and NWN 2 will take you back down to 1st level with incompatible rules and a 20th level ceiling.
Yes. The time has come to retire your character. And in talking to the Gate Guardian, it is up to you how you choose to do so and the reasons for your choice.
I hope you enjoyed the Sands of Fate.
John McA
|
Politica de confidentialitate | Termeni si conditii de utilizare |

Vizualizari: 4782
Importanta: ![]()
Termeni si conditii de utilizare | Contact
© SCRIGROUP 2026 . All rights reserved