| CATEGORII DOCUMENTE |
| Bulgara | Ceha slovaca | Croata | Engleza | Estona | Finlandeza | Franceza |
| Germana | Italiana | Letona | Lituaniana | Maghiara | Olandeza | Poloneza |
| Sarba | Slovena | Spaniola | Suedeza | Turca | Ucraineana |
DOCUMENTE SIMILARE |
||||
|
||||
Builder (Map
Editor) 1.01
User Manual
3. Installing and running Builder
5.3. Recommendations on arranging objects
5.5.1. Selecting and moving objects
5.5.5. Arranging objects along a line
5.5.6. Changing reflection setting for objects
5.6.3. Planting and deleting trees
5.6.4. Changing tree parameters
5.6.5. Finding trees on the map
5.7.2. Planting and deleting trees
6. Saving a map and linking it up to a mission
The process of composing a mission for Theatre of War includes three stages:
Use the graphics editor (not publicly released) to create altitude and terrain-type map for your future mission map.
The Builder utility is used for arranging static objects (fences, bridges, buildings and trenches) and trees on a previously prepared map.
In the Mission Editor you place units on the map and write triggers (to control these units, check win/lose conditions, assign tasks and play videos).
The Builder utility is used on the second stage to arrange static objects and trees and change their locations.
Note: in this version of Builder you cannot edit altitude maps, terrain-type maps, surface texture, roads or grass. The main purpose of this version of Builder is changing, deleting and adding objects on maps created by developers.
Please, also note that to compose game missions you need to use the Mission Editor supplied with the current game version.
To run Builder utility you need to have the following components installed on your computer:
Windows XP operating system
Theater of War version 1.2.0.46 or above
After you run builder.exe the main application window will pop up.
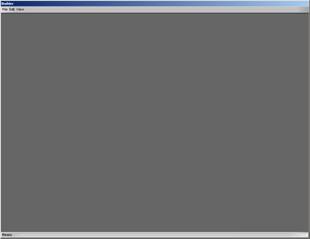
Picture 4.1. Main window of the application
The main windows menu allows you to open the list of available statics, change video settings or load one of the existing maps.
You can open a window with a list of statics from the menu View->Statics
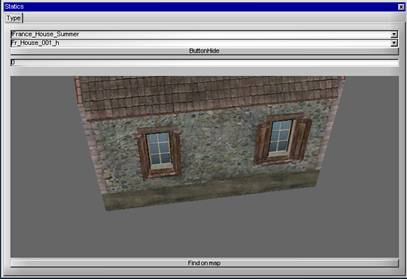
Picture 4.2. View statics window.
Confirmation level set: 0.
In this window you can select:
Object type (for instance, !France_House_Summer, Animals etc.)
Object sub-type (for instance, Fr_House_001_h, Pig_001 etc.)
Damage level (an integer from 0 to 100). To view or put on the map a partly destroyed static object specify any number other than 0.
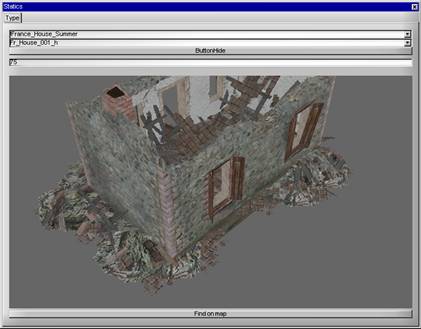
Picture 4.3. View statics
window.
Damage level set: 75
In Video Settings dialog window you can change current display resolution, switch to window or full screen modes or disable display of grass, trees or shadows. This window is invoked from the menu View->Video Settings
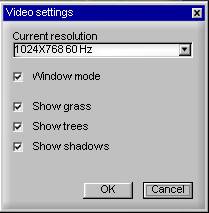
Picture 4.4. Video settings window
You can hide or show grass, trees or shadows without restarting the application. To do so just click the OK button. However, if you need to change current display resolution or switch from full screen to window mode (or vice versa) you will have to restart Builder after clicking OK.
Attention! In case you have selected a display resolution or refresh rate in the Video Settings window that your display fails to support, then after running Builder you will have to open bldwin.ini and manually enter the refresh rate and resolution in the window parameter inside the [core] section.
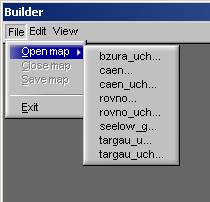
Picture 4.5. Menu with list of
available maps.
To open the map use the menu File->Open. When you run Builder it automatically finds all available maps and adds their names to the menu. If you specify name of a map in command line parameters, Builder will automatically load the map.
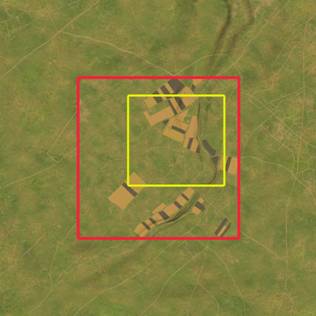
Picture 5.1. Map
zones
The landscape of a map consists of several zones:
Near zone (red box on the picture). This is a fixed zone
sized 2 x
Game zone (yellow box on the picture). Inside this zone a player can move the camera, select his units and assign them orders. Size and location of the game zone may be changed in the mission editor.
Far zone This is a fixed zone located outside the near zone that serves to decorate the horizon. Units cannot move in this zone but you can place far trees into it.
Builder allows you to arrange objects of the following types:
Statics Include buildings, trenches, fences and dead animals.
Trees. Standard highly detailed trees. They cast shadows, serve as an obstacle for infantry and vehicles and fall if run over by tanks or hit by a shell explosion.
Far trees Poorly detailed trees. They cast no shadows, are no obstacles and cannot be destroyed. These trees serve to be arranged far off in big quantities to decorate the horizon.
To avoid lower game throughput or failures in map loading you should observe recommendations as follows when arranging objects:
The number of statics should be below one thousand.
The number of trees should be below three thousand.
The number of far trees should be below fifty thousand.
Objects should be arranged in so that to avoid having large impassable areas on the map. Otherwise, the map may fail to load.
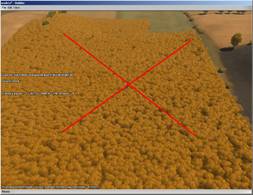
Picture 5.2. A large impassable area made of trees.
If after being edited in Builder a map still fails to load try to reduce the number of impassable objects (trees, buildings, fences) especially in areas where those are plentiful.
Builder supports two modes for viewing and editing: 2D and 3D. You can toggle between the two modes by ENTER. If you hold Ctrl button down when switching from 2D to 3D the camera will move on to the place where the mouse pointer is.
In 2D mode you can change the camera height by + and - keys or the scroll bar on the left. You can move the camera with a vertical or horizontal scroll bar. Besides you can zoom in a certain area on the map if you select it with the mouse pointer and hold Shift and the left mouse-button down.
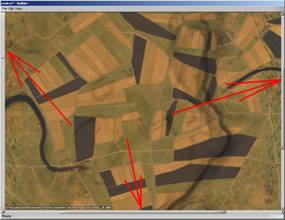
Picture 5.3. Editing map in 2D mode.
Arrows show controls that allow changing position of the camera.
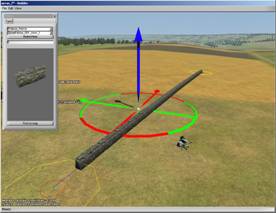
To zoom the camera in or out in 3D mode move the mouse pointer along the Y-axis (up and down) holding the right mouse-button down.
To move across the map move the mouse pointer along Y-axis holding the left mouse-button down. For smooth movement, hold down the Shift key.
To rotate the current object horizontally, move the mouse pointer around the X-axis (left and right) while holding down the scroll wheel.
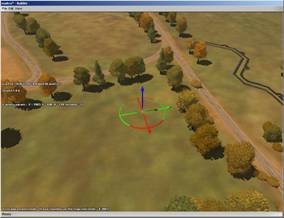
Picture 5.4. Editing map in 3D mode.
In 3D mode you can release the mouse pointer from the object. To do so, press the NumPad-0 key. To reselect the object with the mouse pointer press NumPad-0 once again.
To switch to the statics editing mode select the item Edit->Work with Statics or press the key combination Alt + O.
To select a group of objects, move the mouse pointer pressing Alt + left mouse-button. To deselect a group of objects move the mouse pointer pressing Alt + right mouse-button. To select all statics on the map on the menu Edit select the item Select All. To cancel selection use Edit -> Unselect All. You can enable (disable) selecting statics if you uncheck the option- Edit->Enable statics selection.
Picture 5.5. Selecting group of objects in 2D mode.
In 2D mode you can additionally select a single object by left-clicking it.
In 3D mode you can select a single object by pressing the Tab key. To deselect a single object press Tab once again.
To select objects of a particular type on the map open the window Statics (View->Statics), select an object of the required type and click the button Find on map.
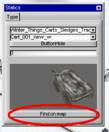
Picture 5.6. Finding an object on the map.
In 2D mode you can move objects using Drag-n-Drop option holding down the left mouse-button.
To rotate a group of objects in 2D mode perform Drag-n-Drop by the scroll wheels or the keys NumPad-7, NumPad-9, NumPad-4, NumPad-6, NumPad-1 and NumPad-3. If you use NumPad-X keys while the menu option Edit->Rotate Statics is checked objects will change their individual orientation when the group is rotated.
To move a group of objects in 3D mode:
Place the pointer on one of the selected objects and press the Tab key.
Move selected objects holding down the right mouse-button. You can also rotate selected objects with the scroll wheel.
Press Tab once again
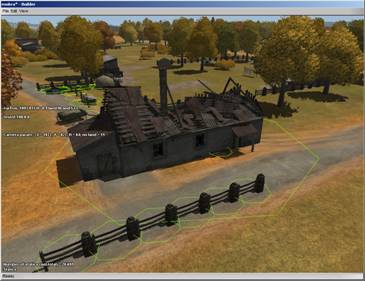
Picture 5.7. Moving objects in 3D mode
To insert objects in 2D and 3D modes use the Insert key. You can select the type of object to be inserted and its damage level in the view statics window (in the menu View->Statics).
To delete selected objects press the Delete key. To delete all objects select Delete All on the Edit menu. You can undo or redo deleting objects (check items on the menu Edit->Undo, Edit->Redo)
Additionally you can insert objects using the key combination Ctrl + left mouse-button. To delete a single selected object use the key combination Ctrl + right mouse-button.
To change type of a single object:
Select this object (left mouse-button in 2D mode, Tab key in 3D mode).
Use the Home /End keys to change object type. Use Page Up / Page Down keys to change object sub-type.
To change confirmation level for a selected group of objects (without changing types of objects):
Select and object group.
Open view statics window (on the menu View->Statics).
Specify desired damage level in the editbox (from 0 to 100).
Press the ENTER key to make changes effective.
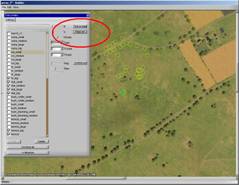
To change type of object group:
Switch to 2D mode.
Select a group of objects.
In the menu (called up by clicking right mouse button) select the item Replace all selected objects to
In the window that will pop up select an object to be replaced and click Replace button.
Click Close button.
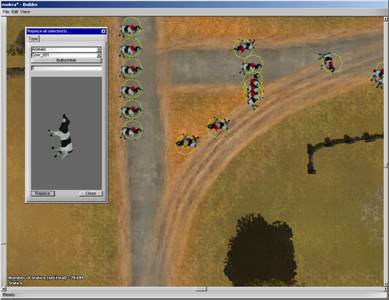
Picture 5.8. Changing group of selected objects
To clone selected objects:
Switch to 2D mode.
Select a group of objects.
Click the right mouse button and select the command Clone selected objects in the menu that will pop up.
To copy selected objects to the hard disk drive:
Switch to 2D mode.
Select a group of objects.
Click the right mouse button and in the menu that appears select the command Save selected objects on HDD.
Objects that were saved on the hard disk drive can be inserted into another map. To do so select the command Restore objects from HDD in the menu.
Besides standard commands for copying (CTRL + C), cutting (CTRL+X) and pasting (CTRL+V) selected objects are available in 2D mode.
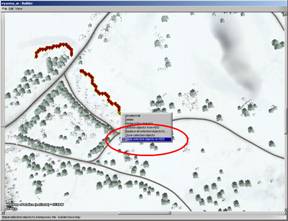
Picture 5.9. Saving selected objects on a hard disk drive
This option may be used to align building on streets, building fences, lines of posts etc.
First of all you need to set two points to define the line you will use to align objects. To set a point, right-click on the map while holding the space bar down. To delete a point right-click it while holding down the space bar at the same time.
After you set two points, in the bottom left part of the screen a legend specifying distance between the two objects will pop up (see picture 5.10).
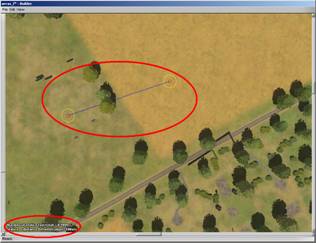
Picture 5.10. Arranging objects along a line
You can increase or
decrease distance between the objects with a space of
To copy any selected object (see View-> Statics) along the defined line, use the F5 key. To change rotation angle for objects arranged in a line using 2D mode click the scroll wheel and move the pointer along X-axis (left and right).
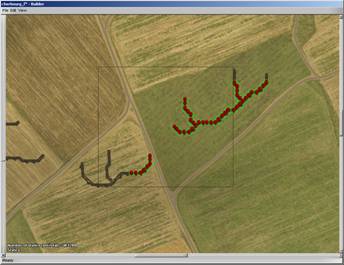
To delete objects arranged along the line press the F7 key. All operations with objects are relevant until you change at least one of the points that determine the line.
Picture 5.11. Arranging fences along a line
In the menu View->Display Filter you can enable/disable the display of different statics types. For that you just need to uncheck from one of menu items. To disable the display of all statics select the item View->Hide all. To enable display of all statics select the item View->Show all.
On the menu View->Static icon size you can select the size of icons to be displayed in 2D mode above the selected statics.
To switch to trees editing mode select the item Edit->Work with Trees or press the key combination Alt-T.
To select a group of trees move the pointer while pressing Alt + left mouse-button. Release the mouse-button and choose the command > Select Trees in the menu that will pop up.
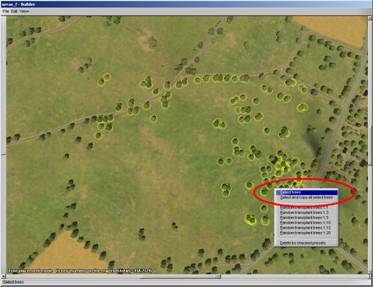
Picture 5.12. Selecting trees
To deselect a group of trees move the pointer while pressing Alt + right mouse-button. To select all trees on the map, on the menu Edit choose the item Select All. You can cancel selection in the menu Edit -> Unselect All.
In 3D mode you can select the nearest tree by pressing the Tab key. To deselect a single tree, press Tab again.
You can move trees in 2D mode using Drag-n-Drop option by holding down the left mouse-button.
To move a group of trees in 3D mode:
On the menu View select the item Trees or press the key combination Alt + S. A dialog window with a list of presets, i.e. previously set trees parameters will appear. To add a new preset to this list, enter its name and click the button Add. To delete a preset, select it and click the button Delete.

Picture 5.13. List of presets for trees.
To edit the settings of a preset, select it and open the window, pressing the button Advanced >>.
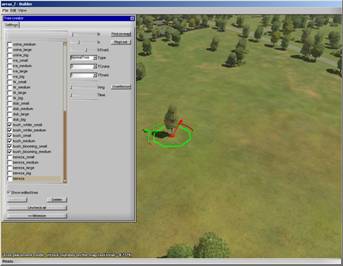
Picture 5.14. Settings of a preset
You can change the following parameters of a tree:
R foliage size
h height of tree
hTrunk height of trunk
Type type of tree
TCrone foliage texture type
TTrunk trunk texture type
To enable the display of an edited tree check show edited tree on the checkbox (see picture 5.14).
To create a new preset with the settings of an existing tree place the pointer near to the tree and press the key combination Ctrl + S. A new preset under the title unnamed will be added to the dialog window with the list of presets. Change its name and click the button add (see picture 5.15). Please, note that the name of preset must not contain symbols as follows: period (.), slash (), backslash (/), space ( ), asterisk (*), question mark (?).
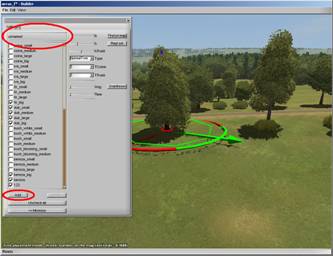
Picture 5.15. Creating a preset basing on settings of an existing tree
To plant a single tree in 2D or 3D mode use the Insert key. You can select a preset of a new tree on a window with a list of presets (on the menu View->Trees).
To delete any selected trees press the Delete key. To delete all trees, on the menu Edit select the item Delete All. You can undo or redo deleting trees (see items on the menu Edit->Undo, Edit->Redo).
Additionally, you can plant a single tree using the key combination Ctrl + left mouse-button. You can delete a tree located under the mouse pointer using the key combination Ctrl + right mouse-button.
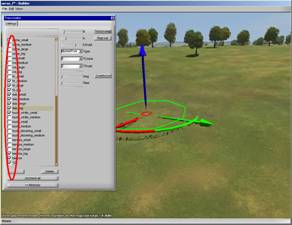
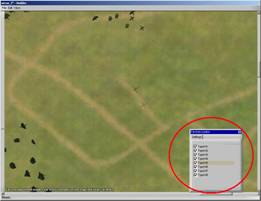
Picture 5.16. Window with a list of presets.
Presets to be used in a group arrangement are ticked off.
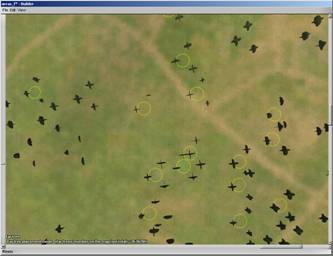
To plant a group of trees:
Open window with the list of presets (see menu View->Trees).
Check the presets you want to use for planting a group of trees (see Picture 5.16).
While holding down Alt + left mouse-button, move the mouse pointer and define the area for planting.
Release the mouse-button. In the menu that will pop up select one of Random transplant trees 1:X items.
To delete trees of certain presets:
Open window with the list of presets (see the menu View->Trees).
Check the presets with trees you want to delete (see Picture 5.16).
While holding down Alt + left mouse-button, move the pointer and set the area where you want to delete all the trees of selected presets.
Release the button and in the menu that will pop up select the item Delete by checked presets.
Changing parameters of a single tree:
Switch to 3D mode and select the desired tree with the Tab key.
Using the Home / End / Page Up / Page Down keys, select the desired preset.
Press the Tab key once again.
To change the parameters of any selected trees on a window with the list of presets, select one and click the button Repl. Sel (see picture 5.17).
Open the dialog window with the list of trees presets (on the menu View->Trees). Click the button Advanced >> to invoke additional controls.
Picture 5.17. Finding and replacing trees
To find trees of a certain type on the map select one of the presets and click the button Find on map. Any Trees that have the same parameters as the selected preset will be selected (see Picture 5.17)
To copy a group of selected trees press the key combination Ctrl + C or right-click the mouse in 2D mode and in the menu that will pop up select the command Copy selected trees.
To clone trees located in a certain area:
Switch to 2D mode.
Holding down + left mouse-button define the area where you want trees to be cloned.
Release the mouse-button and in the menu that will pop up choose the item Select and copy all selected trees.
Far trees are arranged in groups of three which are always directed towards the center of the map. Up to 8 types of such groups of three are available on every map.
To switch to far trees editing mode select the menu item Edit->Work with Far Trees.
Selecting and moving far trees is similar to the procedure of selecting and moving regular trees described above in paragraph 5.6.1.
Picture 5.18. Selecting and moving far trees
You can plant a single tree in 2D or 3D mode using the Insert key. You can select a type for the far tree in a window with the list of far tree types (on the menu View->Far Trees).
Picture 5.19.List of far trees types
To delete selected trees press the Delete key. To delete all trees on the menu Edit select the item Delete All. You can undo or redo deleting trees (check the menu items Edit->Undo, Edit->Redo).
Additionally you can plant single trees using the key combination Ctrl + left mouse-button. To delete a tree located under the mouse pointer use the key combination Ctrl + right mouse-button.
To plant a group of far trees:
Open the window with a list of far trees (check menu View->Far Trees).
Check the types of trees to be planted as part of the group (see Picture 5.19).
Holding down Alt + left mouse-button move the pointer and define the area for planting.
Release the mouse-button. In the menu that will pop up select one of Random transplant trees 1:X items.
To delete a group of trees:
Holding down Alt + left mouse-button, move the pointer and define the area to be cleared of far trees.
Release the mouse-button and in the menu that will pop up select the item Delete trees.
To change type of a single tree:
Switch to 3D mode and select the tree with the Tab key.
Using the Home / End / Page Up / Page Down keys, select the required type of tree.
Press Tab once again
To save an edited map select the item Save map on the menu File.
Changes you made will be saved to the folder Maps<map name> of the game directory. To see the results of your work load any of missions that uses that map. You can create a new mission in the mission editor.
If you need to restore the original map clear the folder Maps<map_name>.
2007
|
Politica de confidentialitate | Termeni si conditii de utilizare |

Vizualizari: 1553
Importanta: ![]()
Termeni si conditii de utilizare | Contact
© SCRIGROUP 2026 . All rights reserved