| CATEGORII DOCUMENTE |
| Bulgara | Ceha slovaca | Croata | Engleza | Estona | Finlandeza | Franceza |
| Germana | Italiana | Letona | Lituaniana | Maghiara | Olandeza | Poloneza |
| Sarba | Slovena | Spaniola | Suedeza | Turca | Ucraineana |
DOCUMENTE SIMILARE |
|||||
|
|||||
TERMENI importanti pentru acest document |
|||||
In the end, every modification and adjustment for 'handling' comes down to getting the maximum work out of those four little patches of where the rubber meets the road.
Race car handling is a very broad and very technical subject, and we're not going to pretend to cover this subject completely. With this site's main audience being the weekend racer using a predominantly stock car, we're going to focus on the basics of the physics involved, and the practical application of after market hardware.
If you're interested in an in-depth study of the physics and engineering behind leading edge handling, there are several excellent books about this topic, and you'll need those references.
Whether you're just beginning, or already have some race driving experience, you'll need to have a basic understanding of the physics involved in race car dynamics to maximize your performance. While you can go to any number of shops and buy hardware, you need to understand the purpose of each of the major components affecting the handling of the car, and how each of them affect each other. There is no point in blindly spending hundreds or thousands of dollars on fancy parts without knowing exactly what it is you're trying to accomplish, or how to adjust them for maximum performance. Having an understanding of handling physics, your car, and your goals, will help you know whether that killer part described in a magazine article or ad is going to help, or whether it needs something else at the same time to be effective.
If you've spent a lot of money on parts for your car and think it's not handling as well as it should be, it could be your driving, but it could also be a mismatch of parts because you (or your shop!?) didn't understand what the parts actually do and how they affect the whole car. Fine tuning a car's handling is about compromises. There is no single setup that will provide peak performance on all tracks, or even on all parts of a single track. To adjust for this, you will have to understand the forces and dynamics the car experiences during racing and how after-market handling hardware affects them.
Start with the basics we present here. With an understanding of what affects your vehicle's handling, you can decide on an upgrade path that suits your budget, and meets the needs of the skills you're developing.
Assuming equal horsepower and driver skills, the fastest car around the track will be the one with the most tire traction. Traction aids in acceleration, braking, and cornering.
'Handling' is all about maximizing tire traction. Regardless of how much advanced hardware the car has, the bottom line is that the car's entire braking, accelerating, and cornering performance has to be translated through the four small patches of rubber in contact with the road. Think about it. Ignore absolutely everything about a car except for how much rubber is in contact with the road. Maximizing the performance of these four small patches is what 'handling' is all about.
Maximum traction, of course, is affected by the suspension design, the type of tire, it's rubber compound, its contact patch size, and several other factors. Once a given car and tire is selected, there is still the task getting the absolute most out of that specific tire.
After-market products which can help improve tire traction include anti-roll bars, shock tower bars, stiffer springs, adjustable shocks, wheel alignment kits, and others. Used properly, these items are designed to maximize the contact patch of the tire during dynamic conditions. Used improperly, these same components will actually deteriorate traction and handling under race conditions.
Another major factor in tire traction, often overlooked, is the driver. A practiced driver having very smooth control of the car, and high sensitivity to the tire's traction performance can improve the car's lap time as much as just about any single after market hardware modification, and it's free. Give a pro driver your car for a 30 minute session, and he'll likely best your times by an amount you thought impossible.
To do this, the driver must fully understand the tires, how their maximum performance is achieved, and have enough practice time developing a sensitivity to how the tire is performing at any given moment on the track.
Three factors determine the maximum potential grip of a tire: the coefficient of friction provided by its rubber compound (stickier is better), the amount of rubber as determined by the tire size (bigger is better), and the amount of downforce applied to the tire (pushing down adds to the total friction applied). Of course there is a limit to all of these, and a point is reached where more is not better.
There are two factors in reaching and sustaining the maximum traction performance from the tire. First, a tire's maximum traction potential is actually reached when there is a small amount of slippage. This 'slippage' is translated differently for braking, accelerating, and cornering.
Under braking, the peak performance of the tire is reached when the tire is turning slightly less than a one-to-one relationship of the distance traveled. In other words, if the car were at a steady state, and the wheel turned 10 times to cover a certain distance, under braking, the wheel would now turn perhaps only 9-1/2 times to achieve the peak slippage performance. It is possible to learn how to feel the car through the brake pedal, steering wheel, and seat and sense this tiny bit of extra braking force from the tire.
In acceleration, the tire should travel slightly more distance than the distance of the acceleration (spin just a bit faster than normal). The tires will actual slip; not a lot all at once to result in free wheelspin, but ever so slightly during the whole acceleration phase. When you can sense this slip, and control it, this is when you're getting maximum acceleration from the vehicle.
In cornering, this slippage is present when the wheels are actually turned just slightly more than the actual amount required to go the intended path (this difference is an angle and is where we get the term 'slip angle' from). To accomplish this slip angle the car must actually be sliding ever so slightly during cornering. Not a big power slide, just a little extra slip. At first, this can feel very uncomfortable, as though you are starting to lose traction. In fact, this is where the car has its greatest traction. The tricky part is approaching this limit and not crossing it. If the car is not sliding at all, then it isn't going fast enough. If it is sliding enough to actually drift (or have noticeable understeer, or oversteer), the tire is being used beyond its limit. The corner speeds will be slower, and the tire will wear out much more quickly.
In each of these cases, we emphasized the 'slightly' aspect of this slippage. Too little, and the tire does not reach maximum performance. If the car feels 'hooked up on rails,' then the car is not being driven fast enough. Until you feel that tiny bit of slip, you can go faster. Knowing how to approach that point without exceeding it takes a great deal of practice. Too much slippage and you'll exceed the tire's limits and the tires slide excessively resulting in locked-up braking, wheel spin in accelerating, excessive sliding during cornering. Ultimately they will overheat, get slippery, and wear out much faster.
The amount of slippage required is different for each tire, but we're talking in the range of 4 to 10 percent. When cornering, the steering angle input is perhaps 5 to 6 degrees more than required to negotiate the turn. However, to keep this from turning the car too much for the corner, it has to be pushed with speed to generate that little bit of slip to compensate. Racing tires will perform best with a little less slippage than a street tire. If you learn to race on a street tire then switch to racing tires, you'll have to learn to back off a little, and be smidgen more gentle with the race tire.
How should this slippage concept affect your driving? If you look at the graphs which illustrate the affect of slippage on traction, you'll see that at the peak traction point, there is actually a pretty wide margin of slip that will generate maximum traction. If you tend to drive in the latter part of that band, you'll acheive good cornering performance, but being closer to the edge the tire's limits, you'll build more heat and generate greater tire wear. The tires will feel great for a while, but they will wear out sooner, and the last several laps in session will have poor performance. If you drive within the earlier part of that peak traction band, your traction performance will remain consistent over a longer period of time. In time trials, you won't see much of a difference (except in replacement tire costs), but in racing, this will put you farther ahead of the competition in longer runs.
A time that you may need to drive in latter part of the traction band is when the track is cold, and you must push the tire harder to keep heat buildup in the tire.
One more principle to learn. A tire's maximum traction potential will not be realized unless it is brought to that point gradually. This is true of just about everything dealing with frictional traction, and you experience it regularly in everyday occurrences.
Imagine this experiment. Place a piece of paper on a table, and an ordinary breakfast bowl on the paper. Start pulling on the paper slowly, then gradually faster. The bowl remains on the paper and is dragged along with it. Next, yank the paper immediately. It will come out from under the bowl leaving the bowl unmoved, or barely moved. Same bowl, same paper, same table. What was different? The acceleration of the forces applied. In your car, the tires are the paper.
Ease the car smoothly into a corner, and the tire will have a high level of traction. Jerk the steering wheel too quickly, and the tire will not maintain grip with the road. Same car, same tires, same road. The difference is the acceleration of the forces, or the smoothness with which cornering, acceleration, and braking forces are applied. Smoother is grippier.
The principle of driving smoothly is paramount to every factor of improving a car's handling performance. All the hardware in the world will not fix a car with a driver using 'jerk and stab' braking, accelerating, and turning control behavior. Inexperienced drivers frequently blame the lack of the greatest hardware in their car for performance problems which are actually caused by their driving style. There's enough stories to suggest even a few pros have this habit. Be honest and analyse your driving, or get an experienced instructor to analyse it for you.
One of the common faults and gripes of new drivers is front end push (understeer) when entering a corner. 'Man, my car slides something horrible going through the first half of that turn.' There is significant probability that the car is fine, but the driver is braking too late, too hard, and is rushing the turn-in with a sudden steering movement. Brake sooner, let up sooner (and more gradually), and ease into the corner with a larger and smoother radius. This will likely cure the understeering problem, and will most certainly reduce it if suspension setup is an issue.
Smooth driving maximizes tire traction. Maximized tire traction is what leads to fast driving. We repeat -- smoother is grippier.
Another factor which affects tire traction, but one that is not likely to be factor in the weekend racing of your street car is vertical loading -- the combination of mechanical and aerodynamic downforce. Whether applied by mechanical forces (which is essentially gravity), or aerodynamic forces, the total amount of downward push on the tire affects the available traction. To demonstrate, lightly drag a pencil eraser across a table. It slides easily. Now push down on it and drag it. There is much higher friction. Same goes for tires.
This simple demonstration might lead you to believe you should add weight to your car to gain more traction. However, practical experience tells us that lighter cars generally handle better than heavier ones. It turns out that while greater weight on the tires will increase traction potential, it also increases the amount of work they have to do. When cornering, the tire must keep a heavier car on the track, and therefore there are greater lateral forces. If you graph the increase of traction vs. the increase in work based on the increase in weight, the work load increases faster than the traction improvement. So mechanical downforce is not necessarily the way to increase tire traction.
This is where aerodynamics have played such an important role in racing the past couple of decades. Aerodynamic downforce provides that increased push down on the car to increase traction, but that push is not translated into lateral load that the tires have to deal with when cornering. There is increased traction without increased work.
All handling modifications and adjustments come down to improving the traction of the four tire patches on the road.
Tires are actually their grippiest when there is about 5% slippage involved.
Driver smoothness is a major factor in the car's overall grip. All the fancy hardware in the world won't cure the loss of grip created by a jerky driver (and we don't mean personality).
A fundamental topic in any discussion about handling is weight transfer. If you do not fully understand weight transfer, you will not be effective in understanding how to adjust the car for maximum handling performance.
Given a certain car weight, there is a certain amount of mechanical downforce applied to each tire. As we stated in the tire traction article, this downforce impacts the grip potential of the tire. While a car is braking, accelerating, or cornering, the effective mechanical downforce on, and therefore the grip of, the tires is constantly changing.
These changes are referred to as 'weight transfer.' Of course, the weight of the car isn't changing, or moving about the car, but the forces on the tire contact patches are changing due to inertia and momentum. If you were to have a set of scales under the tires while driving, you would see what appears to be a constant changing of the weight at each tire, hence the name.
Referring
to the figures, we have illustrated a street car weighing 3000 lbs, and with a
typical
Anytime the car's direction changes through braking, accelerating, or cornering, each tire will experience a gain or loss of mechanical downforce, such as the examples illustrated. This weight transfer has significant impact on traction. Unfortunately for us, the net sum of the traction of the four tires does not stay equal. What is lost from the unloaded tires is not entirely transferred to the loaded tires. Overall there is a loss in traction.
Because of this, race car design, and some of the modifications you make to your street car, are designed to minimize weight transfer. It cannot be eliminated, but it can be reduced. The more it is reduced, the more traction is retained. By reducing the increase in load on the loaded tires, we can reduce the work they have to do. By reducing the loss of load on the unloaded tires, we retain the traction they can provide.
Contrary to what you may be inclined to believe, the amount of weight transfer is not altered by springs, shocks, anti-roll bars, etc. Weight transfer is a result of inertia and momentum. These suspension components cannot change that. What these components can do is impact how much the suspension moves in response to the load change, and how quickly the load transfers to the tire contact patches.
The amount of weight transfer is dominated by the vehicle's weight, location of the center of gravity, wheelbase, and track, and the amount of force applied during braking, accelerating, and cornering.
Weight transfer is a function of the vehicle's weight and the forces acting on that weight. Reduce the weight, and ou reduce the product the of the forces involved.
The center of gravity is the fulcrum point through which the vehicle's weight is multiplied by dynamic forces. In particular, the higher the CG point is, the greater the effect of the forces. Reduce the CG height reduces the product of the forces and vehicle weight.
The longer the wheelbase and wider the track in relation to the height of the center of gravity, the more resistance the car has to weight transfer. They behave as counteracting lateral levers to the vertical lever of the center of gravity point.
Another important concept of controlling weight transfer besides minimizing it, is to control where it is transferred. Where weight transfer occurs is related to the static weight distribution of the car, the roll couple distribution of the car, the height of the roll center of the car, and the slope of the roll center in relation to the ground plane.
Roll couple distribution is the relative roll stiffness between the front and rear of the car, and the left and right of the car. In cornering, the front of the car may roll less than the rear of the car. This has impact on how the weight transfer is distributed.
The roll center is the line through which the vehicle rolls. It is not necessarily parallel to the ground. Weight distribution, and roll coupling distribution can create a roll point at the front of the car which is lower to the ground that the roll point of the rear of the car. This creates a sloped line. The angle of this line has influence on how much weight is transferred, and where it goes.
Modifications which reduce vehicle weight and the location of the center of gravity impact the amount of weight transferred and where it is transferred. Reducing a vehicle's total weight reduces the amount of weight transfer. Redistributing that weight front & rear, or side to side will change how that weight transfer is distributed among the four tires. This affects the individual mechanical loading and therefore grip of the tires.
Removing weight from the car reduces the work the tire must do, and improves grip. Balancing the weight evenly in the car provides an even distribution for balanced response to dynamic changes. Intentionally biasing the weight distribution to a specific side or quarter of the car might be advantageous for the net results of grip under dynamic conditions. (You might want to shift weight to the right rear of the car at a track with a lot of high speed right turns to reduce the load of the left front tire, and increase the load of the right rear tire for more balanced grip during cornering).
Static weight distribution can be changed by physically moving objects within the car (relocating the battery, removing items from the car, etc.). It can also be changed by altering the ride height of individual corners of the car. Lifting a corner alters the CG location and in effect, increases weight distributed to the opposite coner. This is done primarily through coil-over shock & spring setups and by spacers.
Relocating the CG to a more favorable position can also reduce weight transfer. Without getting into the engineering of it all, the location of the center of gravity acts as lever handle. We know from basic physics that a lever can be used to increase force and work. If the center of gravity is very high, there is essentially a long lever in the car. During braking, accelerating, or cornering, the G forces are amplified by this lever created between the CG point and the tire contact patches. The further apart they are, the greater leverage, and the greater the weight transfer.
With a given car, you can't change the CG location dramatically, but you do have some ability to affect the center of gravity enough to make major improvements to the car's handling performance. If you're willing to sacrifice some comfort, convenience, and looks, you can subtract and relocate weight to affect the front to rear and the side to side weight centers. You can also alter the CG height by lowering the car with lowering springs, lower sidewall tires, and to a smaller degree by adding removing, or moving weight in the car.
Once you have selected your car, there's nothing you're likely going to do to change the wheelbase or track width. You might increase track width a little with wider wheels though.
We said that springs, shocks, etc. cannot change the amount of weight transfer. What they can change is the rate of the weight transfer, and the impact weight transfer has on the suspension geometry caused by dive (braking), squat (accelerating), and body roll (cornering).
The rate of weight transfer impacts the responsiveness of the car to driver inputs. The faster the weight transfer, the quicker the response. This allows the driver to have greater control of the car. However, a faster weight transfer requires greater skill of the driver. Smoothness and quicker reaction sensitivity to the tire traction are needed. It turns out that shocks have the largest impact on rate of weight transfer. The stiffer they are, the faster the tranfser.
The impact of weight transfer on suspension geometry has to do with maintaining as large and flat a tire contact patch as possible. When the body rolls, dives, or squats as a result of weight transfer, the geometric relationship of the suspension components to the body and the wheel changes the shape of the contact patch. For the unloaded tires, the patch size will be reduced. This effect must be minimized. Changes in shocks, springs, anti-roll bars, and wheel alignment are made to maximize the tire contact patches of all tires during the dynamic changes of weight transfer.
In the next articles which cover the major components, we'll define what those components do, and how they can be manipulated to control the effects of weight transfer and the changing tire contact patch size.
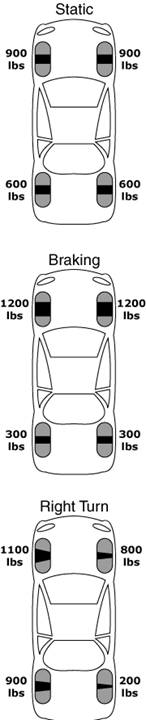
The top figure shows a vehicle with the weight as measured at each tire while the car is at rest (The grey represents the tire, the black patch is the actual tire contact patch with the road).
During braking, weight transfer increases the load at the front tires and reduces the load at the rear tires. Accelerating of course would be the opposite.
During cornering, the loads for each tire could be quite different. The goal of all 'handling modifications' for your car is to optimize the the corner weights and tire contact patches to be as even as possible during cornering (assuming relatively equal left and right turns on the road course).
At nearly every event, there is endless discussion about tire pressures. Newcomers seem to know it's important, but few understand what to do, when, and why. This article will focus on the practical aspects of adjusting tire pressure to achieve maximum grip and handling balance.
Whether you're using race tires, high performance tires, or regular street tires, the goal of adjusting tire pressures, as with all other adjustable suspension components, is to maximize the contact patch, and thus the handling grip of the car. Generally, adjustable shocks, anti-roll bars, replaceable springs, wheel alignment, and other adjustable suspension features are used to provide the majority of adjustment to the car's handling balance and grip. Tire pressure is typically used as a fine tuning adjustment.
However, the majority of weekend track drivers are using relatively stock cars, and have only their tire pressures to adjust. Whether it's your only tuning method, or the last refining step, you need to understand what is happening to the tire during racing, and what the variables are to be effective in adjusting tire pressure. We're going to present this in the form of two phases in determining the correct tire pressures to race at.
First is the large scale setting of what the tire operates best at. Considering the wide variety of tires and cars used at any weekend hobby event, we can expect a wide range of optimum tire pressures to be used at fully heated racing temperatures. Somewhere within the 30-40 psig range is likely for most cars, but that's still a very broad range. If 40 psig is the max, then 30-40 psig represents a 25% window, and nothing in racing is as vague as a 25% window. So first, you have to determine where in this 10 psig band your tires perform best.
The second phase is the fine tuning realm of within 2 psig of the optimum setting. This small adjustable range can be played with based on track conditions to tweak for the best performance at any given time on the track.
We want to first step you through a practical approach to your first few race day's tire pressure settings, then step you through a system to determine the general range of pressure the car handles best at, then finally through some tips for fine tuning. First, however, there's some basic background stuff to cover.
There's a lot to cover, so this article is broken into several sections as listed to the right.
First and foremost, you cannot possibly tune and optimize your tire settings without having the proper tools.
At the very minimum you need an accurate and repeatable tire gauge. Don't cheat yourself with a $3 pencil style gauge. Get a dial gauge, preferably an oil-filled one, with a maximum reading of 50 to 60 psig. It should also have a bleeder valve so you can bleed air from the tire while the gauge is still connected. It's also worth getting the protective rubber case or shell. Dropping a gauge can ruin its calibration, and the rubber shell can prevent that.
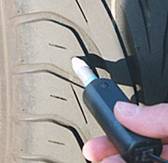
To be most effective, you also need a tire pyrometer. You can do a lot with just a pressure gauge, but you'll never be able to quickly and consistently tune the tire pressures without temperature data. Many decent pyrometers are available for a little more than $100. The probe types that penetrate the tires are the preferred ones.
The first rule in taking tire temperatures is that they must be taken when the car comes in from a full race-speed lap. Taking temperatures after a cool down lap is useless. If necessary, the driver should come in a lap early (before the checkered flag) to ensure the tires are race hot. If the driver waits for the checkered flag, chances are he'll get stuck behind slower traffic. The track will be under a no passing rule during cool down, and the tires will cool too much.
Tire temperatures are taken in three places on the tire. First on an outer tread block on a street tire, or about 1' in from the outside edge of a racing slick. Second, in the middle of the tire. Third, on an inner tread block or 1' in from the inside edge of the tire. Often on high performance treaded tires, you'll need to measure the second tread block in from the edge. The outer shoulder block will not retain enough heat for a meaningful reading.
The temperature probe should be inserted all the way in. Whenever taking temps of a treaded tire, be sure to center the probe in the tread block. The edges will cool faster, so it is important to have as much rubber surrounding the probe as possible. Wiggle the probe a little when first pressing it in to ensure it is well seated.
The temperature reading will fluctuate for several seconds. Do not wait for it to be perfectly stable. As soon as it settles to within a couple of degrees F, take the reading and move on. You shouldn't have to wait more than 5 seconds for each reading.
Always measure each tire in the same pattern. Whether it's inside, center, outside, or the other way around doesn't matter. Just do it the same way every time.
Be consistent in the tire sequence also. Generally, you'll want to measure the hottest side first to be sure they're not overly heated. For example, if the entry to the pits is after a series of long right turns, measure the left tires first. Whatever the sequence, be sure to repeat it with every reading.
We'll cover how to interpret the readings in following articles.
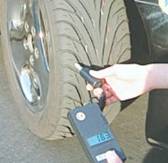
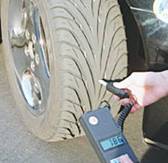
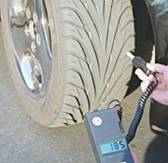
When taking tire temperatures, take 3 readings from the outside, middle, and inside of the tire. As shown in the photo immediately above, be sure to insert the probe in the center of the tread block when measuring treaded tires. This can be tricky with tread blocks of irregular shapes like this tire shown. The goal is to get a roughly equal amount of rubber around the probe.
For your first racing experience, or your first experiences with a new tire, you'll need to first determine the realm of the gross tire pressure setting. Assuming there's no one to tell you how your tire and car combination are best set up, you'll need to experiment to know whether the car handles better in the 30-34 psig range, the 33-36 psig range, or the 36-40 psig range. Once you have a feel for this, you can fine tune to within 1/2 to 1 psig for optimum handling balance and performance.
There are two points from which to set tire pressures. First, you have to adjust the cold (ambient) pressures before the car takes to the track for the first time, or after it has completely cooled off between sessions. After the tire has reached full racing temperature, it is possible to fine tune from the fully heated point, but it will also be important to know when the tire has cooled back down what it's cold temperature is.
We know the tires are going to heat up when they're driven on. The friction between the rubber and the road will generate heat. A lot of heat. This heat is going to transfer to the gaseous air in the tire, and cause it to expand which leads to an increase in the tire pressure. It happens to work out that an increase of about 10 degrees F causes about 1 psig increased tire pressure.
On the track, you're going to work the tires much more than is possible on the street. Repetitive, high cornering forces and aggressive braking are going to generate much more heat and therefore higher tire pressures. Because of this, the typical pressures you run on the street are going to be too high for the race track. During normal street driving, tire pressures will increase over the recommended factory 'cold' settings about 2-4 psig. During racing, a cold tire pressure setting will increase anywhere from 6 to 10 psig. Tire pressures must be lowered from their usual street settings before going onto the track.
As with just about everything, the 'correct' starting pressure 'depends.' There's a lot of variables. Still, you have to start somewhere, then you can test various pressure settings to find the best balance in performance. Remember, even the pros have to test several settings every race weekend to find the best performing point. There is no formula, no 'right' answer that you can use every time.
So, if you're using street tires on the track, the generic, 'start somewhere' point is 5 psig lower than the car manufacturer's recommended tire pressures. (Note: use the car manufacturer's recommended tire pressure as the baseline. Many service and oil change stations with poorly trained techs will pump tires up to pressure stated on the tire side wall. Hello! That's the maximum setting, not the recommended setting. Watch out for those guys!)
From a cold starting point of 5 psig less than street pressures, you can begin the trial and error cycle of making small adjustments and determining the effect. To do this, you will need to run several laps to get the tires hot to start with. Take it easy the first 3 laps or so until the tires come up to temperature. The car will be quite sloppy with the initial low pressures.
After 3 or 4 laps, the tires should feel consistent. Run several more laps to get a feel of the overall grip level and the handling balance. If you're held up by traffic, stay out until you get at least three maximum-effort laps. Then come in to take the pressures and temperatures, and report on the handling. Do not make a cool down lap before coming in as the tires will cool down significantly making the tire temperature data useless (When you park, be sure to not use the parking brake, or rest on the brake pedal as you can easily warp the brake rotors).
If you have a temperature probe, you can use the tire profile reading as the primary guide to tell you if the pressure should be increased, decreased, or left as is.
if the centers of tires are 5 or more degrees hotter than the edges, then the tire pressure should be lowered. Try about 1 psi for each 4 to 5 degrees the center is higher than the lowest edge temperature.
if the center temperature is more than a few degrees lower than the edge temperatures, then the tire pressure is too low. Try increasing it by 1 psi for each 4 to 5 degrees the center is lower than the highest edge temperature.
use the guide below for more detailed tire temperature interpretation tips.
|
Description |
Temperatures |
Temperatures |
Interpretation |
||||
|
Center is low by more than 5 degrees of the highest reading |
Tire pressure is too low. Increase 1 to 2 psig per 5 degrees difference |
||||||
|
Center is high by more than 5 degrees of the lowest reading |
Tire pressure is too high. Decrease 1 to 2 psig per 5 degrees difference |
||||||
|
Inside edges always hotter than center or outer edges |
Too much negative camber |
||||||
|
Outside edges always hotter than center or inner edges |
Not enough negative camber, too much body roll during corners (causing positive camber). Try stiffer springs or anti-roll bars. |
||||||
|
Left or right edges of tires hotter than center and opposite edge |
Probably the last set of turns before exiting the track are long or hard rights. This could be normal. Otherwise look for alignment errors. |
||||||
If you do not have a temperature probe (get one!), then use this as general guide.
Generally the tire pressures should be close to equal on a car with neutral handling. If the front or rear tire pressures are significantly different, you can adjust them to a mid point between the two readings. (If the fronts are 38 psig, and the rears are 32 psig, then try adjusting them while they're still hot to all be 35 psig). Try this setting for the next session.
If the tires felt very slippery, especially if they got worse on every lap, then the tire pressure is too high. Take each tire pressure and write it down. If only the front or rear tires felt slippery (the front was slippery if the car understeered and wouldn't respond to more steering input, the back was slippery if the car wanted to oversteer and spin), then lower the pressure of just that pair by 4 psig while they're still hot. Try this setting for the next session.
If the tires felt spongy, then the tire pressures are too low. When the pressures are too low, they will have low grip and still tend to slide like a tire that is too hard, but the feeling will be different. Instead of a smooth slippery slide, the tire will scrub and have more vibration in the slide. The difference is subtle, but you'll have feel for it in the steering wheel, and from the seat in your legs and back. In this case, increase the pressure while the tires are hot by 2 psig. Try this setting for the next session.
For the first few sessions you'll want to make large pressure adjustments of 2 to 4 psig. This way in about three sessions you can note whether the car felt better in the low 30's, mid 30's, or high 30's psig range, Once you feel the car behaves better in one of these ranges, you can move on to 1 psig incremental changes to close in on the optimum setting. If after 5 or 6 laps you know the car is just not right, don't force it. Come in and make an adjustment. There's no point to driving a really poor handling car and risking an off track excursion over it.
Once you have some experience with your car, you may find that the best starting point is only 2 psig less, or as much as 6 or 8 psig less than the street pressures you run at. There is a large difference in cars, tires, and driving style that affect this. However, starting at 5 psig lower than street pressures should prevent most tires from becoming excessively hard and slippery, and from exceeding their maximum safe pressure.
Once you know the general tire pressure range you're aiming for, you can make smaller increments to target the optimum setting.
If you're racing on a particular brand and model of tire for the first time, or you've never taken tire data before, you have some trial and error work to get through, and this will take some time. Depending on the track time available to you, it may take more than your first event to close in on the optimum pressure settings.
If you're running on a race track for the first time ever, this will lengthen how long it takes to determine the best tire pressures as your own inconsistent and incorrect driving will cloud the data you collect. However, take the right data, (use the charts we've provided, and the information in many of the recommended books), and you'll be able to quickly narrow in on the best performing pressures.
Based on the car's handling and tire temperature readings, make adjustments in small increments of 1/2 to 1 psig as needed, then run several more laps to feel the difference. Repeat this cycle as many times as needed until the best balance and maximum grip is achieved (as shown by your lap times). Use the charts we've provided (above and the Tunding Guide) to help interpret the feel and the tire temperature data into how to adjust the pressures.
Each time the car comes in, use your log sheet (see the Practice Sessions section for a downloadable log sheet) and immediately write down the tire pressures and temperatures. Make notes as to the specific handling responses in each corner of the track. Also, write down exactly the changes made on each tire.
After several sessions, you'll get to know the range within a pound or so for the tires that they perform best when hot. When they cool down, you can make note of the cold pressures, and use those pressures the next time as a starting point.
Once you have a feel for the target pressure when the tires are hot, there is some math you can use to calculate a starting point that should be within a pound or two of the best settings. How that works, requires some further understanding of the ambient air temperature and it's effects on the tire's pressure.
We mentioned earlier that 10 degrees F changes the tire pressure about 1 psig. If a tire starts with a certain cold pressure in the morning, the warming of the day is effectively adding pressure to the tire over the course of that day. The temperature the tire runs at will be affected by the combination of the ambient air temperature, the track surface temperature, and the amount of friction introduced (how hard you drive).
If
for your first session of the day, it's overcast, the
air temp is 65 and the track temp is 70, then in the afternoon the sky is
clear, the air temp is 85, and the track temp is 105, there is considerably
more heat to influence the temperature of the tire surface. If you drive just
as hard, the tire will be hotter, and the pressure will be higher. This change
from morning to afternoon is going to be much more pronounced in some climates
than others. The southwestern
To maintain the same racing pressure settings in the afternoon as achieved in the morning, you'll have to compensate for the increased pressure due to ambient temperature. While there is probably a formula to understand the effect of the relationship of the ambient temperature and the track temperature, it will be complicated by the aerodynamics around the tires, and the heat generated by the brakes. You can generally use the ambient air temperature and the 10 degrees per 1 psig relationship as a guide for adjusting tire pressures throughout the day. Take ambient air temperature readings at the start of each session, and use this to determine how to adjust the tire pressures. As the day warms, you'll have to drop tire pressures accordingly before each session.
One more item related to ambient temperature--youll find that if the car is parked with one side of the car facing the sun, those two tires might be 10 to 20F warmer than the shaded side (and therefore 1 to 2 psig higher in pressure). You should cover those tires up with some simple plywood panels, or at least know not to set them to the same pressure as the cooler side of the car.
The above sections provided some practical guidance to settings tire pressures. In these next sections, we'll take a little closer look at exactly what it is we're trying to do.
What exactly is the goal of tweaking tire pressure? The bottom line is that you're looking for the maximum traction possible over the largest portion of the track possible.
With a given set of tires (which have a determined rubber compound and size you can't change), the variables you can play with to achieve the maximum traction is finding the tire's best operating temperature, and optimizing the contact patch size. The discussion above in finding the best tire pressure settings is really just an indirect method of tuning the contact patch and having the tires operate at their peak temperature range.
The temperature of the tire is influenced by the ambient air temperature, the surface temperature of the track, and your driving (how hard you push the car). Because you won't have the luxury of choosing an optimum rubber compound for the conditions like the pros, your main tool for achieving the maximum grip temperature is driving the car at its maximum capacity without exceeding it (and overheating the tires). This assumes the ambient temperatures are warm enough to achieve the tire temperature needed. If it's 50 degrees outside, chances are, the tires will never get hot enough to produce their maximum grip potential.
The contact patch of a given tire size is affected by the suspension geometry, and by the tire pressure. In a stock street car, you don't have any adjustability at the track in the suspension, so tire pressure is your main tool.
While we start with setting tire pressures in their cold state, we're really interested in their pressures (and temperatures) when they're running hot.
Every tire will have a temperature range where the rubber reaches its most 'sticky' point without becoming greasy, and without physically falling apart. Race tire manufacturers often have this temperature identified, but for a street tire, it's unlikely you'll find any spec sheet with this temperature data identified. Finding the best temperature range of the tire will come primarily from experience with driving on it, knowing how hard it can be pushed before overheating causes it to become slippery. When you get runs of 15 to 20 minutes or more that were fast (within a few tenths as fast as you've been able to achieve), and the tire grip stayed consistent, you've probably found the maximum grip operating temperature of the tire. Head back to the pits, and take pressure and temperature readings, and use that data as a target for that tire. For most street tires the temperature range can be expected to be about 180 to 200 degrees F before they get slippery. You may have sessions where faster laps are possible, but if, in attempting to keep that pace, the tire progressively gets slipperier, then you're driving the tires too hard and they're overheating.
We know the tires are going to heat up when they're driven on. The friction between the rubber and the road will generate heat. A lot of heat. This heat is going to transfer to the gaseous air in the tire, and cause it to expand which leads to an increase in the tire pressure. It happens to work out that an increase of about 10 degrees F causes about 1 psig increased tire pressure. During racing, a cold tire pressure setting will increase anywhere from 4 to 10 psig.
The increased pressure has an effect on changing the tire shape, and the resulting area in contact with the road. This 'contact patch' is what we're trying to optimize. In fact, we're trying to maximize it.
To understand the effect of pressure on the contact patch, let's first look at a tire in a static load state (rolling straight or parked).
If the tire pressure starts out too high, the increased pressure from heat buildup will make the tire shape somewhat convex. The contact patch will be narrower with the outer edges of the tire not able to touch the road because the rounded middle has lifted the edges. This tire is said to be too 'hard.'
If the starting pressure is too low, even after heating up, the tire shape will tend towards being concave. The outer edges under the wheel rims will have firm contact with the road, but the middle will deflect inwards. This minimizes the contact patch in the middle. This tire is said to be too 'soft.'
The perfect tire will have a contact patch the full width of the tire with an even pressure across the width. This is the condition we're striving for.
We've just looked at the case of a static tire. However, when we're racing on a road course, the tires are not always in such a static state. The forces of cornering, braking, and accelerating will constantly be changing the shape of the contact patch as the rubber twists from these forces. Indeed, it is under cornering that we are typically looking for the highest levels of grip possible. All else being equal, a car that can get through corners the fastest, will be the quickest. Again, all else being equal, the car with the optimized contact patches will have the most grip and be the quickest through the corners.
While there are several suspension adjustments possible in race cars and modified street cars, we may also need to 'tweak' the air pressure on an individual wheel basis to achieve the maximum contact patch under the dynamic conditions of the road course. In fact, these will be different for each track.
A harder tire may have a slight convex shape during a straight run, but may be necessary to help keep the sidewall stiff enough during cornering to prevent the tire from rolling under the wheel rim excessively. So, while in a static state, the contact patch is smaller than optimally possible, this actually increases the effective contact patch size during cornering.
These tire behaviors during cornering are what might lead us to having left side tires, right side tires, or even a single tire at a different pressure than the others. This would be done to fine tune the handling of the car through certain corners.
The final goal is actually a compromise in looking for the maximum contact patch during as much of the lap as possible. We may find that one settings is optimum for corners 3 & 7, but that another is optimum for corners 2 & 4. If corners 2 & 4 are faster than 3 & 7, then the emphasis must be placed on corners 2 & 4 as there is more to gain from them being optimized. In the end, the 'correct' tire pressures are the ones that allow the fastest laps in long runs.
Everything described above is aimed at long-run, road racing sessions. In a 2-3 lap qualifying run or single lap autocross racing, the tires will not have a chance to heat up as much. Under these conditions, you will actually have to tune the handling balance using 'cold' tires and therefore the cold pressures will be higher than for road racing practice or race sessions, and closer to the car manufacturer's cold tire settings (assuming similar tires).
The principles of tuning are the same, though. Make a run, make notes as to the handling performance, adjust the pressures in small increments, and repeat the test runs until the fastest lap times point to the correct pressure settings. Compensating for ambient temperature changes throughout the day also applies.
Something that we've noticed with many stock street cars is a significant differential in the front and rear tire heat potential. In theory, all four tires should be contributing as equally as possible to the overall traction of the car. In theory, they should all use close to the same pressures, and run close to the same temperatures. However, the typical stock street car, especially front-drive cars, do not follow this in practice.
In a race car, the chassis (assuming adjustability of springs, shocks, sway bar, etc.) has been set up to provide as close to neutral handling as possible for most circumstances. This is the fastest setup, and it provides equality among the four tires close to the theoretical perfect balance. However, it takes an experienced driver to know how to handle the car at the limit, or in emergency maneuvers. With many suspension adjustments to achieve neutral handling in a race car, tire pressure is used for very fine tuning of the setup.
Most street cars are not set up for neutral handling. A front drive car will typically have significant understeer. While this is not conducive to fast cornering, if someone is driving too fast around a corner, the front wheels will slide and not turn the car as much as expected. The natural reaction of the driver to this is to lift off the gas which is the right thing to do to regain some traction. In a car that oversteers, lifting off the throttle reduces traction on the rear tires and actually causes even more oversteer, and will often induce a spin. Therefore, an understeering tendency becomes a positive 'safety feature' for a street car and the average driver.
Back to the theory that all four tires should contribute equally to the cornering grip. There are also two other dynamics that work the tires and generate heat: accelerating and braking. In a rear drive car, the rear wheels have the workload of acceleration and the tire heat generated. The front tires handle the majority of the braking load and the heat buildup. While the two are likely not equal, it does help to distribute the workload and keep the heat buildup shared. In a front drive car, the front tires have the workload of doing both braking and accelerating. Furthermore, a factory stock front drive car probably has a tendency towards understeering in the corners, and that adds even more heat to the front tires from the excessive cornering friction. This combination conspires to heat up the front tires a great deal more than the rear tires.
During a driving session on the track, the front tires may increase as much as 9 to 10 psig from the cold setting. The rear tires on that same car may only come up 4 to 5 psig. This clearly points out that the car is far from having the front and rear tires contribute equally to handling grip. This is not optimum at all, and requires cold pressure settings at a seemingly odd starting point.
If we look at the example situation above, we may find from testing that when the tires are hot, a reasonably neutral handling balance occurs when the front tires are at 34 psig and the rear tires are at 35 psig. If we know that the front tires are going to increase in pressure by 9 psig from a cold setting, then the appropriate cold setting is 34 minus 9, or 25 psig. The rear tire cold setting would be 35 minus 4, or 31 psig. This may sound completely counter intuitive considering that on the street, and when you first go out on the track for the first few laps, these settings will feel absolutely horrible (this setting will likely result in a lot of oversteer and will feel very loose). However, on the track, on about the third lap, the handling will settle down and should reach a neutral balance.
Remember that what matters is how the car handles in long runs, and it is the hot pressures that are to be focused on. If this means starting out with some seemingly strange cold settings, so be it.
As an aside, the best thing to cure significant understeer, and the first money that should be spent on any factory car with excessive understeer is a rear anti-roll bar. As a first modification, this will probably result in more lap time improvement per dollar spent than anything you can have done to the car.
Springs are primarily responsible for keeping the tire in contact with the road surface over bumps and dips.
In the realm of physics, springs are noted as being efficient machines for storing mechanical energy. When a spring is compressed, the energy required to perform the compression is stored. When the compression force is removed, the spring returns to its original shape. No additional energy input is required. A spring can also be stretched (to a point), and it will return to its original shape. All this depends on the use of effective materials of course.
In a car, compression of the suspension spring is caused when the wheel travels across the front side of a raised bump. A portion of the energy used to cause forward motion of the vehicle is redirected causing the wheel to travel up, which compresses the spring. The spring stores the vertical energy, and as the wheel travels down the backside of the bump, the energy stored in the spring pushes the wheel back down. For safety and handling, this has the significant benefit of keeping the tire in contact with the road surface as the tire travels over a bump. A similar process occurs for dips, except that the spring elongates rather than compresses to start with.
Without springs, the wheels would transfer the redirection of the vertical energy into the vehicle chassis and cause the vehicle to bounce off the bumps. This would both be annoyingly uncomfortable to the passengers (a concern to street car manufacturers), and the driver would momentarily lose some or all of the ability to steer, accelerate or brake as traction from the tires would be lost (a safety concern for all, and a maximum performance concern for racing).
With springs, the vehicle body can maintain a relatively linear path (providing comfort for the passengers), while the wheel travels up and down over the bumps (allowing for continuous safe vehicle control, and continued traction for maximum racing performance).
Therefore, the purpose of the spring in an automobile is to isolate the wheel assembly from the body, and allow the tire to maintain contact with the road over surface imperfections.
Relative to its shock absorbing function, the spring must be stiff enough to prevent full compression or elongation in large bumps and potholes. However, it must also be soft enough maintain good contact with the road. The softer the spring the better the road contact over bumpy surfaces. However, the stiffer the spring, the better the resistance to bottoming out on large bumps. Somewhere between these extremes is a range of good spring rates (stiffness) to work for the expected environment.
In order to handle bumps and dips, the entire wheel assembly is designed to have a certain amount of vertical travel length from full extension to compression. The rougher the road, the more wheel travel is needed, and the longer the overall spring length needs to be. Factory passenger cars are designed to function well over a broad range of conditions, and the suspension system in particular must be prepared to compensate for potholes, freeway expansion joints, rutted gravel roads, and other less than ideal road surfaces. Therefore, a street car is designed with quite a bit of suspension travel length (think of how far you have to jack up a car's body to get the wheel off the ground--that's about half the wheel travel)). In a high performance sports car (i.e. of the Porsche, Ferrari, Viper, and NSX type), manufacturers assume a more limited range of road surfaces, and design in less wheel travel by a of couple inches. In the typical sports car or sports sedan of the Mustang, Camaro, Eclipse, Integra, and BMW 3 types, the suspension is a little better than the general sedan, but it's really not a great deal different.
In racing, we can assume a certain degree of ideal conditions, or at least more ideal than public roads. In a stock street car, even notoriously 'bumpy' race courses feel glass smooth compared to most public roads. In these conditions, the purpose of the spring can be focused to maintain maximum and consistent contact of the tire with the relatively much smoother road surface. Under these conditions, very little wheel assembly travel is required. The spring can be optimized for smaller wheel travel conditions. For example, a CART or Formula 1 race car driven on smooth courses may only have 1/4 to 1/2' of total suspension travel!
How does wheel travel impact handling? Well, just from the CART example given above, we might assume that shorter wheel travel is better. And, of course, it is. Though the wheel assembly travels up and down, it does not do so on a linear path. The wheel assembly is at some point fixed, and the wheel assembly actually travels in an arc. Whether the body stays put, and the wheel travels (through bumps), or the wheel stays put and the body travels (body roll), this has impact on the camber angle of the wheel which changes the tire contact patch shape.
Therefore, for racing conditions, limiting the wheel travel distance is a desirable thing. For street cars, the use of lowering springs (shorter and stiffer) is one method to reduce wheel travel. In extreme cases, it will also be necessary to use shorter shocks.
So far we have used bumps in the road to illustrate how springs behave. Springs are also acted upon by the forces of acceleration, braking, and cornering. The momentum of the vehicle body in cornering, braking, and acceleration transfers into the springs causing compression and elongation. This is an easy to see effect of weight transfer as it results in visible body roll -- both the side-to-side roll we're mostly familiar with during cornering, but also front-to-back roll -- particularly the 'nose dive' under hard braking.
Body roll by itself is not necessarily bad. If the four tires remain flat on the road surface with balanced downforce, who cares whether the car body is parallel to the road or not (aerodynamics aside). What body roll does though is change the angles of the suspension components to the wheel assembly (which we call suspension geometry).
This is pretty much the same thing as we discussed above with wheel travel, except this is from the opposite perspective. With the wheel on the fixed plane of a smooth road, the body now travels, and causes the wheel assembly to travel in the arc we described. This changes the camber and tire contact patch particularly of those tires which are unloaded and the suspension elongates.
Aside from bump absorption, the spring also contributes to the roll stiffness of the car--the ability to resist dive under braking, squat during acceleration, and body roll during corning. The anti-roll bars also play a roll in this, and the two combined create the total roll stiffness of the car. Stiffer springs will resist body roll more, reduce change in the suspension geometry, and maintain a more consistent tire patch size.
Note: many people are under the misconception that body roll causes weight transfer. This is not true. See the weight transfer article for details about this.
Part 1
what does a spring do?
spring stiffness
wheel travel and body roll
roll stiffness
Part 2
spring stiffness for racing & street use
using springs to lower the car
another option: coil overs
summary
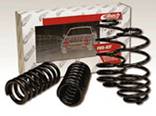
After-market springs such as these progressive-rate replacements for stock springs will help reduce body roll, and can lower the car's center of gravity. They're typically about 15% to 20% stiffer than stock. Any time that springs are changed, shocks should also be changed.
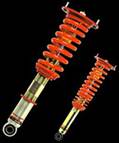
Coil-over spring and shock assemblies such as these lower the car's center of gravity, and generally have stiffer compression ratings to increase roll resistance even more than typical progressive rate street springs. Additionally, their biggest advantage in tuning is that they allow the height of each corner of the car to be adjusted which alters the weight transfer characteristics of the car. Height adjusting is performed by turning a threaded seat at the bottom of the spring which rides up & down a threaded collar on the shock.
The spring's roll resistance characteristics helps to resist the forces during dynamic changes, and make the car more stable during the transition. This implies a stiffer spring is needed to minimize the compression and elongation, and therefore minimize the change to the suspension geometry.
However, even purpose-built race cars cannot simply use the stiffest spring available. If we return to the case of having no springs at all (the ultimate in stiffness), even a 'smooth' race track would be violently bumpy without some suspension dampening. At some point the spring becomes too stiff for the road surface, and the vehicle will lose traction as it bounces over surface imperfections. The race technician and driver have to find the most effective balance between being soft enough to allow the tire to stay in contact with the road surface over bumps, and being firm enough to control suspension geometry and keep the tire as flat as possible on the road surface.
A driving enthusiast's car which does double duty on the street and the track has a larger window to find compromise in than does a race car. Putting full race springs on your street car may seem the macho thing to do, and though your car should be faster on the track, it will make your life miserable on the street. In fact, it is quite likely to cause damage to other suspension components when you come across that surprise pothole.
Today, after-market springs offer features that not too long ago would have been found only on race cars. The research done in sports car class racing has resulted in several manufacturers producing high performance progressive rate springs for virtually all sport enthusiast cars that allow an acceptable comfort level on the street yet significantly increase handling performance over the stock springs.
Most factory stock springs have a constant or nearly constant factor of stiffness called the spring rate. As the spring is compressed or elongated, the force required to change the spring's length stays the same. The spring rate is linear as the spring goes from full elongation to full compression. This provides greater comfort across minor and major bumps, but does little to minimize body roll under hard cornering.
Progressive rate springs have a softer spring rate during some initial portion of compression or elongation, but then get progressively stiffer as continued force is applied. This is typically accomplished by changing the shape of the spring. This ability to start soft and get firmer with higher compression allows the spring to accommodate typical street bumps with satisfactory comfort. On the track under high braking or cornering forces, the spring's stiffer region comes into effect to reduce the body roll compared to the stock spring. Compared to a full race spring, there is a little more body roll before the spring takes a firm set, but that's the compromise of a dual purpose car.
Most after-market progressive-rate springs start out about 15% firmer than the stock part, and get stiffer from there. Though they offer acceptable bump absorption, they do give the vehicle a noticeably rougher ride, especially with larger bumps where the spring becomes stiffer. However, given the success of these springs, the comfort for performance trade off is considered well worth it by sports car enthusiasts.
In selecting an after-market spring set, you should know how much stiffer than stock it is, whether it is progressive or linear, and how much it will change the car's ride height. If you're concerned about losing too much ride comfort, you should ride in another car as closely prepared to yours as possible. Some people stiffen their suspensions for periodic racing only to discover they really don't care for it the remaining 97% of their driving time.
You should also know what other suspension changes you're going to make to the car including wheel and tire sizes, and talk with a technician experienced with your car type. Certain combinations of springs, shocks and tire sidewall sizes will function better than others. A mechanic from a specialist shop or race team may offer some advice learned from experimentation and testing.
One other thing related to spring selection is that of vehicle ride height. On the street, the variety of road surfaces, speed bumps, drainage channels, and steep driveways requires the car's lowest point have a certain practical height above the road to avoid damaging the car.
In racing, ride height has significant impact on the vehicle's center of gravity ('CG') which is one of the major influences in a car's weight transfer characteristics. Ideally, the CG should be as close to the ground as possible, and race cars will be lowered as much as allowed by the rules. Open-wheel formula cars are lowered as much as possible without bottoming out while racing which often ends up being 1/2' or less on very smooth tracks.
The most straightforward way to lower the CG is to lower the car, and the most direct way to do that in a street car is with shorter springs. Most street cars can be lowered somewhat from their factory setting, but there are several practical limitations in the design of the suspension system. A realistic compromise needs to be made that considers the clearance needs for the street, and the suspension system of the car.
Extremely low cars ('slammed' in today's vernacular) may look good (or at least look like the racing sedans they seek to imitate), and if done right will handle better on the track, but there are some limitations on the street. Springs which are too short may cause interference problems with other suspension components such as the shocks. Additionally, the suspension geometry (the connection points, and lengths of it parts) are designed with a certain spring length in mind to keep the wheels in proper alignment. A severely lowered car that does not also alter the suspension will cause the wheels to have excessive camber for sure, and will likely also adversely affect the castor and toe. You might think it looks great, but this will severely reduce the handling performance of the car.
You should consult someone experienced with your car type before just buying the spring which seems to lower your car the most. Such a spring may also require a specific matching shock or other suspension changes to actually improve the handling performance.
Speaking of shocks, it is generally necessary to buy stiffer shocks at the same time you change the springs. Springs alone will lower the CG, and will reduce body roll, but neither is the primary function of the spring. For road imperfections, shocks work in conjunction with the spring, and are designed with each other's ratings in mind. Going over bumps, a stiff spring may resist the first compression well, but without sufficient shock capacity, the car will bounce more than it should afterwards which ultimately reduces the car's handling performance. Also, stiffer springs will prematurely fatigue stock shocks. They'll last a while, but will eventually get weaker and decrease the handling performance.
If you can only afford shocks or springs, either keep saving to get both, or start with the shocks. Performance shocks alone which provide firmer bump and rebound control, and greater control over weight transfer rate, will improve handing performance more than stiffer springs alone will.
There is increasing availability of coil-over suspension setups for street cars. The coil-over is a combined assembly of the shock and spring where the spring rests in a height-adjustable base.
Coil-over setups were designed to optimize racing performance, and so several characteristics of coil-overs seem to make them the ultimate choice in suspension modifications.
First, coil-overs allow the car to be lowered more than conventional shock and progressive rate spring upgrades. This of course is a good thing for weight transfer control, but as we mentioned earlier, can cause real comfort and damage-potential problems for a street car.
Secondly, the spring rates are usually much stiffer than even progressive rate springs, and they're usually linear. On the race track, there's no need for a progressive spring rate, and coil-overs with their racing purpose, aren't intended to use them. This also allows the spring to be shorter which is where the greater lowering potential come from.
The main purpose and advantage of the coil-over design is to allow independent ride height adjustability of each corner of the car. This ride height adjustability allows manipulation of the center of gravity of the car. In particular, by manipulating the front to back or side side to side location of the center of gravity, weight transfer can be controlled to influence specific tires on the car. If you can pre-dispose the car to distribute weight transfer a certain way, you can optimize the grip of certain tires and improve the overall speed of the car through corners.
Raising the back of the car puts the CG more forward. Raising the front of the car pushes the CG more rearward. The left or right side could also be independently raised or lowered. With these adjustments, you can reduce the amount of grip lost to specific tires during weight transfer.
For example on a race track with a high percentage of high-speed right turns, you could set the car up to reduce the weight transfer to outside left tire, and increase the weight that remains on the right rear. Compared to the same car with fixed ride heights, the one with the adjustable coil-overs will be able to increase the overall grip through more even wieght distribution during the dynamic load of the right turns.
So, this sounds like an awesome modification to run out and get, right? Well, yes it is -- for racing. Like we say, for the street this is an extreme modification. You may be die hard, and live with the harshness of the ride, but you'll likely have very grumpy passengers.
It is possible to minimize the harshness by using softer springs, or even progressive rate springs for that matter. However, those springs will tend to be longer, will not allow the car to be lowered as much negating some of the advantage. Some people will use stiff springs for the track, then swap to softer springs on the street between events.
Springs allow the wheel to remain in contact with the road surface over bumps. The bumpier the road surface, the softer the spring needs to be. In a street car, it's not likely you'll be set up to change springs easily, but in selecting an after market spring, you should understand the balance of ride comfort and track performance you want, and identify the spring best suited to that compromise.
Lowering the car with shorter springs will also reduce weight transfer, but excessive lowering (beyond the design range of the other suspension components) will cause other problems that will diminish handling performance, and potential create very unsafe conditions if the suspension bottoms out easily.
Progressive-rate after-market springs are designed to reduce body roll to maintain better tire contact patch during cornering, and reduce weight transfer while sacrificing only a little ride comfort.
A coil-over spring and shock assembly is generally the ultimate set up for racing. The car is lowered significantly, the springs are usually much stiffer for body roll control, and the ride height of each corner of the car is adjustable allowing tuning control over the center of gravity and weight transfer. Coil-overs are an extreme modification for street use, and renders the ride comfort intolerable on the street for most people.
For all changes to the spring stiffness, especially coil-overs, be sure to test drive a car that has a setup similar to what you're looking at. Ride stiffness is a definate try before you buy situation to make sure you can live with it the 97% of the time you're not racing.
The primary function of a shock absorber is to dampen the oscillation of the spring after the wheel travels over bumps and dips.
If you've read the springs article, you know that the spring's job is to allow the tire to maintain constant contact with the road surface. It is the spring that actually absorbs the shocks of surface roughness.
So,
contrary to their popular name in the
We mentioned that a spring retains energy to allow it to return to its original shape after being compressed or stretched. Unfortunately, a spring will not just return to its original shape and stay there. You've probably witnessed yourself that if you compress or bend a spring it will oscillate back and forth in smaller and smaller increments until finally coming to rest. If you have ever seen an old car bounce endlessly after going over a bump, you have seen what springs will do in a car with ineffective shocks. This is not good for safe control of the vehicle, and it's certainly not any good for effective handling while racing.
The shock's primary purpose is to control this oscillation. In a passenger car, the designer has the choice of just how fast the shock dampens the spring. If the dampening is immediate, the car will have better weight transfer rate control, but a harsher ride. If the dampening is a little slower allowing perhaps 2 to 3 oscillations, the ride will feel much smoother.
In racing, we want the dampening to be almost immediate. A vehicle's bouncing on the springs creates erratic shifts in the tire contact patches and mechanical downforce on the tires. Both of these conditions reduce the effective grip the tires have. Any bounce in the body of the vehicle must be eliminated quickly to allow full grip to return as fast as possible to the tires.
However, like springs, it is possible to have too stiff a shock. First, if the shocks are stiffer than the springs, the springs will be overpowered, and will not actually fulfill their bump absorbing function.
Secondly, a shock has a major affect on how quickly weight transfer occurs in the dynamic changes of accelerating, braking, and cornering. The stiffer the shock, the faster the weight transfer occurs. This will help the vehicle have very responsive steering, but the transfer can be too fast for the driver.
During cornering in particular, the driver must be able to induce smooth weight transfer and feel the tires reach their maximum grip. If the weight transfer occurs too fast, the driver will not feel the tires approach that peak grip, and will likely overshoot the traction capacity of the tires causing excessive sliding or spins.
When modifying your car, starting with the most awesome race hardware you can buy is not likely the appropriate starting point. Full-race shocks are going to be too stiff for the street, and will likely cause the car to bounce off of bumps. Additionally, you'll probably not have the sensitivity to feel the grip level of the tires when cornering at maximum speed.
To help with the dual purpose street/track car, and to provide some adjustability for tuning handling performance, there are several after-market shocks that are adjustable. A manual (or even electronic) dial allows selection of several settings which are progressively stiffer. These shocks can be turned to their softest setting (they're still going to be stiffer than stock) for a smooth ride on the street, and their firmest for the track to minimize body roll and increase the steering responsiveness. The adjustability also allows finer tuning of handling performance for a given track. As discussed in the weight transfer and the handling tuning sections, adjustable shocks can be used to help adjust out small amounts of oversteer and understeer.
If you can't afford adjustable shocks, don't assume that stiffer is better in a fixed rate shock. Shocks should be selected knowing the springs they will be used with. Too stiff a shock will overpower the spring reducing its effectiveness. If the shock is not adjustable, then matching the shock to the rating of the springs is even more critical. You sould consult a shop experienced in this matching.
Talk with a technician familiar with your car, and find out what shocks offer the best performance for you car's degree of modification. The 'killer' shock for someone else's car may not be the best one for yours.
The shock's purpose is to control the oscillation of the spring's response to bumps and dips. The stiffer the shock, the faster the dampening. The shock also controls the rate of weight transfer. The stiffer the shock is for compression (or 'bump' as it is often called), the faster weight transfer occurs which determines how fast the tires will take their 'set' in a corner, and the resulting steering responsiveness of the car.
It is possible to have too stiff a shock which will overpower the springs, and results in weight transfer being too fast for the driver's experience and sensitivity to feel when maximum tire grip is achieved in a corner (generally resulting in a lot of spins).
Shocks need to be selected knowing the ratings of the springs.
The primary function of anti-roll bars is to reduce body roll by adding to the roll resistance of the springs.
An anti-roll bar, also referred to as a stabilizer or sway bar, is a bar or tube which connects some part of the left and right sides of the suspension system. On independent suspension systems, the connection point is usually the lower control arm.
Most cars have a front anti-roll bar, and most sports cars are going to have both a front and rear bar. After market bars are going to be stiffer than the stock ones.
Anti-roll bars are used to reduce body roll during cornering. They add to the roll resistance of the suspension springs for a higher overall roll resistance Because the primary purpose of the spring is to maintain maximum contact with the road surface over imperfections, we must settle for the roll resistance provided, and it is rarely enough. The anti-roll bar adds to the roll resistance without resorting to an overly stiff spring. A properly selected anti-roll bar will reduce body roll in corners for improved cornering traction, but will not increase the harshness of the ride, or reduce the effectiveness of the tire to maintain good road surface contact.
So, how does limiting body roll improve handling? The suspension system geometry (the lengths and connecting points of its parts) of a street car is designed to keep the bottom of the tire parallel with the road for maximum contact patch. At rest, the car's suspension has a particular geometric relationship to the road surface. Body roll changes that relationship, and reduces the suspension's ability to keep the tire parallel to the road.
During body roll, the car body is no longer parallel with the road, and neither is the suspension geometry. Even though the suspension allows the wheel to be somewhat independent from the body, the high cornering forces, and resulting large body roll of a factory car, on the track take the suspension close to its limits where it affects the angle of the wheel.
Large amounts of body roll cause the wheels to tilt away from the corner which lifts the edges of the tire and reduces the contact patch size. While this can be compensated for by having the wheel purposely tilted inward to start (adding negative camber), there is a practical limit to this which is not enough in most cars to compensate entirely for the body roll. The anti-roll bar reduces the amount of body roll, and therefore helps to maintain as much of the contact patch as possible.
As with all good things, more is better only to a point. Because the anti-roll bar connects the left and right sides, this reduces the independence of independent suspension. Too stiff a bar, and you can cause too much loss in the ability of the left or the right wheel to independently respond to road surface imperfections. The purpose of suspension is to maintain maximum tire contact with the road. The purpose of independent suspension is to allow the left and right wheels to each seek that contact separately. The left wheel may need to be going down when the right needs to be going up. If they were tied together as with the old floating rear axles, one or both of the wheels is not achieving maximum contact. In fact, too stiff an anti-roll bar can actually cause an inside wheel to lift completely off the ground during hard cornering.
When cornering, the bar will twist with the outside end being pushed down, and the inside end being lifted (just like the body of the car). On the outside tire, this downward pressure helps increase tire traction. However, on the inside tire, the anti-roll bar is pushing up on the suspension reducing the downward force the spring is trying to place to keep the tire on road. If the anti-roll bar is too stiff, it will overpower the spring, prevent it from extending enough to keep the tire on the road, and the wheel will actually lift off the ground. This is not an optimum situation, but it is common in several racing classes. The cause is not so much poor engineering, but the limitations of the class rules that allow the engineer to compensate for it.
The anti-roll bar is also used to tune the roll coupling of the chassis. Roll coupling is the relationship of the roll resistance of the front of the car and the roll resistance of the rear.
The balance of the roll coupling, because of its effect on traction, has influence on whether the car has a tendency to understeer or oversteer. While this can be caused by several factors, the anti-roll bar (especially, an adjustable one), can be used to compensate.
As we mentioned, the anti-roll bar helps increase the mechanical downforce of the outside tire during cornering. This increases the traction of that tire, and that end of the car (front or rear). An increase in traction at that end, may leave the opposite end with too little traction. An imbalance of traction occurs, and one end of the car will lose traction before the other end. If the front tires lose traction before the rear tires, the car will understeer. If the rear tires lose traction before the front tires, the car will oversteer. Changing the anti-roll bar stiffness can adjust this out.
The anti-roll bar reduces body roll to keep the suspension geometry, and ultimately the tire, parallel with the road. Stiffer bars reduce body roll more, but too stiff a bar can deteriorate independent suspension performance, and ultimately cause an inside tire to lift off the ground during hard cornering.
The anti-roll bar can also be a major tuning element in reducing excessive understeer or oversteer. Used incorrectly it can also cause it.
Like other parts you can buy for the car, the 'killer' biggest, stiffest anti-roll bar you can buy is rarely going to be the appropriate choice. Look for someone experienced with your car, and can take into account the shocks and springs already installed in your car.
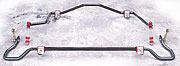
The anti-roll bar connects the left and right suspension systems to add to the roll-resistance of the springs. Anti-roll bars may have irregular shapes to get around chassis components such as these shown, or may much simpler depending on the car.
Even though it is made of steel (and whatever else), the chassis and body of every car flexes. As a car progresses through a turn, the forces involved will cause the car to twist. This needs to be minimized.
This twisting is not the slanting of body roll as the springs stretch on one side and compress on the other. This is an actual twisting of the floor pan and body panels. Like the flexing of a suspension system, this twisting impacts the tire contact patches, and in fact affects the suspension system by changing the suspension system's alignment with the body and with the road surface.
The most common after market street modification to reduce twisting is to add shock tower braces. The car's body structure by necessity has several very large cutouts to accommodate doors and windows, the engine hood, and the trunk or hatchback door. These holes, like large holes cut out of a box, reduce the strength of the body and make it easier for the car to twist.
Shock tower bars add a solid bar across the tops of the shock towers (they just happen to be a convenient point that can be connected with a straight or nearly straight bar) to fill the gaps in two of the largest holes--across the engine bay and across the trunk cavity. During cornering these bars add strength and reduce the overall twisting of the body.
Aftermarket tower braces are typically fairly easy bolt-in items. In addition to installing these, shops which specialize in modifying your particular car may also know of unique weak spots in the car's chassis that benefit from special bracing as well.
Is one bar style or make going to be functionally better than another. Probably, but overall they're all going to be very close, and likely beyond your ability to tell the difference. Some cars are going to accommodate bars which go directly from one tower to the other. Other cars may not have space in the engine bay to do this, and may instead connect the shock towers to the firewall. Likewise, some cars will have room for rear tower bars, and others will not.
The next stage in stiffening the chassis is usually adding a roll cage. Though primarily a safety feature, roll cages are welded or bolted to the chassis in several places which adds to the chassis' resistance to twisting.
There are numerous styles of roll bars and roll cages. The difference between a roll bar and cage is the complexity of the structure, and its scope of protection. Generally, the roll bar's purpose is only to provide a crush resistant structure above the driver's head. This is usually a single bar with support bars to have four points of contact with the car chassis for strength (a two-point roll bar is useless for racing).
A roll cage is a more complete structure designed to protect the driver from all sides. Obviously, the latter is safer, but may be impractical for the dual purpose street car as it will require significant modification to the car's interior panels.
For time trial driving or autocrossing, the four point roll bar adds a significant level of rollover safety without sacrificing the interior of the car much. It will render the back seat unusable for passengers however. Even if passengers fit, the proximity of the steel bars designed for front passenger safety, makes for a very dangerous environment for rear passengers.
The most common way to reduce the flexing of the car's body is to use bolt-on shock tower braces such as this one across the front shock towers and across the rear shock towers.
Tuning a car for optimum handling is far from an exact science. Guides such as this one below are useful for summarizing the impact that certain components have on a car. However, it does not provide specific solutions considering the car, driver, and track conditions, or degree of change needed.
We expect to develop a more sophisicated set of scenarios with suggestions to try under certain conditions, not as exact solutions, but rather as examples of how to go about analysing and problem solving, and the possible options to try.
Until then, this table summarizes the basic purposes of suspension components and their effects on the car's handling.
|
Component |
Function |
Optimum |
Too Little |
Too Much |
|
Springs |
Maintains tire contact with the road surface over bumps and dips. Also, provides resistance to body roll. |
As stiff as possible without the car bouncing off of the tops bumps. |
The spring bottoms outs (the coils slam into each other under full compression). Too much body roll, sluggish steering response. |
Too stiff won't allow the tire to comply to the road. The car will bounce off of bumps losing traction. |
|
Shocks |
To dampen the oscillations of the srping after traveling over bumps and dips. |
Stiff enough to minimize oscillation to just one cycle. |
If the shock is too soft, the car body will continue to bounce several times after a bump or dip, and will make the body very 'sloshy' during braking, accelerating, and cornering. This will have an erratic effect on weight transfer and tire traction. |
If bump is too stiff, it will prevent the spring from doing its job over a road bump. If rebound is too stiff it will prevent the tire from dropping to fill a dip. Overall if the shock is too stiff, it prevents the springs from working, and the car will be very difficult to control over bumpy surfaces. |
|
Anti-roll Bar |
Should be stiff enough to minimize body roll, balance roll coupling between the front and rear for equal front and rear tire grip in corners, and not cause wheels to lift off the ground during cornering. |
The optimum setting is just enough stiffness to minimize camber change caused by body roll during cornering. This will allow the tires to stay as flat as possible for maximum contact patch. |
Overall, as the body rolls, it changes the suspension geometry allowing the tire to tilt too much and reduce the contact patch size. Too soft a resistance on one end of the car compared to the other can cause the opposite end of the car to lose traction prematurely (also subject to springs, shocks, and tire pressure adjustments). |
Overall, may cause an inside wheel to lift off the road surface during cornering. Excessive stiffness at one end of the car compared to the other end will cause the stiff end to lose traction before the opposite end (also subject to springs, shocks, and tire pressure adjustments). |
|
Tire Pressure |
Keeps the tire contact patch firmness on the road surface even across the width of the tire. |
Just enough so that the surface temperature is even across the width. |
The tire width will take on a concave shape, and the center will not be providing maximum possible traction. (The center temperature reading will be low) |
The tire width will take on a convex shape, and the edges will not be providing maximum possible traction. (The center temperature reading will be high) |
|
Camber |
Adjusts the vertical angle of the wheel (the amount of tilt towards or away from the body). Some amount of negative camber which tilts the top of the wheel into the body is the norm for high performance cornering. |
Maintains a flat tire contact patch during cornering to maximize grip for highest possible cornering speed. For street driving more than 1 degree negative camber will prematurely wear out the inside treads. For racing it's common to use as much as 3 degrees on a road course. |
The deflection of the tire during corning will lift the inside edge of the tire off the track reducing the contact patch size. |
The outside edge of the tire is prevented from reaching the track surface even under cornering, which reduces the tire contact patch. Also limits the contact patch available during accelerating and braking. Straight line driving will be less stable. |
|
Front Wheel Toe |
To stabilize the car in straight line driving, and to help steering responsiveness. Viewed from the top of the car, toe is the amount of angle the wheel has relative to the front-to-back centerline of the car. It is measured by the difference in the distance between the front edges of the wheel rims versus the rear of the wheel rims. If the front edges are wider than the back edges, the toe is 'out.' If the front edges are closer together than back edges, the toe is 'in.' The units are length (inches, mm, etc.) rather than degrees. |
For racing, front toe-out is preferred to increase steering responsiveness and help minimize understeer. However, this may make the car unstable in straight lines during street driving. Optimally the front is a balance between straight line stability (acheived with toe-in) versus quick steering response (acheived with toe-out). |
Sluggish steering response. Increased understeer. |
Very nervous in straight line driving. The car will want to wander and is easily led by road surface features like seems, cracks, etc. Can also cause rapid tire wear. Typical range is 1/8' to 1/4' total toe out. 1/4' can be extreme for the street. |
|
Rear Wheel Toe |
See Front Wheel Toe section above. |
For most street and track applications, rear toe-in is preferred to stabilize straight line driving. |
The rear of the car will be less stable in straight line driving. |
Tire wear will be accelerated. Typically the factory settings are suitable. |
|
Coil Over Height |
To adjust the height of each corner independently, thereby relocating the center of gravity and manipulating weight transfer. |
Overall, each corner will be as low as possible, with one or more corners adjusted for maximum tire grip and overall neutral handling balance. |
Not to be interpreted as too little, but a corner lower than the others will induce weight transfer to that corner increasing the load. This may be what is wanted. |
Not to be interpreted as too much, but a corner higher than the others will induce weight transfer to the opposite corner decreaseing the load on the adjusted corner. |
Before getting into the test scenarios, one thing to be clear about is the general test methods to use. Analyse the handling performance of the whole track, look at tire temperature data, determine whether a slight, moderate, or major adjustment is needed. Remember -- change one thing, test, and re-analyse the data. If the change was not an improvement, set it back to where it was, and try something different. Always change one thing at a time. If the change was positive, but not perfect, then continue by adding smaller degrees of changes. For example, you might make a major change like switching to a stiffer rear sway bar, then add a moderate change by adjusting just the front shock settings up one notch stiffer, and finally make a slight teak with a right rear tire pressure drop of 1 psig.
To make major changes, adjust the alignment (usually toe & camber), change springs, change sway bars (different stiffness bars), or change shocks.
To make moderate changes, adjust shock settings of two or four wheels, make significant sway bar mounting adjustments by lengthening or shortening the mounting point by several positions, or make large tire pressure changes (>2psig). Small alignment changes could be considered moderate, but without the equipment and know how, this is really a major change for a hobbyist driver with a street car.
Slight changes are usually accomplished by adjusting tire pressure by 1 psig, adjusting the settings of one or two shocks, or making single position change on sway bar mounting length.
Laptimes and segment times are the final judge of performance improvements (along with tire wear). If you're tuning to get faster through section X, then be sure to time just section X to see if the changes are in fact improvements. Next, you'll want to know total lap times to make sure the improvements for section X didn't sacrifice time on the rest of the track for a net loss and slower lap time. Finally, you'll want to be sure the changes aren't causing accelerated tire wear.
|
Driving |
Brake earlier, ease off the brakes more gradually, possibly trail brake into the corner a little longer, and start the turn-in a little earlier with a smoother arc towards the apex. This problem is common with inexperienced drivers. The tendency is to go for that awesome late brake, but the subsequent panicy turn-in causes the front tires to break traction and slide through the initial turn-in. Relax, and make the turn-in smoother. If the problem is only with one or two corners, and the car handles well everywhere else, then driving technique is definately the recommended cure. Don't ruin a good handling setup to improve one or two minor corners using hardware changes. |
|
Tire PSI |
If the driving technique doesn't help, try a tire pressure tweak first. Two possible options: decrease the front, or increase the rear pressures. To decide which one to do, look at tire temperature profiles. In particular, look at the center temperatures. If the front center temps look a little high, then decrease the front tire psi by 1 psig. If the rear center temps look a little low then increase the rear tire pressure by 1 psig. Try one, then the other, if necessary. If neither works, put the pressures back to what they were. |
|
Shocks |
Two options: soften both front shocks, or increase the stiffness on both rear shocks. If the trouble is only with left turns then try softening the left front shock, or stiffening the right rear shock. If the trouble is only with right turns then try softening the right front shock, or stiffening the left rear shock. If none of these changes works, restore the original setting before moving onto the next solution. |
|
Springs |
For this problem, a spring change is probably not suitable. |
|
Anti-Roll Bar |
Same as shocks: either soften the front, or stiffen the rear. |
|
Alignment |
Add another 1/16' more total front toe out. Add another 1/4 or 1/2 degree negative camber. This is a big adjustement typically only suitable if all corners have big understeer. |
Once we get more scenarios like this defined, we'll convert them to separate pages with a list to choose from. The solutions from Driving Technique to the various suspension components will be ordered in the preferred order of solutions.
|
Politica de confidentialitate | Termeni si conditii de utilizare |

Vizualizari: 1961
Importanta: ![]()
Termeni si conditii de utilizare | Contact
© SCRIGROUP 2026 . All rights reserved