| CATEGORII DOCUMENTE |
| Bulgara | Ceha slovaca | Croata | Engleza | Estona | Finlandeza | Franceza |
| Germana | Italiana | Letona | Lituaniana | Maghiara | Olandeza | Poloneza |
| Sarba | Slovena | Spaniola | Suedeza | Turca | Ucraineana |
DOCUMENTE SIMILARE |
|
TERMENI importanti pentru acest document |
|
MailWorks Professional User Guide
Disclaimer
Software
Version: 1.2 - 09/09/2002 (Usage Guide). Copyright 2002 MailWorksPro.com -
All Rights Reserved. THIS COPYRIGHT INFORMATION MUST REMAIN INTACT AND MAY NOT
BE MODIFIED IN ANY WAY.
When you
purchased this software you agreed to accept the terms of this Agreement. This
Agreement is a legal contract, which specifies the terms of the license and
warranty limitation between you and 'Mailworkspro.com'. You should carefully
read the following terms and conditions before installing or using this
software. Unless you have a different license agreement obtained from
'MailWorksPro.com', installation or use of this software indicates your
acceptance of the license and warranty limitation terms contained in this Agreement.
If you do not agree to the terms of this Agreement, promptly delete and destroy
all copies of the Software.
Versions
of the Software: Only one licenced copy of MailWorks Professional may be used
on one web server.
License
to Redistribute: Distributing the software and/or documentation with other
products (commercial or otherwise) by any means without prior written
permission from 'MailWorksPro.com' is forbidden. All rights to the MailWorks
Professional software and documentation not expressly granted under this
Agreement are reserved to 'MailWorksPro.com'.
Disclaimer
of Warranty: THIS SOFTWARE AND ACCOMPANYING DOCUMENTATION ARE PROVIDED 'AS
IS' AND WITHOUT WARRANTIES AS TO PERFORMANCE OF MERCHANTABILITY OR ANY
OTHER WARRANTIES WHETHER EXPRESSED OR IMPLIED. BECAUSE OF THE VARIOUS HARDWARE
AND SOFTWARE ENVIRONMENTS INTO WHICH MailWorks Professional MAY BE USED, NO
WARRANTY OF FITNESS FOR A PARTICULAR PURPOSE IS OFFERED. THE USER MUST ASSUME
THE ENTIRE RISK OF USING THIS PROGRAM. ANY LIABILITY OF 'MAILWORKSPRO.COM' WILL
BE LIMITED EXCLUSIVELY TO PRODUCT REPLACEMENT OR REFUND OF PURCHASE PRICE. IN
NO CASE SHALL 'MAILWORKSPRO.COM' BE LIABLE FOR ANY INCIDENTAL, SPECIAL OR
CONSEQUENTIAL DAMAGES OR LOSS, INCLUDING, WITHOUT LIMITATION, LOST PROFITS OR THE
INABILITY TO USE EQUIPMENT OR ACCESS DATA, WHETHER SUCH DAMAGES ARE BASED UPON
A BREACH OF EXPRESS OR IMPLIED WARRANTIES, BREACH OF CONTRACT, NEGLIGENCE,
STRICT TORT, OR ANY OTHER LEGAL THEORY. THIS IS TRUE EVEN IF 'MAILWORKSPRO.COM'
IS ADVISED OF THE POSSIBILITY OF SUCH DAMAGES. IN NO CASE WILL
'MAILWORKSPRO.COM' OR LIABILITY EXCEED THE AMOUNT OF THE LICENSE FEE ACTUALLY
PAID BY LICENSEE TO 'MAILWORKSPRO.COM'.
Warning:
This program is protected by copyright law. Unauthorized reproduction or
distribution of this program, or any portion of it, may result in severe civil
and criminal penalties, and will be prosecuted to the maximum extent possible
under the law.
Introduction
The documentation shown below is included
with each purchase of MailWorks Professional and acts as an informal guide to
installing and using the powerful MailWorks Professional suite. If this guide
fails to answer your questions, then please fill out our support form, which
you can do here.
Both
installing and using MailWorks Professional are extremely easy, and by simply
browsing this user guide you should be able to start using MailWorks
Professional immediately.
Web Server Requirements
Operating System: Linux
Web Server: Apache
Scripting: PHP v4.1 or above
Database: MySQL 3.23 or above
Mail Server: You must have a mail server setup and configured through your php.ini file
Browser: Internet Explorer v5.5 or above on a Windows PC. MailWorks Professional does not work on Macintosh's
JavaScript: Must be enabled
Other: Your PHP installation must support the set_time_limit() function and must also have magic quotes enabled. Both of these options are present in default installations so this will rarely cause problems.
Installation
Guide
MailWorks
Professional is a set of PHP scripts that should be copied to your web server.
This installation guide will explain exactly how to get your copy of MailWorks
Professional up and running in just minutes.
First off, extract the zip file that was attached to the email sent to you by our sales team. Make sure you preserve the directory structure, and that file names are kept in the proper format.
You should see one
readme.html file and one MailWorksPro directory. Change into the MailWorksPro
directory. FTP into your web server and change into your root directory, which
should be something like /home/sites/mysite.com/html.
*** MailWorks Professional MUST be installed in your root directory ***
Upload the entire contents of the MailWorksPro directory. The directory
structure on your web server should now look something like this:
/home/sites/mysite.com/html
/mwadmin
/ewp_images
/images
/include
/includes
/sql
/templates
/mwsubscribe
/images
Open up Internet Explorer and go to https://www.yoursite.com/mwadmin/, obviously replacing www.mysite.com with your domain name. Because you are loading MailWorks Professional for the first time, you will automatically be re-directed to the 'First Time Setup' page. On this page you setup all of the options for your MailWorks site, your database, privacy policy, etc. The setup page looks like this:

This page contains the following options which you must complete:
Once you have completed the details on this page, click on the Save Changes button at the bottom of the page.
Creating
+ Sending Your First Newsletter
It
takes literally 5-10 minutes to create and send your first newsletter with
MailWorks Professional. This example will step you through the whole process
and will also teach you how to import a subscriber list along the way.
Firstly, make sure you are logged into
your MailWorks Professional admin area. Visit https://www.yoursite.com/mwadmin,
replacing www.yoursite.com with your domain name.
Next, you will need to create a newsletter template. A template contains the
basic information for a newsletter, and you create a newsletter based on a
template. Click on the Create New link under the Templates section on the
left menu. You should see a screen like this:
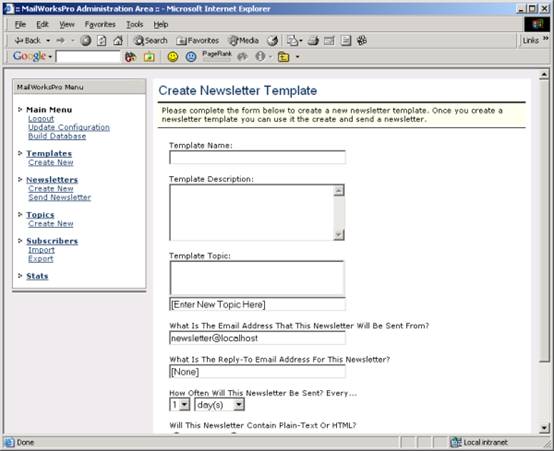
When your visitors goto your newsletter subscription page and
subscribe, they are asked for some details and are also shown a list of
newsletters to which they can subscribe. The details from the newsletter
template that you are about to create are shown on this page.
The Create New Template page requires 7 fields to be completed:
Template Name: The name of the newsletter template that you are creating, such as The MailWorksPro.com Newsletter.
Template Description: A 4-5 line paragraph that describes this newsletter template. For example, The MailWorks Professional newsletter contains information, special discounts and tips relating to MailWorks Professional.
Template Topic: Each newsletter template that you create will be listed under a topic on your subscription page. A topic is like a category and is the ideal way for sites that run more than one newsletter to categorize their newsletters. Some sample topics that you might like to use are Our Newsletters, General Newsletters, Paid Newsletters, Members Only Newsletters, etc. Click on the text field that says [Enter Topic Here] and type in your topic name.
Sent From Email Address: When you send this newsletter to your subscribers the email header includes a from field, which shows where the newsletter came from. By default this will be something like mailer@yoursite.com. If you want to mask where the newsletter came from then enter something like newsletter@yoursite.com or support@yoursite.com.
Reply-To Email Address: If your visitors reads your newsletter when its sent and clicks on the reply button in their mail program then the email address that their reply is sent to will be something like mailer@yoursite.com by default. You can redirect their replies to an existing email address by entering it in this field. An email address such as support@yoursite.com is a popular choice.
Sending Frequency: How often will you send this newsletter? The sending frequency will be displayed next to each newsletter template on your subscription page. The most popular sending frequencies are weekly and monthly.
Newsletter Format: You can send newsletters in text or HTML format. Depending on the option that you choose here, you will either be able to create your newsletters as plain-text or rich HTML.
Complete this form to create a sample newsletter template. Once youre done, click on the Add Template button at the bottom of the page. Click on the Continue link to go to the list of current templates - you should see your new template in this list.
Your new template will be shown on your subscription page, so goto https://www.yoursite.com/mwsubscribe/ and click on the subscribe link to see it (we will learn more about the subscription pages later). You should see something like this:
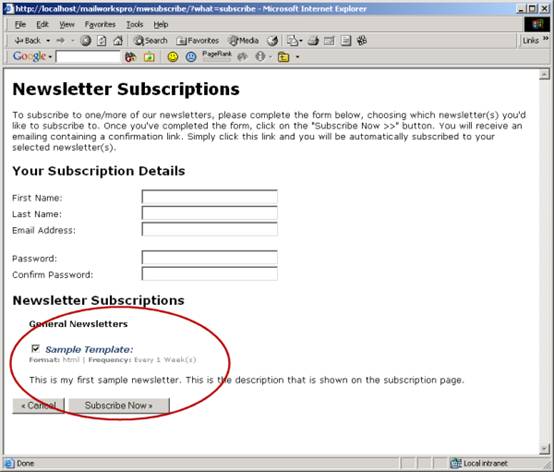
As you can see, your new template is listed and visitors can subscribe to it.
Creating The Newsletter
Its now time to create a newsletter. Newsletters are based on templates and each template can have more than one newsletter. For example, lets say that you run a site with just one newsletter. You create a template called Joes Newsletter. The template contains the details of when the newsletter is sent, its format, etc.
You send your newsletter each month, so each month you create a new
newsletter based on the Joes Newsletter template. You might have a
newsletter for February, one for March, one for April, etc - each of these is
a new newsletter based on the original template.
Lets create your first newsletter now. Click on the Create New link under
the Newsletters category on the menu down the left. You should see a screen
like this:
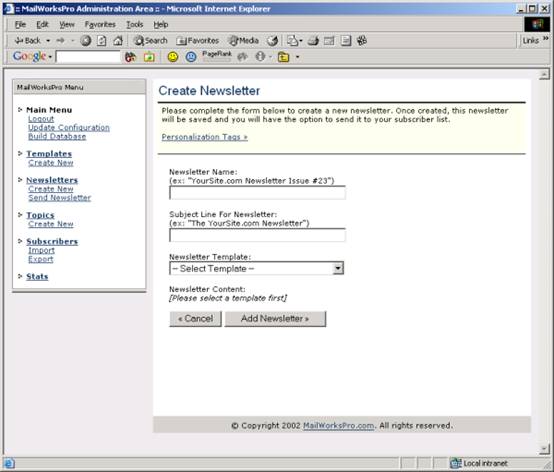
The Create Newsletter page has four fields which must be completed to create a new newsletter:
Newsletter Name: The name of the newsletter youre creating, such as Joes Newsletter Issue #2.
Subject: The subject line that will be sent with the newsletter.
Newsletter Template: The template upon which this newsletter is based. Once you select a template you will see either a text box or rich text area appear, where you can create the actual content for the newsletter.
Newsletter Content: Depending on the selected template, either a text box or rich text area will appear. Enter the content of your newsletter here.
Heres a sample completed Create Newsletter page for a HTML newsletter:
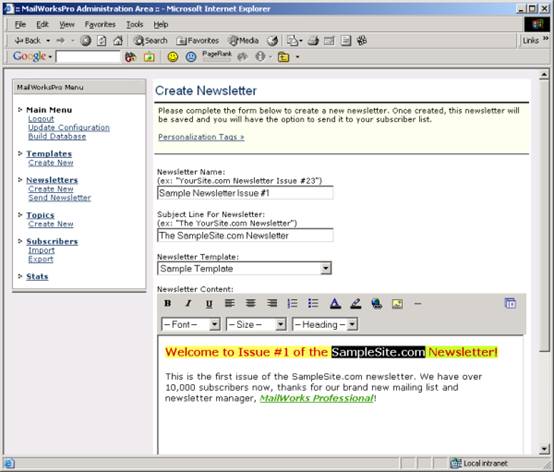
Once youve completed all of the fields, click on the Add Newsletter button at the bottom of the page. This will save your newsletter to the database. Click the Continue link to see your newsletter in the list:

Look at the status field for this newsletter - it is pending. A newsletter can have one of two status values: pending or sent. After youve created a newsletter it is pending, and once its sent its status changes to sent.
At this point we have created a template as well as a newsletter based on this template. The next step is to send the newsletter, but before we send the newsletter we need to build a subscriber list. We will look at two methods of doing that now: subscribing using the subscription forms and importing a list from a file on your hard drive.
Building A Subscriber List
First up, lets manually add ourself to the subscriber list for our sample newsletter - this will demonstrate both how to use the subscription forms and also how to manage subscribers. Fire up your web browser and go to https://www.yoursite.com/mwsubscribe, obviously replacing www.yoursite.com with the domain name of your web site. You should see a menu like this:
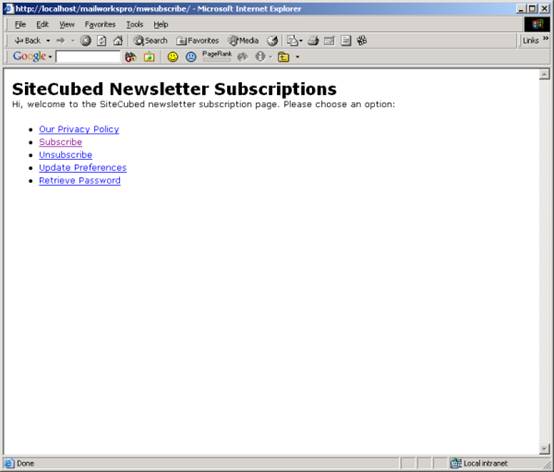
If you have chosen to use templates from the Update Configuration link in the admin area then your subscription page will obviously look different. There are 5 links here:
Our Privacy Policy: Displays the privacy policy that you created when you setup MailWorks Professional earlier.
Subscribe: Displays the subscription form where users can signup for your newsletter and enter their personal details.
Unsubscribe: Displays a form to let users unsubscribe from your newsletter(s).
Update Preferences: For existing subscribers, they can login and update their personal details and subscription preferences.
Retrieve Password: Lets a user enter his/her email address and sends them a new subscription password via email.
Were interested in the subscription form, so click on the subscribe link. You should see a page like this:
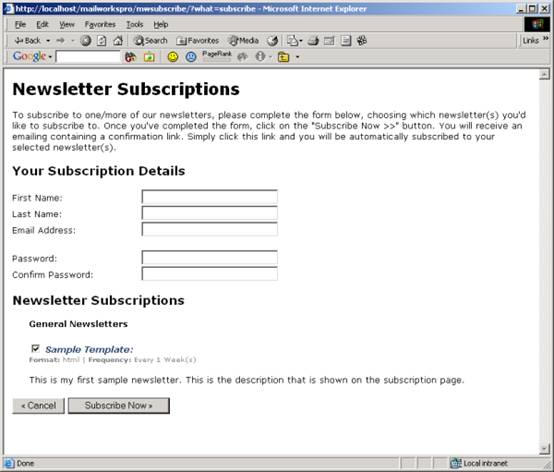
Complete this form with your own details to get a feeling for how it works. Make sure your sample newsletter is checked - as you can see, the details for each newsletter template are shown with an option to subscribe to that newsletter.
Once youve completed this form, click on the Subscribe Now button. You will see a confirmation message telling you to check your email. MailWorks Professional sends each new subscriber a confirmation email to make 100% sure that they indeed did request to subscribe to your newsletter - this eliminates nasty spammers and people signing up others without their permission.
Check your email. You should receive a confirmation email that looks something like this:
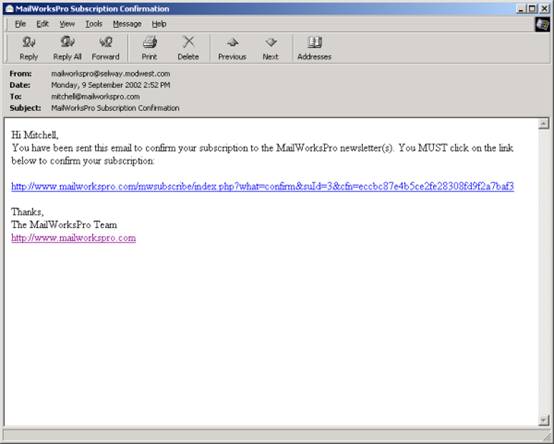
After clicking on this link your subscription status will be changed from pending to subscribed. Newsletters will only be sent to subscribed (i.e. confirmed) users.
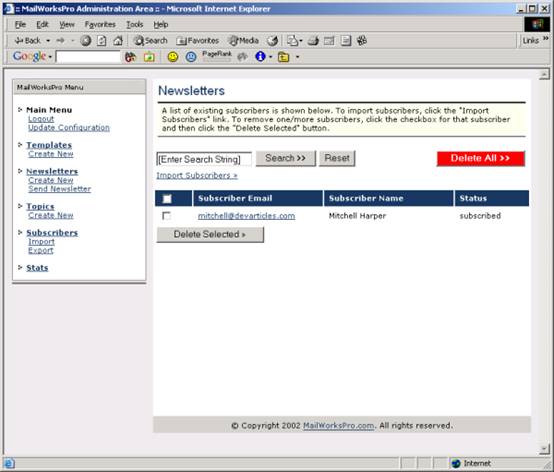
To see your new subscription in the MailWorks Professional admin area, goto https://www.yoursite.com/mwadmin/, login and click on the Subscribers link in bold from the menu down the left. You should see a new subscriber:
The next method build your subscriber list is to import an existing list of subscribers. We will look at how to do that now.
Importing Subscribers
If youre already running a mailing list manager or have a list of subscribers, then you can import them with MailWorks Professional. Click on the Import link under the subscribers category on the menu down the left. You should see a page like this:
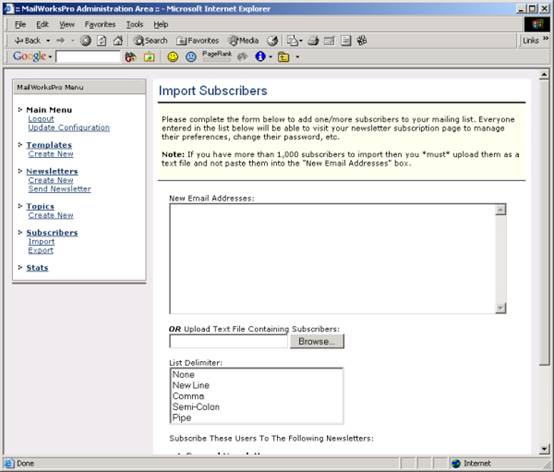
You have the option to either copy-paste a list directly into the text box or to upload a text file containing your subscribers. For this example we will create and upload a text file. Create a new text file called mysubscribers.txt. Enter the following into the file and save it (replacing yourdomain.com with your domain name):
subscriber1@yourdomain.com
subscriber2@yourdomain.com
subscriber3@yourdomain.com
subscriber4@yourdomain.com
subscriber5@yourdomain.com
subscriber6@yourdomain.com
subscriber7@yourdomain.com
subscriber8@yourdomain.com
subscriber9@yourdomain.com
subscriber10@yourdomain.com
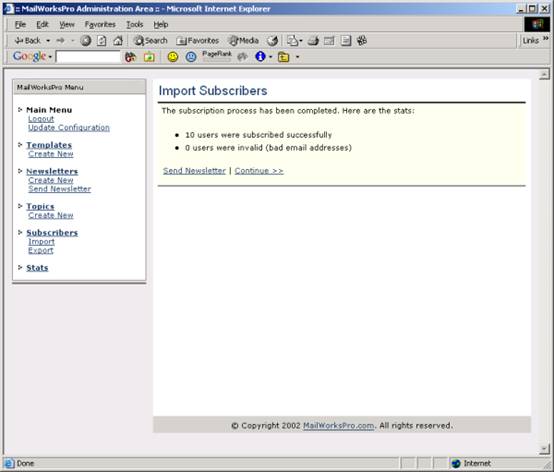
Click on the Browse button and choose the mysubscribers.txt file that you just created. Choose New Line for the list delimiter and make sure the checkbox for your sample newsletter is checked. Click on the Import Subscribers button and the subscribers will be automatically extracted from the mysubscribers.txt and added to your subscriber list.
All imported users are assigned random passwords - they can goto https://www.yoursite.com/mwsubscribe to retrieve their password and manage their subscription preferences.
You will see a confirmation message that looks like this:
Easy! You can also export subscribers using the export link under the
subscribers category. Feel free to play with subscription exporting before
continuing.
Now that weve built a subscriber list we can send our sample newsletter. Lets
do that now.
Sending The Newsletter
Click on the Send Newsletter link under the Newsletters category. You will see the following screen:
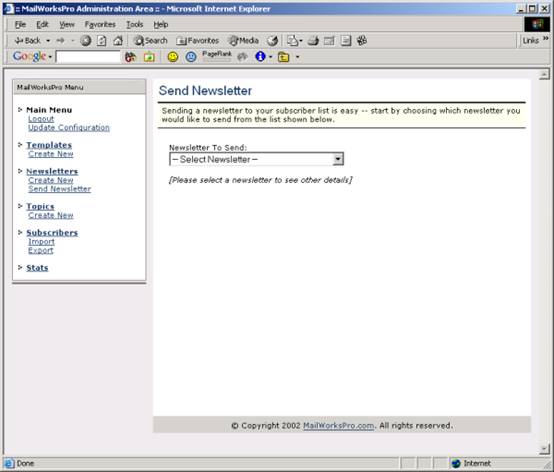
Click on the drop down list and choose your sample newsletter. The page will refresh showing a list of details for the selected newsletter, including how many subscribers it will be sent to:
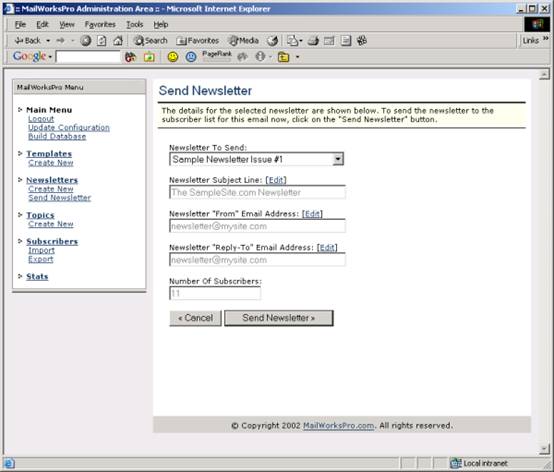
To put your newsletter sending on autopilot and have it sent directly from your web browser, click on the Send Newsletter button. Your newsletter will be sent to everyone on your list without any page refreshing, as shown below:
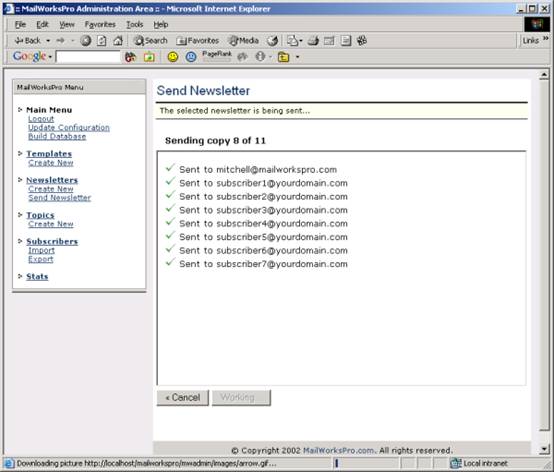
For each subscribe that the newsletter is sent to, a tick or cross is displayed along with their email address indicating whether the newsletter was sent to them successfully or not. When the newsletter is sent to all subscribers you will be taken to a statistics page that shows the details of the mailing, including how long it took:

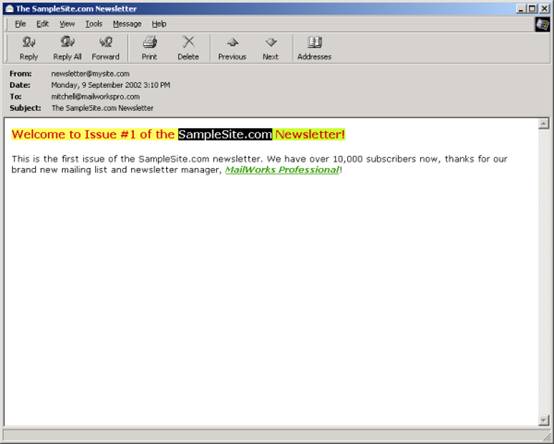
In previous steps you shouldve added yourself to your newsletter subscriber list. Check your email and you should see the newsletter in your inbox:
And thats all there is to it! Youve just learnt how to create a template as well as a newsletter. Youve also learnt how to subscribe to your newsletter(s), import subscribers from a file and send your newsletter directly from your web browser with MailWorks Professional!
Viewing
Statistics
MailWorks Professional tracks and displays powerful statistics that
show you everything from how many new subscribers your list received today to
how many subscribers came from .COM host names. Click on the Stats link on
the menu down the left to view the stats page. It should look something like
this:
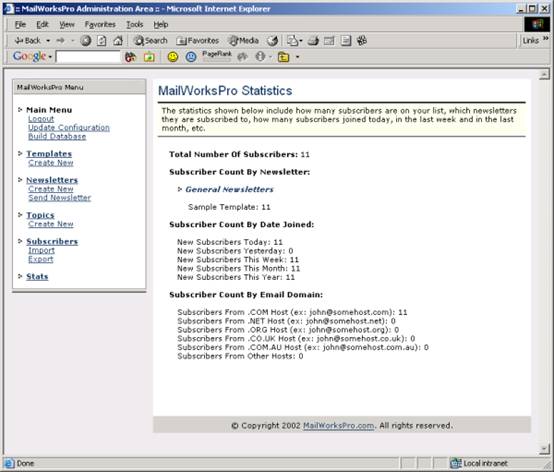
This page is extremely handy to view on a daily or weekly basis to see
how your newsletter subscriber list is coming along. Its a good idea to print
these stats every week to track how your subscriber list grows over time.
Linking To Your
Subscription Page
To build your subscriber list you need to link
to your subscription page from your web site. The URL of your subscription page
is your domain name plus /mwsubscribe/ on the end.
For example, if you run https://www.pinktoycars.com and have installed and setup MailWorks Professional then the URL to your subscription page is:
https://www.pinktoycars.com/mwsubscribe/
Your MailWorks Professional administration area is accessible my placing /mwadmin/ on the end of your domain, like this:
https://www.yourdomain.com/mwadmin/
You should promote your newsletter subscription page in various places throughout your web site. One of the most effective ways to get visitors to join your subscriber list is to display a popup window when they exit your web site.
If youd like to add a popup page to your web site then create a simple HTML page that links to https://www.yoursite.com/mwsubscribe/ and use the popup window generator to create a popup to link to this page.
Conclusion
This setup guide has shown you how to use
MailWorks Professional to maintain a subscriber list and send newsletters
directly from your web browser. If you have any questions
then please dont hesitate to email us at support@mailworkspro.com.
We are always happy and willing to answer any support questions that you may
have.
|
Politica de confidentialitate | Termeni si conditii de utilizare |

Vizualizari: 2438
Importanta: ![]()
Termeni si conditii de utilizare | Contact
© SCRIGROUP 2026 . All rights reserved