| CATEGORII DOCUMENTE |
| Bulgara | Ceha slovaca | Croata | Engleza | Estona | Finlandeza | Franceza |
| Germana | Italiana | Letona | Lituaniana | Maghiara | Olandeza | Poloneza |
| Sarba | Slovena | Spaniola | Suedeza | Turca | Ucraineana |
Incorporating Subreports
Subreports are used to create multiple views of data on a single report. A limitation of the standard report is that only a single view of the data can be displayed. Rather than create one or more reports to present additional views of the data, subreports are used to present data that is independent of the main report or present multiple parent-child relationships.
From a functional and design standpoint, a subreport is virtually identical to a standard report. It has the same layout as a standard report and it can use all the same report objects. The subreport differs from a standard report in that it is an object on a report. Thus, it is part of another report.
You need to be aware of three aspects of subreports: the options for linking them to the main report, how to add and edit a subreport object and whether it should be bound to the main report. These three aspects of the subreport are covered in this chapter.
Linking Options
The most important aspect of subreports is the various options you have for linking them to the main report. Linking is used to display information on the subreport as well as filter the data of the subreport. A subreport can also be unlinked and it will be totally independent of the main report. Its data will not be effected by the main report at all.
Passing data to the subreport is done via a parameter field that is populated with information from the main report. Another way of linking a subreport to the main report is to use shared variables as a means of passing data between the main report and the subreport. These shared variables normally aren't used for filtering data, but they are used in formulas in the report. Table 13-1 is a summary of the different linking options between a main report and its subreports. A more thorough description of these options and related examples are listed after the table.
Table 13-1. Subreport linking options
|
Linking Option |
Description |
|
Linked with a data field |
A field from the main report is passed to the subreport and this is used for filtering records. If the field is from a PC database (e.g. MS Access) then it must be indexed. |
|
Linked with a formula field |
A formula's value from the main report is passed to the subreport and this is used to filter records. Used to link to non-indexed fields in PC databases (e.g. MS Access, Excel). |
|
Unlinked |
The subreport is not connected to the parent report. There is no data passed between the parent report and the subreport. The subreport can use a data source that is independent of the parent report. This is used for combining unrelated reports into a single report. |
|
Unlinked and using a formula field |
A formula's value from the main report is passed to the subreport, but it doesn't effect record selection. It can be used for displaying data on the subreport. The subreport will select records based solely on the record selection formula that is associated with the subreport. |
|
Unlinked and using global variables |
Multiple variables can be used to pass data back and forth between the parent report and the subreports. |
Linking with a Data Field
Linking subreports with a data field lets you filter the data in the subreport based upon the data that is in the main report. This is useful when you are linking multiple tables that have a parent-child relationship.
Using a single report, instead of a subreport, that links multiple tables together is useful when the tables have a one-to-one relationship or when two tables have a parent-child relationship. But when there is a single parent table and multiple child tables, and you want to print the detail records of each child table, then you should use a subreport for the additional child tables. If you use a single report to print this data and you link the tables using the default inner join, then it is possible that not every record will print when there isn't a matching primary key in both child tables. If you use an outer join to link the tables, then you could get some records printed multiple times depending upon how many times the primary key appears in each child table.
Using a subreport with multiple child tables corrects these problems. Within the main report print the records from one of the child tables in the detail table. For the other child tables, create a subreport for each one and use the main report's primary key to link them together. The subreports are placed in their own Details section so that the records print sequentially after the main report's detail records.
The drawback to linking with a data field is that if you are using a PC database (e.g. MS Access), then the fields must be indexed. You must create an index for the fields before running the report.
An example of linking with a data field is shown in Figure 13-x. This report shows the sales detail for each customer. Below the detail records is a list of all the credits that has been issued to this customer. Since there are two listings of detail records, this must be printed with a subreport. In this example, a subreport is created that lists the credits for a customer and it is added to the main report's Group Footer section. It is linked via the Customer Id.
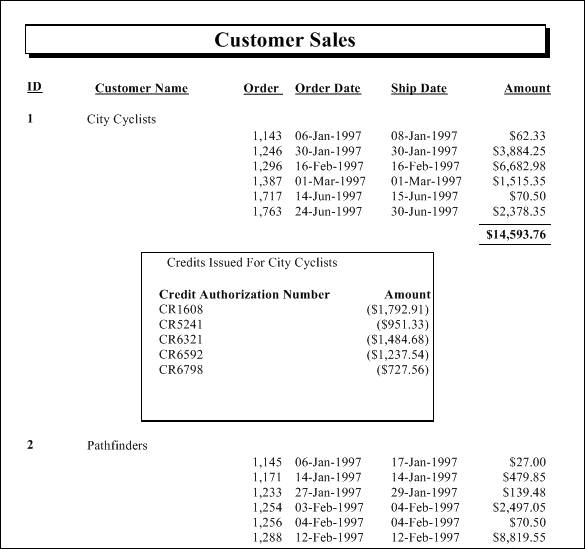
Figure 13-1. Unlinked subreport being used in the report header.
Linking with a Formula Field
Filtering records in a subreport can also be done using a formula field. There are two benefits to using formula fields: they can be customized to parse or join multiple data fields, and they can link non-indexed fields from PC databases.
Being able to parse or join multiple data fields and use the results to link to a subreport is very helpful. It is a common task to have to link tables from two different programs together and the data isn't compatible. This can happen when the programs were developed by different teams in the same company or when one company acquires another company and they have to consolidate their data. Formulas give you the flexibilty to massage the data from one table so that it is in a compatible format with the data in the other table. This can consist of converting the field to a different data type, concatenating multiple fields together or parsing a field to extract out the extraneous characters.
Subreports aren't restricted to using indexed fields for linking tables. Linking with formulas lets you use any field in the table to link the two reports together.
Using Unlinked Subreports
An unlinked subreport is used when you want to combine two or more reports onto one report and these reports don't have any common data to create a relationship between them. The unlinked subreport is completely independent of the main report and the main report's data doesn't effect the subreport.
Figure 13-2 shows an example of an unlinked subreport. It is a customer sales report that shows the prior year sales amount for each customer. The report is grouped by country and within each group it shows the customers from that country and what their sales were last year. At the top of the report it will show a summary of the prior year sales for each country. This lets you analyze how each country compares to the other before looking at detail records within each customer. Since there isn't a field that can be linked between the summary report and the customer detail report, these two reports are unlinked. This is implemented by adding the summary report as a subreport in the main report's header section.
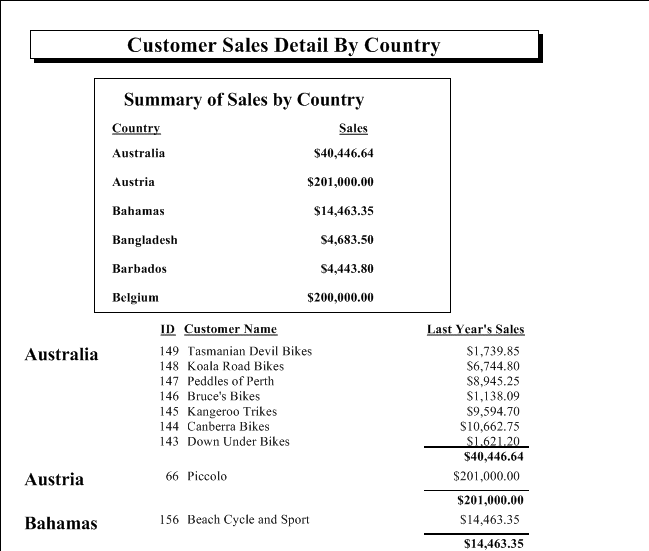
Figure 13-2. Unlinked subreport being used in the report header.
Another example of an unlinked subreport is a form letter that can have a variable number of standard attachments printed at the end of it. For the Report Footer area, you would create multiple sections. Within each section add one subreport that represents a standard attachment. Set the conditional formatting to suppress the section if a field in the main report doesn't meet a certain value. In this case, the person receiving the form letter would have Boolean fields that are set to True for each attachment that should be included. If the proper field isn't True, then the section is suppressed and the attachment isn't printed. Although this may appear to be a linked subreport because data in the main report determines whether to print the subreport, it isn't. It is an unlinked subreport because there is no data that is being passed to the subreport. The Boolean field in the main report determines whether the subreport should or shouldn't be printed, but it's value never gets pass to the subreport and thus it doesn't effect the content of what is printed.
Using Formula Fields without Linking
Formula fields can also be used by a subreport without linking them. This is used when you want to pass data to a subreport without filtering the data on the field. For example, the main report can pass a string to the subreport so that the string gets printed in the subreport's page header.
Passing Data Via Shared Variables
Shared variables let you share data between a main report and its subreports. This lets you perform calculations, track subtotals and create strings in one report and pass this data to the other report.
Adding a Subreport
A subreport is added to the main report in the same way that the other report objects are added: using the Insert menu item. Right-click on the main report and select Insert | Subreport. This gives you the outline of a subreport object attached to your mouse cursor and you move the cursor around to position it in the proper place on the report. Click the mouse to drop the subreport onto the report.
Note: Subreports can only be one level deep. A subreport object can only be added to a main report and it can't be added to another subreport. If you right-click on a subreport and select Insert, the Subreport option will be disabled.
After placing the subreport object on the report, the Insert Subreport dialog box is opened. This dialog box, shown in Figure 13-3, gives you three ways of creating a subreport. The first way is to select an existing report that is in the current project. Click on the dropdown box to see all the reports in your project, and select the one you want. The second way to create a subreport is to import one from outside the project file. There is a Browse button that lets you find the report on your local computer or on the network. The third way is to create a report from scratch. When selecting this option you also have to click on the Create Report button to open the Report Expert dialog box. If you don't click this button then the OK button will stay disabled until you do so. The Report Expert button opens the Report Expert for a standard report. Once you are finished using it to build your report template, click Finish and you are brought back to the Insert Subreport dialog box. The OK button is now enabled, but don't click on it until you decide how to link the subreport to the main report.
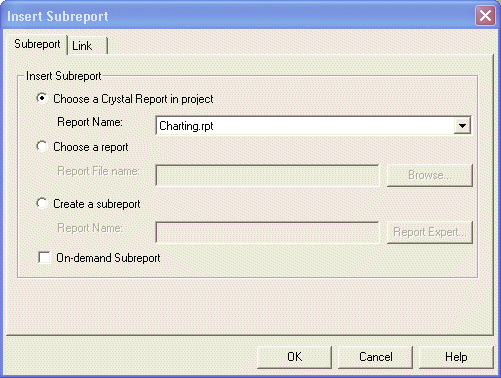
Figure 13-3. The Insert Subreport dialog box.
Note: When importing an existing report as a subreport, whether already in the project or external to the project, the subreport is a copy of the original report. When you make changes to the subreport, the original report is not modified. The subreport is saved within the same .rpt file as the main report.
After setting the report information on the main tab, go to the Links tab (shown in Figure 13-4) to set whether the report is linked or unlinked.
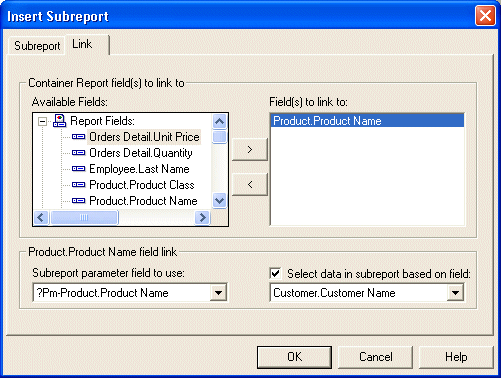
Figure 13-4. The Links tab of the Insert Subreport dialog box.
The Links tab has a list on the left side that shows the available report fields, formulas and data fields. The list on the right shows the fields from the main report that are selected to link to the subreport. At the bottom is a frame that shows the details of how the field(s) will be linked to the subreport.
This dialog box is where you set the properties that determine how the subreport is linked to the main report. These linking options and how to set the properties for each are listed next.
Linked with a Data Field
Linking subreports with a data field lets you use a data field in the main report to filter the data in the subreport. The two fields must be of the same data type to link them together. If this is a PC database, then both fields must have an index already set up in the database.
To create a linked subreport, select the data field from the listbox on the left and add it to the listbox on the right. Once the data field is added, the linking frame at the bottom appears and shows you the parameter field's name and the field in the subreport's data field to link to. The parameter name is automatically filled in for you. This parameter is used internally to pass the main report's field value to the subreport. Normally, when you have a parameter field on a report, the user is prompted to enter a value for the parameter before the report can be run. This is not the case with subreports. Subreports populate the parameter with the value of the field from the main report behind the scenes. You do not have to worry about this implementation.
The checkbox on the right tells the subreport that the main report's data field is being linked to a field in the subreport. This will be checked by default. Below the checkbox is a dropdown box listing the fields in the subreport. Select the one that is used to filter the data in the subreport. It must be of the same data type as the field from the main report.
Linked with a Formula Field
Linking a subreport with a formula lets you have more creativity for how it is linked to the main report. You can add a formula to the main report to convert the data type of a data field so that it is compatible with the field in the subreport. You can also have a formula field that is simply equal to the value of a data field in the main report. This gets around the restriction of having to use indexed fields for PC databases. Another reason for using formulas is to be able to either concatenate or parse fields so that their format matches the format of the field in the subreport.
To link with a formula field in the main report, make sure the formula field has already been created before adding the subreport object. If this has already been done, then the formula field will show up in the list of report fields. Select the formula field to link to and add it to the listbox on the right.
Once the formula field has been added, the frame at the bottom of the dialog box appears and it works the same as adding a data field: the parameter name is automatically filled in, the checkbox tells the subreport to link to the field that is listed in the dropdown box below it.
Tip: When you use the linking expert with either data fields or formulas, it defaults to filtering records that match the field you selected. But you aren't limited to filtering your report on exact matches to the field. You can change the filter so that it performs any type of filtering on the field (e.g. less than the field, greater than and equal to the field, etc.) When you are done using the linking expert on the main report, right-click on the subreport and select Report | Edit Selection Formula | Records. You can modify the formula to fit your needs
Unlinked Subreports
An unlinked subreport doesn't have any connection to the main report. Thus, it is totally independent. To create an unlinked subreport, do not set any properties on this dialog box. If you had already added fields to the listbox on the right, then remove them and this will remove any links between the main report and this subreport.
Unlinked with a Formula
Formulas are used with unlinked subreports so that information can be passed to the subreport without filtering any data. This is similar to the unlinked subreport because both subreports are independent of the main report. The benefit with using a formula is that although the subreport isn't linked, you can still pass information from the main report to the subreport. This information can be displayed on the report or used in the subreport's formulas.
To create an unlinked formula field, select the formula from the main report's list of available report fields. Once the formula has been selected, the frame at the bottom of the dialog box appears and the parameter name is already filled in. Since this is an unlinked report, uncheck the checkbox that is to the right of the parameter name. This causes the linking field dropdown box to become disabled. Since this is an unlinked subreport, you don't need to specify a linking field.
Unlinked with Shared Variables
Shared variables can be used to pass data between the main report and the subreport. The difference between using a parameter field and a shared variable is that shared variables can be used to pass data in both directions. When using parameter fields, data can only be passed from the main report to the subreport.
Since the subreport is not linked to the main report, then you shouldn't set any properties on this dialog box. This is the same as creating an unlinked subreport. The difference is that both reports have to have a formula that declares and uses the shared variable.
To illustrate how this works, lets modify the example report shown earlier that lists the customer sales and any credits issued to the customer. The report should also show the net amount of adding the total sales with the total credits issued. This revised report is shown in Figure 13-5.
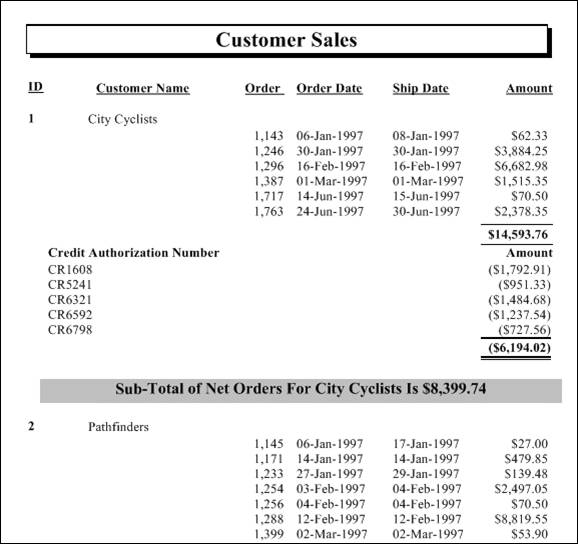
Figure 13-5. Calculate net sales amount using a subreport.
Since the sales amount is on the main report and the credits are listed on the subreport, it needs to use a shared variable so that the two reports can share their data. A formula is added to the subreport to calculate the total credit amount for the customer. The formula is placed in the report header of the subreport so that it gets calculated when the report is first run.
Shared TotalCredits as Currency
TotalCredits = Sum()
Formula = TotalCredits
The main report needs to be modified so that it has a formula that declares the same shared variable and uses it in the calculation. If the main report doesn't declare the variable as shared then it will always be zero. Notice in the formula that the TotalCredits variable is being added to the sum of the order amounts. It isn't being subtracted because it is already a negative number.
Shared TotalCredits as Currency
Formula = Sum(, ) + TotalCredits
A variation of using shared variables with subreports is to use a subreport to perform a particular calculation but not show the subreport on the report. The last example used a subreport to display and calculate the total credits given to a customer. However, you could have preferred to not show the details of the credits on the report and instead just use the total amount in the formula. If you try to do this by either hiding or suppressing the subreport or the section it is in, then the subreport won't calculate the shared variable. This is because the subreport has to be printed in order for the formulas on the subreport to be calculated. One alternative is to make the subreport object very small so that it isn't visible on the report. Depending upon how the subreport is designed, this may or may not print any extraneous graphics on the page. A better alternative is to modify the subreport object in your .NET application so that its height is set to 0 and the object isn't allowed to grow. The designer doesn't let you set the height to 0 but setting it via code gets around this limitation.
Dim rpt As CrystalDecisions.CrystalReports.Engine.ReportDocument
Dim rptObjects As CrystalDecisions.CrystalReports.Engine.ReportObjects
rpt = New SuppressSubreportDemo()
rptObjects = rpt.ReportDefinition.ReportObjects
rptObjects.Item('Subreport').ObjectFormat.EnableCanGrow = False
rptObjects.Item('Subreport').Height = 0
CrystalReportViewer1.ReportSource = rpt
Editing the Subreport
Once the subreport object has been added to the main report, you will probably need to edit it. Depending upon the types of changes you want to make to the subreport, there are different ways of editing it.
To edit the content of the subreport, from the main report either double-click on the subreport object or right-click on it and select Edit Subreport. This opens the subreport in the same design tab as the main report. The subreport is now treated the same as any other report. You can add new report objects, modify existing ones, or delete report objects.
When editing a subreport, the report designer changes so that it displays tabs at the bottom of the designer. Each tab lists the name of the main report and all open subreports. This lets you move back and forth between the main report and its subreports. This is shown in Figure 13-6.
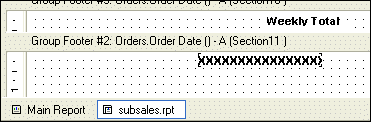
Figure 13-6. The tabs that list the main report and open subreports.
Caution! If you have a main report that uses many subreports, you may find that you can't open them all and see their tabs listed at the bottom of the designer. As of now, Crystal Reports doesn't have a way to scroll to the other tabs. Thus, you will not be able to have all subreports open at one time. To make room for more tabs, go to a subreport that doesn't need to stay open and right-click on it to open the menu. Select Close Subreport. This closes the subreport and removes the associated tab from the designer. There will now be room for a new subreport to be opened.
You can also modify other aspects of the subreport. When viewing the main report in design mode, right-click on the subreport object and you will see two menu options called Format and Change Subreport Links. The Format menu item opens the standard format dialog box where you set properties such as Suppress, Keep Object Together, etc. The formatting options on the Border, Subreport and Font tabs control how on-demand subreports are displayed on the main report. This is discussed in the next section. The Change Subreport Links menu item opens the Subreport Links dialog box. This lets you change the fields that are used to link the main report to the subreport.
One of the formatting oddities of subreports is there is no easy way to suppress a subreport with no data. Setting the formatting option Suppress Blank Section doesn't have any effect because the subreport is an object on the main report and the section isn't considered to be blank. Since subreports typically have column headings just like other reports, a subreport with no data will still print their column headings.
Getting around this problem requires making quite a few changes to trick the main report into not printing the subreport. The general idea is to make a copy of the subreport and put it in the next section on the main report. The first subreport has to set a shared Boolean variable that tells whether there are any records in the report. Then this subreport must be resized so that it doesn't take up any room on the main report. The next step is to use that shared variable on the main report so that the second subreport is conditionally suppressed when the variable is True.
To illustrate how to do this in your own reports, the customer sales report that has been used throughout this chapter is modified so that it won't show the subreport if there are no credits for a customer. As shown in Figure 13-7, customer Spokes 'N Wheels has no credits listed, but the subreport still shows the column headers.
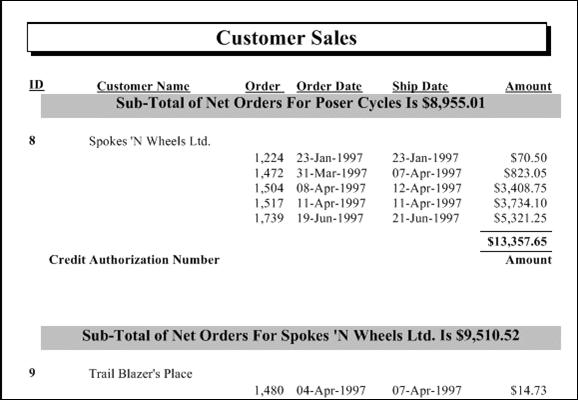
Figure 13-7. Customer Spokes 'N Wheels subreport only shows column headers.
The first step is to add a new section where the subreport is and insert a new copy of the subreport into this section. If the subreport was created from an existing report, then simply base the new subreport off the same report. If the subreport was created from scratch, then you have to run through the report expert again to recreate it.[1] This new subreport must have the same links to the main report as the original subreport.
When finished, the main report now has two sections with a subreport in each. The first section has the original subreport and the second section has the copy.[2] Figure 13-8 shows how the sample report looks. I put the copy of the subreport in Group Footer #1b (I used the template shortcut method) and Group Footer #1c has the original subreport.
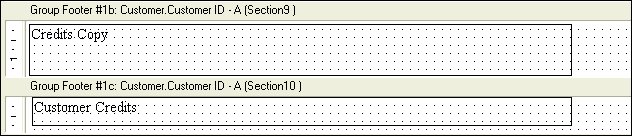
Figure 13-8. The subreports in the Group Footer sections.
The first subreport is responsible for determining if there are any records being printed and it sets a shared Boolean variable accordingly. You can test for the existence of any records by using either the IsNull() function or seeing if the Count() function returns 0. For this example, I used the IsNull() function and tested the Credit Authorization Number field.[3] This formula is placed in the Report Header section of the subreport.
Shared SuppressSub As Boolean
SuppressSub = IsNull()
Formula = SupressSub
The purpose of the first subreport is to determine whether there is any data that should be printed, but you don't want two copies of the same subreport to be shown to the user. Yyou have to hide the first subreport. But as you learned earlier, if you hide or suppress a subreport, then its formulas won't be calculated. So you have to set the subreport object to have a height of 0 and set the section to Underlay Following Sections (so that the section its in doesn't take any space on the report). Setting the Underlay property is done via the format properties in the designer. To set the subreport height to 0, use the following code when opening the report in your .NET application.
Dim rpt As CrystalDecisions.CrystalReports.Engine.ReportDocument
Dim rptObjects As CrystalDecisions.CrystalReports.Engine.ReportObjects
rpt = New SuppressSubreportDemo()
rptObjects = rpt.ReportDefinition.ReportObjects
rptObjects.Item('SubreportCopy').ObjectFormat.EnableCanGrow = False
rptObjects.Item('SubreportCopy').Height = 0
CrystalReportViewer1.ReportSource = rpt
The subreport in the second section is the one that the user will see. It has to be modified so that it is only displayed if the first subreport determined that there are records to be printed. Use the shared Boolean variable in the conditional formatting formula of the Suppress (No Drill-Down) property for the section that has the subreport.
Shared SuppressSub As Boolean
Formula = SupressSub
Figure 13-9 shows the report after these changes have been made. You can see that the subreport is now suppressed for the customer Spokes 'N Wheels, and it is still visible for the next customer.
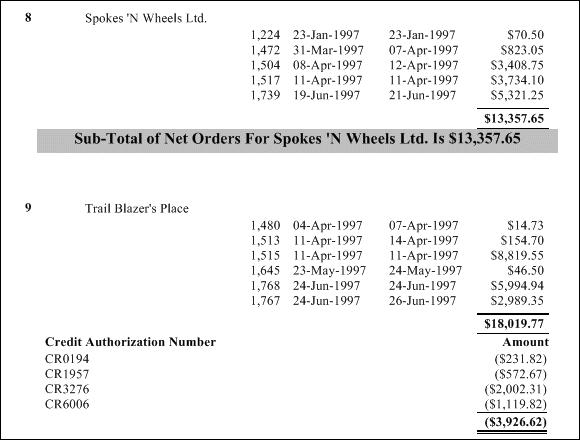
Figure 13-9. The subreport is suppressed when there are no records to print.
Using On-Demand Subreports
By default, subreports are run at the same time as the main report. When you view or print the main report, the subreport information is printed as well. This may result in a performance decrease because the subreport could require just as much time, if not more, to process as the main report. If this performance issue becomes a problem, you can declare the subreport so that it isn't bound to the main report. This is called an on-demand subreport.
An on-demand subreport doesnt print at the same time as the main report. Instead, a hyperlink that describes the subreport is shown where the subreport should appear.[4] When the user clicks on the hyperlink the subreport is processed and shown to the user. The on-demand subreport is shown on a separate tab in the viewer.
Caution! On-demand subreports are designed for use with the CrystalReportViewer control. If you send the report directly to the printer, only the placeholders will be printed and not the subreport. The placeholders are meant to be clicked on by the user and then show the subreport in a separate tab. Thus, even in the viewer you still can't print the subreport as part of the main report because it is not on the same tab. Each on-demand subreport has to be printed by itself.
An on-demand subreport improves the performance of your report by delaying when the subreport is processed. Subreports are normally processed while the main report is being processed. Depending on the subreport, this might have a negative performance impact on the overall main report's performance. An on-demand subreport doesn't have this effect because it is shown on the main report using a text placeholder. The user has to click on the placeholder to run the subreport. If there are multiple on-demand subreports on the main report, then each one must be clicked individually for it to be run.
To define a subreport as being an on-demand subreport, use the Subreport tab of the Insert Subreport dialog box. At the bottom of the dialog box is an On-Demand Subreport checkbox. It is unchecked. Click on it to make the subreport an on-demand subreport.
By default, an on-demand subreport is shown as a hyperlink on the main report. The text is the name of the subreport.

Figure 13-10. On-demand subreports are shown as a hyperlink on the main report.
When you click on the hyperlink the subreport is processed and displayed on a new tab in the viewer. Each on-demand subreport is displayed on its own tab.

Figure 13-11. On-demand subreports are shown on a separate tab in the viewer.
If you feel that displaying a hyperlink isn't professional enough, you can display a customized placeholder instead. When you are in design mode, right-click on the subreport object and choose Format. Then go to the Subreport tab that is shown in Figure 13-12.
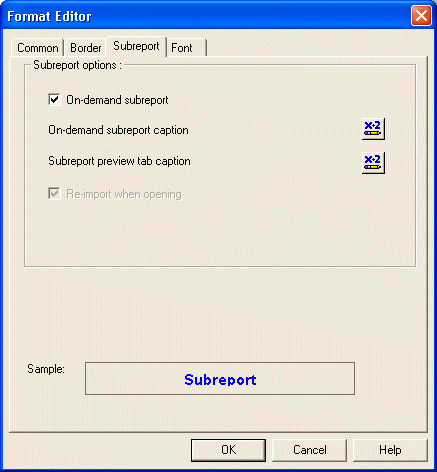
Figure 13-12. Formatting the subreport placeholder.
There is a formula button for modifying the caption that is displayed on the main report. You can enter a simple string in this formula or customize the string by concatenating data fields into it. The rest of the tabs on this dialog box can be used to format how the placeholder looks. For example, you can change the font, the background color and the border. Figure 13-x shows the placeholder formatted with a border and a larger font size.

Figure 13-13. The subreport placeholder.
Programming the Object Model
Note: This section isnt written yet.
Summary
Subreports make it possible to print reports that display a wider variety of data than what a standard report can print. Subreports can be used to print from multiple data sources on a single report as well as get around some of the limitations of linking tables together.
The copy of the subreport really only needs to have a single field in its Details section. To save yourself some time, you could use the report expert to just create a simple template of the subreport and only have one field listed in its detail section.
If you took the shortcut mentioned in the last footnote and only made a template of the subreport, then you need to switch the sections that each subreport is in. Thus, the first section should have the template and the second section should have the original subreport.
Since this function only tests one field on the subreport, the copy of the subreport really doesn't need any other fields in it. This is why the template shortcut method only has you add one field to the Details section.
|
Politica de confidentialitate | Termeni si conditii de utilizare |

Vizualizari: 1457
Importanta: ![]()
Termeni si conditii de utilizare | Contact
© SCRIGROUP 2025 . All rights reserved