| CATEGORII DOCUMENTE |
| Bulgara | Ceha slovaca | Croata | Engleza | Estona | Finlandeza | Franceza |
| Germana | Italiana | Letona | Lituaniana | Maghiara | Olandeza | Poloneza |
| Sarba | Slovena | Spaniola | Suedeza | Turca | Ucraineana |
The F92 underground train for BVE4
Introduction
Having worked for a long time in silence, this underground train is my first sign of life again to bring some 'fresh air' into the BVE scene again.
So this train is indeed some kind of revolution:
As far as I know, this is the first train for BVE that makes such consequent use of the possibilities the OS_ATS plugin offers
More that 2500 lines of source code lead to the most realistic train simulation ever in BVE.
All 16 usable ATS-functions BVE offers have been used to make driving the train as accurate as possible. Furthermore, there are many other, non-usable functions for train systems and effects.
All this will be operated from the new hi-res panel with more than 80 different bitmaps, accompanied by the self-scripted sound system with more than 85 sounds, which recreates nearly every sound of the original train.
To have a go at all these new functions immediately, I have updated the Bentschen U1 line by Patrick Popiol to support the new features of my F92.
You'll find the route in the folder 'Bentschen', it's called
'U1 Fe-TI_F92neu.csv'
And now: Hop on and get going! But first you should print out the tutorial!
Rdiger Hlsmann in July 2006
The functions of the F92
The F92 is equipped with the following functions:
realistic power and braking controls
SIFA (deadman)
Fahrsperre (tripcock)
side-selective door release and door-closing button
manual dispatching with passengers and ELA (electronic loudspeaker announcement)
complete sound system with many new effects
hi-res 1024*768 panel with light/dark-effect with many animated parts and pressable buttons
tripcock counter and odometer
An updated version of the Bentschen U1 by Patrick Popiol is included in the package.
Attention: You'll need the original Bentschen U1 line.
Download at www.bentschen.de
The panel of the F92
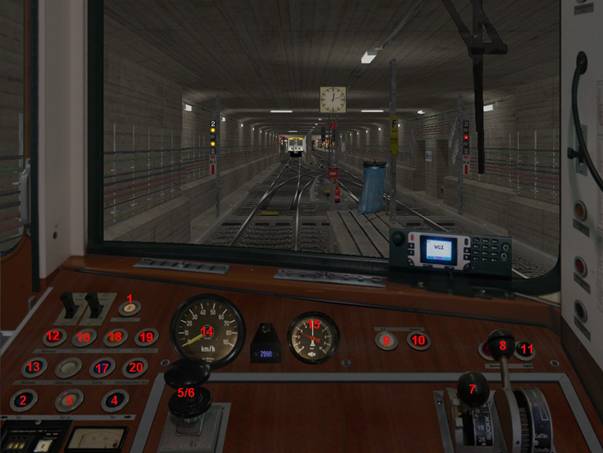
Description of the numbered parts (these have been transferred into BVE)
Fahrsperre / tripcock <1>
The pilot lamp lights up when the tripcock is turned on and goes out when the train passes a red signal or is caught by a speed-checker (G).
This also happens, if you move the speed-selector into neutral above 7 km/h.
Below 7 km/h, you can turn on the tripcock again by pressing the button. Furthermore, you can pass a red or not working signal while holding down the button and not exceeding 7 km/h.
Trfreigabe links /door release left <a>
With this button, you can release the doors on the left side. When the doors are opened, the lamp is light green. If you press the button while driving, the doors will be preselected and the lamp is dark green. Below 7 km/h the doors can be opened by the passengers.
Attention: If you come to a stop outside a station having the doors preselected already, you'll have to press the door-closing button before the train stops.
Otherwise, the doors could be opened in the tunnel.
Tren schlieen / close doors <s>
By pressing this button, the doors will be closed. The pilot lamp lights up as soon as all doors are closed.
Attention: The pilot lamp if off when the speed-selector is in neutral.
Trfreigabe rechts / door release right <d>
Same as 02.
Fahrtaster / Throttle button <Space>
As long as you press this button, the train accelerates.
Attention: The train won't accelerate unless the doors are closed and the brake handle is in notch 'Fahren' (drive).
SIFA / deadman <TAB>
The SIFA (Sicherheitsfahrschalter / deadman handle) applies the brakes if the driver becomes unconscious for example.
This is why the SIFA has to be pressed all the time. It can only be released while standing in brake notch 'E4' and air brakes applied or when the speed selector is in neutral.
Fahrschalter / speed-selector <NUM 7> up, <NUM 4> neutral, <NUM 1> down
With the speed-selector, you can select the desired speed.
On 3-phase-units (like the F92) this speed is maintained automatically while the throttle button is pressed.
Notch 15 is a shunting notch and may only be used for a short time.
Bremsschalter / brake handle <NUM 8> release, <NUM 2> brake,
<NUM Enter> stopping brake
The brake handle has the following notches:
Abschluss / lap all air pipes are closed
Fahren / drive slow release of air brake, train can only accerelare in this notch
Lsen / release fast release of the air brake
E1 electric brake notch 1 - slow release of air brake
E2 electric brake notch 2 - slow release of air brake
E3 electric brake notch 3 - slow release of air brake
E4 electric brake notch 4 - all air pipes are closed
Luftbremse / air brake applies the air brake
Schnellbremse / emg. brake applies the emergency brake
Normally, the train is slowed down with the electric brake until it nearly comes to a stop. The electric brake cannot stop the train completely, so you have to apply the stopping brake by pressing the button on top of the brake handle in notch 'E4'.
The stopping brake releases 0.5 bar from the brake pipe so the train comes to a stop.
It can be applied at all speeds, but you should normally only use it below 10 km/h.
If you're using the air brake to slow down the train, please note the following:
Below 4.5 bar brake pipe pressure, the electric brake cannot be applied. To start braking, move the brake handle into notch 'Luftbremse'. To keep the current brake pressure, go to notch 'E4'. The Notches 'E1' up to 'E3' are releasing notches and can be used to slowly release the air brake. To release the air brake quickly, use the notch 'Lsen'.
Meldelampe / pilot lamp 'E4'
This lamp lights up when the highest e-brake notch E4 is reached. Then you can apply the stopping brake
Meldelampe 'Luftbremse' / pilot lamp 'air brake'
This lamp shows that the air brake is applied (below 4.5 bar brake pipe pressure). As long as this lamp lights up, the train cannot accelerate.
Taster 'Signal' / horn button <p>
This button engaged the horn.
Meldelampe / pilot lamp 'Automat'
When this lamp lights up, the automat (driving motor safety device) is turned turned off in at least one unit of the train. (In BVE, you cannot switch it on again).
You can only use the air brake, furthermore, the train cannot accerelare that fast any longer.
Kennlampe / pilot lamp'Automat'
This lamp shows if the automat of your unit is turned off.
Tachometer/ speedometer
Shows the speed in km/h
Doppelmanometer / double manometer
Shows the brake pipe pressure (red needle) and the filling pipe pressure (white needle).
When the brake pipe pressure reaches 5 bar, the air brakes are released, maximum brake pressure is applied at 3 bar.
The needle of the filling pipe should always be at 5 bar.
Meldelampe 'Schaltwerk' / pilot lamp 'camshaft'
This lamp is only of importance, when there is at least one DC-unit coupled in your train. It lights up on all driving notches where there are resistors in the circuit and goes out when the speed is above 25 km/h. When you release the throttle button, it also lights up for a few seconds.
Meldelampe 'Lfter' / pilot lamp 'fan'
This lamp lights up when the fans are not running although the speed selector is set to a km/h-notch.
This happens when you turn on the panel or drive through a long gap in the 3rd rail.
A buzzer sounds simultaneously.
Kennlampe 'Federspeicher' / pilot lamp 'spring loaded brake'
This lamp lights up when the spring loaded brake is applied in a unit of the trein.
Taster und Meldelampe 'Federspeicher ein' / button and pilot lamp 'spring loaded brake on'<5>
With this button, the spring loaded brake can be applied.
This brake works by spring power on two axles of each car and is released by air pressure. It is used in first place to prevent a shut down train from rolling away, but it can also be used in critical situations to support the e-brake ('E5'). But this should be an exception.
When the spring loaded brake of your unit is applied, the red lamp lights up.
Taster 'Federspeicher aus' / button 'spring loaded brake off' <r>
Releases the spring loaded brake. Press the button for about one second to make sure that all spring loaded brakes are released.
Further functions not shown in the picture:
ELA (electronic loudspeaker announcement) <x> or <c>
The ELA is used for passenger information and is operated by the driver-
When standing in a station, two messages can be broadcasted:
'Zug nach [Fahrtziel]Einsteigen bitte!' / Train to [destination]Please get on board
'Zurckbleiben bitte!' / Please stand back!
The station announcements between stations are played automatically.
DEUTA-device (maximum speed control)
If the maximum speed of the train (70 km/h) is exceeded, a bell rings. At the same time, the train is slowed down by the air brake. Below 70 km/h, the brakes can be released again.
Tripcock counter and odometer
At the lower screen border, there are three counters:
The tripcock counter 1 shows the number of unwanted emergency brakes.
The tripcock counter 2 shows the number of willingly passed red signals.
The odometer shows the number of kilometers run ever since.
The train is delivered with all three counters set to zero.
Updating of existing routes for the F92
To be able to use all of the new functions, you'll need to make some additional entries in the route file.
The following beacons are used by the F92:
Beacon 23
Defines the side on which the doors will open. Entry .Beacon 23;0;0;1, for right, .Beacon 23;0;0;2, for left and .Beacon 23;0;0;0, to reset.
The beacon 23 has to be set before the station as well as at the exact stopping position.
Behind the station, a reset beacon must be placed, so that nobody wants to enter in the tunnel.
Beacon 24
On startup, this beacon defines the doors on the given side to be already open.
.Beacon 24;0;0;1, right and .Beacon 24;0;0;2, left.
With this beacon, you'll be able to take over the train with open doors. It has to be placed at the beginning of the route and to be reset behind the first stopping position by setting the last value to zero.
Beacon 25
defines the number of passengers, who want to get on/off at the next station.
With .Beacon 25;0;0;21, there will be 21 passengers waiting for you at the next station. This beacon,too, must be reset behind the station.
Beacon 26
With .Beacon 26;0;0;0, a speed-dependent rail joint sound will be played at this position.
Beacon 27
defines the destination for the ELA broadcast 'Zug nach [destination]Einsteigen bitte'. With .Beacon 27;0;0;30, for example, you can set the sound to index 30 of the [ATS] sounds defined in the file sound.cfg. This file can be found in the train folder. The beacon has to be placed at the beginning of the route.
Beacon 28
sets the screeching sound in tight and fast curves. .Beacon 28;0;0;1, defines the beginning, .Beacon 28;0;0;0, the end of the curve.
Attention: This sound can only be heard above 50 km/h.
Beacon 29
sets the rumbling sound in tight and slow curves. .Beacon 29;0;0;1, defines the beginning, .Beacon 29;0;0;0, the end of the curve.
Attention: This sound can only be heard above 25 km/h.
Beacon 30
With .Beacon 30;0;0;0, the scratching sound of a 3rd rail beginning will be played at this place.
Beacon 31
With .Beacon 30;0;0;0, a switch sound will be played. The last value defines the position of the switch: 0 for straight, 1 for diverging.
Beacon 44003
defines a signal magnet which has to be put behind the corresponding signal.
With .Beacon 44003; 0; 0; 40, an additional speed-checker (G) will be placed there as well, which will stop the train if it exceeds 40 km/h. The G is only active, when the signal shows a slow aspect (signal state 1 or 2).
On signals without G, the last value is to be set to zero.
Beacon 44004
defines a G-only magnet. .Beacon 44004; 0; 0; 25, for example, is a G which will stop
Special thanks to
Marcel Kuhnt (many sounds, advice and extensive beta testing)
Oskari Saarekas (programming advice)
Patrick Popiol (creator of the updated Bentschen U1)
Benjamin Ebrecht (horn-sound)
Copyright
The program, its parts and files included in the package (bitmaps, text files and most of the sounds) are 2006 Rdiger Hlsmann.
For decompiling and/or modifying of files as well as publishing them, my prior permission is required and/or the permission of the respective author.
|
Politica de confidentialitate | Termeni si conditii de utilizare |

Vizualizari: 1816
Importanta: ![]()
Termeni si conditii de utilizare | Contact
© SCRIGROUP 2026 . All rights reserved