| CATEGORII DOCUMENTE |
| Bulgara | Ceha slovaca | Croata | Engleza | Estona | Finlandeza | Franceza |
| Germana | Italiana | Letona | Lituaniana | Maghiara | Olandeza | Poloneza |
| Sarba | Slovena | Spaniola | Suedeza | Turca | Ucraineana |
DOCUMENTE SIMILARE |
|||||||
|
|||||||
![]()
This collection of lines and spaces is
called a staff. We can refer to each line and each space by its number. A staff
doesn't usually have numbers written beside the lines and spaces. We've put
them there to show the fact that we number them from the bottom. On the staff
we place notes and rests. (You'll find out more about notes and rests in later
lessons.) At the beginning of each staff we place an object called a
'clef'. A clef tells us which notes are which. The two most common
clefs are the 'treble' clef:![]() and the 'bass' clef:
and the 'bass' clef: ![]() A treble clef line and a bass clef line joined together form what is called a
'grand staff':
A treble clef line and a bass clef line joined together form what is called a
'grand staff':
Looks familiar? All piano music is written on a grand staff.
Do you know the alphabet? Then you know one important thing about musical note-names: they follow the letters of the alphabet when ascending:

As notes go 'higher', the letter names follow the pattern of the alphabet. Once reaching the letter 'G', the pattern returns to letter 'A' and continues on.
As you might imagine, when a scale descends (goes downward), the letters go in reverse:

So as notes go 'lower', the letter names follow the pattern of the alphabet backwards. Once reaching the letter 'A', the pattern returns to letter 'G' and continues on.
Here is a diagram of the Grand Staff, with all of the notes labeled:
The scale above starts on a low 'E' and proceeds upward for a little more than 3 octaves. An octave is comprised of eight notes, where the bottom and top notes of the octave have the same letter name. The succession of notes shown above starts on a low 'E' and passes through three more 'E's. Therefore we say that the range of this scale is more than three octaves.
You will notice that the 'C' in the middle is a note drawn on a leger line. A leger line is a way of extending the range of the staff. Take a look at this example:
![]() If you use the diagram of the Grand Staff from above
and continue upward from the last given note (G), you will see that this note
is actually a 'C'. Theoretically you can have an unlimited number of leger
lines, though obviously once you exceed four or five it begins to get difficult
to count all those lines! Leger lines can extend up above or below the staff,
no matter what clef is used:
If you use the diagram of the Grand Staff from above
and continue upward from the last given note (G), you will see that this note
is actually a 'C'. Theoretically you can have an unlimited number of leger
lines, though obviously once you exceed four or five it begins to get difficult
to count all those lines! Leger lines can extend up above or below the staff,
no matter what clef is used:
A solid understanding of the principles of music theory requires a solid understanding of the piano keyboard. You may already have this solid understanding, but I'd recommend reading this lesson anyway.

Notice that a piano keyboard is a collection of white and black keys. Unless you are a being from another planet, you will know that pressing a key causes the piano's key mechanism to operate. This causes a small felt-covered hammer to strike a string (or set of strings) inside the piano, and you hear a sound.

It is the black keys that help you understand 'where you are' on a keyboard. The black keys are grouped together in alternating groups of two and three. The note 'C' is the white note that is just to the left of each group of two black notes. Here is a piano keyboard with the white notes properly labeled:
Let's start with the lines on the staff. The notes that are written on the lines in the staff are C, E, G, and B. You can make up a fun sentence to help remember the names of the notes that are written on the lines in the staff. Example: Cows Eat Glue Buckets. Make up one for yourself and write it down somewhere. Keep it close to your keyboard for reference.

Now let's look at the spaces on the staff (I'll leave the 'C' note in just for reference only. It is not on a space). The notes that are written on the spaces in the staff are D, F, and A. You can make up a fun sentence to help remember the names of the notes that are written on the spaces in the staff. Example: Dogs Find Apples. Make up one for yourself and write it down somewhere. Keep it close to your keyboard for reference.
This spacing of 12 on the keyboard or 8 on
the staff, is called an 'Octave.' In the picture above, you are
looking at 'Octaves' on the staff and on the keyboard, (from 1
'C' note to the next 'C' note). You will be learning all
the notes in 1 octave (1 group). The octave we will concentrate on will include
'middle C.'
Find all the 'C' notes you can on your keyboard.
NOTE: Keyboards come in different widths so don't worry if you end up with more or less 'C' notes than the keyboard shown above. Look for two black keys and then the first white key to the left of these black keys. This white key will always be a 'C' note.
Now, you've often heard that term 'MIDDLE C'. If you sit roughly at the middle of a piano and look down, you should be looking at MIDDLE C. As you can see there are several C's as you glance up and down the piano keyboard. The one in the middle is called MIDDLE C.
The naming of the black notes requires that you understand what sharps, flats and semitones are. In our western culture, the smallest space (interval) between two pitches is called a semitone. Looking at a piano keyboard, you will see that a semitone above the note 'B' is 'C'. That is because there is no note between them; therefore, the distance between 'B' and 'C' is one semitone. Similarly, the notes 'E' and 'F' are as close together as they can be: there is no note between them, so they are said to be one semitone apart.
Want more semitones? Look at the note 'C' (doesn't matter which one). The semitone above 'C' is that black note, the lowest of the group of two black notes. What do we call that note? We call it 'C-sharp'. So the answer to the question, 'Tell me the name of the note that is one semitone higher than 'C'' is 'C-sharp'. What's the note that is one semitone higher than 'F'? 'F-sharp'! One semitone higher than 'A'? 'A-sharp'. Any black note can be named for the white note that is just below it in the manner just described.
Now, look at the note 'G'. The semitone down from that note would be the black note which is the lowest of the group of three black notes. We would call that note 'G-flat'. Did you notice? 'F-sharp' and 'G-flat' are the same pitch! All of the black notes on the piano keyboard have two different names. Give two names for the black note which is the middle of the group of threeThe answer would be 'G-sharp' and 'A-flat'.
Here is a picture of a keyboard with all of
the keys properly labeled, with a staff showing where each note is located. In
printed music, we use this sign to indicate 'sharp': ![]() , and this sign to indicate 'flat':
, and this sign to indicate 'flat': ![]()

Look at the first measure. It has some strange signs at the beginning of it and it has some numbers. We will be looking at the numbers for now. The numbers tell you what size the measure is. First let's learn a little more about the different parts of the staff before we learn more about the measure size.
Look at the staff again. Starting from the top of the staff, there are five horizontal lines. Count these five top lines. These top five lines in the staff are called the 'Treble Clef.' The 'Treble Clef' shows the notes that you will be playing with your right hand on the piano. The 'Treble Clef' has it's own label so that you know it's a Treble Clef. Look at the object that looks like a strange violin on the left side of the Treble Clef (it is next to the 4/4 numbers). This is the sign (label) for Treble Clef. In fact it is called a Treble Clef.
Look at the staff once more. Starting from the bottom of the staff, there are five horizontal lines. Count these five bottom lines. These bottom five lines in the staff are called the 'Bass Clef.' The 'Bass Clef' shows the notes that you will be playing with your left hand on the piano. The 'Bass Clef' has it's own label so that you know it's a Bass Clef. Look at the object that looks like a backwards letter C on the left side of the Bass Clef (it is next to the 4/4 numbers). This is the sign (label) for Bass Clef. In fact it is called a Bass Clef.
Quick Review
In order for someone to play music, and not just the notes in a random way, they will need a kind of map to tell them which note to play, when to play it, and for how long. It is like a hiker on a trip. The hiker's map tells them where to go, how to get there, where to rest, and how long (or short) to stay if they want to get to the end of their journey on time. Reading a piece of music is a kind of hiker's map. And if more than one person is playing the same music with you, you will both need a map to tell you which note to play, where to rest, and how fast or slow to go so that you both end your journey at the same time. This is what measures and beats do for you. They are the directions on a map to play music (a musical map).
These map directions are written on the 'Staff.' The staff is divided into very small parts of a journey. These parts are called 'measures,'and the measures are divided into even smaller parts called 'beats.'
This is where the math of music begins. If you add all the beats together in 1 measure, they need to equal the size shown for that measure. Let's say that we have a measure size of 1. Let us also say that we have 4 beats divided equally within that measure. What size do 4 equal beats need to be to equal 1 when they are all added together?
1/4 each.
If you add 4 quarters together you get 1.
What size do 8 equal beats need to be to equal 1 when they are all added together?
1/8 each.
If you add 8 eighths together you get 1.
What size do 16 equal beats need to be to equal 1 when they are all added together?
1/16 each.
If you add 16 sixteenths together you get 1.
What size do 2 equal beats need to be to equal 1 when they are all added together?
1/2 each.
If you add 2 halves together you get 1.
What size does 1 equal beat need to be to equal 1?
1 each.
If you have 1 whole you have 1.
Musical notes are not all held for the same duration. There are long notes and short ones, and all others in between. Composers need a way of indicating to performers how long to hold each note. By making each note look a little different, this can be easily communicated.
Here is a whole note, a note you've probably seen before, sitting on a line:
![]()
The whole note is not normally found sitting on a line like this, of course. It's been placed there to help you visualize its length. This diagram is showing that one whole note takes up the entire line. If we divide the line into two equal parts, a whole note would be too big to fit in it. We need notes of shorter duration. These are called half notes:
![]()
You can tell with this diagram that it takes two half notes to make a whole note. Let's keep going. The next smaller note value is called a quarter note:
![]()
It takes four quarters to make a whole note. Also, you can tell that it takes two quarter notes to make one half note.
We could keep going, theoretically, forever! However, let's just do one more for now. Here are notes of even shorter value, called eighth notes. They look like quarter notes with flags:
![]()
So eight eighths equals one whole. It also equals two halfs. It also .
Let's look at all the diagrams placed together. You can see the relationships between note lengths very clearly*:

Here's an equation that should now make some sense to you:
![]() It shows that two quarter notes equal one half note
in length. Here's another one:
It shows that two quarter notes equal one half note
in length. Here's another one:
![]() This may look a little complicated, but take your
time and figure it out: if you add together the lengths of one half note, two
eighth notes and one quarter note, you will get one whole note. It's just the
same as the following arithmetic equation:
This may look a little complicated, but take your
time and figure it out: if you add together the lengths of one half note, two
eighth notes and one quarter note, you will get one whole note. It's just the
same as the following arithmetic equation:
2 + ![]() +
+ ![]() + 1 = 4
+ 1 = 4
No problem!
DOTTED NOTES
You know that in many time signatures a
quarter note ![]() equals one beat. When you add a dot to a note, you add half of its value
to the note. What's half of one?
equals one beat. When you add a dot to a note, you add half of its value
to the note. What's half of one? ![]() .
If you add that to the quarter, you get a note that is 1
.
If you add that to the quarter, you get a note that is 1![]() beats long.
beats long.
A dotted quarter note looks like this: ![]() The dot makes the note half again as long as a quarter note. (1 +
The dot makes the note half again as long as a quarter note. (1 + ![]() )
= 1
)
= 1![]()
Here is a dotted half note: ![]() It is one half note plus half of a half note (one quarter). A dotted half note,
therefore, is three beats long. (2 + 1 = 3)
It is one half note plus half of a half note (one quarter). A dotted half note,
therefore, is three beats long. (2 + 1 = 3)
Let's review.
We have beats that equal:
When you describe a note in music, there are at least two parts to the description. The first part, as you have learned in previous lessons, is its 'Melodic Name.' Its melodic name is determined by its location on the staff. There are 'C' notes, 'D' notes, 'F#' notes and so forth. And now we are going to learn its 'Rhythmic Name.' Its rhythmic name tells you how long (or short) to play a note you see written on the staff.
Rhythmic Names include (from our study about beats):
So when describing a note in music, we can have a 'C' note that is a 'Quarter note.' Or, we can have an 'A#' note that is a 'Half note.' Just remember that there are two parts to describe each note that you see written on the staff. And, when you add all the notes together in 1 measure, they need to equal 1 whole measure.
This is the stem for a Quarter
note (quarter
notes do not have any flag and have a solid black circle)-![]()
This is the stem and flag for an
Eighth note (notice
it has a solid black circle)-![]()
This is the stem and flag for a Sixteenth
note (notice
it has a solid black circle)-![]()
This is the stem for a Half note (half notes do not have
any flag and they use a black circle with a hole in it)-![]()
This is a Whole note (whole notes do not have
any flag or stem and they use a black circle with a hole in it)-![]()
*British equivalents for these
North American note values: Whole note = semibreve; Half note = minim;
Quarter note = crochet; Eighth note = quaver
In order to play notes on the piano and not trip over your own fingers, there are methods shown on the staff to help you know which finger (or thumb) to use to start playing the notes you see written.
Hold your hands up in front of you (palms pointed away from you). Spread your fingers apart. Look at your left hand. Beginning with your little finger, this finger is called #5.
Now look at the thumb of your left hand. The thumb is called #1. There are five fingers and five numbers, one for each finger (or thumb). What number would you guess would be assigned to your pointer finger?
Answer = #2
How about your ring finger?
Answer = #4
And, how about your middle finger?
Answer = #3
Do the following exercise.
It takes some practice for any student learning
to play the piano to do this. It's not easy to think about wiggling one finger
at a time and having your brain tell the nerves for just that one finger to
move (wiggle). With some practice, you will be able to do this without having
to concentrate on doing it.
Now look at your right hand. It is also numbered in the same way as your left hand.
Repeat the exercise above using your right
hand.
Wiggle Those Fingers . . .
For the final part of this lesson, we are going to practice wiggling fingers by typing.
Place your hands on your computers typing keyboard. With your left hand, place your fingers accordingly.
put #5 finger on
letter key A.
put #4 finger on letter key S.
put #3 finger on letter key D.
put #2 finger on letter key F.
put #1 finger (thumb) on the space bar.
Now add your right hand to the keyboard in the
following way.
put #5 finger on ;
(semicolon).
put #4 finger on letter key L.
put #3 finger on letter key K.
put #2 finger on letter key J.
put #1 finger (thumb) on the space bar.
Type the following and when you see the letter 'X', hit the space bar with your left hand thumb. Also, when you see the letter 'O', hit the space bar with your right hand thumb and do not type any of the spaces shown in the following message. Begin typing:
AAAA XXXX SSSS XXXX DDDD XXXX FFFF XXXX
OOOO JJJJ OOOO KKKK OOOO LLLL OOOO ;;;; OOOO.
Continue to type this exercise for 3 minutes.
That's it, you're done. 'Bookmark!' this page in your browser and practice Lesson Seven from beginning to the end for five days. Don't skip anything. The purpose of this lesson is to train your brain to respond to moving any one finger at a time. It takes about ninety days for your brain to strengthen a nerve pathway from itself to 1 finger of your choice.
Doing this exercise for five days will help strengthen the pathways and get you a good start on finger control. Remember, 'Practice does not make perfect but it does give you more confidence. And, confidence is nice to have.'

Well it's Show Time! In this lesson we are going to put it all together. Don't panic!. We will go slow and explain fully.
Look at the staff above. You will be playing with your left hand first in measure number 1. In measure number 2, you will be playing with your right hand. Then in measure 3 you will be playing with both hands together. Finally, in measure 4 you will be ending with both hands together.
Place the 5 th finger of your left hand on low 'C' of your keyboard. Low 'C' is 7 white keys below (to the left of) middle 'C'. Look at the keyboard above to help you find low 'C'. It is marked with a number 5. Now, place the number 1 finger (your thumb) of your right hand on middle 'C'. It is marked as always and also with a number 1. Your hands are now in the correct starting position to play this song.
Notice in measure 3 that you will need to
adjust both hands to the right to change to new finger positions. The number 1
finger (thumb) of you left hand will start on note 'A' below middle
'C'. The number 3 finger of your right hand will start on note
'A' above middle 'C'. The whole purpose of finger
positioning is so you don't run out of fingers when you get to measure number
4. If you try and keep your fingers in the position as when you started playing
the song (you can see by trying it yourself), that you would run into problems
trying to play measure numbers 3 and 4.
Lesson 5.1: Books And Hand Rocking
For the finishing touch to these lessons, you need to go to your local music store and purchase a book. Or, you may know someone who will lend you the kind of book I need you to get. I want you to find a small song book of very simple songs. The songs should not be any harder than the ones you have seen in these lessons. You are looking for a beginners song book. It only needs to have songs in it and nothing else.
From my personal experience and most of my students, following are a couple of books worth getting:
Super Sight-Reading Secrets: An Innovative, Step-By-Step Program for Musical Keyboard Players of All Levels
Piano for Dummies (For Dummies)
Keyboard (Magazine)
One of my students introduced me to this DVD which I think is great for beginners and intermediates. It is a little expensive but it's worth the money:
I want you to set some time aside each day (30 minutes or so) to pick one song out of the book and practice playing it. If you have followed these lessons faithfully, you now have the skills to do this with confidence. I want you to set some time aside each day (30 minutes or so) to pick one song out of the book and practice playing it. If you have followed these lessons faithfully, you now have the skills to do this with confidence.
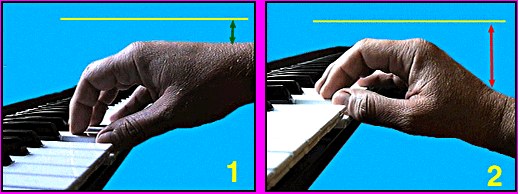
Lots of work in this lesson? Yes there is. This is the next to the last page. We need to talk about technique. Remember our discussion on assigning each finger a number? This was a way to help you so that your fingers don't trip over each other. There is another part to this problem. It is called 'Hand Placement.' Your hands need to be in the correct position in order to work with the finger numbering system.
Look at the two figures above. Figure 1 shows the correct placement for your hand. Figure 2 shows the WRONG placement of your hand. The top of your hand should be parallel with the keys on the piano. The yellow line shown in each figure is parallel with the keys. Place your hand on your keyboard as shown in Figure 1. Notice that your forearm is now also parallel with the keys on your keyboard. When you are ready to strike (play) a note on your keyboard, keep in mind that your wrist is the hinge point. Your elbow is not a hinge point. And, your knuckles are not hinge points. The only movement used to strike a note is at the wrist and of course, your finger joints. The action is similar to scratching the top of your leg. Try it.
Here are some other tips for body technique in relationship to playing the piano.
Your fingers should remain slightly curled under your hand.
You should sit up straight similar to sitting and typing a letter.
You arms should be generally relaxed at the elbows.
Your right foot should be placed ahead of your left foot (your heel helps support your back).
Music is often divided up into units called measures
or bars. Each measure has a certain number of beats. The number of
beats is determined by the time signature. (Another word for time
signature is meter). For example, some music is written so that every
measure has four beats, and that the quarter note is the unit that
'gets the beat'. In such a piece the time signature would be ![]() . We say 'four four' when we read this time signature. In
. We say 'four four' when we read this time signature. In ![]() time, the top '4' represents the number of beats per bar: four. The bottom '4'
tells us what kind of note gets the beat. The bottom four means 'quarter
note'.
time, the top '4' represents the number of beats per bar: four. The bottom '4'
tells us what kind of note gets the beat. The bottom four means 'quarter
note'.
In this lesson, we are only going to deal with three different time signatures:
![]()
![]() and
and ![]()
There are things you will eventually need to know about all time signatures. For example, you will eventually learn that the time signatures listed above are called simple time signatures. But that's not necessary right now. All you need to know is that in each of these particular time signatures:
-the top number tells us how
many beats.
-the bottom number tells us what kind of note gets the beat.
(Lesson 13 will delve into time signatures to a greater degree, and you'll learn about compound time signatures. Compound time signatures tell us the number of beats in a bar, but not in a direct way. Don't worry about it for now!)
Take a look at the following piece of music:
![]()
This is a piece of music that has been
written in ![]() time. That's obvious, because of the time signature at the beginning of the
piece! But let's say that the composer 'forgot' to put a time
signature at the beginning. How would we be able to know that the piece was
in
time. That's obvious, because of the time signature at the beginning of the
piece! But let's say that the composer 'forgot' to put a time
signature at the beginning. How would we be able to know that the piece was
in ![]() ?
Well, if you count up the number of beats in each bar, you would find that each
bar has three beats, and that each beat is a quarter note:
?
Well, if you count up the number of beats in each bar, you would find that each
bar has three beats, and that each beat is a quarter note:
Bar1: 3 quarter notes = 3 beats.
Bar2: 4 eighth notes plus 1 quarter note = 3 beats.
Bar3: 1 half note plus 2 eighth notes = 3 beats.
Bar4: 1 dotted half note = 3 beats.
|
IMPORTANT: Take a look at bar 2 and observe how the eighth notes have been 'beamed'. (You'll remember that the beam takes the place of the flags). The fact that two eighth notes are beamed together shows that the beat unit is the quarter note. In some music you will find four eighths beamed together. That would mean that the half note would be the beat unit. (Four eighths = one half-note). |
It is necessary, in any given time signature, to make sure that each bar has the same number of beats, and that the number of beats is the top number of the time signature. If we were to take the example above and write the count of each bar, it would look like this:

If you play a musical instrument, you are probably already familiar with 'counting' in this manner.
What if you were to get a piece of music in which the composer put the time
signature at the beginning, but 'forgot' to draw in the bar lines:
The time signature is ![]() .
So count two beats, then draw a bar line; then count another two beats and draw
another bar line. It should work out that every bar gets two beats, because
that is what
.
So count two beats, then draw a bar line; then count another two beats and draw
another bar line. It should work out that every bar gets two beats, because
that is what ![]() means! Here's what it should look like once you've drawn the lines in:
means! Here's what it should look like once you've drawn the lines in:

Bar 1: 2 eighths plus 1 quarter = 2
beats.
Bar 2: 4 sixteenths plus 1 quarter = 2 beats, etc..
You can see that each bar gets 2 beats. The
counts have been written in. Notice that each beat gets a number (that's
obvious!) In bar 1, the first eighth gets a '1'. The second eighth
gets a '+' to indicate that it's in-between beats one and two. In bar
2, the first sixteenth gets a '1'. The next sixteenth gets an
'e' (our way of showing a note that is one sixteenth past the beat).
The next sixteenth is a '+' because it is one eighth past the beat.
The fourth sixteenth gets a 'a'. (our way of showing a note that is
the fourth sixteenth past the beat.) This funny way of showing the counts makes
it easy to say the counts. For example, if you saw a bar of music in ![]() that had eight sixteenth notes, you would say the count like this: 'One
-e- and - a Two -e- and - a'.
that had eight sixteenth notes, you would say the count like this: 'One
-e- and - a Two -e- and - a'.
>
Sometimes we have to write the counts into a
bar that features syncopation. Syncopation occurs when the normal
rhythmic stesses in a bar are changed. For example, normally in a piece of
music written in ![]() one tends to be quite aware of a 'strong - weak - strong - weak' pusling
of the music.
one tends to be quite aware of a 'strong - weak - strong - weak' pusling
of the music.
If you come across a piece of music in which the eighth note gets the beat,
then each eighth note gets a number, and each sixteenth gets a '+':
The best way to learn these 'Musical Styles' (Time Signatures) is to
listen to them. By listening to them, you will be able hear the style in your
head before you play it. When you see a 3/4 on the staff, you will be able to
recall a Waltz that you have listened to before. And, you will then have some
idea of what the music should sound like before you begin playing it. This is
important!
Band Leaders/ Music Teachers, etc. will communicate how they want you to play a piece of music by referring to it's style. Let's look at a list of common styles:
Waltz in 3/4
Jazz Waltz in 3/4
Dixieland in Cut Time (2/4) see C with vertical line through it below.
Polka in Cut Time (2/4) see C with vertical line through it below.
Polka in 4/4
Jazz Waltz in 6/8
March in 4/4
March in Cut Time (2/4) see C with vertical line through it below.
Jazz Waltz in 5/4
Latin, Bossa, in 4/4
Ballad in 4/4
Ballad in 3/4
Ballad in 6/8
Swing in 4/4
12 Bar Blues in 4/4
And there are hundreds more in Classical, Latin American, Middle Eastern, Oriental, Folk Music, Rock, etc.
In general a Time Signature of 3/4 is used for a 'Waltz.' In general a Time Signature of 2/4 is used for a 'March or Polka.' In general a Time Signature or 6/8 is used for a very fast 'Waltz.'
An 'interval' is the space between two notes. Shall I be obvious? A small interval is a situation where there are two notes close together! There are three small intervals to be dealt with in this lesson: semitone, whole tone, and tone-plus-semitone.
SEMITONES:
We have already dealt with the semitone in lesson 3. Now you need to know that there are two types of semitones. Both sound exactly the same, but they are written differently. Take a look at this example:
![]()
Both of these semitones sound exactly the same. Play them on your instrument. From your knowledge of semitones, you know that if you were to play both examples on a musical instrument, you would play the same notes! In other words, the point here is that G# and Ab are exactly the same pitch. But here's the difference: we would say that in the first example, 'G-sharp is a DIATONIC semitone lower than A'. In the second example, we would say 'A-flat is a CHROMATIC semitone lower than A'.
So there are two types of semitones: DIATONIC
SEMITONES and CHROMATIC SEMITONES. Here are quick definitions:
|
DIATONIC SEMITONE: |
|
CHROMATIC SEMITONE: |
Here are some more semitones, correctly labeled:

(You will learn in later lessons that a diatonic semitone is also called a minor 2nd)
WHOLE TONES
A whole tone equals the distance of two semitones. Looking at this view of a piano keyboard, you can see two notes indicated by dots:

The 'G' and the 'A' are one whole tone away from each other due to the fact that there is a note in between them: the G-sharp, or A-flat. This distance of two semitones is called one whole tone.
To write whole tones, we begin by ensuring
that they've been placed on the staff correctly. Whole tones are written on
the staff so that if one note is on a line, the other must be on the space
above or below it. If one note is written on a space, the other must be on the
line above or below it. However, just because two notes are placed on a
staff in this manner, don't automatically assume they are whole tones. Take
this interval, for example: ![]() The 'E' is on the line directly below the 'F'. But as you can see from the
diagram of the keyboard above, these two notes are only one semitone apart-
there is no black note in between them. The rule about placement of the notes
on the staff is only part of the procedure. You must now adjust the second
note, if necessary. In this case, you would add a sharp to the second note in
order to make it a whole tone higher:
The 'E' is on the line directly below the 'F'. But as you can see from the
diagram of the keyboard above, these two notes are only one semitone apart-
there is no black note in between them. The rule about placement of the notes
on the staff is only part of the procedure. You must now adjust the second
note, if necessary. In this case, you would add a sharp to the second note in
order to make it a whole tone higher: ![]() There is one other place on the keyboard where there is no black note between
white notes: between 'B' and 'C'. So a whole tone above 'B' would be 'C#'.
There is one other place on the keyboard where there is no black note between
white notes: between 'B' and 'C'. So a whole tone above 'B' would be 'C#'.
Here's a quick definition:
|
WHOLE TONE |
Here are some written whole tones:

Notice that whole tones are written on adjacent lines or spaces. (You will learn in later lessons that a whole tone is also known as a major 2nd.)
TONE-PLUS-SEMITONE
A tone-plus-semitone is the distance of three
semitones. On paper, it must be written so that if one note is on a
line, the other note must be in the space above or below it. If one note is in
a space, the other note must be on a line above or below it. And just as
with the situation regarding whole tones, do not assume that because you have
placed the notes correctly on the staff that they are automatically a
tone-plus-semitone apart. You must then adjust the second note so that the
proper interval exists.
|
TONE-PLUS-SEMITONE |
Here are some written tone-plus-semitones:

(You will learn in later lessons that a tone-plus-semitone is also known as an augmented 2nd)
A scale is a series of notes that proceed up or down by step. ('Step' means by tone or by semitone). A major scale proceeds by following a certain pattern of tones and semitones. But we'll get to that in a moment. Make certain that you fully understand the difference between tones and semitones. If you're still a little rusty, go back to Lesson 7. Understanding scales depends on your knowledge of tones and semitones. Please note that when we say 'tone', we mean 'whole tone'.
We'll go through the process of writing a major scale step by step (no pun intended), and you'll see that writing scales is actually a fairly simple process! I would recommend getting a piece of staff paper and writing out the steps as you see them demonstrated here for you. It will help you to clearly visualize the entire process. We are going to write an F-major scale in the treble clef, ascending, using quarter notes.
Writing an F-Major Scale in the treble clef:
STEP 1:
Draw a treble clef on a staff. Then
place an 'F' on the staff, the 'F' above middle 'C'.
![]()
STEP 2:
Write a note on each line and space, ascending
for one octave. Remember, any note below the middle line 'B' should
point its stem upward; any note above the middle line 'B' should point its stem
downward. The 'B' itself can go either way.
![]()
STEP 3:
You've now written a scale, but not necessarily
a major scale. Major scales follow a certain pattern of tones and semitones.
Here is that all-important pattern:
|
Tone - Tone - Semitone - Tone - Tone - Tone - Semitone |
A major scale is a series of 8 consecutive notes that use the following pattern of half and whole steps:

We now have to examine the intervals between each and every note to see that they conform to this pattern. If they don't, we can use accidentals (sharps and flats) to make them conform.
We start by looking at the first two notes, 'F' and 'G'. What is the distance between these two notes? It is a whole tone. Therefore, the first interval in the pattern, 'Tone', is correct, and we can go on.
Now let's look at the 2nd and 3rd notes, the 'G' and 'A'. The distance between these two notes is a whole tone, so that conforms to the second interval requirement, tone. On we go!
Our next notes to examine are the 3rd and 4th notes, the 'A' and 'B'. This forms a whole tone. But our major-scale pattern says that there should only be a semitone between these two notes. No problem! We'll just lower the B to a B-flat, and now it's a semitone.
Here's what we've got so far:

We show whole tones with a square bracket and semitones with a slur (curve).
Just keep going, checking each interval between all notes in the scale. You will find that in this scale, the B-flat is the only accidental that we have to use. Here is the complete correct F-major scale:

An F-major scale, as you can see, has one flat. It is the only major scale that has one flat. All the different major scales use their own set of accidentals. In the next lesson, you'll learn how to make a proper key signature from the accidentals that are used.
Make sure that you write your scale using the process mentioned above. Start with one octave of notes, THEN make your adjustments if necessary.
For practice, try writing an A-major scale in the bass clef. Just go back to Step 1 and start on an 'A'.
If you are asked to write a scale in a descending pattern, you simply reverse the order of the Tone - Semitone pattern
We've all seen key signatures - they're the collection of sharps or flats at the beginning of each staff. We also know what they mean. When we see the following key signature
![]()
we know that every B, E and A will be flat, unless canceled out temporarily by an accidental. In the previous lesson's test, you were asked to write an A-flat major scale. If you did your job properly, it should have looked like this:
![]()
Remember, the square brackets represent whole tones, the rounded ones represent semitones. Now how do we convert those accidentals to a key signature?
Take a look at the scale and write down all
of the accidentals you used. In the case of the A-flat major scale above, you
used: A-flat, E-flat, D-flat, and B-flat. Now we need to know what order to
write them down in a key signature. For that, we have a nifty little rhyme:
|
Battle Ends And Down Goes Charles' Father |
The first letter of each word in this sentence tells us the order that the flats are entered in a key signature: first the 'B', then the 'E', the 'A', and finally the 'D'. It looks like this, in both clefs of the Grand Staff:
A key signature that uses all seven possible flats will look like this:
The neat thing about the '
|
Father - Charles - Goes - Down - And - E<nds
- |
A key signature that uses all seven possible sharps will look like this:
KEY SIGNATURE HINTS:
There are some little 'tricks'
that can help you know which major key belongs to which key signature. Consider
this key signature:
You might think this is a rather complicated one to start with, but in fact
it's quite easy if you remember this rhyme:
|
When sharps you see, the last is 'ti'. |
'Ti', of course, is the solfa name for the seventh note of the scale, the 'leading tone'. (You'll learn more about these technical names in a later lesson.) The last sharp indicated above is the B#. If that's the seventh note, we know that the next note will be the key-note, and it will be one diatonic semitone higher. Therefore, this key signature belongs to C#-major.
Consider this key signature:
Now remember this little rhyme:
|
When flats there are, the last is 'fa'. |
'Fa' is the solfa name for the fourth note of the scale. The last flat indicated above is the F-flat. If that's the fourth note, we know that the key-note will be four notes lower. Counting down in this key signature four notes, we hit 'C-flat'. Therefore, this key signature belongs to C-flat major.
So here are the rhymes to remember:
|
THE ORDER OF FLATS: |
Battle Ends And Down Goes Charles' Father |
|
THE ORDER OF SHARPS: |
Father Charles Goes Down And Ends |
|
'SHARP' Key Sig. Hint: |
When sharps you see, the last is 'ti' |
|
'FLAT' Key Sig. Hint: |
When flats there are, the last is 'fa'. |
In the Key of C, there are 0 sharps and 0 flats.
In the Key of G, there is 1 sharp.
In the Key of F, there is 1 flat.
In the Key of D, there are 2 sharps.
In the Key of B flat, there are 2 flats.
In the Key of A, there are 3 sharps.
In the Key of E flat, there are 3 flats.
In the Key of E, there are 4 sharps.
In the Key of A flat, there are 4 flats.
In the Key of B, there are 5 sharps.
In the Key of D flat, there are 5 flats.
If you memorize these Keys and which notes are sharped or flatted, you will be covering 90% of the songs ever written. There are songs written in the key of F sharp which has 6 sharps, C sharp which has 7 sharps, and G flat which has 6 flats, but they are rarely used outside the world of classical music.
Here is a graphic representation of what you saw on the previous page. It would be a good idea to 'bookmark' this key page. The root for each key is RED. The sharp(s) or flat(s) are GREEN.
Let's practice a few Key Signatures.
In the Key of G how many sharps are there? Which note is sharped?
In the Key of F how many flats are there? Which note is flatted?
In the Key of B how many sharps are there? Which notes are sharped?
In the Key of E flat how many flats are there? Which notes are flatted?
In the Key of B flat how many flats are there? Which notes are flatted?
Pretend you are still a composer writing a new
song and the new song is in the key of D (2 sharps). In the melody line, you
find that one of the notes that is normally played as a sharp needs to be
played as a non-sharp. To do this, you would label it with a
'Natural' note sign. Look at the figure above. See the C ? The
key signature says to sharp all C's. See the little parallelogram to the left
of the C note? This is a 'Natural' sign.
Do it another way!
There are 15 major and 15 minor key signatures. The sharps or flats at the beginning of the staff indicate the main tone (diatonic) to which other tones are related.
Db-C#, Gb-F#, Cb-B, are enharmonic keys, meaning that they are written
differently, but sound the same.
There are 15 major and 15 minor key signatures. The sharps or flats at the beginning of the staff indicate the main tone (diatonic) to which other tones are related.

You are ready. In your simple song book that I asked you to get in earlier lessons, are there any songs with Key Signatures other than C? If so, practice playing some of them. If not, try to find another simple song book that has flats and sharps. Many look for the Keys of G, F, D, and B flat. You are doing well. Keep up the good work. I think it is time for one of those big teddy bear hugs again. Give yourself a BIG one. See you in the next lesson.
In Lesson 7, you learned how to name 'small' intervals. These were intervals that occupied the space of a 'second' - the semitone, whole tone, and the tone-plus-semitone. Now we are going to learn how to name intervals that are larger than a second.
In fact, the method we use to name larger intervals actually applies to all intervals, big or small. There are two components to the name of an interval:
![]()
The first component, in this case the letter 'P', tells us the quality of the interval. The 'P' stands for 'perfect', but more on that a little later. The second component , the number, tells us the distance between the two notes. The number is very easy to determine. Assigning a '1' to the bottom note and counting upward until reaching the top note, you can see that the 'D' is five notes higher than the 'G'. Therefore, the interval shown above is a 5th. So much for the easy part!
There are several different kinds, or qualities, of intervals. You have heard these terms before in conversation with musicians: major this, diminished that, etc. But how do we actually determine the quality of an interval?
For our purposes here, all intervals will fall into two main categories: the perfect ones, and the non-perfect ones. Let's look at the perfect intervals first. There are four intervals that can be described as being perfect: 1, 4, 5, and 8. For example, we might say 'perfect fifth' in describing a certain kind of fifth. Intervals that are perfect have a certain sound that is variously described by musicians as 'pure', 'hollow' or 'bare'. The other intervals, 2, 3, 6, and 7, are non-perfect ones. They are the ones described as being major or minor. Depending on the number, these intervals will be described as either 'harsh' (2 or 7) or 'sweet' (3 or 6).
Back to the perfect ones. If an interval is determined to be a fifth, like the one above, we need to ask ourselves an important question in order to determine what kind of fifth the interval is: 'Is the top note in the major scale of the bottom note?' If the answer is 'yes', then the interval will be perfect - a 'perfect fifth'. If you examine the example above, the question you would ask is 'Is the top note ('D') found in a 'G' major scale? You know from the previous scale lesson that the answer to that is 'yes'. Therefore, it is a perfect 5th.
But what if the answer was 'No'? What if instead of the above example, we had one of the following:
![]() or
or ![]()
Would the number of the interval be the same? Absolutely, because the top note is still five notes above the bottom note. But are they still perfect intervals? Well, ask yourself the question, 'Is there a D# in a G-major scale?' No. 'Is there a Db in a G-major scale?' No. So they're not perfect - they're something different.
With the perfect intervals (1,4,5 or 8), there are three possibilities:
This diagram shows those three possibilities. If the answer to the question is 'yes', then the interval is perfect; this is why there is a rectangle drawn around the word 'perfect'. If it is 'too large' to be yes (such as is the case with the D#), then the answer would be 'Augmented 5th'. That's because D# is one semitone higher than 'D', and so we go to the next larger interval. If it is 'too small' to be yes (such as is the case with the Db), then the answer would be 'Diminished 5th'. That's because Db is one semitone lower than 'D', and so we go to the next smaller interval. Easy!
Now consider the following interval: ![]()
What number would be placed under it? A '3', of course, because if you consider the bottom note to be '1', and then count upward until reaching the top note, the 'A' would be three notes higher. But what kind of '3'?
This interval is a third, and so we know that it is not going to be a perfect interval. It's going to be given a name like 'major' or 'minor, or something else. But you still have to ask the same question: 'Is the top note ('A') in the major scale of the bottom note ('F')'? Checking your Scale Reference Sheet, you can see that the answer is 'yes'. But what does that mean?
With the non-perfect intervals (2,3,6 or 7), there are four possibilities:

Notice the rectangle drawn around the word 'major'. That is there to remind us that if the answer to the question 'Is the top note ('A') in the major scale of the bottom note ('F')' is yes, then the interval is major. Indeed, the answer to the question is yes, so the interval is a major 3rd. We can show that by writing either '+3' or 'M3'. What if the interval were different - say, an 'F' on the bottom and an 'Ab' on the top. That would be one semitone smaller than a major 3rd - it would be a minor 3rd ('m3', or '-3'). Here, then, are the four possibilities with the interval of a 3rd:
![]()
There are several things about this example that would actually require some in-depth explanations (the double flat, for example!) Do not be concerned about those issues at this point. Later lessons will deal with double flats (and double sharps as well). For now, it is important that you realize that all four of the intervals shown above are considered '3rds'. They are 3rds because the distance from the lowest note to the highest note is 3, no matter what accidental is in front of the note. But looking at those four intervals, if you ask yourself the question, 'Is the top note in the major scale of the bottom note?', the only interval for which the answer is 'yes' would be the one with the 'A' on top. Therefore, that's the one we would call the major 3rd. From left to right, the four intervals are: diminished 3rd, minor 3rd, major 3rd, and augmented 3rd.
What do you do if the bottom note is a note
for which we don't have a major scale? For example what about this one: ![]() We don't have a B-sharp major scale. In this case, imagine in your mind that
you just lowered both pitches by a semitone. That would result in an E-flat on
top and a B on the bottom. Then the interval becomes easier to figure out:
'Is there an E-flat in a B-major scale?' No, there's an E-natural.
E-flat makes this a diminished 4th. Then, raise both notes the same amount to
get back to the original notes. By raising both notes the same amount, the
interval stays the same size. And so the answer to the above example is:
Diminished 4th.
We don't have a B-sharp major scale. In this case, imagine in your mind that
you just lowered both pitches by a semitone. That would result in an E-flat on
top and a B on the bottom. Then the interval becomes easier to figure out:
'Is there an E-flat in a B-major scale?' No, there's an E-natural.
E-flat makes this a diminished 4th. Then, raise both notes the same amount to
get back to the original notes. By raising both notes the same amount, the
interval stays the same size. And so the answer to the above example is:
Diminished 4th.
So to sum up, there are two steps to naming an interval. Here they are:
1) Starting with the number '1', count
upward until you reach the top note. Write that number down underneath the
interval.
2) Ask yourself 'Is the top note in the
major scale of the bottom note?'
IF YES: The interval will be PERFECT (if the number is 1,4,5 or 8), or MAJOR (if the number is 2,3,6 or 7)
IF NO: It will be one of the other words as described above, taking into consideration whether it is a [1,4,5 or 8], or [2,3,6 or 7]. For each semitone smaller, go one word to the left of the word in the rectangle; for each semitone larger, go one word to the right of the word in the rectangle.
Use the following guide for abbreviations:
|
Major: |
+ or 'M' |
|
Minor: |
- or 'm' |
|
Perfect: |
P |
|
Augmented: |
Aug or 'X' |
|
Diminished: |
dim or 'o' |
When it comes to writing a note that
is a certain interval above a given note, just proceed in the manner
described above: If you are given this: ![]() and told to write a note a minor 6th above it, simply count up six notes
(the bottom note is '1'). You'll get this:
and told to write a note a minor 6th above it, simply count up six notes
(the bottom note is '1'). You'll get this: ![]() Then ask yourself the question, 'Is there a 'G' in a B-flat major
scale?' The answer is 'Yes', and so this is a major
sixth. We want a minor sixth. So what do we do? We lower the 'G' to a
'G-flat', and now the interval is a minor 6th:
Then ask yourself the question, 'Is there a 'G' in a B-flat major
scale?' The answer is 'Yes', and so this is a major
sixth. We want a minor sixth. So what do we do? We lower the 'G' to a
'G-flat', and now the interval is a minor 6th: ![]()
If you are asked to write a note that is a
certain interval below a given note, the process is similar. Simply
count down from the given note, starting on the number of the interval. If you
are given a 'G,' and told to write a note that is a diminished fifth below it,
start on that 'G' and count down from 5 until you reach 1. You'll now be on the
note 'C'. Ask yourself the question, 'Is there a 'G' in a 'C' major
scale'? The answer is 'Yes', so this is a perfect fifth. We want
to make the interval smaller(to make it diminished), so we raise the 'C' to a
'C-sharp'. (In this case, we raise the 'C', because the 'G' was the note you
were given. Do not change the given note.)
Here are several intervals all correctly labeled*. Study each one and be sure you fully understand the process involved in naming intervals before doing the test.

Remember to follow the two steps:
1) Start on 1, and count upward until you
reach the top note.
2) Ask yourself, 'Is the top note in the
major scale of the bottom note?'
*Two of the intervals shown
above, Aug.4 and dim.5, are also known by the term 'tritone'.
Historically, the tritone was known as the 'interval of the devil';
its position between the perfect 4th and perfect 5th made it quite difficult to
sing in tune.
In the previous lesson you learned how to write intervals, and how to identify given intervals. In this lesson, you will learn how to invert them.
To invert an interval simply means to 'flip it'. In other words, once an interval has been inverted, the note that used to be on the bottom is now on the top. The note that used to be on the top is now on the bottom. As you can see, this is not going to be a difficult lesson!
Consider this interval: ![]() It's
the one we started with in the previous lesson. As you know, it's called a
perfect 5th because counting up from the lower note until we reach the upper
note results in the number '5'. And the answer to 'Is the upper note in
the major scale of the bottom note?' is 'Yes', meaning perfect.
If this is all still foggy to you, you should review Lesson 10.
It's
the one we started with in the previous lesson. As you know, it's called a
perfect 5th because counting up from the lower note until we reach the upper
note results in the number '5'. And the answer to 'Is the upper note in
the major scale of the bottom note?' is 'Yes', meaning perfect.
If this is all still foggy to you, you should review Lesson 10.
Now to invert it. The process is simple: whatever used to be on the bottom becomes the top. So depending on if you moved the lower note up an octave, or the upper note down an octave, you get one of these:
![]()
Both of the examples above have a 'D' on the bottom and a 'G' on the top, and so there are two correct, acceptable answers.
When you invert an interval, the name of the
interval must change. You can go through the exact same procedure that you used
to name intervals in the previous lesson: count upward from bottom to top: that
gives us a '4'. 'Is the upper note in the major scale for the bottom
note?' Yes, there is a 'G' in a D-major scale, so the answer is
'Perfect 4th'. But there's an easier way to name inverted
intervals, if you know the name of the original interval. Check out the
following table:
|
When you invert: |
|
it becomes: |
|
|
When you invert: |
|
it becomes: |
|
|
When you invert: |
|
it becomes: |
|
|
When you invert: |
|
it becomes: |
|
|
When you invert: |
|
it becomes: |
|
|
When you invert: |
|
it becomes: |
|
|
When you invert: |
|
it becomes: |
|
|
When you invert: |
|
it becomes: |
|
|
QUALITY | |||
|
When you invert: |
P |
it becomes: |
P |
|
When you invert: |
Major |
it becomes: |
Minor |
|
When you invert: |
Augmented |
it becomes: |
Diminished |
|
When you invert: |
Diminished |
it becomes: |
Augmented |
Notice that when you invert an interval, simply take the original interval, subtract it from 9, and you'll get it's inversion. For example, If you want to invert a 6th, subtract it from 9 and the answer is a 3rd. (9-6=3)*.
It's tables like this that can make you sound like a genius! It's so easy to learn and commit to memory that you can say to your friends, 'Name an interval, and I'll name its inversion it in two seconds or less'. They say, 'Diminished 6th', and you immediately reply 'Augmented 3rd!' No problem!
Lesson 12: Minor Scales
In Lesson 8, you learned how to write major scales. For the Quiz after Lesson 9, you wrote all of the major scales on a Scale Reference Sheet. Please do not do this lesson unless you fully understand the construction of a major scale.
Take a look at this scale:

This is an F-major scale in which the accidental (B-flat) has been used in place of a key signature. Each note of the scale has been numbered. As you can see, we call the final note '1' because it is simply a repeat of the first note of the scale ('F'). Write this scale on a piece of manuscript paper.
Each note of a scale has a so-called 'Technical Name' associated with it. A technical name is a word that identifies the note, and we often speak of the 'function' of the note by using a technical name. Here they are:
|
Note Number (degree of scale): |
Technical name: |
|
|
TONIC |
|
|
SUPERTONIC |
|
|
MEDIANT |
|
|
SUBDOMINANT |
|
|
DOMINANT |
|
|
SUBMEDIANT |
|
|
LEADING TONE |
In lesson 9, you learned how to write key signatures. Every major scale has its own particular key signature, and we can identify major scales by referring to that key signature. For instance, if I say, 'I'm thinking of a major scale that has one flat,' you know that I am thinking of an F-major scale. That's because F-major is the only major scale that has one flat. Now, here's a new bit of information: There is also a MINOR SCALE that has that same key signature. For every possible key signature, there is one major scale and one minor scale that use that signature. We say that the two scales are related, because they use the same key signature. Let's discover which minor scale is related to F-major.
Look at the F-major scale that you've written down. Find the sixth note. (The submediant). That note is 'D'. On the next line below your major scale, draw a treble clef, and write that note 'D':
![]()
Now draw a scale, starting on the 'D', and proceed upwards for one octave. Remember to use a flat in front of the 'B', because we're going to use the same key signature as F-major:

You've just created a D-minor scale! The D-minor scale is called the relative minor of F-major. It is called the relative minor because it is related to F-major. How is it related? It uses the same key signature. Both F-major and D-minor use one flat as their key signature. Here's what a D-minor scale looks like with a key signature:

So to find the relative minor of a major scale, find the sixth note of the major. That note is the note upon which the relative minor would be built.
The type of minor scale you just learned to write is called a natural minor scale. Sometimes you see them referred to as 'Pure minor'. There are two other types of minor scales you need to learn: the harmonic minor and melodic minor.
HARMONIC MINOR:
To form a harmonic minor scale, take the
natural minor, and raise the seventh note. To change the D-minor scale above
into a harmonic minor scale, we would raise the seventh note, the 'C' to become
a 'C#'. Here it is:

MELODIC MINOR:
To form a melodic minor scale, take the natural
minor, raise the sixth AND seventh note on the way up, and put them back to
their 'natural' state going down. Because the melodic minor looks
different going up than it does going down, you must write a melodic minor
ascending and descending. Here is a D-Melodic minor scale:
![]()
IMPORTANT:
You should play these, and all, examples in
this course. It is not enough to have an intellectual understanding of musical
concepts. Music lives in the ears, and you must take the time to play each
example and become familiar with them.
Determining Key Signatures of Minor Keys
Now you should know how to take a major scale, find the note upon which the relative minor scale will be constructed, and write the three forms of that minor scale. But what if you're simply told 'Write a B-minor scale'? How do you determine the key signature?
If you don't know the key signature, it will
help to find the relative major. As you know, a minor scale and its relative
major will share the same key signature. In the case of B-minor, you know that
'B' is the sixth note of some major scale. Simply go up a whole tone, plus a diatonic
semitone. That will get you the relative major. So a whole tone plus a diatonic
semitone above 'B' is 'D'. D-major will use the same key signature as B-minor.
If you've done your Scale Reference Sheet, you will already know that D-major
has a key signature of two sharps. Same thing for B-minor!
All of the 'Major' scales have a cousin. Major scales are related to 'Minor' scales. Unlike the cheerful major scale, the minor scale is darker. Minor scales are more introspective and mysterious.
The relationship between 1 major scale and it's cousin the minor scale is the number of sharps or flats. They both have the same number. The C scale is void of any sharps or flats. It's cousin, the A minor scale, is also void of any sharps or flats. Here is a list of the major scales and their cousins, the minor scales.
C major and A minor
G major and E minor
F major and D minor
D major and B minor
A major and F sharp minor
E flat major and C minor
E major and C sharp minor
A flat
major and F
minor
Bmajor and G sharp minor
Let's go another round
Minor Scales come in three forms: Natural, Melodic, and Harmonic.
Natural Minor scales use the following pattern of half and whole steps:
Melodic Minor scales ascend and use the following pattern of half and whole steps. When descending, they do so in the natural minor form.
Harmonic Minor scales use the following pattern of half and whole steps:
Chromatic Scales are made up entirely of half steps. When ascending, the scale uses sharps, when descending it uses flats.
Whole Tone Scales differ from the other scales because it only has 6 tones. It uses the following pattern:
A pentatonic Scale is a five-tone scale, which has its beginning in antiquity. There are traces of this scale in Oriental and American Indian music. This scale does not have a leading tone, which gives the scale it's unique sound. The scale has two forms. The first one uses the group of two black keys followed by three black keys. The pattern is as follows:
The second one used the group of three black keys followed by two black keys. The pattern is as follows:
Writers of music have a convenient way of
putting music into 'sections' or 'compartments' that make
it visually easy to follow. The compartments have been discussed before we
call them 'measures' or 'bars'. Take a look at most
printed music, and you'll see this very clearly. Measures are separated from
each other by 'bar lines'. You'll also notice at the beginning of
each piece of music a time signature. Simply stated, a time signature consists
of two numbers, one being written above the other, to indicate how many beats
are in each bar. This is stated directly, with simple time signatures (![]() for one), or indirectly, with compound time signatures (
for one), or indirectly, with compound time signatures (![]() for example). Our first task is to discover the differences between simple and
compound time.
for example). Our first task is to discover the differences between simple and
compound time.
SIMPLE TIME SIGNATURES
Simple time signatures tell us two things
immediately: 1)HOW MANY beats are in each bar, and 2) What kind of note gets
the beat. Study the following:
![]()
You can see that the time signature is ![]() .
The time signature tells us two things: a) The '2' tells us that there are 2
beats in every bar, and b) the '4' tells us that each beat is one quarter note
long. Simple! (Guess that's why they call it a simple time signature.)
Also, notice in bar 2 that the eighth notes have been beamed together in groups
of two. That's because two eighth notes together are one quarter note in
length. The writer is showing us that the quarter note 'gets the
beat.' Here's the same excerpt with the beats shown above the music:
.
The time signature tells us two things: a) The '2' tells us that there are 2
beats in every bar, and b) the '4' tells us that each beat is one quarter note
long. Simple! (Guess that's why they call it a simple time signature.)
Also, notice in bar 2 that the eighth notes have been beamed together in groups
of two. That's because two eighth notes together are one quarter note in
length. The writer is showing us that the quarter note 'gets the
beat.' Here's the same excerpt with the beats shown above the music:

If we were to count along with the excerpt as it is played, we would say '1, 2, 1, 2, 1, 2,' etc.
The subdivision or breakdown of a beat is its number of components. In simple time signatures, each beat can be 'subdivided' into two parts. Here is the same excerpt with the subdivision, or breakdown, shown underneath:

This excerpt shows four things that
describe all simple time signatures:
|
1) The beat is an un-dotted
note. |
COMPOUND TIME SIGNATURES:
Unlike simple time signatures, compound time
signatures do not directly show us the number of beats per bar. Instead,
they show us the number of breakdown notes per bar.
Study the following:
![]()
In this excerpt, we can see that the writer
has beamed the first three eighth notes together. The writer is showing that
the first three eighths form one beat; that's why they were beamed together. We
therefore need to take the eighth notes and 'condense' them to
discover what the beat is. Condensing the three eighths down to one note gives
us a dotted quarter. (1 8th plus 1 8th plus 1 8th equals 1 dotted quarter
note.) In other words, the beat in a ![]() bar of music is the dotted quarter. You can see that by going through the two
bars of the excerpt, it is possible to apply dotted quarter note beats. Here's
what it looks like:
bar of music is the dotted quarter. You can see that by going through the two
bars of the excerpt, it is possible to apply dotted quarter note beats. Here's
what it looks like:

Just like with simple time signatures, we can break down each beat into beat subdivisions. However, though simple time beats break down into two parts, compound time beats break down into three parts:

You can see that each bar has SIX
breakdown notes. The breakdown notes are EIGHTH notes. Therefore, the
time signature is ![]() .
.
So, here are the four things that
describe compound time signatures:
|
1) The beat is a dotted note.
|
There! Armed with that knowledge, you should be able to say what time signature the following excerpt is in:
![]()
So let's study it. Look at bar 1. Notice that the eighth notes are beamed together in groups of two. Each one of those eighth note pairs can 'condense down' to form one quarter note. Looks like the quarter note may be the beat unit in this excerpt. Can we apply a quarter note beat pattern to the whole excerpt? Absolutely! This is what it would look like:
So since applying quarter notes as a beat unit seems to work, we can tell that this is a simple time signature:
The beat is an un-dotted note.
Each beat will subdivide into two components.
(One quarter note subdivides into two eighth notes.).
And since we know that it is simple time,
the actual signature should be the number of beats per bar. (![]() , or C
, or C

Lets try another one:
![]()
Look at how the eighth notes have been beamed. Notice, in particular, the last group of notes at the end of the first bar. The dotted eighth, sixteenth, and eighth note have all been beamed together. If we condense those three notes down, we get one note which is a dotted quarter in length. It appears that perhaps the dotted quarter will be the beat unit in this excerpt. Let's see if we can apply a dotted quarter beat to the entire excerpt. The eighth rest and two eighth notes at the beginning would certainly be explained in terms of a dotted quarter beat. That leaves the quarter note and eighth note in the middle, and that, too, can fit into the dotted quarter beat pattern. Here's the first bar, with lines drawn around each beat:
 The lines are there to help you see the beat groups
clearly.
The lines are there to help you see the beat groups
clearly.
When you look at the rest of the excerpt, you can see that the second bar also fits the dotted quarter beat pattern: the two sixteenths plus two eight rests add up to equal one dotted quarter; obviously the dotted quarter in the middle is easy; and the six sixteenths at the end condense down to form a dotted quarter.
So how do we assign this excerpt a time signature? The beat is a dotted note, so this is compound time. Therefore, the numbers of the time signature will reflect the number of breakdown notes in each bar. As this is compound, the beat breaks down into three parts:

How many breakdown notes in each bar? Nine.
What kind of notes are the breakdown notes? Eighth notes. Therefore, the
time signature is ![]() .
.
SYNCOPATION
From time to time in music you will notice occasions where the weak part of a beat, or the notes between beats, are given special emphasis. This accenting of weak beats is called syncopation. It is a very common technique for composers to use, to heighten rhythmic energy and drive. Here is an example of a syncopated passage:

At this point, you should be familiar enough with time signatures as to be able to identify them easily; you should be able to place the beats above an excerpt, and to properly indicate the subdivision underneath. If you feel you need a refresher on this, please re-read Lesson 13.
Take a look at the following example:
![]()
The task here is to fill in the blank space in the middle of the bar with the appropriate rests. How do we do that?
STEP 1: Determine if the time
signature is SIMPLE or COMPOUND.
Is the top number evenly divisible by three? No.
So this is a simple time signature. Therefore this time signature is
telling us that there are two beats per bar, and the quarter note is the
beat unit. So we can go ahead and put the beats in:

Notice that the first beat lines up with the first note in the bar. The last given note is an eighth note, which is only half of one beat long. Therefore we place the second quarter beat before that note.
STEP 2: Write the beat
subdivision(breakdown).
Now that we know where the beats are, we can go
ahead and write in the subdivision. As this is simple time, each beat will
break down into two components (eighth notes):

As you can see, it is easy to line up the eighth notes with the quarter-note beats.
STEP 3: Fill in the rests. IMPORTANT:
COMPLETE THE BEATS THAT HAVE BEEN STARTED FIRST.
In this case, the excerpt is only two beats
long, and each beat has been started. The first note is a sixteenth note. The
basic rule is to complete the subdivision component first. So what would it
take to complete the first eighth note subdivision? Answer: one sixteenth rest:
Now, what will complete the rest of the beat? Answer: One eighth rest:
The first beat has now been completed. Now look at the last beat. The one eighth note that you see is the last thing in the bar. What will it take to complete that bar? Just put an eighth rest in front of the note. Here is the correct answer:

Can you combine the two eighth rests in the middle of the bar and put a quarter rest instead? No. You have to leave the two eighth rests, because they each belong to different beats.
Can you combine the sixteenth rest and the eighth rest in the first beat? Technically, no, although more and more we see publishers doing this sort of thing. The rule is this:
If the rests are at the END of a beat, they should not be combined (like the above example).
If the rests are at the START of a beat, they can be combined, like this example:

Now consider this example:

Is it simple or compound time? The answer is compound, because the top number is divisible by three. Therefore, the time signature is telling us the number of breakdown notes in each bar. Write them in:
(Because it's compound, I know that the eighth note breakdown will be beamed in groups of three.) Now that the breakdown is written, I can go ahead and place the beats. Each beat is three eighth-notes long, as you can see. What one note is three eighth notes long? Answer: A dotted quarter-note:

Notice that the last dotted-quarter beat of the bar is placed just before the group of four sixteenths in the excerpt. That's because the four sixteenths do not make up an entire beat. The four sixteenths make up one quarter note, and in this time signature the beat is a dotted quarter-note long. Therefore, the third beat actually begins somewhere before the sixteenths happen.
Just like with the previous example, you begin by completing the beats that are partially given. The first beat so far has one sixteenth note in it. So we complete the first breakdown note by adding a sixteenth rest:
We then continue by placing a rest for each breakdown note in the first beat:

Now the first beat is complete. We don't combine these rests, because they finish the beat. Now we move to the final beat in the bar. The sixteenth notes take up two of the three eighth notes in the beat. So all we need to do is place an eighth rest in front of them, and we will have completed that beat:
So we have now completed the first and the third beat in the bar. The only thing left is to place a rest for the second beat . The beat is a dotted quarter note, so we will place a dotted quarter rest:
Reread this lesson carefully before trying the quiz.
Do it another way!
There are 15 major and 15 minor key signatures. The sharps or flats at the beginning of the staff indicate the main tone (diatonic) to which other tones are related.
Db-C#, Gb-F#, Cb-B, are enharmonic keys, meaning that they are written
differently, but sound the same.
There are 15 major and 15 minor key signatures. The sharps or flats at the beginning of the staff indicate the main tone (diatonic) to which other tones are related.
As you know, every scale degree has a technical
name. They have been listed before, but here they are again:
|
Note Number: |
Technical name: |
|
|
TONIC |
|
|
SUPERTONIC |
|
|
MEDIANT |
|
|
SUBDOMINANT |
|
|
DOMINANT |
|
|
SUBMEDIANT |
|
|
LEADING TONE |
When we speak of a note in a scale, we can refer to it by its number: 'G' is note number 1 of a G-major scale), or by its technical name: 'G' is the tonic note in a G-major scale.) A technical name not only identifies a note, but can also give us information as to the function of a note within a scale. Further, we can build chords on all of the various notes in a scale, and identify those chords by the technical name. (i.e., a tonic chord)
In this lesson, we are only going to deal
with tonic and dominant chords. This is because tonic and dominant chords form
the basic backbone of much of what we call 'tonal music'. First we need to
learn a couple of important definitions:
|
Chord: |
The simultaneous sounding of three or more notes. |
|
Triad: |
A three-note chord in which one note is identified as the root, another as the 3rd and the other as the 5th. |
A chord can be any three or more notes
played together, but a triad has a particular structure. If we are in the key
of A-major, this would be the tonic note: ![]() If we build a triad on top of this note, according to the definition of a triad
given above, it would look like this:
If we build a triad on top of this note, according to the definition of a triad
given above, it would look like this: ![]() This is a three-note chord in which the bottom note is acting as the root,
the middle one is the 3rd, and the top note is the 5th. Any chord
in this structure (root-3rd-5th) is called a triad. (The numbers 3rd and 5th
refer to the intervals above the bottom note.) We say that this is a tonic
triad because it is a triad that has been built on the tonic note of the
key we're in. It is traditional to indicate the triad by using a Roman numeral.
Since we have just built a triad on the first note of the scale, we place the
Roman numeral for '1' underneath it:
This is a three-note chord in which the bottom note is acting as the root,
the middle one is the 3rd, and the top note is the 5th. Any chord
in this structure (root-3rd-5th) is called a triad. (The numbers 3rd and 5th
refer to the intervals above the bottom note.) We say that this is a tonic
triad because it is a triad that has been built on the tonic note of the
key we're in. It is traditional to indicate the triad by using a Roman numeral.
Since we have just built a triad on the first note of the scale, we place the
Roman numeral for '1' underneath it: 
The procedure we just followed to create a tonic triad is the same for any key. Here are several keys, with tonic triads:

(It is traditional in most schools of theory to indicate major triads with an upper-case 'I', and minor triads with a lower-case 'i'.) These are tonic triads because they are chords built on the tonic note. They are triads because the structure of the chord is 1-3-5. (Root-3rd-5th)
Dominant triads are built in similar fashion as tonic triads. In other words,
simply go to the dominant note of the scale, and build a 1-3-5 triad. Let's
take a good look at the structure of a dominant triad. Note this one, in
D-major::

We put the number ' V ' underneath it because it is a triad that has been built on the fifth note of the scale. Further, it is called a dominant triad, because the fifth note is the dominant note. In a dominant triad, there is always that leading tone, the middle note, that 'wants' to move up to the tonic. That's what gives dominant chords their important place in traditional harmony: they help define the tonic chord in that manner.
IMPORTANT: Dominant triads must always be major, no
matter what key you write them in. Take a look again at the V-chord above. You
will see that the bottom note is the dominant note of the key. The middle note
is the leading tone of the key. (i.e., C# is the leading tone in D-major.) This
is important. Dominant chords must always have the leading tone present.
But look at this V-chord in A-minor: ![]() A leading tone is always a semitone, but you can see that the leading tone in
this triad (the middle note) is a whole tone away from 'A'. So we have
to raise the 'G' to become 'G#':
A leading tone is always a semitone, but you can see that the leading tone in
this triad (the middle note) is a whole tone away from 'A'. So we have
to raise the 'G' to become 'G#': ![]() The simple way to remember this is to remember this rule: 'All dominant
chords must be major, whether you are in a major key or a minor key. If you are
in a minor key, you must raise the third (middle) of the chord to make it
major.' The G# is called an accidental. An accidental is a
sharp or flat symbol placed in the music that does not normally belong to the
given key.
The simple way to remember this is to remember this rule: 'All dominant
chords must be major, whether you are in a major key or a minor key. If you are
in a minor key, you must raise the third (middle) of the chord to make it
major.' The G# is called an accidental. An accidental is a
sharp or flat symbol placed in the music that does not normally belong to the
given key.
Here are some more dominant triads, in various keys:

The V-chords in the minor keys above had their middle notes (the 3rd) raised by using an accidental in order to create a leading tone to the tonic. For example, the 2nd chord has an E# because E# is a leading tone for the tonic (F#).
The quiz for this lesson mainly requires you to be able to build triads on either the tonic note or the dominant. The most important thing to remember is that if you are building dominant triads, they must always be major (in order to have a leading tone present).
At this point, you probably feel quite comfortable with key signatures, and major and minor scales. The focus of this lesson is to be able to examine a musical excerpt and be able to tell what key it is in. We do this by looking at the key signature, if present, and/or accidentals throughout the excerpt.
Have you ever wondered what puts a certain piece of music in a certain key? We can take a look at this excerpt
![]()
and we can determine the key right away. First, we determine key by what accidentals are used, not necessarily by the first or final note of the excerpt. In this excerpt, the only accidental used is b-flat. Just as with our major scales that we did in Lesson 8, we can place a key signature at the beginning of this excerpt of one flat, the b-flat:
![]()
Note that in written music, the key signature appears before the time signature. An easy way to remember this is to remember that the letter 'k' ('key') comes before the letter 't' ('time signature'). You know from Lesson 12 that each key signature has two possibilities: a major key and a minor key*. For example, you will remember from that lesson that a key signature of one flat gives us F-major or D-minor. So how do we know which key this excerpt is in?
The note that most strongly defines the key we are in is the leading tone. The leading tone points to the tonic note. You learned this in the previous lesson when you learned why dominant chords must be major: so that there is a leading tone to the tonic. So in order for an excerpt to be in a certain key, there must exist a leading tone to the key. If this excerpt were in F-major, we would want to see the note 'E', particularly followed closely by an 'F', because that would indicate a leading tone followed by the tonic. Let's look at the excerpt and see if we have 'E' and 'F' in reasonably close proximity:

Yes, there are two instances in this excerpt where 'E' is followed by 'F'. But before we assume we are in F-major, we have to check out the possibility of this excerpt being in D-minor. The notes 'E' and 'F' also exist in D-minor, so just because we see them does not mean that we are certainly in F-major. We need to now check for the existence of a leading tone in D-minor. What is the leading tone in a D-minor scale? Answer: 'C#'. A quick check of the excerpt tells us that there are no C#'s. In order for this excerpt to be in D-minor, we need a C# leading tone somewhere. We don't have it - we have C-natural. So this excerpt is most certainly in F-major. In fact, it would make this process shorter to check the minor key possibility first, because we would have been able to determine right away that there was no leading tone to D-minor present.
Now that was a rather wordy paragraph, and I'd recommend that you reread it carefully before going on.
[NOTE: Why don't we say that the excerpt is possibly in D-minor, using the natural minor scale? The natural minor would not require the raised leading tone. The reason is that the natural minor scale is actually a mode, (the Aeolian Mode). It is indeed possible for an excerpt to be in the Aeolian Mode, but the melody would have to center on 'D', and definitely end on 'D'. I've written more on this point at the bottom of this page which I'd recommend you read. For now it is best to accept that even though we teach natural minor, the excerpts you see in this lesson will require the raised leading tone in order to be said to be in a minor key.]
Let's see what key this excerpt is in:
![]()
First step: make a list of the accidentals used: G# and F#. Can we put those in an order to make a key signature? Well, a key signature with two sharps would be F# and C#. So these two accidentals don't make a key signature right away. What if we consider that the F# is the key signature, and the G# is some other accidental. A key signature with one sharp would be either G-major (and the G# doesn't make any immediate sense) or E-minor (again the G# doesn't make any sense). So that doesn't seem to be a possibility. We have one more option to consider. Any time you see two accidentals one tone away from each other (F# and G#), it could be a melodic minor situation. In melodic minor, the 6th and 7th tones are raised. (The 6th and 7th tones are one tone away from each other.) If the F# and G# were the raised 6th and 7th tones, that would mean that the key we would be considering would be A-minor. You know that A-minor has no sharps or flats. If F# and G# have been raised from their normally natural state, that would mean that this excerpt is in a key that has no sharps or flats. We now know that this excerpt is in A-minor, because of the presence of the leading tone to A-minor (G#).
Here's another example:
![]()
In this excerpt we have been given a key signature of two sharps. So we know that it is either in D-major or B-minor. Let's check first for the presence of a leading tone in the minor- an A#. Yes we have one. But you may be surprised when I tell you that even though we have an A#, the key is probably D-major! Here is the reason why: The A# in this case is acting as a passing tone between A and B. It doesn't have a leading note function- it's simply ornamenting the line. And the proof is that in the next bar we see an A-natural. If the writer of this excerpt were to give us something other than an A-natural in the last bar, it would sound to our ears like B-minor. But the A-natural cancels out the leading tone to B-minor. The last bar emphasizes D-major through the use of the C# leading tone.
Here are some musical excerpts. The key for each one has been given. Look each one over, and be certain that you understand the reasons for each key designation:
1) A-major: ![]()
2) C-minor: ![]()
3) F-minor: ![]()
4) E-major: ![]()
5) B-flat major: ![]()
Modes:
* If your browser has a
1) Key: C-major:

2) Key: C-minor (with raised leading tones):

3) No raised leading tones:

We have more to learn first before delving into the world of modal melodies. For now, let us assume that on the quiz for this lesson, melodies will either be major or minor.
We studied all about tonic and dominant triads in Lesson 15. You learned that a triad is a three-note chord in which there exists a root, 3rd and 5th. Here is a 'C' triad, made up of three notes, a 'C', 'E' and 'G':
![]()
In this triad, the bottom note is the root (1), the middle note is the 3rd, and the top note is the 5th. We know this to be true because if we start on the bottom note and start counting upward from 1, the 'E' in the middle would be '3', and the 'G' on the top would be '5'.
If we look at the structure of this triad, we would see that it is a major triad. Here is why: In each triad there are two intervals to consider:
1- The outer interval
2- The bottom interval
The outer interval is a 5th: if you start on 'C' and count upward until you hit the 'G', you will have counted to 5. What kind of 5th is it? Ask yourself that question, 'Is the upper note in the major scale of the bottom note? (Is there a 'G' in a 'C-major' scale?) The answer is yes, so this is a perfect 5th. Now for the bottom interval. This interval is a 3rd. If you start on 'C' and count upward until you hit the 'E', you will have counted to 3. What kind of 3rd is it? ('Is there an 'E' in a 'C-major' scale? The answer is yes) This is a major 3rd. So now we have determined that this triad is comprised of a major third on the bottom, with the outer interval being a perfect fifth. This makes it a major triad:

Although we dealt only with tonic and dominant triads in Lesson 15, we can actually build triads on any note of a scale. Here is a C-major scale:
![]()
We can build triads on every one of these notes, using the notes of the scale as the root of each triad. Here's what it looks like:

Now we need to examine each triad to determine whether they are major, minor, or something else. We already know that the first triad, built on 'C', is major. That's why there is a '+' underneath it.
Let's take a look at the second triad, the
one built on 'D': ![]() Again, the outer interval is a 5th, and it is a Perfect 5th (Yes, there is an
'A' in a D-major scale). The bottom interval is a 3rd, but it is a minor 3rd
(No, there is no 'F' in a D-major scale. There is an 'F#', and so this interval
is actually a minor 3rd.) This triad is a minor triad. Minor triads have a
minor 3rd on the bottom, with an outer interval of a Perfect 5th:
Again, the outer interval is a 5th, and it is a Perfect 5th (Yes, there is an
'A' in a D-major scale). The bottom interval is a 3rd, but it is a minor 3rd
(No, there is no 'F' in a D-major scale. There is an 'F#', and so this interval
is actually a minor 3rd.) This triad is a minor triad. Minor triads have a
minor 3rd on the bottom, with an outer interval of a Perfect 5th:
![]()
If you keep going through the major scale and examining the triads that are built on each scale tone, you will see that except for the triad built on the 7th note (the 'B' in a C-major scale), they are all either major or minor triads. Here's what we come up with (Major chords are indicated with a '+' sign, minor chords with a '-' sign):

Now for that triad built on the 7th note. It has an outer interval of a 5th, but you can see that it is actually a diminished 5th (No there is no 'F' in a B-major scale there's an 'F#', so this 5th is diminished). The bottom interval is a 3rd, and a quick examination will tell you that it is a minor 3rd. Any triad which consists of an outer interval of a diminished 5th and a bottom interval of a minor 3rd is called a diminished triad:
![]()
A diminished triad is different from a minor triad by the fact that a diminished chord has an outer interval of a diminished 5th: the minor triad has a perfect 5th.
Here is an important table of information.
Study it carefully:
|
When building triads on a major scale: I-chords are ALWAYS MAJOR ii-chords are ALWAYS MINOR iii-chords are ALWAYS MINOR IV-chords are ALWAYS MAJOR V-chords are ALWAYS MAJOR vi-chords are ALWAYS MINOR vii-chords are ALWAYS DIMINISHED |
IDENTIFYING CHORDS BY USING ROMAN NUMERALS
We can use Roman Numerals to describe all of these triads. We did this in Lesson 15 when dealing with tonic and dominant chords. For example, in the triads shown above, the note 'C' is the first note of the C-major scale. Therefore, we assign the number '1' to that chord. When describing chords using numbers, it is traditional to use Roman Numerals. It is also traditional to use upper-case letters for major and augmented chords, and lower-case letters for minor and diminished chords. Here are the triads of a C-major scale, properly numbered:

Now you can see that we can identify triads
by their Roman Numeral. In C-major, the C-major chord is a I-chord. The D-minor
chord is a ii-chord. The E-minor chord is a iii-chord, etc. Which chord is the
vi-chord? Answer: the A-minor chord. This process works, of course, in any key.
The vi-chord in F-major is a d-minor chord. The iii-chord in D-flat major is an
F-minor chord, etc.
IDENTIFYING CHORDS BY USING TECHNICAL NAMES
As you know, each scale degree, whether we
are dealing with major or minor, has a technical name associated with it. We
can apply these technical names to the triads that are built on them. For
example, the first note of a scale is the tonic note. If we build a
triad on the tonic note, it is called a tonic triad. You already know that from
Lesson 15. The supertonic note is the second degree of the scale. The triad
built on the supertonic note can be called the supertonic triad, and so on.
Here is the subdominant triad of G-flat major: ![]() The submediant triad of C-major:
The submediant triad of C-major: ![]() The supertonic triad of F-major:
The supertonic triad of F-major: ![]() Simple, isn't it?!
Simple, isn't it?!
There is one other type of triad, which will show up in the building of triads on the notes of harmonic minor scales. It is the augmented triad. An augmented triad consists of an augmented 5th as an outer interval, and a major 3rd as a bottom interval. Here is one:
![]()
So here are the four types of triads, in a nutshell:
|
TYPE OF TRIAD: |
DESCRIPTION: |
|
MAJOR: |
Outside interval is a Perfect 5th; bottom interval is a Major 3rd |
|
MINOR: |
Outside interval is a Perfect 5th; bottom interval is a Minor 3rd |
|
DIMINISHED: |
Outside interval is a Diminished 5th; bottom interval is a Minor 3rd |
|
AUGMENTED: |
Outside interval is an Augmented 5th; bottom interval is a Major 3rd. |
Here are the triads built on a major scale,
with their technical names above, and the Roman Numerals below:

(In one school of thought it is customary to place a small 'o' after the 'vii' to indicate that the triad is 'diminished'. Similarly, some musicians place a '+' after an augmented triad. This course will not require any such indication. You will be required, however, to indicate the quality of a triad with such symbols as an exercise, as a way of indicating that you understand the structure and quality of a triad.)
Just like with the major scale, you can build
triads on every note of the minor scale. This is what it would look like,
building triads on an A-minor scale (harmonic form):
![]()
Armed with your knowledge of triads, and how to determine quality (major minor, augmented diminished), place the Roman Numeral underneath each triad shown above. Then indicate the quality of each triad by placing a '+' for major, '-' for minor, 'o' for diminished, or 'X' for augmented underneath each Roman Numeral. Get your teacher to check your answers, or click here.
Inversions of Triads
All triads have three positions that they can be arranged in. The root, 1st inversion, and 2nd inversion.
Root Position Triad
If the triad root is in the lowest voice then the triad is in Root Position.

1st Inversion Triad
If the third of the triad is in the lowest voice the triad is the 1st inversion.
2nd Inversion Triad
If the 5th of the triad is in the lowest voice, the triad is in the 2nd inversion.
Figured Bass
Figured Bass was developed in the early Baroque period. It was a system of musical shorthand that made the writing of keyboard parts easier. It was customary for the composer to write out the bass line and to place Arabic numerals above or below the figured bass to indicate the harmonies. The keyboard part was called the continuo, which was improvised by the player.
In figured bass the Arabic numerals represent the intervals that sound above a given bass part. Certain abbreviations have become well known.
|
|
|
|
|
|
Alterations
Alterations from the given key signature are indicated by placing an accidental before the Arabic numeral.
An accidental, such as a sharp, flat, or natural that appears by itself under a bass note indicates a triad in root position with the third interval above the bass note sharped, flatted or naturaled.
Any sharp, flat, or natural sign beside the Arabic number indicates
that this interval above the bass note should be sharped, flatted, or naturaled
depending on the symbol. #6, b6, 6, #6
4
b4
Sometimes, composers used a slash through the Arabic number instead of a sharp.
They both mean the same thing.
Roman Numeral Analysis
In the early 1800's, German composers started to use roman numerals to symbolize harmony. Each note in a scale can have a triad or chord built above it. Upper case (Major) and lower case (minor) Roman Numerals are used to indicate the type of chord. I, IV, V are major triads/chords, ii, iii, vi are minor triads/chords, and vii is diminished.
For this lesson requires you to be able
to do the following:
Define the following: major triad, minor triad, augmented triad, diminished triad.
Determine the quality of an interval by examining the outer interval and the lower interval.
Assign a Roman Numeral to a triad.
To transpose music means to change the pitch of each note without changing the relationships between the notes. This usually means changing the key. However, in this lesson, we will study transposition by one octave. Transposing a melody up or down by one octave will not change the key. (Key transposition will be studied in a later lesson.) Look at the following melody:
![]()
The first note of this melody is 'F'. If we count upward eight notes (one octave), we reach 'F' again.

Because you studied Lesson 16 (Key Identification), you know that this excerpt is in F-major. When transposing a melody up one octave, the key stays the same (in this example, F-major).
![]()
All of the note names stay the same, but they are now an octave higher. Therefore, all of the pitch relationships stay the same: the highest note in this melody is 'G' (the supertonic note); the lowest note is 'C' (the dominant note), etc.
Here is the same melody transposed down one octave:

As you can see, it doesn't fit on the treble clef too well: it is now too low. The performer would be required to read several leger lines. Although this is allowable, it is better to change to the bass clef:
![]()
Now it fits on the staff better. It's at the same starting pitch as the previous example:

When asked to transpose music up or down by one octave, there are some things you will want to keep in mind:
Make sure to check the stem direction: unbeamed notes above the middle line have stems down, unbeamed notes below the middle line have stems up. For beamed notes, find the note in the beamed group that is the furthest away from the middle line; the stems should go in the direction appropriate for that note.
If you know the instrument that the transposed melody will be played on, make certain to use the proper clef, and ensure that the notes are within the range of that instrument. (This is beyond the scope of music theory, but it is an issue for music composers and arrangers.)
Here are some melodies and their octave transpositions. Study them carefully:
i) G-minor, treble clef. Transposed up one octave:

ii) A-major, treble clef. Transposed down one octave:

iii) D-major, bass clef:

iv) B-flat major, treble clef:
You will need a solid grounding in time signatures to do this lesson. You may want to re-read Lesson 13.
|
SPECIAL NOTE: Figuring out how to write triplets and other 'tuplets' (odd groupings of notes) can be an exercise in futility! Beyond triplets, there does not seem to be a hard and fast agreement from editor to editor on how tuplets should look in any given situation: From The Concise Oxford Dictionary of Music, 3rd ed. (Michael Kennedy), p.322: 'Various other combinations are possible, and it is hardly possible to list them or to lay down rules. When an irregular combination occurs the performer should observe the other notes of the measure, and he will quickly realize into what fraction of the measure the irregular grouping is to be fitted.' That being the case, this lesson is designed to give the music student a set of guidelines for writing tuplets that will work in most situations. Take it all with a grain of salt, and after you do this lesson, go have a nice long, hot bath! |
You know that simple time signatures
tell us the number of beats in each bar. For example, in ![]() the '2' tells us that there are two beats in each bar, and the '4' tells us
that the beat unit is the quarter note. You also know that each beat can subdivide
into two smaller units. Here's a sample of music in
the '2' tells us that there are two beats in each bar, and the '4' tells us
that the beat unit is the quarter note. You also know that each beat can subdivide
into two smaller units. Here's a sample of music in ![]() :
:
Notice that we've placed the quarter notes across the top, and eighth notes along the bottom, to show where the beats and subdivided beats are.
In the example above, the first note of the bar is a quarter note. Let's change the melody, so that the first beat of the bar is divided into two even eighth notes, as shown here:

We can divide that beat into four even parts easily by using four sixteenth notes (The pitches used in these examples are unimportant; the focus of this lesson is on the rhythms.) :

So what do we do if we want to divide the beat into three even parts? Do we have a note value that accomplishes this?
Yes we do. It's called a triplet, and it looks like this:
![]()
The first three notes of the bar are grouped together, using a slur or bracket, with a number '3'. The '3' indicates that the three notes are to be spread evenly across the beat so that the three notes are equal in length. Here is another example of music that uses a triplet:
![]()
In music where the quarter note gets the
beat (as in ![]() ,
, ![]() or common time,) triplets that take up one beat are called eighth
note triplets.. They are written to occupy the space that two eighth
notes would occupy. That's the important rule to remember about triplets:
or common time,) triplets that take up one beat are called eighth
note triplets.. They are written to occupy the space that two eighth
notes would occupy. That's the important rule to remember about triplets:
|
Triplets occupy the same space that two notes of that value would normally occupy. |
Look at the last example. In the second bar, the triplets occupy the same space that two eighth notes would normally occupy. Now look at the excerpt below. It shows a triplet, but it's made up of quarter notes, not eighth notes:
![]()
If you apply the rule above (triplets occupy the same space that two notes of that value would normally occupy), you would conclude correctly that the quarter note triplet is two beats long. That's because two quarter notes equal two beats.
What about other 'odd'
groupings'? Odd groupings (not triplets) are called 'tuplets'.
Look at the first example below. What makes it 'odd' (a tuplet) is
that there are five sixteenths where you'd expect to find four. Now look at the
next example, in ![]() .
What makes the pair of eighths a tuplet is that there are two notes where you'd
expect to find three. Easy! Just remember to write the number above the
grouping, as shown. (It doesn't matter if you use a bracket or a slur - both
are acceptable.)
.
What makes the pair of eighths a tuplet is that there are two notes where you'd
expect to find three. Easy! Just remember to write the number above the
grouping, as shown. (It doesn't matter if you use a bracket or a slur - both
are acceptable.)
Ex.1 
Ex.2
Filling In the Missing Tuplet
Completing a bar with a tuplet figure simply requires following a short series of steps. Consider the following example:

Here are the steps we go through to figure out the basic time value of the six notes we need:
1- What is the duration of the missing
beat? (Answer in this case: one quarter note)
2- The required tuplet is a group of six (look
at the example). What standard grouping of notes is larger than six in
common time ( ![]() )? Seven? No. Eight? Yes! What group of eight fits? Thirty-second notes, of
course.
)? Seven? No. Eight? Yes! What group of eight fits? Thirty-second notes, of
course.
3- Cut the answer (thirty-second notes) in
half: sixteenths. That's the value of your tuplet! Here it is:

We can use those same steps to figuring out tuplets in compound time, by eliminating the final step. Look at this example:

Let's go through the steps: What is the duration of the missing tuplet? It is one dotted quarter-note long. What standard grouping of notes is larger? 3 eighths. So the tuplet will be made up of 2 eighths. (We don't do step 3: that's just for simple time)
The truth of the matter is that publishers of music will ultimately put any time value they wish, and the discrepancies abound for compound time! Their reasoning would be: Anyone can tell that the empty spot is one dotted quarter (in the case of the sample above), so just play the two notes evenly across the beat - it doesn't really matter what kind they are. Sometimes you'll see, for example, a '9'-figure, using sixteenths, and then you'll see the same figure in another score using thirty-seconds.
Here are some bars of music that use tuplets. Study them carefully before trying the quiz for this lesson.

In Lesson 18, we learned how to transpose music up or down one octave, sometimes into another clef. In this lesson, we will learn how to transpose music up or down into another key.
Take a look at the following short excerpt:
![]()
It is in G-major. We know this because there is one sharp in the key signature, and there are no D-sharps to indicate a leading tone to E-minor. (If this is not clear, re-read Lesson 16 (Key Identification)
Play the melody above several times.
You will notice that although it starts on a different pitch, it somehow sounds 'the same' as the previous melody. This melody has been transposed into a new key, F-major. Here is what it looks like:
![]()
There are several ways to transpose melodies, and it is recommended that you become familiar with all of them, and use one method to check against the other. The following three methods will assume that you have been given the original key, and the key that you will be transposing the melody to. Let's use these methods to transpose our melody from G-major to F-major.
The first step to using any of the following
three methods is to place the clef, time signature, and the new key signature
on a staff, like this: ![]()
METHOD 1. Transposing by Scale Degree
(Technical Name)
When transposing a melody into a new key, the scale degrees, or technical names, will remain the same. In other words, if the melody begins on the tonic in the original key, it will begin on the tonic of the new key. If it ends on the submediant in the original key, it will end on the submediant of the new key, and so on. In the first example above, the melody begins on the mediant (3rd degree) of the original key, G-major. Therefore, the new melody will begin on the mediant (3rd degree) of the new key, F-major:
![]()
You can then go through the entire G-major version of the excerpt, determine the technical name (scale degree) of each note, and write the same degree in the new F-major version.
Here is another way to do it:
METHOD 2. Transposing by Harmonic Interval
You know that the original key is G-major
and the new key is F-major. Now determine the interval between those two
notes: ![]() From your knowledge of intervals, you know that the 'F' is a major 2nd lower
than the 'G'. Therefore all the notes in the new melody will be a major second
lower than the original G-major melody:
From your knowledge of intervals, you know that the 'F' is a major 2nd lower
than the 'G'. Therefore all the notes in the new melody will be a major second
lower than the original G-major melody:

3. Transposing by Melodic Interval
Take the original melody and determine the intervals between each successive note of the melody:
Then determine the first note of your new, transposed melody. Do this by using Method 1 (Technical name). Once you have determined that 'A' is your starting note, apply the intervals of the original melody to the new melody, like this:
Transposing melodies where the key is vague
or the melody is atonal.
As stated before, it is advisable to use all three methods throughout the transposing process, checking one against the other. This is especially true when dealing with accidentals, or in situations where the melody is atonal. An atonal melody is a melody in which there is no tonal centre, and the music is not in any particular key. Study this rather complicated excerpt:
![]()
You might think that since the key signature has no sharps or flats, it is therefore in C-major or A-minor. But this melody has many accidentals that cannot be explained by either of those keys. Therefore we would be correct to say that the melody is probably atonal. If you listen to the excerpt, you will see that it does not seem to centre on any key. So how do we transpose it?
Obviously, if the key of the melody is
irrelevant, we would not likely be asked to transpose it to a particular key:
we would likely be asked to transpose it by a certain interval. Let's transpose
it up a major 3rd. Our first note will be a major third above 'A', which is
'C-sharp': ![]() We can proceed in this manner, transposing every note up a major third. Don't
forget to check your progress using the other methods discussed in this lesson.
For example, using Method 3 (melodic intervals) we know that the second note in
this excerpt is a minor 3rd higher than the first note. Therefore, in
our new transposed melody, the first note will be C#, and the second note will
be 'E', and so on.
We can proceed in this manner, transposing every note up a major third. Don't
forget to check your progress using the other methods discussed in this lesson.
For example, using Method 3 (melodic intervals) we know that the second note in
this excerpt is a minor 3rd higher than the first note. Therefore, in
our new transposed melody, the first note will be C#, and the second note will
be 'E', and so on.
The third note in the excerpt is E-flat. We can transpose it correctly by either: Method 2 (harmonic interval)- writing the note that is a major 3rd higher ('G'); or Method 3 (melodic interval)- writing the note that is a major 6th lower than the previous note. Here is the melody, correctly transposed a major 3rd higher:

Let's review a little of what we learned about triads in some previous lessons. In Lesson 15 you learned that a triad is a three-note chord in which there is a root, a third and a fifth. In Lesson 17 you learned about four different kinds of triads: major, minor, augmented and diminished. You should at this point have a clear understanding of the structure of triads. If you don't, go back and reread those lessons before continuing with this lesson.
In all of the triads you have seen so far,
the root has been on the bottom, the third in the middle, and the fifth on top,
like this one: ![]() This triad happens to be a C-major triad. We say that the triad is in ROOT
POSITION, because the root is on the bottom. If we are in C-major, we would
give this triad a Roman numeral 'I'. That's because 'C' is the first note in a C-major
scale. Building a triad on the first note of a scale gives us a I-chord. A I-chord
in C-major has a 'C', 'E' and 'G.
This triad happens to be a C-major triad. We say that the triad is in ROOT
POSITION, because the root is on the bottom. If we are in C-major, we would
give this triad a Roman numeral 'I'. That's because 'C' is the first note in a C-major
scale. Building a triad on the first note of a scale gives us a I-chord. A I-chord
in C-major has a 'C', 'E' and 'G.
We can show exactly how the notes are
ordered in a triad by indicating the intervals above the bass (bottom) note.
For example, in the triad above, and indeed with all triads in root position,
there is a note three notes above the bass, and a note five notes above the
bass. Therefore, to be technically precise, we could call this triad: ![]()

The '5' indicates the 'G' which is the interval of a 5th above the bottom note. The '3' indicates the 'E' which is the interval of a 3rd above the bottom note. However, for root position chords,the common practice is to just use the Roman numeral. If you see a chord with a Roman numeral and no small 'Arabic' numbers after it, it is a root position chord. So the chord above could be represented by just using the Roman numeral:

Here are triads built on the notes of a C-major scale, all in root position. We know they are root position because: 1) there are no small Arabic numbers after the Roman numeral; and 2) the chord is made up of a root, 3rd and 5th with the root on the bottom:

Remember, we use upper-case Roman numerals to indicate major and augmented triads, and lower-case letters to indicate minor and diminished.
It is possible to 'reposition' the chords above so that the root is no longer on the bottom. For example, you could write each one of the chords above in such a way that the 3rd of each chord is on the bottom:
![]()
The Roman numeral will stay the same for each chord, because the components of each chord (1,3,5) are still present. It's just that now they are in a different order. So how do we indicate this kind of triad, where the same notes exist as for root position chords (1-3-5), but that the 3rd is on the bottom? If you count upward from the bottom note, you will discover that the other notes are a 3rd and a 6th above it:

Such chords are called 1st inversion chords. It is traditional with 1st inversion chords to drop the little '3' after the Roman numeral, and just use the '6'. So the triads shown above would be labeled like this:

It is also possible to rearrange root position triads so that the 5th is on the bottom:

We use the same Roman numerals as before, to label these triads. The first triad is made up of a C, E and G, and so it gets a Roman numeral 'I', and so on. If you count upward from the bottom note, you will find that the other notes are a 4th and a 6th above it:
Such chords are called 2nd inversion chords. All of the triads of a C-major scale would be labeled like this:

Let's sum up what we've learned in this lesson
so far:
A Root
position triad is a triad in which the root is on the bottom. It is
labeled with a Roman numeral, with no Arabic numbers after it. Ex: ![]()
A 1st
inversion triad is a triad in which the 3rd is on the bottom. It is
labeled with a Roman numeral, and a small '6' after it. Ex: ![]()
A 2nd
inversion triad is a triad in which the 5th is on the bottom. It is
labeled with a Roman numeral, and a small '6' and '4' after it. Ex: 
Here are some triads properly analyzed. Study
each one, and be certain that you understand how each one has been analyzed
before trying the quiz:

Notice that in the final example the V-chord has been made major by raising the 3rd. All dominant chords must be major.
Two more points about inversions: All of the
examples above have used close spacing. That means that all of the tones
are within an octave of each other. But it is possible to spread out the notes
into different octaves (open spacing). Also, you will be required to
analyze triads in which some of the tones appear more than once in the
triad.Look at these triads- they are all 2nd inversion triads:
They are all I-chords because they all have a C, E and G. They are all 6-4 chords (2nd inversion) because they all have the 5th (g) as their lowest note. Easy!
A cadence is a resting of a musical phrase. Phrases may rest briefly, such as in the middle of a melody, or more permanently, such as at the end of a melody. Our task in this lesson will be to study these cadences, and to be able to identify and write them.
Take a look at this melody, which has been harmonized with some basic chords:
If you play the melody, you can hear that there is a brief pause in bar 4 (the first arrow), and a more permanent-sounding conclusion in bar 8 (the 2nd arrow). The pause in bar 4 is not the sort of pause that we would want to end the melody on; we can hear that it wants to continue. The end of the melody has a more 'final' sound. Those two spots in the music are called cadences.
The two types of cadences demonstrated by the example above are the half cadence (the one in bar 4), and the authentic cadence (the one at the end). Let's look at authentic cadences first.
An authentic cadence requires two things:
1) The resting of a musical phrase, and
2) a chord progression of V-I.
The melody above ends on a V-I chord progression, and it also rests (after all, it IS the end of the melody!) So it is an authentic cadence. It is similar to a period in written languages. There are two types of authentic cadences:
PERFECT Authentic Cadence:
A Perfect Authentic Cadence (PAC) requires that
the V-chord and the I-chord are both root-position chords, with the topmost
voice (soprano) ending on the tonic note. Here are some PAC's:

Notice that the V-chords in the minor keys have been altered to be major. Notice also that the soprano voices moves to finish on the tonic, and the bass voice moves either up a 4th, or down a 5th. That's because PACs must feature root position chords- NO INVERSIONS ALLOWED!
IMPERFECT Authentic Cadence:
An Imperfect Authentic Cadence (IAC) is a V-I
progression, but allows for inversions, or permits the soprano voice to finish
on a note other than the tonic. Here are some IACs. Try to figure out what
makes them IAC, and not PAC:

In the F-major cadence, the fact that the first chord is an inversion (V6) makes it IAC. In the A-major cadence, the soprano ends on the mediant, not the tonic. In the Bb-major cadence, the V-chord is an inversion. In the last example, the soprano voice ends on the 5th of the chord, not the tonic.
A half cadence (HC) requires two things:
1) The resting of a musical phrase, and
2) A chord progression that ends on a V-chord.
A half cadence is similar to a comma in written languages. In the melody at the beginning of this lesson the half cadence occurs in bar 4. Play it again and notice that, although is rests, it feels like it needs to go on; it needs something more.
Here's a little ditty that features a half cadence in the middle and a perfect authentic cadence at the end:

Much of the time, a half cadence features the progression I-V, but it can be 'anything' - V. Here are some half cadences:
A plagal cadence (PC) is a progression that ends IV-I. It is often referred to as the 'Amen' cadence, because it sounds like the 'amen' that is sung at the end of many hymns. Here is a progression that features a plagal cadence at the end:
NOTE: Here is an interesting point you may want to ponder. In the example above, the progression V-I that you can see at the end of bar 1 into bar 2 can be thought of as the actual cadence, and the IV-I at the end as merely a 'tag', or phrase extension, intended only to stretch out the ending a little longer. What do you think?
Here are some plagal cadences:
Here is a table with the various cadences:
|
TYPE OF CADENCE |
PROGRESSION |
|
Perfect Authentic Cadence (PAC) |
V-I, where both chords are in root position, and the soprano ends on the tonic. |
|
Imperfect Authentic Cadence (IAC) |
V-I, where one of the chords is in inversion, or the soprano does not end on the tonic. |
|
Half Cadence (HC) |
Any chord to V (but commonly I-V) |
|
Plagal Cadence (PC) |
IV-I |
Occasionally, a V-chord will cadence on something other than a I-chord. In such cases, the resulting cadence is known as a deceptive, or interrupted cadence. Most deceptive cadences follow the progression V-vi, since vi works as a relatively good substitution for I, and one can hear the 'resting' of the phrase.
A mode is a type of scale. You've already learned to write major and minor scales in previous lessons. Music based on major and minor scales came into common usage in the early 1600s, and of course we have been using them ever since. Before the 1600s, composers wrote in what were called modes. There was a resurgence of interest in modes toward the end of the 19th century, with composers like Debussy. Modal melodies can be very beautiful, and their study is certainly worthwhile! Such study of modes can get quite in-depth, and is a fascinating field of study. However, for our purposes here as a rudimentary music theory course, we shall only delve into the basic construction of modes so that we can identify and write them.
The first and perhaps most important thing to remember about modes is: A mode is distinguished by the pattern of tones and semitones, not by the actual pitches used.
Take a look at this C-major scale, starting on a middle C and proceeding upward for one octave:

The tones and semitones have been indicated, and you can tell by that tone-semitone pattern that this is indeed a C-major scale.
What if you were to take this same C-major scale, but instead of starting on a 'C', started on a 'D' and proceeded upward for one octave. It would look like this:
![]()
It still has the pattern of tones and semitones that belong to C-major; it's just that the scale now starts and ends on a 'D' instead of a 'C'. We call this scale the dorian mode. We say that the note 'D' is the key note, or final, of the mode. A scale that runs from what appears to be the second degree (supertonic) up to the second degree an octave higher is said to be in the dorian mode.
We can start a scale on all the different notes of our C-major scale above. For example, if we write a scale from the mediant to the mediant, we get the phrygian mode:
![]()
(The tone-semitone pattern is still that of the C-major scale.)
Subdominant to subdominant gives us the lydian mode:
![]()
Dominant to dominant produces the mixolydian mode:
![]()
Submediant to submediant produces the aeolian mode:
![]()
And leading tone to leading tone makes the locrian mode:
![]()
Incidentally, when you write a major scale from the tonic note up to the tonic note, you are also forming a mode, called the ionian mode! So something in C-major could technically be said to be in C-ionian, though we more often than not simply call it 'C-major'.
The examples above are all modes based on a key
signature of no sharps, no flats. These are all transposable into any key
signature:
![]()
What mode is this? We see a key signature of A-major (three sharps) where the scale runs from the mediant note to the mediant note one octave higher. That means it is the phrygian mode. Simple!
You remember in Lesson 16 that we determined keys by identifying the key signature. Now we need to expand that idea a little. Though key signature helps to determine key, we need to examine the melody closely and see its construction and direction. The following excerpt, on first glance, looks like it could be G-major, because there is a key signature of one sharp, and there are no leading tones (D#) to make E-minor (the relative minor) a possibility:
![]()
But, in fact, this is in the aeolian mode. Here is the procedure to arrive at that determination:
1- One sharp in the key signature makes it either:
G-major
E-minor
One of the seven modes
2- It can't be E-minor, because that would require the presence of D# to create the leading tone that's necessary to emphasize E as a tonic.
3- It could be G-major, but look at the melodic shape: there is much that points to 'E' as a significant note, rather than 'G'. The opening interval of 'E' to 'B' (perfect 5th) solidifies 'E' as an important note. The first three notes of bar 3 are members of a triad built on E. The shape of the melody at the end 'pulls the ear' toward 'E', and indeed 'E' is the final note. So even though we know it cannot be E-minor, there is much evidence that 'E' is some sort of 'tonic'. It is in such cases that we need to examine the possibility of the use of a mode. 'E' is the sixth note of the G-major scale, and the mode based on the sixth note is the aeolian mode. Therefore, this excerpt is in E-aeolian.
Examine the following excerpts. They have been
analyzed according to mode. Be certain that you understand the reasons for each
mode choice before trying the quiz for this lesson:


Explanations
The first excerpt is in E-flat Lydian. This is
because the key signature is that of B-flat major, but the note 'E-flat' seems
to be very important:
It starts and ends on E-flat.
Each beat (except for the first beat of the last bar) starts with a note from an E-flat triad.
E-flat is the 4th note of the B-flat scale; therefore, this is in the Lydian mode, which is the mode based on the 4th note of a major scale.
Each of the other examples are in their respective modes for similar reasons.
As stated before, this lesson is simply a rudimentary introduction to modes. The question of whether an excerpt is major, minor or modal can be very interesting and complicated, but in this lesson we are focusing on modes in their 'purest' state.
A clef is a symbol placed at the
beginning of a musical staff that indicates the pitch of the notes on that
staff. The two most common clefs are the treble clef:![]() and bass clef:
and bass clef: ![]() .
The treble clef is also called the G-clef, because it originated hundreds of
years ago as a stylized letter 'G'. The letter 'G' evolved into the scroll-like
sign that we know as the treble clef. The bass clef's other name is the F-clef,
because it started out as a letter 'F' sitting on a staff, eventually modifying
into today's bass clef.
.
The treble clef is also called the G-clef, because it originated hundreds of
years ago as a stylized letter 'G'. The letter 'G' evolved into the scroll-like
sign that we know as the treble clef. The bass clef's other name is the F-clef,
because it started out as a letter 'F' sitting on a staff, eventually modifying
into today's bass clef.
There is another clef, called a C-clef. It
looks like this: ![]() The C-clef is written so that it is centered on a line. Wherever the C-clef
is centered, that line is considered to be the note 'Middle C'. Depending
on the line upon which it is placed, this clef gets a different name:
The C-clef is written so that it is centered on a line. Wherever the C-clef
is centered, that line is considered to be the note 'Middle C'. Depending
on the line upon which it is placed, this clef gets a different name:
ALTO CLEF:
![]() In this case, the clef has been centered on the
middle line. So here is Middle C, written in this clef:
In this case, the clef has been centered on the
middle line. So here is Middle C, written in this clef: ![]() The alto clef is used by violas in an orchestra. Here is a C-major scale, in
the treble clef:
The alto clef is used by violas in an orchestra. Here is a C-major scale, in
the treble clef:

Here is that same scale, written in the alto clef:

As with the treble and bass clefs, you can use leger lines to extend the staff upward and/or downward.
TENOR CLEF:
![]() As you can see, the clef has been placed so that it
is centered on the 4th line. That means the 4th line is middle C. Here is the
C-major scale above, written in the tenor clef:
As you can see, the clef has been placed so that it
is centered on the 4th line. That means the 4th line is middle C. Here is the
C-major scale above, written in the tenor clef:

There is another tenor clef, commonly called
the 'vocal tenor clef': ![]() You only usually see this clef in vocal music. Music written in the vocal tenor
clef should be read as if it is in treble clef, then sung one octave lower.
(Read more about octave transposition in Lesson 18.) Used by tenor voice
(hence the name!) Here is the same C-major scale, written in the vocal tenor
clef:
You only usually see this clef in vocal music. Music written in the vocal tenor
clef should be read as if it is in treble clef, then sung one octave lower.
(Read more about octave transposition in Lesson 18.) Used by tenor voice
(hence the name!) Here is the same C-major scale, written in the vocal tenor
clef:
Reading pitches from an 11 line staff can be
confusing, and all 11 lines of the Great staff are usually not required for the
notation of a given part of music.
Music is therefore written on staffs of five
lines only.
But which five lines of the Great staff are
selected ?
To identify the five lines a Clef is
displayed at the beginning of the staff (Clef = 'key' in French).
In our present notation system three Clefs are in use :
I. The G Clef identifies the G line for the G above
Middle C (4th line from the top).
This is commonly called the Treble Clef.
It is used for most instruments and
for the right hand music for the
piano.
II. The C Clef identifies the C line and Middle C in
the exact middle of the Great Staff.
Now only used as:
1. the Alto Clef for the alto singer and the viola, and as
2. the Tenor Clef for the tenor vocalist and the cello.
III. The F Clef identifies the F line for the F below
Middle C (4th line from the bottom).
It is commonly called the Bass Clef.
It is used for the piano left hand
music, the baritone vocalist and for several bass
instruments, such as the contra bass, tuba and trombone.
Here an overview of the line combinations of the various staffs in use today :
A musical score is a copy of a piece of music that shows all of the instrumental parts together, giving a view of the entire piece. Conductors often work from scores, because they are able to see everyone's part at the same time. There are different kinds of score that are quite common. For example, a close score, also called short score or condensed score, is a score that has two or more instrumental or vocal parts on each staff. (The three names close, short, and condensed are synonymous, and can be used interchangeably.) The two-stave format is a commonly used short score type, and looks very much like a piano score. ('Stave' is the plural form of the word 'staff') When using two staves, the top staff uses the treble clef and the bottom staff uses the bass clef, unless the instruments being written for are all of one or the other clef:
 Notice that each staff of the short score has notes
that have their stems pointing upward, and notes with stems pointing downward.
The stem direction seems to break the rule that notes above the middle line
must point their stem downward, and notes below the middle line must point
their stem upward. In two-stave short score, the understanding is that in the
top staff, notes with stems upward are to be sung or played by the soprano
voice(s) (or instruments) and notes with the stems downward are to be sung or
played by the alto voice(s) (or instruments). In the bottom staff, notes with
the stems pointing upward are to be sung or played by the tenor voice(s) (or
instruments) and notes with the stems downward are to be sung or played by the
bass voice(s) (or instruments). It is much more common for voices to perform from
a score like this rather than instruments. Instrumentalists prefer to see
simply their own part on the page. Vocalists rely more on seeing their notes in
relation to the other existing parts- it makes it a little easier to sing in
tune.
Notice that each staff of the short score has notes
that have their stems pointing upward, and notes with stems pointing downward.
The stem direction seems to break the rule that notes above the middle line
must point their stem downward, and notes below the middle line must point
their stem upward. In two-stave short score, the understanding is that in the
top staff, notes with stems upward are to be sung or played by the soprano
voice(s) (or instruments) and notes with the stems downward are to be sung or
played by the alto voice(s) (or instruments). In the bottom staff, notes with
the stems pointing upward are to be sung or played by the tenor voice(s) (or
instruments) and notes with the stems downward are to be sung or played by the
bass voice(s) (or instruments). It is much more common for voices to perform from
a score like this rather than instruments. Instrumentalists prefer to see
simply their own part on the page. Vocalists rely more on seeing their notes in
relation to the other existing parts- it makes it a little easier to sing in
tune.
It is possible to have more than two staves in a short or close score. If you are writing, just as an example, for a full orchestra, but wish to conserve space, you may choose to use a short score format of, let's say, four staves: first staff for woodwinds, second staff for brass, third staff for strings, and the fourth staff for percussion. Sometimes composers will use multiple staves in this fashion, but will use the upper staves for the high notes and the lower staves for the low notes, then indicate with small lettering which instruments play which notes. Here is an example of such a score:
![]() It will probably be obvious right away that there are
benefits and disadvantages to using such a score format. The main advantage is
that you are able to see the notes of a medium-sized orchestra at a glance. As
you get better at recognizing chords, you can perceive the general tonality of
the piece quickly using this type of score.
It will probably be obvious right away that there are
benefits and disadvantages to using such a score format. The main advantage is
that you are able to see the notes of a medium-sized orchestra at a glance. As
you get better at recognizing chords, you can perceive the general tonality of
the piece quickly using this type of score.
The main disadvantage in using close score for orchestra is that it becomes rather difficult to narrow down which instrument is playing which notes. So if you detect problems in a rehearsal situation, it can be a frustrating trying to determine which instrument is at fault. Often, publishers will choose to provide both a full score (see below) and a short score with each orchestral or concert band publication. This is very useful, because it allows the conductor to work from a full score in rehearsals, then provide the option of switching to a short score for performance. The short score usually will require less frequent page turns, because more music can be fit onto one page. As you can see, you also have to be a bit 'creative' with your use of stem directions if you have three or more parts on a staff! And because several instruments are on one staff, it is not possible to show the proper transposition of a transposing instrument such as Clarinet or Bb-trumpet.
For fairly straightforward music, a short score
is ideal- it shows everyone's part in a concise format. But it is sometimes
desirable to show each part on its own staff. Let's go back to the excerpt at
the beginning of this lesson. Since it was intended for four players, a score
showing each part on its own staff would require four staves. A score that
shows each part on its own staff is called open score or full
score. (The two terms open and full are synonymous, and
can be used interchangeably.) There are many different types of open score,
depending on the number and type of instruments for which you are writing. For
example, here is the excerpt given above, rewritten in open score for string
quartet:

![]() You can see that all of the notes of the short score
excerpt have been given their own staff, according to stem direction. In the
top staff of the short score, the stems up have been given to Violin I, and
stems down to Violin II. The viola (an instrument shaped like a violin, but
slightly bigger and tuned a perfect 5th lower) gets the notes that were the
stems up notes of the bass staff of the short score. The cello is given the
stems down notes. With the open score format, the conductor can see each
player's part clearly, because each part is on its own staff.
You can see that all of the notes of the short score
excerpt have been given their own staff, according to stem direction. In the
top staff of the short score, the stems up have been given to Violin I, and
stems down to Violin II. The viola (an instrument shaped like a violin, but
slightly bigger and tuned a perfect 5th lower) gets the notes that were the
stems up notes of the bass staff of the short score. The cello is given the
stems down notes. With the open score format, the conductor can see each
player's part clearly, because each part is on its own staff.
If the excerpt was intended for voices, a modern vocal score, also called modern choral score is frequently used. Here it is:
![]() It looks like the string quartet score, except that
the tenor line has been given a 'vocal tenor clef', a clef that looks
like a treble clef with an '8' beneath it. You will have seen this before, in Lesson
24, and it means to sing the notes an octave lower than treble clef.
It looks like the string quartet score, except that
the tenor line has been given a 'vocal tenor clef', a clef that looks
like a treble clef with an '8' beneath it. You will have seen this before, in Lesson
24, and it means to sing the notes an octave lower than treble clef.
There are many, many types of both close and
open scores, and so it is not feasible to list them all. This lesson is simply
intended to give you an idea of how the various score formats work. The quiz
for this lesson will require you to transcribe music from one score
format to another. Here are the formats you will be required to know:
SHORT (CLOSE) SCORE:
FULL (OPEN) SCORE for String Quartet:
FULL (OPEN) SCORE for Choir:
Tempo
|
|
Very slow |
|
Larghetto |
Not as slow as largo |
|
Adagio |
Slow, leisurely |
|
Lento |
Slow |
|
Moderato |
Moderate |
|
Andante |
Moving with a moderate tempo |
|
Andantino |
Faster than andante |
|
Allegretto |
A little slower than allegro |
|
Allegro |
Moderately fast |
|
Vivace |
Lively, animated, brisk |
|
Presto |
Fast, rapid |
|
Prestissimo |
Very rapidly |
Dynamics
|
Pianissimo |
Very soft |
|
Piano |
Soft |
|
Mezzo piano |
Moderately soft |
|
Mezzo forte |
Moderately loud |
|
Forte |
Loud |
|
Fortissimo |
Very loud |
|
Crescendo |
Increasing in loudness |
|
Decrescendo |
decreasing in loudness |
|
Diminuendo |
diminishing in loudness |
|
Rinforzando |
sudden increase in loudness |
|
Sforzando |
play the note with sudden emphasis |
Style
|
Amoroso |
tender and affectionate |
|
Animato |
animated; lively |
|
Calando |
gradually softer and slower |
|
Cantabile |
in a singing style |
|
Con Anima |
with life and animation |
|
Con Brio |
with vigor and spirit |
|
Con Fuoco |
with energy or passion |
|
Deciso |
decisively |
|
Detache |
detached |
|
Dolce |
sweetly |
|
Doloroso |
sorrowfully |
|
Espressivo |
expressively |
|
Furioso |
furious |
|
Giocoso |
humorous |
|
Grandioso |
with grandeur |
|
Grazioso |
gracefully |
|
Legato |
smooth and connected |
|
Leggiero |
lightly |
|
Maestoso |
majestically |
|
Marcato |
marked and stressed |
|
Marzial |
in the style of a march |
|
Morendo |
dying away |
|
Perdendosi |
dying away |
|
Pesante |
heavy |
|
Religioso |
religious, solemn |
|
Rubato |
taken out of tempo |
|
Semplice |
simple |
|
Sempre |
always, continuously |
|
Sostenuto |
sustained |
|
Soto voce |
in an undertone |
|
Staccato |
short and detached |
|
Tenuto |
sustained, held for full value |
|
Tranquillo |
tranquill |
Articulation
|
Staccato |
a dot placed above or below a note means to play it short |
|
Slur |
a curved line either above or below notes that connects two different pitches that are to be played smoothly |
|
Tie |
a curved line either above or below two of the same notes indicating not to attack the second note |
|
Tenuto |
a line above or below the note means to play the full value of the note |
|
Accent |
an accent placed above or below the note means to emphasise the not |
|
Breath Mark |
an apostrophe placed above the staff means to take a breath |
Clarity Terms
|
Assai |
very |
|
Con |
with |
|
L'istesso tempo |
same tempo |
|
Meno |
less |
|
Mosso |
moved, agitated |
|
Non troppo |
not too much |
|
Piu mosso |
faster |
|
Poco |
little |
|
Poco a poco |
little by little |
|
Sempre |
always |
|
Simile |
in the same manner |
|
Subito |
suddenly |
|
Politica de confidentialitate | Termeni si conditii de utilizare |

Vizualizari: 5091
Importanta: ![]()
Termeni si conditii de utilizare | Contact
© SCRIGROUP 2025 . All rights reserved