| CATEGORII DOCUMENTE |
| Bulgara | Ceha slovaca | Croata | Engleza | Estona | Finlandeza | Franceza |
| Germana | Italiana | Letona | Lituaniana | Maghiara | Olandeza | Poloneza |
| Sarba | Slovena | Spaniola | Suedeza | Turca | Ucraineana |
In this chapter you will learn how to: Create a functional report in
ABAP Query Build a basic functional area
using a logical database Maintain a user group Create a report using a
functional area and a user group
ABAP Query
Contents
Learning the Basics of ABAP Query 22
Creating a Report with ABAP Query 27
Running the Query 226
Understanding the Report List 227
Getting the Most from ABAP Query: Tips & Tricks 227
Review 233
Where to Learn More 233
In this chapter, you will learn about ABAP Query, a tool that lets you present data from database tables in report lists. Before getting into how you can use ABAP Query to create reports, it is important to understand its features and basic organization.
ABAP Query is an easy-to-use reporting tool that lets you query data from one or more database tables and funnel it into a list. With this tool, you can extract data from virtually any application or database table in the R/3 System. ABAP Query enables you to create lists by moving through menus.
The output of ABAP Query can be:
< Displayed on the screen in a table format
< Displayed on the screen using SAP graphics
< Downloaded to a spreadsheet (for example, Microsoft Excel)
< Downloaded to a flat file
< Saved as an extract that can be viewed later.
ABAP Query is used by two different groups of people. Each group works with different ABAP Query components.
< Departmental users: These are end users who create new queries and generate lists. Non-technical users find ABAP Query particularly useful because it does not require any programming knowledge.
< System administrators: System administrators set up the necessary environment for end users and carry out transports.
ABAP Query can be used to access just about any data in the database, making it very desirable for users in many areas of a business. Several R/3 application areas provide a predefined logical database for easier information retrieval.
How Is ABAP Query Organized?
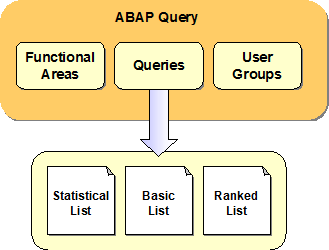
As shown in the graphic, ABAP Query has three main components:
< Functional areas
< Queries
< User groups
Functional Areas
You need functional areas to offer a preselected set of data to the user, depending on the task to be accomplished. A functional area defines the tablesand the fields within those tableswhich can be queried. Functional areas use a logical database, a direct read from a table, or a series of table joins to determine the available tables.
|
|
Why create functional areas ABAP Query allows you to evaluate data in the R/3 System. However, since the system contains several hundred thousand fields in logical databases, in tables, and sequential datasets, it is simply not practical to offer all these fields to a user for selection when creating queries. Therefore, before starting to create queries (using the component Maintain Queries), you create functional areas (using the component Maintain Functional Areas). Functional areas provide the user with a framework for defining a query quickly and easily. Functional groups When you create a functional area, you select a logical database from an application system. However, since one logical database can contain a vast number of fields, you combine fields together in logical units known as functional groups (see page ). A functional area not only allows you to restrict the number of fields and group them together in meaningful units, but it also allows you to define auxiliary fields and process them like database fields. You can also read the long texts in additional tables (for example, the long text of an airline carrier in the table SCARR) and perform any necessary preliminary work. This means that you can evaluate sequential datasets just as easily as SAP databases. Starting with Release 4.0, a functional area can have a name of up to 24-characters. Previous releases were limited to four-character names. SAP now delivers functional areas in various applications. |
User Groups
User groups link users to functional areas and queries and control the functional areas and queries a user can access. Each functional area is assigned to one or more user groups. For access to ABAP Query, a user must be a member of at least one user group. All members of a user group can access the same data as well as the same programs (queries) to create lists.
|
|
What is a user group? A user group is a collection of users that work with comparable data and accomplish similar tasks. Changes to functional areas and queries are immediately visible to all users. The users assigned to a user group can only access the functional areas assigned to their user group. When creating a query, the user group controls which functional areas can be used. (However, user groups are irrelevant if a user has full authorization to all R/3 data.) Starting with Release 4.0, user groups can have 12-character names. Prior releases were limited to two-character names. |
Queries
When you create different lists using ABAP Query, you can save the layout for each list. The element created is called a query. A query is specific to a user group and functional area. When creating a query, you may only select one functional area. Within a query, you must also specify functional groups in the selected functional area. This means the selected area (and the groups) must contain all the fields you wish to include in the query.
|
|
Using queries If appropriate authorizations are in place, you can execute, modify, copy, and delete queries. Any modifications to queries affect all users of a user group. That is, if one user deletes a query, it is lost for all other users as well. All changes or new creations are at once visible to all users. Starting with Release 4.0, queries can have 12-character names. Prior releases were limited to two-character names. |
Queries have three different types of reports or lists:
< Basic list: Sorts and totals selected fields as specified by the user in the query. This is the most common kind of report.
< Statistical list: Totals, calculates averages, and allocates percentages based on the fields in the query.
<
Ranked list: Ranks fields based on numeric fields,
including currency or quantity.
A single query may have multiple statistical and ranked lists but only one
basic list.
< Logical database: A series of tables that are linked together via a logical database program.
< Functional groups: Part of a functional area. You create functional groups within a functional area and then assign the fields you want to query to the functional group.
|
|
Logical database To retrieve data, ABAP provides an extra read program called a logical database. This program reads the required data and provides it to you in the correct order. You only write the statements that process the data. To take advantage of this functionality for your report program, you must declare the logical database in the report attributes. SAP delivers several logical databases in the application areas and gives a user the capability of creating their own. We strongly recommend that a basis/tools expert be involved in the creation of a logical database. To view the delivered SAP logical databases, follow the menu path: Tools ABAP Workbench Development Programming Environment Logical Databases, or use transaction code SE36. Functional groups If a field is not assigned to a functional group, it cannot be included in a query. Functional groups have two-character names and are functional-area dependent. There are no naming restrictions for functional groups. |
From the SAP main menu, choose System Services ABAP Query to access ABAP Query. To access the components of ABAP Query, use the menu paths shown in the following table:
|
ABAP Query Component |
Menu Path |
|
Maintain Queries |
Tools ABAP Workbench Utilities ABAP Query Queries |
|
Maintain Functional Areas |
Tools ABAP Workbench Utilities ABAP Query Functional Areas |
|
Maintain User Groups |
Tools ABAP Workbench Utilities ABAP Query User Groups |
There are several differences between ABAP Query and other reporting tools:
< ABAP Query can access data from any table within SAP. Most other reporting tools can access only certain tables.
< ABAP Query is ideal for listing data from any application in the system. It can calculate additional fields such as purchase price variance (PPV) in procurement or aging buckets in accounts receivable (A/R), and total and sort on any field. These fields are calculated on each line of a detail report and then totaled by the specified fields (for example, material or customer).
< ABAP Query reports are typically simple listing and totaling reports, unlike a balance sheet or an income statement that requires complex groupings (for example, a cash or revenue line made up of several accounts on a financial statement). Such complex groupings would require the query to read tables multiple times to appropriately total and sort the accounts. Other tools (such as Report Painter/ Report Writer which uses sets for these groupings) are better suited for reports with complex groupings.
< An understanding of the data dictionary and perhaps some basic programming: While an ABAP programming background is not critical to use this tool, knowledge of the data dictionary and some basic programming is helpful. If you are not familiar with the data dictionary or do not possess basic programming skills, you may want to enlist the help of a basis/tools expert at some point. These skills will come in handy when the functional area you are building needs additional tables, additional fields, or table joins.
< Know required database tables and fields: Before starting a query, you should know the required tables and fields. To execute a query, data must be present in the tables you are accessing. A general understanding of the fields and how they are stored in the database is also helpful. For example, the posted dollar amount in an FI document is stored as an absolute number. The system uses the posting key to determine if the actual value is positive or negative. To show the correct amount in your query you will need to create an additional field in the functional area that checks the posting key to determine the correct amount. The correct amount is then stored in the additional field for your queries.
< System settings: An administrator must first make the required settings to allow a user to work with ABAP Query.
< Authorizations: End users and system administrators must have the appropriate authorizations to use ABAP Query.
In this section a guided tour shows you how to create a report using ABAP Query. This step-by-step approach is built around a sample report (see the graphic below). We suggest you take a few minutes to familiarize yourself with the scenario and the desired report.
|
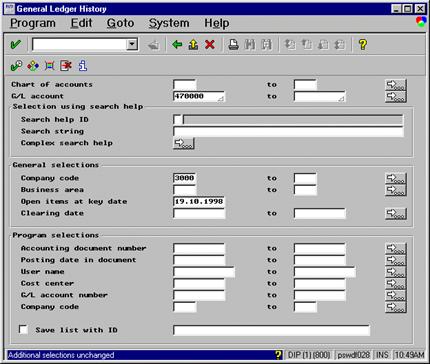
Example: Bungee Corporation wants to view the account history for several G/L accounts at a timein a specified format. While they like many of the standard reports provided in R/3, they would prefer to change the order of the columns. Bungee Corporation believes that in the future they will include fields from internal tables, and thus would like to begin creating custom reports. Additionally, the company wants to be able to print the General Ledger history. |
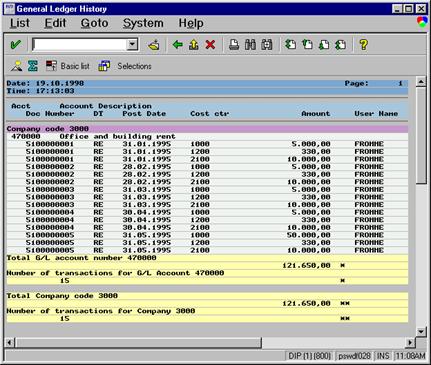
Shown below is a preview of the General Ledger History report with all the desired functionality. For this query, we will create a functional area using a logical database. This is an easy and effective way to start creating queries.
|
Note: In the example we use Release 4.0B. While this release has a different look-and-feel than prior releases, the underlying concepts and terminology remain the same. |
The main steps in creating a query are shown in the graphic below.
|
|
Guided Tour |
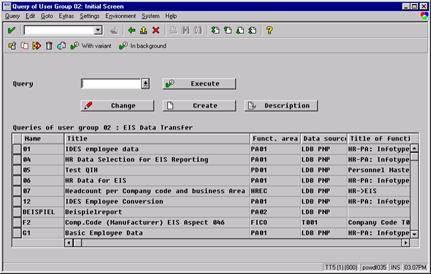
To access the initial screen of ABAP Query, choose System Services ABAP Query.
|
|
|
|
Choose Create. |
|
|
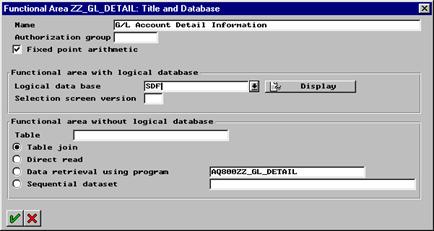
Leave Fixed point arithmetic selected to ensure that the decimal places are correctly set for the calculations. In Logical data base, enter the name of the logical database you want to use for the functional area (for example, SDF). To display the tables and fields available in the logical database, choose Display. Select Table join. Choose Enter. |
|
|
|
|
|
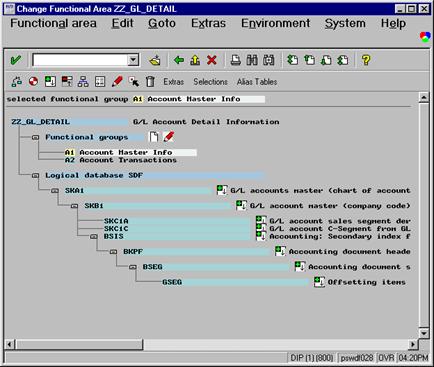
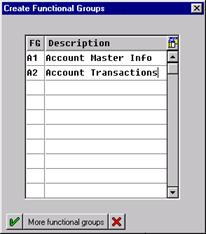
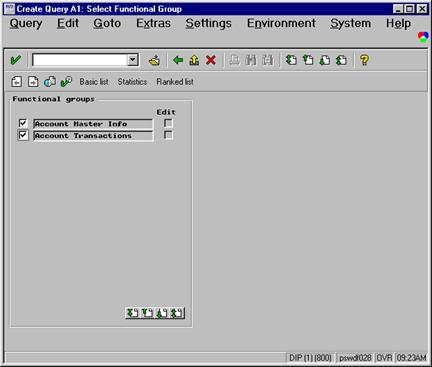
< A1 for Account Master Info < A2 for Account Transactions Choose Enter. |
|
|
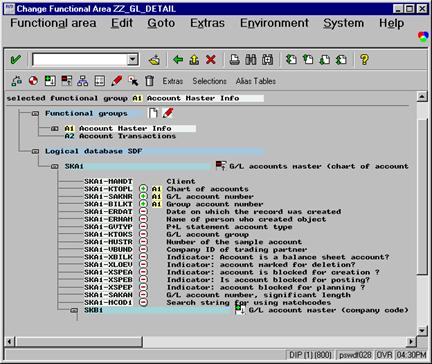
Click line A1, Account Master Info, to highlight the group for field assignment. To assign the fields to the
functional group A1, click the minus (-) sign, next
to the field names. The icon changes to a green plus (+) sign. The functional
group A1 appears next to the green icon, indicating
that the fields have been assigned to the highlighted functional group.
|
|
|
|
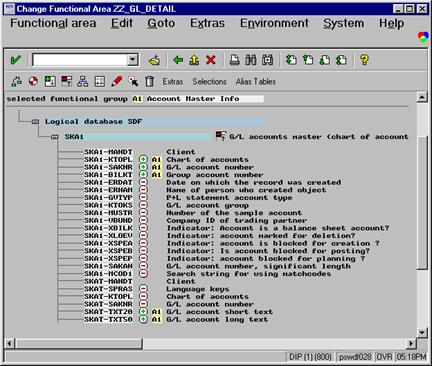
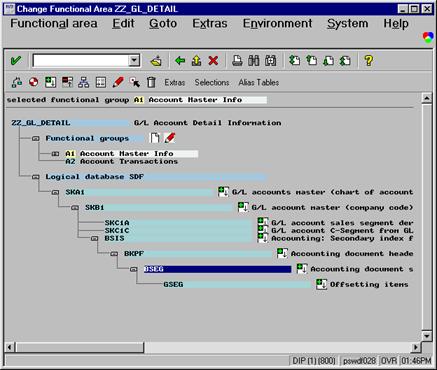
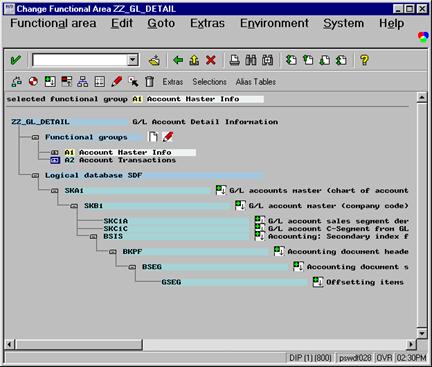
Selecting fields for functional groups When selecting fields for your functional groups, select the field in the highest possible table. For example, company code (BUKRS) is available in tables SKB1, SKC1A, SKC1C, BKPF, BSIS, BSEG, and GSEG. The company code should be selected only from table SKB1 because it is the highest table in the logical database hierarchy that contains the company code. If the company code is selected from more than one table, it will appear multiple times to the users when creating queries. Multiple appearances can be extremely confusing. The next two steps involve ABAP programming statements. You may want to ask a Basis/Tools expert to help you if you are not familiar with SELECT statements and basic ABAP code. |
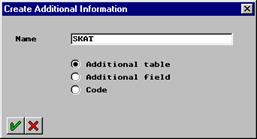
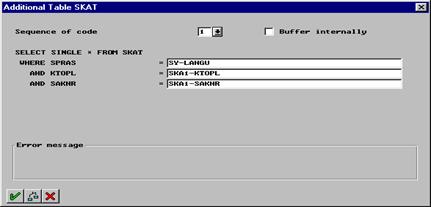
The next step is to add an additional table that does not exist in the logical database. In this example, the G/L account description is not stored in any of the logical database tables; it is stored in table SKAT. We need to add table SKAT to table SKA1 (shown below) because all the key fields of table SKAT are available in table SKA1.
|
Choose Extras in the toolbar to add an additional table. |
|
|
|
|
|
Choose Enter. Note that the selected table is SKA1. |
|
|
Choose Enter twice to return to the Change Functional Area ZZ_GL_DETAIL screen. |
|
|
|
|
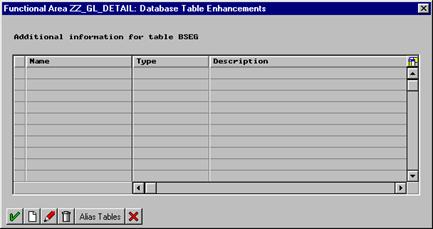
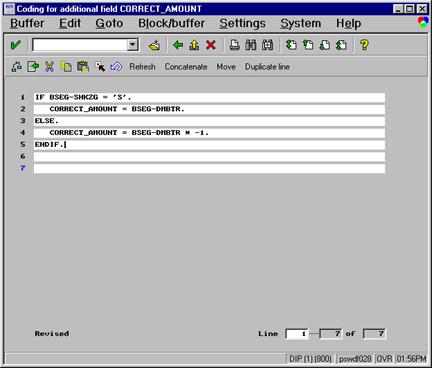
We will now look at the same logical database (SDF), but at a different table (BSEG). The next step is to add an additional fieldin this example, the dollar amount in table BSEG is stored as an absolute value. The online system uses the posting key to determine if the additional field is positive or negative. We need to add an additional field that would contain the amount with the proper sign so that the final totals are correctly calculated.
|
Choose the Extras button to add an additional field. |
|
|
|
|
|
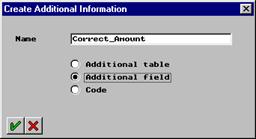
Select Additional field. Choose Enter. |
|
|
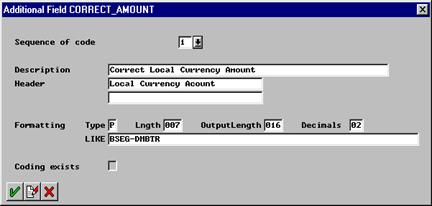
In Header, enter the column header text. Enter the format of the field by either manually entering the type, length, output length, and decimals. Alternatively, you may specify the name of the field (for example, BSEG-DMBTR) whose formatting this additional field should mirror. To enter the ABAP code for the additional field, choose Editor. |
|
|
Remember to enter the periods at the end of each line! Choose Save. Choose Back. Choose Enter twice to return to the logical database view of the functional area. |
|
|
To add the additional field (CORRECT_AMOUNT) to a functional group so that it can be used in queries, expand the BSEG table to show all the fields. Scroll down to the bottom and select the CORRECT_AMOUNT field. |
|
|
Choose Back after the functional area has been generated. |
|
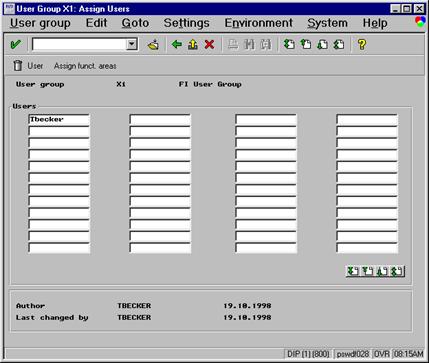
Step 5 below describes how to create a user group.
|
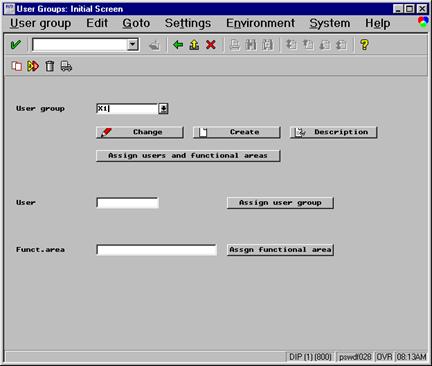
In User group, enter X1, the name of the user group. If a user group does not exist,
choose Create. |
|
|
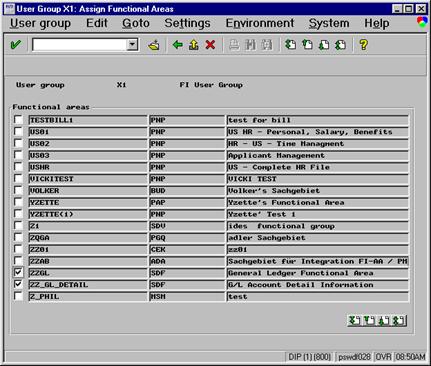
Choose Assign funct. areas to assign the appropriate functional areas to the user group. |
|
|
Choose Save to save the assignments. Choose Back twice to return to the main user group screen. Now that the functional area and user groups have been set up, you are ready to build the query. |
|
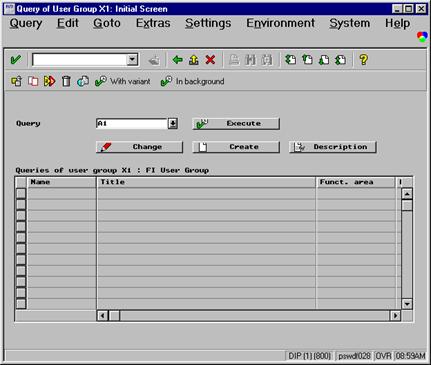
|
Make sure you are working in the appropriate user group. If not, choose the Other User Group button and switch to the correct user group. In the Query field, enter a name for the new query. In this example, enter A1. Choose Create. |
|
|
|
|
|
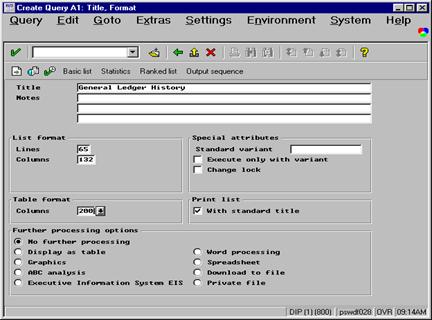
In Columns, enter the column size (in characters). In Lines enter the desired number of lines. In this example, the number of lines and columns is 65 and respectively. This should match a print format if the query is to be printed. Choose Next Screen to continue. |
|
|
Choose Next screen to continue. |
|
|
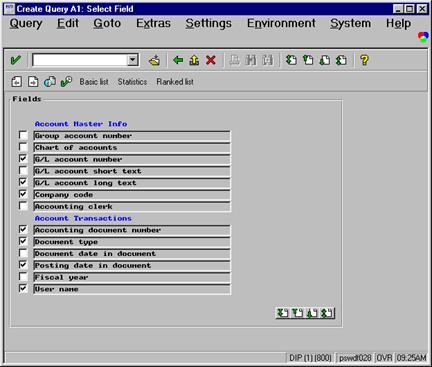
Use Page up or Page Down to scroll through the fields. In this example, the fields you select would be based on the desired report output (as shown in the sample report on page 27). Choose Next Screen to continue. |
|
|
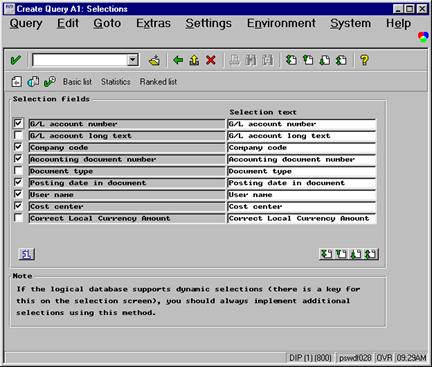
If selection fields straddle multiple pages, use Page up or Page Down to scroll through the fields. Choose Basic List to continue. |
|
|
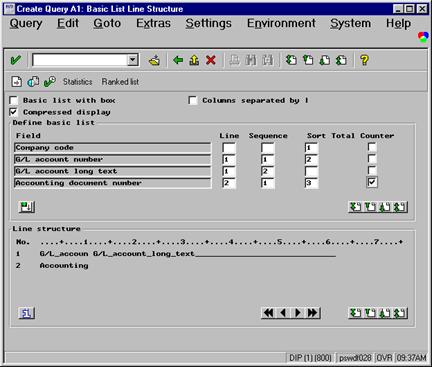
Use Page up or Page Down to scroll through the remaining fields. To view a full page of fields, choose Select and order the sort fields in the Sort column. The Total button is available on all numeric, currency, and quantity fields. This gives you the option to total the sort fields. The counter field is new in Release 4.0 and allows you to count the number of entries in your query for the selected field. This will also total on the sort fields. The Compressed display checkbox allows detail transactions to be suppressed on the initial screen (and then expanded if necessary). With compression on, you will see the account number and a total for the account. When expanded you will see all the related transaction detail. Choose Next Screen to continue. |
|
|
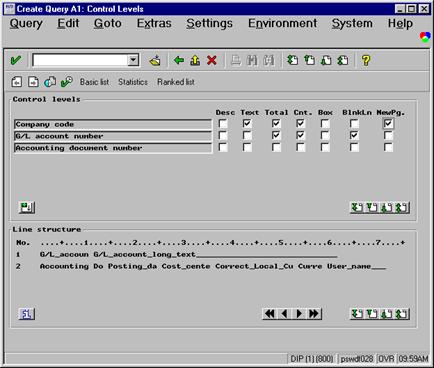
To get text above each sort break, select Text. To get totals for a sort level, select Total. This option works only if you have also selected Total for a numeric field on the previous screen. To get counter totals for the sort field, select Cnt. (counter). To get a blank line between account numbers, select BlnkLn. To get a page break at each new company code, select NewPg. Choose Next Screen to continue. |
|
|
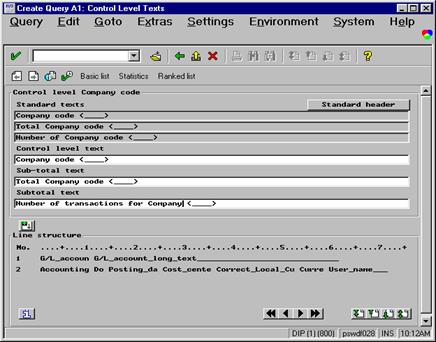
Choose Next Screen to continue. Choose this button through each of the
control-level text screens. |
|
|
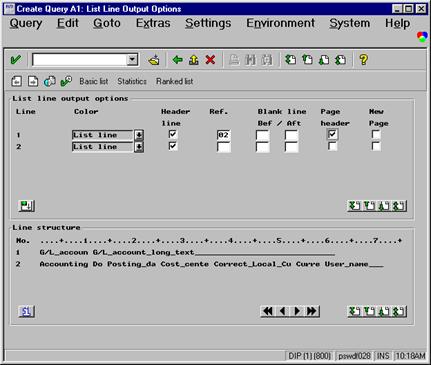
Selecting Ref. checks the referenced line (for example, line 02) which is the detail transaction line for an activity. If there is no activity for line 02, then line 01 is suppressed as well. If the detail lines for an account break across pages, selecting Page Header repeats the first line (with the account number and description) at the top of the next page. Choose Next Screen to continue. |
|
|
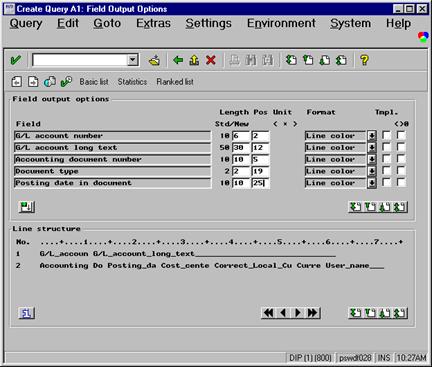
If the Pos fields are left blank, the default is one space between each field. Entries in the Pos column determine where in the line you want the field to start. In our example, we want the account number to start in character position 02 and the text in character position 12. This means there will be 4 blank spaces between the account number and text (12 - 2 6 = 4). Choose Next Screen to continue. |
|
|
Note: You must remember where the line breaks occur (for example between the G/L account long text and the accounting document number). The long text is on line and the document number starts line . |
|||
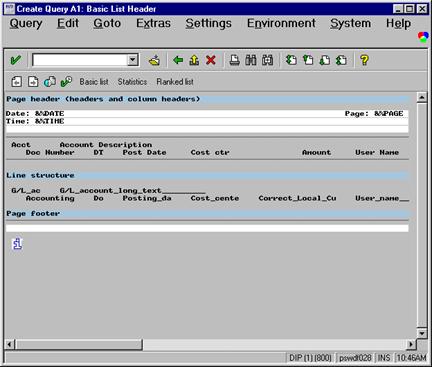
|
Change the description in the popup box. Choose Enter. To enter a date, time, page, or name, put your cursor in the white line in the Page header section and type &%DATE, &%TIME, &%page or the appropriate variable name. To insert additional lines, double-click on the white line. Choose Save. Congratulations! Your query is now ready to run. Choose Execute to run the query. |
|
||
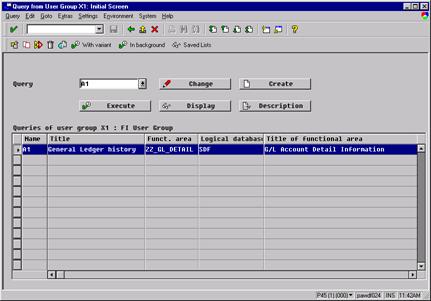
|
Select the query from the list. In this example, user group X1 has only one query (A1). Choose Execute. |
|
|
Notice that the G/L account number and Company code fields appear twice because both the logical database and the query use these fields as selection criteria. Be sure to remove this duplication from the query. Dynamic selections are also available because of the logical database. These selections should also be used instead of query selections. Choose Execute to run the query. |
|
|
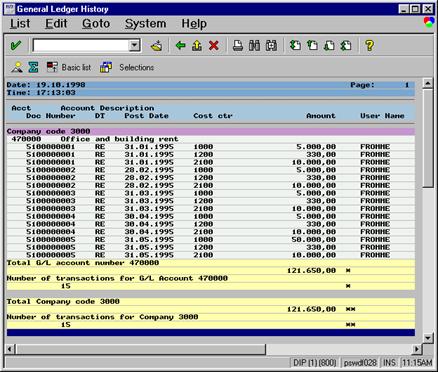
The basic list shown here is a simple listing of detailed
transactions for specific G/L accounts. In this example, 15 transactions have
been posted to the G/L account based on the selection criteria specified at
the time of executing the query. < Expand or collapse the detail with the Basic List button. < Drill down (sometimes referred to as Report Call) to call up a variety of reports or transactions from this query. Drilldown capability is specific to the query. <
Save the query to a file to be
called up and viewed later. |
|
|
|
Creating variables In the functional area, you can use available selection criteria to customize specific fields (variables) for entry at execution time. These new variables work for all queries created within the functional area. You can set up selection options and parameters that work just like the ABAP code statements Select-Options and Parameters. With these selection options you can make the variables: < Work with their matchcodes < Mandatory fields < Display only < Highlighted < Set defaults |
The following example explains how to customize the variables from within the functional area.
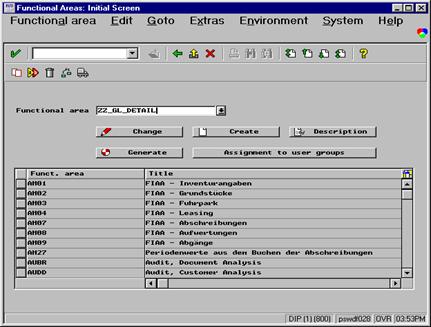
From the SAP main menu choose System Services ABAP Query, then Tools ABAP Workbench Utilities ABAP Query Functional Areas.
In the Functional area field, enter the name of the functional area to be changed and click the Change button (not shown).
In the Change Functional Area screen, choose Selections (not shown).
If the functional area was created using a logical database, the database selection criteria will appear. Do not add these fields again or try to change them. If the functional area was created using table joins or direct table reads, this table will be empty which means there are no pre-defined selection criteria included in the functional area. You will need to manually add all the desired fields as selection criteria.
![]()
![]()
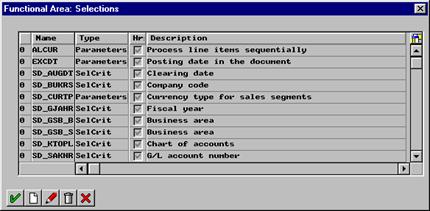
Choose Create to add a new field.
In the Create Selection window, enter the name of the new selection criteria. Use a name that starts with an alpha character.
![]()
![]()
![]()
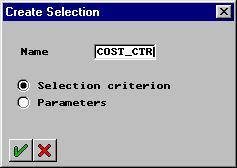
Select Selection criterion. Since parameters only allow one value, this selection gives you the most flexibility to enter multiple values and ranges.
Choose Enter.
![]()
![]()
![]()
![]()
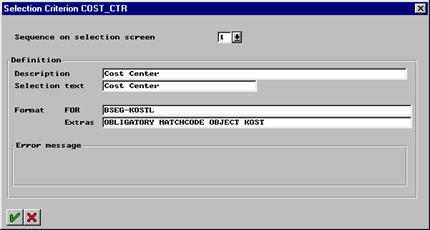
Enter the description and selection text
for the field. In this example,
Enter the name of the field being added in the FOR statement.
In the Extras statement, enter any criteria for the field. In this example, the cost center field is made a mandatory field with matchcode capabilities.
Choose Enter.
|
|
Table joins became available with Release 3.0C. If just a few tables are being used to create a functional area, tables joins can be more efficient than logical databases. However, logical databases are essential for hierarchical processing. Table joins should be considered for performance reasons when creating the functional area. |
|
|
Only inner table joins are available in the standard 4.0x
releases. Left outer tables joins are available in Release 4.5x. If left outer joins are needed in a 4.0x
system, refer to |
What follows is an example of starting a functional area with a table join. The example stops at the point where you begin adding fields to the functional groups. For more information on how to add fields to the functional groups and to finish the configuration of the functional area, see page .
From the SAP main menu choose System Services ABAP Query, then Tools ABAP Workbench Utilities ABAP Query Functional Areas.
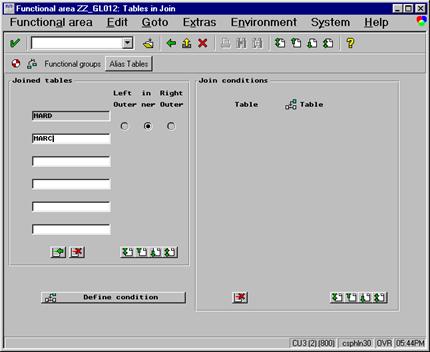
In the Functional area field, enter the name of the functional area to be created and choose Create.
In the Name field, enter a description for the functional area.
In the Table field, enter the name of the table (for example, MARD) with which you want to begin the table join. For best results, a high percentage of fields from the table you choose (for example, MARD) must also be present in the other table (for example, MARC
Select Table join.
Choose Enter.
![]()
![]()
![]()
![]()

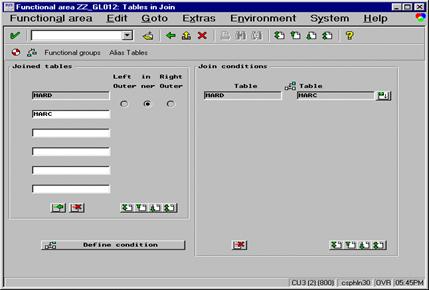
Enter the names of the other tables that are needed in the functional area.
Choose Define condition to define the link between the two selected tables.
![]()
![]()
The tables appear in the Join conditions (right side of the screen).
Choose Specify conditions to define the join.
![]()
![]()
You are prompted for proposals for the table join. Choose Yes and the system will propose the join conditions.
![]()
![]()
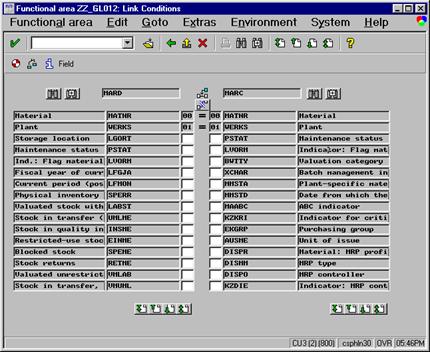
The proposed join between MARD and MARC is the material number and the plant. These are the two key fields on MARC. If both key fields can be matched (as in this case), then the system will always bring back one unique recordif a record is found.
|
|
If the proposal did not
create the intended join conditions, you may want to define additional join
conditions. To do this, enter matching numeric values in the two-character
space next to each field. For example, if |
Choose Back to go back one screen.
Choose Functional group on the next screen to begin adding fields to the functional groups from the adjoined tables.
Each query has Report Call functionality for drilling down to other reports. These reports can be any of the following:
< Report groups created using Report Painter/Report Writer (see chapter 3)
< Drilldown reports created using the Drilldown reporting tool (see chapter 4 and appendix F)
< ABAP programs
< Other ABAP queries
< Transaction codes (for example, standard reports available in LIS. For more information, see chapters 5 and 6)
|
|
Many customers like to drill down to display transaction codes for master records and detail transactions from queries. To add the Report Call functionality to a query: You must be in Create or Change mode within the query. Choose Goto Report assignment. Assign any of the report types mentioned above to the query. |
< Creating functional areas using table joins, instead of logical databases, is more efficient for processing if you are using only a few tables. However, logical databases are essential for creating hierarchical lists. You may want to consider the pros and cons of using functional areas and logical databases if performance issues are an important concern. Due to perceived performance problems, many customers make limited use of ABAP Query.
< Non-technical users may find it difficult to work with table joins, additional tables, and additional fields. People may get discouraged and back away from the tool. Have the more technical team members create the functional areas and user groups. Delegation of tasks allows less technical team members to concentrate on creating queries.
< While ABAP Query is an easy tool to work with, it is important to recognize that experience with the tool is valuable toward producing an efficient query.
< It is important to control the usage of the tool; not every user in a company should be given permission to create, change, or access queries. Controlled access to ABAP Query is recommended for optimal system performance and report organization. A reporting team should be formed to create and change queries. This team should be responsible for naming conventions, report creation, and testing. The team should ensure that duplicate functional areas, queries, and user groups are not created and that the standards are adhered to.
< A report specification form is a valuable tool. A sample form is included in the Fundamentals of Reporting guidebook and on the companion CD supplied with this guidebook set. This form serves as the key channel of communication between the reporting team and the end users that need reports.
ABAP Query is an easy-to-use tool for extracting data from the R/3 System. It can be used with most tables, both standard and user-defined. With ABAP Query you can list data, total, and sort from almost any table or combination of tables. ABAP Query can create basic, statistical, and ranked lists. It works with logical databases, tables joins, or individual tables. Queries can be printed, downloaded, used with graphics, saved as extracts, or simply viewed on the screen.
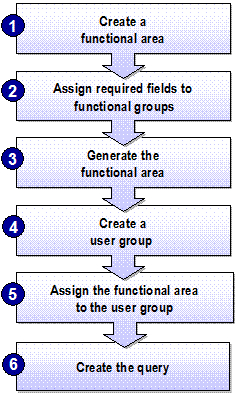
The following steps are needed to create a report with ABAP Query:
Create a functional area.
Assign required fields to functional groups.
Generate the functional area.
Create a user group.
Assign the functional area to the user group.
Create the query.
<
R/3 Library (Online help): In
Release 4.0B, you will find more information on ABAP Query. Go to R/3
< ABAP/4 Query, a comprehensive book from the ABAP/4 Development Workbench documentation published by SAP AG. To order printed copies use product number 50014371.
< BC405: ABAP/4 Development WorkbenchReporting, a five-day training course offered by SAP Education and Training.
|
Politica de confidentialitate | Termeni si conditii de utilizare |

Vizualizari: 2046
Importanta: ![]()
Termeni si conditii de utilizare | Contact
© SCRIGROUP 2025 . All rights reserved