| CATEGORII DOCUMENTE |
| Bulgara | Ceha slovaca | Croata | Engleza | Estona | Finlandeza | Franceza |
| Germana | Italiana | Letona | Lituaniana | Maghiara | Olandeza | Poloneza |
| Sarba | Slovena | Spaniola | Suedeza | Turca | Ucraineana |
1. BIOS Versions
Every motherboard has its own unique BIOS designed especially to handle the hardware it contains. The basis for the majority of BIOS Programs is the Phoenix Award BIOS, which occurs in two different formats. You'll also find some computers that run an American Megatrends (AMI) BIOS.
The structure of BIOS menus and the nomenclature used for menu options vary from vendor to vendor. In fact, BIOS menus for two successive motherboard models can even differ to a greater or a lesser extent. This explains why we can't provide precise descriptions of BIOS options in every PC known to humankind. Nevertheless, you should find the following explanations based on the Phoenix Award BIOS directly related to (if not identical with) what you find on your own PC. Don't stress if you can't find some of the settings named on your computer - this just means the BIOS on your PC doesn't address the related hardware functions or capabilities directly.
2. Accessing Your BIOS
During start-up, as the BIOS is checking hardware components
on your system, tallying up available RAM, and checking out hard disks (and
other drives and devices), you can invoke the BIOS Setup program by pressing a
special key on your keyboard. Often, this means striking the delete [
If it works as it should, the BIOS will finish counting up available memory, and then the primary BIOS menu screen will appear. If this doesn't produce the desired result, reboot the PC and try a different key. Many notebooks, for example, use the [F1] or escape [Esc] key. Sometimes, keys such as [F2], [F10] or key sequences like [Alt F1] may do the trick instead.
3. Manipulating BIOS Settings
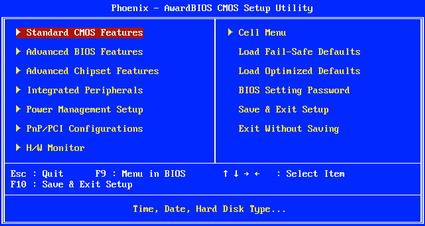
The BIOS Setup program: Navigate to an entry using the cursor keys, then hit Enter to make a selection (Screenshot A)
To access an option in the BIOS, use the cursor (arrow) keys to highlight your choice, as shown in Screenshot A. The Enter key will either invoke a sub-menu or open a selection window, as illustrated in Screenshot B. To alter the value associated with the setting you've selected, you'll have to use the plus [+]or minus [-] keys, or another combination such as [Page Up] and [Page down]. From the main menu screen, you'll use this technique to navigate into various sub-menus, some of which may have subordinate menus of their own as well, until you get where you need to go.
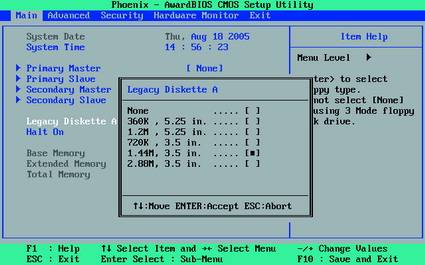
Opening sub-menus: Many option values may be altered with the plus [+] and minus [-] keys, while others require navigating inside selection menus or pick lists, as shown in Screenshot B.
Let's take a brief overview look at the various menus in a typical BIOS setup program:
In the '
In the 'BIOS Features Setup' menu, you'll work with general settings of all kinds.
The 'Integrated Peripherals' menu is where you can manage interfaces and auxiliary system functions.
The 'Power Management Setup' menu is where you go to configure energy saving or power management functions.
The 'PnP/PCI Configurations' menu permits you to rearrange which interrupts (IRQs) relate to specific PCI expansion cards in your PC. If you don't find these functions identified as such (or something similar) in the Main menu, you'll probably find them under the 'Advanced' menu instead.
The 'Hardware Monitor' menu shows values from system sensors, such as the processor temperature or fan speeds (in RPM). These are normally for the CPU cooler and system fan, but may also be for the power supply or other fans for which the motherboard has sensing hardware.
The 'Load Setup Defaults' item restores factory default settings, and wipes out any changes you may have already made. This can be especially useful when you've misconfigured something and the results cause problems on your system.
4. Ending A BIOS Session
To end your work in the BIOS Setup program, you must strike the [F10] key, or select the main menu entry that reads 'Save & Exit Setup'. Sometimes this involves first selecting an 'Exit' option, then choosing the 'Exit & Save Changes' sub-entry. You will then be presented with a choice between [Y] and [N], where the [Y] key saves your changes, and the [N] key discards them. Select one or the other, and you'll exit the BIOS Setup program.
Key Settings
The following BIOS tricks will show you how to change the boot priority order on your computer, start a desktop PC with a keypress or a mouse click, activate support for USB 2.0, and handle problems with fans or hardware changes.
5. Establish Boot Priority Order
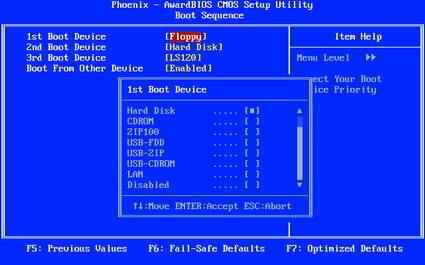
Skip the floppy during startup: Pick the hard disk as the boot drive (as shown in Screenshot C).
Most PCs attempt to boot from the floppy disk during startup. This consumes valuable time and introduces the possibility of infection from boot sector viruses. And let's face it: there's rarely any need to boot from the floppy these days anyhow. Telling the BIOS to not bother with checking the floppy drive and turning off drive checks for floppies helps shorten boot time.
The BIOS has a mechanism to let you control the devices from which your PC can boot, and the order in which those devices should be checked. The following configuration lets your PC skip the floppy drive during startup, thereby speeding the boot process and beefing up system security.
Here's how you do it: First select 'Advanced BIOS Features, Boot Sequence' then switch the '1st Boot Device' from 'Floppy' to 'Hard Disk', as shown in Screenshot C; this may be called 'HDD-0'. This instructs the BIOS to go straight to the boot sector on the hard drive without taking any unnecessary detours.
With this change made the computer no longer tried to boot from the floppy drive, but it still checks to see if a floppy drive is installed on your PC, which wastes time. To avoid this check, be sure to set the 'Boot Up Floppy Seek' option to 'Disabled' as well.
6. Speed PC Boot Up
The bottom line on this change is that your PC won't go off looking for new hard disks and other drives each time it boots. Skipping this check helps speed boot up.
Here's how you do it: Unless you change drives in your
system regularly, set the drive search time to zero. From the '
7. Activate USB 2.0 Support
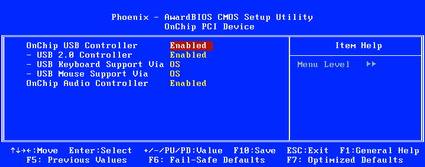
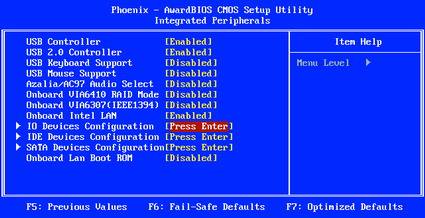
USB: Those who've installed Windows XP with Service Pack 2 should enable the 'USB 2.0 Controller', shown in Screenshot E.
On many motherboards, the 'USB Controllers' Option is installed so that only USB 1.1 is active. The root cause of this issue is that Windows XP itself, prior to the addition of any Service Packs, does not support USB 2.0. The following BIOS manipulation lets you activate support for USB 2.0 after the fact.
To do it, simply change the value for this option to 'Enabled' (as shown in Screenshot E) or to 'V1.1+V2.0', as may sometimes be the case. The prerequisite for using the faster USB 2.0 interface is that Service Pack 1, at a minimum, must be installed for Windows XP.
8. Fixing Problems With USB Devices
Some memory sticks, flash drives, MP3 players with memory stick functions, and USB hard drives draw their power from the USB port. If insufficient power is delivered, the device may not work. That's why you need to make sure that the USB interface can deliver enough power to attached devices.
Check your BIOS to see if you can find an option named 'USB 2.0 HS Reference Voltage'. If that option is available, change the associated value from 'Low' or 'Medium' to 'High' or 'Maximum'.
9. PC Reaction To Power Failure/Loss
Within the 'Power Management' menu, the BIOS offers an option to determine how the computer will react to
a power outage or failure. The 'AC Power Loss Restart' or
'Restore on AC Power Loss' option controls how the PC will behave
once power is restored following a power outage (or other unexpected or
ungraceful shutdown). The '
10. Monitor PC Health
The BIOS offers information and settings about the operational health of your PC. These tools let you monitor vital system components in real time, including the CPU, fans, power supply, and hard disks. For example, CPU temperature alarms or alerts can help you avoid overheating your system, and perhaps even foil an emergency shutdown.
In the 'Health' or 'H/W Control' menus you can track variations in input voltages as well as read actual temperatures inside your PC. Most BIOSes show at least the CPU and case temperatures, and many provide other temperature readings as well, such as for hard disks and the motherboard or CPU socket. Likewise, you can obtain fan speed readings (in RPM) for CPU and system fans.
11. Mitigate Fan Problems
If your PC won't start up, it might be because the CPU fan is spinning too slowly - or not at all. This is especially true for thermo-regulated high-end coolers that might turn very slowly (or stop entirely) when temperature readings are very low, tricking the BIOS into thinking something's wrong with the fan. That's when the following BIOS tweak comes in handy.
Set the value for the option named 'CPU Fan Failure Warning' to 'Disabled'. Once you've deactivated this function, the computer will start even with a slow fan. Of course, one problem is that you may not be able to access the BIOS on your first system start if, as is often the case, the default value for this setting is 'Enabled'. In that case, you may need to temporarily switch back to the cheap CPU cooler that came with your motherboard or CPU, which operates constantly at maximum fan rotation speed. After you disable this setting, switch back to your high end cooler without worrying about an emergency shutdown blocking access to the BIOS setup program.
Modern hard disks can detect problems or symptoms that suggest a drive crash is imminent, and issue a warning to the BIOS. This function is called 'Self Monitoring And Reporting Technology' (SMART). Activating 'HDD SMART Capability' allows the BIOS to send a warning message to software such as Norton System Works, or the well-known SpeedFan freeware utility. That software can then in turn alert you to the condition of your storage device, providing early warning about potential disk problems so you can take corrective or evasive action.
12. Avoiding A System Crash
Modern hard disks can detect problems or symptoms that suggest a drive crash is imminent, and issue a warning to the BIOS. This function is called 'Self Monitoring And Reporting Technology' (SMART). Activating 'HDD SMART Capability' allows the BIOS to send a warning message to software such as Norton System Works, or the well-known SpeedFan freeware utility. That software can then in turn alert you to the condition of your storage device, providing early warning about potential disk problems so you can take corrective or evasive action.
13. Using Older Scanners And Printers
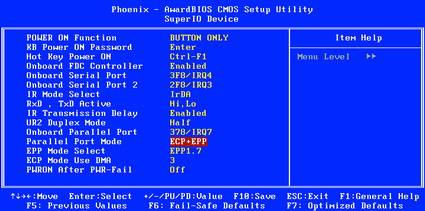
Parallel port: 'ECP + EPP' is the fastest mode of parallel port communications (Screenshot F).
Your PC's parallel interface (aka parallel port) is normally set to allow only unidirectional communications. This setting works for nearly all devices, but also limits data transfer rates to a slow 100 kbps. The following trick can deliver data transfer rates of up to 1 Mbps for your parallel port.
All you need to do is activate either 'ECP' (
Warning: If a printer and a scanner share a single parallel port, this configuration can cause device conflicts or problems, as shown in Screenshot F. If you want to maintain a high data transfer rate, you may need to install an additional PCI expansion card to add a second parallel port to your machine and then move one of these two devices to the other such port. Alternately, use a USB-to-parallel-port adapter for one of the two devices instead.
14. Display Power-on Self-Test (POST) Results During Boot-up
During PC start-up, many computers simply flash a colorful vendor logo instead of showing you what's going on. Instead of pretty pictures, you can - and probably should - have the PC show you the results of the tests it's performing.
Here's how to do it. From within the 'Advanced BIOS Features' menu, set the value for the 'Full Screen LOGO Display' option to 'Disabled'. After that, you can follow along and read the results of all the tests your PC runs while it's starting itself up.
15. Boot Your PC Twice As Fast
This trick lets your computer skip various component tests during start up. For example, available RAM space will be tallied just once, rather than the customary three times; your computer should start nearly twice as fast as a result.
From within the 'Advanced' or 'Advanced BIOS Features' menus, change the value of the 'Quick Power On Self Test' or 'Quick Boot' option to 'Enabled'.
Warning: If any hardware problems show up after you make this change, you'll want to revisit BIOS Setup and return this option to 'Disabled' - that will let the BIOS help you identify what's causing the trouble, so you can fix it.
16. Start The Right Graphics Card
The BIOS tries to decide which graphics card to use each time it runs, but this isn't really necessary - you already know!
Pick the menu option labeled 'Init Display First', which may also appear as 'Primary VGA BIOS' or 'VGA Boot From' depending on your BIOS version. Set its value to 'AGP' if you use an AGP graphics card in your PC. In brand-new systems with PCI Express, this option is normally named 'PEG Port/Graphic Adapter Priority' instead. In that case, set its value to 'PEG', if your system uses a PCI Express graphics card.
17. Deactivate Outmoded Graphics Functions
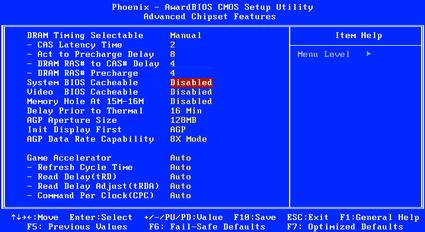
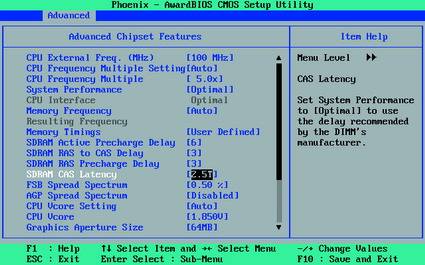
BIOS Cacheable: These settings only improve performance in MS-DOS (see Screenshot G.)
The 'Video RAM Cachable' and 'Video BIOS Cachable' options boost graphics performance on older machines running DOS - but they do nothing for Windows. So why bother with them at all?
Set both the 'Video RAM Cachable' and 'Video BIOS Cachable' options to 'Disabled'. While you're at it, deactivate the 'VGA Palette Snoop' as well, if this option appears. You can also safely deactivate the 'System BIOS Cacheable' option (see Screenshot G) - it no longer provides a performance boost, and in some cases, may actually have a negative impact on system stability.
18. Install Texture Memory
The option for 'Graphics Aperture Size' (which may show up as 'AGP Aperture Size') was originally intended to help AGP graphics cards make more efficient use of system RAM when rendering graphics textures. This function has become outmoded now that many graphics cards have 128 MB or even 256 MB of video RAM onboard. At the same time, video RAM typically runs faster than system RAM. The old rule of thumb, often stated as 'Set the graphics aperture size to half the RAM in your system,' thus no longer applies. It's better to set texture memory to an optimal size instead.
Set the value for the 'Graphics Aperture Size' which may also show up as 'AGP Aperture Size' to '128' or '64' MB instead.
19. Modify Clock Settings
This trick prevents problems with an AGP card when overclocking the Front Side Bus (FSB).
The menu item 'AGPCLK/CPUCLK' (may show up as 'AGP Clock') appears on systems with motherboards for which the manufacturer provides overclocking functions. If present, set its value to 'Fix'. This prevents overclocking the FSB from also automatically overclocking the AGP graphics card. A value of '1/1' causes the AGP card to run at the same clock rate as the FSB. A value of '2/3' sets the AGP clock to 2/3 of the FSB clock rate, so that 100 MHz for the FSB translates into 66 MHz for the AGP card.
20. Boosting AGP Clock Rates

Increasing the AGP clock rate boosts performance but can also lead to problems - see Screenshot H.
Some motherboards permit the AGP clock rate to be increased. Ratchet up the tempo in small steps (see Screenshot H) for the 'AGP Frequency' value, and reboot your PC after each incremental change. Test each setting with something like a 3D shoot-em-up game, to see if the system remains stable. Keep at it until signs of instability manifest themselves, then back off to the previous setting.
21. Boost AGP Voltage Levels
Higher clock rates also entail higher power consumption. The following changes provide the graphics card slot on the motherboard with higher input voltage.
The 'AGP Voltage' option permits you to boost input voltage in increments of 0.1 volts. Make these changes, however, only when higher AGP clock rates lead to system instability and you feel a need for increased speed.
Warning: In some circumstances, setting voltage levels too high can destroy a graphics card. When boosting input voltage has no effect, be sure to reset the voltage to a lower value, and turn the AGP clock rate down, to be sure you restore your system to steady and stable operation.
22. Activate CPU Cache Levels
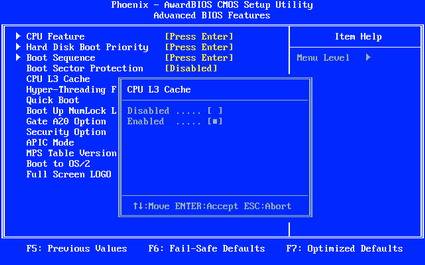
Activating the CPU cache at any of Levels 1, 2, or 3 delivers definite performance advantages (see Screenshot I.)
The CPU runs markedly faster than the rest of the motherboard, so it must often wait for data. Speed this process up with help from CPU cache, a form of faster memory that sits between the CPU and system RAM.
Level 1 (L1) cache is very small but is located on the CPU die itself, providing fast, temporary storage for data. Level 2 (L2) cache is significantly bigger and can store entire program elements; when the CPU asks for data that the cache already has, this improves performance because system RAM can't respond to retrieval requests nearly as quickly. Systems that include CPUs with an integrated L2 cache typically also have access to external Level 3 cache memory that speeds the PC still further. Activate all related options that the motherboard (and BIOS) make available to you,as shown in Screenshot I.
23. Turn On APIC
The motherboard chipsets generally contain two main components usually called the north bridge and south bridge. These drive data signals between the CPU, system RAM, and expansion cards and other peripheral devices. The following configuration lets the computer handle more interrupts and thus, more devices. The total number of usable interrupts climbs from 16 to 24. In addition, interrupt handling becomes noticeably more flexible, while also leading to time savings in data management.
All you have to do is go to the 'Advanced BIOS Features' menu and make sure the 'APIC Mode' function is set to 'Enabled'.
24. Turn On Burst Mode
Access to hard disks, PCI cards and RAM all work faster in 'Burst Mode'. In this mode of operation, pairs of devices can exchange data especially quickly, because multiple data transfers can be initiated or acknowledged with a single signal instead of requiring each individual item to be handled or acknowledged separately.
In your travels through the BIOS setup program, whenever the 'Burst Mode' option appears, make sure it's set to 'Enabled'. You should also test the system thoroughly for stability after making such a change.
Warning: Many PCI cards won't work properly if the 'PCI Dynamic Bursting' option is set to 'Enabled'.
25. Activate Bus Mastering
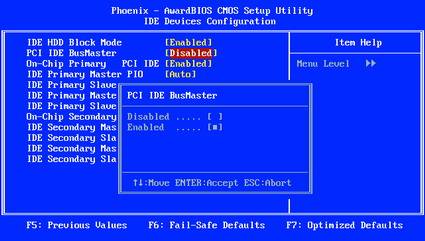
Activate Bus Mastering: This setting speeds hard disk access (see Screenshot J.)
This BIOS setting instructs Windows to use the faster DMA (Direct Memory Access) mode when reading from or writing to a hard disk. DMA mode permits disk drives to access system RAM directly without involving the CPU. This speeds access to data on the hard disk, for example, and saves valuable CPU resources.
When the 'Integrated Peripherals' menu includes an option named 'PCI IDE BusMaster', set its value to 'Enabled' as shown in screenshot J. Once this setting has been activated, go to 'Start, Control Panel, System' and click on the Device Manager button from its Hardware tab. Look for a subordinate entry that reads something like 'IDE ATA/ATAPI Controller' - the designation may vary from motherboard to motherboard. Double click the entry that reads 'Primary IDE Channel' and then select the 'Advanced Settings' tab. In the device entry pane(s), you should see an entry labeled 'Current Transfer Mode'. Inside its data field, make sure the entry reads something like 'Ultra DMA Mode'. Hard disks usually offer a value that reads 'Ultra DMA Mode 5 (Ultra 100)', while CD and DVD drives or burners typically operate in Mode 2 (Ultra 33).
26. Change RAM Timing Settings
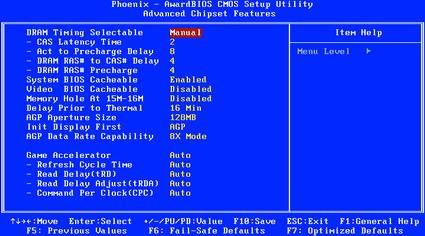
Reduce latency times: This only works on high-quality RAM modules, but when it does work, it makes a huge difference (Screenshot K.)
Every SDRAM and DDR memory module includes a Serial Presence Detect (SPD) chip, which stores memory timing values settings. RAM vendors specify SPD values designed to guarantee safe, stable operation. Most of the time, however, it's worthwhile to experiment with tighter timing values, as this can improve overall performance by as much as 10%.
The relevant option may be named something like 'System Performance', 'Memory Timings', or 'Configure DRAM Timing'. As a rule, the default value for this option is 'By SPD'. This instructs the computer to read recommended timing values right from the memory module itself, and to automatically use those values for memory access. The alternate value 'Enabled' is likewise unlikely to cause problems for your PC.
Those who want to tweak their systems for speed should instead select the values 'Disabled' or 'User Defined' if and when they're available (see Screenshot K.) Then set the parameter values yourself, as described in the tips that follow next.
27. Lower The RAS-to-CAS Delay Value
It's best to think of system memory as a kind of two-dimensional table. Accessing data first requires identifying a row using a signal called Row Address Strobe (RAS) and then a column using Column Address Strobe (CAS), to uniquely identify a specific memory location. A pause is required between the RAS signal and the CAS signal, to be sure that memory is correctly addressed. This RAS-to-CAS delay normally consumes two or more clock cycles.
The value for the 'SDRAM RAS to CAS Delay' lets you specify exactly how many clock cycles must elapse between sending a RAS signal and then following with a CAS signal. Possible settings usually fall in a range from 2 to 5, where 2 is fastest. Reduce this value one cycle at a time, and test your system for stability with each change. The better the RAM, the smaller the value at which your system will keep working properly.
28. Reduce CAS Latency
When memory access is underway a particular time period must elapse between specifying a memory address and accessing its contents; this is called latency. This interval for a memory cell may be set to 2T for two clock cycles, 3T for three clock cycles, and so on. A smaller value for 'SDRAM CAS Latency' means faster performance; higher means slower performance.
The safest and most correct value for 'SDRAM CAS Latency' is usually printed on a label or etched directly onto the memory module itself. Typical values are 3T or 2.5T for lower-cost memory modules. Change this setting to 2.5T or even 2T, then test your system for stability. Some memory manufacturers claim that 2T-capable memory can also handle higher memory clock rates. If tightening CAS latency succeeds, you may also want to try boosting the memory clock rate by increasing the value for the 'Memory Frequency' option.
Warning: Make only one change at a time, then reboot and test its effects by running a benchmark. This makes it easy to back off only the right value when instability rears its head and requires a rollback of some kind.
29. Reduce Memory Load Time
With the correct settings, memory cells acquire the electrical charge they need to operate more quickly. Set a value for the 'SDRAM RAS Precharge Delay' option (in clock cycles) for the interval when the charge level is building and when the RAS signal is sent. Smaller values, such as '2', set the tempo faster than larger values, but larger values ensure more stable system operation. Reduce the number of clock cycles one at a time and test your system for stability after each such change.
30. Shorten The Delay Before The Next Memory Access
The 'SDRAM Active Precharge Delay' option is also specified as a number of memory clock cycles. It indicates the delay between subsequent memory accesses, so reducing it can speed up overall memory access.
A typical rule of thumb for this value is: Active Precharge Delay = CAS-Latency + RAS Precharge Delay + 2 (added as a safety margin). As with other experimental value tweaks, reduce this number by one clock cycle at a time to determine if faster values work, as is often the case. As soon as stability problems appear, bump this value up by one to ensure trouble-free operation.
31. Read RAM Timings
RAM Timings: Incremental changes to settings help speed RAM performance (Screenshot L).
The recommended values for the settings in Tips 27 through 30 appear most often on the memory module itself. A set of values that reads '2.5-4-4-8' is specified in clock cycles, and means the CAS Latency is 2.5 cycles, the RAS to CAS Delay is 4 cycles, the RAS Precharge Delay is 4 cycles, and the Active Precharge Delay is 8 cycles. These represent the setting values that the manufacturer recommends for the memory's specified clock frequency. Smaller values may very well work, but they also risk system crashes. To improve performance, reduce these values incrementally one at a time, and test each change for system stability and performance, as shown in Screenshot L.
32. Increase RAM Input Voltage Levels
When RAM runs faster, it needs more voltage. That's why you must boost input voltage levels to match clock rate increases.
The 'DDR Reference Voltage' option permits voltage levels to be raised in increments of 0.1 volts. Increasing this value makes sense only when you've reduced one or more timing values or have increased the frequency of the memory clock, and when stability problems begin to manifest.
Warning: Setting input voltage levels too high can destroy memory modules in some cases!
33. Turn Off Motherboard Audio
Eliminate deadweight: Turn off unused functions, such as the motherboard's sound chip (Screenshot M).
The motherboard sound chip may never be used. If you install a PCI sound card, or never use your PC's audio functions, deactivate sound chips on the motherboard. This increases overall system performance and stability.
In the 'Integrated Peripherals' menu, set the value for the 'AC97 Audio Select'option to 'Disabled' (as shown in Screenshot M).
34. Turn Off
The
Only those who need an older joystick, or who use the game
port as a
Here's how: From the 'Integrated Peripherals'
menu, set the value for the '
35. Deactivate Onboard-LAN Functions
Some motherboards come equipped with two network interfaces, but as a rule, most users need only one, and can turn the other one off. Even a defective interface should be turned off. This increases system performance and stability.
From the 'Integrated Peripherals' menu, simply set the value for the 'Onboard Intel LAN' option to 'Disabled'.
36. Deactivate Unneeded Ports
The bottom line: Only old PDAs or serial-attached modems need the old COM1 and COM2 ports. Deactivating them saves two IRQs, and lowers the number of active interrupts the CPU must check. The parallel LPT interface is often superfluous today, too. If you attach your printer or scanner to a USB port instead, you won't need this old interface any more.
From the 'Integrated Peripherals' menu deactivate the COM1 and COM2 interfaces through the
'IO Devices, Com-Port' option, which may sometimes appear as '
37. Deactivate Firewire
You only need Firewire if you plan to editing video from a camcorder, or use other Firewire peripherals. Otherwise, turn it off.
From the 'Integrated Peripherals' menu, set the value for the 'Onboard 1394 device' option to 'Disabled'.
BIOS Update
From time to time, motherboard manufacturers release new BIOS versions. An updated BIOS optimizes existing hardware and may also introduce new functions, such as overclocking features. We recommend that you update your BIOS whenever a new commercial version is released (but you can usually skip interim alpha or beta releases).
The BIOS program uses resides in a special kind of flash memory module. It's rewritable, which enables an old BIOS to be overwritten completely by a new version. Updating the BIOS requires special software tools, which the motherboard or system manufacturer will supply for each model. Because of the memory technology used, updating the BIOS is also known as 'flashing the BIOS.'
When it comes to performing a BIOS update, users face two alternative methods to complete this task. First, they may use a Windows tool, which usually comes with the driver CD for the motherboard, or may be downloaded from the motherboard or system vendor's Web site. At regular intervals, this tool checks to see if new versions of the BIOS are available, downloads them automatically when they're detected, and installs them at the user's behest. This method is easy, but weighs your PC down with yet another program that consumes system resources running in the background.
The Windows option is by no means bad, as long as your system remains stable. If your Windows installation gets messed up, however, avoid this method. In that case, you'll want to employ the following DOS method instead.
Normally, you'll download this tool from your manufacturer's Web site. Next, you'll start your system from a DOS boot disk, and invoke the flash program from the command line; many such utilities come in the form of a ZIP file which, when extracted to a floppy disk, copies all the necessary files - including DOS boot files - to a floppy for you. This approach is more reliable because it requires no device drivers to load before it goes to work.
Warning: When you flash the BIOS on a notebook computer, it shouldn't be running on battery - it's essential that it be plugged into a wall socket or you risk a shutdown during the update, which can wreak havoc on your system.
38. Loading A New BIOS
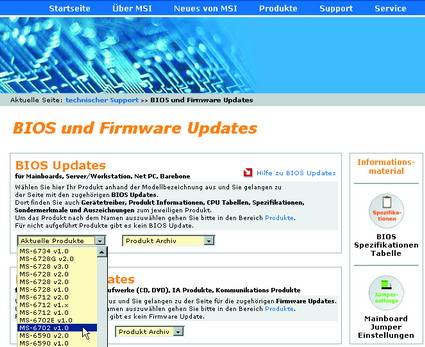
Select your motherboard (or system): Use only BIOS versions that apply to your motherboard (or system) make and model (see Screenshot N.)
Visit your motherboard (or system) manufacturer's Web site, and check out their support pages. Look for the make and model of your motherboard or system; see Screenshot N. Most of these entries use designations such as 'GA-686BX', 'A7N8X-E' or 'K8T Neo2'. If your search turns up no matches, use only the model name instead. Sometimes this won't help either, though, perhaps because the motherboard name on the packaging (for example 'K8T-Neo') differs from its technical description (for example 'MS-6702 Version 1.0'). Should this happen, switch to the product listings on the Web site instead, and follow the right path to select the motherboard (or system) model that you own. Once you find your match, you can then select 'Downloads' or 'Support' to find what you need.
39. Archiving BIOS Versions
Some people download BIOS update files from the manufacturer's website regularly, even when they may not need them: for example, to assess experimental, alpha, or beta releases, or changes not relevant to specific installations. You can always replace later updates that you may not like or that cause problems with older BIOS versions. Always read the Readme file that accompanies any BIOS update through completely before you install it. The file will describe exactly what changes and enhancements are included in the associated BIOS version.
40. Test Your Update Installation
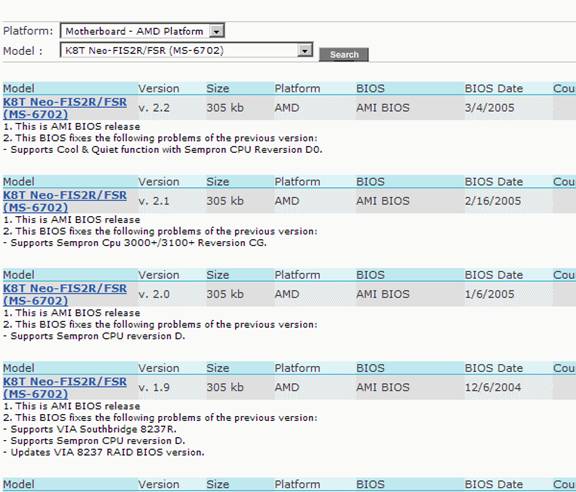
Installation testing: Remarks like these help you decide if you want to use an update or not (see Screenshot O.)
If a BIOS update addresses specific, concrete problems (as shown in Screenshot O), you must decide if those issues apply to your system. If not, you should probably skip the update unless it also promises definite performance improvements. A BIOS update often enables the installation of a faster CPU and may thus provide measurable performance gains.
If you didn't purchase your motherboard yourself, or it came as part of a turnkey PC, it's best to check the system vendor's site to see if a BIOS update is available for the motherboard. It's possible that the PC vendor will offer a BIOS update that originated as a BIOS update for the motherboard it contains. But it's also possible that the PC vendor will offer its own unique BIOS update that differs from the generic BIOS update for the motherboard. If you're unsure whether you should apply the update from the PC vendor or the motherboard manufacturer, ask the manufacturer; if you can't get a straight answer, it may be wise to simply skip the update altogether.
41. Preparing A Flash Disk
When you download a BIOS update, it normally takes the form of a ZIP archive that contains numerous files. One file will contain the actual BIOS image itself, which may have a cryptic name such as 'W7176IMS.110' or 'AN8D1007.BIN'. You'll also normally find some kind of text file that includes installation instructions.
An executable file of type .EXE is the actual tool for flashing the BIOS. It transfers the contents of the BIOS file to the flash memory chip where the BIOS resides. For Award BIOSes, for example, this file is usually named 'awdflash.exe'. You might also find a helper file that simplifies invocation and use of the flash tool; as an example it might be named something like 'start.cmd', 'flash.bat', or 'autoexec.bat'. Unpack these files into a directory named 'C:BIOS'. If the BIOS update is available for download as a self-extracting executable file, copy that file into the 'C:BIOS', and extract its contents by executing the file inside that directory.
Important: While the PC is still running (before you reboot, in other words), print the Readme file that contains additional information about the BIOS update. Keep it with your motherboard or system manuals. If you don't have a copy of those manuals, visit the vendor's Web site. There you'll find nearly all manuals available for download as PDF files.
42. Flash Your System From Diskette
You'll need a bootable DOS diskette to start this process rolling. To build one of these, start by selecting My Computer from the Start menu. Right-click the floppy drive icon that appears inside that window. Select 'Format' in the pop-up menu that appears, then click the checkbox next to 'Create an MS-DOS startup disk' in the resulting format window. Click 'Start' to begin the formatting process, then close the 'Format 3 1/2' Floppy' window when it finishes. Erase all the files on the newly formatted diskette, and copy the Flash tool and the BIOS file onto the diskette (for example, this would mean 'awdflash.exe' and 'w6330vms.360' for a relatively current Award BIOS version).
To install the new BIOS into the flash memory chip using a startup diskette, reboot the PC and make sure it boots from the diskette. Next, invoke the BIOS Setup program by striking the required key during initial startup. Select the 'Advanced BIOS Features, Boot Sequence' menu entries (which may also appear as 'Advanced, Advanced BIOS Features' on some machines). Make sure the value 'Floppy' is set for the '1st Boot Device' option. Exit the sub-menu using the escape [Esc] key. Use the [F10] key to end this Setup session, and be sure to retain your changes by striking to [Y] to answer 'Yes' when asked if you want to save your changes.
43. Flashing The BIOS From DOS
Double-check that your machine has a steady and reliable source of power. As mentioned earlier, don't flash the BIOS on any notebook computer while it's running on its batteries - make sure it's plugged into a wall socket.
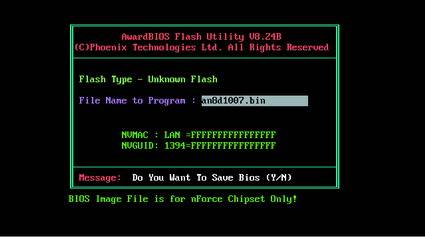
Reboot your PC and boot from the diskette you created with the Flash tool and BIOS file. When the prompt to 'Enter the name of the command interpreter' appears, enter the name of the Flash program, followed by the name of the BIOS file itself (this looks like
A:>awdflash.exe w6330vms.360
in our Award BIOS example). The program will take over and guide you through the rest of the process.

Archive the old BIOS: Before flashing in a new BIOS, secure the old one for possible later re-use by striking the [Y] key to save it to a file (Screenshot P.)
While the names of the Flash tool and the BIOS file may be different on your PC - for example, 'awdfl789.exe' and 'w6330vms.250' - the approach remains the same. Follow the instructions on the monitor and respond to all back-up and archive related queries. For every update, save a copy of your old BIOS to a file, as shown in Screenshot P. This backup will let you get back in business should the new BIOS cause problems after it's installed.
Finally, the Flash program will rewrite the BIOS image to the flash memory where it will then reside. Restart your PC once this action is complete. Make very sure that your PC doesn't lose power or get turned off during the update process, or you'll gain a new (and probably unwanted) appreciation for this bit of computer jargon: 'the machine is in an indeterminate state'.
44. Loading The New BIOS
Once the update is complete, turn your PC off. Be sure to remove the power cable, then erase your CMOS as described in Point 5 in the 'BIOS Golden Rules' section that follows next. Reconnect your power supply to the grid by reattaching the power cable, then plugging it into a wall socket. Turn the PC on, and you should be rewarded with an on-screen message that refers to the new BIOS you just installed. Hit your magic key to invoke the BIOS Setup program. Select the 'Load Optimized Defaults' option (which may appear as 'Exit, Load Setup Defaults' on some machines). Exit setup and save changes by striking the [F10] and [Y] keys, then start the PC up again to start enjoying the fruits of your labors.
BIOS Golden Rules
When you change BIOS settings, there's little you can actually break, as long as you don't elevate any input voltages. Nonetheless, it's a good idea to know about and follow various rules to help stay out of trouble.
Create a backup copy of your current BIOS. Before you install a new or changed BIOS, save the old version. Every Flash tool includes an option such as 'Save current BIOS as' (see Screenshot D). With the help of a backup, you can always get your system up and running again if a new version or changes to settings cause problems.
Change only one setting at a time. When running the BIOS Setup program, make changes carefully, one at a time, and in small increments where applicable. Restart you PC after each change and take it on a test drive under Windows to make sure things work properly. This is the only safe way to determine what impact individual settings changes have on your PC.
Run stress tests or benchmarks. Running your system under heavy or full load is the best way to determine whether or not aggressive settings cause problems when the PC is put to work. For this purpose, parallel use of massively networked applications such as online games, video editing, or 3D benchmarks such as 3DMark 2005 work best.
If all else fails, try a cold boot. If the PC won't boot after pressing the Reset button, turn off the computer and wait a minute or two before turning it back on. Use the switch on the power supply, not the buttons on the front of your PC.
Erase the CMOS. When the PC won't boot any more after you make BIOS changes, you won't be able to access the BIOS Setup program to back those changes out. Should this happen, you'll need to erase the CMOS memory in which the BIOS settings reside. Follow the instructions for clearing or resetting CMOS from your motherboard (or system) manual.
In some cases, this requires moving a jumper to bridge contacts that are designed to send a 'Clear CMOS' instruction to that memory. This may mean actually moving a physical jumper block on the motherboard, or may require flipping a DIP switch. Remember to remove that jumper after you've cleared the CMOS.
Another possibility is removing the CMOS battery and unplugging the PC from the wall. This may take several hours to work reliably, however.
Pacman 03.03.2006


|
Politica de confidentialitate | Termeni si conditii de utilizare |

Vizualizari: 695
Importanta: ![]()
Termeni si conditii de utilizare | Contact
© SCRIGROUP 2024 . All rights reserved