| CATEGORII DOCUMENTE |
Aplicatia Microsoft PowerPoint
![]()
In cele doua saptamani dedicate lucrului cu programul Microsoft PowerPoint vor fi studiate urmatoarele paragrafe:
1. Introducere in Power Point
2. Lansarea aplicatiei Microsoft PowerPoint
3. Crearea sau Deschiderea unei Prezentari
4. Deschiderea unei prezentari create si salvate anterior
5. Crearea unei prezentari cu optiunea Blank Presentation
6. Aspectul ecranului si al paginilor in PowerPoint 7. Actiuni asupra fisierelor cu prezentari PowerPoint
8. Actiuni asupra paginilor
9. Aparitia si succesiunea
paginilor in Prezentare 10. Vizualizarea prezentarii
11. Navigarea prin pagini in timpul prezentarii
12. Impachetarea aplicatiei in vederea prezentarii pe alt calculator
13. Despachetarea aplicatiei in vederea prezentarii pe calculator
Pentru aprofundarea tematicii, se recomanda parcurgerea unor materiale suplimentare; un material in limba romana este in Anexa1 si un tutorial in limba engleza este atasat la sfarsitul documentului prezent (Anexa 2). In format electronic va fi atasat un document .pdf in care se construieste o prezentare cu programul Microsoft PowerPoint si alt fisier .ppt creat pentru prezentare.
1. Introducere in Power Point
Aplicatia "PowerPoint" permite crearea de prezentari continand informatii de sinteza, sub forma de text, diagrame, imagini foto si grafice referitoare la o tema specifica; prezentarea este un fisier compus din pagini (slide-uri) succesive.
Lucrand in PowerPoint se pot realiza multe actiuni intre care:
- crearea unei prezentari noi;
- modificarea paginilor unei prezentari existente;
- adaugarea de pagini noi sau introducerea de texte, imagini CLIPART, diagrame EXCEL, tabele WORD sau alte obiecte;
- inserarea de imagini artistice, utilizand o gama larga de instrumente de desenare din PowerPoint;
- inserarea de efecte sonore si animatie, efecte speciale (texte ce apar din toate directile, tranzitii de la o pagina la alta, etc.).
- efectuarea, pe paginile de prezentare, de adnotari invizibile pentru public;
- introducerea in pagina in timpul prezentarii ei a unor obiecte grafice vizibile pentru public (sageti, desene simple, texte in regim grafic, etc.).
Fiind un program complex cu multe facilitati si optiuni, se recomanda sa fie folosita permanent si intens colectia de fisiere din meniul Help ca parte integranta din aplicatia Microsoft PowerPoint sau sa fie accesat site-ul Microsoft aflat la adresa web https://microsoft.com/office/powerpoint/default.htm.
In rezumat, PowerPoint este o aplicatie profesionala care permite crearea de pagini electronice unite in cadrul unui singur fisier nume.PPT si care contine pagini (slide-uri) de prezentare.
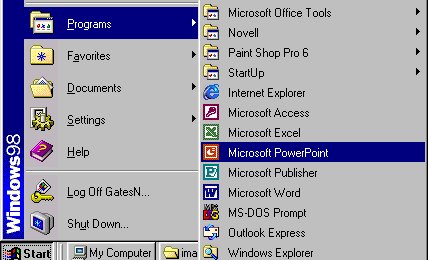
2. Lansarea aplicatiei Microsoft PowerPoint
Se pot folosi doua moduri in care se activeaza aplicatia PowerPoint:
1.Dublu-click pe pictograma Microsoft PowerPoint pe desktop

2.Click pe Start --> Programs --> Microsoft PowerPoint
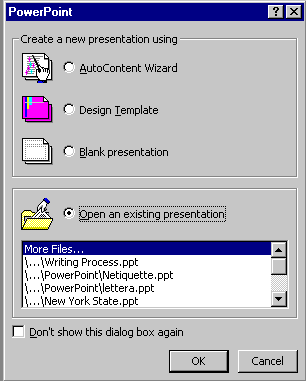
3. Crearea sau Deschiderea unei Prezentari
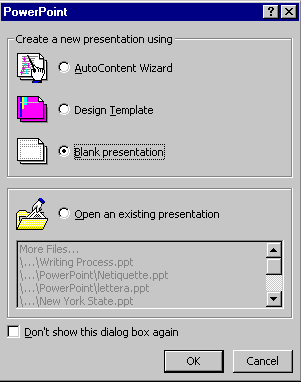
Dupa lansarea programului Power Point apare o fereastra aplicatie cu posibilitatea alegerii intre a crea o noua prezentare prin una din cele trei optiuni (AutoContent Wizard, Design Template sau Blank presentation) sau a deschide o prezentare creata si memorata anterior.
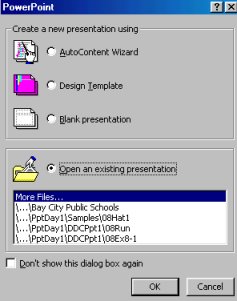
3.1. Utilizarea instrumentului AutoContent Wizard
AutoContent Wizard ghideaza utilizatorul pas cu pas in constructia unei aplicatii Power Point simple si este calea cea mai sigura si rapida pentru crearea unei prezentari, mai ales pentru incepatori. Lansarea instrumentului deschide o fereastra de Start apoi succesiv un numar de trei ferestre (Presentation Type, Presentation style, Presentation options) de configurare a prezentarii prin activarea butonului Next; iesirea se face prin click pe butonul Finish si pe ecran va aparea prezentarea proiectata. In prezentarea schematica realizata cu AutoContent Wizard se poate interveni si se inlocuieste informatia de tip text implicita prezenta cu cea dorita in paginile (slide-urile) care o compun. Se pot introduce elemente de tip text, grafic, sunet sau oricare actiune mentionata in paragraful de introducere.
Pentru a trece de la o pagina la alta se utilizeaza click dreapta apoi NEXT (pagina urmatoare) si PREVIOUS (pagina precedenta).
Odata activata aplicatia Power Point, lansarea instrumentului AutoContent Wizard se poate face si din meniul File si selectarea optiunii New.(CTRL+N) care deschide o fereastra "New Presentation" cu doua optiuni: Blank Presentation si AutoContent Wizard (daca se activeaza aceasta din urma).
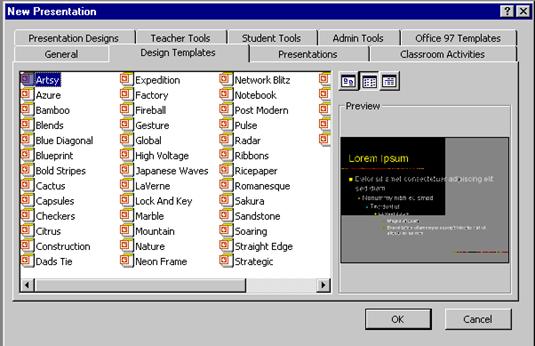
3.2. Utilizarea variantei Design Template
O metoda de a crea o noua prezentare consta in utilizarea unor machete predefinite (template) oferite de aplicatia Power Point; in macheta aleasa se introduce textul si obiectele grafice proprii prezentarii care inlocuiesc partial sau total pe cele oferite implicit de aplicatia Power Point.
Utilizarea variantei Blank Presentation
Alegand calea Blank Presentation se creaza o noua prezentare cu setarile implicite pentru text si culoare, fara un text oferit initial de aplicatia Power Point (vezi mai jos, paragraful 5.)
4. Deschiderea unei prezentari create si salvate anterior
Open an Existing Presentation deschide pentru modificari o prezentare salvata deja sub forma nume.PPT
1.in fereastra prezentata in figura de mai mai sus, selecteaza Open An Existing Presentation
2.Click in fereastra alba de sub optiune pe prezentarea dorita
3.Daca in fereastra alba de sub optiune nu se afla prezentarea dorita, selecteaza More Files si valideaza cu OK
4.Localizeaza prezentarea dorita si activeaza butonul Open
Puteti deschide chiar din timpul lucrului cu Power Point o noua prezentare cu FILE si NEW din meniul superior, ceea ce va da posibilitatea de a folosi formatul prezentarii curente. Puteti deschide mai multe prezentari in acelasi timp; cea curenta la care lucrati se afla denumita in partea de sus a ferestrei, celelalte sunt in lista si se pot activa utilizand optiunea WINDOW din bar-meniul superior.
5. Crearea unei prezentari cu optiunea Blank Presentation
Dupa selectia optiunii Blank
Presentation se deschide o fereastra cu mai multe modele din care se alege unul
pentru pagina care se construieste; dupa selectie, prima pagina (slide) este pe
fond alb cu fonturi si alte elemente de design implicite, ce vor fi eventual redefinite
ulterior.
Pastrand denumirile originale in limba engleza, machetele (de la stanga la
dreapta) poarta denumirile generice:
Title Slide
Bulleted List
Two Column Text
Table
Text & Chart
Chart & Text
Organizational Chart
Chart
Text & Clip Art
Clip Art & Text
Title Only
Blank Slide
Daca aveti o idee clara despre ce si cum va arata urmatoarea pagina, este recomandat sa alegeti un model predefinit din cele de mai sus oferite de aplicatia Power Point; daca nu aveti inca o idee clara asupra aspectului paginii ce urmeaza sa o construiti, se poate insera informatia in modelul de pagina alba (Blank Slide) si pe parcursul constructiei se rearanjeaza cat mai convenabil.
6. Aspectul ecranului si al paginilor in PowerPoint
Vizualizarea paginilor si/sau lucrul asupra lor se poate face in cinci moduri, precizate in mod grafic in partea din stanga jos a ecranului, ca in figura urmatoare:
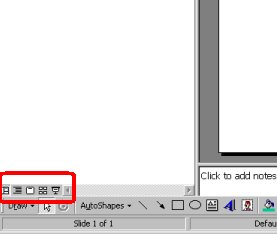
Normal View
![]()
Modul de afisare Normal View permite constructia prezentarii pagina cu pagina si ofera in acelasi timp o imagine structurala a intregului fisier.
Outline View
![]()
Modul de afisare OUTLINE (ansamblu) permite concentrarea atentiei asupra continutului prezentarii, facand abstractie de obiectele grafice; optiunea de afisare Outline View se foloseste cand se defineste structura fisierului intr-o vedere de ansamblu.
Slide View
![]()
Modul de afisare SLIDE (pagina) permite editarea, adaugarea, stergerea in pagina si vizualizarea imediata a efectului acestor modificari; optiunea de afisare Slide View se foloseste cand se lucreaza in maniera pagina dupa pagina.
Slide Sorter View

Modul de afisare SLIDE SORTER (sortarea paginilor) permite vizualizarea pe ecran la un moment dat a tuturor paginilor cu text si grafica ale unei prezentari, in miniatura, in scopul alegerii paginilor ce vor constitui in final prezentarea; in modul de afisare SLIDE SORTER se poate modifica pozitia relativa a paginilor, se pot adauga efecte speciale de derulare a prezentarii si de animatie, se pot fixa parametri de timp pentru defilarea automata a paginilor in prezentare.
Slide Show View
![]()
Modul de afisare Slide Show View este folosit in expunerea prezentarii ca un produs intermediar sau final in care fiecare pagina ocupa intregul ecran; defilarea paginilor incepe cu cea curenta in momentul alegerii modului Slide Show View. Daca se doreste inceperea prezentarii cu prima pagina se efectueaza:
Click Slide Show in bara superioara a aplicatiei PowerPoint
Se selecteaza View Show
7. Actiuni asupra fisierelor cu prezentari PowerPoint
7.1. Cautarea unei prezentari
1. Din meniul FILE alegeti OPEN; apare caseta 'Open dialog box'
2. Alegeti butonul FIND FILE; apare caseta de cautare 'Search dialog box'
3. In caseta FILE NAME tastati numele fisierului pe care il cautati.
7.2. Inchiderea unei prezentari
1. Din meniul FILE alegeti CLOSE sau - Click cu mouse-ul pe butonul cu x din dreapta sus a ferestrei prezentarii, sau - CTRL + F4. Daca ati facut modificari, POWER POINT intreaba daca doriti sa le salvati.
2. Apasati (click):
YES pentru a salva,
NO pentru a inchide fisierul fara a salva ultimele modificari,
CANCEL pentru a renunta la inchidere.
7.3. Salvarea unei prezentari
Prezentarile elaborate sunt salvate in mod curent sau interactiv la inchiderea unei prezentari sau la parasirea aplicatiei curente; nu pot fi salvate decat fisierele active.
Prezentarile sunt salvate implicit ca fisiere nume.PPT sau ca fisiere pictures: Windows metafile *.WMF - astfel ele pot fi exportate in WORD sau alte aplicatii.
La prima salvare apare caseta File Name in care se tasteaza numele fisierului.
Pentru a salva prezentarea pe un alt disc, in alt director sau sub un alt nume se utilizeaza optiunea SAVE AS.
Daca creem si salvam o prezentare pe un calculator care utilizeaza un set de fonturi, este posibil sa nu obtinem acceasi prezentare daca deschidem fisierul pe alt calculator care utilizeaza fonturi diferite. Pentru a evita aceasta neplacere, se pot salva fonturile-sau sa le incorporam-in prezentare.
Pentru a salva si fonturile existente pe calculator, in scopul exportarii fisierului pe alte calculatoare care nu contin fonturile respective, utilizam optiunea saving a prezentation with embedded fonts astfel: in meniul File, click Save As; Click Tools in fereastra care se deschide, si apoi click Embed TrueType Fonts.
Nota: Se pot incorpora oricare tip de fonturi recunoscute si acceptate (TrueType font) de Windows. Alte fonturi cu caracteristica- TrueType font- pot fi incorporate numai daca nu au restrictii de licenta, de exemplu nu sunt tiparibile sau instalabile; in astfel de situatii apare un mesaj de atentionare cu motivatia esecului de incorporare a fonturilor. De retinut ca salvarea unei prezentari cu fonturi incorporate creste mult dimensiunea fisierului.
7.4. Crearea si salvarea unei prezentari implicite (Default)
Cand creem o prezentare care include setari si stiluri pe care dorim sa le utilizam permanent, o putem salva drept implicita, astfel incat sa avem acces la ea ori de cate ori alegem optiunea Blank Presentation.
1. Deschideti prezentarea pe care doriti sa o definiti si pastrati ca implicita.
2. Din meniul FILE alegeti SAVE AS
3. La numele fisierului tastati DEFAULT.PPT
4. Alegeti OK
Din acest moment, fisierul salvat este noua prezentare implicita.
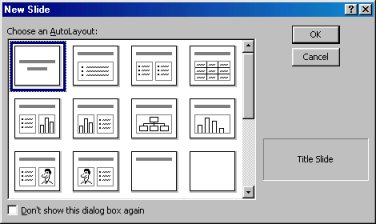
8. Actiuni asupra paginilor
8.1. Inserarea unei pagini noi
Pentru construirea slide-urilor se poate alege o schema proprie sau se alege o macheta din variantele propuse prin selectarea din bar-meniul superior a optiunii INSERT si apoi NEW SLIDE.
Exisa o varietate mare de machete; unele cu casete text plasate in diferite pozitii, altele cu locuri definite pentru grafica sau alte obiecte. Programul PowerPoint permite optimizarea ulterioara a pozitiilor acestora in functie de dorinta designer-ului.
Click Insert in bara superioara a aplicatiei PowerPoint
Select New Slide
Exploreaza machetele si click pe cea aleasa
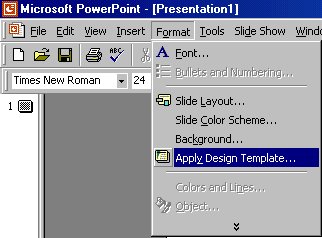
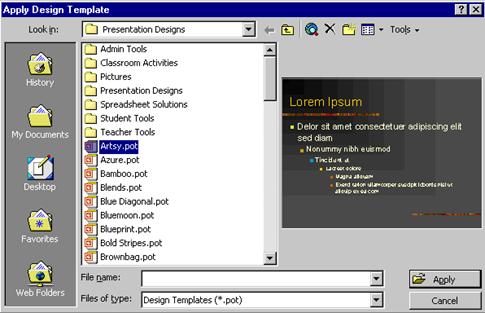
8.2. Formatarea (definirea aspectului) unei pagini
Dupa crearea slide-urilor, exista posibilitatea definirii succesiunii, a duratei de afisare a unei imagini, a ordinii etc. Aplicatia PowerPoint ofera posibilitatea modificarii aspectului paginilor si prezentarii: formatul, culorile, tipul de trecere dintr-o imagine in alta, alt LAYOUT, alt decor, alta infatisare, de exemplu prin selectarea din meniul din bara superioara a optiunii FORMAT si alegerea unui submeniu; daca se alege Apply Design Template este oferita o galerie de unde se poate alege un model.
Click Format in bara superioara a aplicatiei PowerPoint
Select Apply Design Template in bara superioara a aplicatiei PowerPoint
Selecteaza un model/macheta preferat/a din Presentation Designs
Click pe butonul Apply
Inserarea unui Clipart & Imagine (Pictura)
Se afiseaza pagina in care se doreste introducerea unei imagini
Click Insert in bara superioara a aplicatiei PP
Select Picture
Select Clip Art
Click pe categoria preferata
Click imaginea dorita
Click Insert Clip pe meniul shortcut
Cand se incheie utilizarea galeriei de imagini (Clip Gallery), click butonul Close pe bara de titluri din "Clip Gallery"
Nota: Pasii 1-4 sunt asemanatori pentru inserarea altor obiecte (fotografii, filme, sunet, diagrame grafice, s.a.)
9. Aparitia si succesiunea paginilor in Prezentare
Se pot alege diferite tipuri de afisare succesiva a paginilor in scopul personalizarii prezentarii si atragerii atentiei; optiunea pentru o varianta din lista oferita de PowerPoint se realizeaza astfel:
In Slide sau Slide Sorter View, selecteaza pagina sau paginile asupra careia/carora dorim sa impunem forma de aparitie (tranzitia).
In Slide Show din bara superioara a ecranului aplicatiei PowerPoint, click Slide Transition
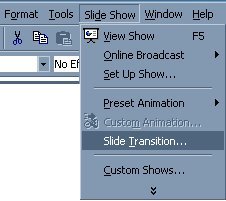
In Effect box, click pe tranzitia dorita si apoi selecteaza oricare alte optiuni din cele existente
Pentru a deveni efectiva/activa pentru pagina aleasa, click Apply.
Pentru a deveni efectiva/activa forma de aparitie pentru toate paginile, click Apply to All.
Se repeta pasii de mai sus pentru fiecare pagina sau grup de pagini careia/carora le fixam modul de aparitie pe ecran.
Pentru a vedea tranzitiile, in meniul Slide Show, click Animation Preview.
10.
Vizualizarea prezentarii
Se poate vizualiza prezentarea ca o succesiune de pagini(slide-uri)
cu una din urmatoarele variante:
Click Slide Show in extremitatea din stanga jos a ferestrei aplicatiei PowerPoint.
In meniul Slide Show, click View Show.
In meniul View, click Slide Show.
Se apasa tasta F5 a tastaturii
11. Navigarea prin pagini in timpul prezentarii
Pagina urmatoarea
o Click pe butonul stang al mouse-ului sau apasati Enter pe tastatura
Pagina precedenta
o apasati Backspace pe tastatura
Iesirea din prezentare
o apasati Esc pe tastatura
12. Impachetarea aplicatiei in vederea prezentarii pe alt calculator
Se deschide prezentarea PowerPoint vizata
In meniul File, click Pack and Go
Se urmaresc instructiunile oferite de Pack and Go Wizard.
13. Despachetarea aplicatiei in vederea prezentarii pe calculator
Se introduce discul sau alta memorie care contine prezentarea in calculatorul destinatie sau se conecteaza la retea in locatia unde se afla prezentarea
In My Computer, se merge in locatia unde se afla prezentarea impachetata, apoi dublu-click Pngsetup
Se apasa Enter in locatia destinatie unde dorim sa copiem prezentarea.
ANEXA 1
Crearea unei prezentari multimedia folosind PowerPoint
Materialul din ANEXA 1 este descarcat din site-ul RegieLive.ro
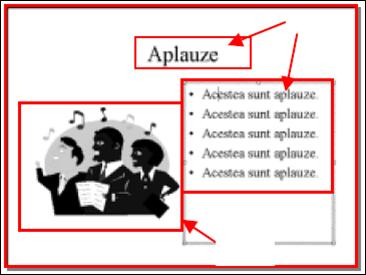
Creati o prezentare noua: alegeti optiunea NewFile. In caseta se dialog New Presentation alegeti optiunea Blank Presentation. Creati primul diapozitiv si alegeti tipul de diapozitiv care contine atat text, cat si o imagine. Scrieti textul, scrieti titlul si inserati imaginea. Veti aplica animatii atat textului, cat si obiectului imagine.
Vizualizati diapozitivul in modul Slide View.
Alegeti optiunea Custom Animation.
Slide Show
Se deschide caseta de dialog Custom
Animation cu patru sectiuni: Order&Timing care contine
obiecte prin care stabiliti modul in care va fi activata
animatia, Effects care contine obiecte prin intermediul
carora aplicati efecte de animatie textelor si obiectelor, Chart
Effects care contine obiecte prin intermediul carora
aplicati efecte de animatie diagramelor si Multimedia
Settings care contine obiecte prin intermediul carora
stabiliti modul in care se vor aplica efectele sonore (in cazul in care
obiectul selectat in diapozitiv este un clip audio).
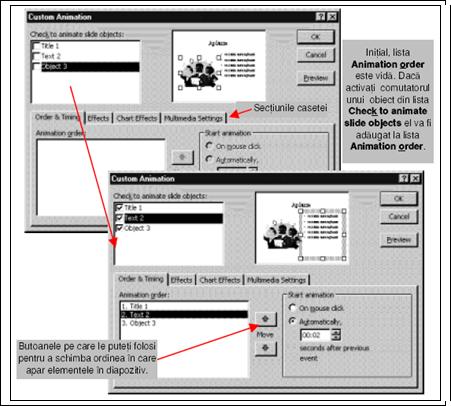
Deschideti sectiunea Order&Timing si in lista de comutatoare Check to animate slide objects activati comutatorul Text 2. Numele acestui obiect va fi adaugat la lista Animation order.
Stabiliti modul in care se activeaza efectul de animatie. Grupul de butoane radio Start Animation contine doua butoane radio: On click mouse - animatia se activeaza la executarea unui clic cu mouse-ul si Automatically - animatia se activeaza automat dupa un interval de timp. Stabiliti ca efectul de animatie sa se aplice automat la 2 secunde: activati butonul Automatically si in caseta de text cu derulor scrieti 2.
Selectati si celelalte doua articole din lista: Title 1 si Object 3 si stabiliti ca le veti aplica un efect de animatie automat la 2 secunde.
Deschideti sectiunea Effects si stabiliti pentru fiecare element al diapozitivului modul in care se va manifesta efectul de animatie. Selectati mai intai din lista Animation order textul Text 2.
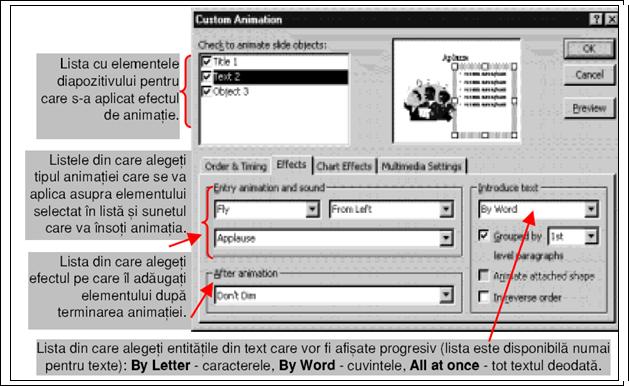
Din cele trei liste Entry animation and sound (doua pentru tipul animatiei si una pentru sunete) alegeti tipul de animatie (modul in care este afisat in diapozitiv textul sau imaginea) si sunetul care va insoti animatia (un sunet din lista de sunete sau un fisier cu sunete cu extensia .avi).
Pentru texte alegeti entitatile din text care vor fi afisate progresiv din lista Introduce text.
Din lista After animation alegeti efectul aplicat textului sau obiectului dupa ce a fost afisat animat: schimbarea culorii (culoarea se alege din paleta de culori), ascunderea automata a elementului dupa ce a fost afisat animat (Hide After Animation), ascunderea automata a elementului pana la executarea unui clic cu mouse-ul (Hide on Next Click).
Reluati aceste operatii pentru fiecare element din lista (obiectul si textul din titlu). Selectati mai intai elementul in lista Check to animate slide objects.
Elementele animate ale diapozitivului sunt prezentate in dipozitiv in ordinea in care apar in lista Animation order. Schimbati ordinea in care apar in diapozitiv elementele animate, cu ajutorul sagetilor din dreapta acestei liste. Selectati in lista elementul si apoi executati clic pe sageata care arata sensul in care vreti sa mutati in lista elementul.
De fiecare data cand doriti sa vedeti ce efect obtineti cu valorile stabilite, actionati butonul declansator Preview.
Cand ati obtinut efectul dorit, inchideti caseta de dialog actionand butonul Ok.
Adaugati animatie diagramelor
Adaugati la prezentare un diapozitiv nou care contine o diagrama. Pentru aceasta veti folosi fie optiunea de meniu New SlideInsert, fie scurtatura Ctrl+M, fie optiunea New Slide din lista ascunsa Common Task de pe bara de formatare, fie butonul New Slide de pe bara Standard.
Vizualizati diapozitivul in modul Slide View.
Alegeti optiunea Custom Animation
Slide Show
Se deschide caseta de dialog Custom Animation. Deschideti sectiunea Timing si din lista Slide objects without animation selectati diagrama, iar din grupul de butoane radio Start Animation activati butonul Animate. Stabiliti ca efectul de animatie sa se activeze automat la 2 secunde.
Deschideti sectiunea Chart Effects pentru a stabili efectul de animatie.
Din cele doua liste Entry animation and sound alegeti tipul de animatie (modul in care vor fi afisate elementele diagramei) si sunetul care va insoti animatia
Alegeti
entitatile din diagrama care vor fi afisate progresiv din lista Introduce 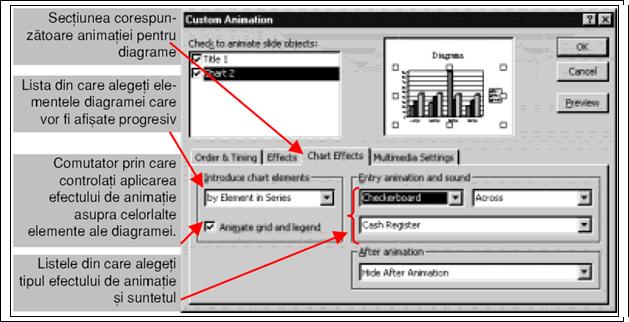
chart elements: by Series (seriile), by Categories (categoriile), by Element in Series
(elementele din serii), by Element in Categories (elementele din categorii), All at once
(toata diagrama).
Stabiliti daca efectul de animatie se aplica si celorlalte obiecte din diagrama
(grila, textul, legenda, axele). Daca activati comutatorul Animate grid and legend, aceste obiecte vor fi animate inaintea elementelor diagramei ca un grup de obiecte independente, iar daca il dezactivati, aceste obiecte nu vor fi animate.
b. Din lista After animation alegeti efectul aplicat diagramei dupa ce a fost afisata animat
Testati efectul obtinut cu butonul Preview si cand ati obtinut efectul dorit inchideti caseta de dialog cu butonul Ok.
Adaugati butoane de aplicatie unei prezentari
Adaugati un diapozitiv nou la prezentare. Veti insera in acest diapozitiv doua butoane de actiuni Home si Sound.
Vizualizati diapozitivul in modul Slide View.
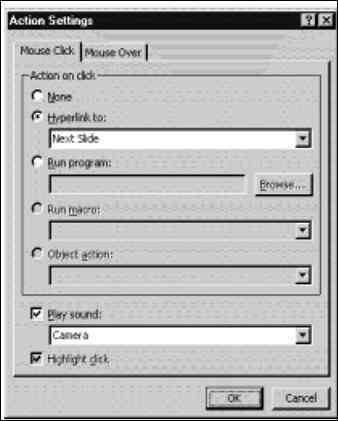
Alegeti optiunea Action Buttons.Slide Show. Din lista de butoane prezentate, alegeti butonul Home. Se deschide caseta de dialog Action Settings. Caseta de dialog are doua sectiuni: Mouse Click, ce contine controale pentru stabilirea actiunii declansate atunci cand executati clic pe buton si Mouse Over, ce contine controale pentru stabilirea actiunii declansate atunci cand deplasati cursorul de mouse peste buton. Deschideti pe rand cele doua sectiuni si stabiliti pentru fiecare dintre butoane urmatoarele metode: la deplasarea mouse-ului peste buton declansarea unui sunet, iar la executarea unui clic, reintoarcerea la inceputul prezentarii pentru butonul Home si respectiv trecerea la urmatorul diapozitiv pentru butonul Sound. Aceasta caseta de dialog se va deschide de fiecare data cand doriti sa stabiliti anumite caracteristici ale unei actionari cu mouse-ul a unui obiect din diapozitiv (pictograma asociata unui clip audio sau video sau unei inregistrari sonore, o hiperlegatura, o imagine etc.). De aceea vor fi prezentate toate controalele casetei de dialog, chiar daca unele dintre ele nu se folosesc in cazul butoanelor de actiuni.
Din grupul de butoane radio Action on click, respectiv Action on mouse over alegeti butonul corespunzator actiunii declansate:
None - nici o actiune;
Hyperlink to - legatura la un alt diapozitiv, prezentare sau fisier (elementul la care se face legatura va fi ales din lista ascunsa atasata butonului). In sectiunea Mouse click alegeti pentru butonul Home optiunea First slide, iar pentru butonul Sound optiunea Next slide.
Run program - lanseaza in executie un program (identificatorul complet al fisierului care contine programul va fi scris in caseta de text alaturata butonului sau va fi construit cu ajutorul casetei de dialog Browse pe care o deschideti cu butonul Browse).
Run macro - lanseaza in executie un fisier macro. Fisierul macro contine un ansamblu de comenzi care au fost inregistrate folosind limbajul de programare
Visual Basic for Applications - VBA si care pot fi atasate prezentarii. Se foloseste in cazul in care utilizatorul executa mai des un grup de comenzi si in loc sa execute de fiecare data acel grup de comenzi se va executa o singura comanda, cea prin care fisierul macro este lansat in executie. Fisierul macro poate fi creat si interactiv, prin inregistrarea unui grup de operatii executate cu ajutorul tastaturii si a mouse-ului (numai clicuri, nu si operatii de glisare). Aceste actiuni vor fi transformate de catre un modul al aplicatiei in instructiuni VBA si inregistrate intr-un fisier macro.
Object action - declanseaza o actiune asupra unui obiect. Este disponibil numai daca obiectul selectat este un clip audio sau video sau inregistrarea unui sunet. In functie de tipul obiectului, actiunile pot fi: Open (deschide fisierul si aplicatia care l-a creat), Edit (permite editarea obiectului cu aplicatia care l-a creat) si Play (lanseaza in executie obiectul).
Comutatorul Play sound il activati atunci cand vreti sa se auda un sunet, iar din lista alegeti sunetul (veti alege un sunet in sectiunea Mouse over a ambelor butoane).
Comutatorul Highlight click respectiv Highlight when mouse over il activati atunci cand vreti ca obiectul pe care executati clic cu mouse-ul sau peste care glisati mouse-ul sa fi evidentiat. Este disponibil numai pentru obiecte (imagini, pictograme asociate sunetelor sau clipurilor audio sau video).
Pentru a modifica actiunile unui buton, selectati butonul si apoi alegeti optiunea Action SettingsSlide Show. Se deschide caseta de dialog Action Settings in care faceti modificarile.
Legati o aplicatie de o imagine din diapozitiv
Minimizati aplicatia PowerPoint. Deschideti editorul de texte Notepad. Scrieti un text. Salvati textul in fisierul test.txt in directorul Windows (directorul in care se gaseste aplicatia Notepad). Inchideti aplicatia Notepad. Reveniti in aplicatia PowerPoint.
Afisati primul diapozitiv al prezentarii. Selectati imaginea.
Deschideti caseta de dialog Action Settings cu optiunea de meniu Action SettingsSlide Show.
In sectiunea Mouse Click activati butonul Run program. Actionati butonul Browse. In caseta de dialog Browse, cautati in directorul Windows aplicatia notepad.exe si o selectati. Inchideti caseta de dialog Browse. In caseta de text a butonului Run program este scris identificatorul aplicatiei. Scrieti in continuarea identificatorului, numele fisierului care contine textul: c:windowsnotepad.exe test.txt (in functie de numele directorului in care se gaseste sistemul de operare pe calculatorul vostru este posibil ca identificatorul sa nu fie acelasi).
In sectiunea Mouse Over, activati comutatorul Highlight when mouse over. Inchideti caseta de dialog.
Lansati in executie pezentarea primului diapozitiv. Deplasati mouse-ul peste imagine. Observati ca imaginea este evidentiata, iar cursorul de mouse are forma unei maini (semnifica faptul ca o legatura este sensibila la prezenta mouse-ului).
Executati clic pe imagine. Se deschide fereastra aplicatiei Notepad, iar in fereastra este incarcat fisierul de text.
Inchideti fereastra aplicatiei Notepad. Ati revenit la diapozitiv. Terminati prezentarea (executati clic cu butonul din dreapta si din meniul de comenzi rapide alegeti optiunea End show).
Inserati clipuri audio si video in diapozitiv
Puteti insera sunete, clipuri audio si video intr-un diapozitiv. Sursele pe care le puteti folosi pentru clipurile audio si video sunt:
Dosarul Window Media al sistemului de operare. Pentru a avea acces la clipurile din acest dosar alegeti optiunea Movies and Sounds-Insert, dupa care alegeti fie optiunea Movie from File (pentru clipuri video), fie optiunea Sound from File (pentru clipuri audio).
Discurile compact - CD. Pentru a avea acces la clipurile de pe un CD alegeti optiunea Movies and Sounds-Insert, dupa care alegeti optiunea Play CD Audio Track. Daca CD-ul este audio puteti preciza ce zona din CD veti inregistra (pista de inceput si de sfarsit).
Galeria de clipuri. Pentru a avea acces la clipurile din acest dosar alegeti optiunea Movies and Sounds-Insert, dupa care alegeti fie optiunea Movie from Gallery (pentru clipuri video), fie optiunea Sound from Gallery (pentru clipuri audio). Puteti adauga noi clipuri in galeria de clipuri executand clic pe butonul Import Clips.
Situl Web Clip Gallery Live. Pentru a avea acces la aceste obiecte deschideti Clip Gallery si apoi executati clic pe butonul Clips Online.
Sunete inregistrate cu ajutorul unui microfon. Pentru a executa aceasta operatie alegeti optiunea Movies and Sounds.Insert, dupa care alegeti optiunea Record Sound.
Siturile Internet prin care puteti cauta clipuri audio si video, efecte grafice etc. Accesul la aceste situri il obtineti din prezentarea PowerPoint Central pe care o lansati in executie cu optiunea PowerPoint Central.Tools.
Adaugati un nou diapozitiv la prezentare si inserati in acest diapozitiv un clip audio folosind una dintre metodele de mai sus. In functie de fisierele cu clipuri audio sau video pe care le aveti la dispozitie puteti sa inserati mai multe clipuri audio sau video, folosind mai multe dintre metodele prezentate. Stabiliti un efect de evidentiere a pictogramei asociate clipului audio sau video atunci cand glisati mouse-ul peste pictograma (prin intermediul controalelor din caseta de dialog Action Settings).
Folositi hiperlegaturi
Creati un diapozitiv care contine un text si o imagine. Veti adauga o hiperlegatura imaginii, catre o foaie de calcul Excel, si o hiperlegatura unui cuvant din text, catre un document Word. Pentru realizarea hiperlegaturii procedati astfel:
Selectati obiectul caruia ii atasati legatura (imaginea sau cuvantul).
Deschideti caseta de dialog Insert Hyperlink fie
alegand optiunea Hyperlink.Insert, fie apasand scurtatura
Ctrl+K, fie executand clic pe butonul Insert Hyperlink ![]() din
bara standard.
din
bara standard.
Folosind controalele din caseta de dialog Insert Hyperlink
alegeti la ce tip de element se va face legatura: Existing
File or Web Page (un fisier de pe disc sau o pagina de Web de pe
Internet), Place in This Document (un diapozitiv din prezentare sau o
alta prezentare - Custom Show), Create New document (un document
care se creeaza in acel moment; se poate alege aplicatia cu care creati
documentul), E-mail Address (o adresa de E-mail cu un mesaj). 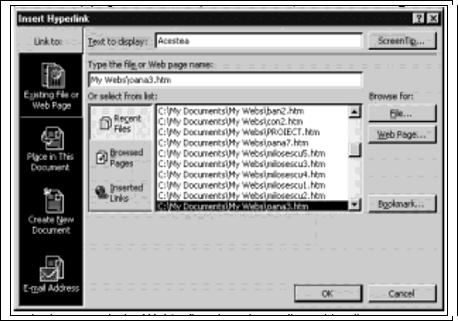
Alegeti fisierul cu care se face legatura: fie scrieti numele fisierului in caseta de text Type the file or Web page name, fie alegeti numele fisierului din lista Or select from list, fie cautati acest fisier pe disc (butonul File care deschide caseta de dialog Link to File), fie cautati pagina Web in reteaua Internet (butonul Web Page care lanseaza
in executie browserul de Web), fie alegeti un diapozitiv din prezentare sau o alta prezentare (butonul Bookmark care deschide caseta de dialog). In lista Or select from list poate fi afisata o lista cu fisierele recent folosite (butonul Recent Files) sau o lista cu cele mai vizualizate pagini de Web (butonul Browsed Pages) sau o lista cu cele mai recente legaturi adaugate la fisier (butonul Inserted Links).
Adaugati efecte de tranzitie unei prezentari
Puteti sa creati efecte de tranzitie si temporizari:
Vizualizati diapozitivele prezentarii in modul Slide sorter. Daca vreti sa personalizati efectul de tranzitie pentru fiecare diapozitiv, selectati diapozitivul si aplicati efectul. Daca vreti sa aplicati acelasi efect de tranzitie mai multor diapozitive, selectati grupul de diapozitive astfel: tinand tasta Shift apasata, executati clic pe diapozitivul pe care vreti sa-l selectati. In acest mod de vizualizare este afisata bara Slide Sorter care contine urmatoarele controale:

- Slide Transition - deschide caseta de dialog Slide Transition.
- Slide Transition Effect - deschide o lista din care puteti alege efectul de tranzitie.
- Text Preset Animation - deschide o lista din care puteti sa alegeti un efect de animatie pe care sa-l aplicati textului si imaginilor din diapozitivele selectate (puteti adauga sau schimba efectul de animatie aplicat diapozitivului curent sau diapozitivelor selectate).
- Animation Preview - arata efectul de animatie pentru diapozitivul sau diapozitivele selectate.
- Hide Slide - ascunde
diapozitivul sau diapozitivele selectate (nu vor mai fi afisate automat in
prezentare).
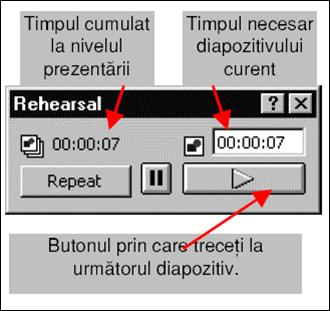
- Rehearse Timings - lanseaza in executie diapozitivul in modul temporizare in care puteti stabili (inregistrand in timpul executiei) temporizarea (timpul necesar pentru trecerea de la un diapozitiv la altul).
- Summary Slide - creeaza un diapozitiv nou pe care il insereaza la inceputul prezentarii si care va contine, sub forma unei liste marcate, titlurile diapozitivelor prezentarii (creeaza un diapozitiv cu cuprinsul - indexul - prezentarii).
- Speaker Notes - deschide caseta de dialog Speaker Notes in care puteti sa notati comentariile auditoriului.
- Common Task - deschide o lista de comenzi prin care puteti sa administrati diapozitivele unei prezentari (sa adaugati un diapozitiv nou, sa stabiliti continutul diapozitivului etc.).
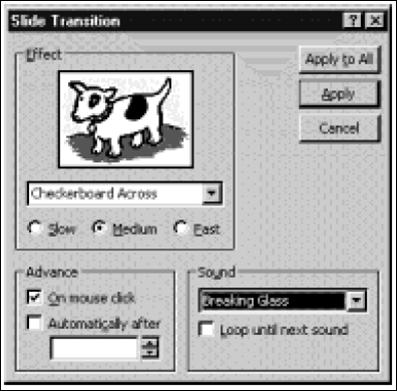
Deschideti caseta de dialog Slide Transition fie alegand optiunea Slide Transition.Slide Show, fie alegand butonul Slide Transition din bara Slide Sorter.
Din lista Effects alegeti tipul de efect de tranzitie pe care-l aplicati diapozitivelor selectate. Viteza de aplicare a efectului de tranzitie o alegeti din grupul de butoane radio atasate listei Effects. Modul in care se aplica efectul de tranzitie (prin actiunea mouse-ului si/sau automat la un interval de timp) il stabiliti prin intermediul controalelor Advance. Daca vreti ca efectul de tranzitie sa fie insotit de sunete, alegeti sunetul din lista Sound. Daca vreti ca sunetul sa fie repetat pana la urmatorul efect sonor, activati comutatorul Loop until next sound.
Actionati apoi declansatorul Apply to All pentru a aplica efectul de tranzitie intregii prezentari sau declansatorul Apply pentru a aplica efectul de tranzitie numai diapozitivelor selectate.
Aplicati efectul de temporizare unei prezentari
Puteti sa stabiliti modul in care sunt afisate diapozitivele unei prezentari: prin executarea unui clic cu mose sau automat, dupa un interval de timp. Intervalul de timp poate fi stabilit in secunde pentru fiecare diapozitiv sau pentru un grup de diapozitive, sau poate fi stabilit prin inregistrarea efectiva a timpului necesar prezentarii unui diapozitiv (modul Rehearsel).
Vizualizati diapozitivele prezentarii in modul Slide sorter.
Deschideti caseta de dialog Rehearsal alegand optiunea Rehearse Timings.Slide Show. La deschiderea ferestrei porneste un contor care inregistreaza timpul in care este afisat diapozitivul pe ecran. Continuati inregistrarea actionand butonul pentru trecerea la urmatorul diapozitiv. Cand ajungeti la sfarsitul prezentarii, apasati tasta Esc si confirmati inregistrarea executand clic pe butonul Yes.
ANEXA 2
TUTORIAL PowerPoint
Description: Listed below are many common tasks that you would use while working in PowerPoint. To find out how to perform these tasks click on the appropriate link below and it will guide you in a step by step fashion by providing detailed directions and screen shots to visually assist you.
Starting From Scratch
One way to start your presentation is
to start from scratch. In this way you are starting out with a blank
presentation. You can then design your own background choices. You would not be
using a template design. To start a presentation from scratch
follow these steps:
Open up PowerPoint.
A PowerPoint dialog box will open.
Click on the radio button that says blank presentation.
Click OK.
Your new presentation will open. Choose your slide layout and click OK.
You can now start working on your presentation or start designing the background that you would like to use for this show.
Open Existing Presentations
To continue working on a previous presentation you would
have to open that file instead of starting a new one. To open up an existing
file follow these steps:
Open up PowerPoint.
A PowerPoint dialog box will open.
Click on the radio button existing presentation.
If your presentation is listed in the box you can just double click on it to open it up. If they don't show up in the box just leave more files selected and click on OK.
The Open dialog box would then open. Choose your file and click on Open.
You can then continue working on your file.
Using A Template
You can use the built in templates
that PowerPoint provides to begin your presentation. In this way you will have
a consistent design that goes together. The template will include your
background as well as font styles, colors and sizes for your placeholders, as
well as selected bullets that match the template. There are many templates
built in and you can choose the one that best suits your needs. To begin your presentation using a template follow these steps:
Open up PowerPoint.
A PowerPoint dialog box will open.
Click on the radio button that says Design Template.
Click OK.
The new presentation dialog box will open.
You can click on the different file names for the template designs and you will see a preview window that displays what the template looks like. You can look under the Presentation tab, Presentation Designs tab as well as Design Templates tab. If you previously had Office 97 you may have an Office 97 templates tab that you can look through as well.
Double click on the design that you like and your presentation will open with that template choice.
Adding New Slides
While working on your presentation you will often need to
add new slides. To add a new slide to your presentation
follow these steps:
While
in slide view or normal view click on the new slide icon from the standard
toolbar. ![]()
or
Go to Insert on the menu bar and choose new slide or click on Control + M. You can also click on the drop down from the common tasks menu bar found on the formatting toolbar and choose new slide.
The Slide layout dialog box will open.
Choose the slide layout that best fits the slide you are adding.
Click on OK.
Your new slide will be added.
PowerPoint Views
There are six different views found
in PowerPoint. The default is the
|
Normal View |
Tri Pane View. You can view notes, outline and your slide all at once. |
|
Slide View |
Best used when working on your slides individually. The majority of the screen space is for your slide for easier viewing. |
|
Slide Sorter View |
Allows you to view all of your slides at once. Great for moving slides around and deleting or just looking at the flow of your show. |
|
Outline View |
Best for working on adding your text for the show. Work in an outline format. |
|
Notes Page View |
View a small image of the slide along with space to write your speaker notes. |
|
Slide Show |
This is for previewing and actually running the show. The slides will be full screen. |
To change your views follow these steps:
Click
on the view button on the bottom left hand side of the PowerPoint screen.![]()
or
Go to View on the menu bar and choose the best view to suit your needs.
Deleting Slides
There are a few ways to delete
slides. If you want to delete one slide and you are in normal or slide view
follow these steps:
With the slide open go to Edit on the menu bar and choose delete slide.
If you have a few slides to delete then you may be better off to delete them in slide sorter view. Get in slide sorter view and follow these steps:
Click on the slide you want to delete and hold the shift key down while you click on the other slides you want to delete.
Click on the delete or backspace key and the slides will be deleted.
Moving Slides
You may find that as you or your students are working on
your presentation you may need to move the slide order around. To best do this
you should be in the slide sorter view. Once in that view follow these steps:
Click on the slide that you want to move and hold the mouse button down while you move the slide to the desired location. You will see a vertical bar as you move the slides. When the bar is in front of the slide where you want to position your slide release the mouse button and the slides will be moved to the new position.
Applying
Design Templates
If you are working on your
presentation and at any given time you decide that you would like to apply a
design template or change the one you are currently using follow these steps:
Right click on the slide you are working on in either the slide view or normal view.
Click on Apply Design Template. ( You can also just click on the down arrow for common tasks and choose Apply Design Template.)
Click on the design you would like to use and click on the Apply button.
Your new design will be applied.
Adding Backgrounds You can create your own backgrounds when working in FrontPage. If you start a new presentation by choosing blank when you start, you can build and design your own background instead of using the design templates. You can add a solid color, gradient, texture, pattern, or even a picture for your background. To design your own background follow these steps:
Open up PowerPoint and choose blank presentation.
Right click on the slide and choose Background or go to Format on the menu bar and choose Background.
The background dialog box will open.
Follow the set of directions that pertain to the type of background you want to add: color, gradient, texture, pattern or picture.
Color
Click on the down arrow and choose one of the colors shown or click on More Colors and pick the color you would like for your background.
Click on OK.
Click on Apply to apply to the current slide you are on or Apply to All to apply to all of your slides.
Your new color will be added
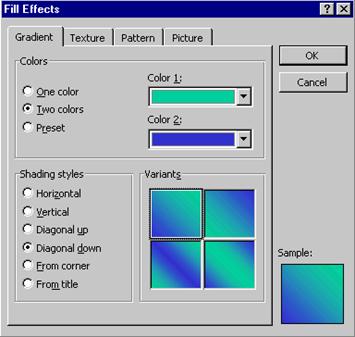
Gradient
Click on the down arrow and choose Fill Effects.
Make sure you are on the Gradient tab.
You can choose One Color, Two Color or Present. Present are previously created gradients that you can choose from. If you choose two color Click on the down arrow to make your two color choices.
Click on the radio button next to shading styles.
Under Variants, click on the design that you like for your gradient.
Click on OK.
Click on Apply to apply to the current slide you are on or Apply to All to apply to all of your slides.
Your new gradient color will be added.
Texture
Click on the down arrow and choose Fill Effects.
Click on the Texture tab.
Click on one of the textures designs that are listed there. If you want to bring in your own texture from a file that you have saved you can click on Other Texture and go out and find the file that you want to use.
Click on OK.
Click on Apply to apply to the current slide you are on or Apply to All to apply to all of your slides.
Your new texture will be added

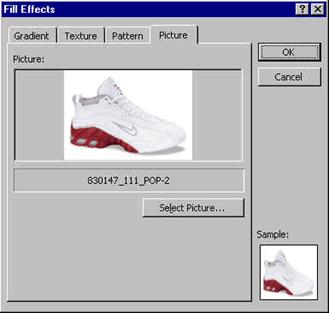
Picture
Click on the down arrow and choose Fill Effects.
Click on the Picture tab.
Click on select picture and go find the graphic file that you want to use.
Click on OK.
Click on Apply to apply to the current slide you are on or Apply to All to apply to all of your slides.
Your new background with a graphic will be added.
Adding Textboxes
One way to add text to your
slide is to add a text box. You will then have to format the text to the
desired type. To add a text box follow these steps:
Click on the text box icon found on the drawing toolbar. ![]()
Click and drag the box in the desired location.
Type your text.
Click outside of the box and the lines will disappear.
To edit the text just click inside the box and make your corrections just as you would with a word processor.
Adding Placeholders
A quick way to add your text and have it
automatically formatted is to add a placeholder. These work great for your
titles and subtitles. That way each slide will have a consistency in
formatting. To add a placeholder follow these steps:
Click on the down arrow for Common Tasks and choose Slide layout. You can also right click on your slide and choose slide layout.
Click on Apply or Reapply.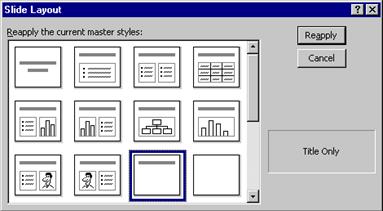
The placeholder will appear. Click inside and start typing. The placeholder's formatting is preset if you are using a design template.
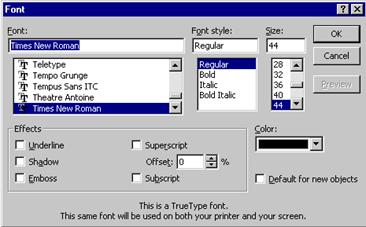
Formatting
Text
There are a couple of different ways to format
your text once you type it in. You can either use the menu bar or the
Formatting toolbar. To format your text to change things like font, color,
style, size etc. follow these steps:
Select your text by either highlighting it or click on the diagonal lines that surround the text so that it turns to little dots. When you do this any formatting you add will effect everything in the box.
Using the formatting toolbar choose the formatting that you want to add
from the standard toolbar. There are buttons and drop downs for font, size,
style, and alignment. ![]()
You can also go to Format on the menu bar and choose font. The font dialog box will open. Make your changes within the dialog box.
Click OK and your changes will occur.
Working With Graphics
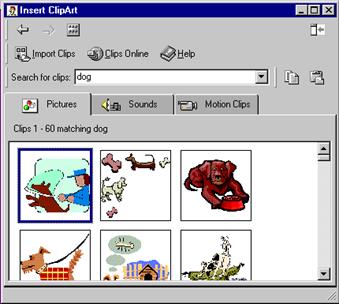
Adding Images
From Clipart
One task you will be
performing often would be to add images to your page. You can bring in images
that you have saved or you can use Microsoft's Clip Gallery which has thousands
of images, photos, and animations. It is also searchable making it easier to
find the type of image you want to use. To use the clip gallery follow these
steps:
Go to Insert on the menu bar and choose
Picture and then Clip Art or you can click on the Clip Gallery icon from the
drawing toolbar. ![]()
The Clip Gallery will open.
Either click on the category you want to look through or type in a keyword for what you are looking for and hit enter.
The images will appear. When you find the one you like click on it and click on the insert icon.
You can at this point add additional images or if you are done close the clip gallery window and your image will be placed on your slide.
Adding Images From File
You can add your own images
that you have saved or have access to. To add images from file follow these
steps:
In slide view go to Insert on the menu bar and then Picture and click on From File.
Choose the picture that you have saved.
Click on Insert.
You can then resize your image if you need to and move it to the appropriate location.

Adding Animated Gifs
One way to spruce up your
presentations is to add animated gifs. This is new to PowerPoint 2000. Animated
gifs did not work in previous versions. Adding this type of file is really no
different than adding an image. You will not see the animation while in the
regular view. You have to be in the slide show to see them.
Go to Insert on the menu bar and choose clipart if you want to find animated gifs that are in the Clip Gallery. They are listed under the motion tab. You can also choose from file and find your own animated gif.
Get into the slide show view and you can see what the animation will look like.

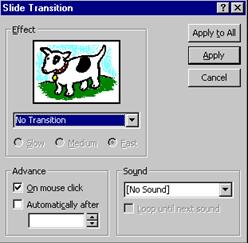
Adding
Transitions
You can add transitions that occur between your
slides. As your show moves from slide to slide you have an animated transition
between them. It is a nice effect to add to your show. It is easiest if you add
your transitions while in the slide sorter view. You can add the same
transition to each slide or you can pick different transitions. To add
transitions follow these steps:
Get in the slide sorter view.
Click on the Slide Transition button from the slide sorter toolbar. ![]()
The slide transition dialog box will open.
Click on the down arrow and choose the type of transition you want to use. You will see a little preview in the effect window.
Choose if you want the transition to be slow, medium, or fast.
If you want a sound attributed to the transition then click on the down arrow next to sound and choose the sound you want to use.
If you want your transition to run when you click the mouse then put a check in 'On mouse click'. If you want the animation to occur automatically put a check in that box and put a number for the amount of seconds you want to wait until the transition occurs.
Click on Apply to All if you want that same transition to occur after each slide or Apply if you just want to add it to the one slide.
Adding Animations
You can take any of the images in your
presentation and animate them. That is what really brings your presentation to
life. There are many different types of animations to choose from. To animate
an image follow these steps:
Right click on your image and choose custom animation or click on your image and go to Slide Show form the menu bar and choose custom animation.
Click on the down arrow next to entry animation and sound. Choose one of the animation types. Another drop down may become active where you can further define the action the image will take.
Click on the order and timing tab.
Leave on mouse click if you want to click to have your animation occur or click on the radio button for automatically and put in the number of seconds you want to wait before the action occurs.
Click on OK.
Get into the Slide Show mode and check out your animation.
Adding Sounds
There are many different
ways to add sound to your PowerPoint presentation. You can add sound effects to
images, add sound icons you can click on or even just have your music play
throughout the whole show. Your sound clips should be in either the wav or mid
format. There are a few other less common file types you can use. You can also
use a CD and play that while you are giving your presentation. To insert sound
into your presentation follow these steps:
Go to Insert on the menu bar and choose Movies and Sounds and then sound from gallery if you want to pick a sound file from Microsoft's Gallery or choose from file if you have a saved sound file you want to use.
Find the sound file that you have access to and double click on it.
A dialog box will open up and ask you if you want your sound to play throughout the whole show.
Click Yes if you want it to play automatically and no if you do not.
An icon will be inserted into your presentation.
Get into Slide Show mode and your sound should automatically start if you choose that or click if you did not and your sound should play.

Finishing Up
Spelling
One very important step in working with
PowerPoint is to make sure you perform a spell check on your presentation. You
should also proofread it as well. It can be quite embarrassing to find mistakes
while you are presenting. To run a spell check follow
these steps:
With your presentation open click on the spelling icon from the
standard toolbar. ![]()
You can also go to Tools Spelling or hit F7. A spell check will be run on your show.
When typing in PowerPoint if you get a red squiggly line under your text that is an indication that your word may be incorrectly spelled. You can right click on the word and choose one of the words listed or choose ignore if the word was spelled correctly.
Running The Show To run your show, check it out, or when it is for the real presentation follow these steps:
If you want to start at the beginning of your presentation then go to Slide Show from the menu bar and choose View Show or hit F5.
If
you want to begin looking at your show starting at the slide you currently have
open in normal or slide view then click on the slide show icon from the
views icon. ![]()
Using The Pen Feature
The pen is a neat tool that
you can use while in your presentation. You can draw on your slide for effect.
You can write on your slide. To activate and use the pen follow these steps:
While in the slide show mode either right click on the slide and choose Pointer Options and then pen or you can click on the icon on the bottom left of the screen and choose Pointer Options and then pen. You can also use the keyboard command of Control +P to activate the pen and Control + A will bring the arrow back.
You can then draw on the slide.
To chance the pen color right click on the slide and choose Pointer Options then pen color and click on the color of your choice.
To erase the pen from the slide while in the slide show view hit E on the keyboard and it will erase the pen.
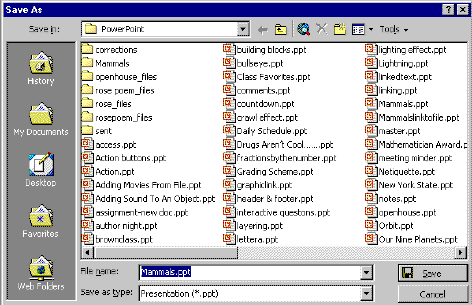
Saving
You should periodically save your show as you
are working. I like to start out by saving my show and then hitting the save
icon every 5 or ten minutes as I work. To save your presentation
follow these steps:
If it is the first time you are saving your show go to File on the menu bar and choose Save As.
Choose the location for saving your file and give your file a name.
Click on Save.
If you have saved your show
before you can click on the save icon from the standard toolbar of to to File
Save.![]()
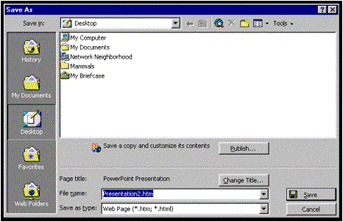
Saving As A Web Page One really cool thing you can do with your PowerPoint files is to post them on the web. The process with which the program is able to keep the integrity of the show and change it to html code it amazing. The shows look great online. You can bring your presentation with you by just having Internet Access. You can also post your presentations so students and parents can have access to them anytime, anywhere. To saver your show as a web page follow these steps:
1. Open up your presentation.
2. Go to File on the menu bar and choose Save As A Web Page.
3. The Save As dialog box will open.
|
|
Click on the down arrow next to Save in and point to the area of your web server where you have access.
5. Click on the Publish button.
6. The Publish as a Web Page dialog box will open.
7. This is where you will make selections customizing how your presentation will be displayed. Under Publish What complete presentation if you want to publish all or choose the slides you want to publish. Leave the check next to display speaker notes if you want them to be available.
8. Under Browser Support make one of the choices below.
a.
Microsoft Internet
Explorer 4.0 or later ( high fidelity) if you want your presentation to be
viewed only in Internet Explorer. This takes full advantage of the presentation
and allows you to view in full screen. If you know your audience will be using
Internet Explorer then this is the best choice to make. ( It
will however work in the Latest version of Netscape. You just can't do the full
screen.) This method of saving looks the best.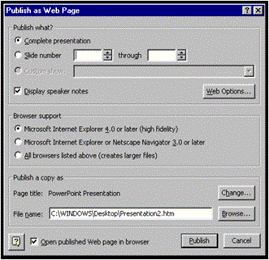
b.Microsoft Internet Explorer or Netscape 3.0 or later- If some of your audience will be using Netscape (older versions than the newest one), then you should make this your choice.
c. All browsers listed above- This will create larger files but if your audience is using IE or Netscape and file size is not an issue then you can choose this type.
9. Down under file name type in the path where you want to save (on your web server) or click on the Browse button to browse to it.
10. Click on the Web Options button.
11. The web options dialog box opens.
12. Click on the drop down next to the Colors box and choose the colors you want for the text with and background of the Outline.
13. Make your choice of options under the tabs presented in the Web Options dialog box. (I typically leave the defaults set).
14. Click on OK.
15. Click on Publish.
Once you save this it created two files. If you called your show summerday then after saving the file you would have created a folder called summerday_files and an htm file called summerday.htm. If you are using FrontPage you can import these files into your web. Create a link to the summerday.htm file. When your visitors click on this link it will open up the PowerPoint show.
Your show should open up in a browser to show you what it would look like.
Here is an example of an online PowerPoint. Be leery though this one uses large graphics so it may load slow. This PowerPoint was saved enhanced for Microsoft Internet Explorer so it will only display using that browser.
Printing
You can print out your presentation in different
format. All of the variations of the printing types can be found in the print
dialog box. Listed in the table below are the types of printing you can do. To
print your presentation follow these steps:
Go to File on the menu bar and choose Print.
The Print dialog box will appear. It may look different than the one displayed here. The dialog box varies depending on your particular type of printer. You should have basically the same options however.
Choose what you want to print, all slides, particular slides, or the current slide.
Enter the number of copies you want to print. Check if you want them collated.
Choose what you want to print: slides, handouts, notes pages, or outline view.
Click on OK.
|
Printing Choices |
|
Slides |
Prints out each slide on a full page |
|
Handouts |
Here you have choices for 2,3,4,6,or 9 slides per page. If you choose 3 then your slides will also have lines to the write for note taking purposes. You also have a choice to order then on the page horizontally or vertically. |
|
Note Pages |
Prints out one small version of each slide per page with your notes section on the bottom of the page. |
|
Outline View |
Prints out the outline view of your presentation. |
|
Politica de confidentialitate | Termeni si conditii de utilizare |

Vizualizari: 2260
Importanta: ![]()
Termeni si conditii de utilizare | Contact
© SCRIGROUP 2025 . All rights reserved