The following page details
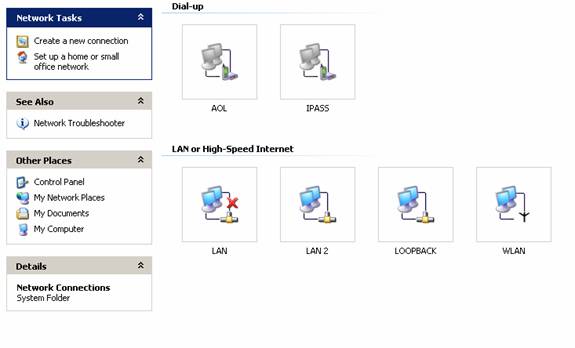
the steps necessary to create a WindowsXP VPN Server 1. Go to Start
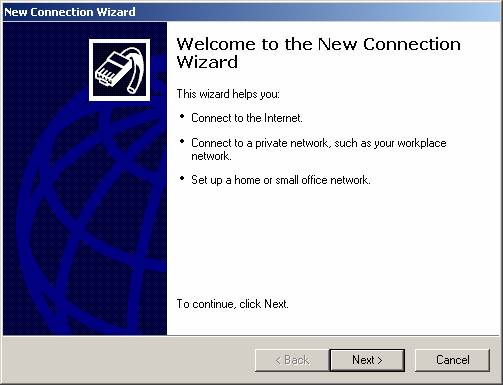
/ Settings / Network Connections 2. Start the New Connection Wizard3.
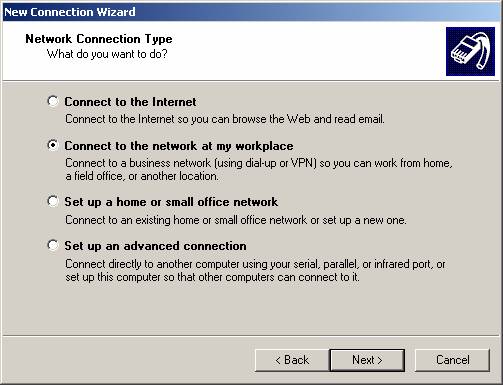
Click on the Next button 4. Select Set up advanced connection5.
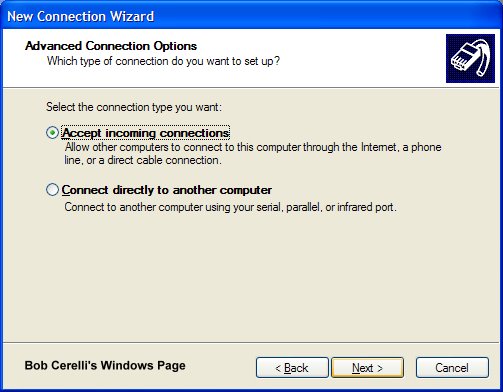
Click on the Next button. 6. Click on Accept incoming connections7.
Click on the Next button 8. At the LPT1 page, skip it and just click on
the Next button. 9.
Click on Allow virtual private connection10.
Click on the Next button 11. Add user accounts that you want to be able
to connect to your WindowsXP computer. 12.
Click on the Next button. 13. Highlight Internet Protocol (TCP/IP) and
click on Properties 14.
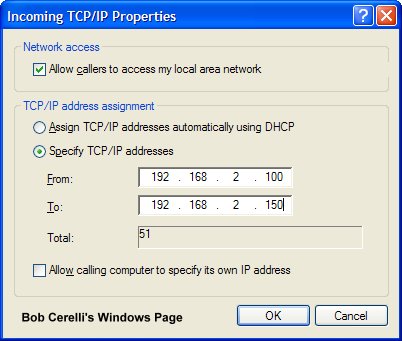
Determine how you want the remote computers to get their IP address
19. The above example will assign IP addresses to each
client. Make sure the IP scheme is the same as on your server.
20. Submitted by Andy
Bloss
If the VPN server is behind a router,
Port Mapping will need to be done on the router. Standard port usage is 1723
for PPTP. You might also need to configure your router for PPTP
Passthrough. Port usage for IPSec is 500, 50-51. These ports will have to be
forwarded to the VPN server's
IP
On the computer that is
running Windows XP, confirm that the connection to the Internet is
correctly configured.
You can try to browse the
internet
Ping a known host on the Internet,
like yahoo.com, something that isn't blocking ICMP
Click Start, and then click
Control Panel.
In Control Panel, double
click Network Connections
Click Create a new connection
in the Network Tasks task pad
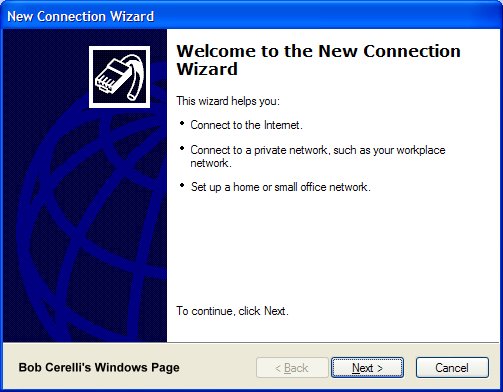
In the Network Connection
Wizard, click Next.
Click Connect to the network
at my workplace, and then click Next.
Click Virtual Private Network
connection, and then click Next.
If you are prompted, you need
to select whether you will use a dialup connection or if you have a dedicated
connection to the Internet either via Cable, DSL, T1, Satellite,
etc. Click Next.
Type a host name, IP or any
other description you would like to appear in the Network Connections
area. You can change this later if you want. Click Next.
Type the host name or the
Internet Protocol (IP) address of the computer that you want to connect
to, and then click Next.
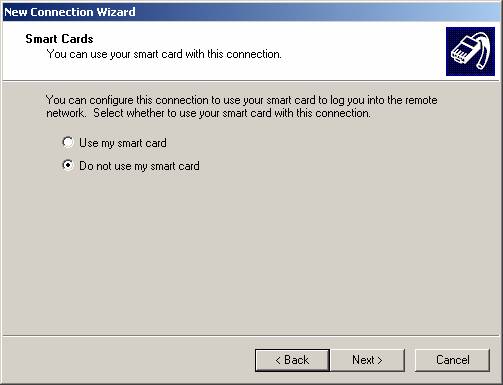
You may be asked if you
want to use a Smart Card or not.
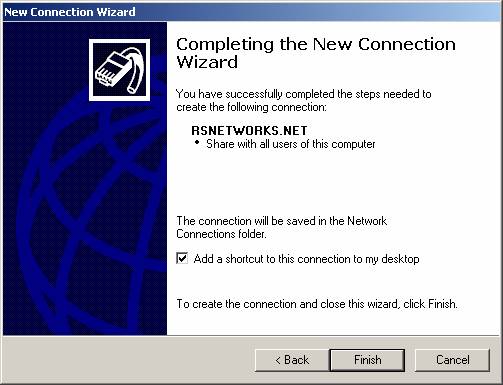
You are just about done,
the rest of the screens just verify your connection, click Next.
Click to select the Add a
shortcut to this connection to my desktop check box if you want one, if
not, then leave it unchecked and click finish.
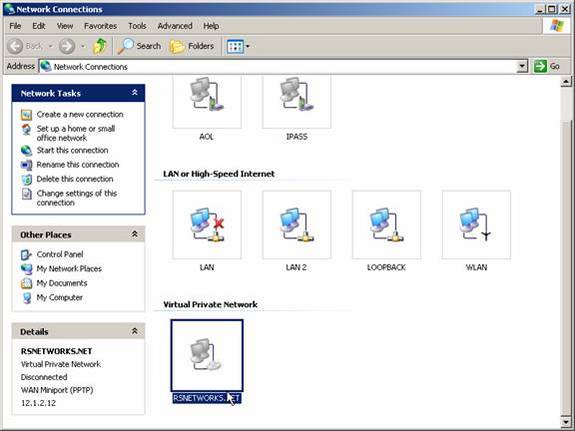
You are now done making your
connection, but by default, it may try to connect. You can either try the
connection now if you know its valid, if not,
then just close it down for now.
In the Network Connections
window, right-click the new connection and select properties. Let's take a
look at how you can customize this connection before it's used.
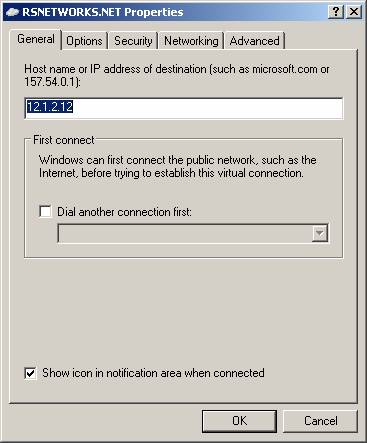
The first tab you will see
if the General Tab. This only covers the name of the connection,
which you can also rename from the Network Connection dialog box by right
clicking the connection and selecting to rename it. You can also configure
a First connect, which means that Windows can connect the public network
(like the Internet) before starting to attempt the 'VPN' connection. This
is a perfect example as to when you would have configured the dialup
connection; this would have been the first thing that you would have to
do. It's simple, you have to be connected to the Internet first before you
can encrypt and send data over it. This setting makes sure that this is a
reality for you.
The next tab is the Options
Tab. It is The Options tab has a lot you can configure in it. For one, you
have the option to connect to a Windows Domain, if you select this check
box (unchecked by default) then your VPN client
will request Windows logon domain information while starting to work up
the VPN connection. Also, you have options here for redialing. Redial
attempts are configured here if you are using a dial up connection to get
to the Internet. It is very handy to redial if the line is
dropped as dropped lines are very common.
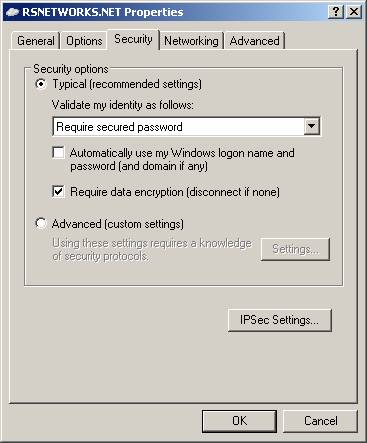
The next tab is the Security
Tab. This is where you would configure basic security for the VPN client.
This is where you would set any advanced IPSec configurations other
security protocols as well as requiring encryption and
credentials.
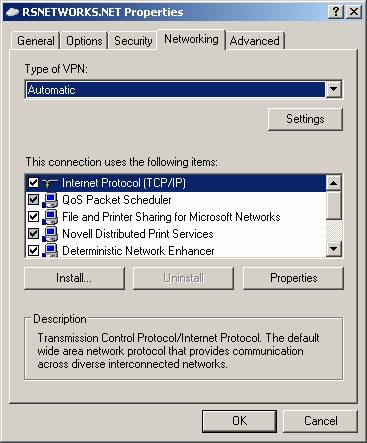
The next tab is the Networking
Tab. This is where you can select what networking items are used by this
VPN connection.
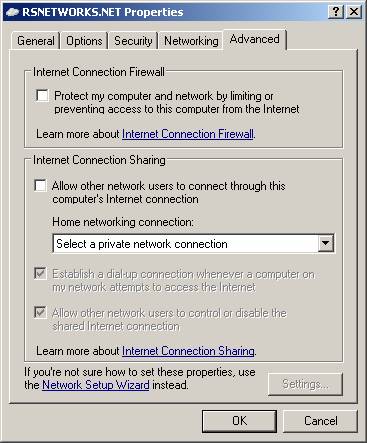
The Last tab is the Advanced
Tab. This is where you can configure options for configuring a
firewall, and/or sharing.
Connecting to Corporate
Now that you have your XP VPN client all set up and ready, the next step is
to attempt a connection to the Remote Access or VPN server set up at the
corporate office. To use the connection follow these simple steps. To open the
client again, go back to the Network Connections dialog box.
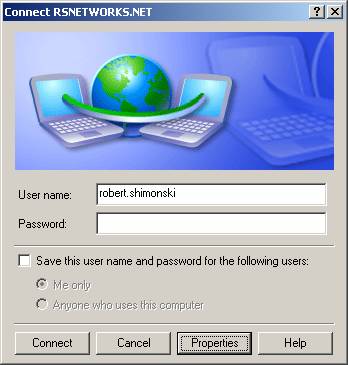
One you are in the Network
Connection dialog box, double-click, or right click and select 'Connect'
from the menu - this will initiate the connection to the corporate office.
Type your user name and
password, and then click Connect. Properties bring you back to what we
just discussed in this article, all the global settings for the VPN client
you are using.
To disconnect from a VPN
connection, right-click the icon for the connection, and then click
"Disconnect"
Summary
In this article we covered the basics of building a VPN connection using
Windows XP. This is very handy when you have a VPN device but don't have
the 'client' that may come with it. If the VPN Server doesn't use highly
proprietary protocols, then you can use the XP client to connect with. In a
future article I will get into the nuts and bolts of both IPSec and more detail
on how to configure the advanced options in the Security tab of this client.
In plus, pentru partea de client se poate adauga:
Configure the VPN Connection
If the network connections page is not already open, click
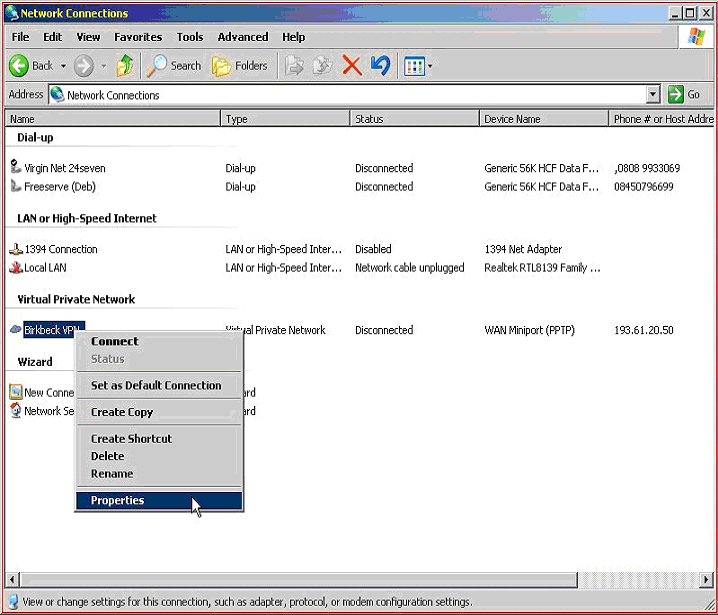
My Computer > Control Panel > Network Connections.
Right click on Birkbeck VPN connection and choose properties from the
pull-down menu
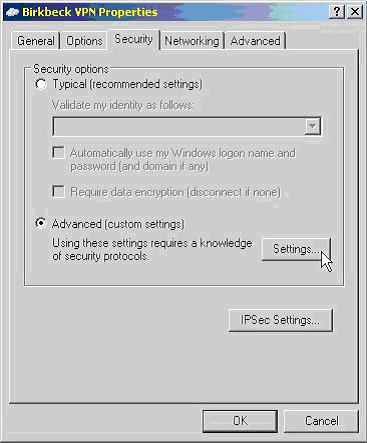
Click on the Security tab, and select Advanced (Custom Settings),
then click the Settings.button
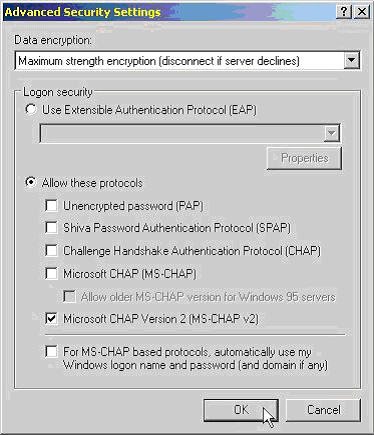
Change the Data encryption to Maximum strength encryption, and
make sure only Microsoft CHAP version 2 (MS-CHAP v2) is the only allowed
protocol (un-tick the rest) and click OK
 3.
Click on the Next button 4. Select Set up advanced connection
3.
Click on the Next button 4. Select Set up advanced connection 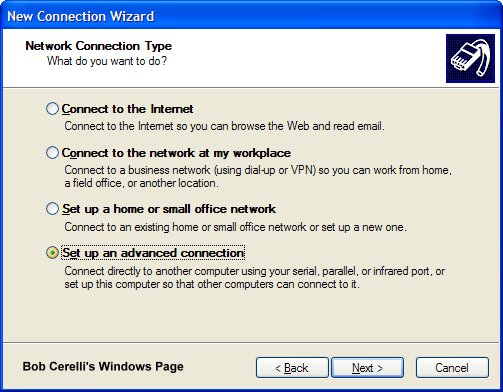 5.
Click on the Next button. 6. Click on Accept incoming connections
5.
Click on the Next button. 6. Click on Accept incoming connections
 7.
Click on the Next button 8. At the LPT1 page, skip it and just click on
the Next button.
7.
Click on the Next button 8. At the LPT1 page, skip it and just click on
the Next button. 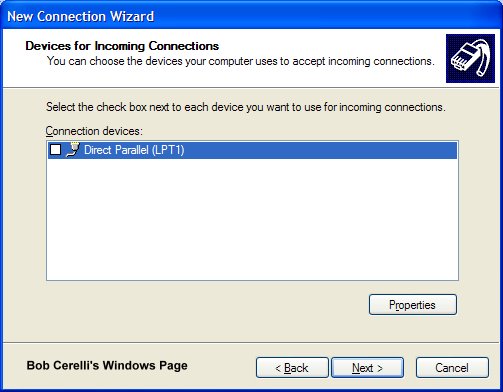 9.
Click on Allow virtual private connection
9.
Click on Allow virtual private connection 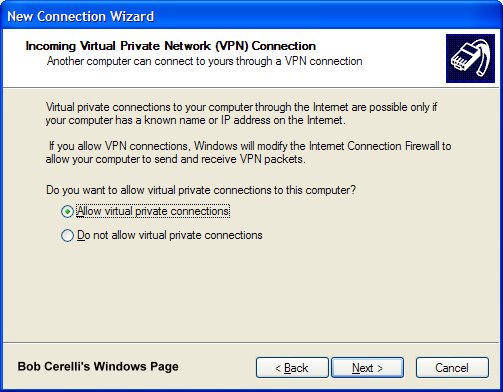 10.
Click on the Next button 11. Add user accounts that you want to be able
to connect to your WindowsXP computer.
10.
Click on the Next button 11. Add user accounts that you want to be able
to connect to your WindowsXP computer. 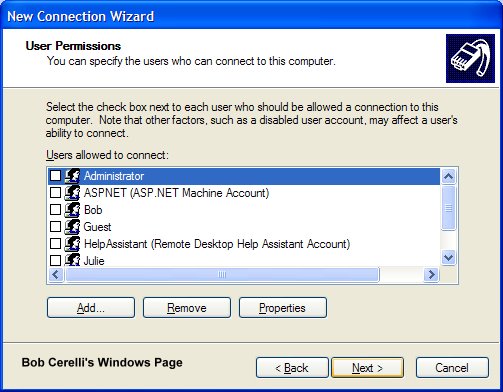 12.
Click on the Next button. 13. Highlight Internet Protocol (TCP/IP) and
click on Properties
12.
Click on the Next button. 13. Highlight Internet Protocol (TCP/IP) and
click on Properties 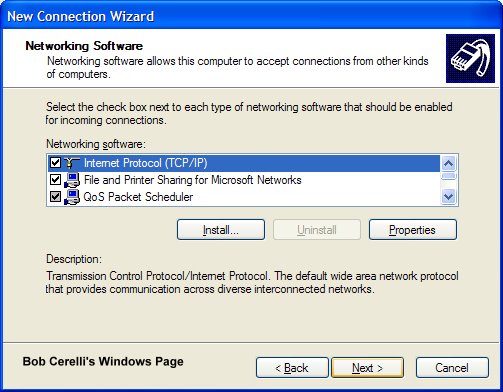 14.
Determine how you want the remote computers to get their IP address
14.
Determine how you want the remote computers to get their IP address