| CATEGORII DOCUMENTE |
| Asp | Autocad | C | Dot net | Excel | Fox pro | Html | Java |
| Linux | Mathcad | Photoshop | Php | Sql | Visual studio | Windows | Xml |
DOCUMENTE SIMILARE |
|||||
|
|||||
One of the most important things about drawings is that the objects they contain can be tied to database information. This is done in a very simple way: every drawing has a table associated with it. Every object in the drawing is tied to one record, that is, one row, in the table.
When a drawing is imported or created, a table will be created for it automatically. This table will appear under the drawing in the project pane in a hierarchical view.
Because every object in a drawing is associated with a record in a database table we can use visual methods in drawings to grab data from the table, and we can use tabular / database methods within tables to grab objects in the drawing.
Clicking on objects in a drawing is often a much easier way
to find data than sifting through a text table. For example, it is much easier to select a group of Western states by
clicking on them in a map than to search through a text table to find entries
for '
At times we may combine both methods, perhaps making a selection using table-oriented database methods and then refining the selection through mouse-based selection moves in the drawing.
Example
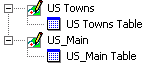
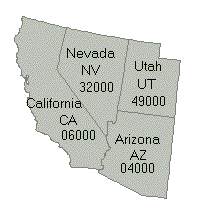
Imagine we have a drawing called Western_States that shows Western states in the

In the project pane this drawing appears with its associated table indented underneath it.
![]()
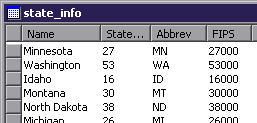
If we double click open the table for this drawing we might see that it contains four records, one for each state.
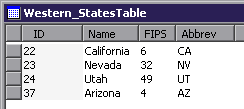
The table contains a field created and maintained by Manifold, the object ID number, plus three other fields. These other fields give the name, FIPS (Federal Information Processing Standard) code and the two letter postal abbreviation for each state.
When a drawing is created or imported Manifold automatically assigns a unique object ID number to each object. Manifold uses this object ID number to maintain the connection between each object in the map (the state areas in this case) and the corresponding row in the database table. Simple drawings might not have any data in their tables other than the object ID for each object. Drawings that are rich in data may have many fields in their database tables.
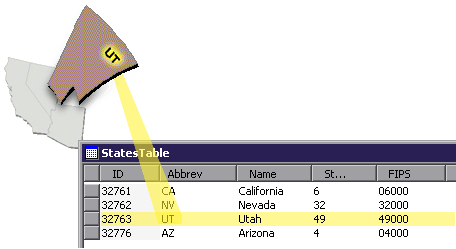
The association between objects in drawings and their record (row) in the database table is invisibly and automatically maintained for us by Manifold at all times. Whenever we select an object in the drawing we automatically select the corresponding row in the table. Whenever we select a row in the table we automatically select the corresponding object in the drawing. If we right click on the object and choose Fields in the context menu, we can see the object's fields.
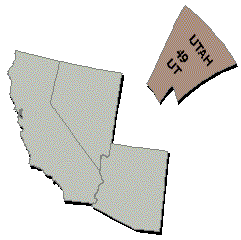
If we imagine each area object as a shape cut out of
cardboard, it is as though we have written the database information on the
underside of each area. It is as if we
could pick up the area for
In the example above, where do the fields come from? Our example uses a drawing originally published with many fields by the US Bureau of the Census. The drawing was imported, the drawing's table was opened and then some fields were deleted from the table to create the example shown. Most drawings used in GIS originate in some GIS data file that already has data fields created and filled in with values for the various objects in the drawing. In other cases we will use Manifold tools to merge data from databases into a drawing's table. In some cases, we will create a new field and add data by hand to each object.
Newcomers to GIS often focus on the visual presentation of maps. In contrast, experienced GIS users often feel that the most important aspect of GIS is the ability to use geography as a 'handle' to grab and manipulate data within databases. The emphasis of much GIS work is not so much the precise drawing of cartographic features as it is amassing and utilizing rich databases of information within tables that are connected to maps. At times it is almost irrelevant how accurate or detailed is the cartography. For this reason, database skills and rich databases are extremely important in much GIS work.
Manifold includes a very fast and powerful database engine, so one can work with drawings that include many thousands of objects with many database fields per object in the drawing's table. As discussed in the Tables and Queries topics, Manifold's ability to manage database tables exceeds that of many database management systems.
Tables that belong to drawings always exist entirely within Manifold. The data they contain is kept within the Manifold project file. Tables that are imported into a Manifold project are also managed within Manifold and their data saved within the Manifold project file. When tables are imported into the project, a copy of their data is taken from the original source and written into the project file. Manifold can also link tables into a project from external sources. When tables are linked into a project the data remains outside of Manifold in the original source.
Manifold has the ability to link to external tables for two main reasons. The first reason is simple space saving. At times it is more convenient not to make a copy of a table by importing it into the project. The second reason is dynamic updating by external programs. Some types of data, such as the count of customers in a particular county at exactly a certain moment, might be updated on a real time basis within a multi-user software application that keeps its data in a non-Manifold system such as SQL Server. If we link such a table into a Manifold project we can have the benefit of a table that appears in the project but which is dynamically updated by processes outside of Manifold.
Using Relations between Tables
A drawing's table can contain a large amount of data for objects in the drawing. However, at times it is more convenient to organize data using multiple tables instead of placing all fields in a single table. We may do this entirely within a Manifold project just to better organize our data. We could also use multiple tables because some of those tables need to be linked into the Manifold project from external sources in order to save space or to provide dynamically updated information.
A drawing's table can be used in database work just like any other table. In particular, it may be connected to other tables using relations . A relation between tables uses a key field with values common to both tables to connect the two tables so that columns from one table may appear in another table. This allows data that appears in one table to also appear in another table without having to physically duplicate the data.
To connect another table to a drawing's table, Manifold needs to know how the two tables should be related. This is done using a 'key field' that contains matching values in the drawing's table and in the other table. This means that a drawing's table must have at least one field that can be used to match values with other tables.
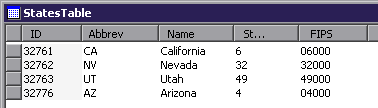
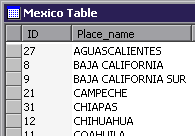
For example, suppose our drawing of four states has only one
field in the table in addition to the internal object ID field. The Abbrev column gives the two-letter
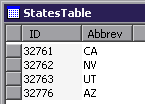
Suppose also we have a state_info
table, perhaps imported from some demographic database we found on the web,
that gives information for each state in the
In this case, we can use the state postal code abbreviation as a key field to form a relation between the two tables. We can then 'borrow' fields from the state_info table and include them in our drawing's table as if they were fields native to that table:
The illustration above shows the drawing's table after it
has had a relation formed and three additional columns included from the state_info table. We can use the data borrowed from other
tables just as if the included fields were built into the drawing's table. Whenever we select the
For example, we could tell Manifold to create labels that showed the contents of various data fields for each object. These labels could grab data from the included fields as well as from the original field in the table:
The data required will automatically come out of whatever tables are connected to the drawing's table via relations. Note that to make this magic work all we need is a key field that exists in the drawing's table that can be used to match up records with a corresponding key field in the other table.
Note also that since Manifold projects can link to external tables that reside in external database providers, a drawing's table can have a relation with an external table. If the external table changes, the data shown in the map will also change. This is a good way of using table data in a drawing when the data changes frequently.
For example, if we wish to display weekly sales totals in a map of sales regions we could link the sales table in our corporate SQL Server database into our project and then form a relation between that table and a drawing's table that shows sales regions. Whenever we display the map using that drawing, it will automatically include the latest sales figures as they are kept in the SQL Server database.
Tables Work with Lines and Points, Too
The above examples use areas because they are easy to illustrate as having information written on them. Any map object, including lines and points, can have database information attached. Points are often used to show the locations of facilities, customers, towns, stores and other locations. Each point could have many data fields in the table.
Lines can have data fields in tables as well. Typical uses of fields attached to lines are to maintain information on roads or to record data for streams or other linear waterways.
Keeping Organized
Each object in the drawing corresponds to a record (one row) in the drawing's table. Every object in that drawing will have the database fields in that table. Not every cell in every record has to be full of data, of course, but all objects in the drawing (that is, every row in the table) will have the field structure for that table.
To keep things organized it is wise not to mix up objects in one drawing that really would be better organized in separate drawings. For example, suppose we have a drawing of states as areas with demographic information for each state. If we also have a drawing of roads with maintenance data for each road, it would make sense to keep the roads and the states in separate drawings so that the two different drawings can have different fields in their tables. We can always combine the multiple drawings in a single map if we want to see the states and the roads together in one map.
Note that there's no problem mixing lines and areas in the same drawing; however, it's usually the case that objects shown as areas (like states) tend to be associated with different types of database fields than objects that are drawn with lines (like roads). An exception to this trend is the display of water features in 'hydrography' layers in maps where water features are frequently drawn using both areas (lakes) and lines (streams) in the same drawing. Drawings showing hydrography features will often use the same database table for both lakes and streams, since the same information (name, fresh or salt water, perennial or seasonal feature, etc.) fields are often used for both.
Summary
Every drawing has a table that at least contains one field, the object ID field.
Every object in a drawing is associated with one record in the table. A record is one row in the table.
Each data attribute field is one column in the table.
All objects in the drawing will have all the fields in the database table associated with that drawing.
When objects logically should have the same data fields, group them together in a drawing.
Use maps to show different drawings together at the same time.
See Also
The Query toolbar is a fast way to select objects in drawings using the data values they contain.
Drawings and Tables
Attaching Linked Tables to Drawings
This topic gives specific examples of interacting with drawing tables, to show how the association between drawings and database tables discussed in the Drawings and Databases topic works in practice.
Recall that every drawing in Manifold has a database table tied to it. Each object in the drawing corresponds to a record (one row) in the database table. Every field in the database will be a column in the database table. A drawing's table will have at least one field, the object ID field, which provides an identification number for each object in the drawing. The object ID is a unique number generated by Manifold when the drawing is created or imported. Tables can contain other fields as well. For example, a drawing showing cities as points could have a Name and Population field in the table that gives the name of each city and its population.
A drawing's table can be used like any database table. For example, it can be used to form relationships with other tables, including tables that are saved outside of Manifold in external database providers.
When drawings are imported from a GIS format that saves both object and database table information the new drawing that appears in the project will automatically have a table created that is populated with data. When we create a new, blank drawing in a project Manifold will automatically create both the drawing and a table to go with that drawing.
![]()
By default, the minimum field in drawing's table is an ID field that gives the object ID number of each object in the drawing. ID numbers are assigned on a unique basis for each new object created or imported into any drawing. All ID numbers are guaranteed unique.
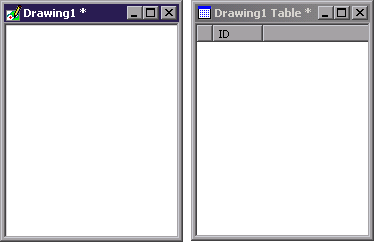
We can open the drawing in a drawing window and also open the drawing's table in a table window. When a new drawing is inserted there are no objects in the drawing or associated records in the table. To fit conveniently as screen shots within this documentation, both the drawing window and table window have been resized to very small sizes.
Note that the ID field cells in the table are shown using the default light gray color that indicates read-only cells. The ID field in a drawing's table may not be edited since the ID is the hard-wired connection between each object in a drawing and the record in the drawing's table that corresponds to that object.
Drawings and their Tables are Synchronized
For drawings and their tables, any changes in one component are immediately updated in the other component. Adding or deleting an object in the drawing will add or delete the associated record in the table.
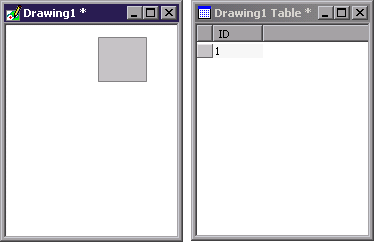
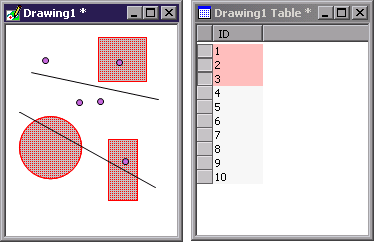
If we use the Tools toolbar to add an area to the drawing a record appears for it automatically in the table as well. Tables usually show more interesting data than Object IDs; however, as the simplest possible example of a drawing's table it is handy for the purposes of this topic to show just the Object ID field.
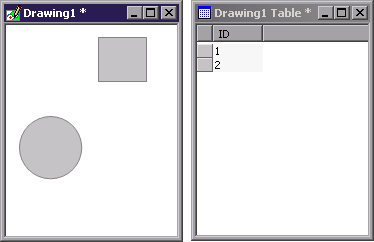
Creating another area in the drawing adds another record in the table as well.
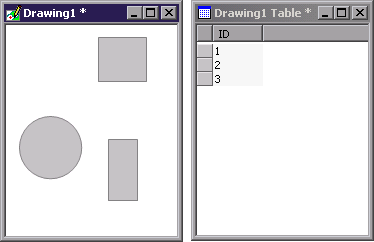
Creating a third area adds a third record, shown with an ID of 3. [Note: It is very rare that we would ever see such low numbers in sequence as object IDs since we normally work with large, complex maps where objects are imported, deleted, created and so on in potentially large numbers. Object IDs are therefore more normally semi-random numbers and not neat, small numbers in sequence.]
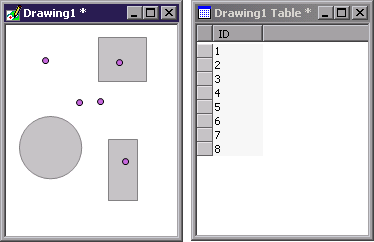
The screen shot above shows our drawing and table after we have used the Tools toolbar to add several points. See the Adding Points, Lines and Areas topic for information on how to add points to a drawing.
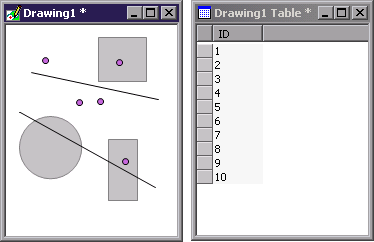
Using the Tools toolbar we can add two lines as well. Note that two more records have appeared in the table.
Selections are Synchronized
A drawing and the drawing's table share a single selection since both the drawing and the table are just two different ways of seeing the same objects. Any changes to that selection in either the drawing or the drawing's table will immediately be updated in the other.
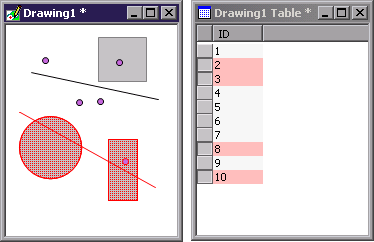
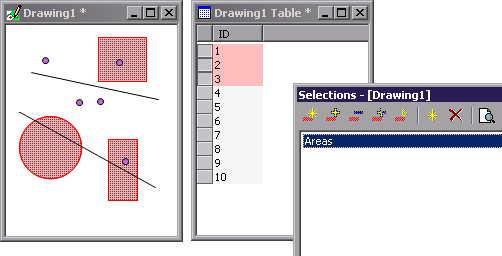
Any Selection made in the drawing will simultaneously appear in the table with a change in background color of the associated records. Selected records will have a faint red background color by default. The example above shows we have selected two areas, a line and a point in the lower half of the drawing.
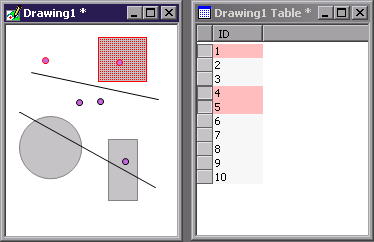
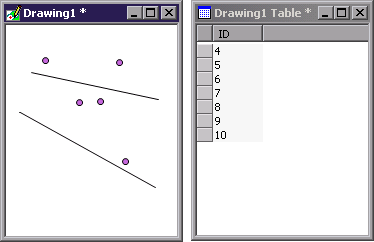
If we change the selection by selecting two points and an area in the upper part of the drawing the selection shown in the table will immediately be updated to match.
The Selections pane shows the same set of saved selections for both drawings and their tables. The example above shows the Selections pane opened and moved into position so it can participate in our screen shots. We have selected the three areas and have saved them as a saved selection called Areas.
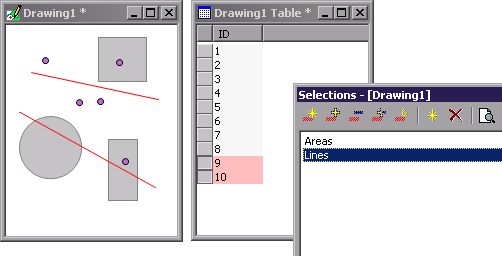
We can select the two lines and save them as a saved selection called Lines.
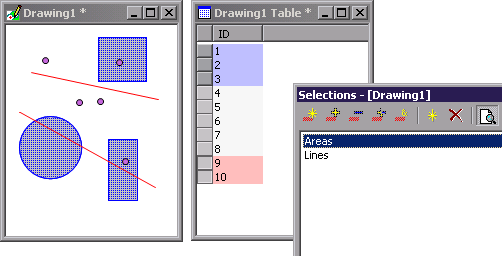
At any time, we can click into the Selections pane and get a Preview of any of the saved selections by pushing in the Preview button in the Selections pane. When the Preview button is pushed in he highlighted saved selection will be shown in blue preview color in both the drawing and in the table. If a record is both in the current selection and in the preview it will be shown in a color mid-way between the red selection color and the blue preview color. [Manifold will automatically interpolate between whatever selection color and preview color we specify in the Tools - Options dialog].
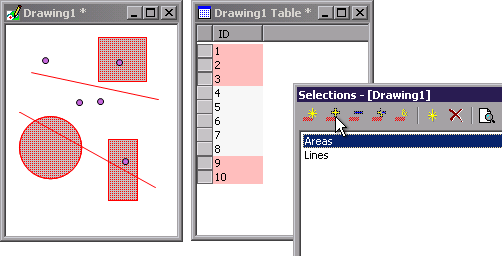
![]() We can use the selection command buttons to
combine a saved selection with the existing selection. In the illustration above we have pushed out
the Preview button, clicked on the Areas saved selection and then pressed
the Add to Selection button in the
Selections pane toolbar. This adds the
areas to the current selection for a selection that consists of both lines and
areas.
We can use the selection command buttons to
combine a saved selection with the existing selection. In the illustration above we have pushed out
the Preview button, clicked on the Areas saved selection and then pressed
the Add to Selection button in the
Selections pane toolbar. This adds the
areas to the current selection for a selection that consists of both lines and
areas.
Deletions are synchronized as well. Suppose we select just the areas and choose Edit - Delete.
The areas will be deleted in the drawing and their associated records will be deleted in the table as well.
A Drawing's Table Cannot Add Objects to the Drawing
We cannot add objects to a drawing by adding records to the drawing's table. The reason is that the information seen in the table is only part of the information that defines the object. An object in a drawing is defined by the geometric coordinates that specify its location and shape. These are not visible or part of the table: they are part of the data within the drawing itself.
Deleting an object in a drawing will delete the object's record in the drawing's table. Deleting a record in a drawing's table will delete the associated object in the drawing.
Note: It is possible to create a linked drawing that is created based on the contents of an external geocoded table. In that case, the external table controls both the linked drawing and the linked drawing's own table. If a record is added to the external table then a new point will be created in the linked drawing and a new record will appear in the linked drawing's own table. See the Linked Drawings and Geocoded Tables topic for more information.
Attaching External Tables to a Drawing's Table
So far we've seen that every drawing is linked to a table and that the drawing's table is created within the project at the same time the drawing is created. All such tables exist entirely within the project. Sometimes we would like to link our drawing's table to an external table that is linked into the project.
To do this we use queries to join the drawing's table with an external table. The resulting query table can then be used with the drawing. See the Attaching Linked Tables to Drawings topic.
The Info Pane
A convenient way of seeing data from drawing tables one record/object at a time is to use the Info pane to step through data one object at a time.
Tech Tip
The illustrations above show the first object created having an ID of 1. Although the first object created in a new drawing may well have an ID of 1, this is not guaranteed. Object IDs are unique within a given .map file but are not guaranteed to begin with 1. It is therefore entirely possible to create a new drawing and to then create a new object in that drawing that has an object ID of, say, 5. Even in the case of the first drawing in a completely blank drawing it is still possible not to get an object ID of 1 for the first object created.
See Also
The Query toolbar is a fast way to select objects in drawings using the data values they contain.
Tables show data organized into rows and columns. Every row in a table is a record. Every column in a table is a field. We will use the words 'row' and 'record' interchangeably. We will also use the words 'column' and 'field' interchangeably.
This introductory topic provides a brief overview of how Manifold approaches tables and databases. It is intended for readers already familiar with database concepts such as tables and queries. See the Tables topic and subsequent topics for a complete guide to working with tables. See the Working with Queries topic for an introduction to queries. See the Query toolbar topic for a fast way to select records in tables.
Tables and Drawings
Every drawing in Manifold has a table associated with it. Each object in the drawing (that is, every point, line or area in the drawing) is linked to a row in the table. Drawings have a table even if there are no data fields saved for each object. In that case, the drawing's table is mostly empty. It has only one field, the object ID field, for each row. The object ID field is used to link each row to its associated object and cannot be edited.
Deleting an object in a drawing will delete the object's record in the drawing's table. Deleting a record in a drawing's table will delete the associated object in the drawing.
Other Tables
Tables may also be database tables having nothing to do with drawings that are imported into a Manifold project or linked into the project from an external database source. New tables may also be created with Manifold.
Tables may be brought into projects from almost any database, even from those that have nothing to do with drawings or maps. We will often work with tables that have no geographic context. We may wish to prepare data for later use together with drawings and maps, or we might simply wish to use Manifold as a general-purpose means of viewing, analyzing, exploring and managing databases.
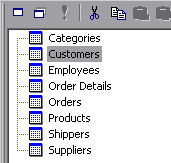
The illustration above, for example, shows a project with tables imported from the Microsoft Northwind Traders example database shipped with Microsoft Access.

If we open the Customers table we see the same data familiar to many Access users who have worked with this sample database.
There are two types of database tables that may be imported or linked into a Manifold project:
Tables from files and file types that may be opened directly by Manifold's own database engines and so require no other database software. These include .mdb, .dbf, .udl, .wkX, .xls, .db, and .html files as well as ascii or text database files organized as comma separated value (.csv) form.
Tables from data sources that are provided by external database engines via OLE DB or ODBC. Some such sources may require external database software. Configuring Windows for Manifold installation by installing MDAC will install a default set of OLE DB / ODBC drivers for popular databases.
To import or link a table into a Manifold project
1. Choose File - Import - Table or File - Link - Table depending on whether you wish to import the table or to link it.
2. In the Files of type box choose the access method desired. Use ODBC Data Sources or OLE DB Data Sources to connect via ODBC or OLE DB. Choose one of the standard file types, such as MDB or XLS to connect directly to common file types.
3. Browse over to the database file and open it. When using ODBC or OLE DB data sources, this will involve sub-dialogs.
4. Choose the tables to be imported. Choose more than one table if desired.
5. When linking tables, check Read Only if you wish a read-only link.
6. Press OK.
After the initial choice of File - Import or File - Link, all dialogs are the same. The only difference is whether the data in the table is copied into the project or if it is left outside in an external file or data source.
Alternate method to import or link a table
1. Open the Tools - Database Console dialog.
2. In the Data source box, specify one of the usual files types (.mdb, .db, etc.) or specify an OLE DB data source or use the browse button next to the box to browse to an OLE DB data source. When browsing to an OLE DB data source, in the Provider tab of the Data Link Properties subdialog use the Microsoft Jet OLE DB Provider to connect to common file types such as MDB or XLS.
3. The upper pane will show the contents of that data source, including any tables and the fields they contain. Click on a table to highlight it.
4. Click on the Import button in the dialog's toolbar to import the highlighted table. Click on the Link button to link the table.
5. Press Close.
In all cases, tables that are imported or linked will appear to be part of the project like any other table. Manifold can import data from or link to a very wide range of database files and database providers.
See Importing and Linking Tables for more information on using existing tables.
See Creating New Tables for information on creating new tables.
See the Database Console topic for a useful console for browsing databases and importing and linking tables. The database console can also be used to execute SQL commands within an external database provider, such as SQL Server or Oracle.
Table Windows
Clicking open a table will display it in a table window, a classic row and column text database table presentation. A table may be opened in more than one window simultaneously. Opening an SQL query will also result in a table showing the results of the SQL query.
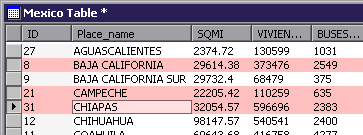
Table windows show many records at once. Selected records appear highlighted in red selection color. Records will be shown in selection color whether they were selected within the table window or (in the case of drawing tables) if they were selected by clicking on the corresponding objects in the drawing. Records may also be selected using the query toolbar or queries.
Table windows are controlled using a mix of menu command choices, context menus, selection and use of the transform toolbar . Try right clicking onto a column head, a record handle, and a cell to see the different context menus that appear with tables. See the Tables - Context Menus topic for a summary guide to context menus in tables.
By default, table windows do not use horizontal or vertical gridlines between rows and columns. Gridlines may be turned on in Tools - Options .
Columns
Columns are headed with the name of the field they show. We can reorder, show or hide columns in a table using the View - Columns command. Using the View - Columns command, we can also display intrinsic fields as columns in the table. Intrinsic fields are computed quantities, such as the length of lines, or system quantities such as the latitude and longitude position of a point. Right click onto a column head to see a context menu of many additional commands that work with columns.
The boundary lines between column heads may be moved left or right to make a column wider or narrower. If you are using Windows 2000 or Windows XP columns may be dragged and dropped into different left to right arrangements. We can also use Best Fit or Best Fit All to automatically set the width of columns.
Specifying Languages for Columns
Columns in tables can have different languages specified. This allows one column to show text in one language while another shows text using a different language character set. Several different languages can be used in different columns within the same table. By default, tables use the Windows locale setting for the current user. If desired, any text column in a table can be set to a different language by right clicking on the column head and choosing Language.
Rows
![]()
Records have a record handle at their left margin. A black triangular arrow marks the current record in its record handle.
![]()
The current record will be specified by a current record arrow in its handle as well as by outlining the active cell.
![]()
When selected, the current cell is highlighted by a slightly lighter shade of the red selection color.
Selection Methods
Selecting records in the Table window is part of many tasks in Manifold. Selection in tables, like drawings, uses selection modes to specify whether the selection command should replace, add to, subtract from, invert with or intersect any previously existing record. The default mode is Replace.
Click on a cell to make it the current cell and to make that record the current record.
Click on a record handle to select that record.
SHIFT-click on a record handle to select the record and to also select all the records between it and another selected record. This is often used to select a series of records: click on the top record and then SHIFT-click on the bottom record and all the records in between will also be selected.
CTRL-click on a cell to select that record.
SHIFT-CTRL-click on a cell to select a range of records.
See the Selection in Tables topic for more details.
Copy and Paste Operations with Columns
Copy and Paste are handy commands for copying data between fields. Suppose we have a numeric field that is a double, and we would like to convert the field into an integer. We do this by first creating a new field that is an integer. A new column will appear. Next, we Copy the contents of the double numeric field's column and then Paste into the new integer field's column.
This method works between reasonably compatible types. For example, numbers like 3.1415 may be converted into text
strings such as '3.1415', but it does not make sense to attempt to
convert '
We can also use the Transform toolbar to copy values from one column to another, also with automatic conversion whenever possible.
Editing Cells
See the topic Editing Data in Tables for details on changing values inside cells and adding new records to tables.
See the Editing Intrinsic Fields in Tables topic for a discussion of how we can move objects by editing their locations as they appear in intrinsic fields in a table.
Bookmarks
Bookmarks are icons in the left margin of text components such as comments, queries and scripts. They allow fast navigation within lengthy text. Bookmarks are also available within tables, comments, scripts and queries. Within tables they are very useful for marking particular records when jumping back and forth between records in a table. When tables or queries are sorted the bookmarks correctly travel with the records into the new sort order.
To set a bookmark in a table, click anywhere in the row to be marked.
Press F8 or choose Edit - Bookmarks - Toggle to set the bookmark. To clear the bookmark, press F8 or choose Edit - Bookmarks - Toggle again.
Add other bookmarks as desired. We can now use Ctrl-F8 to jump to the bookmark below the current row or Shift-Ctrl-F8 to jump to the bookmark above the current row. See the Edit - Bookmarks topic more on bookmark.
Effect of Tools - Options Settings
When importing tables, keep in mind that the default setting in Tools - Options is to not import empty columns. Check the Import empty columns in tables option to import tables with columns that do not contain any values in the originating table.
Note also the setting of Trim strings imported from external databases (on by default). This will delete leading and trailing whitespace characters from imported table strings.
The Trim strings option (just like the Trim table transform operators) removes characters listed in the Tool Properties pane's list of token separators. By default, these are the 'white space' characters consisting of the space character, tab, newline and carriage return. Note that adding any other characters to the separator list in Tool Properties will subject them to removal as well if they occur as leading or trailing characters.
ViewBots
ViewBots are one-line analytic instruments used to dynamically compute a statistical or comparative measure over a subset of records and are extremely useful for analyzing tables. They are one of the most popular functions in Manifold for experienced users. See the ViewBots topic.
Transform Toolbar
The Transform toolbar is an extremely powerful tool for managing and editing tables. It is easy to use and should be mastered by every Manifold user doing serious work with tables. New users and experts alike will experience dramatic productivity gains by learning to use the transform toolbar.
Active Columns
Active Columns are a way of embedding short (or long) snippets of scripts within tables to automatically accomplish calculations. The idea is similar to that of spreadsheets, but appearing in tables in a much more powerful way.
Decision Support System
Manifold's Decision Support System provides remarkable data mining capabilities by applying fuzzy inferences in an easy to use way.
Working with SQL Server and Oracle
When working with server-based OLE DB providers such as SQL Server and Oracle, users are strongly encouraged to maintain primary keys in all tables linked into the Manifold project. A side effect of how such servers interact through OLE DB is that if the table does not have a primary key, performance will be greatly reduced.
ODBC and .map Files
When first launched Manifold will automatically install the Manifold ODBC driver. This driver allows other applications to work with data in tables and queries in a Manifold .map project file. See the Using the Manifold ODBC Driver topic.
Notes
Tables within Manifold have many powerful capabilities within the context menus that appear when right clicking on different parts of the table. For example, one can change field types using the Change Type choice that appears when right clicking onto a column head. In another example, one can right click on a record and choose More Like This to automatically see more records like that one sorted to the top of the table. Take the time to read through the Tables topic and subsequent topics in the Tables book to learn about these and many other powerful capabilities.
Many of the illustrations for tables are screen shots made using the Nwind.mdb sample database provided by Microsoft. This is a version of the Northwind.mdb sample database distributed with Access and thus familiar to many Microsoft Office users. Nwind.mdb is provided on the Manifold System CD in the Help examples folder.
Queries are components that store statements written in Structured Query Language (SQL). Queries can select data from one or more tables, filtering, grouping and ordering it as desired or otherwise managing the contents of tables that exist within a project. The simplest form of query chooses columns and records from one table and displays them as a table.
Queries are easy to create. Use File - Create - Query to create a new query and then edit it by double clicking on it to open it (or by right clicking on it and choosing Open). Enter the SQL statement you wish to use and close the query.
Run the query by highlighting it and clicking the Run button. Whenever the query is run it will execute the SQL statement. If the SQL statement in the query returns a table the query will display it in a table window. The resultant table may be used like any other.
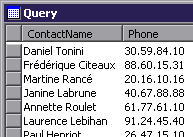
SQL is a really easy way of phrasing queries. Don't be intimidated by experts who make SQL out to be more complex than it need be. While SQL can certainly be used to write fearsomely complex queries that no one understands, most of the time it is used by average people to write very simple, obvious queries this one:
Select
ContactName, Phone from Customers where Country = '
The table names and fields used in a query refer to whatever tables we have in our project. If we've imported the Customers table from the Nwind.mdb sample database into our project and place the above SQL statement into a query, when we open the query we will see a simple table with two columns:
Simple SQL statements displaying data from a single table are written as follows:
Select (fields) from (table name) where (condition)
SQL is not case sensitive except inside text strings used within quotes in criteria. We can use parentheses to group criteria within criteria to keep our statements legible, and we can use tabs and spaces, multiple lines and indents as desired to keep things clear:
Select ContactName, Phone from Customers
where
(Country = '
or
(Country = '
)
As can be seen from the above, words like And and Or may be used within criteria.
A search of Internet using any good search engine looking for keywords such as 'SQL', 'style' and so on will produce numerous pages advocating various styles of writing SQL queries. Since SQL is case insensitive, our advice is to avoid writing in ALL CAPITALS as is advocated in some of the style guides. Other than that, choose whatever writing style you like. Extra parentheses don't hurt. Use them to keep queries legible and well organized and to guarantee the order of precedence in comparison operators is what you want it to be in complex queries.
SQL is very powerful and even fun. Don't deny yourself the benefit of this easily learned tool. The nice thing about SQL is that it is easy to learn to write simple queries and it is very easy to extend one's capabilities in an incremental way. With a little practice, you too will be spinning out intense little SQL queries as fast as your fingers can fly over the keyboard.
Dot Nomenclature
'Dot' nomenclature allows us to refer to exactly a desired field within a given table even when other tables in our project might use the same field name in a different way. Dot nomenclature is simply the table name followed by a period '.' and then the field name:
Customers.ContactName
The above refers to the ContactName field in the Customers table. If we are writing simple queries that involve only one table we need not use dot nomenclature. We could simply write ContactName as in the examples above. However, if we are working with more than one table we can always use dot nomenclature to clear up any ambiguities about which field is intended. Sometimes it is necessary to use dot nomenclature to resolve ambiguities.
Field Names in Brackets
Manifold as well as many modern database management systems allow field names to contain the space character and other non-alphanumeric characters. Such field names should be enclosed in [ ] square brackets when written in queries. Simple field names that do not contain spaces or other non-alphanumeric characters need not be enclosed in brackets.
To preserve maximum capability to export data to a wide variety of database systems we suggest the use of field names that do not contain spaces or other unusual characters.
Bookmarks
Bookmarks are icons in the left margin of text components such as comments, queries and scripts. They allow fast navigation within lengthy text. Bookmarks are also available within tables and queries. Within tables they are very useful for marking particular records when jumping back and forth between records in a table. When tables or queries are sorted the bookmarks correctly travel with the records into the new sort order.
To set a bookmark in a table, click anywhere in the row to be marked.
Press F8 or choose Edit - Bookmarks - Toggle to set the bookmark. To clear the bookmark, press F8 or choose Edit - Bookmarks - Toggle again.
Add other bookmarks as desired. See the Edit - Bookmarks topic for notes on how to jump between bookmarks or to go to the previous or next bookmark.
ODBC and .map Files
When first launched Manifold will automatically install the Manifold ODBC driver. This driver allows other applications to work with data in tables and queries in a Manifold .map project file. See the Using the Manifold ODBC Driver topic.
Notes
See the Queries topic for more. That topic and the topics following it in the Queries book introduce various other useful SQL methods, including examples of how to create a new query table that displays data from two other tables at once. The more advanced topics also discuss 'action queries' that are used to do things with the data.
See Also
The Query toolbar is a fast way to select objects in drawings or records in tables using the data values they contain. For very simple queries the query toolbar is much faster than creating and running an SQL query.
See the Database Console topic for a useful console for browsing databases and importing and linking tables. The database console can also be used to execute SQL commands within an external database provider, such as SQL Server or Oracle.
See Selecting Objects with Queries for information on selecting objects within drawings or drawing layers in maps using SQL queries.
See the Manifold SQL Extensions topic for a list of extensions to SQL in Manifold that allow creation of SQL queries that employ fuzzy logic, make spatial comparisons or employ the geocoding engine for work with street addresses.
Search and replace operations in Manifold are easy with the Edit - Find , Edit - Find Next and Edit - Replace dialogs. These are very similar to the analogous dialogs in Microsoft Office applications. They appear for table and drawing components. When used with drawings, the Find, Find Next and Replace dialogs operate on the data in tables associated with the drawings.
To search for a value:
1. Open the drawing or table.
2. Choose Edit - Find.
3. Enter the value to be found (text, a number, or a regular expression) in the Find what box.
4. Choose optional settings, such as matching case.
5. Press Find Next to find and select for editing the next instance of the value, or choose Find All to find and select all instances of the value.
6. Searches proceed from the current position in the table towards the end of the table. To begin a search at the beginning of the table, press Restart.
Using Find in a drawing will find and select the object that has that value in its table record. Objects will be selected as the primary selected object, ready for editing. Once the Find dialog has been used, we can use the Edit - Find Next command to find the next instance of the previously found value.
Options in Find and Replace Commands
|
Find what |
The value or regular expression to be found. |
|
|
Special characters button: use to call a subdialog that allows entry of special characters. |
|
Replace with |
Value used to replace found values. |
|
Match whole word only |
Match the value only when it occurs as a whole word. With this checked, 'the' will match the word the but not occurances of these letters within words such as weather. |
|
Match case |
Replace is case insensitive by default. This forces a match exactly on the case given in the Find What value. Example: unchecked, 'the' will match The and tHe. |
|
Use regular expressions |
Regular expressions are a concise and flexible notation for finding and replacing patterns of text. |
|
Search only in |
By default, Replace will search all fields. Check this to restrict the search to only the field given. |
|
Find Next |
Find the next instance of the search value. |
|
Replace |
Replace this instance of the search value. |
|
Replace All |
Replace all instances of the search value. |
|
Restart |
Move the current record pointer to the beginning of the table. Searches proceed from the current record pointer only. |
|
Close |
Close the dialog |
Example
To find the
Finding and Replacing
We can replace values using the Edit - Replace dialog, which is the same as the Find dialog with the addition of a Replace with edit box and Replace and Replace All command buttons.
Using Regular Expressions
Regular expressions are a concise and flexible notation for finding and replacing patterns of text.
See the Regular expressions topic for information on using regular expressions. These are a much more sophisticated and flexible method than simply using the * and ? characters.
The Windows clipboard Copy and Paste As commands are used throughout Manifold to copy data, to transfer data between components and to transform data from one form into another. For example, copy and paste within the project pane are used to copy components in into different forms. To copy a terrain as an image we Copy the terrain component in the project pane and then Paste As an image component into the project pane. Subsidiary dialogs will be called on the fly as necessary to make the desired image component out of the data in the terrain.
Any standard Windows clipboard commands work for Copy and Paste As. For example, when a component is highlighted in the project pane, we can copy using Edit - Copy, by right clicking on the component and choosing Copy from the context menu or by using a CTRL- C keyboard shortcut for Copy.
There are some limitations in this process. For example, a table can be copied and pasted as a drawing only if the table is geocoded. See the Linked Drawings and Geocoded Tables topic.
Note that we can use the Copy, Paste and Paste As buttons either from the project pane toolbar or from the main toolbar. We can also use these commands as they appear in the right-click context menus.
|
|
Cut - Copy the highlighted component to the Windows clipboard and then delete it from the project. |
|
|
Copy - Copy the highlighted component to the Windows clipboard. |
|
|
Paste - Paste the Windows clipboard into the project. |
|
|
Paste As - Paste the Windows clipboard into the project as a given component. The down arrow pulls down a menu showing what types of components can be used for the data on the clipboard. |
Example: Copy an Image and Paste As a Table
1. Open the project pane.
2. Right-click on the image component to be copied and choose Copy from the context menu.
3. Right-click anywhere in the project pane other than onto an existing component and choose Paste As. and then Table in the context menus that appear.
4. Choose the options desired in the dialog that appears for how the image data should appear in the table. For example, for each pixel we can create separate fields giving the Red, Green and Blue channel values for that pixel.
5. This creates a new table component where each record in the table is taken from one pixel in the image. The table is 'geocoded' with the pixel locations of each pixel in the image together with the values of the pixels.
For more sophisticated use, it is also usually possible to Copy from within a component window and to Paste As. the data directly into a new component in the project. For example, we can select points within a drawing and then Copy those points, click into the project pane and use Paste As. a table to create a table that contains geocoded records for each copied point.
Copy and paste works for images and surfaces between Manifold and other applications. For example, one can Copy an image in PhotoShop and Paste it into the project pane as a new image in Manifold or vice versa. Surfaces will be copied as a bitmapped image using whatever display options are currently applied. Images copied from other applications are always pasted as images.
Autoscope
The 'scope' of a Copy is what is copied. When copying from an open drawing, image or other window, if a selection is present only those items (image pixels, drawing objects, table records, etc) that are selected will be copied. This is an example of autoscope, where the scope of the copy is automatically restricted to the selection if one is present.
In contrast, when using Copy to copy components that are highlighted in the project pane the entire component will be copied whether or not there is a selection within that component.
Typical Copy and Paste As Combinations
|
Comment to Script |
Copies the text of a comment and pastes it as a script. |
|
Script to Comment |
Copies the text of a script and pastes it as a comment. |
|
Drawing to Table |
Reads the coordinate locations of points and pastes them as records into a geocoded table. This is a fast way of creating a list of latitude / longitude locations for points in a map, such as a city. |
|
Table to Drawing |
Paste a geocoded table as a drawing of points. |
|
Image to Table |
Create a table where each record is a 'geocoded' pixel from the image. |
|
Table to Image |
Create an image from a table where each record represents the pixel coordinates and values for each pixel in the image. |
|
Drawing to Labels |
Create a labels component with a label in position for each object in the drawing. When copying and pasting between the same Manifold session, can automatically create labels that are populated from the drawing's fields. |
|
Labels to Table |
Create a table where each record is the geocoded location of a text label as well as the text string in the label. |
|
Table to Labels |
Create a labels layer from a table of geocoded records where each record has the location and text string for a text label. |
|
Surface to Image |
Although surfaces are shown in a window as if they were a 2D image, this is just an optional visualization of the data. Surfaces may be copied and pasted as images to provide true images. |
|
Terrain to Image |
Create an image from a terrain where the image pixel values correspond to terrain elevations. |
|
Image to Surface |
Create a surface from an image where pixel values are used to create elevations. |
|
Surface to Drawing |
Create a drawing of regularly spaced points where each point contains an elevation field taken from the terrain. |
|
Surface to Table |
Create a geocoded table where each record contains an elevation or other data value for a given point in the surface. |
|
Table to Surface |
Create a surface taking elevation values for point records specified in a geocoded table. |
Pasting Drawings as Tables
When pasting a drawing as a geocoded table, points are represented as a single geocoded record where the latitude and longitude field of the record are taken from the position of the point and the other fields in the table are taken from any data attributes associated with the point. For lines and areas, this position will be the centroid of the object.
The Paste As Table dialog allows a choice of which fields will be pasted. By default, all ordinary fields are checked for pasting while intrinsic fields are not checked for pasting. Intrinsic fields are fields that are automatically computed, such as Area (I). Intrinsic fields include:
|
Type (I) |
A lookup field for object type: area, line or point. |
|
Branches (I) |
The number of branches (indicates topologically branched objects, such as areas with holes or islands). |
|
Coordinates (I) |
The number of coordinates that define the object. |
|
X (I) |
X coordinate of the center of the object in native coordinate system units. |
|
Y (I) |
Y coordinate of the center of the object in native coordinate system units. |
|
Latitude (I) |
Latitude of the center of the object in degrees latitude. |
|
Longitude (I) |
Longitude of the center of the object in degrees longitude. |
|
Length (I) |
Object length (or perimeter). |
|
Area (I) |
Object area. |
|
Bearing (I) |
0 for points and areas. For lines, the bearing in degrees of a straight line segment constructed between the first and last points of the very first branch within the line. Computed using ellipsoidal trigonometry. 90 is East and 270 is West. |
|
Selection Mask (I) |
A byte giving the saved selections mask. |
|
Selection (I) |
Boolean: currently selected or not. |
The Branches (I) and Coordinates (I) fields will be pasted as Int32 integers, the Type (I) field is pasted as a variable-length Unicode text field and all the other computed fields will be pasted as Float64 floating point numeric fields.
See the Intrinsic Fields topic for more information on intrinsic fields.
Pasting Images as Tables
Manifold can paste images as tables where every pixel in the image is pasted as one record in the table.
|
Index (I) |
An index into the palette. Appears as a choice only when pasting palette images. |
|
Color (I) |
A decimal number representing the RGB color. The decimal representation of the six-digit hexadecimal number formed by concatenating the three, two-digit hexadecimal values for R, G and B channels. |
|
Red (I) |
A value from 0 to 255 for the Red channel value. |
|
Green (I) |
A value from 0 to 255 for the Green channel value. |
|
Blue (I) |
A value from 0 to 255 for the Blue channel value. |
|
Alpha (I) |
A value from 0 to 255 for the Alpha channel value. |
|
Intensity (I) |
The intensity of the pixel as a value from 0 to 255. |
|
|
The hue of the pixel as a value from 0 to 255. |
|
Lightness (I) |
The lightness of the pixel as a value from 0 to 255. |
|
Saturation (I) |
The saturation of the pixel as a value from 0 to 255. |
|
Selection Mask (I) |
A byte giving the saved selections mask. |
|
Selection (I) |
Boolean: currently selected or not. |
|
X Offset (I) |
X position of the pixel. The column number of the pixel in image row and column coordinates. |
|
Y Offset (I) |
Y position of the pixel. The row number of the pixel in image row and column coordinates. |
|
X (I) |
X coordinate of the center of the pixel in native coordinate system units. |
|
Y (I) |
Y coordinate of the center of the pixel in native coordinate system units. |
Check the Latitude / Longitude coordinates box to paste the X (I) and Y (I) coordinates as latitude and longitude values.
Color appears as a choice only when pasting palette images; however, the RGB and Alpha values appear even if the image is not an RGB or RGBa image. In this case, they represent the R, G, B and Alpha values for the color of the pixel. Note that even though a color may be taken from a palette, it still can be described as composed of R, G and B values.
Cut and Paste
Cutting objects from one drawing and pasting them into a different drawing is the default way of moving objects between drawings in Manifold. To avoid the need to think about projections, create your blank drawings by creating one drawing and then copy that blank drawing and paste it as several additional drawings. This will guarantee that all of the drawings use exactly the same projection settings. It's then possible to copy, cut and paste objects between the drawings without worrying about projection nuances.
If you've Pasted something into a drawing and don't see it, try Zoom to Fit to make sure it is not outside the window at the current zoom and pan setting.
Copy and Paste between Applications
Some items within Manifold cannot be copied and pasted to other applications because the other applications don't understand the objects used within Manifold. For example, Microsoft Word does not understand how to accept vector objects containing data attributes if objects are copied from a Manifold map and pasted into Word.
Images and surfaces can be copied from Manifold and pasted to any application that understands bitmaps. Surfaces will be pasted as a bitmap using the current display options.
Another option to transfer images or a view of drawings or maps is to use the Tools - Make Image command to save to an image component. This captures the desired component as an image. The image can then be used within Word or other applications.
Tech Tips
At times we would like to fetch a component that's been saved in a .map project file for use in another project file. We can import the component using File - Import - Component directly from the .map file. Another way to do this is to open a second instance of Manifold and to open the saved .map project. We can then Copy components from that project file, switch to our current working instance of Manifold and Paste them into our current project.
Sometimes we would like to transform a component from one form into another, such as converting a surface into an image, and we don't need to keep a copy of the original component around. In such cases it is faster to Cut the original component and Paste As a new component. When using Copy Manifold must make a copy of the data, which can take a long time in the case of very large components.
See Also
Don't miss the Copy and Paste: Image / Table / Drawing example for a detailed series of steps using Copy and Paste As. Starting with an image the example creates a table and then copies that table and creates a drawing.
See the Linked Drawings and Geocoded Tables topic for a practical copy and paste example as well as for important tips related to geocoded tables and drawings.
See the Edit - Paste / Paste Append topic for information on the Paste Objects dialog, which pops up when copying objects from one drawing and pasting them into another drawing.
See the Download and Mosaic Terraserver Images topic for an example using Copy and Paste to assemble a larger image out of smaller ones.
|
Politica de confidentialitate | Termeni si conditii de utilizare |

Vizualizari: 1734
Importanta: ![]()
Termeni si conditii de utilizare | Contact
© SCRIGROUP 2025 . All rights reserved