| CATEGORII DOCUMENTE |
| Asp | Autocad | C | Dot net | Excel | Fox pro | Html | Java |
| Linux | Mathcad | Photoshop | Php | Sql | Visual studio | Windows | Xml |
Overview of Part 4
With Visual Studio .NET and Web Forms, developers can rapidly develop Web applications that run in any browser on any operating system using the same techniques previously used to build form-based desktop applications.
Application Center Test (ACT), a new feature integrated with Visual Studio .NET Enterprise Architect, enables developers to gather performance metrics and perform functional testing of XML Web services within the Visual Studio .NET development environment.
Before Downhill Bikes goes live with their new application, they would like to know that it will scale well. Using a built-in tool like Application Center Test, their developers and testers can see the immediate effects of the changes they make in the performance of their application.
In this part, we will build a Web Form that accesses the previously built Web service. Then we will load test the Web service with ACT.
Part 4: Build a Web Form and Load Test
Step 1 of 6: Add a new ASP.NET Web Form built with C #
Using a built-in template in Visual Studio .NET, we will add a new Web Form for our Orders status page.
a. From the View menu, click Solution Explorer. CTRL+ALT+L
b. In the Solution Explorer, right-click DownhillBikes, then click Set as StartUp Project.
c. From the File menu, click Add New Item. CTRL+SHIFT+A
d. In the Templates pane, click the Web Form icon and type Orders.aspx in the Name box. Click Open.

Part 4: Build a Web Form and Load Test
Step 2 of 6: Add an ASP.NET DataGrid
Dragging a DataGrid from the Web Forms toolbox provides an easy way to visually compose Web applications. The DataGrid is analogous to the grid control we used earlier on a Windows Form. The difference is that the Web Forms version will render HTML, though the developer working with these two controls will see little difference between them, providing a consistent development experience and shorter learning curve for developers new to the Web.
a. From the View menu, click Toolbox. CTRL+ALT+X
b. Click the Web Forms tab in the toolbox.
c. Double-click the DataGrid icon.
d. From the View menu, click Code. F7
e. Position the cursor on the comment line for Page_Load:

f. Double-click the 4.2 Orders Page_Load() item in the Guided Tour toolbox. The code should now look like this:

Part 4: Build a Web Form and Load Test
Step 3 of 6: Secure access to the Orders Web Form
Using the Web.config file, we can lock down access to this page so that only authenticated users have access. This file is part of a hierarchy of configuration files that make it easy to secure Web applications built with Visual Studio .NET.
a. From the View menu, click Solution Explorer. CTRL+ALT+L
b. Double-click the Web.config file (it's the last file in the list).
c. Locate the </location> line (note the "/" before the word "location").
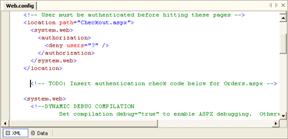
d. Position the insertion point below that line, press the Enter key, and double-click 4.3 Authenticate.

e. Right-click the Orders.aspx file in the Solution Explorer and click View Code.
f. From the File menu, click Build and Browse to view the new Orders page. (Or, press CTRL+F8.)
g. Notice you were first directed to the login page. Click sign in. Now you should see the orders for the customer you logged in as (CustomerID is 1).
Part 4: Build a Web Form and Load Test
Step 4 of 6:
ACT provides sophisticated testing capabilities so that developers can analyze relative performance by simulating load on their Web applications, including XML Web services.
We will use ACT to see the affects of adding an output caching directive to our Web Service. Output caching is a new feature of ASP.NET which enables the reuse of cached pages, thus saving server CPU cycles and increasing perceived application performance.
a. From the Windows
Start menu, select All Programs (Programs in Windows 2000), then Microsoft
Visual Studio .NET, then Visual Studio .NET

Part 4: Build a Web Form and Load Test
Step 5 of 6: Build a new ACT Test Script
Using the built-in Wizard it is very easy to start using ACT. The recording feature records a user session we can then play back to generate load and stress our application.
a. From the Actions menu, click New Test.
b. Click Next on the Welcome screen.
c. Click Record a new test. Click Next twice.
e. Click Start recording.

f. Navigate to https://localhost/downhillbikes/orders.aspx in the browser window that is launched by Application Center Test. Click the sign in [LLR1]button. Then close the browser-you've finished recording your simple script.
g. Switch back to Application Center Test and click Stop recording.

h. Click Next.
i. In the Test name box, type:
orders test

j. Click Next and then click Finish.
Part 4: Build a Web Form and Load Test
Step 6 of 6: Add Page Output Caching
While the page is under load, we'll turn on page caching, with just one line of code. The increase in the number of pages served per second should jump dramatically. Notice that ASP.NET does not require us to stop or disrupt the Web site when we update a page. We just save the page and the changes take effect immediately.
a. Click the orders test item in the left pane.

b. From the Actions menu, click Start Test. CTRL+F5
c. Once the test has started, click Show Details.

d. While the load test is running, switch back to Visual Studio .NET.
e. From the View menu, click Solution Explorer. CTRL+ALT+L
f. Double-click the Orders.aspx file.
g. From the View menu, click HTML Source. CTRL+PgDn
h. Place the insertion point at the beginning of the second line:
|<!DOCTYPE HTML PUBLIC
i. Double-click the 4.6 Output Cache code snippet.

j. From the File menu, click Save All. CTRL+SHIFT+S
k. Switch back to the Test Status window. Click the Show Details >> button to see the graph.
You should see a jump in the number of Requests per Second (RPS) being served up by the page. Since the page is cached (for 10 seconds at a time), we're drastically reducing the number of database calls.

l. Close the Application Center Test windows.
m. In Visual Studio .NET, from the Window menu, click Close All Documents. If it asks to save changes, click Yes.
Part 4 of the Guided Tour enabled us to build an ASP.NET Web application and test it using Application Center Test (ACT). The Web Form-based application we built was constructed using the same development paradigms previously used to build form-based desktop applications - effectively leveling the learning curve to Web application development. We then employed ACT to load test our Web application to ensure scalability in a production environment.
In Part 5, we'll integrate the functionality of third-party XML Web services into our Web application.
[LLR1] If this is the sign in button on the Downhill Bikes site, it should be lowercase as edited.
|
Politica de confidentialitate | Termeni si conditii de utilizare |

Vizualizari: 1244
Importanta: ![]()
Termeni si conditii de utilizare | Contact
© SCRIGROUP 2025 . All rights reserved