| CATEGORII DOCUMENTE |
| Asp | Autocad | C | Dot net | Excel | Fox pro | Html | Java |
| Linux | Mathcad | Photoshop | Php | Sql | Visual studio | Windows | Xml |
An application might need input not only at the beginning of execution but at various stages of a run. The input may not be from a known list of inputs or even if it is, the number of items might be large. It may be necessary to update the user about the state of the application at various stages and to obtain his approval before performing the successive stages. This chapter introduces the properties and use of text handling components, dialog boxes that "converse" with users, and scrolling lists of items that offer a large number of choices. We will cover the classes TextComponent, TextArea, TextField, Dialog, FileDialog and List and describe their methods in detail. The application developed at the end of this chapter is a basic framework for an API Reference Interface Application. Using this interface, users can specify a class name and obtain information about any number of methods in the specified class. They can view the details of any method and optionally can save them in a file.
Depending on an application's charateristics, text input from the user can be a single character, single word, single line, or multiple lines of text. Handling such varying input types is important for a smooth-running application. In Java, the TextComponent, TextArea, and TextField classes in the AWT package provide the necessary interface components for text handling. TextArea and TextFields are subclasses of the TextComponent class. A TextField accepts a single line of text. Consider an application that handles e-mail. You know that e-mail addresses are not multiline text; you can use instances of TextField for the To, Cc, and Subject fields, but for the body of your e-mail message you need a multiline editor.
The editing capabilities of TextField and TextArea are the same. You can disallow editing in both. You can point to any location in the area and enter the input. In a TextField, you have a single line of boxed text visible to you. The number of columns in the text field is application specific, but you can type as many charaters as you want and the text will move to the left accommodating more input. To view the text, you have to move the cursor to the desired location. A TextArea provides two scrollbars (vertical and horizontal) for viewing different parts of the TextArea and editing with ease. Figure 5-1 shows an example To TextField. The second text field, Cc, contains the sender's name as a default string which saves the time required to type in an e-mail id.
![]()
Figure 5-1 A single-line TextField component
The text area, allowing multiple lines to be edited, is created using the TextArea class in the AWT package. Figure 5-2 illustrates the text area provided to edit the body of an e-mail message. It includes scrollbars that allow you to go back and forth in editing. If a certain text field or text area should be protected from editing, you can disable it. Also, in situations where you don't want the characters you type to appear on the screen, such as entering a password, TextField can set echo characters that appear on the screen for each character you enter. Figure 5-3 shows an example in which the user entry is masked by echo characters.
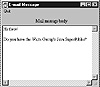
Figure 5-2 A multiline TextArea component
![]()
Figure 5-3 Echo characters in a TextField
A primary window is the root window from which all the other windows used by an application are generated. In the case of Java GUIs, it is a Frame object for an application and a Window for an applet. Applications use dialog windows to conduct context-specific dialog with the user. When a dialog window is closed, its parent is not affected. But the input given through the dialog window is available to the parent even after the dialog window is closed. In Java, two classes implement dialog windows: Dialog and FileDialog. The class Dialog implements a pop-up window to interact with the user. You can design it as a simple prompt window, a message window, or an input window and so on. Depending on the input characteristic, you can specify the Dialog window to be modal or non-modal. A modal Dialog box prevents any action on other windows of the application until the user responds to the Dialog box with some input. If you specify a Dialog box to be non-modal, the user can work on other windows without entering any input for the dialog window. Figure 5-4 shows a Dialog window instance created using the JDK. The Dialog box provides two buttons: OK and Cancel. Selecting either of them decides the next step of the application.

Figure 5-4 A sample dialog box in Java
FileDialog is a Java class that implements a pop-up window offering a selection of files to the user. This type of window can be created in either LOAD or SAVE mode. If in LOAD mode, the FileDialog window is created and an Open button is provided. In SAVE mode, a Save button appears in the file selection window. But you (as a programmer) are responsible for handling the loading and saving of files. You can get the name of the selected file from the FileDialog window. For example, someone might want to include a particular file into an e-mail. Figure 5-5 shows the use of a FileDialog component where directory "chp7" is opened and it contains three subdirectories. By successively selecting the folders you end up with the directory in which the desired file resides. On selecting the file and by clicking the Open button, the file is selected using the given FileDialog component.
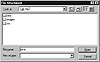
Figure 5-5 Using a FileDialog component for loading a file
Neither menus, checkboxes, nor pull-down menus are adequate when you need an interface to handle a large number of available options. A scrolling list of selectable items makes an efficient way to save window space and present a lot of items for selection. In Java, the class List encapsulates the required behavior of scrolling lists. You can set a List object to allow only one selection or multiple selections. In the case of a single-selection List, selecting an item automatically deselects any other item already selected in the list. In a multiple-selection List, the user can select any number of items from the List. Figure 5-6 shows a list that allows multiple selections. The List class provides methods that support selecting items and manipulating the items selected.
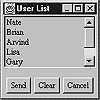
Figure 5-6 A List component with multiple selections enabled
Table 5-1 summarizes the classes necessary for developing user interfaces in Java using text, dialogs, and lists.
|
||||||||||||||||||
TextComponent
Purpose
A component that allows the editing of text. Forms the super class for TextArea and TextField.
Syntax
public class TextComponent extends Component
Description
TextComponent is used to implement the window components involved in text editing. It forms the super class of all text related components.Hence, TextArea and TextField are subclasses of this class. Methods of the TextComponent class allow selection of text, manipulating the selected text, and specifying a text component as either editable or read-only. This class has no public constructors. Figure 5-7 illustrates the inheritance relationship of the TextComponent class.
PackageName
java.awt
Imports
import java.awt.TextComponent;
Constructors
None.
Parameters
None.
Example
The textDemo class, implemented in the following example (Listing 5-1), uses the textPanel class to illustrate the usage of methods in the classes TextComponent, TextArea, and TextField. This application uses all the methods in these classes. The user can type his name, which is echoed as asterisk and then press the ChangeText button and see the effect. Pressing CloneTextArea will make a new image of TextArea. Figure 5-8 shows the resultant window.
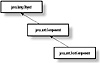
Figure 5-7 Class diagram of TextComponent class
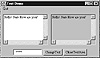
Figure 5-8 The textDemo application in action
Listing 5-1 textDemo.java: Program demonstrating the usage of methods in TextComponent, TextArea, and TextField
import java.awt.*;getSelectedText()
ClassName
TextComponent
Purpose
To get the text selected in the target TextComponent object.
Syntax
public String getSelectedText()
Parameters
None.
Description
Users can select text between desired locations or all of the text in a text component. This method obtains the text selected by the user for further manipulation according to the application's characteristics. It returns null if nothing is selected in the text component.
Imports
import java.awt.TextComponent;
Returns
The selected text contained in the TextComponent; the return type is String.
See Also
The TextArea class; the TextField class; the setText() method of the TextComponent class
Example
Refer to Listing 5-1. In textPanel class, this method is used to obtain the text in the text area as a value for the variable sel_t in the action method.
getSelectionEnd()
ClassName
TextComponent
Purpose
To obtain the end index of the selected text.
Syntax
public int getSelectionEnd()
Parameters
None.
Description
Users can select text between desired locations or all of the text in a text component. This method obtains the end index of the selected text contained in the target TextComponent object.
Imports
import java.awt.TextComponent;
Returns
Returns the index position of the last character in the selected text; return type is int.
See Also
The TextArea and TextField classes; the setText() and getSelectedText() methods of the TextComponent class
Example
Refer to Listing 5-1. After selecting text in the text area using getSelectedText, this method is used in the textPanel class under the action() method to obtain the end index of selected text.
getSelectionStart()
ClassName
TextComponent
Purpose
To obtain the start index of the selected text.
Syntax
public int getSelectionStart()
Parameters
None.
Description
User can select text between desired locations or all of the text in a text component. This method obtains the start index of the selected text contained in the target TextComponent object.
Imports
import java.awt.TextComponent;
Returns
The index position of the first character in the selected text. Return type is int.
See Also
The setText and getSelectedText methods of the TextComponent class; the TextArea and TextField classes
Example
Refer to Listing 5-1. After selecting the text in the text area using getSelectedText, this method is used to obtain the start index of the selected text in the action method of the textPanel class
getText()
ClassName
TextComponent
Purpose
To obtain the text contained in the target TextComponent object.
Syntax
public String getText()
Parameters
None.
Description
TextComponent contains text and it can be edited if allowed. This method obtains the text contained in the text component. It is equivalent to selecting all the text and then getting that selected text.
Imports
import java.awt.TextComponent;
Returns
The text contained in the TextComponent is returned and the return type is String.
See Also
The setText method in theTextComponent class; the TextArea and TextField classes
Example
Refer to Listing 5-1. The name string entered in the text field is found by using this method to include the name (variable name_f) in the string to be written into the text area in the action() method in the textPanel class.
isEditable()
ClassName
TextComponent
Purpose
To obtain the boolean value indicating whether the target TextComponent is editable or not.
Syntax
public boolean isEditable()
Parameters
None.
Description
Users can edit the text contained in a text component if the component is set to be editable using the setEditable method in the TextComponent class. This method finds out whether the text component is editable. It returns true if the text is editable; false if it is not editable.
Imports
import java.awt.TextComponent;
Returns
The boolean value indicating whether the text component is editable.
See Also
The setEditable method of theTextComponent class; theTextArea and TextField classes
Example
Refer to Listing 5-1. In the action method in class TextPanel, when CloneTextArea button is pressed, newArea is created and is set to disallow editing. This method is used to confirm its mode.
paramString()
ClassName
TextComponent
Purpose
To obtain the parameter String of the target TextComponent object.
Syntax
protected String paramString()
Parameters
None.
Description
Returns the String representation of the target TextComponent object, which contains the text. This method is protected and hence, can be used only by the classes within the java.awtpackage.
Imports
import java.awt.TextComponent;
Returns
The parameter string of type String.
See Also
The TextComponent and Component classes
Example
The following code uses paramString by subclassing the TextComponent.
package java.awt;removeNotify()
ClassName
TextComponent
Purpose
To remove the peer of this text component.
Syntax
public void removeNotify()
Parameters
None.
Description
A text component peer is used to change the appearance of your text component, without changing its functionality. This method removes the peer of the target component.
Imports
import java.awt.TextComponent;
Returns
None.
See Also
The addNotify method of subclasses of TextComponent, namely TextArea and TextField; the TextComponentPeer class
Example
Refer to the details and information in the Chapter 9 describing Peers and manipulating peer interfaces.
select(int, int)
ClassName
TextComponent
Purpose
Selects the text between the specified positions in the TextComponent.
Syntax
public void select(int start, int end)
Parameters
start
Index indicating the starting position of the selected text.
end
Index indicating the end position of the selected text.
Description
The textComponent contains a text. The user can select a part of the text or the entire text. This method selects the text contents between the two specified start and end positions. If the value of start is greater than end, then no text is selected.
Imports
import java.awt.TextComponent;
Returns
None.
See Also
The TextArea and TextField classes
Example
Refer to Listing 5-1. This method is used in the action method of class textPanel to obtain the check string after selecting the text or after getting the start and end position if the whole text is selected.
selectAll()
ClassName
TextComponent
Purpose
Selects all of the text contained in the TextComponent.
Syntax
public void selectAll()
Parameters
None.
Description
TextComponent contains text. User can select any part of the text or the full text. This method selects all of the text contained in the text component.
Imports
import java.awt.TextComponent;
Returns
None.
See Also
The TextArea and TextField classes
Example
Refer to Listing 5-1. In the action method in the textPanel class; all the text in the text area is selected and the string is stored in sel_t. This string is used to change the contents of the text area.
setEditable(boolean)
ClassName
TextComponent
Purpose
The boolean value, indicating whether the target TextComponent should or should not be editable, is set.
Syntax
public void setEditable(boolean okToEdit)
Parameters
okToEdit
The text component is editable if this is true; not editable if this is false.
Description
The user can edit the text contained in a text component if the component is set to be editable using this setEditable method in class TextComponent. To set the TextComponent to be editable, the boolean parameter should be true. To set it to be noneditable, the parameter should be false.
Imports
import java.awt.TextComponent;
Returns
None.
See Also
The isEditable method of the TextComponent class; the TextArea and TextField classes
Example
Refer to Listing 5-1, the newArea; the new text area formed is set to noneditable mode using this method. This occurs in the action method of the textPanel class.
setText(String)
ClassName
TextComponent
Purpose
Sets the specified text to be the contents of the target TextComponent object.
Syntax
public void setText(String new_text)
Parameters
new_text
The text of type String which is to be the new text content of the TextComponent.
Description
TextComponent contains text which can be edited if permitted. This method sets the specified text to be the text content of the TextComponent. If the component did not contain any text prior to this method call, then the specified text is set to be the text. If it did contain text earlier, this method replaces the previous text with this new one.
Imports
import java.awt.TextComponent;
Returns
None.
See Also
The getText method of the TextComponent class; the TextArea and TextField classes
Example
Refer to Listing 5-1. In the constructor of textPanel class, this method is used to set the string in the text field to "Enter text here".
TextArea
Purpose
Provides an area in which to display several lines of text. The text can either be read-only or read and edit.
Syntax
public class TextArea extends TextComponent
Description
The TextArea class provides an area in which to display several lines of text or allow editing of that text. So it can be considered to be a multiline editor, if editing is allowed. Wordwrap is set to true and both horizontal and vertical scrollbars are visible. If editing text is allowed, then any position in the text area can be reached using the mouse or the arrow keys. This allows users to move through the text as they would in a full-blown editor. TextArea is a subclass of the TextComponent class. Methods of TextComponent class that allow selection and manipulation of text can be performed in an editable text area. The setEditable method of TextComponent can be used to allow editing a TextComponent object. Figure 5-9 illustrates the inheritance relationship of the TextArea class.
PackageName
java.awt
Imports
import java.awt.TextArea;
Constructors
public TextArea()
public TextArea(int t_rows, int t_cols)
public TextArea(String text)
public TextArea(String text, int t_rows, int t_cols)
Parameters
t_rows
The number of rows specified in the TextArea.
t_cols
The number of columns specified in the TextArea.
text
The text which forms the initial text contents of this TextArea.
Example
Refer to Listing 5-1. In the textPanel class, an instance of this class (TextArea) is a member of the class. It is constructed with 6 rows and 25 columns.
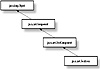
Figure 5-9 Class diagram of the TextArea class
addNotify()
ClassName
TextArea
Purpose
This method creates a peer of the target TextArea object.
Syntax
public synchronized void addNotify()
Parameters
None.
Description
Creates an instance of the TextAreaPeer as a peer for the target TextArea object. Using the peer, you can change the appearance of the TextArea without modifying its functionality. This method is required if you are writing your own AWT.
Imports
import java.awt.TextArea;
Returns
None.
See Also
The TextAreaPeer class
Example
Refer to Chapter 9, which describes the peers and interface for details.
appendText(String)
ClassName
TextArea
Purpose
Append the specified text to the text content of the target TextArea object.
Syntax
public void appendText(String add_text)
Parameters
add_text
The specified text of type String to be appended to the TextArea.
Description
This method appends the specified string to the text contained in the target TextArea object.
Imports
import java.awt.TextArea;
Returns
None.
See Also
The insertText method of the TextArea class; the TextArea and TextField classes
Example
Refer to Listing 5-1. The text "How are you?" is appended to the text area in the action method of the textPanel class.
getColumns()
ClassName
TextArea
Purpose
To obtain the number of columns in the TextArea.
Syntax
public int getColumns()
Parameters
None.
Description
This method returns the number of columns in the target TextArea object. This is the number of columns of the TextArea during its instantiation.
Imports
import java.awt.TextArea;
Returns
The number of columns of TextArea object; return type is int.
Example
Refer to Listing 5-1. In the action method of the textPanel class, the number of columns of the text area is used to create a new text area as a clone.
getRows()
ClassName
TextArea
Purpose
To obtain the number of rows in the TextArea.
Syntax
public int getRows()
Parameters
None.
Description
This method returns the number of rows in the target TextArea object. This is the number of rows in the TextArea during its instantiation.
Imports
import java.awt.TextArea;
Returns
The number of rows of TextArea object; return type is int.
Example
Refer to Listing 5-1. In the action method of the class textPanel class, the number of rows of the text area that is used to create a new text area as a clone.
insertText(String, int)
ClassName
TextArea
Purpose
Inserts the specified text at the specified index in the TextArea.
Syntax
public void insertText(String ins_text, int index)
Parameters
ins_text
The text to be inserted at specified index of the TextArea.
index
The index location in the existing text of TextArea where the new text is to be inserted.
Description
This method inserts the specified string at the specified index of the text contained in the target TextArea object. The value of the index should be less than the length of the already available text in the TextArea. If the index value exceeds the length of the existing text, Java will issue a StringIndexOutofBoundsException.
Imports
import java.awt.TextArea;
Returns
None.
See Also
The appendText method of the TextArea class
Example
Refer to Listing 5-1. In the action
method of the textPanel class, name
string n_str is inserted in the text area using this method.
minimumSize(int, int), minimumSize()
ClassName
TextArea
Purpose
To obtain the minimum size dimension of the TextArea if no parameter is specified. If parameters are specified, this method obtains the minimum Dimensions for the specified number of rows and columns.
Syntax
public Dimension minimumSize(int
rows, int cols)
public Dimension minimumSize()
Parameters
rows
The specified number of rows for which minimum size is to be found.
cols
The specified number of columns for which the minimum size is to be found.
Description
The height and width of window Dimensions are different from the number of rows and columns of the TextArea. If rows and columns are not specified, the rows and columns of the target TextArea object are taken as the values. The number of rows and columns indicate the number of characters accommodated within the space, whereas the Dimension indicates the window dimensions. For example, this method would be helpful in resizing a window or a frame containing a TextArea or in determining where to add the text area in the window.
Imports
import java.awt.TextArea;
Returns
The minimum Dimensions for a TextArea with the number of rows and columns. Return type is Dimension.
See Also
The preferredSize of the TextArea class; the Dimension class
Example
Refer to Listing 5-1. This method is used to print out the minimum width and height required when the CloneTextArea button is selected. This occurs in the action method of the textPanel class.
paramString()
ClassName
TextArea
Purpose
To obtain the parameter String of the target TextArea object.
Syntax
protected String paramString()
Parameters
None.
Description
This method obtains the String representation of the target TextArea object containing the parameters, rows, columns and text contained in it. This method is protected and hence can be used only by classes within the java.awt package. This method overrides the paramString method of class TextComponent.
Imports
import java.awt.TextArea;
Returns
The parameter string of type String.
See Also
The paramString method of the TextComponent class; the TextArea class
Example
The following code uses paramString by subclassing the TextArea.
package java.awt;preferredSize(int, int), preferredSize()
ClassName
TextArea
Purpose
To obtain the preferred dimension of the TextArea if no parameter is specified. If parameters are specified, this method returns the preferred dimension for the specified rows and columns.
Syntax
public Dimension preferredSize(int
rows, int cols)
public Dimension preferredSize()
Parameters
rows
The specified number of rows for which the preferred size is to be found.
cols
The specified number of columns for which the preferred size is to be found.
Description
The height and width of window dimensions are different from the number of rows and columns of the TextArea. If the rows and columns are not specified, the rows and columns of the target TextArea object are taken as the values. The number of rows and columns indicate the number of characters accommodated within the space, whereas the Dimension indicates the window dimensions. For example, this method would be helpful in resizing a window or frame containing a TextArea, or in determining where to position the textArea in the window. It returns the preferred size Dimensions for the text area.
Imports
import java.awt.TextArea;
Returns
The preferred Dimensions for a TextArea with the number of rows and columns. Return type is Dimension.
See Also
The minimumSize method in the TextArea class; the Dimension class
Example
Refer to Listing 5-1. This method is used to print out the preferred width and height required when the CloneTextAreabutton is selected. This occurs in the action method in the textPanel class.
replaceText(String, int, int)
ClassName
TextArea
Purpose
The specified text replaces the existing text between the specified positions in the TextArea.
Syntax
plic void replaceText(String new_text, int start, int end)
Parameters
new_text
The specified text to replace the existing text between specified positions.
start
The beginning index location in the existing text of TextArea where the replacement text is to be inserted in place of the existing text.
end
The ending index location in the existing text of TextArea specifying the last point at which the existing text is to be replaced by the new_text.
Description
This method replaces the text between the specified locations, start and end, with the specified text, new_text. The length of the new_text need not be the same as that of the text being replaced; however, the values of the indexes should be less than the length of the already available text in the TextArea. If the index value exceeds the length of the existing text, an StringIndexOutofBoundsException is issued at runtime.
Imports
import java.awt.TextArea;
Returns
None.
See Also
The insertText method in the TextArea class
Example
Refer to Listing 5-1. In the action method of the textPanel class, replaceText method is used to change the "Enter Text Here" string to "Hello! "
TextField
Purpose
A single line editor and a subclass of TextComponent.
Syntax
public class TextField extends TextComponent
Description
The TextField provides a single
line for editing purposes and an interface for the user to enter text. It
subclasses the TextComponent class with the default set to editable mode. It
can be set to noneditable mode but, in most cases there would be no reason for
you to do so. When ![]() is pressed in the
TextField, an event ACTION_EVENT is posted. Appropriate event handling routines
(e.g., the methods action() or handleEvent()) should be overridden to handle
the events generated. Methods of TextComponent class allowing selection and
manipulation of the selected text can be performed on an editable text field.
Figure 5-10 illustrates the inheritance relationship of the TextField class.
is pressed in the
TextField, an event ACTION_EVENT is posted. Appropriate event handling routines
(e.g., the methods action() or handleEvent()) should be overridden to handle
the events generated. Methods of TextComponent class allowing selection and
manipulation of the selected text can be performed on an editable text field.
Figure 5-10 illustrates the inheritance relationship of the TextField class.
PackageName
java.awt
Imports
import java.awt.TextField;
Constructors
public TextField()
public TextField(int t_cols)
public TextField(String text)
public TextField(String text, int t_cols)
Parameters
t_cols
The number of columns specified in the TextField.
text
The text which forms the initial text contents of this TextField.
Example
An instance of the TextField class is a member in the textPanel class in Listing 5-1. The member object is name_f, signifying name field.
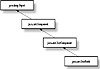
Figure 5-10 Class diagram of the TextField class
addNotify()
ClassName
TextField
Purpose
This method creates a peer of the target TextField object.
Syntax
public synchronized void addNotify()
Parameters
None.
Description
An instance of the TextFieldPeer is created as a peer for the target TextField object. Using the peer, you can change the appearance of the TextArea without modifying its functionality. Required if you are writing your own AWT.
Imports
import java.awt.TextField;
Returns
None.
See Also
The TextFieldPeer class
Example
Refer to Chapter 9 describing the peers and interface for details.
echoCharIsSet()
ClassName
TextField
Purpose
The boolean value indicating whether a character is set for echoing in the target TextField object.
Syntax
public boolean echoCharIsSet()
Parameters
None.
Description
In an object of type TextField, you can set an echo character associated with the field. Whenever you type in a character, only the echo character is displayed in the field and not the original characters you typed in. This is useful when you don't want anyone to see the characters you are entering (for example, in the case of a password or social security number). This method returns the boolean value of true if an echo character is set in the target TextField object; otherwise, it returns false.
Imports
import java.awt.TextField;
Returns
Boolean value of true if echo character is set; false otherwise.
See Also
The setEchoCharacter method of the TextField class
Example
Refer to Listing 5-1. In the constructor of the textPanel class, echo character of '*' is set, if it is not set earlier. This method is used to determine whether the echo character is already set.
getColumns()
ClassName
TextField
Purpose
To obtain the number of columns in the TextField.
Syntax
public int getColumns()
Parameters
None.
Description
This method returns the number of columns in the target TextField object. This is the number of columns set for the TextField during its instantiation.
Imports
import java.awt.TextField;
Returns
The number of columns of TextField object; return type is int.
Example
Refer to Listing 5-1. This method is used to print the number of columns in the text field, name_f, in the action method in the textPanel class.
getEchoChar()
ClassName
TextField
Purpose
To obtain the character used for echoing in the target TextField object.
Syntax
public char getEchoChar()
Parameters
None.
Description
In an object of type TextField, you can set an echo character associated with the field. Whenever you type in a character, only the echo character is displayed in the field and not the original characters you typed in. This is useful when you don't want anybody nearby to see the characters you are entering (for example, in the case of password or social security number). This method returns the character that has been set for echoing in the target TextField object, if it is set. If the echo character is not set, it returns a null character.
Imports
import java.awt.TextField;
Returns
The character set for echoing in the TextField. Return type is char.
See Also
The echoCharIsSet and setEchoCharacter methods of the TextField class
Example
Refer to Listing 5-1. In the constructor of class textPanel, echo character of '*' is set, if it is not set earlier. This method is used to print the echo character to the standard output.
minimumSize(int), minimumSize()
ClassName
TextField
Purpose
Returns the minimum size dimension of the TextField if no parameter is specified. If a parameter is specified, then the minimum size dimension for the specified number of columns is returned.
Syntax
public Dimension minimumSize(int cols) public Dimension minimumSize()
Parameters
cols
The specified number of columns of the TextField for which the minimum size is to be found.
Description
The width of the window dimension is different from the number of columns in the TextField. The number of columns for which the minimum size is to be found can be specified. If it is not specified, the number of columns of the target TextField object is taken as the value. The number of columns indicates the number of characters that can be accommodated within the space whereas the Dimension indicates the window dimensions. For example, this method is helpful to resize a window or a frame containing a TextField or to determine where in the window to add the text field.
Imports
import java.awt.TextField;
Returns
The minimum Dimensions for a TextField with the number of columns. Return type is Dimension.
See Also
The preferredSize method of the TextField class; the Dimension class
Example
Refer to Listing 5-1. This method is used to print out the minimum width and height required when the ChangeText button is selected. This occurs in the action method in the textPanel class.
paramString()
ClassName
TextField
Purpose
To obtain the parameter String of the target TextField object.
Syntax
protected String paramString()
Parameters
None.
Description
This method returns the String representation of the target TextField object containing the parameters column and text contained in it. Because it is protected, this method can be used only by the classes within the java.awt package. This method overrides the paramString method in the TextComponent class.
Imports
import java.awt.TextField;
Returns
The parameter string of type String.
See Also
The TextField class; the paramString method of the TextComponent class
Example
Use of this method is similar to the example given for the paramString method in the TextArea class.
preferredSize(int), preferredSize()
ClassName
TextField
Purpose
Returns a preferred size dimension for the TextField if no parameter is specified. If parameters are specified, then the preferred size dimensions for the specified columns is returned.
Syntax
public Dimension preferredSize(int
cols)
public Dimension preferredSize()
Parameters
cols
The specified number of columns for which the preferred size is desired to be found.
Description
The width of window Dimensions is different from the number of columns in the TextField. The number of columns for which the preferred size is to be found can be specified. If it is not specified, the number of columns in the target TextField object is taken as the value. The number of columns indicates the number of characters that can be accommodated within the space, whereas the Dimension indicates the window dimensions. For example, this method is helpful to resize a window or a frame containing a TextField or to determine where in the window to add the text field. It returns the preferred size Dimensions for the text field.
Imports
import java.awt.TextField;
Returns
The preferred Dimensions for a TextField with the number of rows and columns. The return type is Dimension.
See Also
The minimumSize method of the TextField class; the Dimension class
Example
Refer to Listing 5-1. This method is used to print out the preferred width and height required when the ChangeText button is selected. This occurs in the action method in the textPanel class.
setEchoCharacter(char)
ClassName
TextField
Purpose
Sets the specified character as the echo character for the target TextField object.
Syntax
public void setEchoCharacter(char echo_c)
Parameters
echo_c
The character to be echoed to the screen to represent any input to the text field.
Description
In an object of type TextField, you can set an echo character associated with the field. Whenever you type in a character, only the echo character is displayed in the field and not the original characters you typed in. This is useful when you don't want anyone to see the characters you are entering (for example, in the case of a password or social security number). This method sets the specific character for echoing in the target TextField object. After invocation of this method, a call to echoCharIsSet returns true.
Imports
import java.awt.TextField;
Returns
None.
See Also
The echoCharIsSet and getEchoChar methods of the TextField class
Example
Refer to Listing 5-1. In the constructor of the textPanel class, this method is used to set an echo character of '*', if it has not been set earlier.
Dialog
Purpose
Creates a window that takes input from the user.
Syntax
public class Dialog extends Window
Description
The Dialog provides a pop-up window which takes input from the user. It must be bound to a Frame on construction. The default layout for a Dialog window is BorderLayout. The dialog window can be made modal, i.e., users are prevented from performing anything on other windows until they close the dialog. A dialog can also be non-modal. You can provide the option of resizing the window if needed. It can have a title and/or a border associated with it. Dialog subclasses the Window class. It helps in establishing communication between the user and the application. Figure 5-11 illustrates the inheritance relationship of the Dialog class.
PackageName
java.awt
Imports
import java.awt.Dialog;
Constructors
public Dialog(Frame parent, boolean
modal)
public Dialog(Frame parent, String title, boolean modal)
Parameters
parent
The parent frame to which the dialog is bound.
title
The title of the Dialog window.
modal
Boolean value indicating whether you want the Dialog to be modal or not.
Example
The dialogDemo class implemented in the following example, Listing 5-2 illustrates the use of Dialog and FileDialog classes and their member methods. The SaveDialog class subclasses the Dialog class and is used to indicate that the Save function is not implemented. Figure 5-12 shows the resultant dialogDemo window.
![]()
Figure 5-11 Class diagram of the Dialog class
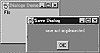
Figure 5-12 The dialogDemo window
Listing 5-2 dialogDemo.java: Progam demonstrating the use of methods in Dialog and FileDialog classes
import java.awt.*;addNotify()
ClassName
Dialog
Purpose
This method creates a peer of the target Dialog object.
Syntax
public synchronized void addNotify()
Parameters
None.
Description
An instance of the DialogPeer is created as a peer for the target Dialog object. Using the peer you can change the appearance of the Dialog window without modifying its functionality. Required if you are writing your own AWT.
Imports
import java.awt.Dialog;
Returns
None.
See Also
The DialogPeer class
Example
Refer to Chapter 9 describing the peers and interface for details.
getTitle()
ClassName
Dialog
Purpose
Obtains the title of the Dialog window, if it has already been set.
Syntax
public String getTitle()
Parameters
None.
Description
A Dialog window can be identified by its title. This title appears at the top frame border of the dialog window. A Dialog can also be constructed without any title. This method returns the title of the target Dialog object if it has been set.
Imports
import java.awt.Dialog;
Returns
The title of the Dialog window, if set earlier. The return type is String.
See Also
The setTitle method of the Dialog class
Example
Refer to Listing 5-2. The title of the SaveDialog object is printed to the screen using this method.
isModal()
ClassName
Dialog
Purpose
The boolean value indicating whether or not the target Dialog window is modal is returned.
Syntax
public boolean isModal()
Parameters
None.
Description
A Dialog window can be modal. This is specified in its constructor. If a dialog window is modal, the user is prevented from performing any action on the parent frame when the Dialog window pops up. The user can work on the parent frame only after the dialog window is closed. This is helpful to convey occurrence of fatal errors in the application or when input is necessary from the user to perform the next step in the application. This method returns true if the Dialog window is modal; false if the window is not modal.
Imports
import java.awt.Dialog;
Returns
Boolean value of true is returned if the target Dialog object is modal; value of false is returned if the target Dialog object is non-modal.
See Also
Constructors of the Dialog class
Example
Refer to Listing 5-2. This method is used to print whether or not the SaveDialog is modal.
isResizable()
ClassName
Dialog
Purpose
Returns the boolean value indicating whether the target Dialog window is resizable.
Syntax
public boolean isResizable()
Parameters
None.
Description
A Dialog window can be made resizable by the user. Using the setResizable method of the Dialog class, a Dialog object is made resizable or nonresizable. The default is resizable. This method returns true if the target Dialog object is resizable; false otherwise.
Imports
import java.awt.Dialog;
Returns
Boolean value of true is returned if the target Dialog object is resizable; false if the target Dialog object is not resizable.
See Also
The setResizable method of the Dialog class
Example
Refer to the example program in Listing 5-2. The SaveDialog object is verified as being resizeable by default using this method.
paramString()
ClassName
Dialog
Purpose
Obtains the parameter String of the target Dialog object.
Syntax
protected String paramString()
Parameters
None.
Description
Returns the String representation of the target Dialog object containing the parameters Frame, title, and value indicating whether it is modal. This method is protected and hence, can be used only by classes within the java.awt package. This method overrides the paramString method of the Container class.
Imports
import java.awt.Dialog;
Returns
The parameter string of type String.
See Also
The paramString method of the Container class; the Dialog class
Example
Use this method similar to the example given for the paramString method of the TextArea class.
setResizable(boolean)
ClassName
Dialog
Purpose
Allows the boolean value indicating whether the target Dialog window is resizable to be set.
Syntax
public void setResizable(boolean ok2resize)
Parameters
ok2resize
The boolean value indicating whether you want the Dialog window to be resizable. True indicates that the Dialog window should be resizable. False indicates that the Dialog window should not be resizable.
Description
A Dialog window can be made resizable or prevented from being resized by the user by using this method. The default is resizable. The boolean value indicating whether or not a Dialog window is resizable can be found using the isResizable method in the Dialog class.
Imports
import java.awt.Dialog;
Returns
None.
See Also
The isResizable method of the Dialog class
Example
Refer to the example in Listing 5-2. In the action method in the dialogDemo class, the SaveDialog is set to be nonresizable using this method.
setTitle(String)
ClassName
Dialog
Purpose
The title of the Dialog window is set to the specified string value using this method.
Syntax
public void setTitle(String title)
Parameters
title
A string value which you want to be set as the title of the target Dialog object.
Description
A Dialog window can be identified by its title. This title appears at the top frame border of the dialog window. A Dialog can be constructed without any title also. This method can be used to set a title, if one has been set during construction, or to rename a Dialog window. The getTitle method in the Dialog class is used to obtain the title if it has been set.
Imports
import java.awt.Dialog;
Returns
None.
See Also
The getTitle method of the Dialog class
Example
Refer to the example program in Listing 5-2. The title of the SaveDialog is set to "Save Dialog" using this method in the constructor of the class SaveDialog.
FileDialog
Purpose
A modal Dialog window displaying a file selection dialog.
Syntax
public class FileDialog extends Dialog
Description
The FileDialog provides a pop-up window which helps the user select a file. FileDialog window is a modal window; hence, the user cannot perform any action on other windows until this FileDialog window is closed. The window is disposed of once the user selects a file or cancels the selection. A FileDialog window has to be bound to a frame parent. The frame parent is found if this FileDialog object is declared a member of a subclass of Frame. Alternatively, you can look back in the tree hierarchy until you find a parent of type Frame. A FileDialog can be constructed in either LOAD or SAVE mode. This characteristic can be specified during construction. The public variable members of this class, LOAD and SAVE, are used to set the mode. After the user closes the FileDialog window by selecting a file, the selection is available within the object instance and can be obtained by using the getFile method of class FileDialog. Figure 5-13 illustrates the inheritance relationship of class FileDialog.
PackageName
java.awt
Imports
import java.awt.FileDialog;
Constructors
public FileDialog(Frame parent,
String title)
public FileDialog(Frame parent, String title, int mode)
Parameters
parent
The parent frame to which the FileDialog is bound.
title
The title of the FileDialog window.
mode
Boolean value indicating whether the FileDialog should be in SAVE or LOAD mode.
Variables
public final static int LOAD-used
to set the FileDialog to load mode as the selected file is to be loaded.
public final static int SAVE-used to set the FileDialog to save mode as the
selected file is to be saved.
Example
The dialogDemo class in Listing 5-2 uses the FileDialog class to pop up a file dialog window for selecting a file using this class. This happens when Open is selected from the File menu in the UI generated by the listing.
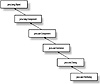
Figure 5-13 Class diagram of the FileDialog class
addNotify()
ClassName
FileDialog
Purpose
This method creates a peer of the target FileDialog object.
Syntax
public synchronized void addNotify()
Parameters
None.
Description
An instance of the FileDialogPeer is created as a peer for the target FileDialog object. Using the peer, you can change the appearance of the FileDialog window without modifying its functionality. This method is required if you are writing your own AWT. It overrides the addNotify method in the Dialog class.
Imports
import java.awt.FileDialog;
Returns
None.
See Also
The FileDialogPeer clas
Example
Refer to Chapter 9 describing the peers and interface for details.
getDirectory()
ClassName
FileDialog
Purpose
Obtains the directory of the FileDialog.
Syntax
public String getDirectory()
Parameters
None.
Description
This method gets the directory of the file dialog window. A FileDialog has a directory, a file, and a filename filter associated with it. The default directory is the directory where you execute the program. You can change the initial directory of the FileDialog by using the setDirectory method.
Imports
import java.awt.FileDialog;
Returns
The directory of the FileDialog window is returned. Return type is String.
See Also
The setDirectory method of the FileDialog class
Example
Refer to the example program in Listing 5-2. The directory selected is printed to the screen after the user closes the file dialog window that pops up when Open is selected in the File menu.
getFile()
ClassName
FileDialog
Purpose
Obtains the name of the selected file using the FileDialog.
Syntax
public String getFile()
Parameters
None.
Description
This method gets the selected file name using the file dialog window. A FileDialog has a directory, a file, and a filename filter associated with it. By selecting a series of the components from the file dialog window, a user finally selects a file or cancels the selection operation. After the window is closed, this method can be used to obtain the name of the selected file. The String returned by this method denotes the file name. If the user has canceled the selection, this method returns a null String.
Imports
import java.awt.FileDialog;
Returns
The name of the file selected by the user using the FileDialog window, or null if the selection has been canceled. Return type is String.
See Also
The setFile method of the FileDialog class
Example
Refer to the example program in Listing 5-2. The selected file name is printed to the screen after the user closes the file dialog window that pops up when Open is selected in the File menu.
getFilenameFilter()
ClassName
FileDialog
Purpose
Obtains the selected filter using the FileDialog.
Syntax
public FilenameFilter getFilenameFilter()
Parameters
None.
Description
This method gets the filename filter of the FileDialog window. A FileDialog has a directory, a file, and a filename filter associated with it. You can implement the FilenameFilter interface in your class and set the filter of a FileDialog object to it. Invoking this method on a FileDialog object returns the filter to which the FileDialog is set.
Imports
import java.awt.FileDialog;
Returns
The filename filter of the FileDialog window. Return type is FilenameFilter.
See Also
The setFilenameFilter method of the FileDialog class; the java.io.FilenameFilter interface
Example
Refer to the example program in Listing 5-2. The string form of FilenameFilter that is set in the file dialog, is printed to the screen after the user closes the file dialog window which pops up when Open is selected in the File menu.
getMode()
ClassName
FileDialog
Purpose
Returns the mode of the FileDialog window. It can be either LOAD or SAVE mode.
Syntax
"public int getMode()
Parameters
None.
Description
A FileDialog can be constructed in either LOAD or SAVE mode. This characteristic can be specified during construction. The public variable members of this class, LOAD and SAVE, are used to compare the mode. This method is used to determine the mode in which a FileDialog window was opened.
Imports
import java.awt.FileDialog;
Returns
The mode in which the target FileDialog object was created. Return type is int and that value can be compared with the LOAD and SAVE variables of FileDialog class.
See Also
Constructors in the FileDialog class
Example
Refer to the example program in Listing 5-2. The mode in which the file dialog window was opened is printed to the screen after the user closes the file dialog window that pops up when Open is selected in the File menu.
paramString()
ClassName
FileDialog
Purpose
Obtains the parameter String of the target FileDialog object.
Syntax
protected String paramString()
Parameters
None.
Description
This method returns the String representation of the target FileDialog object containing the parameters file, mode, and directory. This method is protected and hence, can be used only by the classes within the java.awt package. This method overrides the paramString method in the Dialog class.
Imports
import java.awt.FileDialog;
Returns
The parameter string of type String.
See Also
The paramString method of the Dialog class; the FileDialog class
Example
Use this method similar to the example given for the paramString method in the TextArea class.
setDirectory(String)
ClassName
FileDialog
Purpose
Sets the specified directory of the FileDialog.
Syntax
public void setDirectory(String dir)
Parameters
dir
Directory name to be set for the FileDialog window.
Description
This method sets the directory of the file dialog window to the specified directory name. A FileDialog has a directory, a file, and a filename filter associated with it. The directory of a FileDialog object can be obtained using the getDirectory method.
Imports
import java.awt.FileDialog;
Returns
None.
See Also
The getDirectory method of the FileDialog class
Example
Refer to the example program in Listing 5-2. The directory is set to "C:" in Windows 95. It is set to /opt (to be uncommented in code) in Solaris.
setFile()
ClassName
FileDialog
Purpose
Sets the file for the target FileDialog object to the specified file name.
Syntax
public void setFile(String file)
Parameters
file
Name of the specified file, which is to be set as the file for the dialog window.
Description
This method sets the specified file name for the target FileDialog window. A FileDialog has a directory, a file, and a filename filter associated with it. A user, by a series of selections from the components of the file dialog window, finally selects a file or cancels the selection operation. After the window is closed, the selected filename is available as a member of the file dialog window and can be accessed using the getFile method.
Imports
import java.awt.FileDialog;
Returns
None.
See Also
The getFile method of the FileDialog class
Example
Refer to the example program in Listing 5-2. The file is set to "java" in the action method if Open is selected from the menu.
setFilenameFilter(FilenameFilter)
ClassName
FileDialog
Purpose
Sets the specified filter for the target FileDialog object.
Syntax
public void setFilenameFilter(FilenameFilter filter)
Parameters
filter
The specified FilenameFilter to be set to the target FileDialog window.
Description
This method sets the filename filter of the FileDialog window. A FileDialog has a directory, a file, and a filename filter associated with it. The FileNameFilter object assists in masking the directory with the specified string mask. Only files that are accepted by the filter will form the available selection among all files in that directory.
Imports
import java.awt.FileDialog;
Returns
None.
See Also
The getFilenameFilter method of the FileDialog class
Example
Refer to the example program in Listing 5-2. FilenameFilter is set to an instance of JavaFilter.
List
Purpose
A component that provides a scrolling list of text items from which the user can select one or many items.
Syntax
public class List extends Component
Description
List provides a selection mechanism that allows users to select from an unlimited number of choices. The choices are provided as a scrolling list of items. Selection among limited numbers of choices is provided using Menus, Choice, and Checkboxes which are discussed in Chapter 6. A List can be set such that it allows either a single or multiple selection. An event gets posted on the selection of item(s) and appropriate event handling routines are used to take the necessary action. You have to write your own event handler to handle the LIST_SELECT and LIST_DESELECT events that are posted when items are selected or deselected, respectively. Figure 5-14 illustrates the inheritance relationship of the List class.
PackageName
java.awt
Imports
import java.awt.List;
Constructors
public List()
public List(int visible_rows, boolean multipleOk)
Parameters
visible_rows
The number of rows of visible lines in the List.
multipleOk
Boolean value that specifies whether multiple selection is allowed.
Example
The viewList class implemented in the following example, Listing 5-3, uses the class List to demonstrate the methods in List. Figure 5-15 shows the window that results.
![]()
Figure 5-14 Class diagram of the List class
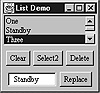
Figure 5-15 viewList window created by executing Listing 5-3
Listing 5-3 viewList.java: Demonstrating the usage of methods of the List class
import java.awt.*;addItem(String), addItem(String, int)
ClassName
List
Purpose
An item is added to the scrolling list. If an index is specified, the item is added at that index of the list; otherwise, it is added to the end of the scrolling list.
Syntax
public synchronized void
addItem(String item)
public synchronized void addItem(String item, int index)
Parameters
item
The String representing the item to be added to the List.
index
The position in the list at which to insert the specified item.
Description
This method adds an item to the list of options in this List. The item gets added to the end of the list if the index is not specified. While specifying the index you should note that the index starts at zero. So the first item has an index value of zero, second item has index value of one, and so on. This method is a synchronized method, so at a given instant only one Thread can add an item when multiple Threads are trying to add items to the target List object.
Import
import java.awt.List;
Returns
None.
See Also
The delItem(int) and delItems(int, int) methods of the List class
Example
Refer to the Listing 5-3. Items are added using this method in the constructor.
addNotify()
ClassName
List
Purpose
This method creates a peer of the target List object.
Syntax
public synchronized void addNotify()
Parameters
None.
Description
An instance of the ListPeer is created as a peer for the target List object. Using the peer, you can change the appearance of the List without modifying its functionality. This method is required if you are writing your own AWT.
Imports
import java.awt.List;
Returns
None.
See Also
The ListPeer class
Example
Refer to Chapter 9 describing the peers and interface for details.
allowsMultipleSelections()
ClassName
List
Purpose
Determines whether multiple selection is allowed in the target List object.
Syntax
public boolean allowsMultipleSelections()
Parameters
None.
Description
You can specify a List to allow multiple selections or only single selectionaccording to the usage of the List object. This method checks tosee if thetarget List object allows multiple selection. You can specify whether you want this List to allow multiple selection by using the setMultipleSelections method.
Imports
import java.awt.List;
Returns
If the target List object allows multiple selection, this method returns true. It returns false if the List does not allow multiple selections.
See Also
The setMultipleSelections method of the List class
Example
Refer to Listing 5-3. This method is used to allow multiple selections in the constrcutor, if that has not been allowed earlier. The verification is done using this method.
clear()
ClassName
List
Purpose
This method clears the list, i.e., it deletes all the items in the List.
Syntax
public void clear()
Parameters
None.
Description
All the items in a List object can be removed by making a single call to this method.
Imports
import java.awt.List;
Returns
None.
See Also
The delItem and delItems methods
Example
Refer to Listing 5-3. When the Clear button is pressed, the event handler clears the list using this method.
countItems()
ClassName
List
Purpose
Obtains the number of items in the List.
Syntax
public int countItems()
Parameters
None.
Description
The method counts the number of items in the List. The count is automatically increased when a new item is added. It is also the maximum index in this List.
Imports
import java.awt.List;
Returns
The number of items in the List at a given instance. Return type is int.
See Also
The getItem() method of the List class
Example
Refer to Listing 5-3. The number of items in the list is printed to the screen using this method.
delItem(int), delItems(int, int)
ClassName
List
Purpose
Remove an item at the specified index from the List, or remove multiple items between the specified start and end positions from the scrolling list.
Syntax
public synchronized void
delItem(int index)
public synchronized void delItems(int start, int end)
Parameters
index
The index position, in the List, of the item to be deleted.
start
The index of the first item in the selected sequence of items to be deleted.
end
The index of the last item in the selected sequence of items to be deleted.
Description
This method deletes an item at the specified index, if an index is specified. If both the start and end indexes are specified, all the items between the given indexes are deleted from the list. The value of start index should not be more than the end index. When specifying the index you should note that the index starts at zero. So the first item has an index value of zero, the second item has an index value of one, and so on. This method is a synchronized method. At any given instance, only one Thread can delete item(s) from the List when multiple Threads are trying to access the target List object.
Imports
import java.awt.List;
Returns
None
See Also
The addItem(String) and addItems(String, int) methods of the List class
Example
Refer to Listing 5-3. When the Delete button is pressed after selecting an item in the list, this method is used to delete the item.
deselect(int)
ClassName
List
Purpose
Deselects the item at the specified index in the List.
Syntax
public void deselect(int index)
Parameters
index
The index of the item to be deselected in the target List object.
Description
The method deselects an item that has been selected earlier. The index of the item is specified and the value of the index should not be more than the number of items in the list. If it is so, an IndexOutofBoundsException is issued at runtime. If you try to deselect a item which is not selected earlier, then there is no effect from this method.
Imports
import java.awt.List;
Returns
None.
See Also
The select(int) method of the List class
Example
Refer to Listing 5-3. Try selecting the fourth item in the list and observe what happens. Selection of the fourth item results in that item getting deselected immediately.
getItem(int)
ClassName
List
Purpose
Returns the item at the specified index in the List.
Syntax
public String getItem(int index)
Parameters
index
The index of the item to be retrieved from the target List object.
Description
The method gets the item at the specified index in the target List object. The index starts from 0. Hence, the index of the first item is 0, the second item is 1, and so on. If the specified index is greater than or equal to the number of items, ArrayOutOfBounds exception is issued at runtime.
Imports
import java.awt.List;
Returns
The item at the specified location in its String form is returned.
See Also
The countItems() method of the List class
Example
Refer to Listing 5-3. When Replace is pressed after selecting an item, this method is used to print the item replaced.
getRows()
ClassName
List
Purpose
Obtains the number of visible lines in the target List object.
Syntax
public int getRows()
Parameters
None.
Description
This method gets the number of lines visible in the target List object.
Imports
import java.awt.List;
Returns
The number of rows visible in the List. Return type is int.
Example
Refer to Listing 5-3. Number of visible items in the list is determined inside the constructor using this method.
getSelectedIndex(), getSelectedIndexes()
ClassName
List
Purpose
The selected index is returned in the case of single selection. An array of selected index values are returned in the case of multiple selection.
Syntax
public synchronized int
getSelectedIndex()
public synchronized int[] getSelectedIndexes()
Parameters
None.
Description
The method gets the index(es) of the selected item(s). Invocation of the getSelectedIndex() method, after selecting multiple items, will result in an ArrayIndexOutofBoundsException being issued. Invoking the getSelectedIndexes() method on a single selection List will retrieve the single selected item. If there is no element selected, both methods will return a value of -1.
Imports
import java.awt.List;
Returns
The getSelectedIndex() method returns the index of the selected iteminasingle selection List object. The return type is int. The getSelectedIndexes() method returns an integer array containing the setofselected indexes.
See Also
The select, deselect, and isSelected methods of the List class
Example
Refer to Listing 5-3. The getSelectedIndexes method is used in the program as it is a multiple selection list. It is used to print the list of selected items.
getSelectedItem(), getSelectedItems()
ClassName
List
Purpose
In case of single selection, returns the selected item. In the case of multiple selections, it returns an array of selected items.
Syntax
public synchronized String
getSelectedItem()
public synchronized String[] getSelectedItems()
Parameters
None.
Description
The method gets the selected item(s). Invocation of getSelectedItem() method on multiple selection List will effect in a runtime exception to be issued. Invoking the getSelectedItems() method on a single selection List will return the selected item. If there is no element selected, both methods will return null.
Imports
import java.awt.List;
Returns
The getSelectedItem() method returns the String form of the selection item in a single selection List object. The return type is String. The getSelectedItems() method returns a String array containing the set of selected items.
See Also
The select, deselect, and isSelected methods of the List class
Example
Refer to Listing 5-3. The getSelectedItems method is used in the program, as it is a multiple selection list. It is used to print the list of selected items.
getVisibleIndex()
ClassName
List
Purpose
This method returns the index that was last made visible by the makeVisible method in the List class. Default is -1.
Syntax
public int getVisibleIndex()
Parameters
None.
Description
The method gets the index of the item that was last forcibly made visible in the List. Though a List object allows users to select from an unlimited number of items, it can display only a part of them. Users have to scroll up and down to view other items. The makeVisible method is used to force a previously invisible item visible. This method returns the index of the item thus made visible. If makeVisible has not been called earlier, invoking this method will return -1.
Imports
import java.awt.List;
Returns
Index of the last item that was forcibly made visible using the makeVisible method.
See Also
The makeVisible method of the List class
Example
Refer to Listing 5-3. The visible index is printed out during LIST_SELECT event occurrence.
isSelected(int)
ClassName
List
Purpose
The method checks to see if the item at the specified index is selected.
Syntax
public boolean isSelected(int index)
Parameters
index
The index of the item that is verified if selected.
Description
The method checks to see if the item at the specified index is selected. If it is selected, this method returns true. If the item is not selected, the method returns false. The index starts from 0. Hence, the index of the first item is 0, the second item is 1, and so on. If the specified index is greater than or equal to the number of items, an ArrayOutOfBoundsException is issued at runtime.
Imports
import java.awt.List;
Returns
A boolean value indicating whether the item at the specified index has been selected.
See Also
The select and deselect methods of List class
Example
Refer to Listing 5-3. This method is used to determine if the item at index 3 (the fourth item) is selected and if so, it deselects it.
makeVisible(int)
ClassName
List
Purpose
The item at the specified index is forcibly made visible in the List.
Syntax
public void makeVisible(int index)
Parameters
index
The index of the item to be made visible in the target List object.
Description
The method forces the item at the specified index in the target List object to be visible. The index starts at 0. Hence, the index of the first item is 0, the second item is 1, and so on. If the specified index is greater than or equal to the number of items, an ArrayOutOfBoundsException is issued at runtime.
Imports
import java.awt.List;
Returns
None.
See Also
The getVisibleIndex() method of the List class
Example
Refer to Listing 5-3. Whatever item you select from the list, the list is reset to be visible from the first item by using this method.
minimumSize(int), minimumSize()
ClassName
List
Purpose
Obtains the minimum size Dimension of the target List object if no parameter is specified. If a parameter is specified, then the minimum size Dimensions for the specified number of rows is returned.
Syntax
public Dimension minimumSize(int
rows)
public Dimension minimumSize()
Parameters
rows
The specified number of rows for which minimum size is to be found.
Description
The height and width of the window dimension are different from the number of rows of a List. If the parameter is not specified, the number of rows of the target List object is taken as the value. The number of rows indicates the number of items to be accommodated within the space, whereas the Dimension indicates the window dimensions. For example, this method is helpful to resize a window or a frame containing a List or to determine where in the window to add the List component.
Imports
import java.awt.List;
Returns
The minimum Dimensions for a List with the number of rows. Return type is Dimension.
See Also
The preferredSize method of the List class
Example
Refer to Listing 5-3. The minimum size details are obtained and printed in the constructor using these methods.
paramString()
ClassName
List
Purpose
Obtains the parameter String of the target List object.
Syntax
protected String paramString()
Parameters
None.
Description
Obtains the String representation of the target List object containing the selected item. This method is protected and hence, can be used only by classes within the java.awt package. This method overrides the paramString method of the Component class.
Imports
import java.awt.List;
Returns
The parameter string of type String.
See Also
The paramString method of the Component class,; the List class
Example
The following code uses paramString by subclassing the List class.
package java.awt;preferredSize(int), preferredSize()
ClassName
List
Purpose
Obtains the preferred size Dimension of the List if no parameter is specified. If a parameter is specified, the preferred size Dimension for the specified number of rows is returned.
Syntax
public Dimension preferredSize(int
rows)
public Dimension preferredSize()
Parameters
rows
The specified number of rows for which the preferred size is desired to be found.
Description
The width of window dimension is different from the number of rows in the List. The number of rows for which the preferred size is to be found is specified. If it is not specified, the number of rows in the target List object is taken as the value. The number of rows indicates the number of items of the List that are visible at a time whereas the Dimension indicates the window dimensions. For example, this method is helpful to resize a window or a frame containing a List or to determine where, in the window, to add the list to. It returns the preferred size Dimensions for the List.
Imports
import java.awt.List;
Returns
The preferred Dimensions for a List with the number of rows. Return type is Dimension.
See Also
The minimumSize method of the List class; the Dimension class
Example
Refer to Listing 5-3. The preferred size details are obtained and printed in the constructor using these methods.
removeNotify()
ClassName
List
Purpose
Removes the peer of this List object.
Syntax
public void removeNotify()
Parameters
None.
Description
A List peer is used to change the appearance of your list, without changing its functionality. This method removes the peer of this component.
Imports
import java.awt.List;
Returns
None.
See Also
The ListPeer class
Example
Refer to Chapter 9 describing Peer interfaces.
replaceItem(String, int)
ClassName
List
Purpose
The specified item replaces the existing item at the specified index in the List.
Syntax
public void replaceItem(String new_item, int index)
Parameters
new_item
The specified item to replace the existing item at the specified position.
index
The index location of the existing item of List where the replacement item is to be inserted instead of the existing item.
Description
This method replaces the item at the specified index with that specified item, new_item. The values of the indexes should be less than the number of available items in the List. If the index value exceeds the number of items, an IndexOutofBoundsException is issued at Java runtime.
Imports
import java.awt.List;
Returns
None.
See Also
The addItemmethod of the List class
Example
Refer to Listing 5-3. This method is used to replace a selected item when the Replace button is pressed after selecting an item.
select(int)
ClassName
List
Purpose
Selects the item at the specified index in the List.
Syntax
public void select(int index)
Parameters
index
The index of the item to be selected in the target List object.
Description
The method selects an item at the specified index. The value of the index should not be more than the number of items in the list. If it is so, an IndexOutofBoundsException is issued at runtime.
Imports
import java.awt.List;
Returns
None.
See Also
The deselect(int) method of the List class
Example
Refer to Listing 5-3. When the Select2 button is pressed, this method is used to select the item at location 2 in the list.
setMultipleSelections(boolean)
ClassName
List
Purpose
Makes the necessary changes, depending on the passed boolean value, to the target List object to either allow or disallow multiple selections.
Syntax
public void setMultipleSelections(boolean multipleOk)
Parameters
multipleOk
If the value of this parameter is true, the List object allows multiple selections; if false, it allows only single selection.
Description
This method specifies a List to allow multiple selections or only a single selection. You can check whether the target List object allows multiple selections by using the allowsMultipleSelection method.
Imports
import java.awt.List;
Returns
None.
See Also
The allowsMultipleSelections method of the List class
Example
Refer to Listing 5-3. In the constructor of viewList, this method sets the list to multiple selection if it has not been set before.
The application for this chapter is a basic framework for an API Reference Interface Application. Using the interface provided in this Java application, users can specify a class name and obtain information about any selection of methods in the specified class. They can view the details of any method and optionally can save them in a file.
Basically, this application is like a Help uitlity for Java API classes. You will provide an interface for users to enter a class name. When they confirm their selection, a list of methods under the specified class will appear from which users can select any number of methods from the list. After making their selection from the list, users must confirm their choices. At this stage, details of the methods will be displayed for quick reference. Optionally, this information can also be saved to a file. For this chapter project it is enough to establish the basic framework and provide details of only one class. Populating the application repository with details of all API classes is up to you; however, if a user specifies a class whose details are not in the code, the application should inform the user about the omission.
In summary, components required for this application are as follows.
1. A text field for the user to specify the class name.
2. A button to confirm the class name specified.
3. A scrolling list to display the methods under the specified class enabling the user to make multiple selection of methods she or he desires.
4. A button to confirm the list of selections.
5. A text area where the method details will be displayed.
6. A button for the user to click when to save the displayed details into a file.
1. First create a class apiReference which subclasses a Frame. It can contain a text field for the user to enter the class name, a list to display the method names under the class, a text area to display the method details obtained for the specified <class, methods> pair. The class also has a member to keep track of number of method names selected. Enter the following code in a file named apiReference.java.
import java.awt.*;2. Having created a basic framework for the class, you can now write its constructor to create an instance of the class apiReference. Decide on the classes you plan to use and the layout of the windowing components. Let the main Frame be in a BorderLayout. Group the components logically for better managment of the application frame. Initialize the class members declared in Step 1. Initialize the class_name member to an instance of TextField with 15 rows and the default class name Dialog. Create a panel for this text field and a button "ClassOK" to confirm the class name specified. Enter the following constructor code inside the class apiReference.
public apiReference()3. The next step is to create a list to display the method names. Let only five rows be visible in the List. Add a button and the multiple-selection list to a panel and position the panel at the center of the application's main frame. Enter the following code inside the constructor defined in Step 2.
// inside the apiReference() constructor4. Now you can create the text area for displaying the method details with a button to be pressed if the user wants to save the information in a file. Also, provide a menu "Quit," which has a menu item "Exit". When a user selects this, the application should end and the window should be closed. Enter the following code inside the apiReference constructor.
// create a text area for method description to appear5. This application will be a stand-alone application, so the following main() method should be defined inside the apiReference class. Include the method definition in the class apiReference. After this step you can compile and run the application using the Java interpreter. This is done by typing "java apiReference" at the prompt. The interface will appear as shown in Figure 5-16, but the buttons won't yet be operative.
![]()
Figure 5-16 The interface as it appears after Step 5
6. Now you need to write appropriate event handlers to handle user selections, deselections, and button presses. When the user selects or deselects an item from the method list, the value of variable "selected" should be changed to reflect the choice. When a button is pressed, an event ACTION_EVENT is generated. If it is the ClassOK button, then the text from the text field should be read. The methods in the selected class should be displayed in the list. When the user clicks on the MethodOK button, the details about that method are appended to the text area, thus displaying the method information. Whereas, if the user clicks on the SaveInfo button, a FileDialog should pop up enabling the user to specify a file name in which to save the information. The application should be stopped if a menu item is selected (there is only one "Exit" menu item). The event handling routine handleEvent takes care of all the above mentioned events. Include the following code in the apiReference class.
String classReq; // string to get the class requested7. Now implement the displayMethodList method. Given a class name, Dialog, all the methods in the class are displayed. If any other class is specified, a dialog window saying that the class details are not yet available is displayed. Enter the following method implementation in the apiReference class.
private void displayMethodList(String req_class)8. Next comes the code that implements Method_Details, as called in the MethodOK branch of button event handling. To save space, the details of each method are not provided. All you have to do is to supply the detail of each method as a String and return the string as follows:
public String Method_Details(String class_n, String method)9. The dialog that pops up is defined as a methodDialog class with an OK button to close the dialog. Enter the following code which defines the class in the file apiReference.java. After entering this code, compile and run the application. Figure 5-17 shows the application in action. In Figure 5-17, the class chosen is Dialog and the two methods selected are addNotify and isModal. The details of the methods appear in the text area in the main frame. You can see a file dialog window that appears in front of the main frame, which shows two files in the directory named "doc" and the name of the file to which the details are to be saved is specified as methods.txt.
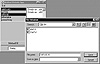
Figure 5-17 The API Reference Interface Application in action
The API Reference Interface Application illustrates the use of TextArea, TextField, Dialog, FileDialog, List, and other windowing components. In this application, choices are confirmed using buttons in the interface. This application will form a very useful on-line reference for Java APIs.
When the application is started, you get a window with a TextField at the bottom where you can enter a class name. After you confirm your choice of class name using the ClassOK button, all the methods that form a part of that class are listed in the list area. The list area is at the left side of the interface. This list is a Java List object in multiple selection mode. You can get the details of as many methods of the class as you want, by selecting the appropriate method name from the list that is displayed. Once you confirm the list of methods you have selected by clicking on the MethodOK button, the information about what the method does will appear in the text area on the right side of the interface. You will note that all it gives right now is a string which says "Details of methodname are ". If you look up the implementation of the application, in Step 8, you have implemented a class named Method_Details. Presently, there is implementation for only the Dialog class and that is very minimal. You can easily extend this project by entering details of more classes and details of each method of the class. This way you can have an on-line API reference for the Java APIs.
After obtaining the method details, you have an option of saving the details to a file for future reference. This is done by clicking on the Save button. This will bring up a file selection dialog box in which you can navigate around directories and specify a file name. On clicking the Save button in the FileDialog window, you effectively save the details to the file you have selected. During the process of using this application, if the system encounters a request which is not implemented, a Dialog window pops up to notify you of the problem.
This application makes effective use of the classes covered in this chapter. By proper extension of this application, you will not only gain a hands-on experience of this application's implementation, but also will know how to go about using the classes in a real-world application. You can exit from the application by pulling down the Quit menu that is available in the menu bar.
|
Politica de confidentialitate | Termeni si conditii de utilizare |

Vizualizari: 1083
Importanta: ![]()
Termeni si conditii de utilizare | Contact
© SCRIGROUP 2025 . All rights reserved